micl9
Well-Known Member
- Thread starter
- #1
This is in fact possible and is not that difficult to do - Mirrors are currently pricey, but for me it was worth it. Enjoy.

and Video
4/14/21 Update
I finally got 2 mirrors and all the wiring kit together. Yesterday I ran the wires from the mirror connector (using the proper connector pins so it plugs in like stock) thru the door, thru the accordion gland to the inner door jamb. Applied 12V to all the pins and everything works. Now I just need to tap into power sources from the truck harness. I am anal about this looking good even though it will all be hidden behind the dash so it may take a few weeks. During that time I will clean up this post and start detailing the steps I took. It starts below.
Oh and one thing to note - the 2019 factory wiring diagrams are NOT 100% accurate regarding wire color, so heads up! Any wire taps made need to be checked before tying them to the mirrors! When I write up the step by step I will clarify this for my XLT w/302a pkg(your mileage may vary!).
Now that I am rounding past 50% complete this is not nearlty as bad as I had thought it would be. Hardest parts has been crimping the tiny terminal pins! Running wires to the RH mirror thru the dash (without taking it apart) may also be a PIA.
4/18/21 Update - SUCCESS!
Well it WORKED. I ran the remaining wire yesterday and that part turned out to be pretty easy. All functions work; HEAT, Turns and Puddles. And of course original functions; Power, Fold and BLIS, still work!
11/8/21 Update
@Scubamado, Ryan came up with an alternative. Just replace the door harnesses with Lariat ones. You still need to do the inside the cab wireing but this simplifies things a bit. It does add cost ~$170 for the 2 door harnesses, but it will be much easier. Start at post #25 for more detials. And start with step 4 WIRE TAP HARNESS in my instructions below.
And @Dr. Zaius reports that the heated mirror glass has dropped to ~$100 each, so just adding heated mirror is a more affordable option to full mirror assy replacement.
This HowTo will apply to:
A much easier alternative, if you just want heated mirrors, is to source just the Lariat mirror glass and run only 2 wires. But so far I have only found this from Ford and it costs 90% of the whole mirror assembly-WTF! Eventually these might be available via junkyards at a reasonable price. In my search for complete Lariat mirror assemblies I did come across one damaged mirror with the glass intact for~$40-50.
Here are the Ford links and price
Mirrors
https://parts.levittownfordparts.com/oem-parts/ford-mirror-assembly-kb3z17683faptm
https://parts.levittownfordparts.com/oem-parts/ford-mirror-assembly-kb3z17682faptm
Glass
https://parts.levittownfordparts.com/oem-parts/ford-mirror-glass-kb3z17k707d
https://parts.levittownfordparts.com/oem-parts/ford-mirror-glass-kb3z17k707b
I think the worst part is the cost of the Lariat mirrors. I found 1 at a junkyard in Oxford White for $300. The driver side took longer and as I had never spent my Ford Pass rewards I used them to buy the other side. $400 ? plus $75 to get it painted white.
And now for the main attraction

and Video
4/14/21 Update
I finally got 2 mirrors and all the wiring kit together. Yesterday I ran the wires from the mirror connector (using the proper connector pins so it plugs in like stock) thru the door, thru the accordion gland to the inner door jamb. Applied 12V to all the pins and everything works. Now I just need to tap into power sources from the truck harness. I am anal about this looking good even though it will all be hidden behind the dash so it may take a few weeks. During that time I will clean up this post and start detailing the steps I took. It starts below.
Oh and one thing to note - the 2019 factory wiring diagrams are NOT 100% accurate regarding wire color, so heads up! Any wire taps made need to be checked before tying them to the mirrors! When I write up the step by step I will clarify this for my XLT w/302a pkg(your mileage may vary!).
Now that I am rounding past 50% complete this is not nearlty as bad as I had thought it would be. Hardest parts has been crimping the tiny terminal pins! Running wires to the RH mirror thru the dash (without taking it apart) may also be a PIA.
4/18/21 Update - SUCCESS!
Well it WORKED. I ran the remaining wire yesterday and that part turned out to be pretty easy. All functions work; HEAT, Turns and Puddles. And of course original functions; Power, Fold and BLIS, still work!
11/8/21 Update
@Scubamado, Ryan came up with an alternative. Just replace the door harnesses with Lariat ones. You still need to do the inside the cab wireing but this simplifies things a bit. It does add cost ~$170 for the 2 door harnesses, but it will be much easier. Start at post #25 for more detials. And start with step 4 WIRE TAP HARNESS in my instructions below.
And @Dr. Zaius reports that the heated mirror glass has dropped to ~$100 each, so just adding heated mirror is a more affordable option to full mirror assy replacement.
This HowTo will apply to:
XLs with 101A and Ford Co-Pilot360
XLTs with at least 301A
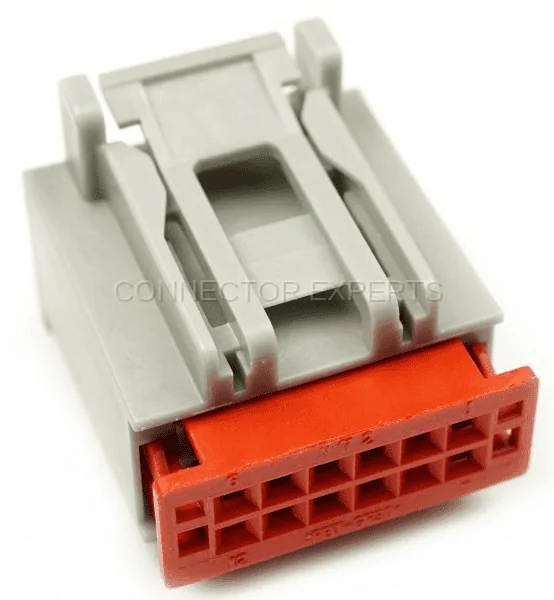
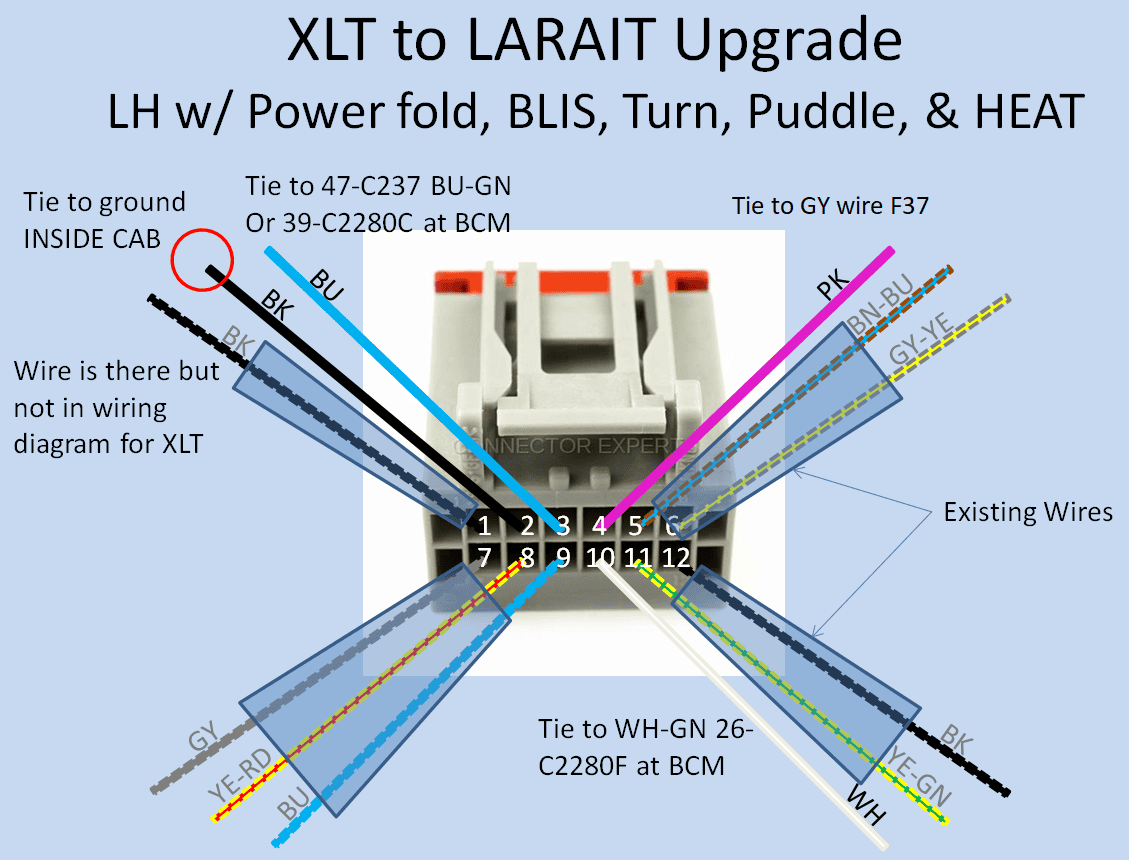
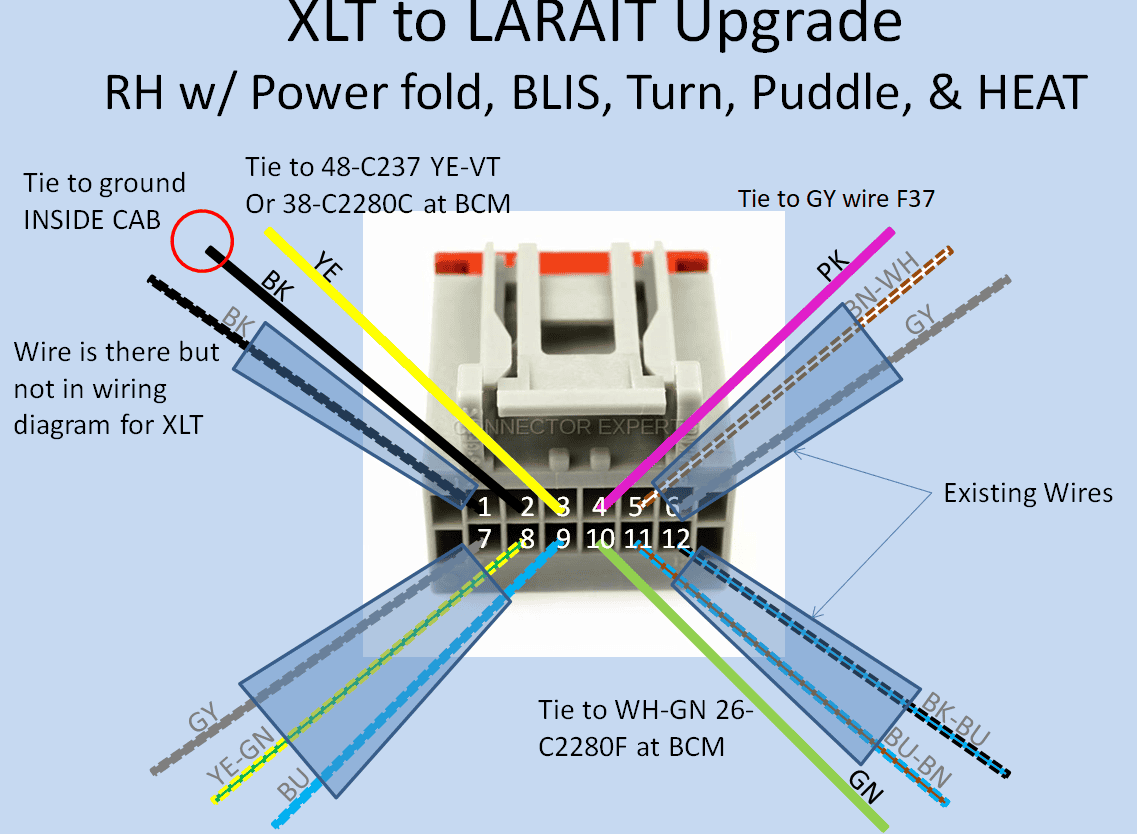
You could do it at lower option levels, but would need to add additional wires not covered here. I am assuming a starting point of Power folding mirrors with BLIS.This is the harness connector that plugs into the mirror, I sourced pin sockets from Amazon to make this a "plug-in" mod. At least at the mirror end.

Its a 12 pin connector and will have 7 wires already in place. So only 5 wires need to be added and 2 are ground, easy right!? ? Turns out mine already had 1 of the 2 grounds installed. Rather odd as there is no matching pin in the mirror. Anyway, only 4 wires to add!
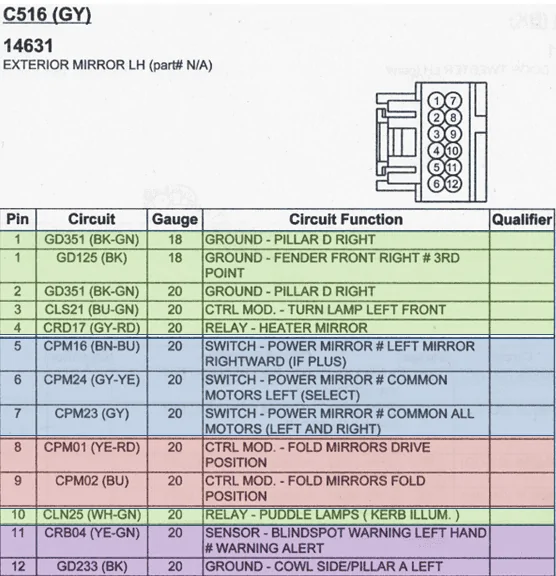
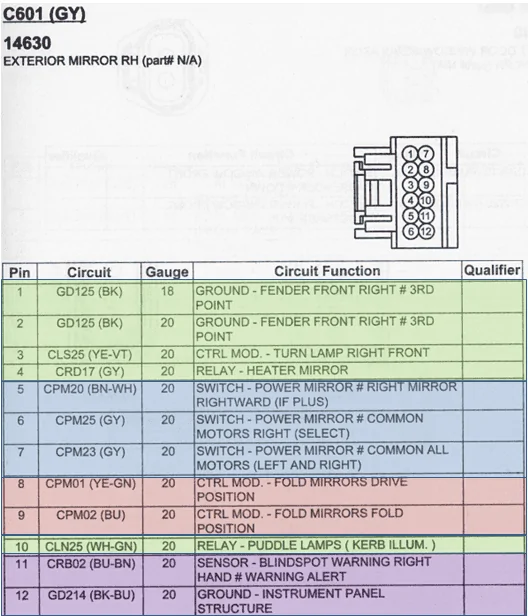
Pin-out (looking at back of mirror) - Thanks @JimH for the connector details!


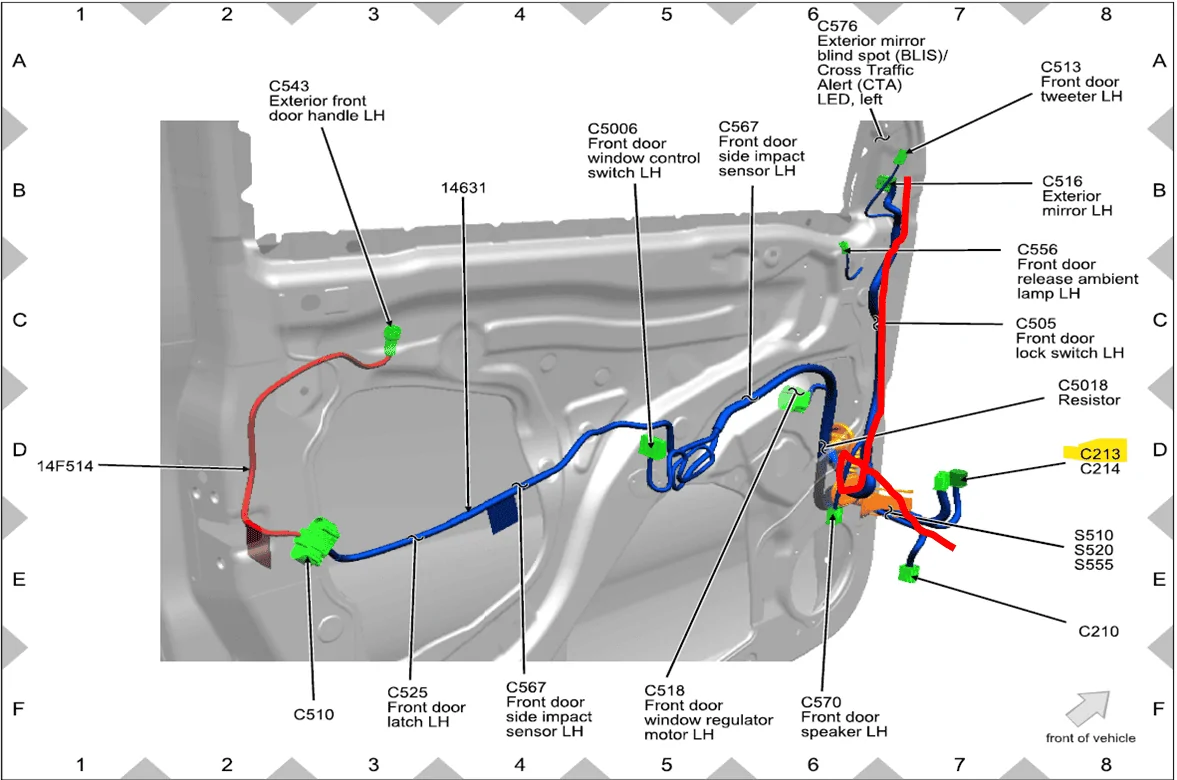
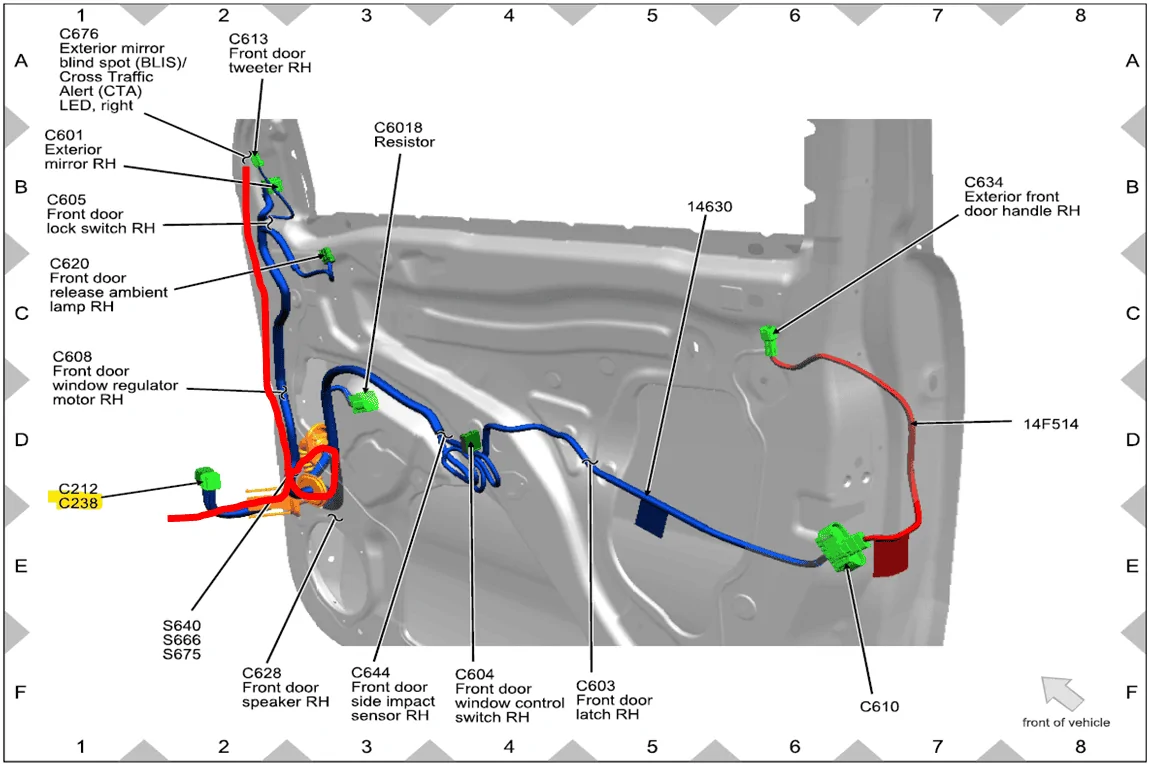
Will need to add the ones in green. Turns and Puddle connections will need to be made at the BCM. Grounds will be made just inside the truck. And the heated mirror will connect to C237 just inside the firewall on drivers left.
Its a 12 pin connector and will have 7 wires already in place. So only 5 wires need to be added and 2 are ground, easy right!? ? Turns out mine already had 1 of the 2 grounds installed. Rather odd as there is no matching pin in the mirror. Anyway, only 4 wires to add!
Pin-out (looking at back of mirror) - Thanks @JimH for the connector details!
Will need to add the ones in green. Turns and Puddle connections will need to be made at the BCM. Grounds will be made just inside the truck. And the heated mirror will connect to C237 just inside the firewall on drivers left.
- From the Wiring manual Pin 1 and 2 get tied together and a single 18AWG GND line run out of the door. Like I said my truck already has a ground line in pin 1, looks to be 20 AWG so I will swap it to pin 2 and add an 18AWG ground wire in pin 1. Which will be routed out the door and tied to ground inside the cab behind the kick panel.
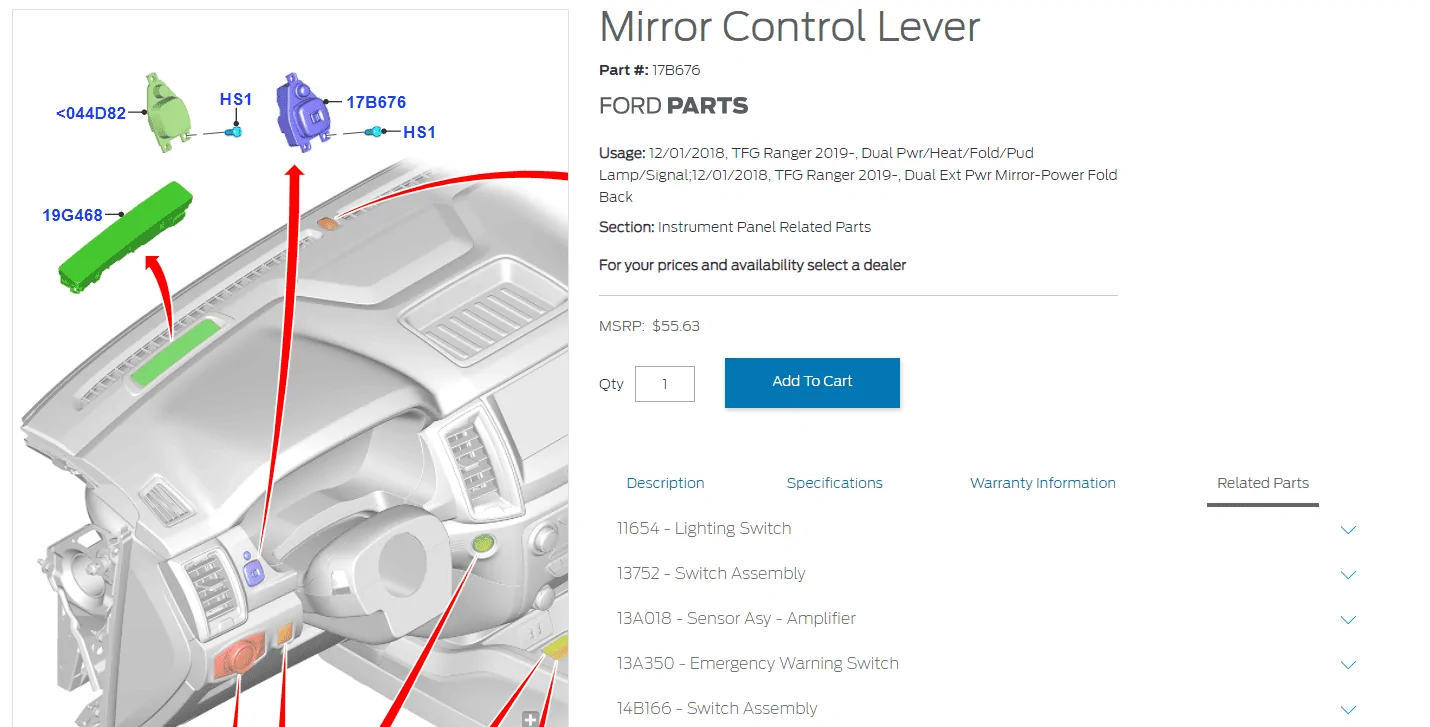
- Pin 3 just gets tied to the turn signal lines coming out of the BCM.
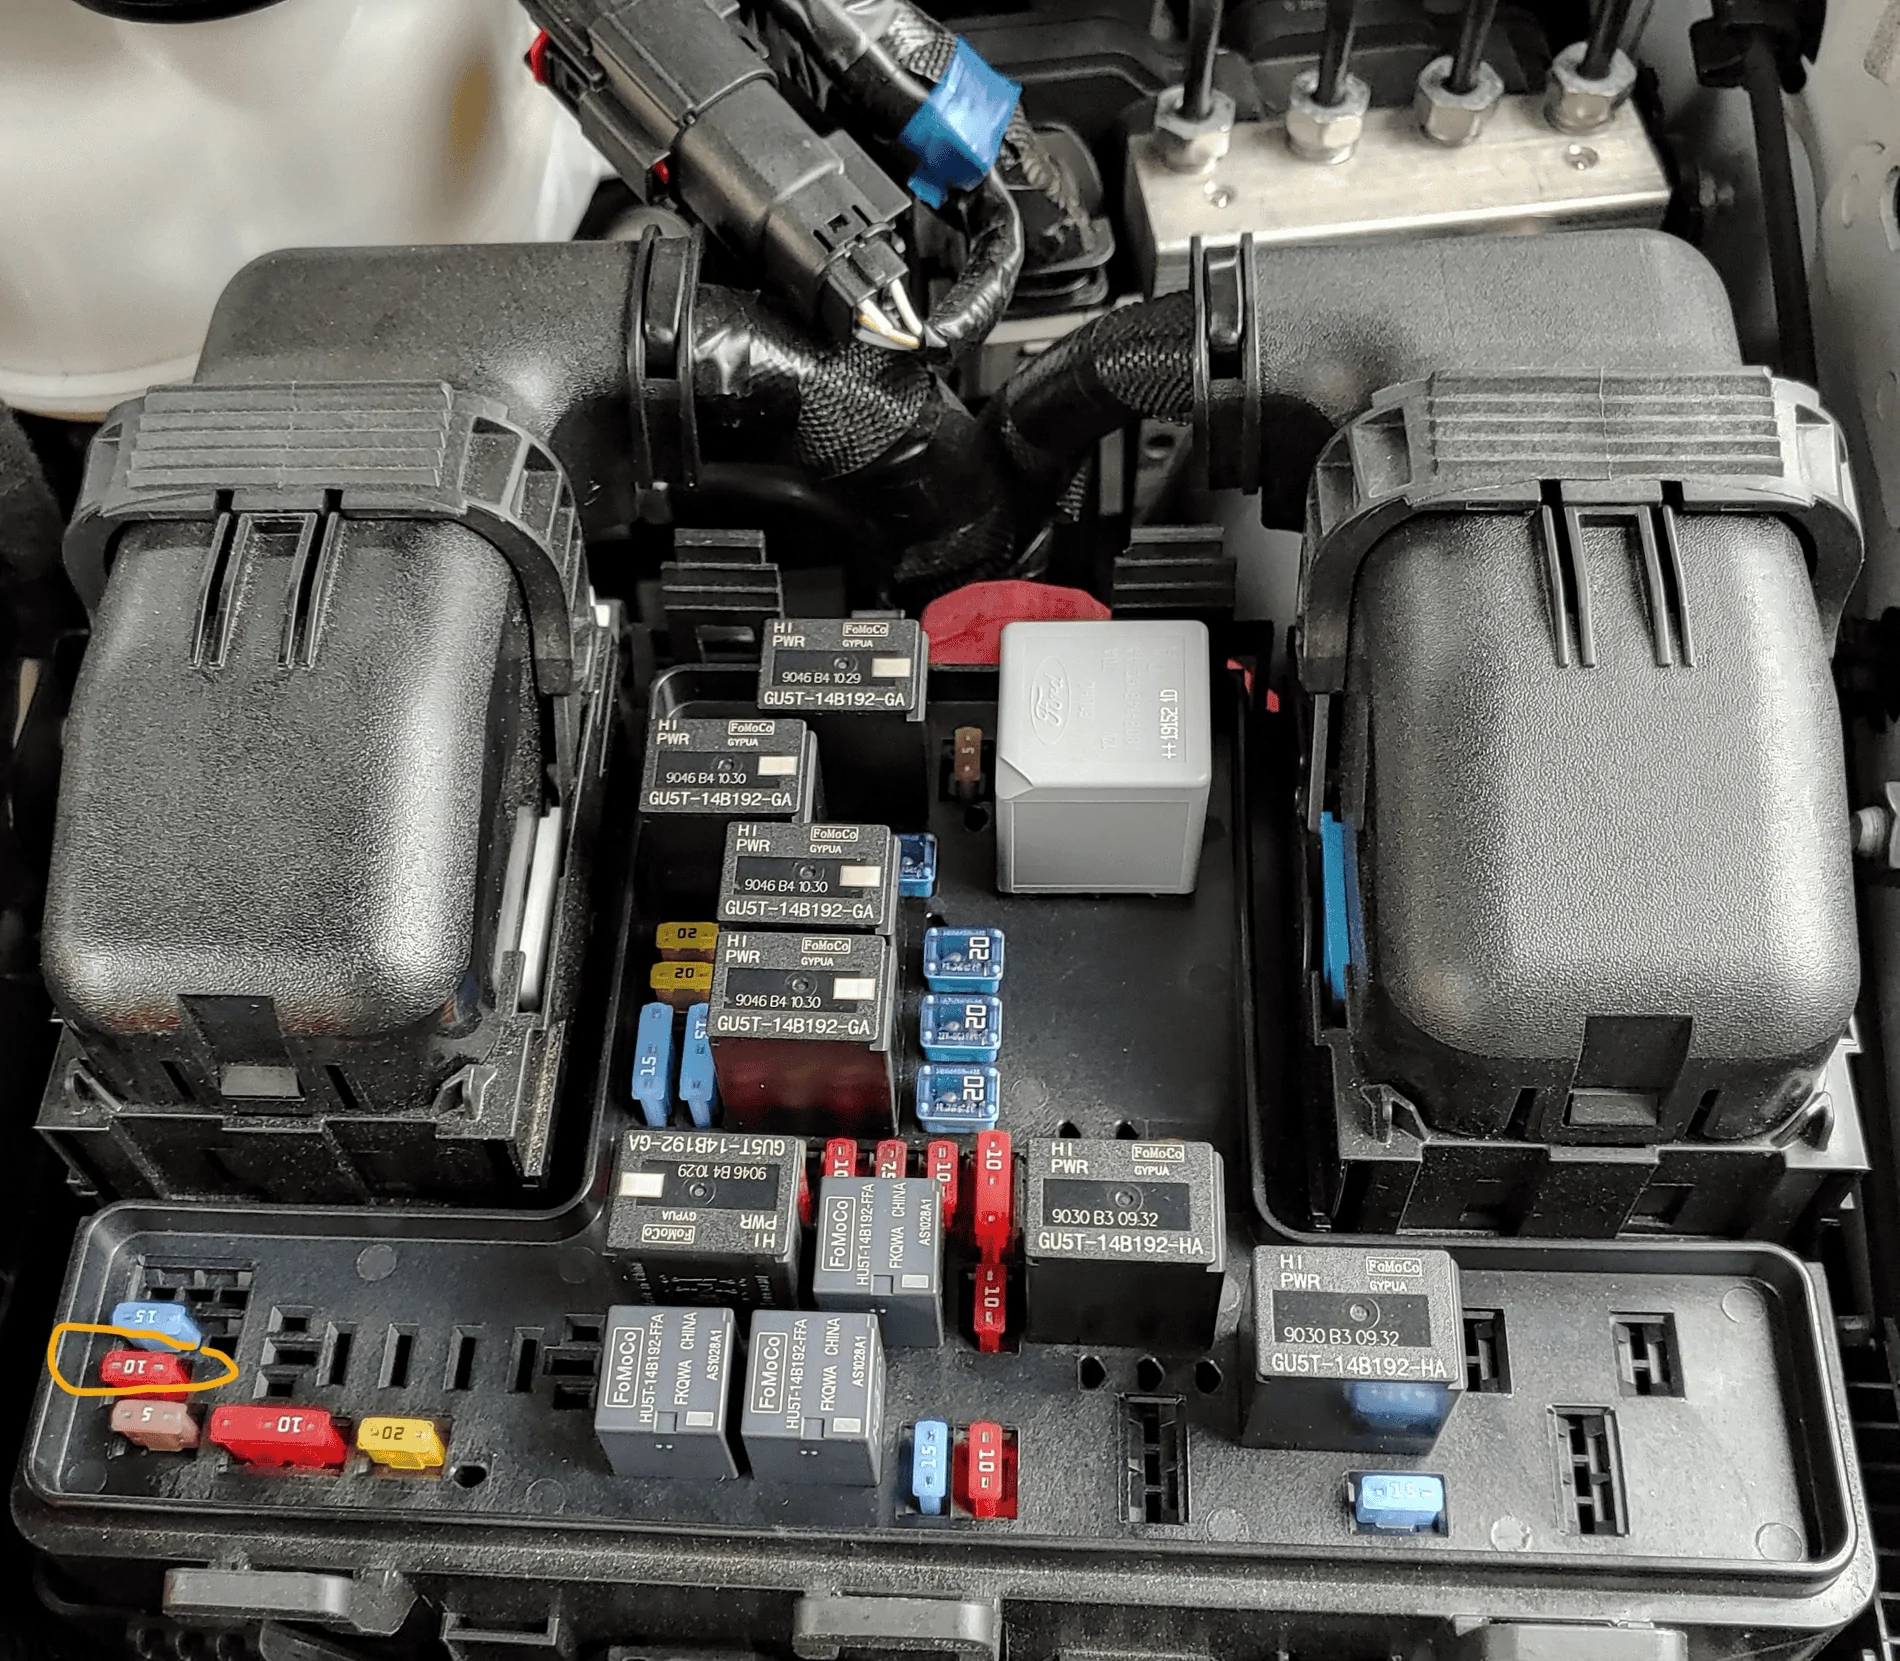
- Heated mirror Pin 4 has taken some research. At worst a fuse tap can be added to F37 circled below image located in the BCM(Drivers side, behind the battery). This is the fuse specifically for the heated mirrors and only the heated mirrors. Interestingly my XLT has this fuse in place! And I verified it gets powered when rear defrost is turned on. The LH connector (C1035A) below has a gray wire coming out pin40, this should be the heated mirror line(CONFIRMED). This wire goes thru the firewall to C237 pin 21. C237 is just inside the firewall at LH kick panel. I was able to find the grey wire on pin 37! so all the wires can be tapped inside the cab! I was in a hurry and broke my back twisting in there to dig out the wire. I should have (and YOU should) disconnect the battery and unplug the harness to get easier access to the back of the connector.

- Pin 10 will tie to the BCM either the cargo light line(stock Lariat) or the interior lighting. I went with cargo light line.
Here are the Ford links and price
Mirrors
https://parts.levittownfordparts.com/oem-parts/ford-mirror-assembly-kb3z17683faptm
https://parts.levittownfordparts.com/oem-parts/ford-mirror-assembly-kb3z17682faptm
Glass
https://parts.levittownfordparts.com/oem-parts/ford-mirror-glass-kb3z17k707d
https://parts.levittownfordparts.com/oem-parts/ford-mirror-glass-kb3z17k707b
I think the worst part is the cost of the Lariat mirrors. I found 1 at a junkyard in Oxford White for $300. The driver side took longer and as I had never spent my Ford Pass rewards I used them to buy the other side. $400 ? plus $75 to get it painted white.
And now for the main attraction
After buying all the parts and supplies (BOM HERE) start with the door harness.
NOTE: I will skip details that can be found elsewhere or are a general task (removing door panels, crimping connectors, etc).
NOTE: I will skip details that can be found elsewhere or are a general task (removing door panels, crimping connectors, etc).
- DOOR HARNESS
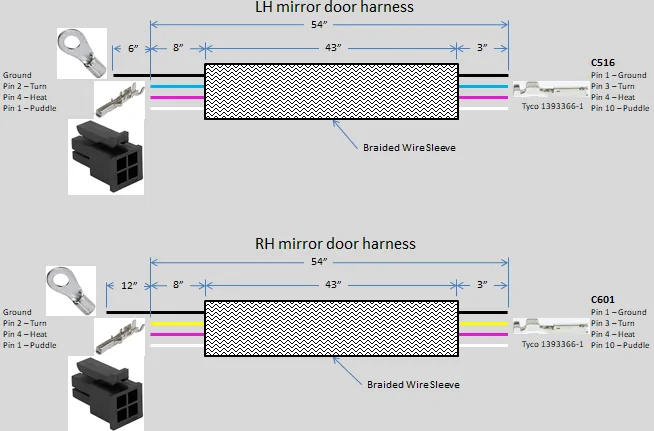
- Cut wire length per image below(I added a little extra length so you will find these a little long). My colors are what I had on hand - you can use whatever colors you like. All wires are 20AWG, except the ground which is 18AWG.
- Add the Ford connector Pins (Tyco 1393366-1) to each wire.
- Cut 1/4" braided wire loom to 43" and feed all 4 wires thru and tape off or heat-shrink the loom ends.
- Add the 4 Pin Molex connector to the other end, pin-out here is either as I did it or whatever you choose. Just note it for when you add the wires to the mating connector to the TAP HARNESS.
- Ground ring crimp can be added now or wait until you decide on ground points in the cab - so wire can be trimmed if needed.

- INSTALL THE DOOR HARNESS
- Remove Door Panel - I used Ethan's @WLFPIR8 TRAC module install video for panel removal(thanks Ethan!) and the factory manual. NOTE: The upper most clip on the armrest trim is very easily broken! I broke the 1st one. What I found that works is to remove all the others and then come in from the top(by the door latch) with a trim removal tool. Ford removal steps attached below. Here are a couple of more Door Panel removal Vids: VID1 and VID2
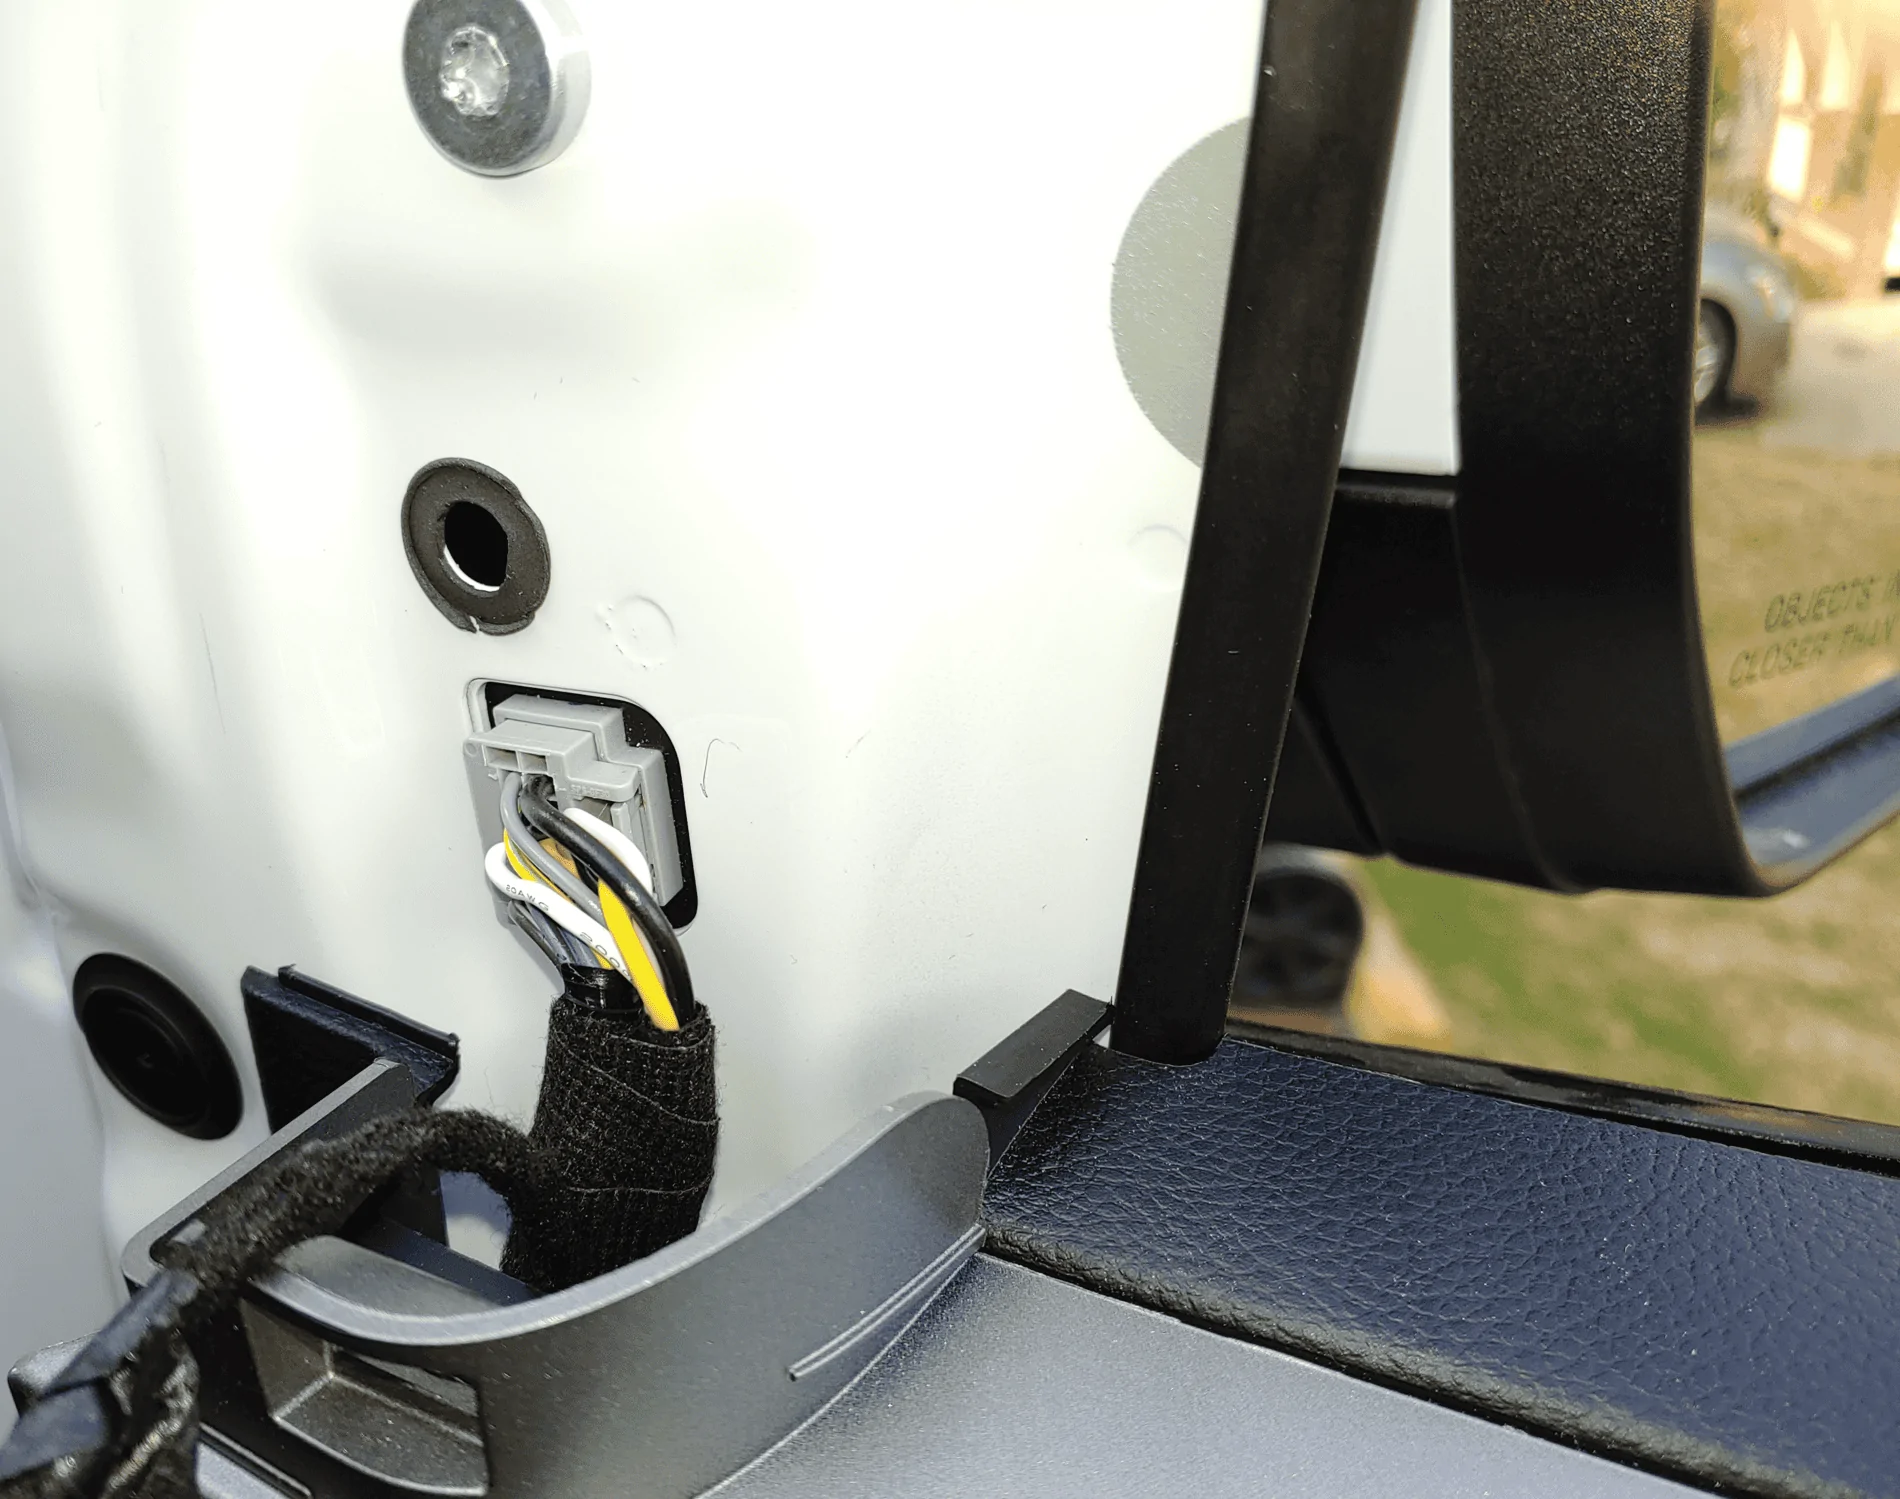
- Route the harness. First off put the window all the way down, this is so you cant run the wires where they would get caught by the window travel. Unplug the door connectors under the firewall(3 on the LH and 2 on the RH). I wanted to keep my door and truck factory water tight so I routed thru the rubber accordion gland, again with Ethan's help! Starting at 1:24 of his video (linked in 2-1 above) he goes thru how to do this. Its really VERY easy. The big a$$ tie wrap works really well and having wire pull lube also makes it very easy. You might be able to skip the latter, but its not expensive... To give you more slack on the wires, push in the oval rubber boot above the speaker and undo the clip beside it.
I also routed my harness thru this boot as well using same technique but a smaller tie-wrap, again to keep everything stock sealed. You will have to remove the tape here as well. Position the harness so that you have an inch or 2 slack at the mirror connector. Re-install all the rubber boots, make sure harness clears the window inside the door. Now tie-wrap the harness from the boot above the speaker up to the mirror to the existing harness. Below in red is how this looks on the door. the loop at the bottom is where its routed inside the door and the vertical run is out side the door. Its not really a loop! its just the perspective of the image.


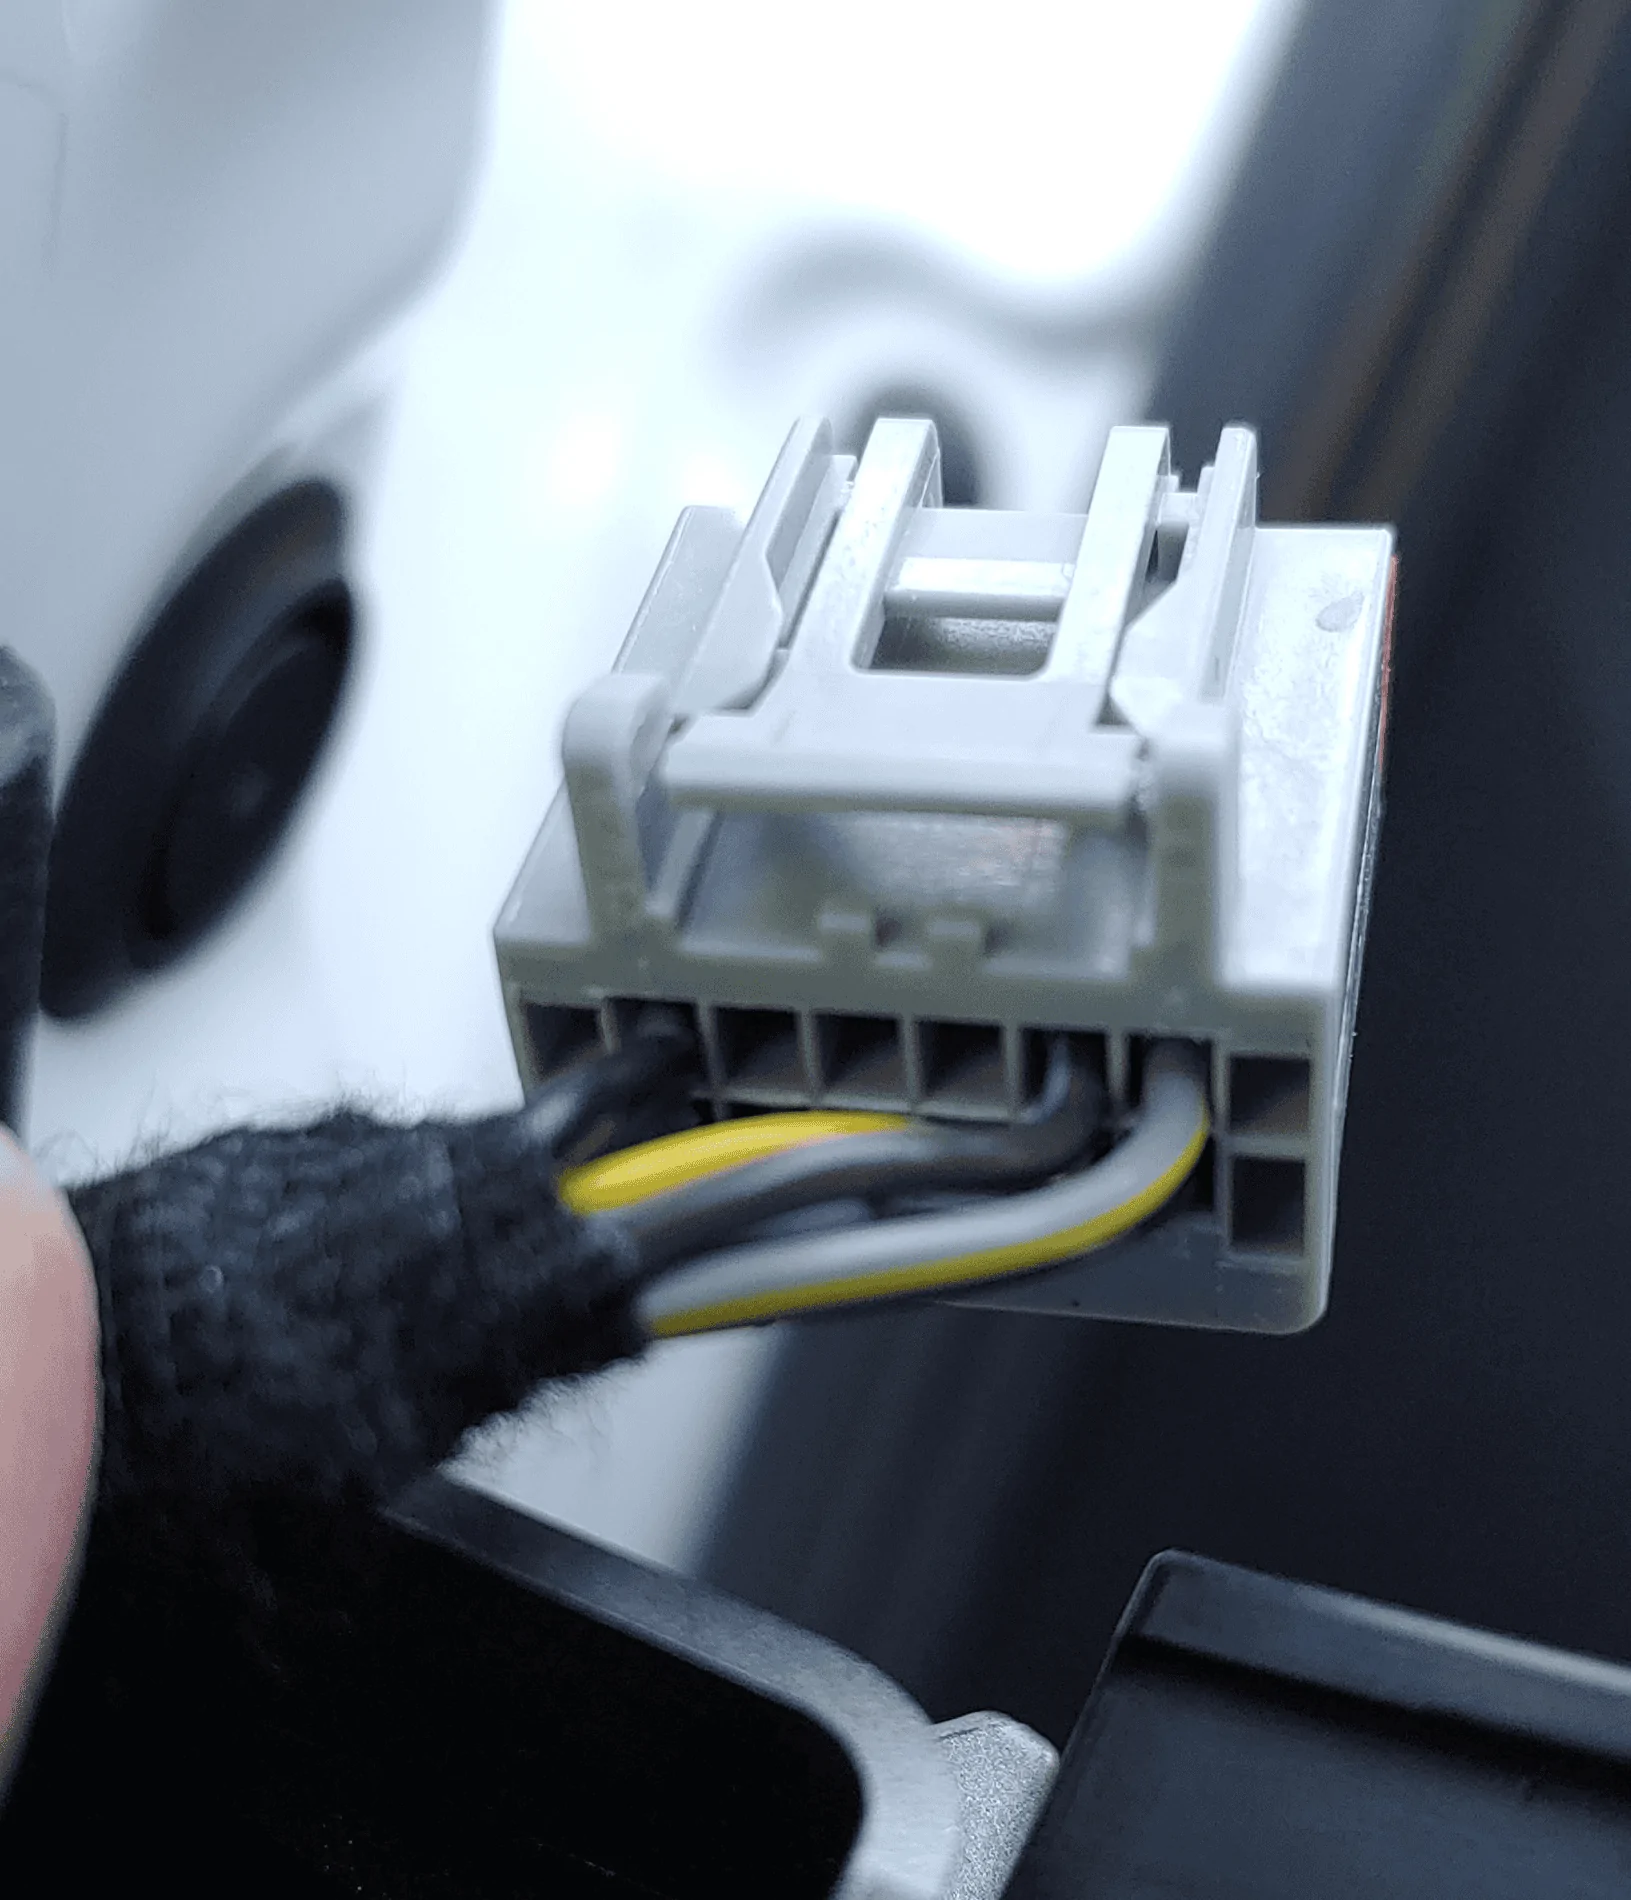
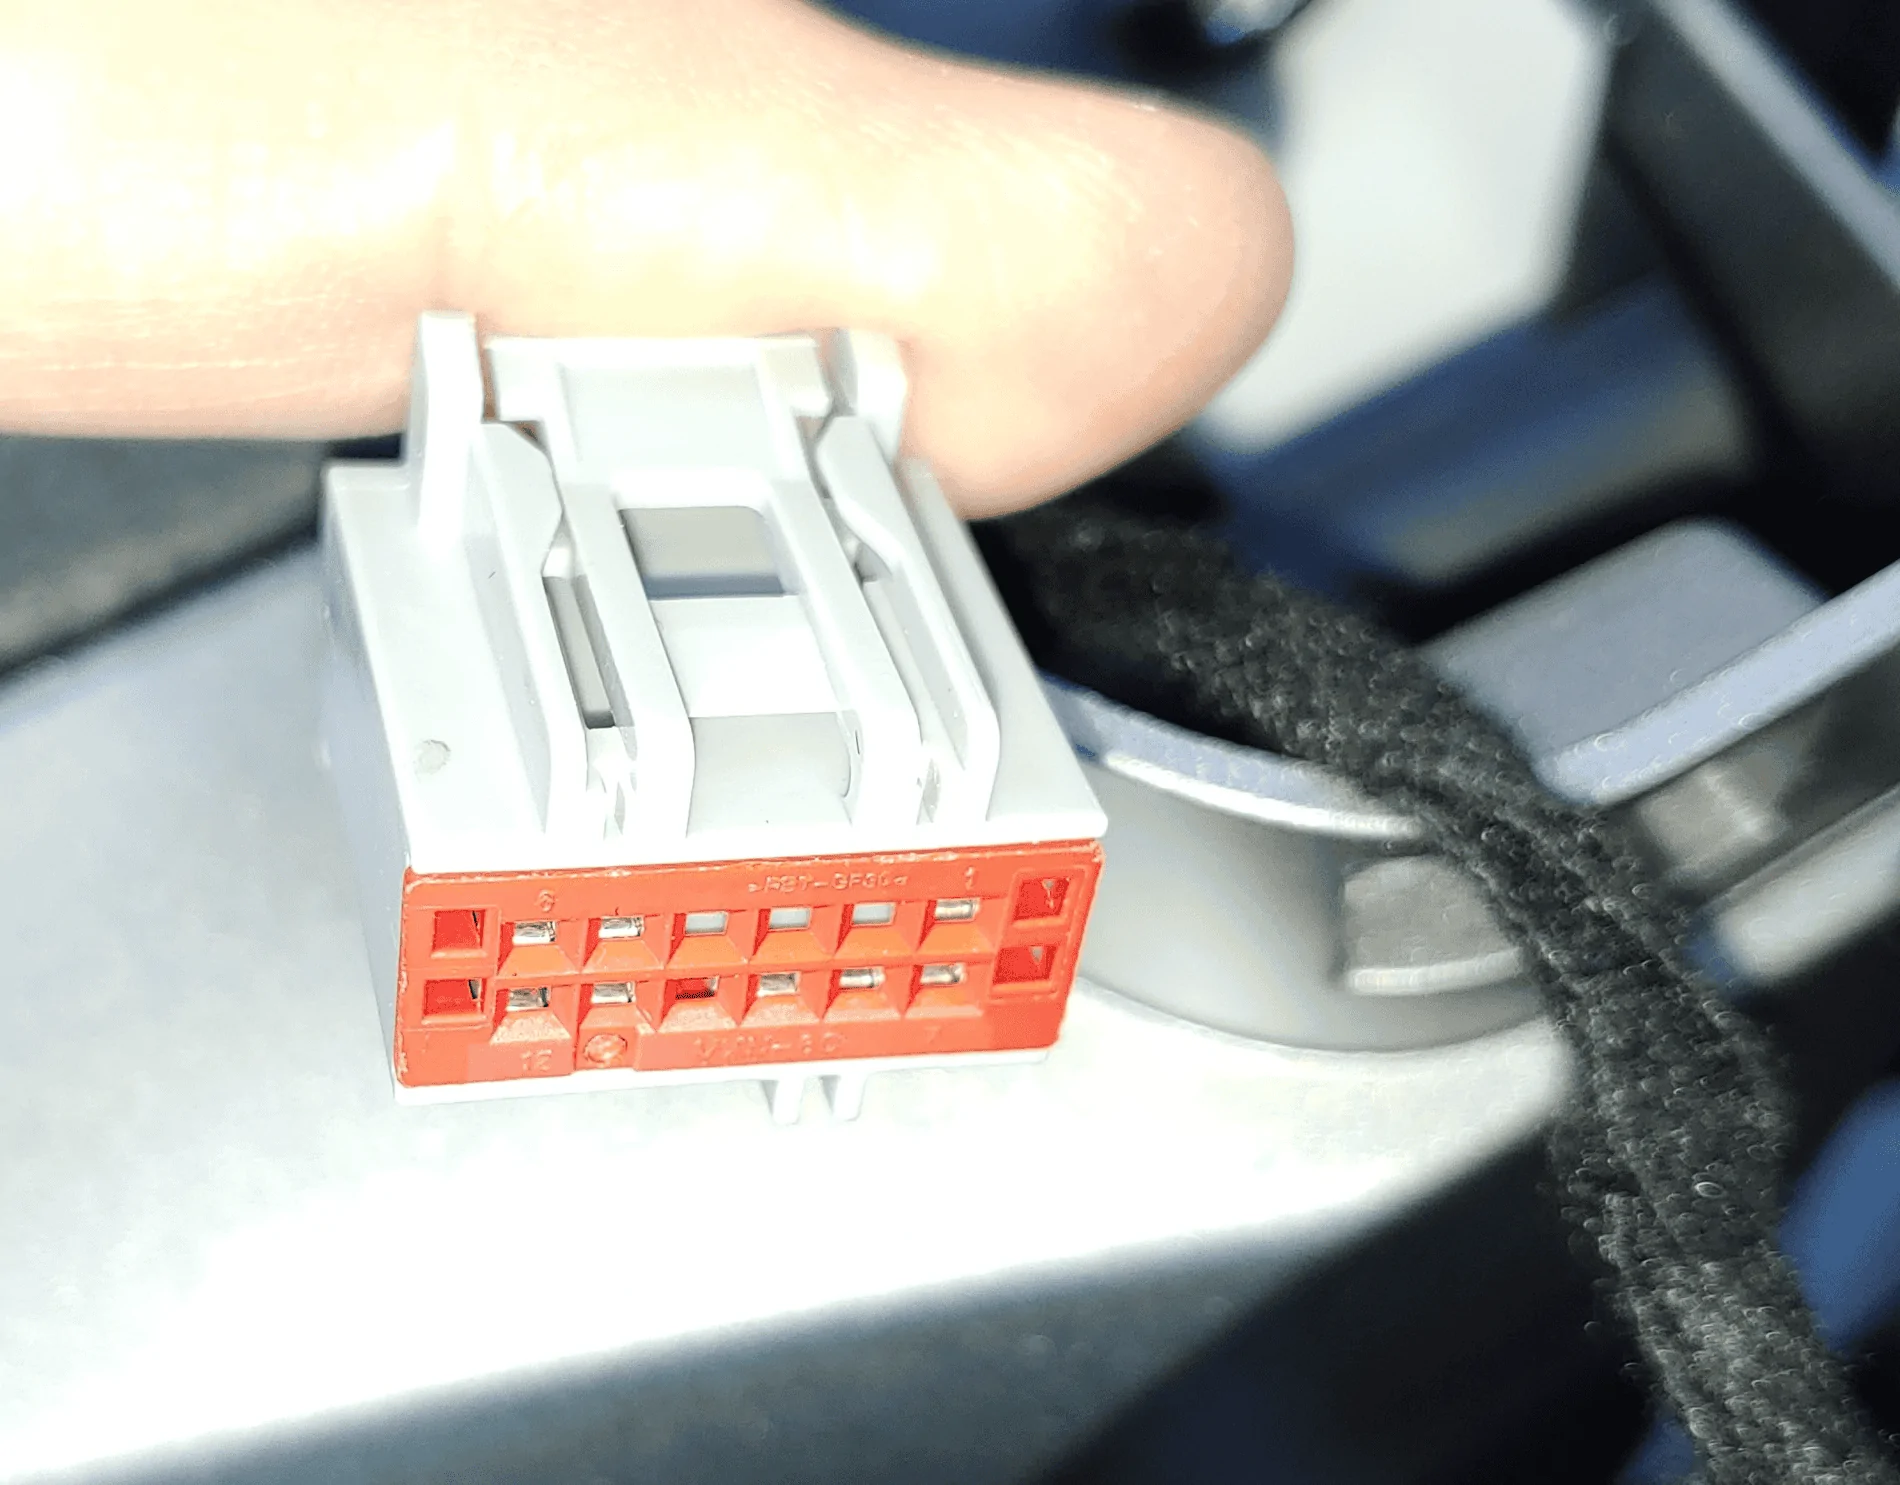
- Install the mirror connector pins. Below is the connector before the wires are added.

 Gently pry up the orange face of the connector, this will unlock the pins. I pried up from either end. They will still be retained, but be careful! Molex instructions HERE. Will look like the image when done - DO NOT REMOVE the orange piece! If you are connector savvy swap pin1 to pin2 using a very small screwdriver to fully release the pin. Otherwise install the wires as shown below. The orientation of the pin matters! The open crimp side of the contact should face out on the connector, not in towards the center. When installed correctly you should hear a "click".


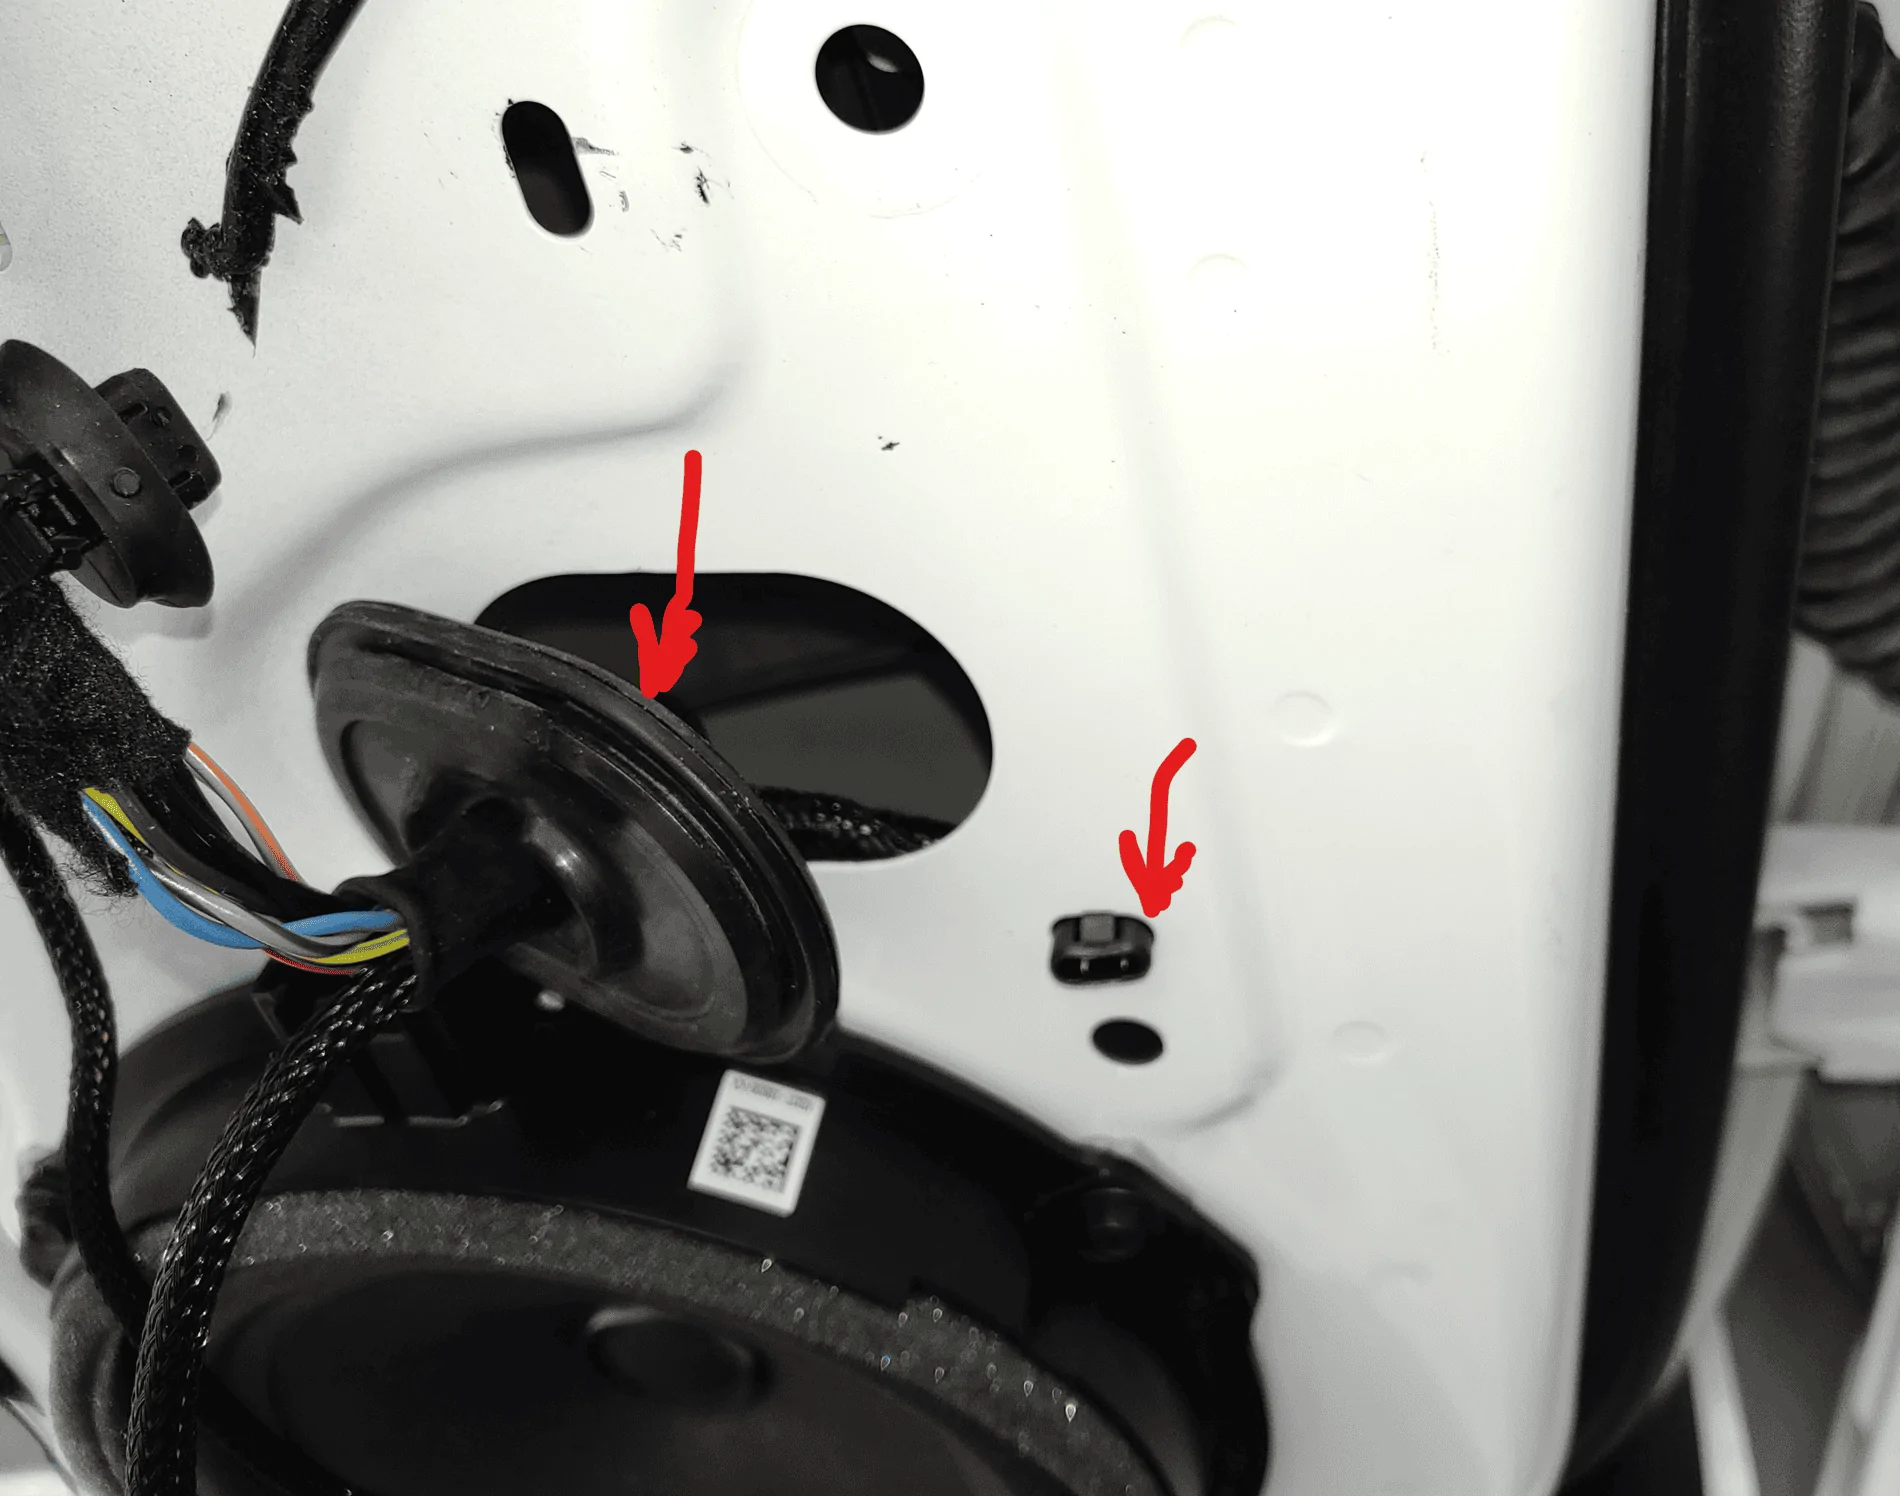
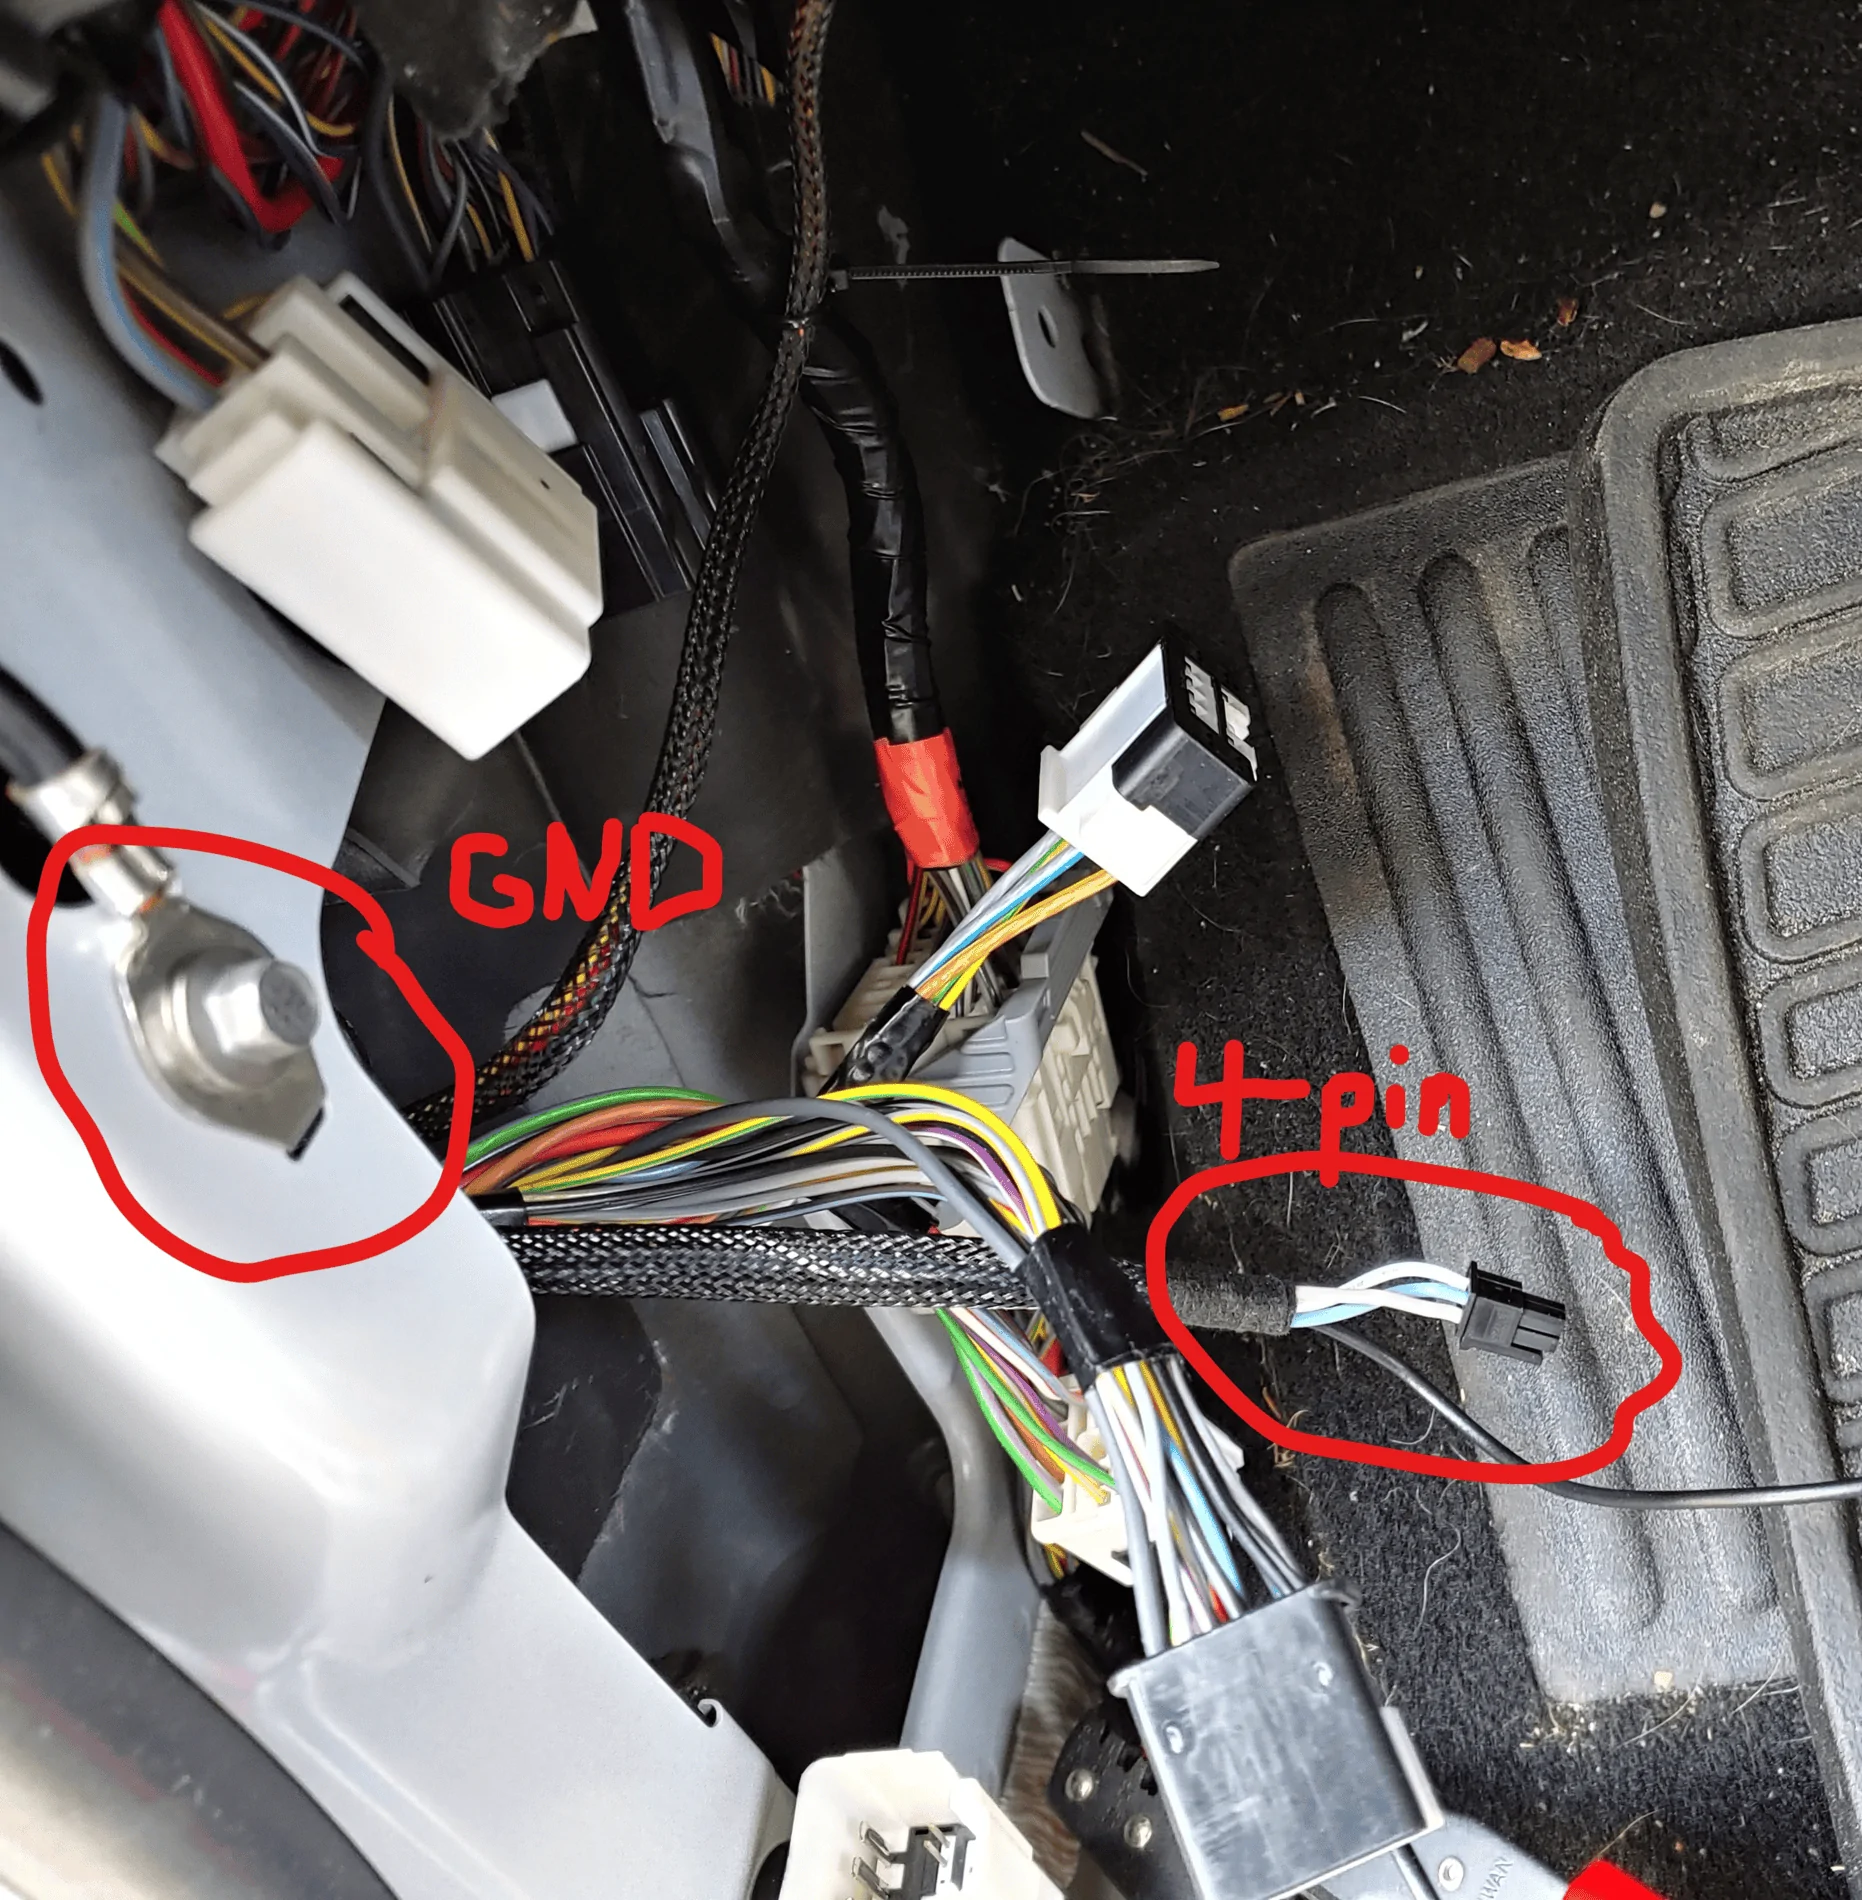
- Inside the cab leave the 4 pin connector for now and tie the ground wire to ground. On drivers side I used the existing ground point under the LH kick panel.
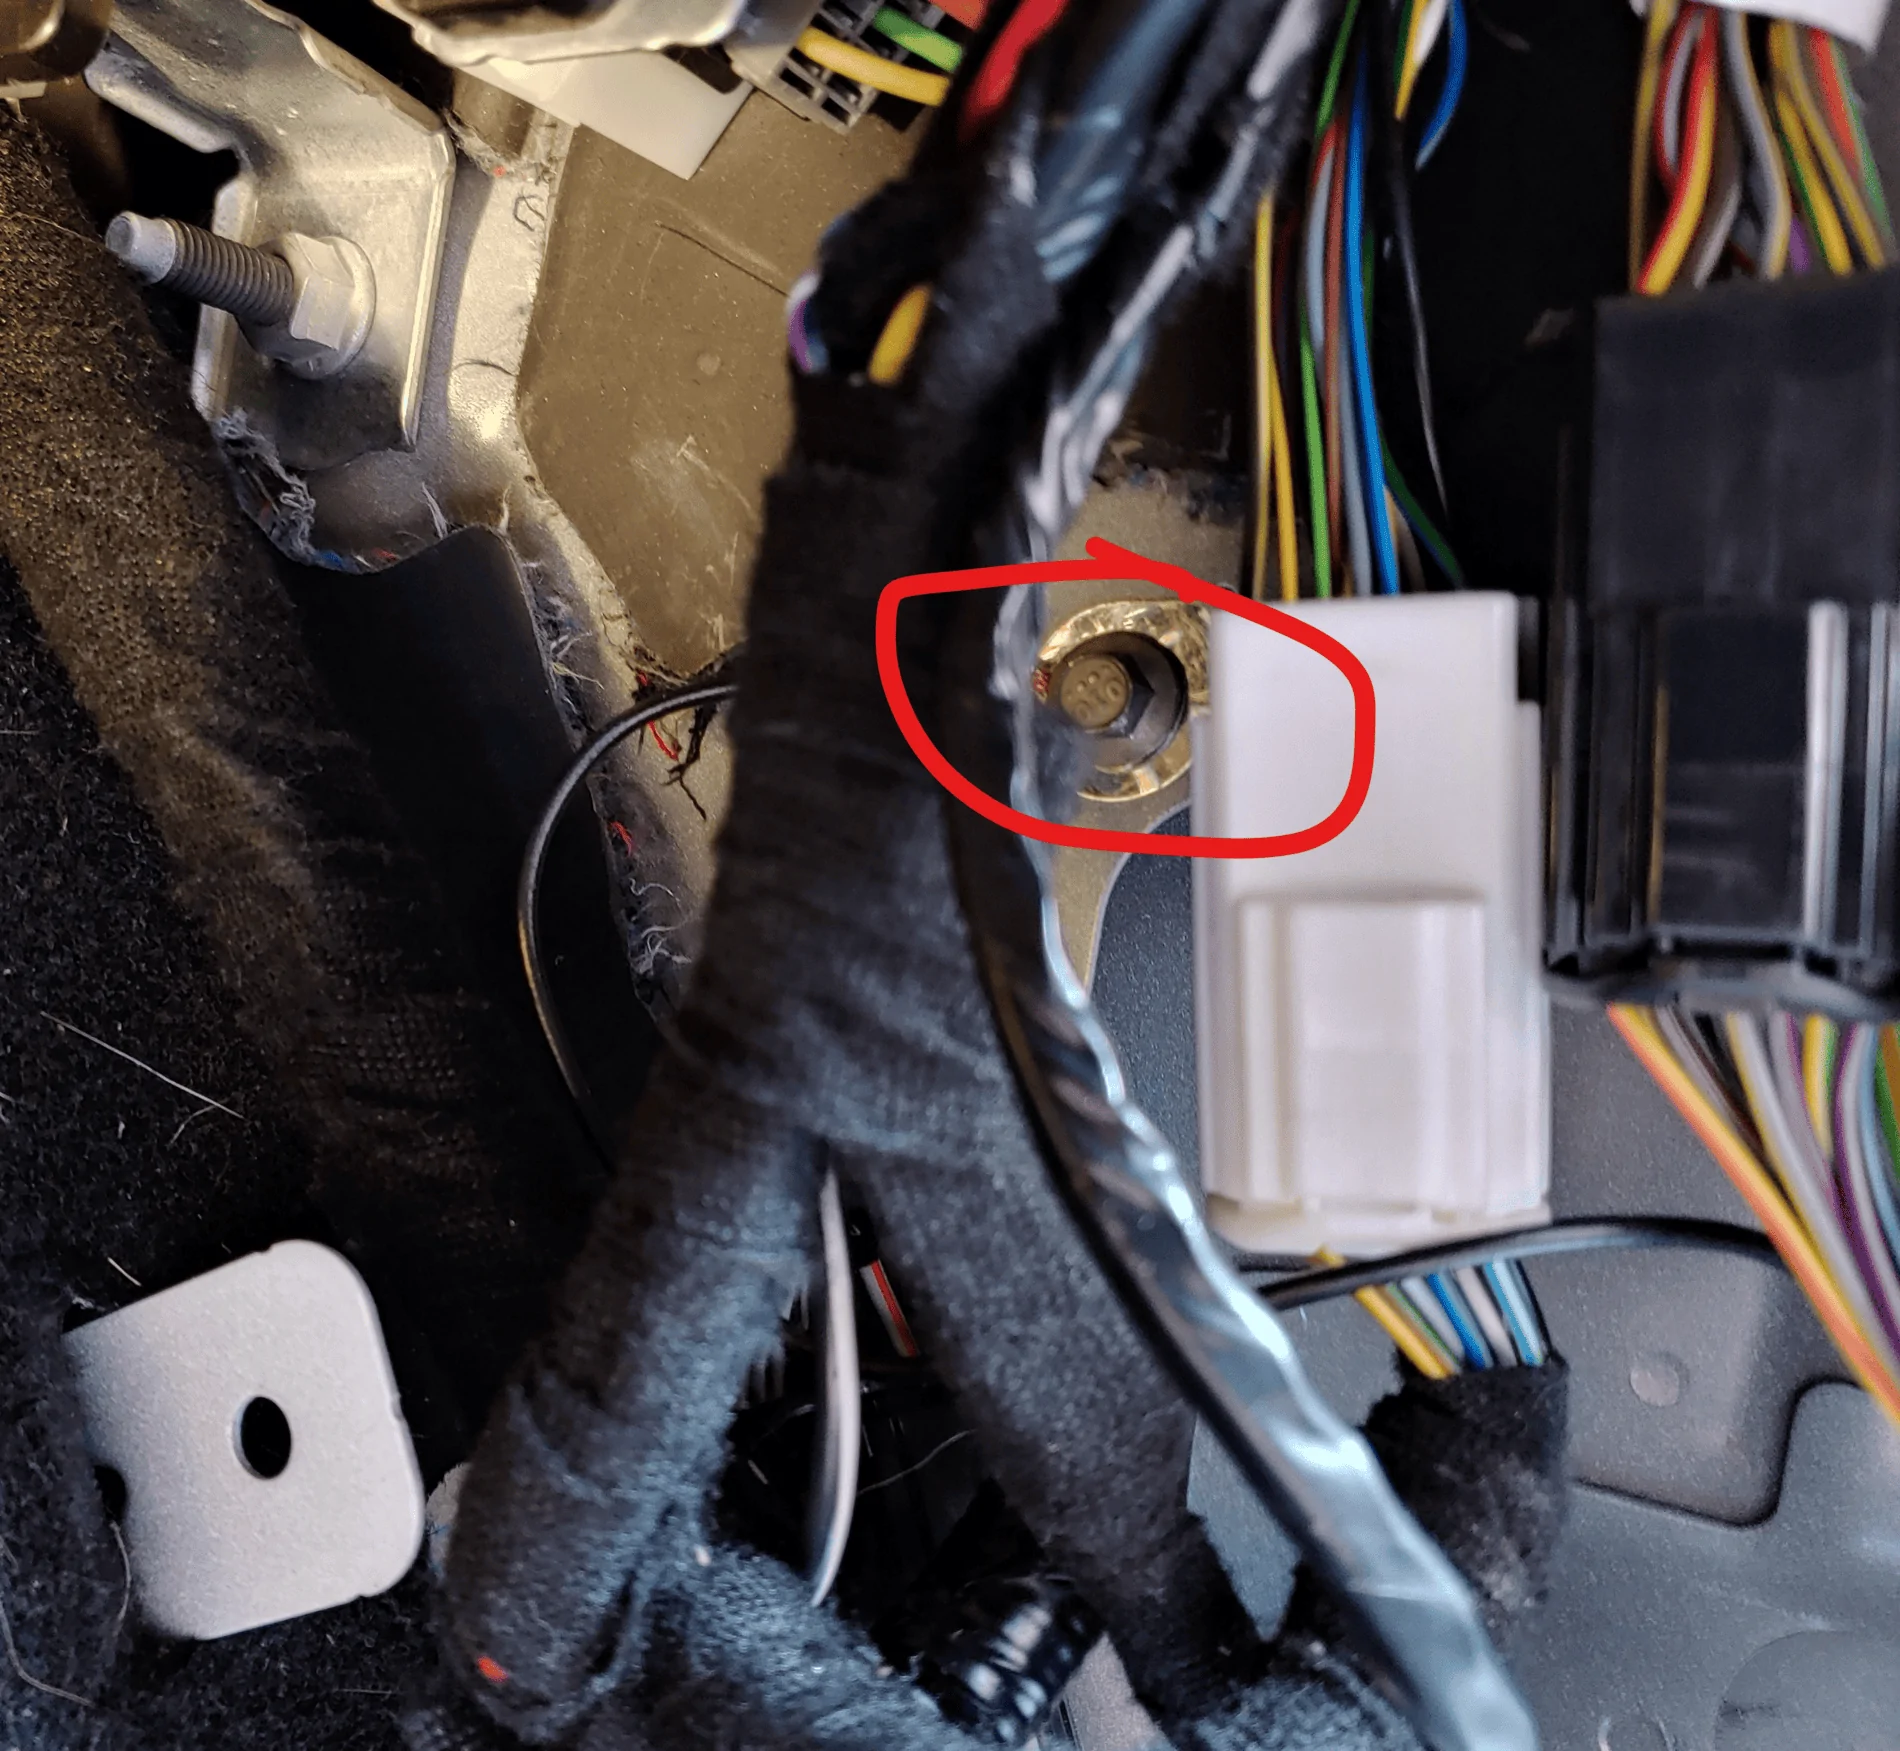
On the RH side there is also a GND point


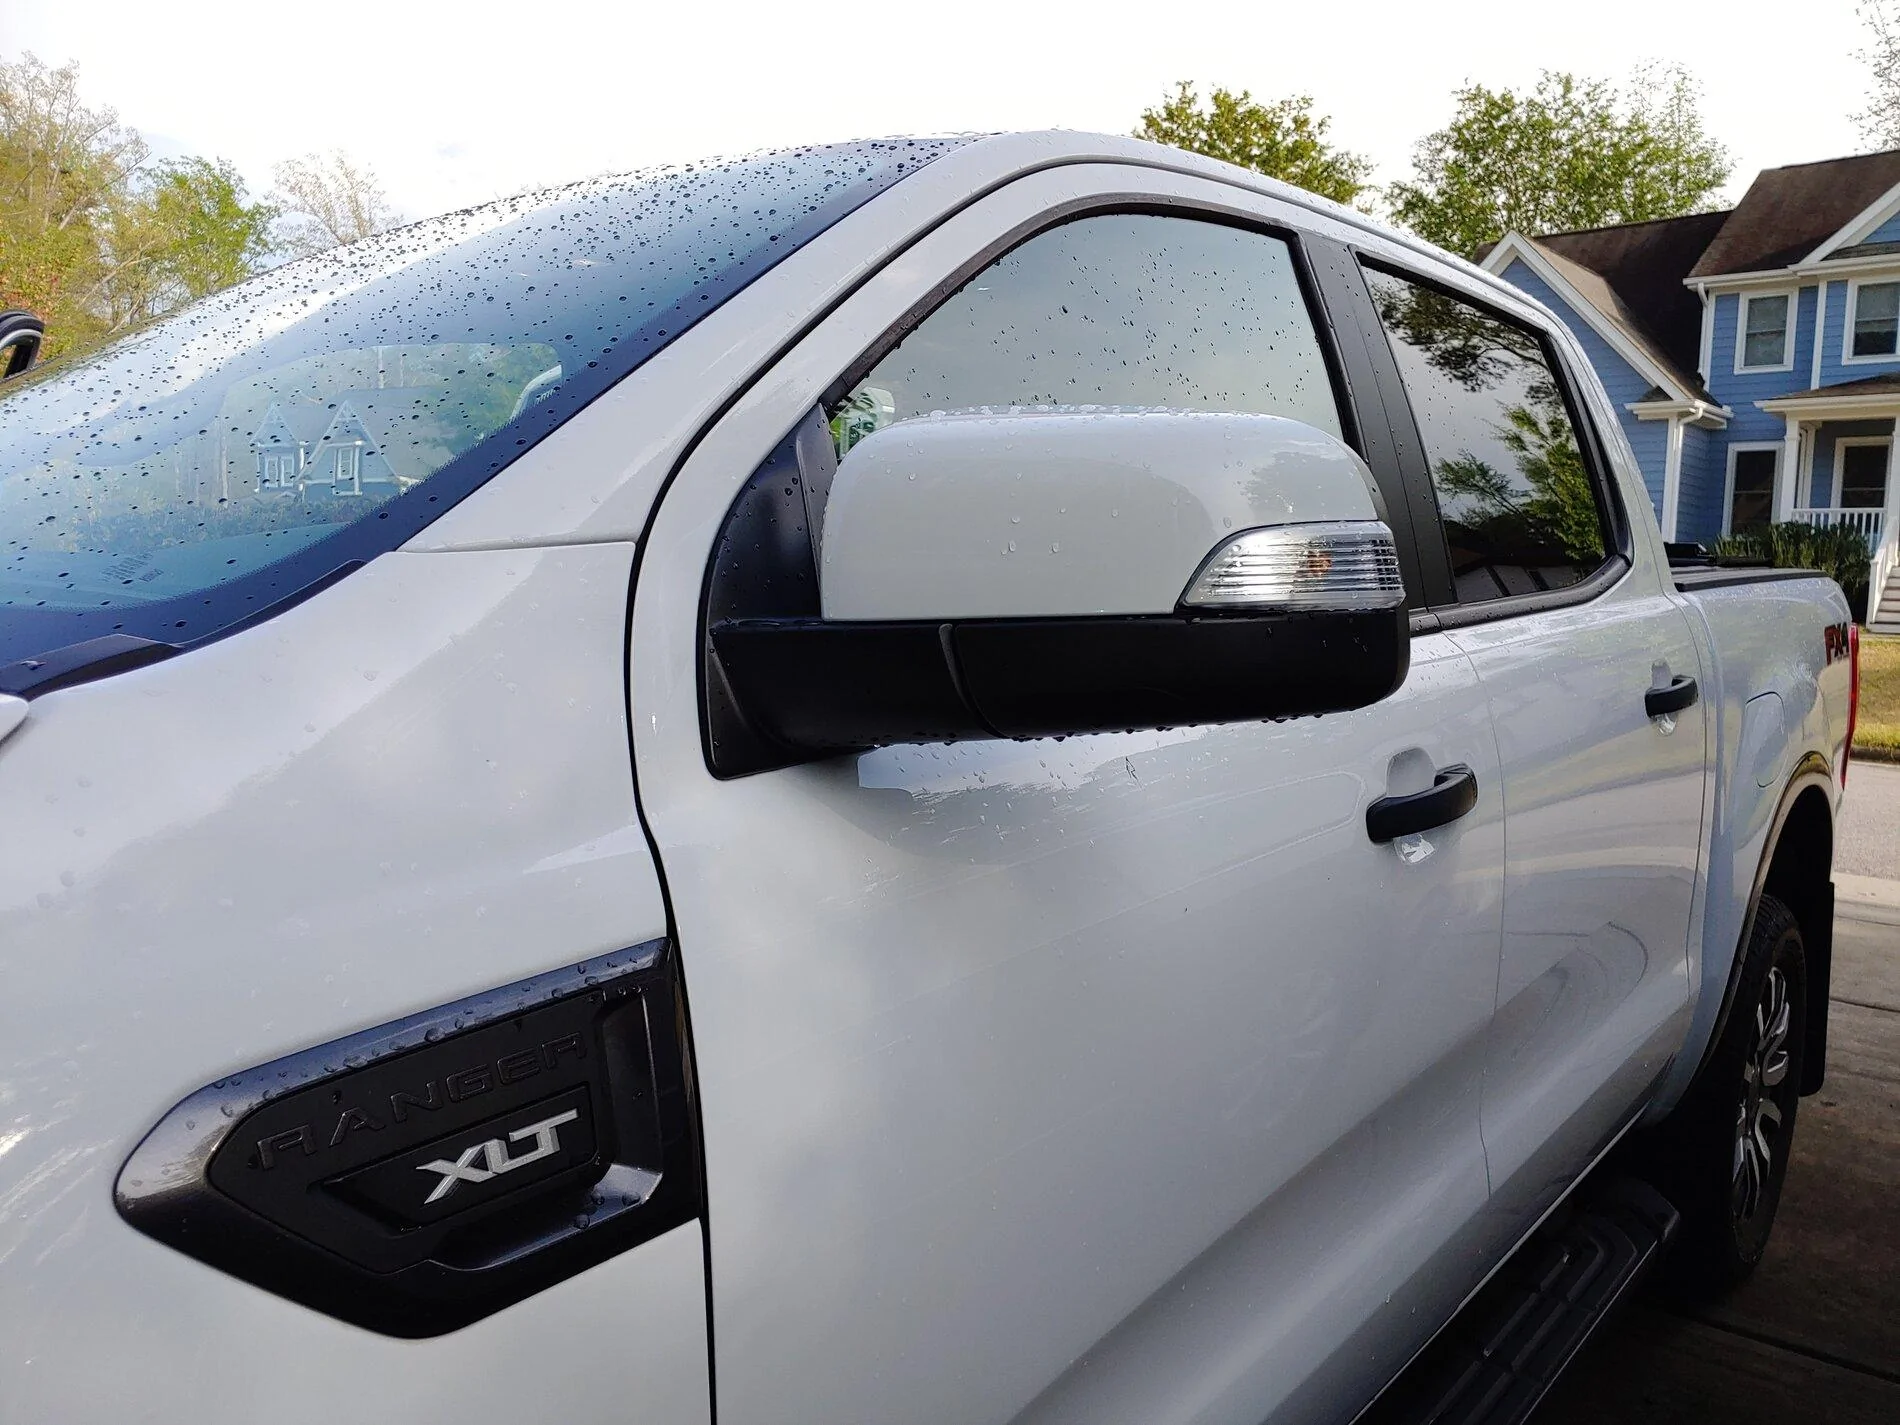
- Swap the mirrors!
- Removal - see attachment
- Installation reverse of removal. Be careful not to over torque the mirror bolts as they could strip easily.
- Plug in the harness!

- Test by applying 12V to each pin in the 4-pin Molex connector. This assumes you have tied all the ground wires to ground. You will be able to feel the heated mirror after 3-5min.
- WIRE TAP HARNESS
- I am going to start with placing the posi-taps on each wire I will be pulling voltage from. Heat, Turns, and Puddles.
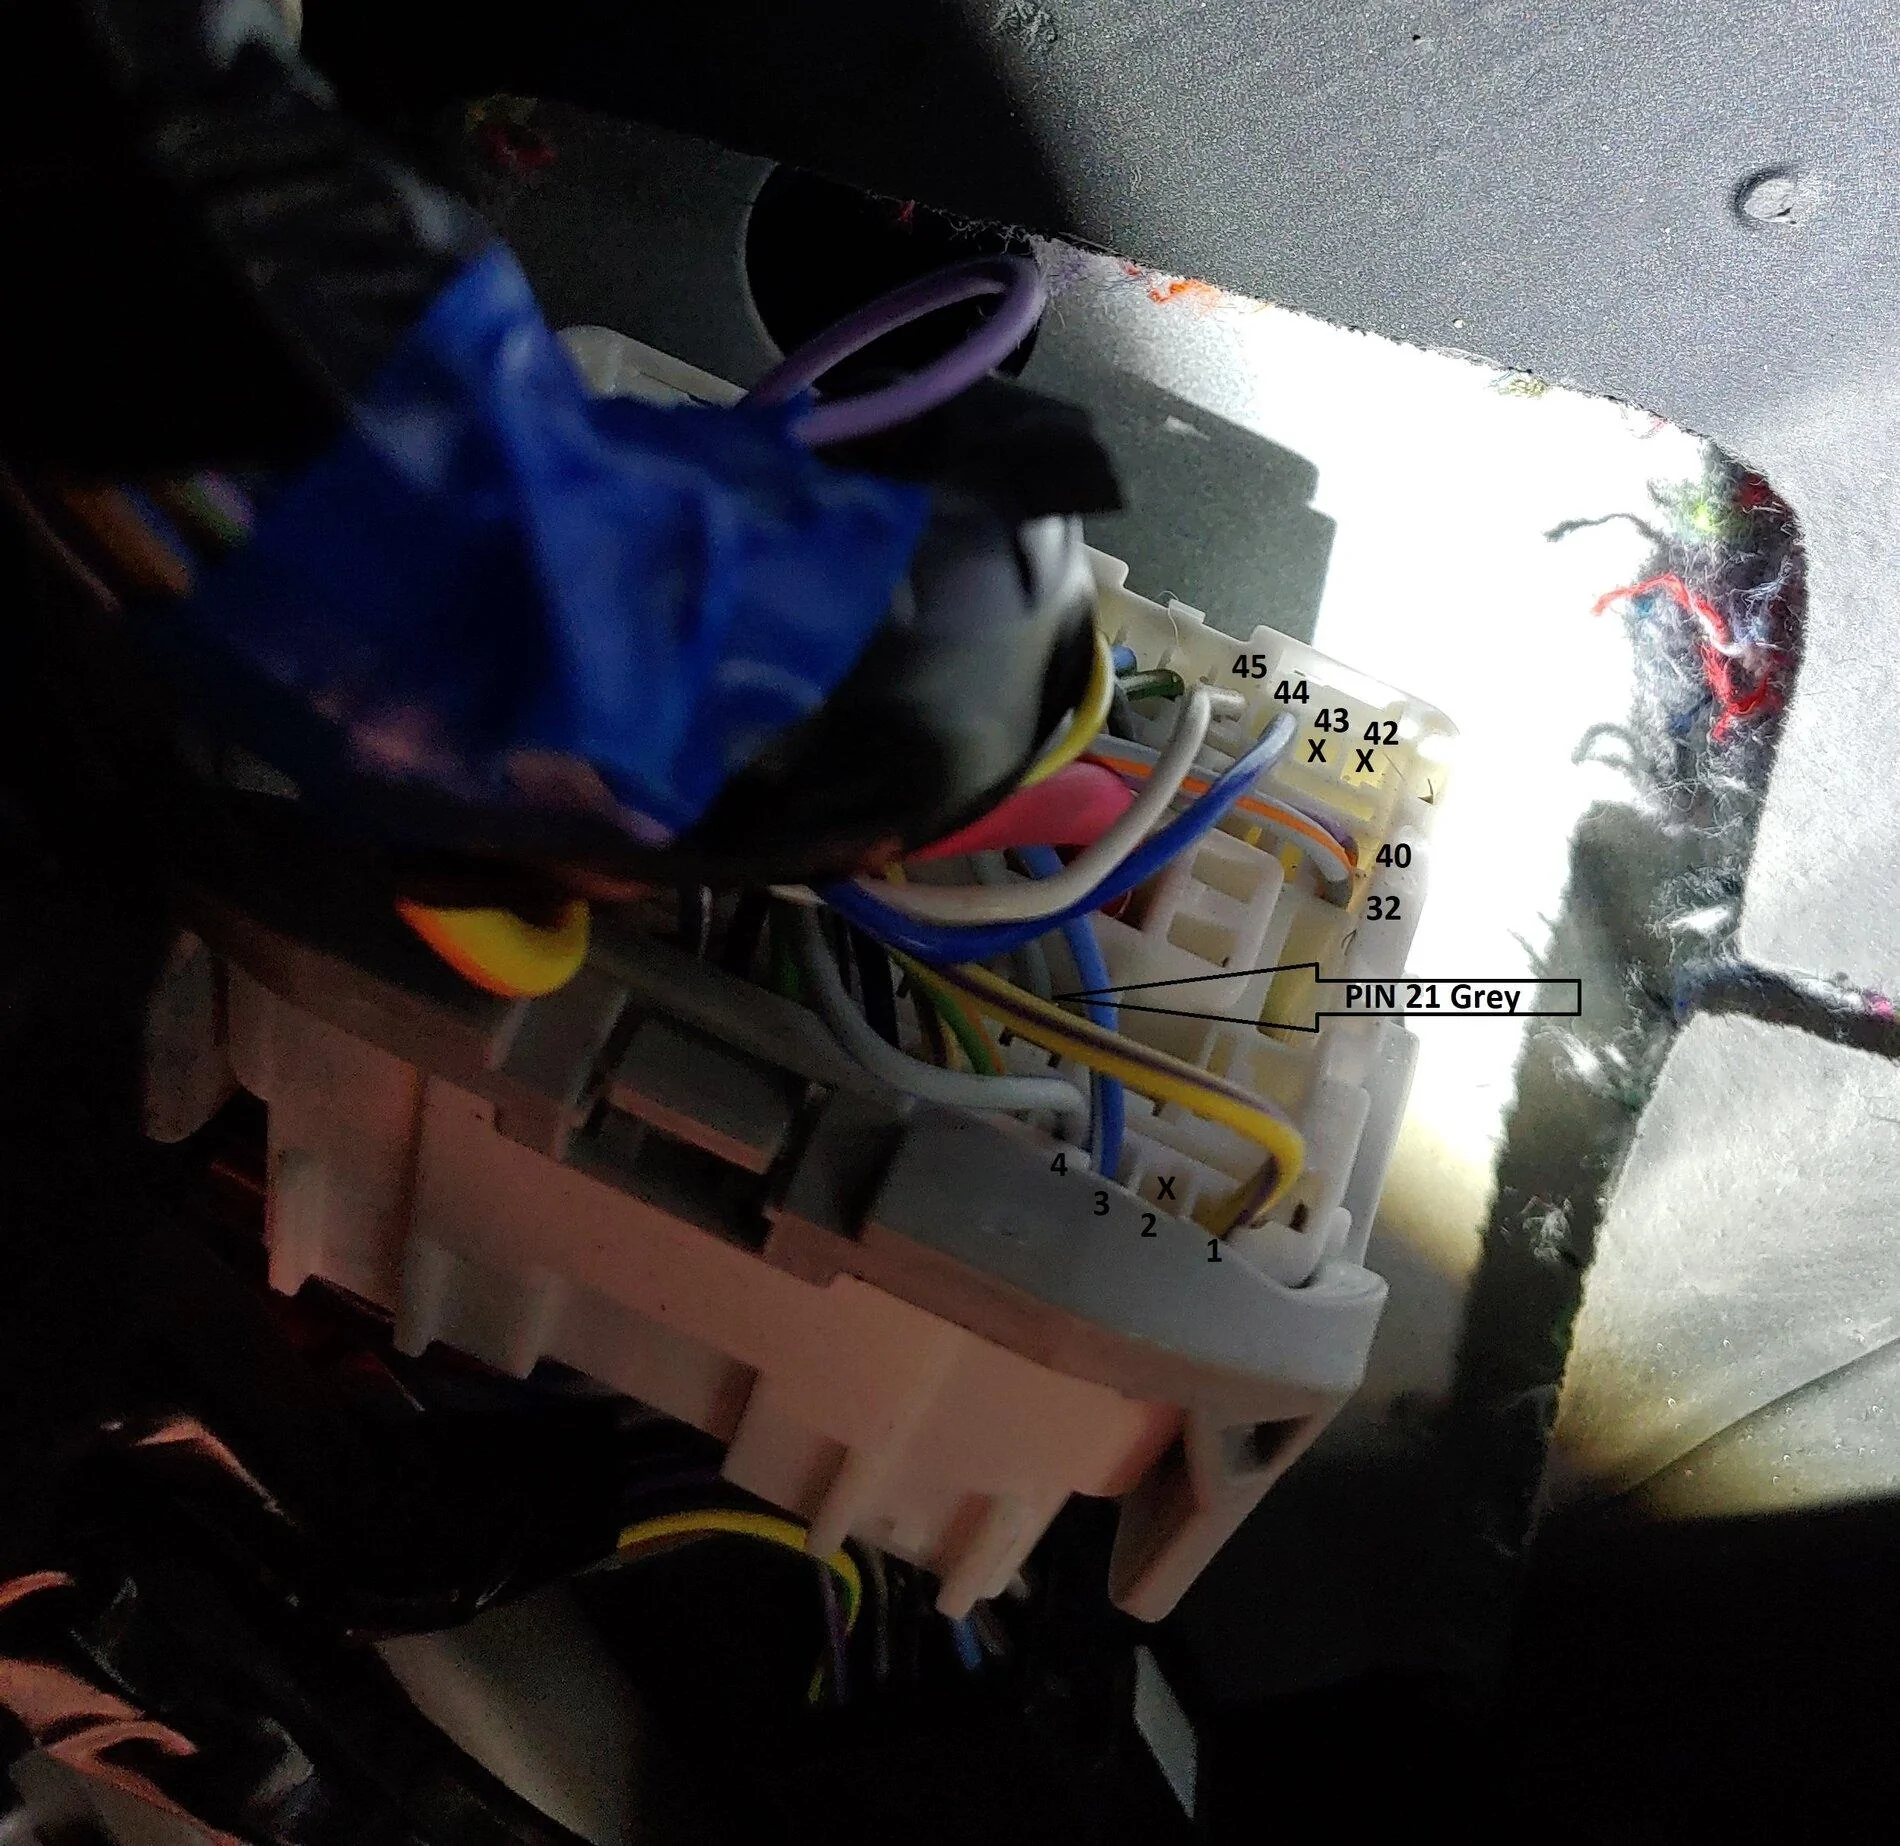
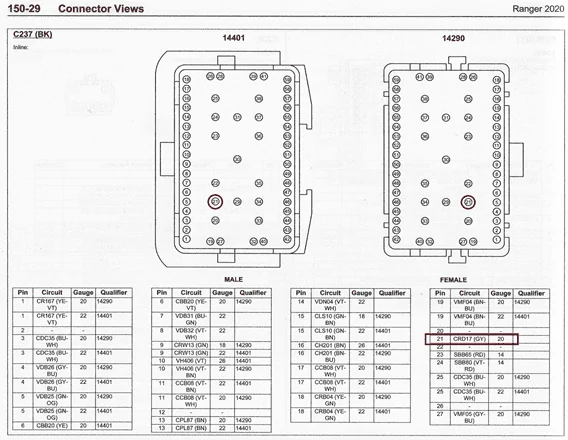
- First is the heated mirror line. As I said above its pin 21 C237. Picture below is the back of the connector with the harness coming thru the firewall. Fish out the gray wire in pin 21 and tap away. As I said disconnect the battery and unplug this connector and peel away the tape to make this easier. Picture is the back of the Male connector in diagram. Grey wire is right next to the BIG red wire. And the arrow pointing out the grey wire is also pointing up. UPDATE 11/24/21 - This wire may only be present on 2019 trucks! I will try to come up with an alternative.


- First is the heated mirror line. As I said above its pin 21 C237. Picture below is the back of the connector with the harness coming thru the firewall. Fish out the gray wire in pin 21 and tap away. As I said disconnect the battery and unplug this connector and peel away the tape to make this easier. Picture is the back of the Male connector in diagram. Grey wire is right next to the BIG red wire. And the arrow pointing out the grey wire is also pointing up. UPDATE 11/24/21 - This wire may only be present on 2019 trucks! I will try to come up with an alternative.
- Turns and Puddles -Sorry, I didn't take many pics as I got closer to the finish line. These 2 are pretty straightforward so I can talk you thru it hopefully.
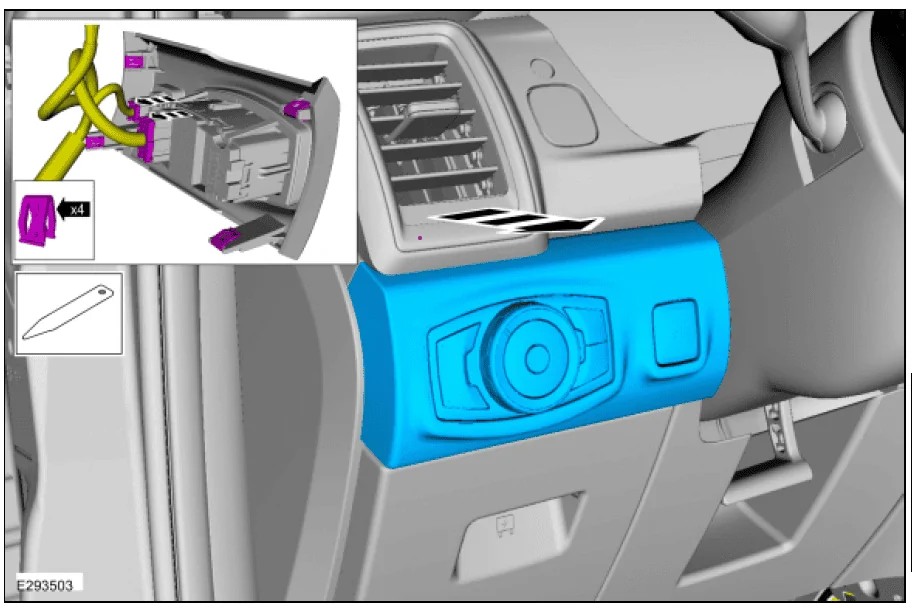
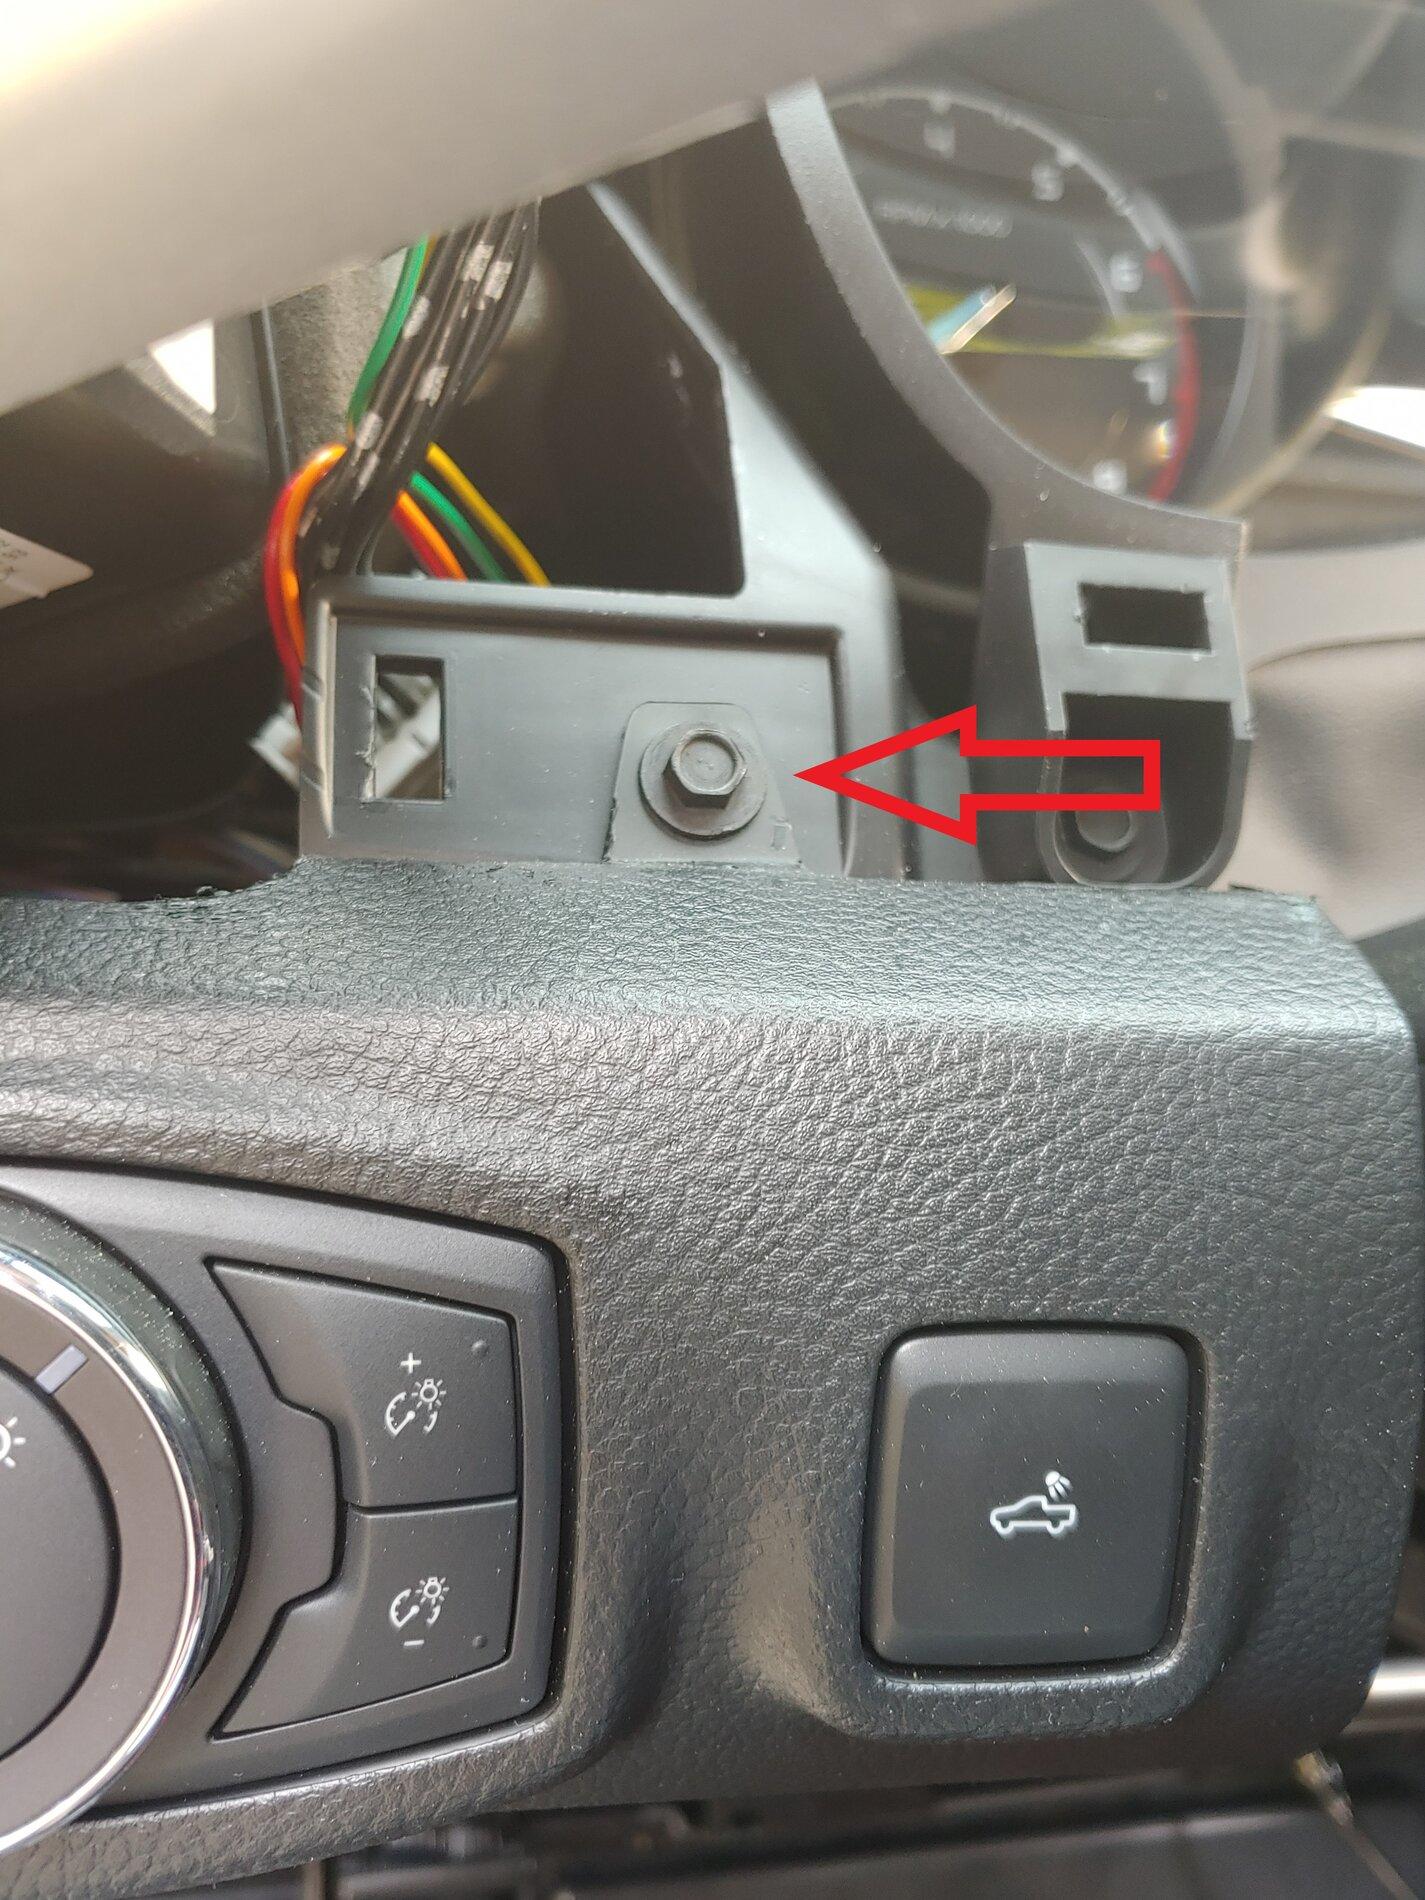
- Remove the vent trim piece to the left of the steering wheel and then remove the light switch trim piece below that. Note this trim has one screw under the vent trim, be sure to remove that!


- The 2 connectors to tap into are C2280C(Turns) and C2280F(Puddles)

- The Puddles wire (WH-GN pin 26) is located just the left of the BCM. The tap is the one with 2 wires coming out (LH and RH)

- Left and Right Turns wire is located behind the light switch. Sorry no picture! LH is BU-GN from pin 39 and RH is YE-VT from pin 38. NOTE: I didn't trace from the connector pin, I just hunted for the correct wire color and tested after I made the tap (BEFORE connecting to the mirrors).
- Remove the vent trim piece to the left of the steering wheel and then remove the light switch trim piece below that. Note this trim has one screw under the vent trim, be sure to remove that!
- Tap Harness'
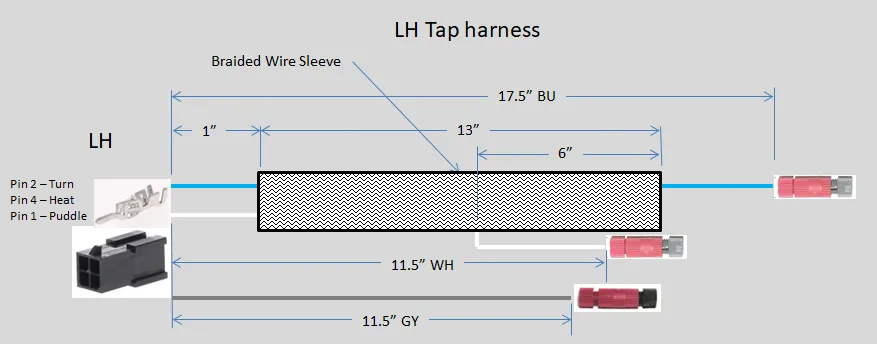
- LH tap harness. Cut wire lengths as shown and crimp on terminals. NOTE- I would NOT use the connector I did, terminals are VERY small and may be undersized for the heat line. Use your choice or the suggested one I linked to in the BOM. Use a small screw driver to fish the WH wire out of the sleeve approx where indicated. Route the harness and hook up the taps.

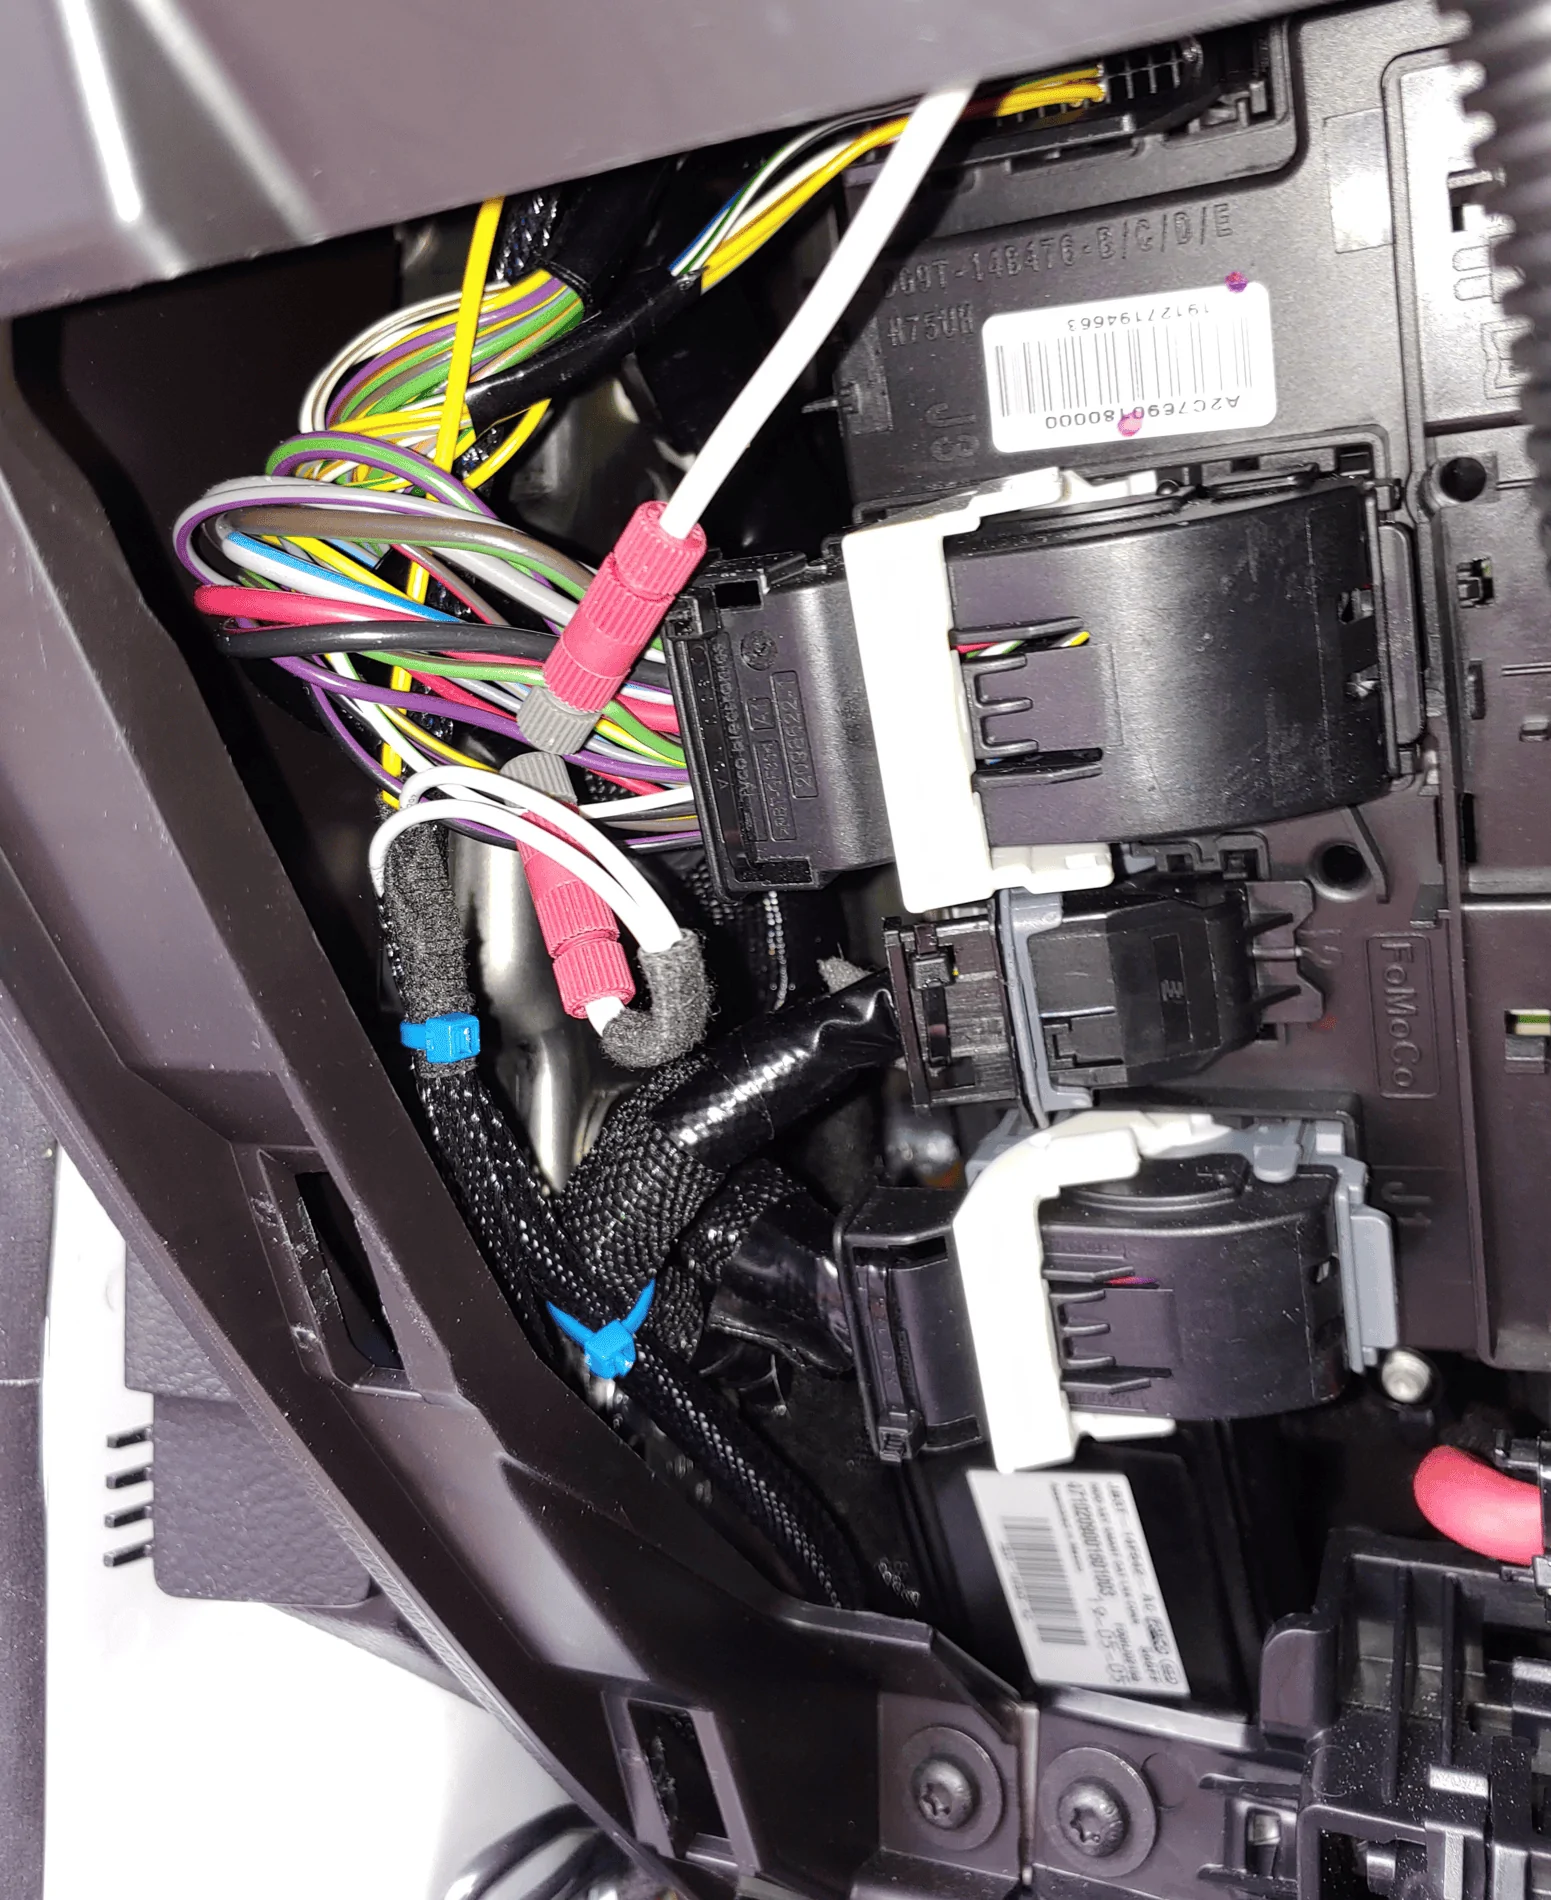
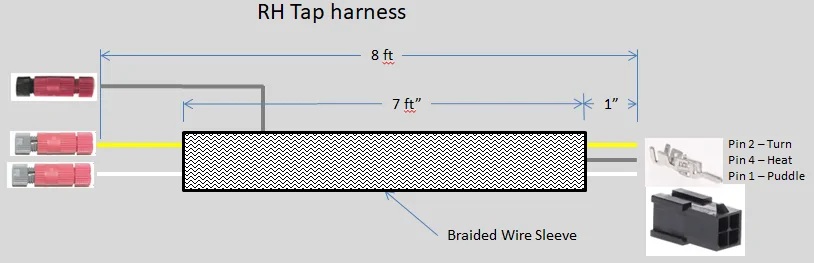
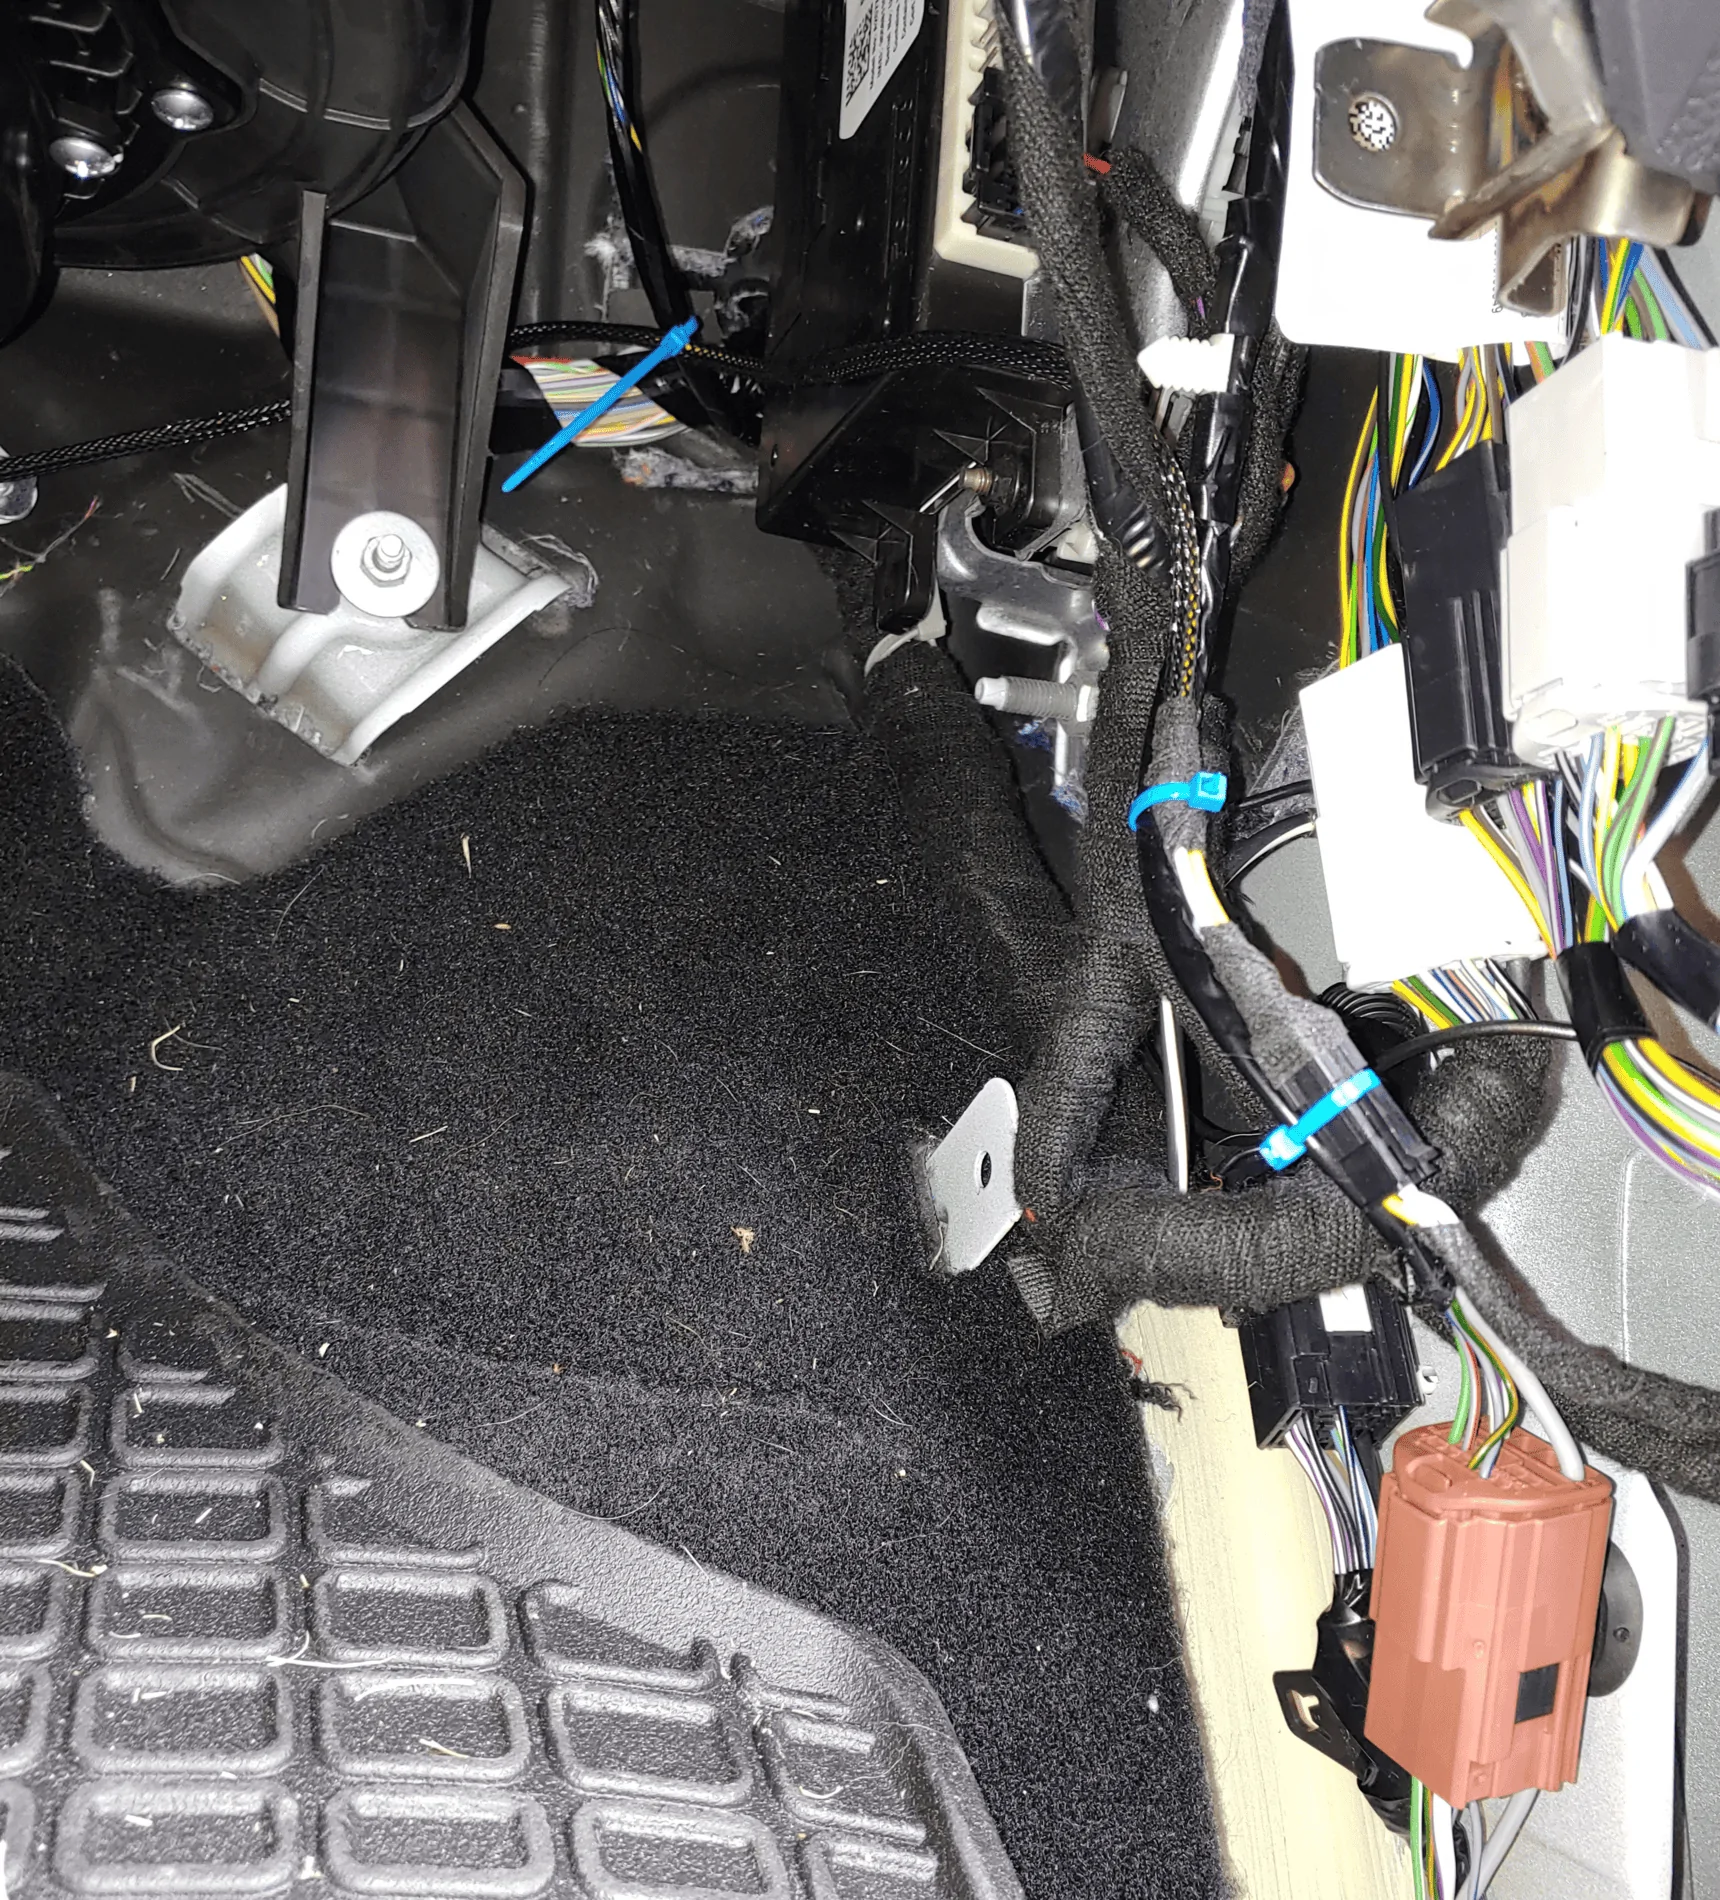
- RH Tap Harness. Cut all wires to 8ft long (yes feet!) and crimp on the terminals. Rout the harness along the RH foot well and behind the HVAC box. Across the foot well and then thru the center stack at the bottom beneath the ducts. Use the same big a$$ tie wrap from the door harness install as a fish tool. Apply tie-wraps!


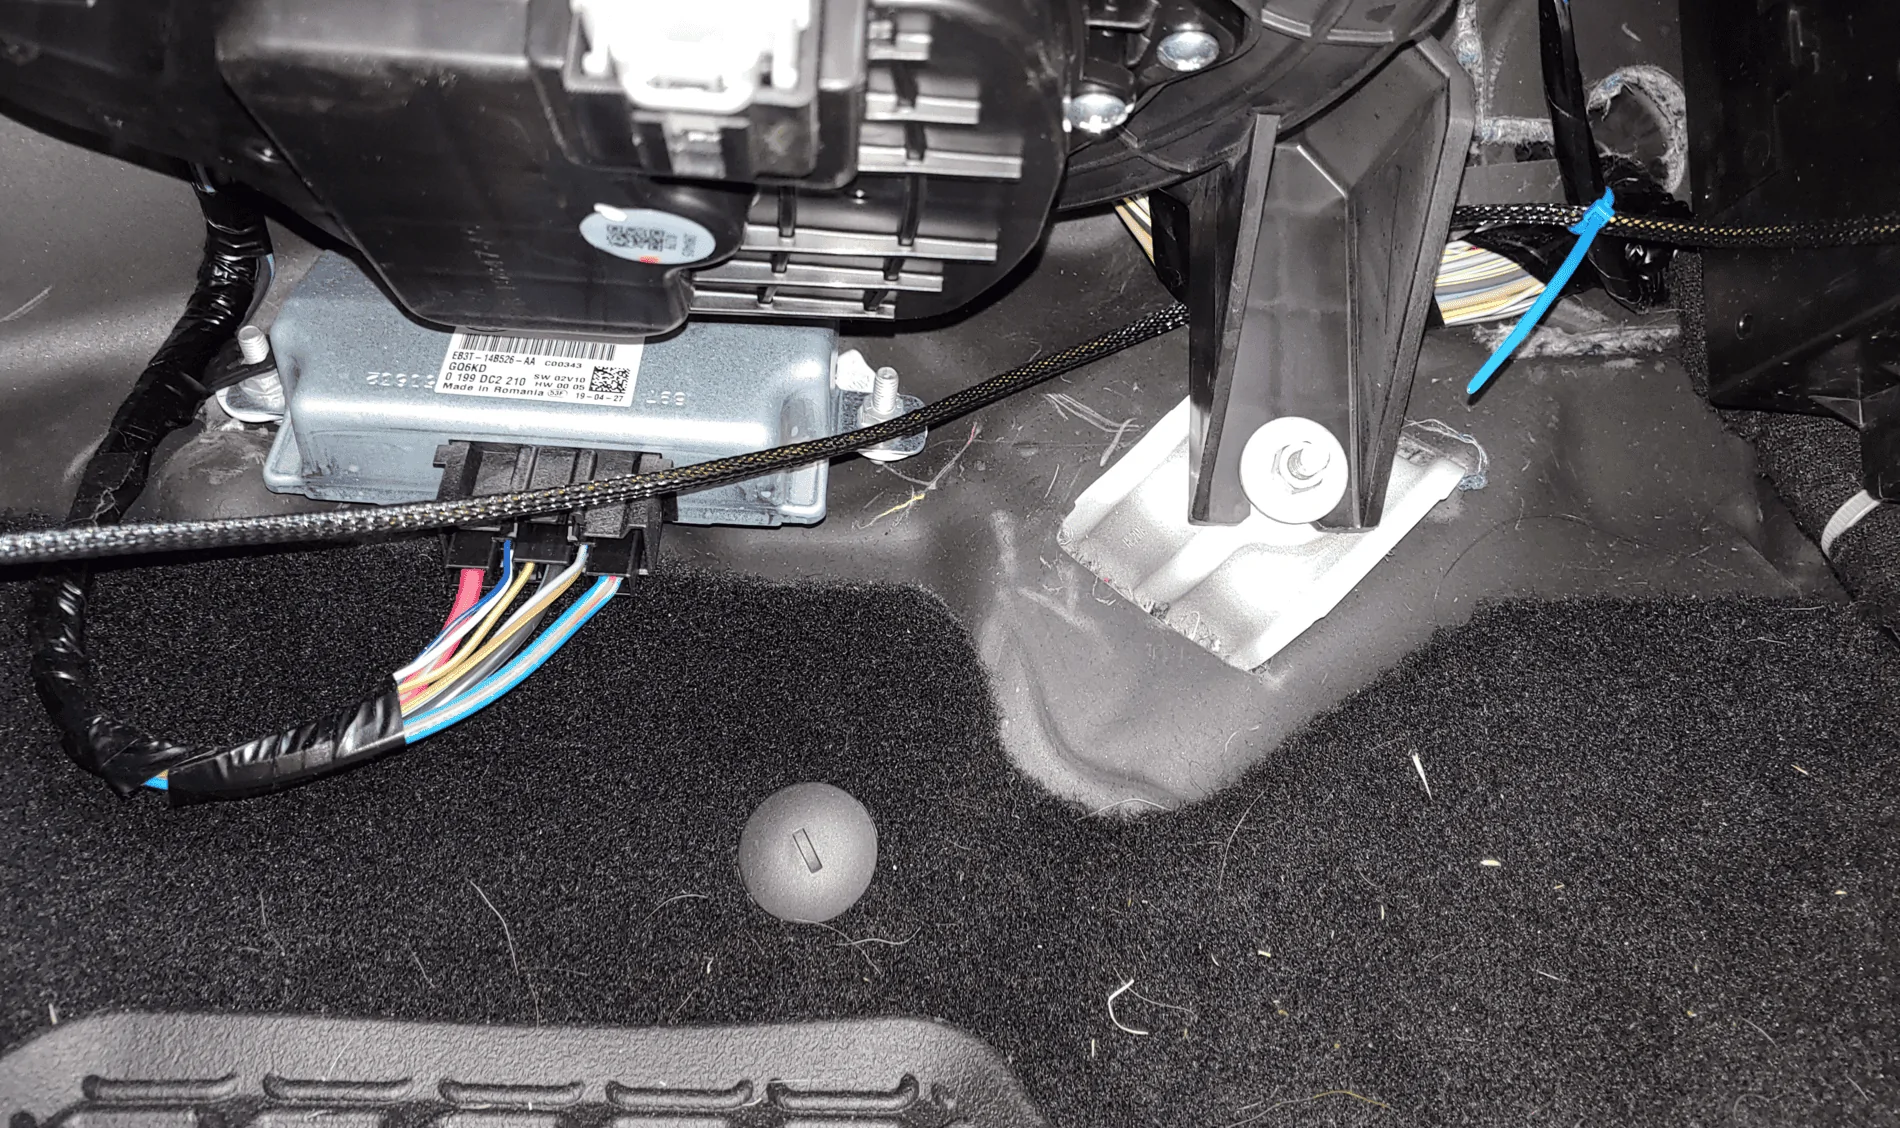
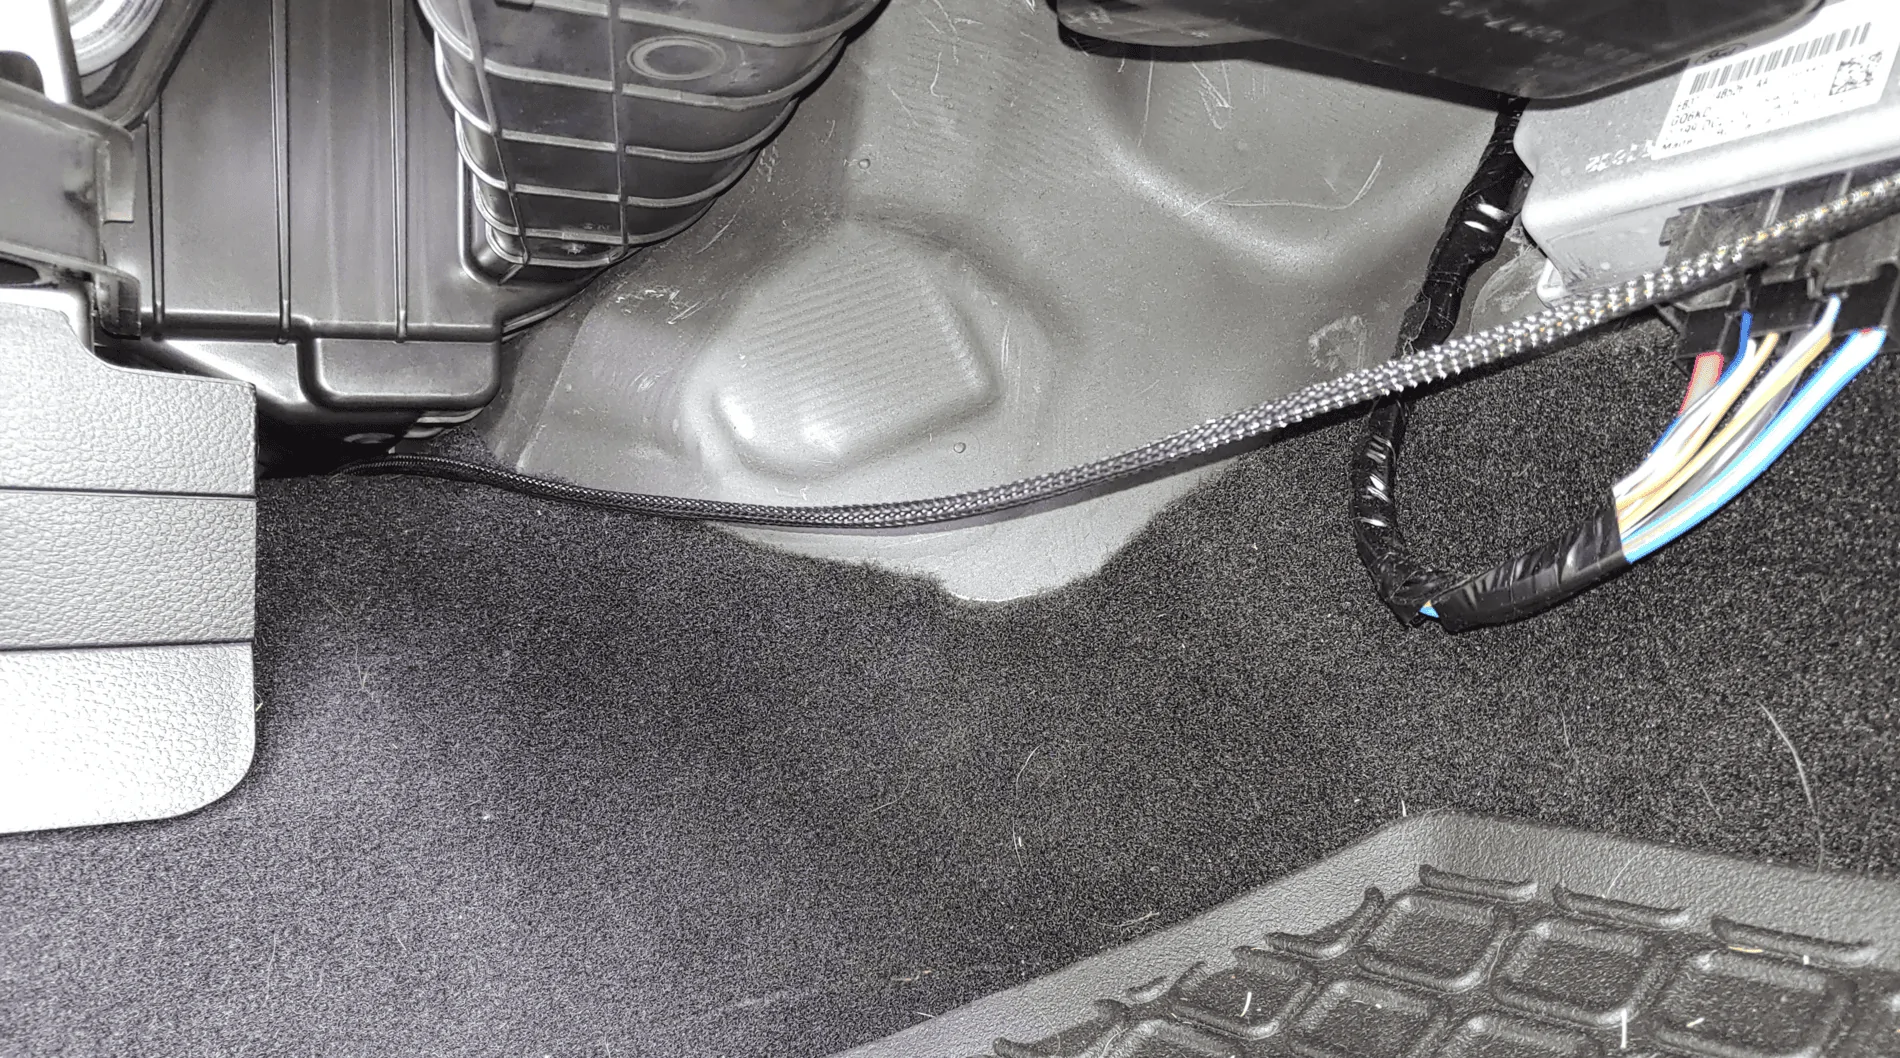
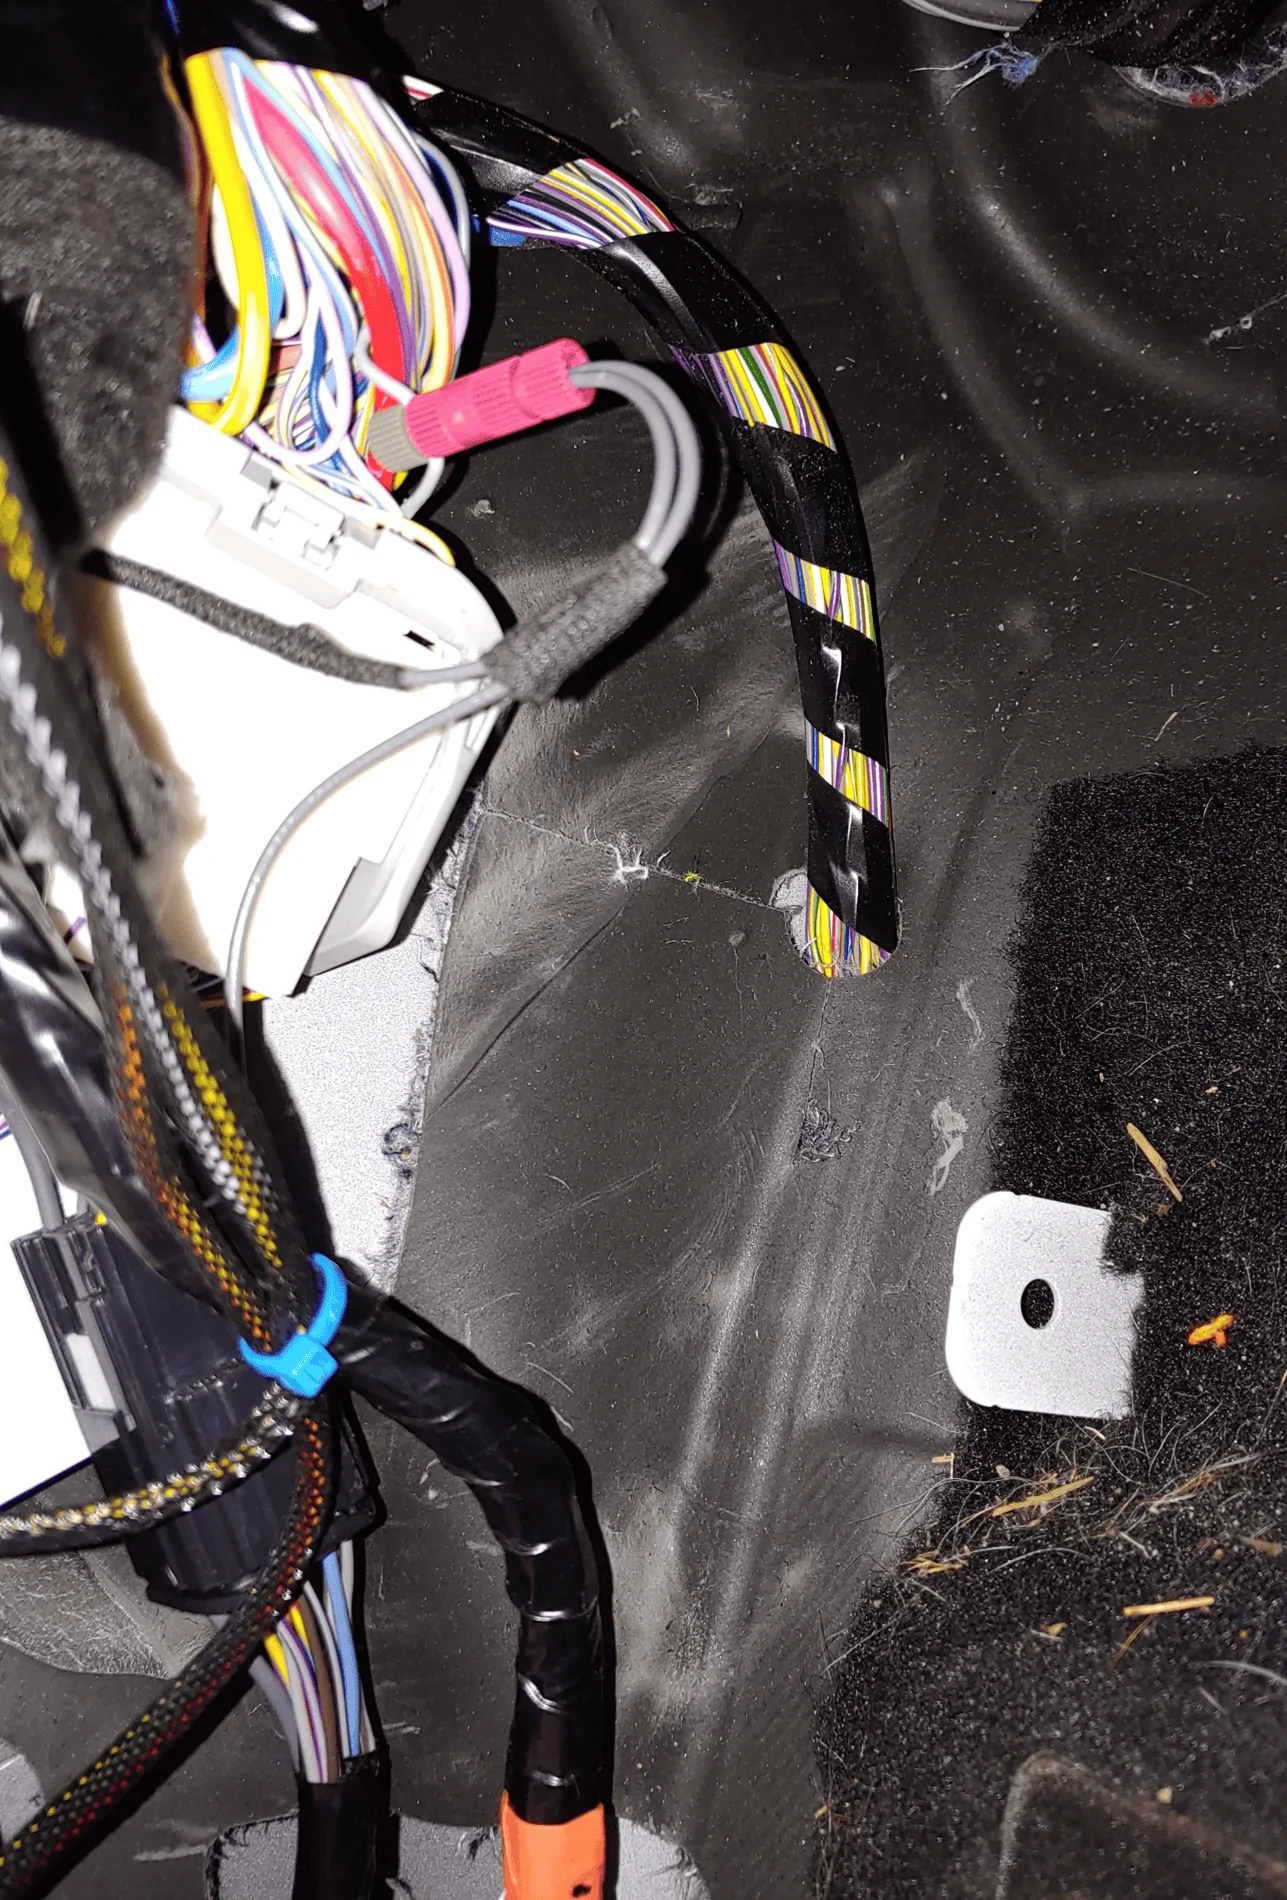
- RH harness final routing and hook up. On the drivers side foot well route the harness along the bar that the fuse trim attaches to. Again use a small screwdriver to pull the GY wire out of the loom to route it over to connector C237. Cut wire to remove excess length. Continue routing the harness to come up to the left of the BCM and make the tap connections, again cutting the wire to length. Install the wires in the posi-taps.

- LH tap harness. Cut wire lengths as shown and crimp on terminals. NOTE- I would NOT use the connector I did, terminals are VERY small and may be undersized for the heat line. Use your choice or the suggested one I linked to in the BOM. Use a small screw driver to fish the WH wire out of the sleeve approx where indicated. Route the harness and hook up the taps.
- I am going to start with placing the posi-taps on each wire I will be pulling voltage from. Heat, Turns, and Puddles.
- DONE! Hook up the battery and test each function.

Sponsored
Attachments
-
419 KB Views: 873
-
1.4 MB Views: 3,916
Last edited: