2021Ranger
Well-Known Member
After seeing the pic of that tube I would just order a new one and clean out the old one or just throw it out.
Sponsored
How about this technique to clean the EGR tube orifice.... I think I'm going to try this.I have not had one off, and have always questioned if any of these may be getting clogged up.
But yes they can be removed and possibly cleaned with a piece of (Safety Wire and Brake Clean) or a small bottle brush.
But to ensure you get a proper seal on both ends of the tube you will need to also replace the seals.
I would like to see a pic of a clogged tube if anybody actually finds one so far they all have been reported as clean with only moisture, but however not many have actually removed the tube for a full inspection.
The Intake Manifold side of the tube has a gasket and the EGR Valve side of the tube has a (O-Ring)
I know in the past I have brought up the possibility that either end of the tube or the EGR Temp sensor (O-Ring) may be leaking and creating a leak in the tubing, thus the DPFE sensor would be reading and picking up inaccurate pressure readings.
Anyway, there is not an easy way to check the tube for clogging without actually pulling it off.
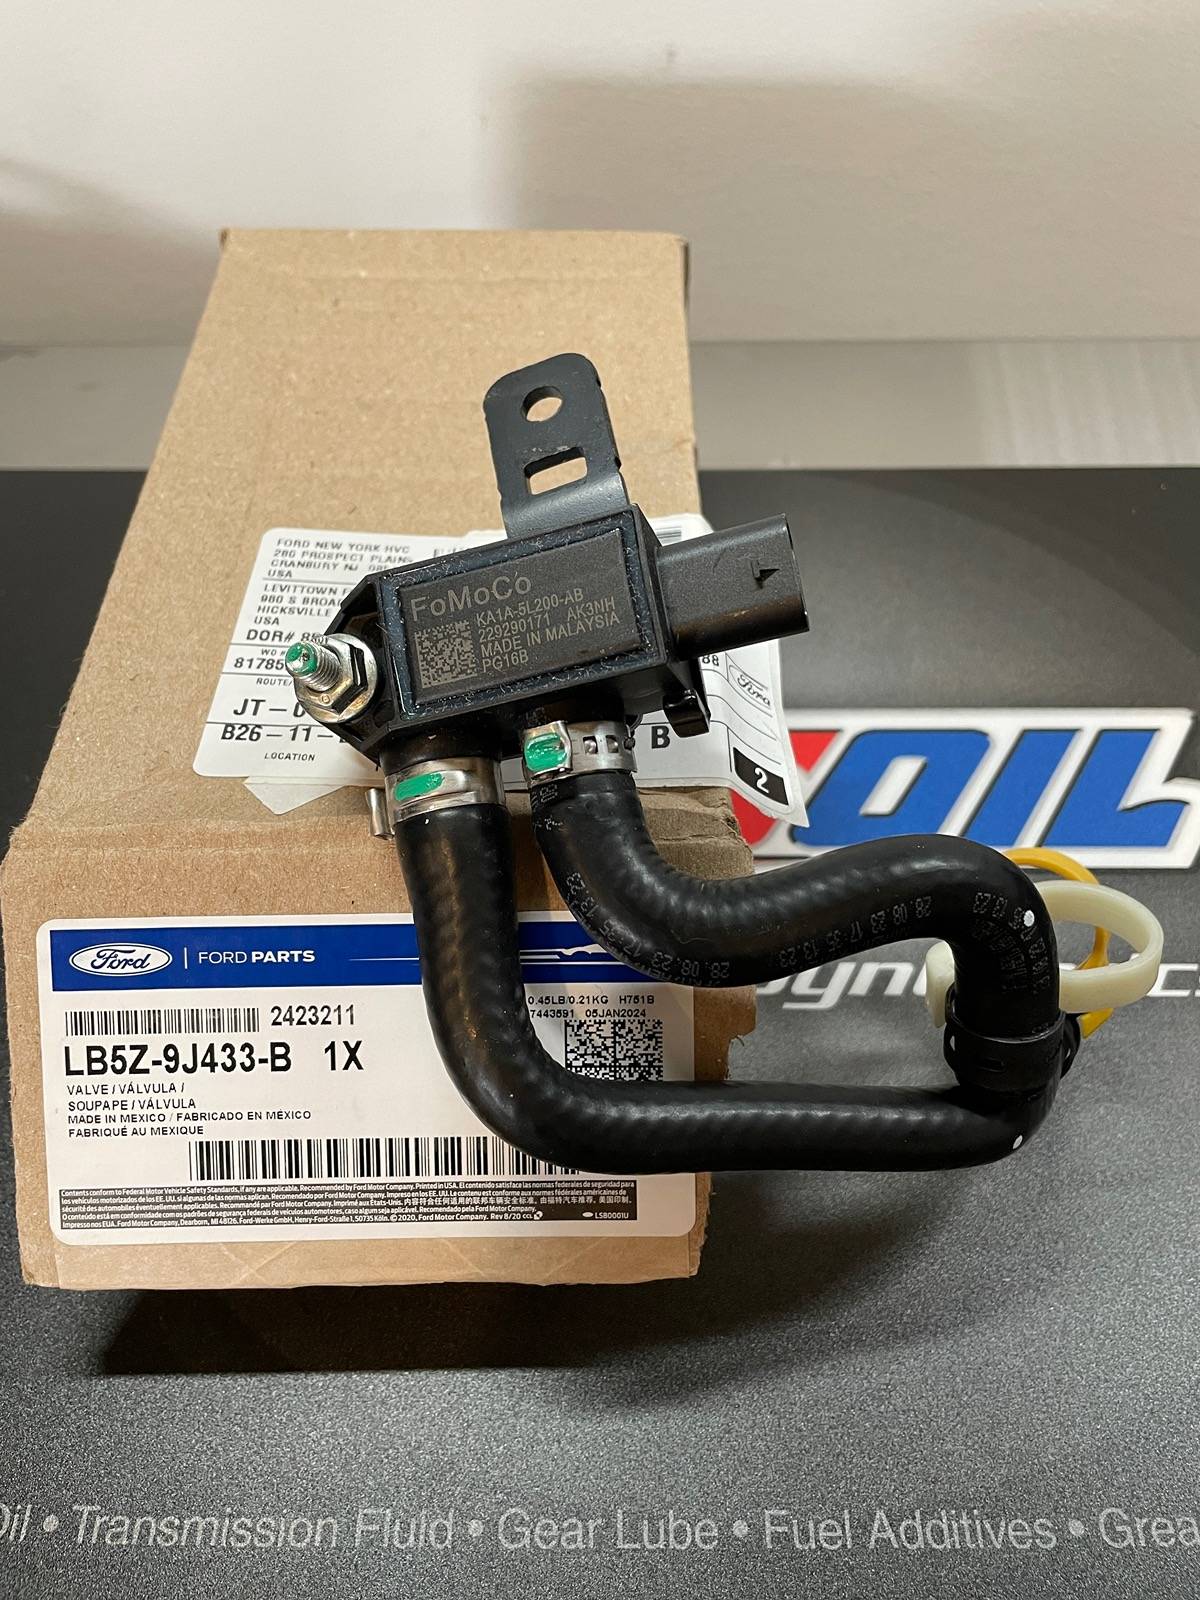
The Tube PN is: LB5Z-9E469-B, it appears it comes with the Gasket & O-ring.
No lifting anything over 5lbs? How on earth will you pee?Yep, total bill for "surgery only" was $81K. In and out the same day. Under for 1.5 hours.
This doesn't cover visits and PT that is coming up. I go back in 6 days to assess my status and remove the patch over my throat. Still in a neck brace for at least 6 weeks, then 3-6 months of minor movement allowed with PT. Fully healed in 9-12 months if all goes well.
I have to say that it is nice to feel my fingers again! If I had not had surgery I would have eventually lost function of my left arm, followed by my right one.
Surgical choices were fuse 3 vertebrae, or disc replacement in 2. Disc replacement offered the best opportunity to keep range of motion. Neither were fun. I now have a 2" bragging scar in my throat!
The last week has been rough, but you get used to it. Turn off the pain by simply ignoring it and focusing on something else. This has always worked for me. I am tired of sleeping upright with the neck brace on 24/7. No head movement, no lifting anything over 5lbs. This is my reality for the next few months.
It could be a lot worse. God let me stick around a while longer. And my dear wife dotes on me constantly. I am a lucky and blessed man!
He can sit down??No lifting anything over 5lbs? How on earth will you pee?
")
Must have put some Lubeguard on themOn Tuesday Doc informed me that the 5lb limit is now 10 and I can dump the neck brace (he used the phrase "slowly transition off over the next 10 days"), and that I could resume driving. So no need to squat!
I didn't have the heart to tell him that I drove to the appointment.... and as soon as I cleared the office door the neck brace came off and hasn't gone back on.
I'm still careful, but starting to live my life normally. Back in bed at night rather than a chair, and moving around almost normally. Best of all , the numbness and tingling in my arms and fingers is completely gone, as is the grinding when turning my head. And those 2 new discs are a silky smooth as butter. I think I got an upgrade!
Not sure if anyone knows but coming from a ME/QE in the electronics manufacturing field (me) it is always possible a bad lot of parts or a bad lot of internal parts in these sensors got installed on our trucks. We may never know for sure.Just replaced my DPFE/EGR sensor on my 2019 w/40k miles. I noticed a significant difference on how the truck shifts. Now my question is, the truck has shifted and performed since new as others have described before replacing this sensor (lugging etc), so now after replacement it feels totally different, why is this? Did Ford change or update something with the part itself since 2019?
Great write up! Bookmarked it as I’ll be doing this with the next few days. Ordered the part from Benny and crew yesterday.Greetings All,
Dropping another one of my write-ups on the infamous bucking/surging epidemic our Rangers seem to have.
Check out the "Bucking/Surging Epidemic" thread started by @Tim Vogt Sr. for every piece of information you could want.
https://www.ranger5g.com/forum/threads/bucking-surging-epidemic.14581/
There are two ways to do this job, simply the replacing the DPFE Sensor itself (Ford KA1Z-5L200-A or KA1A-5L200-AB) or the entire assembly (Ford LB5Z-9J433-B). This write-up is geared towards replacing the entire assembly.
My symptoms were prevalent in the low RPM and low speed range. I drive like a peepaw and slowly pulling out of my driveway I would get a "misfire" feeling but no check engine light. I did my plugs last week so an actual misfire would be highly unlikely so my next step was the DPFE sensor. The transmission would search for gears at low RPMs and sometimes it would feel like driving a manual in too high of a gear through my neighborhood.
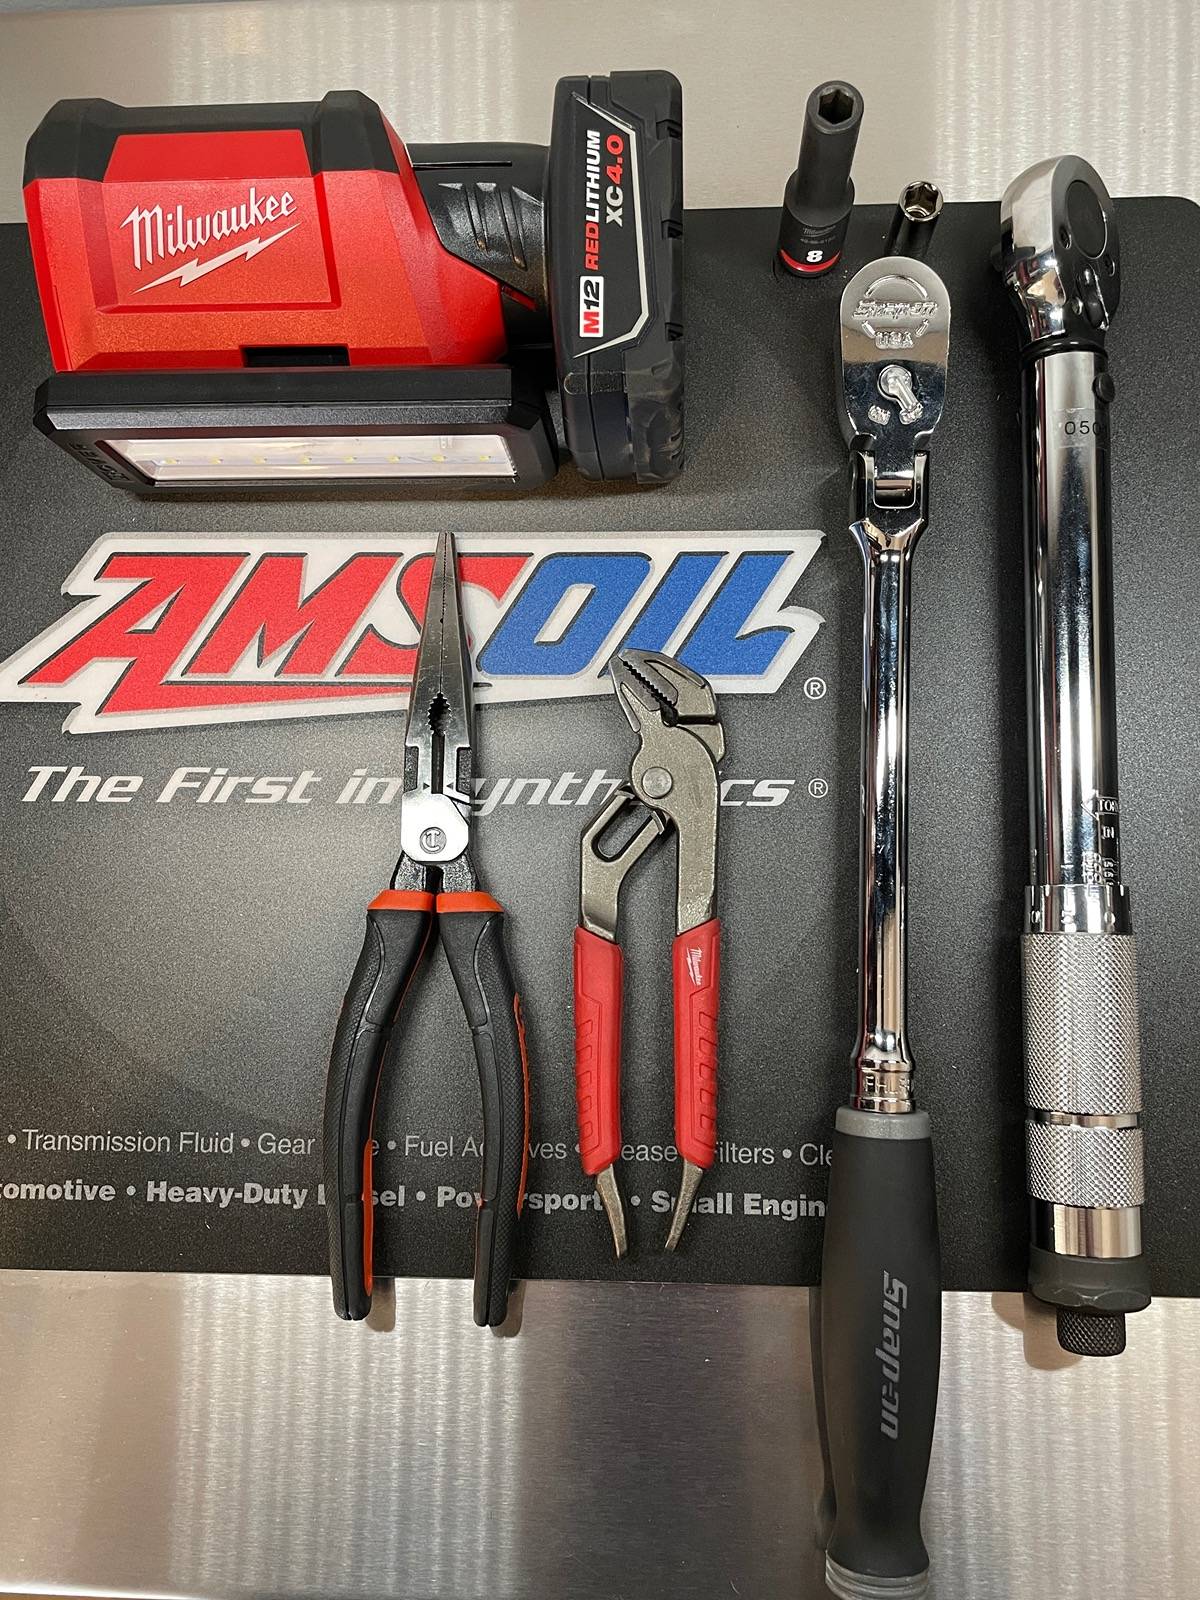
Supplies Needed :
-DPFE Sensor Assembly (Ford LB5Z-9J433-B) ($97 on @LevittownFordParts.com)
-3/8" or 1/4" Ratchet
-8mm shallow and deep sockets
-1.5" extension (if desired)
-Torque Wrench set to 97 in.lbs
-Needle Nose Pliers
-Straight-Jaw Pliers (I used my Milwaukee 6" 48-22-6306 pliers)
-LIGHT (Headlamp, Milwaukee Rover, etc)
-Work Platform or Step Ladder

Step One :
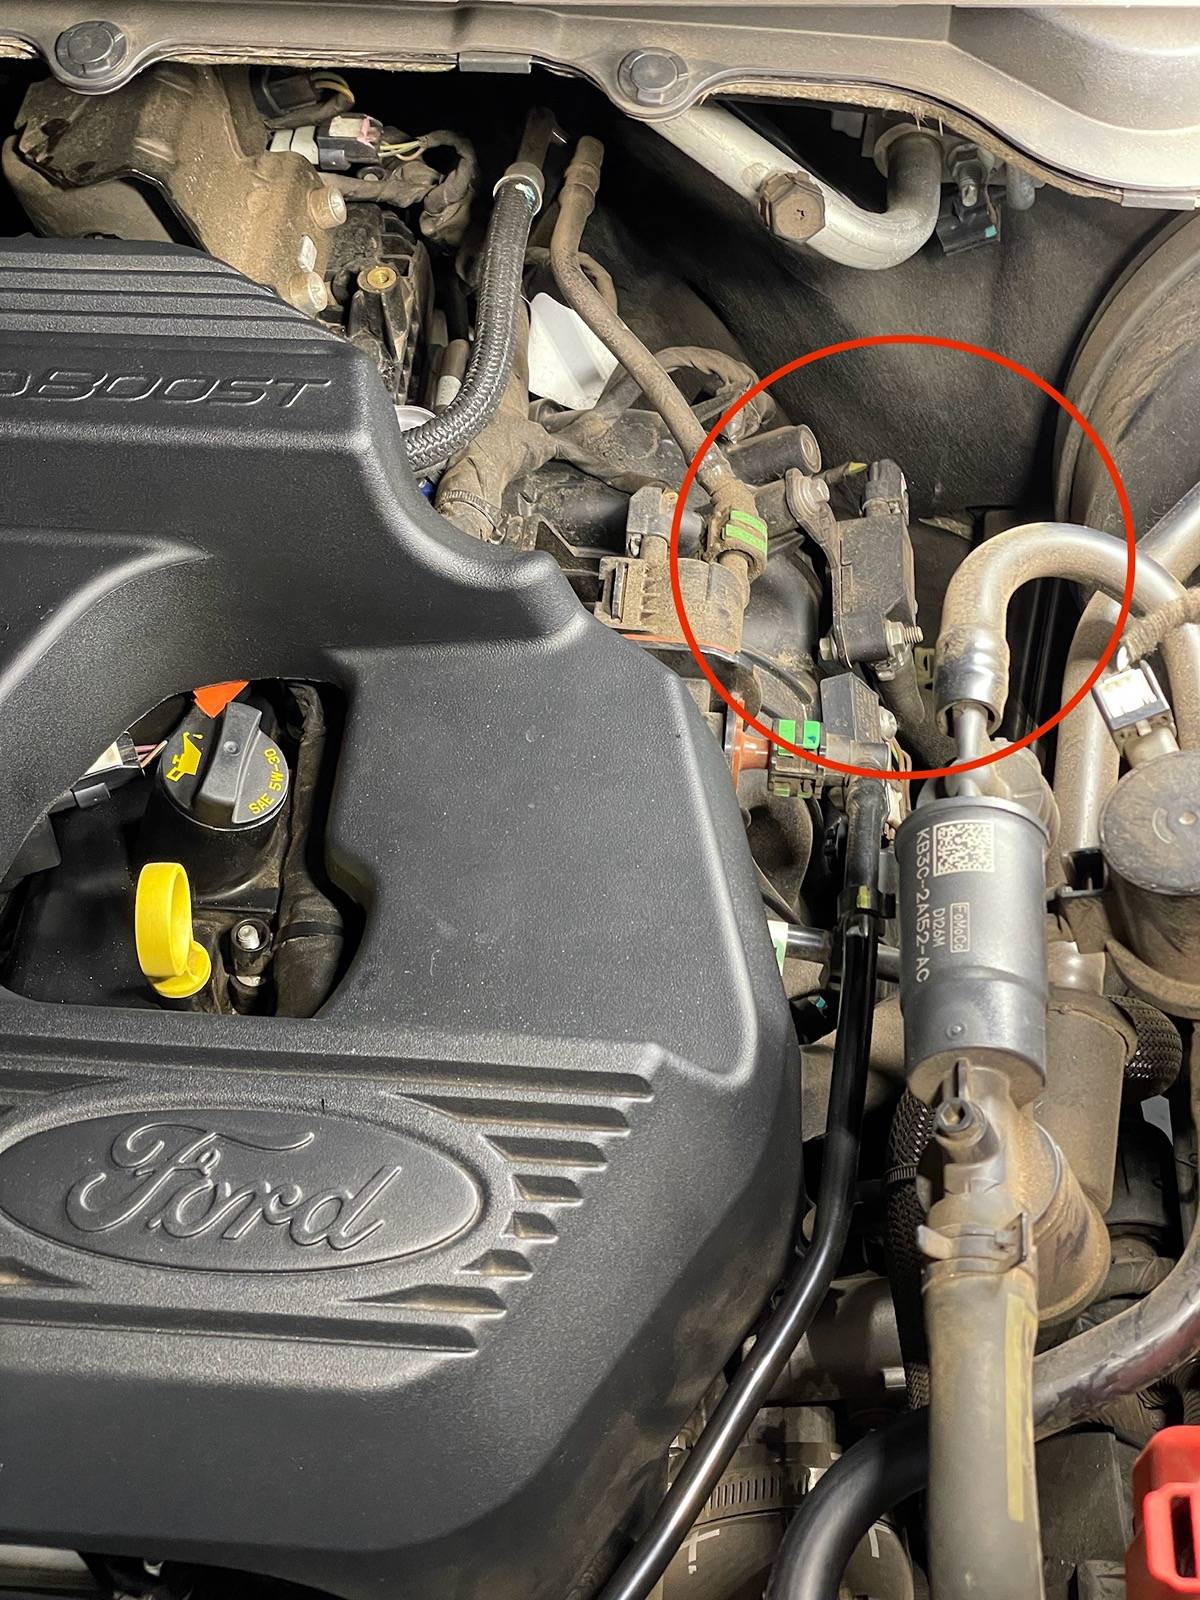
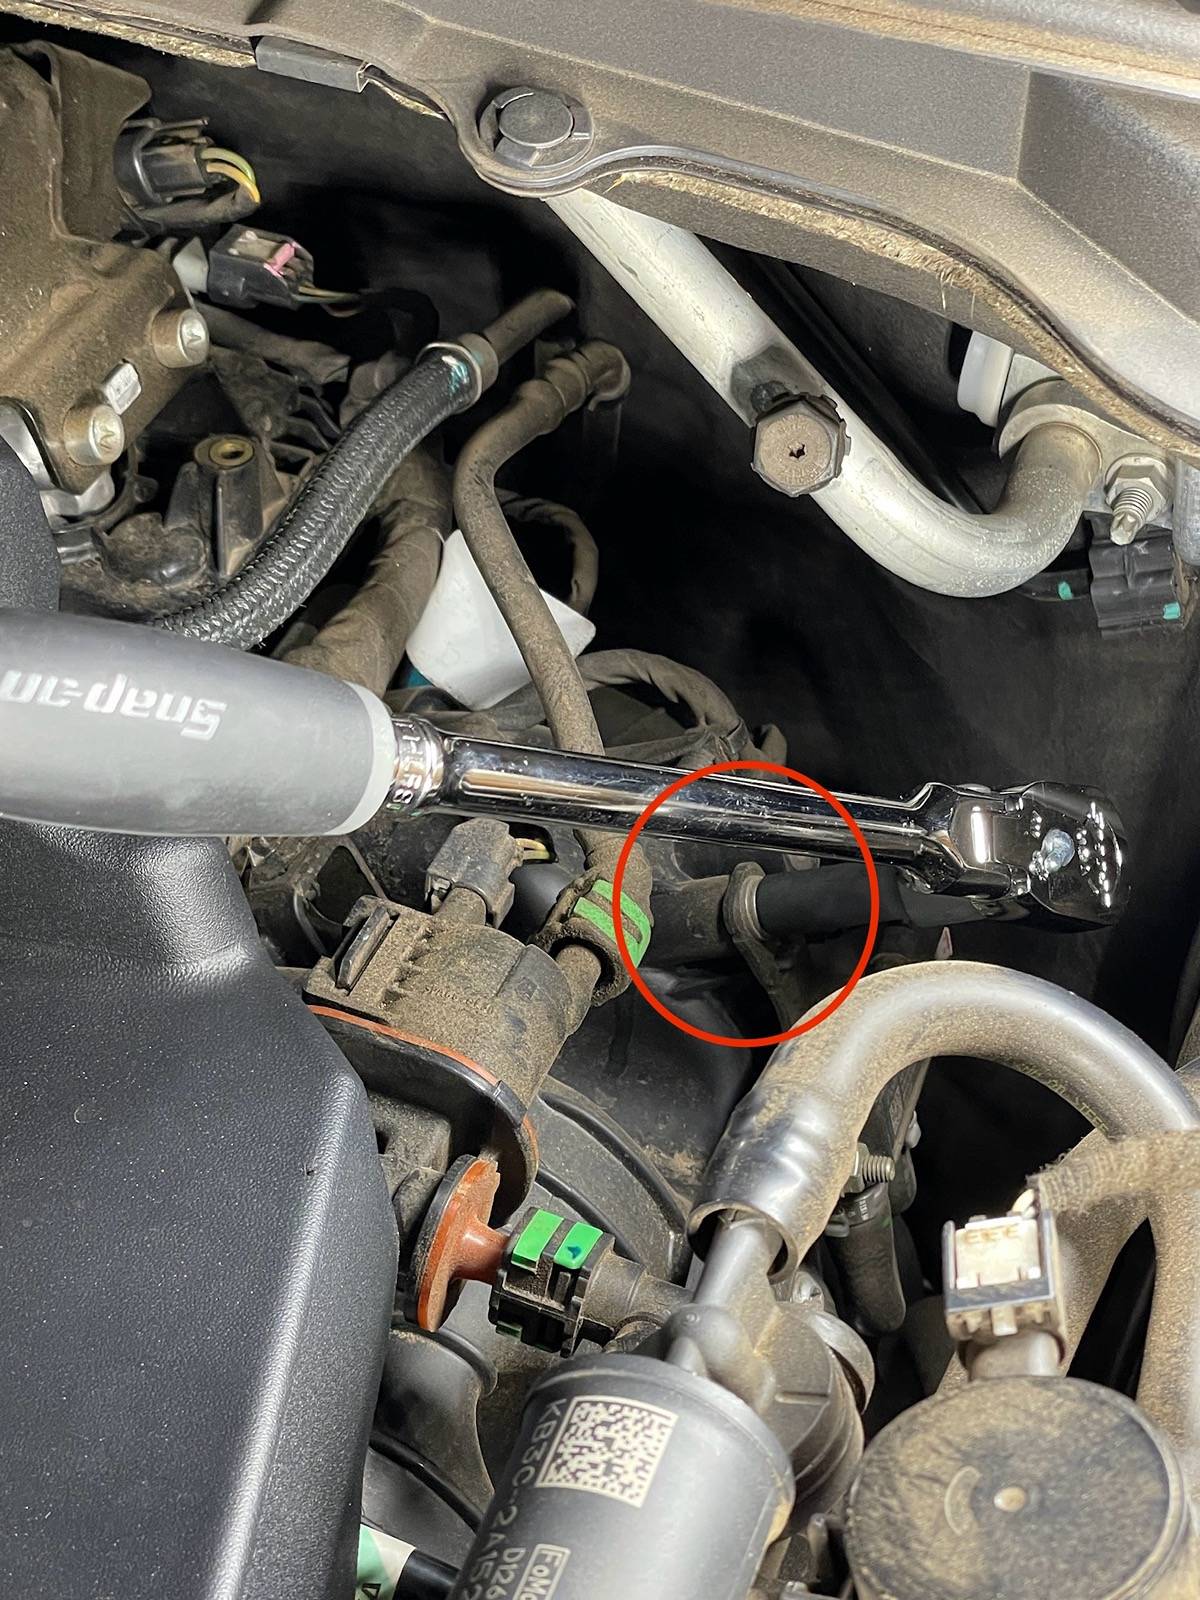
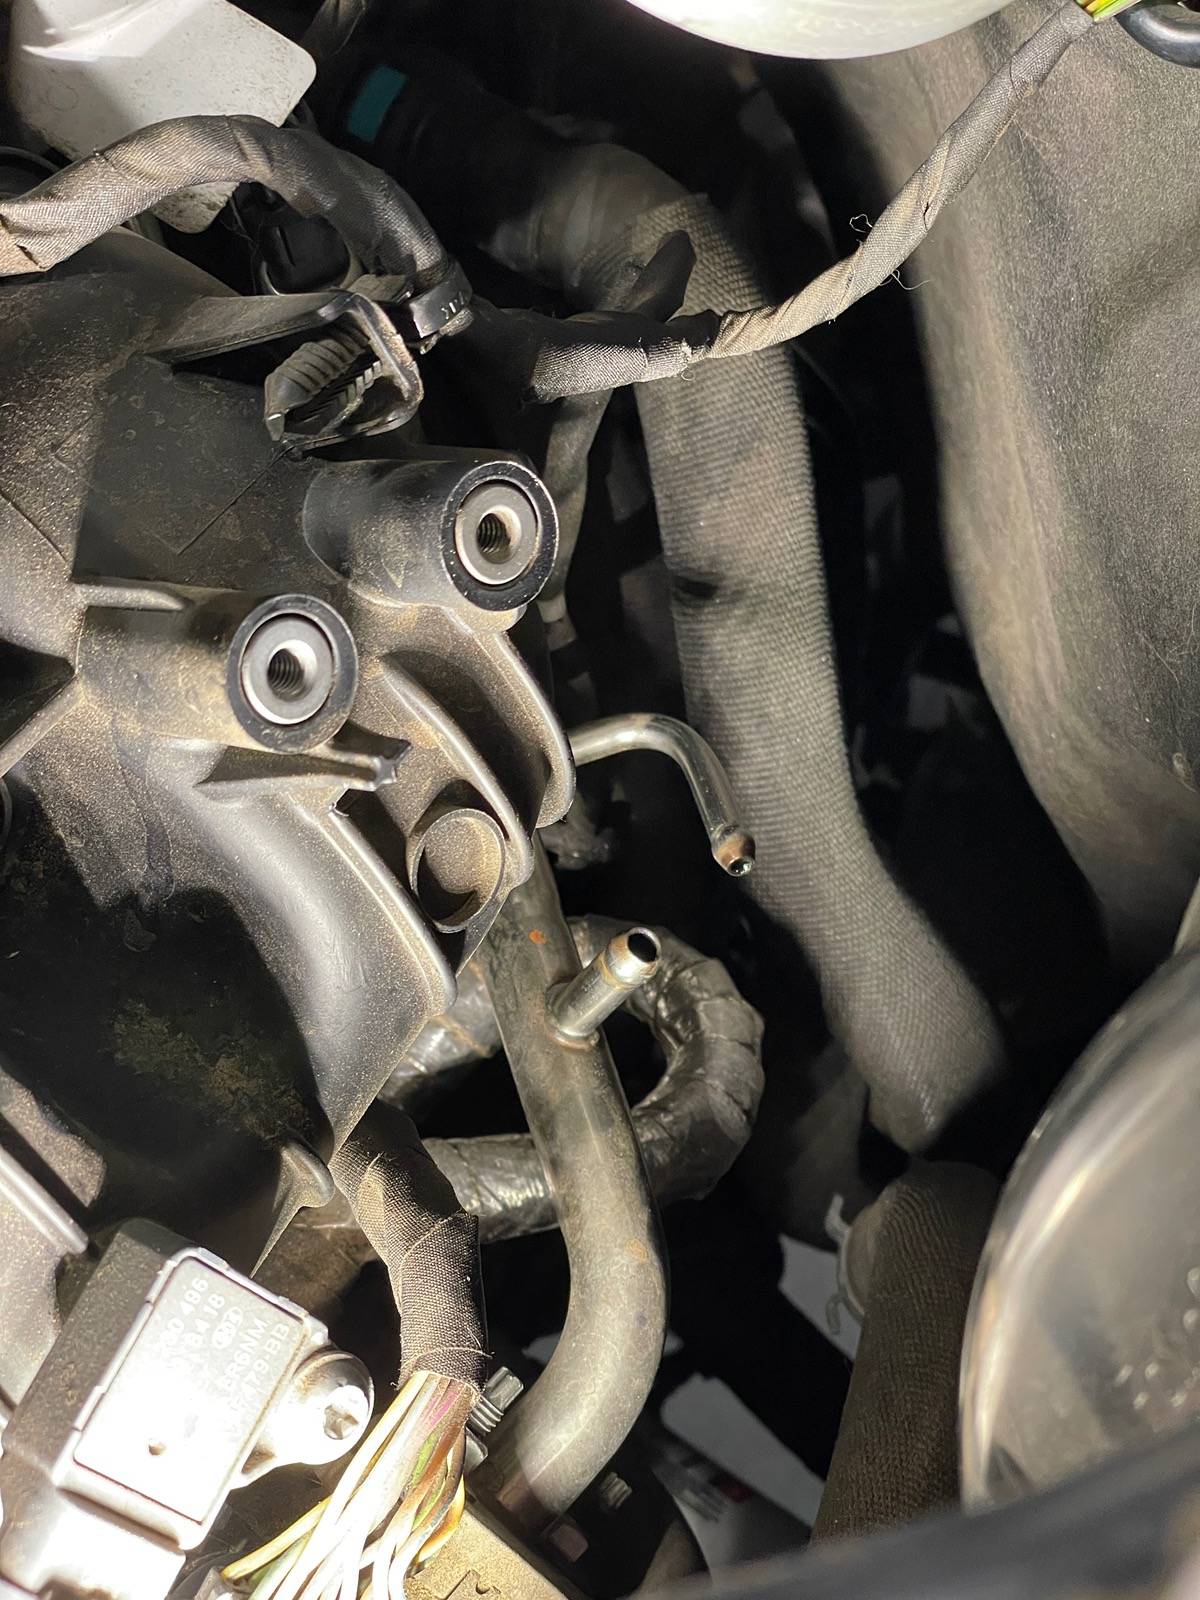
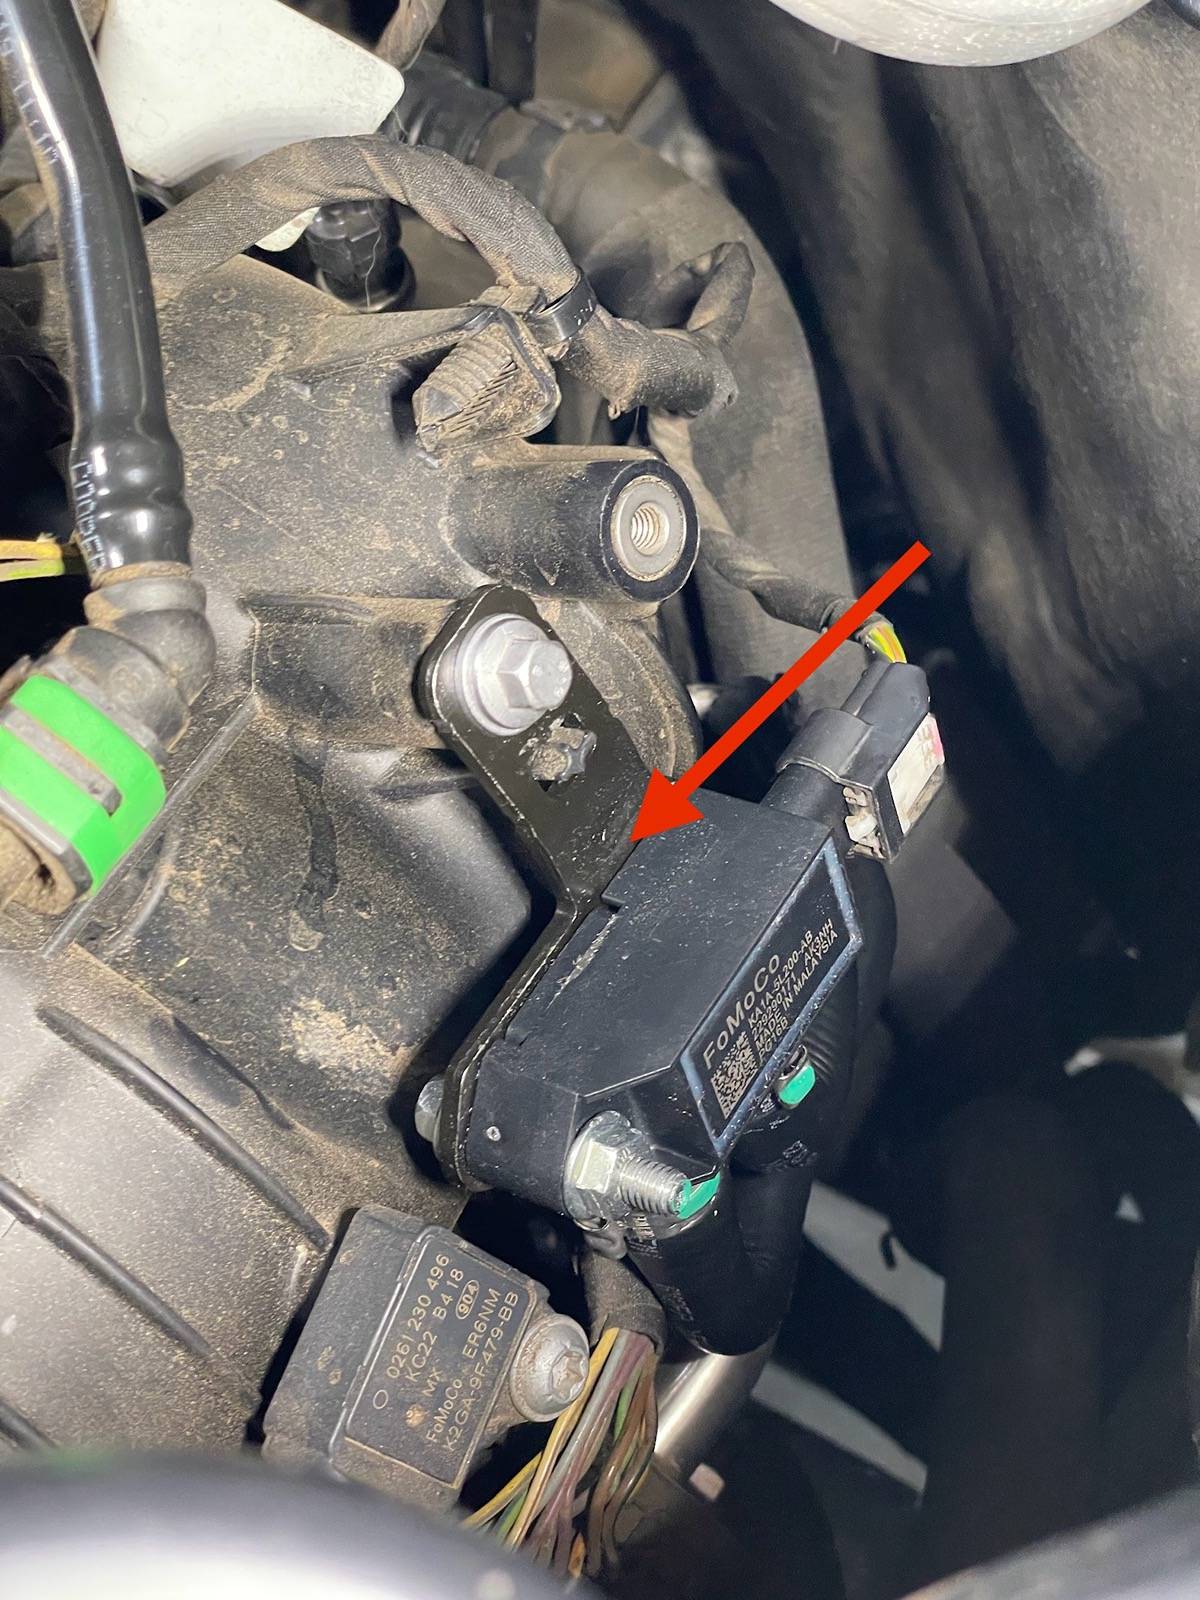
Pop the hood and locate the DPFE sensor. It is located near the back side of the engine on the driver's side of your Ranger near the brake booster.
STEP TWO : (*You could swap this with Step Three if desired)
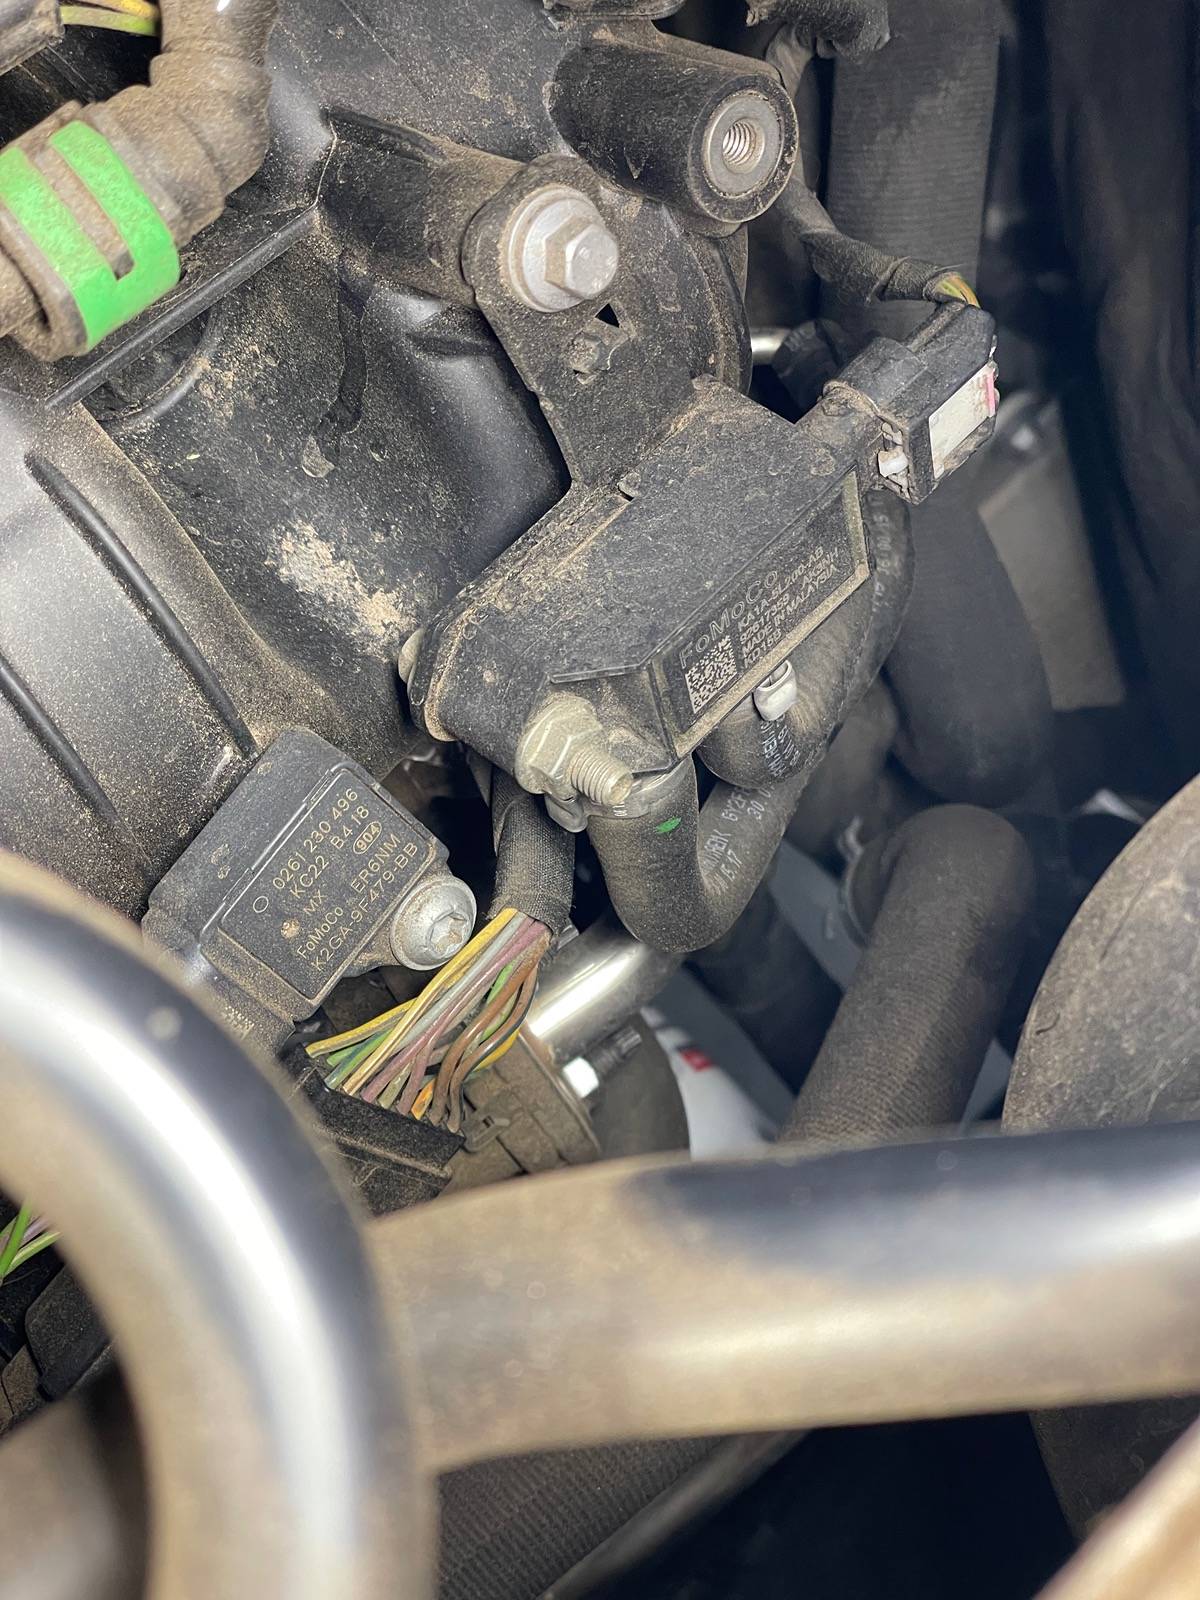
Use your Ratchet and 8mm socket to loosen the single mounting bolt on the top. A deep socket is perfect for this without the brake booster being in the way.
Once you loosen the 8mm bolt, you can easily unthread it all the way using your fingertips to reduce the chances of dropping a socket or the bolt in to the engine bay.
*NOTE there is a washer with the 8mm bolt so be sure to not drop it.
STEP THREE : (*You could swap this with Step Two if desired)
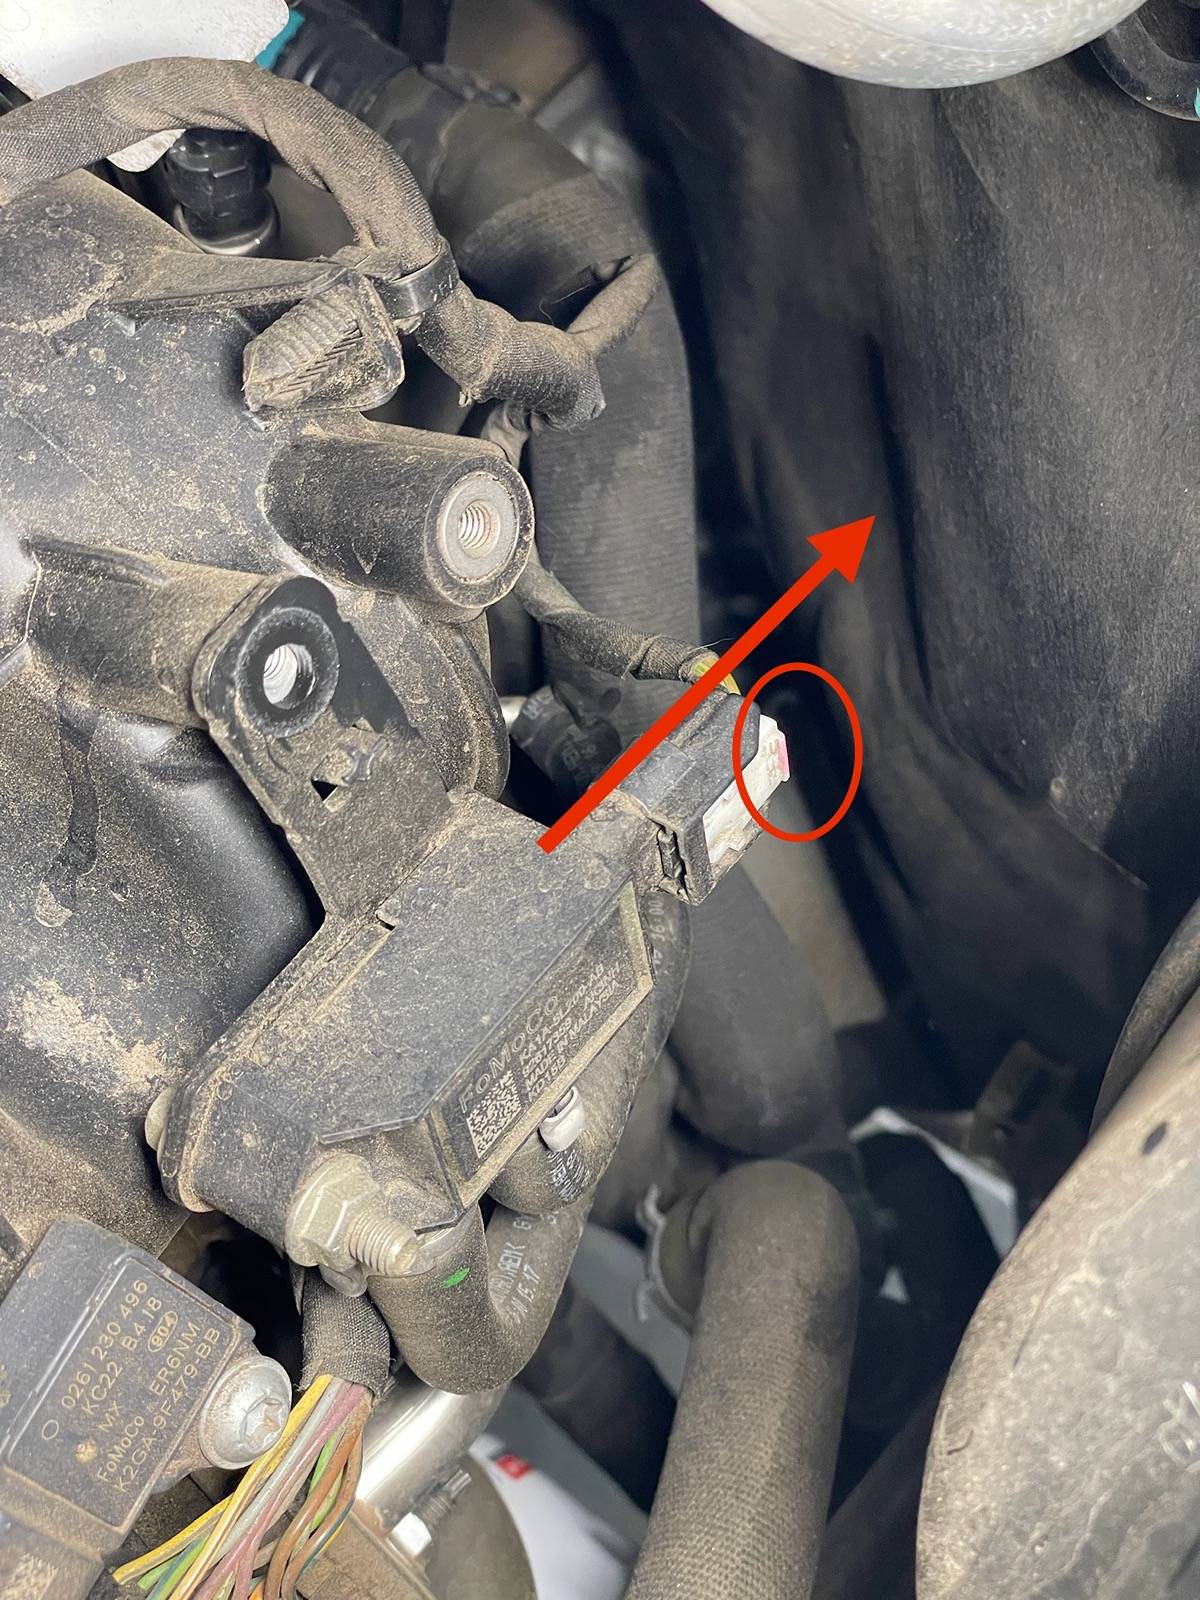
Remove the connector from the DPFE sensor. If you read my Spark Plug write up, the connector works just like the coil pack connectors. Use your fingernail to slide the locking tab out (circled) and wiggle the connector off.
You can hang the connector out of the way on the metal line in the top right of the photo below to prevent damage.
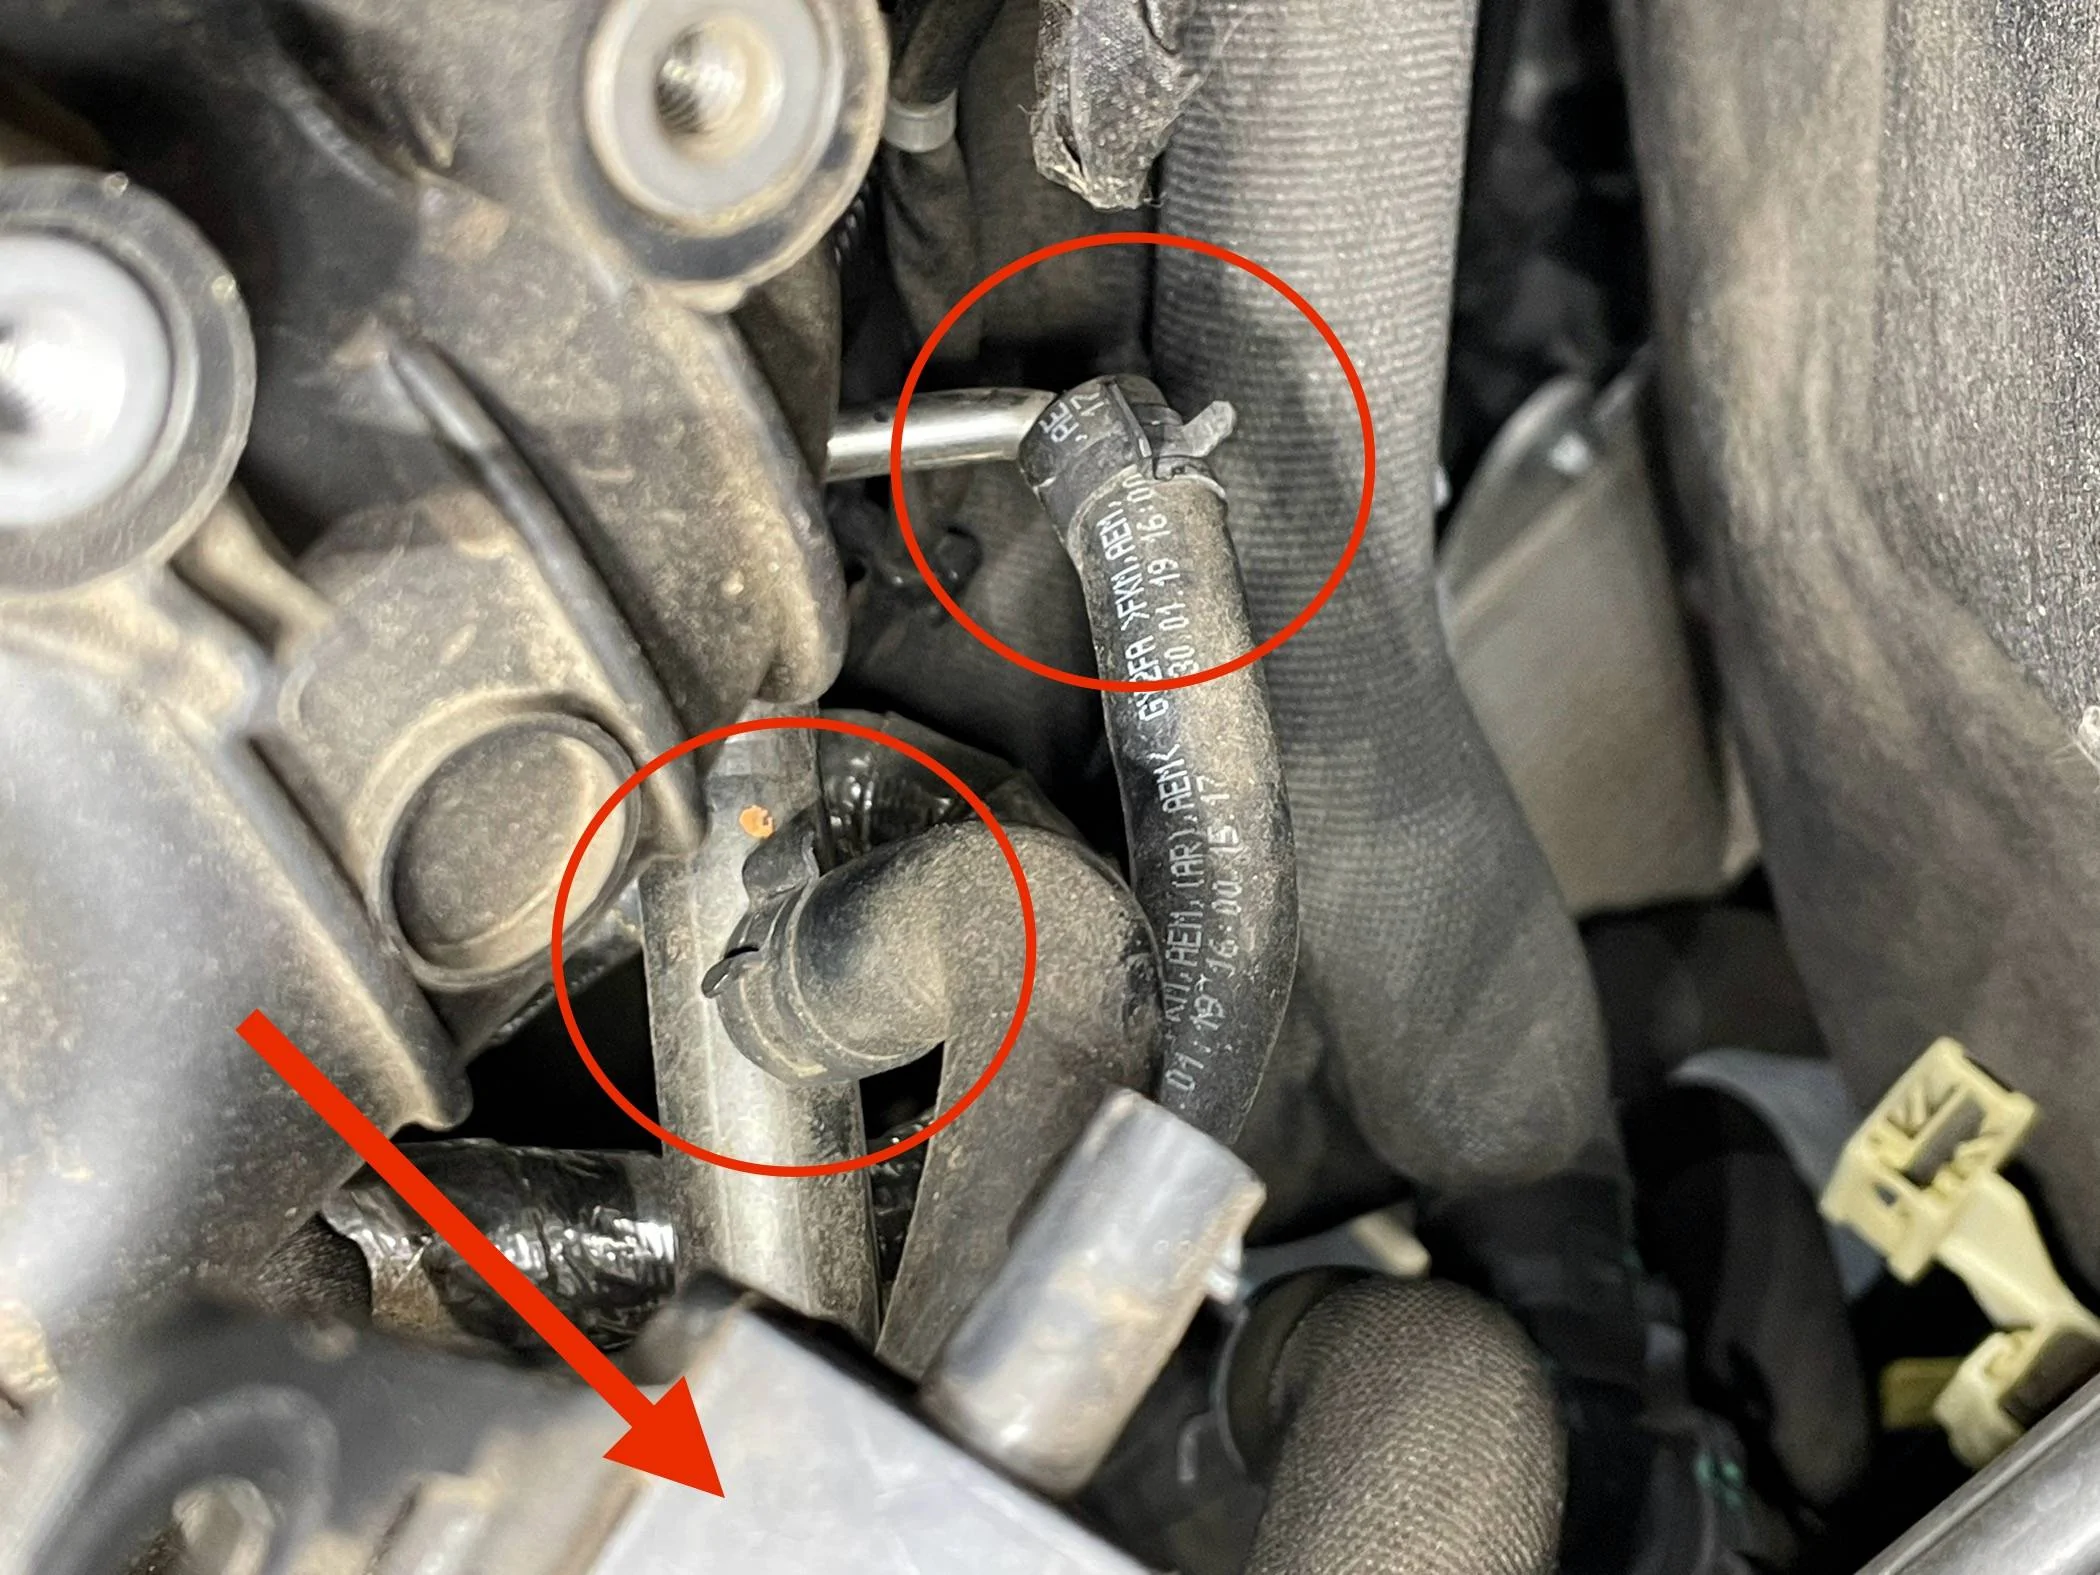
STEP FOUR :
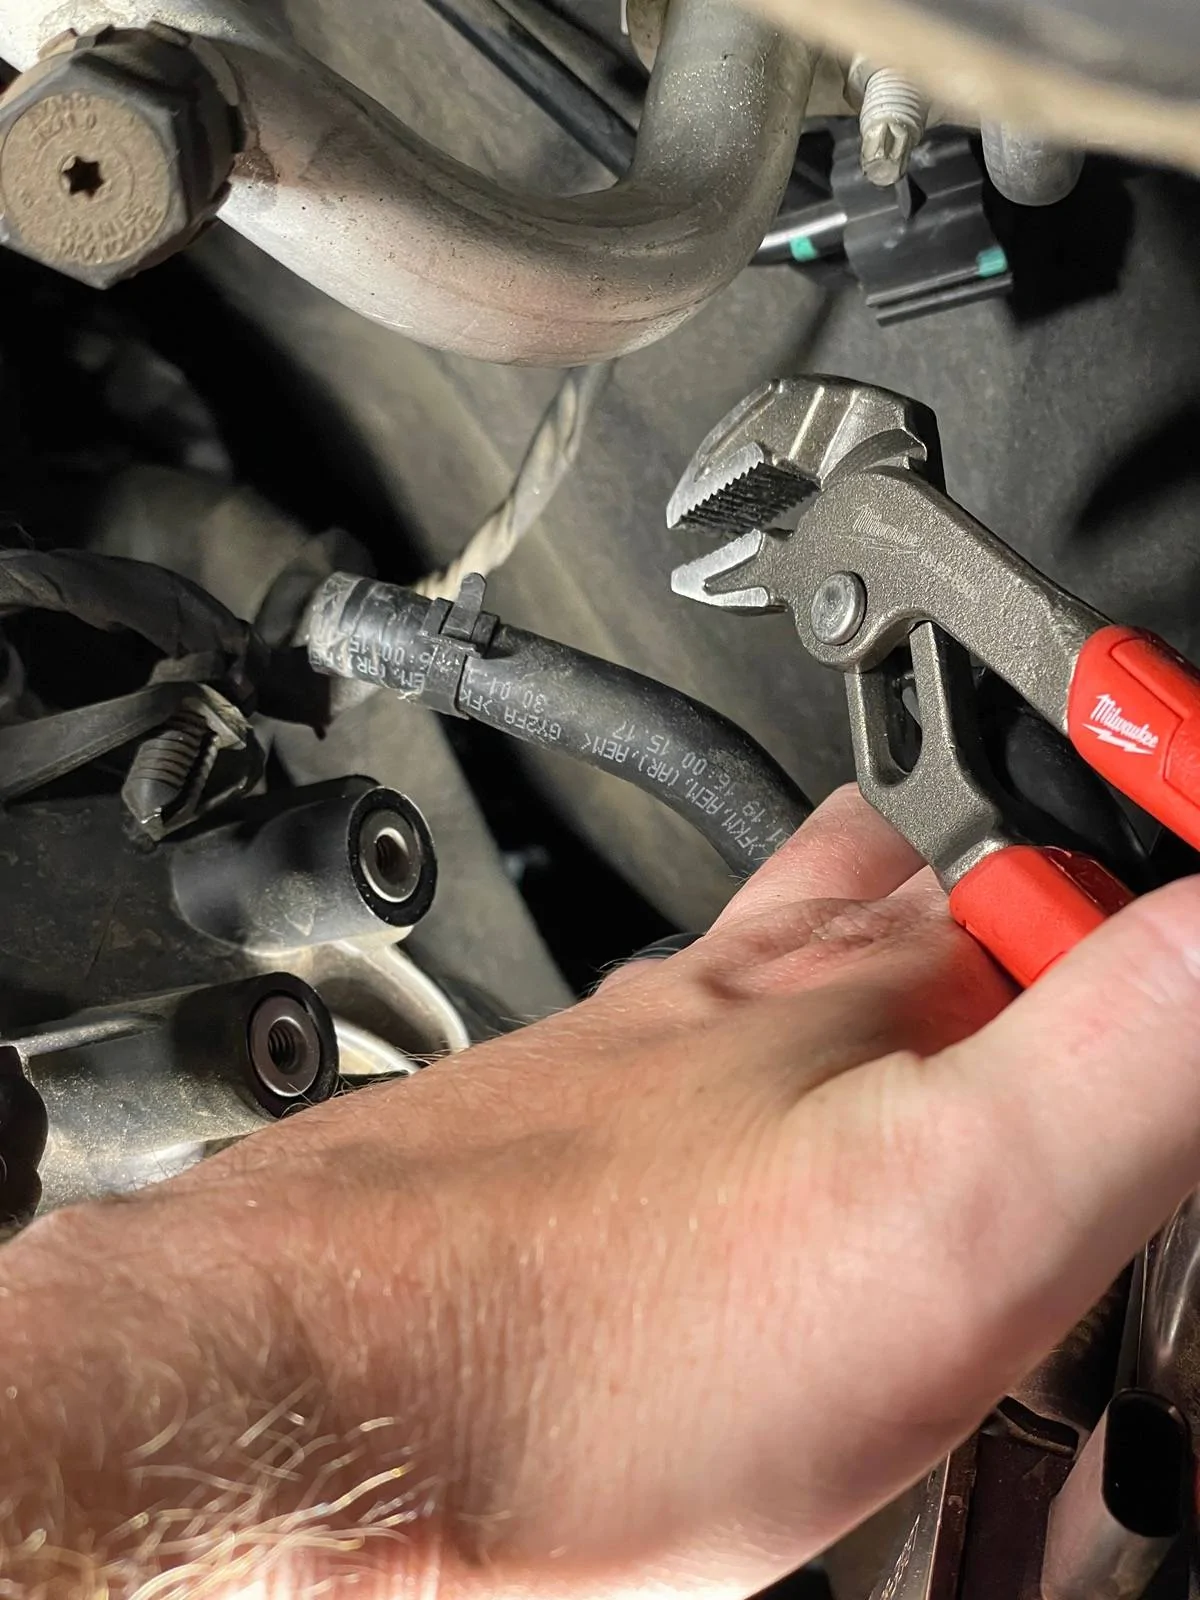
With the DPFE sensor unbolted and unplugged you can pull it out of the way to give you room to access the spring clamps on the hoses. This is where having a light is necessary. Take note of how the spring clamps are oriented. Mine were both facing relatively face-up. Removing the clamps is the most difficult part of the job so just stay calm and take it slow. I started with the shorter hose first to give me more leverage on the longer hose.

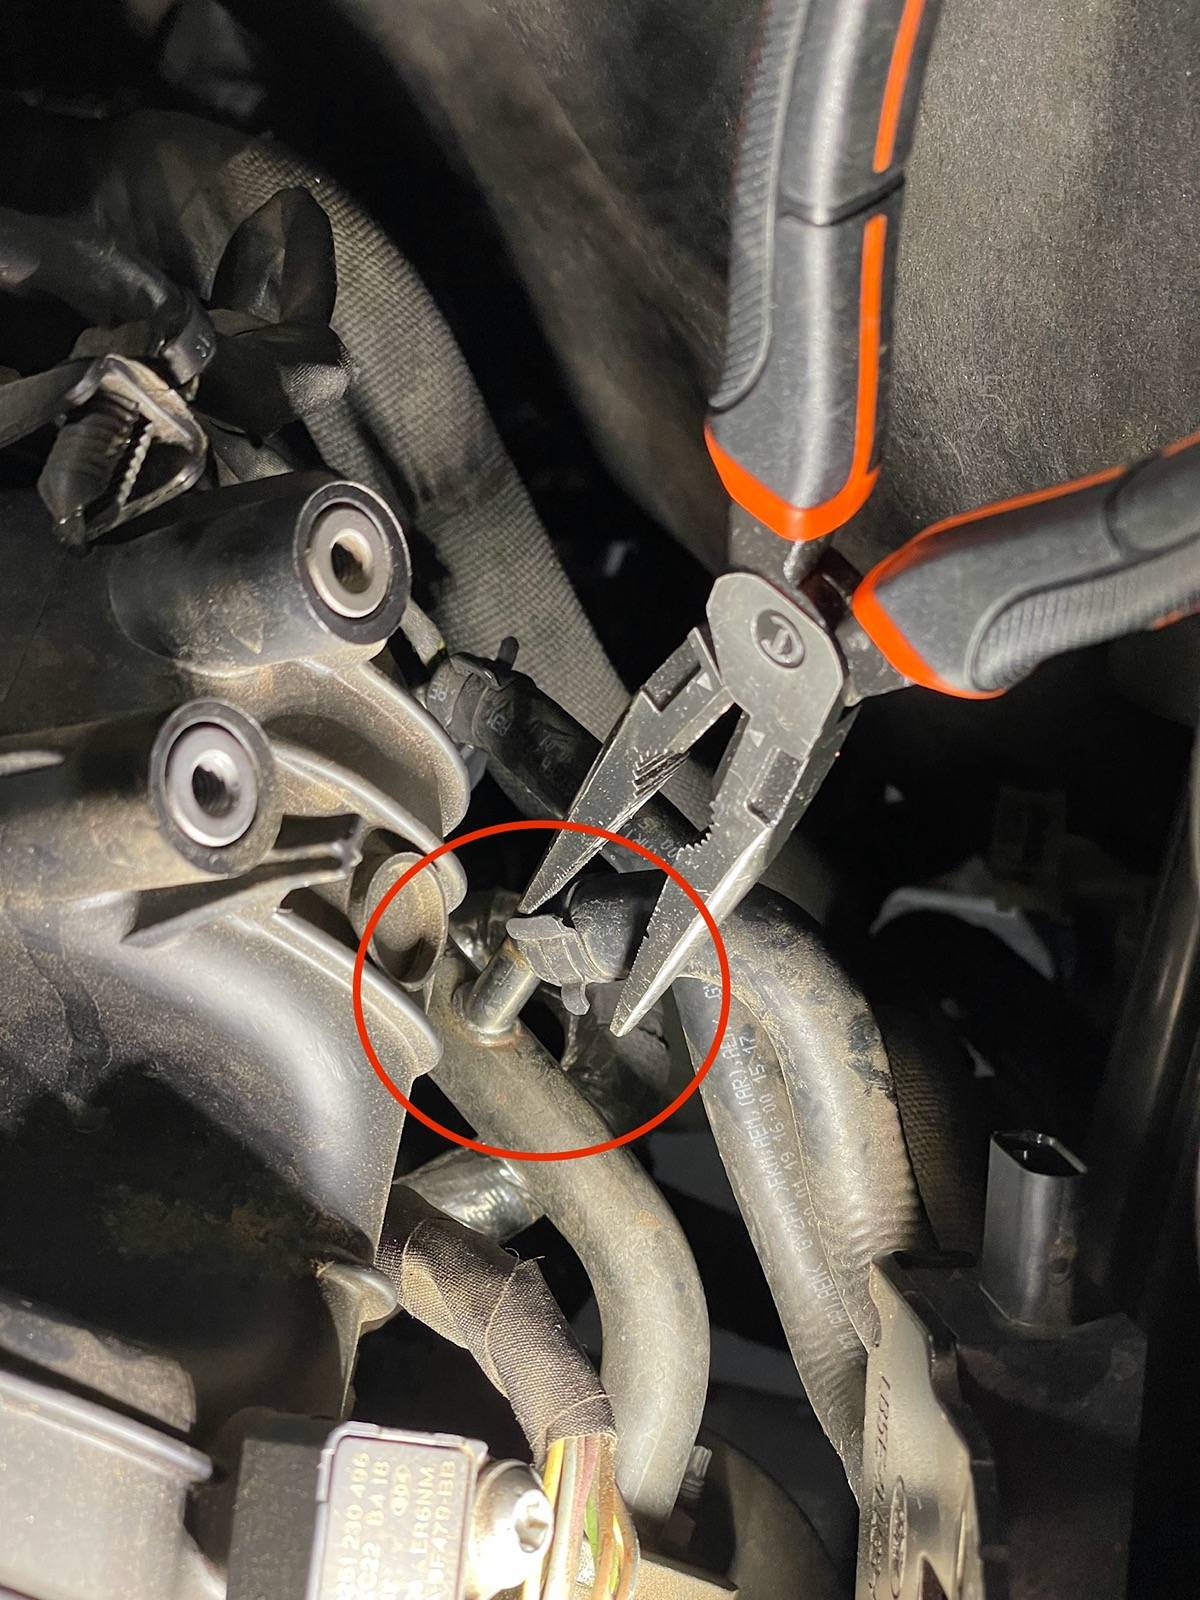
STEP FIVE :
Start with the smaller hose (closest to you) and go straight down with a pair of needle nose pliers (longer ones seemed to work better). When I pinched the spring clamp and pulled up the hose came right off. I did not have to fight it at all. Once the hose is off you can also place it to the side or out of the way to give you the most access to the long hose.
STEP SIX :
Remove the spring clamp on the longer hose (furthest from you). What worked for me was compressing the spring clamp, pliers in my right hand and pulling the hose horizontally to the right with my left hand. The DPFE sensor is now fully removed.
STEP SEVEN :
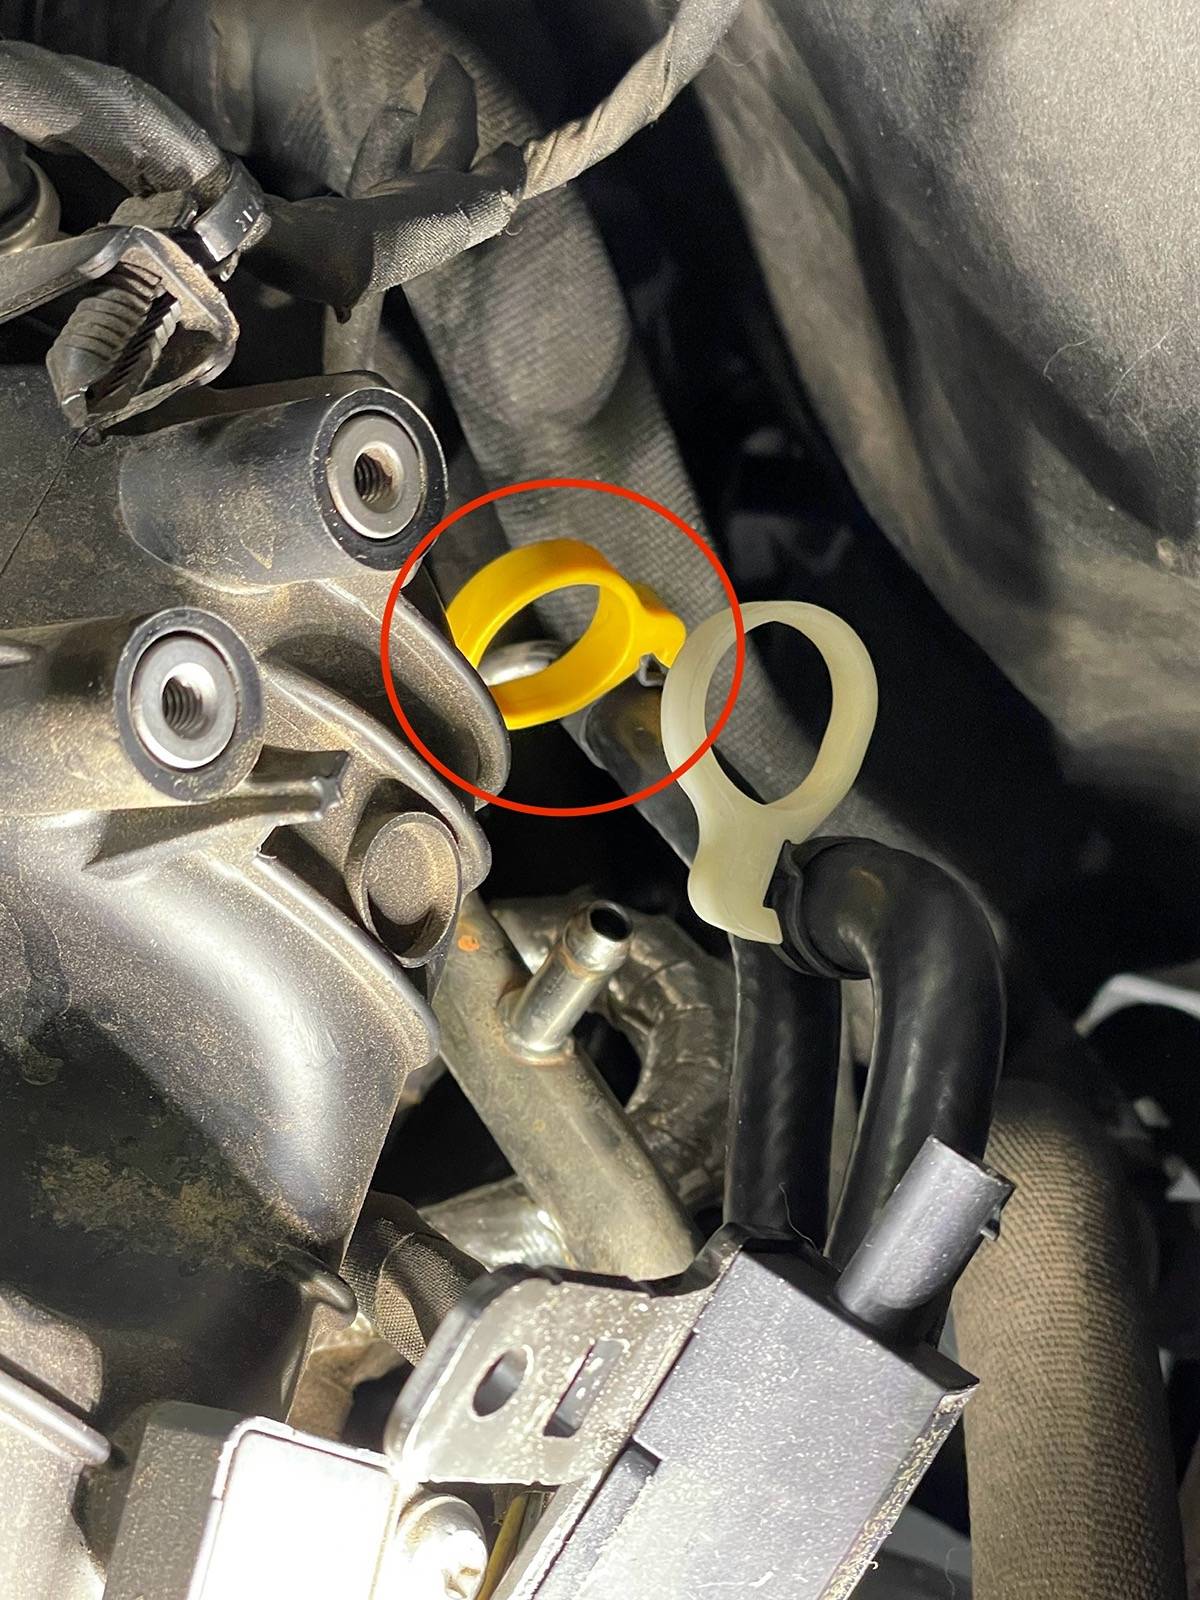
Reverse what you just did in Steps FIVE & SIX and take the new DPFE sensor and slide the long hose(Furthest from you) (yellow clip) on first and the short hose (closest to you) (white clip) on next.
Align the spring clamps facing upward as much as possible to make the job easier the next time you have to potentially perform it.
When the hoses are pushed on as far as possible twist the yellow and white clips clockwise to remove and engage the spring clamps.
STEP EIGHT :
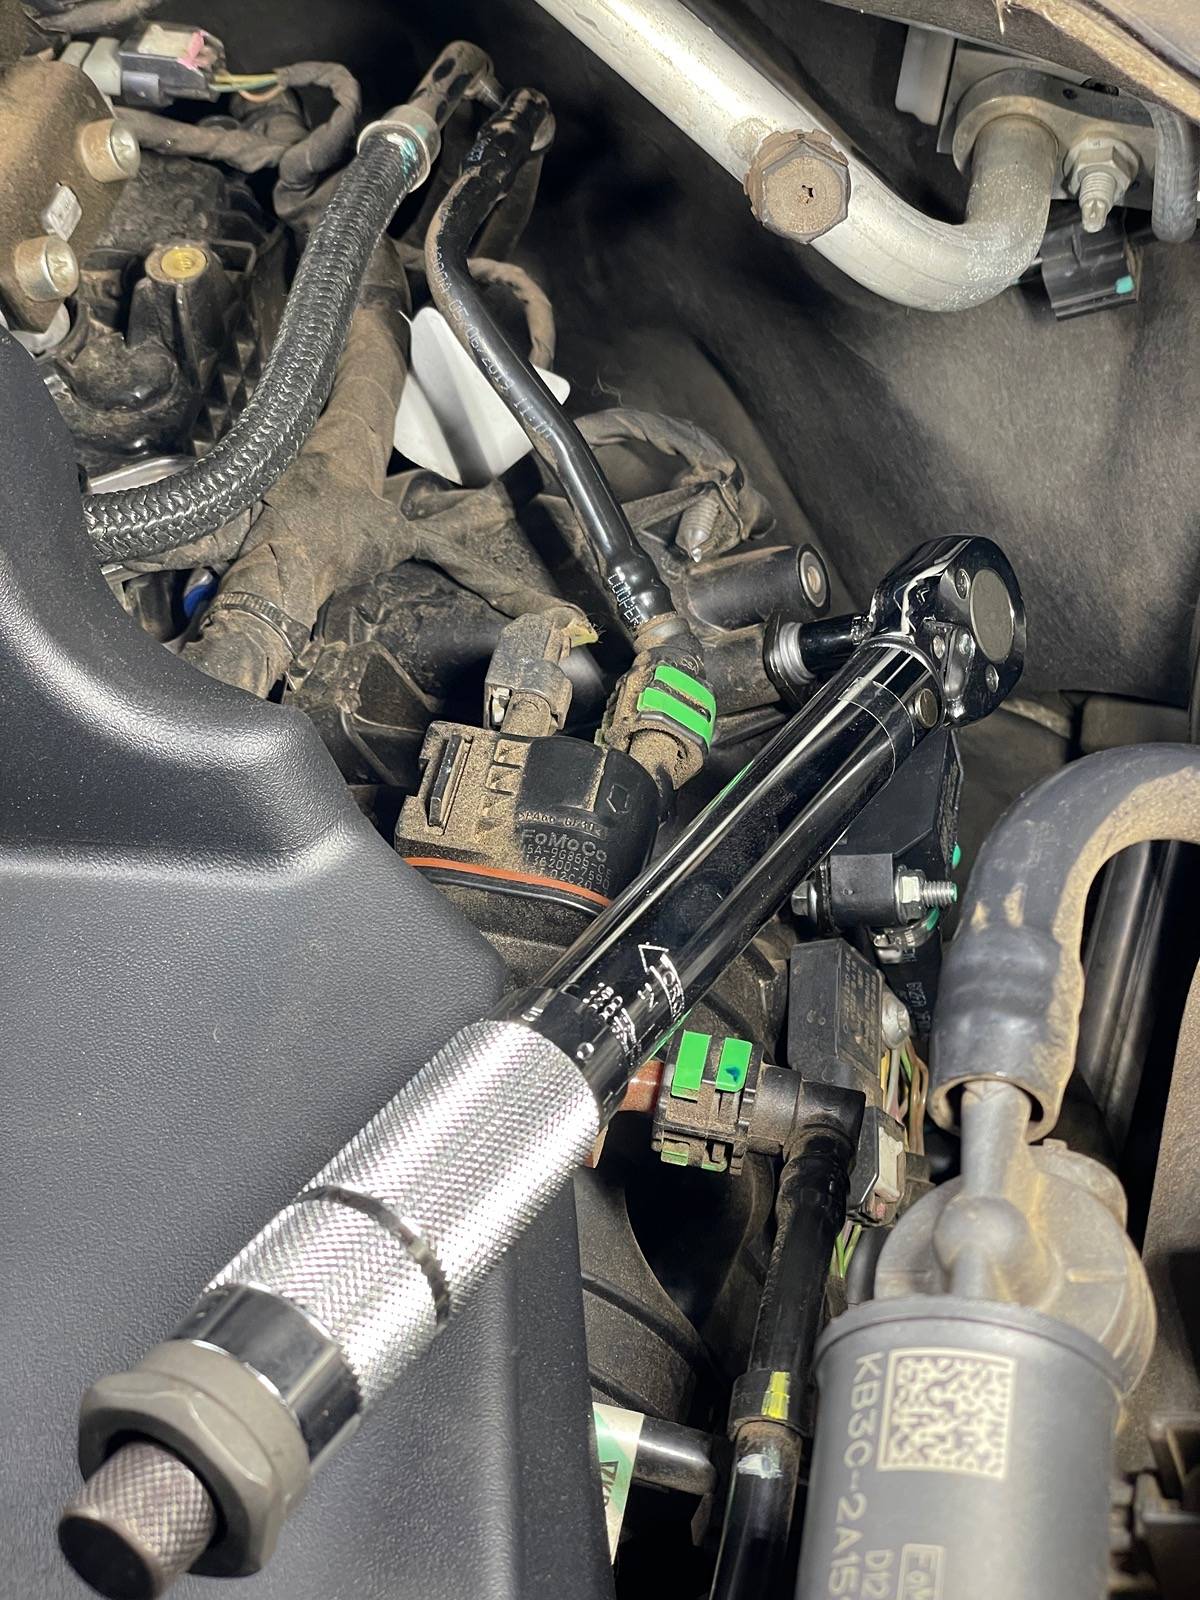
Re-mount your new DPFE sensor using the guide pin and hand thread the 8mm bolt until snug to prevent cross threading. Take your torque wrench set to 97 in.lbs and torque the 8mm bolt. (It takes no effort at all and should click in a second or two)
STEP NINE :
Reconnect the DPFE connector. Slide the connector on until you hear a "click" and use your finger to engage the white locking tab by pushing it from the back towards you.
Crank your Ranger to see if a check engine light or any error message appears. Take a test drive around the neighborhood to see if there is an improvement in the surging/bucking in a low gear. I noticed an instant improvement on my Ranger and it drives like a brand new truck. Time will tell how long the replacement lasts.
That's it! Grab a cold one and enjoy a job well done!
Yet again it took me longer to write this write-up / take pictures than the actual job did. I would say it is a 30 - 45 minute job as long as you do not lose a socket or bolt in the engine bay.
I don't know if Ford makes engineering changes public. But since having this truck from new, I was quite surprised at the change. To be clear, how the truck performing before was not terrible, I just figured that was the nature of the beast, so to say.Not sure if anyone knows but coming from a ME/QE in the electronics manufacturing field (me) it is always possible a bad lot of parts or a bad lot of internal parts in these sensors got installed on our trucks. We may never know for sure.
The markings are the same minus Date Code/Lot Code on my old and new sensor. COO is the same.
 Ok ok!!!! Maybe it doesn't sound quite like that. Alright already! Jeez some people. Whatever. But I'm telling you that the Singer sowing machine is back to running perfectly.