Sponsored

Aftermarket Headlights - Wiring & Issues (Group Help)

jdjeff

Well-Known Member
First Name
Jeff
Joined
May 20, 2021
Threads
9
Messages
65
Reaction score
25
Location
Southeast PA
Vehicle(s)
2021 Ford Ranger XLT
In your above findings and scenarios, the bottom line is the (Start-Up) relays are being forced out of sequence and its due to the BCM and (2) separate power sources from the BCM
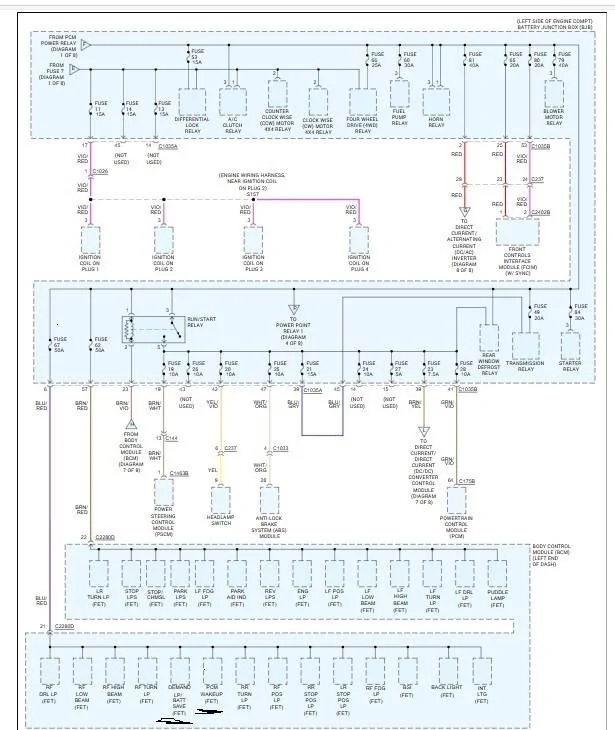
Fuse #62 - Powers all LH Lighting
Fuse #67 - Powers all RH Lighting

Fuse #67 - incorporates the BCM (PCM-Wake & On-Demand Batt Save) circuits
With the (Switch-In Off) and a factory wiring setup there should be no power on the headlights, but since there is tapped power the RH side is getting powered and since the Full Ignition start has not been completed, power output to the (Headlight-Switch-ALL Circuits) has not been established (The Bat Save feature is still holding on the LH side of the lighting) as it is looking for (ISP-R) Ignition Switch Position - Run - via the Can Bus Data. (Inside the BCM)

The above is part of the problem

The bottom line is - The Tapped power source is not playing nice with the BCM, and it throws the Start-Up sequence out of sync in certain scenarios - (Meaning the Headlight) Relays that receive that power (input) to get the sequence started.

The second part of the problem is that the intended startup sequence is set to command a triggered sequence on the headlights at all times when power is introduced- works flawlessly until the BCM already has them commanded on.

I strongly feel that if we could move that programmed trigger from the DRL to strictly (ONLY) when the headlights are commanded on will cure the start-up sequence issues but if you were to hit a long tunnel while driving (The Headlights would go through the startup sequence) before coming on.
It's a simple matter of rewiring the headlight and the power input trigger on the module for it to work.
1. Problem - This will VOID the warranty on the headlights
2. Doable but need to have light on a bench and opened up to determine what wire needs repined.

Or
Make the Forscan changes I have highlighted and Wie-Tap pin #6, this comes with drawbacks though, Opposite the disconnect of the DRL Harness, the DRL will be forced to always Bight and if you do not want the (Door Lock - Door Ajar) feedback to trigger the startup sequence then you will also have to add the (Police/Dark Car) mode and have it enabled as well.

So, we have found a few options for the Morimoto's, and it depends on what do you want to gain or lose. What option serves yours needs best?

one other option would be - Locate the wire that feeds the startup module and simply De-Pin it.
Wire-Tap Pin#6 power and set up Forscan as if these were Lariat LED assemblies
Make any changes you want - (+ Park Lights or +Foglight's) and they will function normally just without the fancy startup sequence. The DRL (Bright) will power just like the Factory LEDs operate.

By De-Pinning you are not Voiding the warranty as you are not damaging any wiring, just simply Re-Pin it back before sending them off for any warranty claim.

So, if we take what @Big Blue has done and dive a bit deeper into the headlight, we can eliminate the startup sequence (The BIG ISSUE HERE) but still have a functioning (Bright-DRL) light output.

But in order to do it, I would need to get one opened up and decipher which wire needs (De-Pinned) to eliminate the sequence or (Moved) to keep the sequence but trigger with a different input (Most Likely) the Headlight Power itself.
TBH - I vote for eliminating the sequence altogether at this point unless I can get it to work properly with only a headlight input trigger - and have it work flawlessly as it does just by tapping in the DRL power from the battery source. -That is the (Unknown)

So, IF I had a Morimoto headlight on a bench, I could determine what needs done, but I cannot do it without physically having one in my hands due to the fact that I cannot locate any documents on how they are wired internally.
At this time, Morimoto (Headlight Revolution) has made the claim that this issue is on their radar. But they also claim nobody has ever sent a light back to them for testing this problem. I wonder what they would do if you/we approached them with the findings we are getting at different levels, would they agree to send out a test light so at least somebody can get to the bottom of this on the bench. The reason I don't want to send these back pretty much means I don't care about no warranty at this point since I will not rip the front end of my truck apart again. Because that is the only solution they offer. They will send out a new light (which one, I asked) But maybe we could go in and ask them to allow us (meaning the consumer) to figure it out. Just give us a sacrificial light to get it OFF their radar.
Sponsored

 
OP
OP
airline tech

airline tech

Well-Known Member
Joined
Aug 24, 2022
Threads
28
Messages
4,452
Reaction score
8,508
Location
Midwest - KS
Vehicle(s)
2022 Ranger Lariat-Super Crew, Cactus Gray
Occupation
Aircraft Tech
Spit balling ideas - install a TIme Delay relay in the Headlight Circuit -Pin #2, this way the Tapped DRL sequence trigger will complete before the headlights are commanded on by the BCM, find a delay relay that matches the timing of the sequence and add a few seconds to it for cushion.
This is another work around for getting the start up sequence to work and it will let the DRL circuit complete the sequence it’s trying to do.
 

Big Blue

Well-Known Member
First Name
Lee
Joined
May 5, 2020
Threads
16
Messages
3,927
Reaction score
9,352
Location
Wisconsin
Vehicle(s)
2019 Ford Ranger XLT FX4 Supercrew lighting blue
Occupation
Retired mechanical designer
I made a post back on page 3 that said this:

I tested this as you requested and a little bit more:

Ok...with no key in the ignition and the switch in auto, I changed the switch from auto to headlights. The lights came on with no startup. When I turn the key to start the truck, there is no change to the lights.

The second thing I tried was to get in the truck with the light switch to off. Upon turning the key to start the truck, I get the startup sequence on both headlights every time. Also, drivers side light bar is off and passenger side is on. Still in the off position only the lightbar remains on the passenger side. If I continue and start the truck, passenger side light bar goes out and the two lightbars come on, with driver's side coming on first for a split second followed by the passenger side. It really get convoluted trying to run back and forth door open door closed I really can't tell what all the interlocks might be. But this behavior was pretty consistent.

After thinking about this for a little bit, it occurred to me that this seems like the same problem in reverse from starting in auto.


Maybe I'm misunderstanding what you said just now in your most recent post. Have you been able to repeat this behavior. What I think you are saying is that the startup seq never works when powering up the lights. But it does work when turning the key with lights in the off postion. However, the light bars are acting goofy with my current configuration. I'm just a little confused.
OK Jeff,
Firstly, I'm not sure who's post you are referring to. Is it @airline tech or mine. If it was mine post a reply to this post as below and I will reply with my answers to your above questions as I think I know what you are seeing.

If you use the Reply button at the bottom of the post it will include the original post with your reply and also notify the original poster. Really help people to keep track of the flow of the posts. Just add your reply at the bottom after the last "[/QUOTE]"
 

jdjeff

Well-Known Member
First Name
Jeff
Joined
May 20, 2021
Threads
9
Messages
65
Reaction score
25
Location
Southeast PA
Vehicle(s)
2021 Ford Ranger XLT
OK Jeff,
Firstly, I'm not sure who's post you are referring to. Is it @airline tech or mine. If it was mine post a reply to this post as below and I will reply with my answers to your above questions as I think I know what you are seeing.

If you use the Reply button at the bottom of the post it will include the original post with your reply and also notify the original poster. Really help people to keep track of the flow of the posts. Just add your reply at the bottom after the last "
"
[/QUOTE]
@Big Blue I was posting to your most recent post. In a way, I guess I'm trying to keep @airline tech in the loop. I know I can be a somewhat ignorant forum user.
 

Big Blue

Well-Known Member
First Name
Lee
Joined
May 5, 2020
Threads
16
Messages
3,927
Reaction score
9,352
Location
Wisconsin
Vehicle(s)
2019 Ford Ranger XLT FX4 Supercrew lighting blue
Occupation
Retired mechanical designer
@Big Blue I was posting to your most recent post. In a way, I guess I'm trying to keep @airline tech in the loop. I know I can be a somewhat ignorant forum user.
[/QUOTE]
Not a problem. I kind of get lost in some of @airline techs posts too. I beleive you and I are seeing the same things. When you are in park and have the headlights turned on. And turn the key to the on position, you will not get a startup sequence. This is because the headlights are directly controlled by the light switch. Any time there is power to the headlight wire the headlight blocks the sequence. In any other switch position there is no power to the headlight circuit until the truck actually starts. Even in Auto. Now with the switch in Auto the light switch, the control of power to the headlights is more complicated. The BCM controls it based on whether it is day or night out. It also doesn't allow power to the headlight circuit until the truck starts. This sets up a race between the headlight power and the tapped power that triggers and powers the startup sequence. This is where the delay you've seen between the headlights comes into play. Sometimes the BCM wins with one headlight and not the other.

I do agree with you trying to do these test is difficult by yourself unless you can park in front of a large glass window where you can easily se both headlights. And having to wait out the various timeouts in the BCM is also a pain. Any time you open or close the door or start and stop the engine sets another timer to wait out.


jdjeff

Well-Known Member
First Name
Jeff
Joined
May 20, 2021
Threads
9
Messages
65
Reaction score
25
Location
Southeast PA
Vehicle(s)
2021 Ford Ranger XLT
@Big Blue I was posting to your most recent post. In a way, I guess I'm trying to keep @airline tech in the loop. I know I can be a somewhat ignorant forum user.
Not a problem. I kind of get lost in some of @airline techs posts too. I beleive you and I are seeing the same things. When you are in park and have the headlights turned on. And turn the key to the on position, you will not get a startup sequence. This is because the headlights are directly controlled by the light switch. Any time there is power to the headlight wire the headlight blocks the sequence. In any other switch position there is no power to the headlight circuit until the truck actually starts. Even in Auto. Now with the switch in Auto the light switch, the control of power to the headlights is more complicated. The BCM controls it based on whether it is day or night out. It also doesn't allow power to the headlight circuit until the truck starts. This sets up a race between the headlight power and the tapped power that triggers and powers the startup sequence. This is where the delay you've seen between the headlights comes into play. Sometimes the BCM wins with one headlight and not the other.

I do agree with you trying to do these test is difficult by yourself unless you can park in front of a large glass window where you can easily se both headlights. And having to wait out the various timeouts in the BCM is also a pain. Any time you open or close the door or start and stop the engine sets another timer to wait out.
[/QUOTE]

Ok...now it gets a little deeper. Today, (daylight) I went to Panera to pick up an order. Parked in front of glass window. Went in to get my food. Came out and turned the key in my normal state of "auto". Upon turning the key, the passenger side went into startup seq. Then turning the key to start, caused both lights to do startup seq with slight delay in the LED light bars. I am seeing this in yet a different circumstance. I also wonder if either of you guys wondered if the light sensor on the dash is variable or just plain on/off. I've noticed that my lights will come on if it's cloudy or rainy. Is there some kind of light interpolation that the BCM goes through besides really bright sunlight vs sort of dark looking outside. Seems like there is some deciphering in the computer vs. what the light sensor is picking up. I don't know...I'm just throwing stuff out there hopiing it sticks or maybe I can spark some kind of "Eureka!" out of you guys. I was also curious...could temperature play a roll on how this plays out.....just guessing. Seems to have gotten worse over time but it's also gotten colder since I had the lights.

This is the crux of what I'm concerned about. Will this keep getting worse over time until eventually the light won't work at all. Are these bucking voltages going to damage the lights beyond repair/warranty?...or worse yet my BCM? And I'll just mention @airline tech for the sake of keeping the conversation in line here. Thanks.

And just an edit here: I was in Panera for better than 10 minutes because i placed a to go order and had to wait. Normally I order online and just go in and grab my order within 2 or 3 minutes I'm out. Every time I've done that in the past, the startup works flawlessly. But I did see you guys talk about a 10 minute delay for one reason or another. Again...just throwing stuff out there.
 
Last edited:
OP
OP
airline tech

airline tech

Well-Known Member
Joined
Aug 24, 2022
Threads
28
Messages
4,452
Reaction score
8,508
Location
Midwest - KS
Vehicle(s)
2022 Ranger Lariat-Super Crew, Cactus Gray
Occupation
Aircraft Tech
I will try to highlight what is happening withing the BCM and the (PCM Wake Circuit)
and what it takes to get (The Run/Start) Relay to Close and get power available on Fuse #19

Find Fuse #67 and follow it down - Look at what is powered off of Fuse #67
Note ALL RH Exterior Lighting - PLUS internal BCM circuits related to Interior Lighting (On Demand Batt Save) and (PCM Wake) are the (2) that I want to point out but FIRST this NOTE

Fuse #67 & Fuse #62 - are always HOT circuits as well as the circuits that feed the (Headlamp Switch)
Meaning if you were to leave your driver's window open and let the truck sit for any amount of time, you can reach in and move the Headlamp Switch from Auto to Headlamp and the Headlights will come (ON) they will remain (ON) without turning the ignition switch to start for 10-Minutes (The Batt Save Feature will trigger) and they will shut off
As I mentioned in a previous post, when the ignition is switched off there is a 10-Minute timed relay inside the BCM that will shut off exterior lighting.
My (Untested) theory is (That Timed Relay) is activated weather any lighting is actually on or not.
I can confirm as I use this feature regularly, I shut off the truck and listen to music, the music (SYNC) will stay powered for 10-Minutes and then shut off or (IF) I open the driver's door it will shut off immediately.
I played with this feature and while listening to music I moved the headlamp switch from Auto to Headlamp - and when the Music Timed out - so did the Headlights (Without Opening the Door)
I tried it again - but this time I opened the door, the music quit - BUT the headlights stayed powered for the remainder of the (10-Minute) timer that was left and then they shut off.

So, what this CONFIRMED for me was that the Exterior Lighting Circuit has a 10-Minute (Time Delay-Relay) incorporated into it from the BCM (Control)
This is something the service manuals do not cover and only found by my (T-Shooting)
This (Time Delay-Relay) MAY be part of the issue with the (Startup) sequence of the Morimoto's
I can only PROVE it is there but cannot prove its a factor for the issue.

Let's highlight why the RH side and LH Side - Timing plays a factor granted it is only milliseconds

Let's start with the (Bottom Row & Fuse #67 - Power Feed) and general focus on what happens when you open the driver's door.
1. The Door Ajar Circuit has triggered the Courtesy Lights (ON) - that power trigger has forced the BCM to supply power on that (Fuse #67) circuit and this also triggers the (PCM-Wake) the BCM then supplies a Ground to the PCM Power Relay and it closes, when the PCM Power Relay closes you will HEAR the noisy Wastegate Actuator Cycle through its (Self-Test)
Note: The PCM Power Relay will stay closed for (3-Minutes) and then open (IF) an engine start or ignition switch input has not been completed within that 3 minutes.

2. Let's say you just (Normal) open the door get in and start the truck, the Fuse #67 circuit has already been pulsed with power, the PCM Power Relay has already closed (via PCM Wake) circuit
and when you transition the (Ignition Switch) past (OFF) the Run/Star Relay will then close this is accomplished by (Can-Bus) data (ISP-R) Ignition Switch Position - Run

When the Run/Start relay closes (ONLY) then power will be available for Fuse #19
Disregard (Fuse #20) to the Headlamp Switch (That is not correct, and the diagram is WRONG)
that power is strictly supplied by the BCM (Internal circuits) and is not a fused source.

I only want t to highlight why the RH headlight can be powered (First) and it is due to the internal circuits of the BCM sharing the RH Lighting circuit along with the PCM Wake circuit as well as the courtesy lighting and I (THINK) this circuit design is PART of the problem as the RH side will power faster than the LH Side, and I think as far as the BCM power output goes the LH side will transition after the Run/Start relay closes - so even without the Morimoto's you already have a (SLIGHT) delay in the timing of the exterior lighting circuit (Transition) inside the BCM.
It is caused by the transition of all the relays and can-bus data transmission at the start-up
A slow data transmission of the (ISP-R) will be the most likely cause of a visual headlight on delay
If I am correct the RH lighting circuit sees it (FIRST) then the LH side.

It boils down to how fast the BCM can process the (You want me to apply Headlight Power Request) at (ENGINE START)
To compound the issue even further - you have a Tapped Power source coming in (AFTER) the Run/Start relay closes - Fuse #19


Since it was asked:

The Sun load Sensor is only a (Resister) that reacts to the available light source upon it.
The sensor has dual duty - Sun load (AC)- Measures the Intensity of the Sunlight hitting it to activate (Auto) Climate control for (MAX-AC) and (Max Blower Speed) in a hot cabin.
and then (Auto) Lamp function as (Ambient Light Sensor)

The BCM sends a voltage signal to the light sensor. The light sensor provides resistance between the voltage signal and ground. The resistance varies depending on the amount of ambient light detected by the light sensor. The brighter the ambient light, the lower the resistance. By varying the resistance, the BCM can determine the amount of ambient light.

So YES, it is a (ON/OFF) function (Switch) internal to the BCM, when the resistance is high enough it triggers the (Headlights) ON

I have looked into possibly playing with the sensor (As-Builts) but nothing that stands out that will cure the issue and keep it active for (normal use)
and that is this line:

726-14-02 - Feature Configure Autocamp Delay (Person 1 through 4) and Vehicle
1414-1414-14A7
The (14) Person 1 through 4 are the first 2 sets and the Vehicle is the last (14) set
14 Hex - converted to seconds = (20-Seconds)
So, this setting I think is how long of a delay does it take for when the (Ambient Light Sensor) sees its dark enough to trigger the headlights on to actually trigger them on.
The only thing that would make sense is - this would be if you are already driving down the highway and it is getting dark.
Not - a starting the truck in the Dark (Setting) the BCM is already reading that resistance (High Resistance)

Then there is this one:

726-26-01 - Ambient Light Sensor (Type)
0100-0003-0058 - xxx0-xxxx-xxxx
0-Slow (15-Seconds) 1=Fast (2-Seconds)
The Ranger (factory) is set to (0) and I believe that some have changed this to (1) to get a faster reaction when driving into a tunnel, I have not tried it so I cannot confirm it works or how well it plays with the above setting - (as the timings do not match)
Either way - we are looking for a way to DELAY the timing of the headlights coming on (at engine) start to resolve the issue - not speed it up so for me this setting will be (NO HELP)


Power Output.jpeg


I know what I am posting is a lot to digest, I am only trying to highlight what you are visually seeing (differences between LH & RH) light outputs and when they are lit. (A brief touch on what circuit is providing the power)
 
Last edited:

Big Blue

Well-Known Member
First Name
Lee
Joined
May 5, 2020
Threads
16
Messages
3,927
Reaction score
9,352
Location
Wisconsin
Vehicle(s)
2019 Ford Ranger XLT FX4 Supercrew lighting blue
Occupation
Retired mechanical designer
I know what I am posting is a lot to digest, I am only trying to highlight what you are visually seeing (differences between LH & RH) light outputs and when they are lit. (A brief touch on what circuit is providing the power)
to tell you the truth I actually do understand most of what you are posting. I worked for 40 years as a mechanical designer/engineer doing process development/improvement project's on high-speed converting equipment. Worked very closely with the electrical engineers. They even trained me in industrial PLC programming. Helped alot to understand what the "sparkies" were talking about in meetings.?

Anyway, I understand our modules are really just PLCs and the asbuilt files are just configuration files, telling the modules what to do with the various inputs. The asbuilt files can only select between predetermined routines programmed into the modules firmware.

Between the testing we've all done believe that I have a pretty clear picture of how my OLM lights work and think the Morimotos are similar. Your early posts on your conversion from HALOs to LEDs have given me insight into how the OEM LEDs work. If it wasn't for the start up sequence, I believe they could be made Plug and play. The use of the power on the DRL lead as the trigger and power to do the sequence is where the ability to be truly PnP goes out the window.

Now, even with the current setup, using tapped power for the sequence. It works fine in any light switch setting but Auto. In Auto the control of the headlights is left to the mercy of the BCM. Which controls each side separately. Which means they may or may not come on at the same time, usually not. This means the tapped power (fuse $19) may or may not get there in time to run the sequence. Or should I say the headlight gets there too late to block the sequence.

As I see it there are only three options that do not involve hacking into the firmware of the BCM, wire tapping the OEM headlight harness or tearing the headlight apart and rewiring it, to work differently, if that's even possible.

The options are:
1. Live with it as it is. This is for those that don't use Auto mode, and have to have the sequence
2. Disconnect the fuse #19 fuse tap. This will eliminate the startup sequence entirely. It will also eliminate the DTLs on bright during the daytime.
3. My choice. Disconnect the fuse tap, use Forscan to change your Allowed DRL Options to 127 - All Options. Change DRL Configiration to something else than 2 - Low Beam. My suggestion is 4 - Fog Lamps. O - Not Defined also works. And change Daytime Lights Includes Parklamps to Enabled. And finally do not uncheck the DRL option in the IPC menu. This will eliminate the startup sequence. When you start the truck in Daylight you will have no lights until you take it out of Park, then you will have parking lamps with the DRL lamps on dim (parking mode), along with your selected DRL lamps.
 
Last edited:
OP
OP
airline tech

airline tech

Well-Known Member
Joined
Aug 24, 2022
Threads
28
Messages
4,452
Reaction score
8,508
Location
Midwest - KS
Vehicle(s)
2022 Ranger Lariat-Super Crew, Cactus Gray
Occupation
Aircraft Tech
I do not know if it makes any operational difference or not, but I wanted to add something that I recently discovered and noted about the popular fuse taps - it's a combination of the design and the very limited fuse tap points on the BJB.

The Following is a Copy & Paste from my post in another thread, that MAY be related to this one.

The reason this MAY be related - Ref the video below, now Fuse #19 is not blowing but @ Engine Start & Start-Up Sequence pulling amperage across the (10-Amp) fuse may be causing some of the Morimoto's Start-Up sequence issues.

Ok:
First, I have to disclose I have never really dealt with the newer style fuse taps and just realized the difficulty in Fuse Tapping the BJB (Engine Bay Fuse Box)
Moreso: The popular Fuse #19 Slot.
As I never looked into how those are wired and how they need to be properly oriented to allow proper circuit protection - I see why the Aftermarket Mfgs want to use Fuse #24 as a tapped source.
You can properly orient the Fuse Tap to pick up - (Source Power) on the proper leg vs Fuse #19 you have the relays blocking you.

First:
I have used this type of Tap on previous vehicles and actually had this type for my (Head Unit) (RAP) Power where it held all the presets/ clock etc.
I did have to (reseat) the fuse on occasion as over time the contacts in the fuse box were spreading from the extra thickness that is added by the tap.
So yes, they work, but they will eventually require you to spread the tap end out to take up any gap created as time goes by.

1743760519882-64-jpg.webp


A Better Option - Same Idea of Tap is this
Do not know if any cheaper options are out there, but found a better alternative to the blade tap damaging the fuse box contacts
So, to use this (properly) install the fuse (Power Leg - Most Forward) and then install a (In-Line) fuse on the wire for your output source.
Note: You can easily make your own with a soldering iron and wire, this set they have done that for you.

prewired-jpeg.webp


I believe it was asked in another thread about this:
I did find this, note this is a Canadian Company, need to research deeper if the US can get this style.

LH - Exit - all others that I have found are RH-Exit
This will allow the same (Cube) the extend over to the right across the top of the other fuses, but you are still dealing with the wire & relay interference.
Note: As it appears the RH- Exit style is too long and will hang outside of the box enclosure if you were to flip it around to pick up the proper orientation as well as the (Relay Interference)
So, this style (LH Exit) only cures 1/2 of the problem - you still have (wire to relay interference)

optifuse-left-hand-jpeg.webp


I did not know this about this style of fuse taps as I never used them but in order for them to properly protect (2) circuits they must be (Installed) in the correct orientation.

The picture below shows (IMPROPER ORIENTATION)

Reason: The side that the (wire exits) is the (Output Feed) side of the fuse
This is tapped into Fuse #19 Slot
With the (Vertical) Fuses (pictured) the (Source Feed - Contact) is on the (Most Forward) Pin or the one closest to the cab.

So, with the below install the lower fuse is taking the current of both fused circuits
So, if improperly oriented (like below) if there is an issue on either circuit the Bottom Fuse could Blow and take both circuits vs separate circuits as the tap is intended.
I find it somewhat amazing that this is not highlighted in the install packaging or instructions from most of the manufactures of these taps and I only recently noted this from the latest posts about taps and locations, I never thought that these were (orientation dependent) but they are to get the (Full - Intended Usage) of the tap.

Intended Function:
Two Sperate Circuits - Protected By (2 Separate) fuses.

Improper Function:
The Lower Fuse (OE-Circuit) is being used to power 2 separate circuits, so you have an amperage draw across the fuse before it reaches the (Upper -added circuit) fuse, so depending on what you are adding this may create issues with the device you are adding, and it is dependent on the device power requirements (it may not like the reduced power) that is actually being feed to it.


fuse-19-tap-jpeg.jpg


Here is a video for explanation:
He does a good job explaining what I am talking about.

How to INSTALL a FUSE Tap correctly | AnthonyJ350

So Real World since I think all owners who have tapped (Fuse #19) with a fuse tap have not experienced the (fuses blowing) but however there are reported issues with (Headlights) and this tapped source, and this would Highlight some of the various intermittent issues with them as a possible (Fuse Tap) orientation from the tap (MAY) be the source of the issues.
Too much amp draws for the 10-Amp fuse feeding 2 outputs.
But other than that - it appears the circuit can handle being tapped improperly; it works but it's not as it is designed for.

So, to close, we are limited to fuse tapped sources in the Engine Bay Fuse Box, more highlighted in the 2020 and up Rangers who lost Fuse #24 as a viable tapped source.
To only way to gain it back would be to open up the fuse box and solder in a Fuse Socket, it would be nice to find the Part Number of one or get a salvage yard (pick n pull) fuse box with or without Fuse #24 present - Swap in the salvage box or use it as a doner box and swap the fuse socket over to the existing box if unable to find a part number for the (new socket)

Another option would be to - add an auxiliary fuse box and then just run your wires to that and skip all the (Fuse Tap) Limitations
 

sandy_koufax

Active Member
Joined
Aug 20, 2023
Threads
3
Messages
36
Reaction score
43
Location
Los Angeles, CA
Vehicle(s)
2020 Ranger Lariat FX4
I’ve read through this all and am still confused. I have a Lariat. I have my grille lights on a relay. For the trigger, can I just set DRL to always bright in forscan, tap pin 6, then be on my way? I’ve done this and don’t notice any issues yet but I obviously don’t know if things look weird while I’m driving.
 
OP
OP
airline tech

airline tech

Well-Known Member
Joined
Aug 24, 2022
Threads
28
Messages
4,452
Reaction score
8,508
Location
Midwest - KS
Vehicle(s)
2022 Ranger Lariat-Super Crew, Cactus Gray
Occupation
Aircraft Tech
I’ve read through this all and am still confused. I have a Lariat. I have my grille lights on a relay. For the trigger, can I just set DRL to always bright in forscan, tap pin 6, then be on my way? I’ve done this and don’t notice any issues yet but I obviously don’t know if things look weird while I’m driving.
When do you want the Grille Lights Lit?
With Parking Lights anytime, they are on? or only when the DRL's are on? as the DRL's are only on in daylight and out of park.

I think most just tap into either side marker light for the (Parking Light) circuit and the Grille Lights will be on (at night)
if you change a setting with Forscan, the DRL's can be set to (Include Parking Lights)
So, the (Led Bar-Headlight) on & bright, tall lamps and the side markers and if tapped off the side marker (Grille Lights)

If tapping Pin#6 for a relay trigger, then the Grill Lights will only work when Pin #6 is powered, and it is only powered in (Auto -Daylight & Out Park) for the US Version
If you change all the Foscan settings to the Canada Version, then the Headlamp Switch has no control over the DRL's and will operate in any switch position, however the (Out of Park) and (Daylight) requirements are still in play.

For Both the (US & Canada) version when it gets dark the headlights are commanded on, power on Pin #6 is dropped as the DRL are not on (bright- bar) you only have park lamp power (dim-bar) which is Pin # 5 feeding the headlamp assembly
 
Last edited:

ControlNode

Well-Known Member
First Name
John
Joined
Nov 29, 2021
Threads
16
Messages
1,709
Reaction score
3,642
Location
Eastern NC
Vehicle(s)
84 Civic "2000S"/16 Focus RS/21 Ranger XLT
Occupation
Computers
I’ve read through this all and am still confused. I have a Lariat. I have my grille lights on a relay. For the trigger, can I just set DRL to always bright in forscan, tap pin 6, then be on my way? I’ve done this and don’t notice any issues yet but I obviously don’t know if things look weird while I’m driving.
I agree with @airline tech, the best option would be to use the parking lights as the trigger. Would result in the lights being operational when they should be, well when they should on a vehicle that is wide enough to require them.
 

sandy_koufax

Active Member
Joined
Aug 20, 2023
Threads
3
Messages
36
Reaction score
43
Location
Los Angeles, CA
Vehicle(s)
2020 Ranger Lariat FX4
When do you want the Grille Lights Lit?
With Parking Lights anytime, they are on? or only when the DRL's are on? as the DRL's are only on in daylight and out of park.

I think most just tap into either side marker light for the (Parking Light) circuit and the Grille Lights will be on (at night)
if you change a setting with Forscan, the DRL's can be set to (Include Parking Lights)
So, the (Led Bar-Headlight) on & bright, tall lamps and the side markers and if tapped off the side marker (Grille Lights)

If tapping Pin#6 for a relay trigger, then the Grill Lights will only work when Pin #6 is powered, and it is only powered in (Auto -Daylight & Out Park) for the US Version
If you change all the Foscan settings to the Canada Version, then the Headlamp Switch has no control over the DRL's and will operate in any switch position, however the (Out of Park) and (Daylight) requirements are still in play.

For Both the (US & Canada) version when it gets dark the headlights are commanded on, power on Pin #6 is dropped as the DRL are not on (bright- bar) you only have park lamp power (dim-bar) which is Pin # 5 feeding the headlamp assembly
I want them on at all times, regardless of daytime or nighttime when the truck is on auto. Currently tapped into pin 6 with the forscan mod above. It seems to be on both at night and day. Is there an issue with this setup?
 
OP
OP
airline tech

airline tech

Well-Known Member
Joined
Aug 24, 2022
Threads
28
Messages
4,452
Reaction score
8,508
Location
Midwest - KS
Vehicle(s)
2022 Ranger Lariat-Super Crew, Cactus Gray
Occupation
Aircraft Tech
Ok - I did some digging and I have found some deeper information for the (Aftermarket) Headlight assemblies - so @jdjeff and @Big Blue may find this interesting.

From what I have found - ALL Aftermarkets use - What would be (PIN 6) as a tapped power source in lieu of having the customer make Forscan Changes and moving the (Tapped Source) to the actual factory wiring of (PIN 6)
Internal to the headlight assemblies - The DRL Pin 6 and Park Pin 5 - Are Bridged, since they are using the same internal logic and the DRL & Park are a shared light.

From what I have found - PIN 6 is still the driving power source for the Start Up Sequence on initial Power Being Applied - Once it sees power on the DRL Tapped Source it begins the startup sequence (Logic) known as a - Start Up Sequencer or Welcome Sequencer or Dance.
Using the Tapped Power (DRL PIN 6) it begins the Animation Sequence and Momentarily uses Pin 6 Power to (blend over to the Low & High Beam) LED drivers to trigger them into the sequence.
This is an important note for that power tap blend over - more on this below.

Some mention that the Park Circuit (Pin 5) is an alternate source to get the startup sequence activated - as the DRL & Park are on a bridged circuit - this alternate activation is not confirmed as of now - but noted.

What I also found: The Meaning of (Plug & Play) regarding Aftermarket Headlamp Assy's
It APPEARS that the assemblies are manufactured to operate under the Halogen As-Built Settings for Power as far as the general operation of the headlights (Halo's use PWM) and they are generally set to operate at that power level (So differently) than if swapping to factory (LED) as they operate at a set voltage level from the BCM - Thus the noted as built (comparisons) between the Halo & LED trims.
However - the Plug & Play factor does create some conflict issues that was overlooked or ignored by the aftermarket manufacturers of these assemblies, and it mainly comes into play with the (Animated Start-Up) Sequence or Dance (Conflicts-of Power)
NOTE: I stated (APPEARS) this is not confirmed as of now, but with most that have swapped very few have complained about the actual lighting, it's mostly been about the Start-Up Sequence and the few have been about (source outputs or flickering)
If source outputs or flickering are the issues you are having, then it's going to require some Forscan changes to alter how the power is supplied to the circuits to match what the factory LEDs use.

Conflicts that the Aftermarket Manufactures (Overlooked) or (Ignored) as they did not take a deep look in how the BCM would handle having a tapped power source feeding into circuits the BCM has master control of.

Conflict Issue #1:

First - Lets address the (Fuse Tap #19) any why it may create a conflict of power to the assemblies.
The install is limited that the fuse tap is to be installed upside down, so this puts the fuses in series, and the power must pass through (2) fuses to get to the intended source (Internal Pin 6 - DRL Power) vs a parallel circuit (each fuse powering) an independent circuit.
The (Start-Up) Sequence REQUIRES a CLEAN STABLE VOLTAGE - to initiate and complete.
When the key is placed in the run position - The PSCM via (Fuse 19) performs a WAKE-UP module circuit integrity check and starts communicating to the other modules on the Can Bus, so even at Key On you have a subtle voltage drop and voltage ripple occurring on the PSCM circuit and compounded by the (In Series) fuse set-up (Incorrect - Set-Up)
Then add in the additional (Voltage Drop & Ripple) as you continue from Run to Start (Starter Cranking)
This is PART of the Start-Up animation (Conflicts) for power and why this tapped source may be creating issues and also the Battery Voltage (itself) will play a role here.

By Noting that: from the posted testing that a direct connect to the battery and (No Issues) and or Pausing @ Run and NO Issues - with the Start-Up Sequence, this conflict proves valid.

Conflict Issue #2:
If we recall back to the (Turn Signal Bulb) swaps and switching to LEDs and it was creating a Hyper-Flash on the dash indicator - this is due to the (BCM) Circuit Check, and the fix is to disable the DTC (Circuit Check) to eliminate the Hyper-Flash and or replace the bulbs that were Can Bus (error free) resistor imbedded or adding a separate resistor in the circuit.

The BCM has the same circuit checks for both the Low Beam & High Beam, known as a Cold Bulb & Warm Bulb Check. (Cold Bulb - At Key-On) - (Warm Bulb - During Operation)
Even with the Headlights (OFF) and this Circuit Check is (set to used) the BCM sends a millisecond pulse on both LF & RF (Low & High Beam) circuits as soon as the key is placed in the (RUN) position - normal no issues with a factory wired headlight as long as the circuit is good.

The CONFLICT - and why the (Start-Up) sequence stops mid animation or stops at only one side (Mostly Noted - Driver's Side
It's about the Timing of this (Circuit Test) Cold Bulb when the key is set to run or clear through to start.

You have the tapped power source - providing power on a circuit that the BCM thinks should not be powered and or the BCM does not have control of that power and then the BCM dumps the power that the tapped power source is trying to provide. (Back Feeding Voltage)
This is what is stopping the (Animation Sequence) from completing or not starting at all.
and its the race for power - as you have a millisecond delay from the tapped power source (In series) and its voltage drop and ripple - tapping into both the Low & High Beam circuits at the same time the BCM is sending a (Millisecond) test pulse on the circuits.
Depending on your headlight switch position and how fast the BCM is in sending the pulse check depends on where the (Sequence will STALL)

I have always thought is was the (2 Power Sources) creating the issue and this confirms my original theory. we are only talking about a (Millisecond) in time, but this is enough to generate the start-up sequence conflicts and the sensitivity of the aftermarket driver that sets that start up sequence in motion and specifically the (momentary) power pulse from the DRL circuit into the Low & High Beam circuit are the main factors for this not working properly.

The startup animation is aborted for possibly 2 reasons:

A. The DTC Circuit (Cold Bulb) check is dropping the (fuse tapped) source when it sees power on a circuit that should not have power yet - The BCM has not commanded them (ON) and the BCM shuts off the power being applied by the tapped power source.
Possibly - More Noted in the (Daytime) Start-Up Sequence

B. The BCM wins the race for Power - The BCM - Powers the Headlights (ON) before the Tapped Power (Pin 6) can tap into the (Low & High) beams and include them into the sequence - the sequencer already sees the power (on) and aborts the animation (Safety Over - Animation)
More Noted in the (Nighttime) Start-Up Sequence


Using the Scenario for - Halogen to Aftermarket Assembly Swap

The POSSIBLE Fix - If keeping the Fuse 19 Tap and only 2 Forscan Changes

1. Keep the Fuse 19 (Fuse Tap)

2. DESELECT - DRL from the IPC Menu.
Note: This ONLY turns off the (Reduced Power -PWM) to the Low Beams and has zero effect on the LED (DRL) as without Forscan Changes to redirect power to (PIN 6) the BCM will still continue to see that the Low Beam circuit is the (DRL) and by switching off the IPC setting you are stopping the power drop (PWM - Duty Cycle) to reduce the power on the Low Beams.

Conflict Note: When in daylight and the gear is moved out of park, if this setting is not changed it will create a voltage fluctuation (flicker) on the low beam (LED) as the source voltage Pin #2 (Low Beam) is still coming from the BCM even though it's not supposed to be lit as a DRL.
So, the Low Beam may be (on & flickering) in daylight along with the (Bright) DRL Light Bar

3. Make only these Forscan Changes: and this is disabling the - Low & High Beam Circuit checks at Key On - and may eliminate the startup sequence issues from completing.

726-46-01: High Beam Circuit Open DTC Configure (xxxx-x1xx-xxxx)
and
726-46-02: Low Beam Circuit Open DTC Configure (x1xx-xxxx-xxxx)
Factory is set to (1) Used ---change the (1) to (0) Unused

This will stop the millisecond circuit check from occurring (Cold-Bulb) check at key to run and it also disables the (Warm-Bulb) check constant monitoring when they are on and in use when driving.
The DRAWBACK -is this is a DTC circuit that is monitoring the headlights (Low & High) beam so the only way to see a fault is by the physical light (same as old school) lighting before the computer module monitored circuit that would show up in a scan of the BCM.

I think this is the simplest solution for getting the (Start-Up) sequence to work correctly and keeping the other (Forscan Changes) the same, the Tapped Power source is part of the conflict, but I feel this DTC (Cold-Bulb) check at key on - is the biggest reason the sequence conflict and it is being blocked from finishing due to the timing of this circuit check (pulse) and tapped power coming into the headlights within (millisecond's) of each other - they cannot cohabitate together and the BCM wins over the (Aftermarket) Sequencer Driver

Note: This setting also ties in the Headlight (On) DELAY some experience, as this (Millisecond) pulse check on the circuits is a slight delay in powering the Headlights (On) if in dark and if one side completes before the other - would show as a delayed power to (ON). Normally the Drivers Side is delayed in powering behind the Passenger side. Logically you would think It would be the opposite, but if thinking only about resistance measuring the (Driver's Side) would be a lower resistance (shorter wire run between the BCM & The Headlight) and the (Circuit Test) will complete faster over the passenger side and the BCM will kill the Driver's side first when it sees the (Start-Up) Tapped power source (Back Feeding) Power. So, this explains why the (Start-Up) animation generally will complete on the passenger side but not the drivers. (Again - It's all about the TIMING of that Power and the Circuit Pulse Check) and also note that the (Tapped) Power feed has a shorter run to the Driver's side than the Passenger Side, so tapped power is reaching it (First) the BCM Pulse check is faster, and it kills the (Animation) Tap into the circuit.

Plus, also note: That the (Headlight Assembly) Sequencer wants to be the (MASTER) however the BCM is also the (MASTER) for lighting control and depending on headlight switch position (OFF - Park-Headlight - Auto) the BCM will interrupt the race for power from the Tapped Power Source.
My theory is that this Forscan Change will help the Sequencer complete its intended action before the BCM takes control of the headlights and it at least stops one of the conflict reasons (Master Control) it lets the (Sequencer Win)

So, in conclusion and keeping it as simple as possible (for the intended PLUG & PLAY) operation and following the install guide + one slight change to the As-Built files just might make the startup sequence work every time the truck is started (Day / Night)
If the above does not help, try these 2 (Things)

A. Pause briefly in (Run) before transitioning all the way to (Start) this will eliminate any cranking conflicts (Voltage Drops & Ripples) and let the startup sequence start and finish before you add in the crank. So, you are only dealing with the (In Series) Fuse Issue and (PSCM -Module Wake) Issue. (Day & Night)

B. Turn the Headlight Switch to (OFF) - This lets the animation start and finish before the BCM commands the Headlight's (ON) (Night-Only) this way the Tapped Power Source - Wins the Race.
As another factor - if the Headlights are already commanded (ON) the sequencer aborts the animation and the BCM Wins the Race.

So, to fix the (Start-Up) animation issue try the above and keep the factory as-builts the same (No-Changes) except for the ones listed above 726-46-01 and 726-46-02 and post the outcome found. (Fixes or No-Help) as I am using the (APPEARS) as a guide that the aftermarkets do not need any other help via Forscan as they are designed to operate with the Factory Halogen (BCM- Settings) and as of now I believe this to be correct but not confirmed as before this dive I assumed that the factory LED settings were required for all LED assemblies, and am backing off that assumption. The Factory LEDs I can CONFIRM that it is REQUIRED as I have performed this swap and could see the operational outcomes it provided by not making the changes, more noted by my memory of (Bad Flickering) on the Low Beams and the DRL Lightbar

So, I refocused strictly on the reasons why the Animated Start Up Sequence was being problematic and this is what I have concluded (Dual Power Inputs) tapping into the Low & High Beam Circuits - not only the BCM wanting to power them on, but the circuit check (pulse) that has not been checked or considered before.
Hopefully, this finding will produce a consistent working (Start-Up) Sequence.

EDIT: I need to edit something here as I am still diving into this a little deeper.
I need to correct something here - The BCM Bulb check is NOT killing the power and causing the Start Up Sequence to (Abort) - It's not the BCM specifically but it's the Bulb Check conflicting with the Logic Controller in the Morimoto's and the Logic Controller (itself) is aborting the startup sequence from the (momentary pulse)
I think I have a solution for a fix and it's a simple solution - but i need some help from @Big Blue
and another test - he performed.

@Big Blue , when you performed the operational test of the (Start-Up) animation
and you performed the test:
Key-OFF and Headlight Switch - AUTO - Start Up Sequence Worked - DRL Illum Bright
Key -OFF and Headlight Switch -PARK - Start Up Sequence Worked - Park Illum Dim

I need to know the outcomes - with Key-OFF and the Following
Headlight Switch - OFF
Headlight Switch - Headlight (ON) - Low Beams (On) and (High Beams (On)
I want the Headlights to be (ON) and stable before you touch the battery with the Tapped Power.
This is an important factor - and does the startup sequence - start or abort midway or complete.

The test outcomes will verify if my solution works as a fix to get the animation to work flawlessly every time.
 
Last edited:

ControlNode

Well-Known Member
First Name
John
Joined
Nov 29, 2021
Threads
16
Messages
1,709
Reaction score
3,642
Location
Eastern NC
Vehicle(s)
84 Civic "2000S"/16 Focus RS/21 Ranger XLT
Occupation
Computers
Yeah, perhaps some aftermarket handle it better than others. I can say the Anzo lights do it about perfect when installed with halogen as-built setup. The logic does prevent the unlock light sequence if running lights were already on, such as with default light setting with remote start active when the truck is unlocked. I did disable the parking lights when using remote start, and the unlock sequence works fine while using remote start now. The lights properly sees low voltage high beam, or any voltage on high beam without parking lights, as DRL mode and lights it's DRL feature instead of the high beams. I do have the power tap, direct to the battery as Anzo instructed, so far no excessive power draw issues have been noticed and it's been like this about a year.

I think, though not tested, the Anzos provide power light assembly's internal logic board of the lights through the external box in one direction, and then when a light input is requested, reverses the voltage on those wires. I assuming that on the logic board there is a rectifying circuit that provides the voltage in the correct flow to the board to operate and can monitor for which way the input flow is to detect that light input signal. Of course a capacitor or something after the rectifying circuit to keep the power active the ms for the input voltage to switch direction. I think this because the Anzo lights do not use the DRL wire lead into the headlight housing.
Sponsored


Top