MarkR
Well-Known Member
Like the ones holding your box together. Its just tough to get any torque with the stubby screwdriverWhat type of head do those have?
Sponsored
Like the ones holding your box together. Its just tough to get any torque with the stubby screwdriverWhat type of head do those have?
There’s also two screws facing the firewall. Slide towards the drivers side to release the heater coreIt appears seen in the pictures this distribution box is attached to the rest of the hvac box with 4 torx screws that are facing up. And the distribution box would need to be slid towards the drivers side to release the evaporator core. This sound about right?
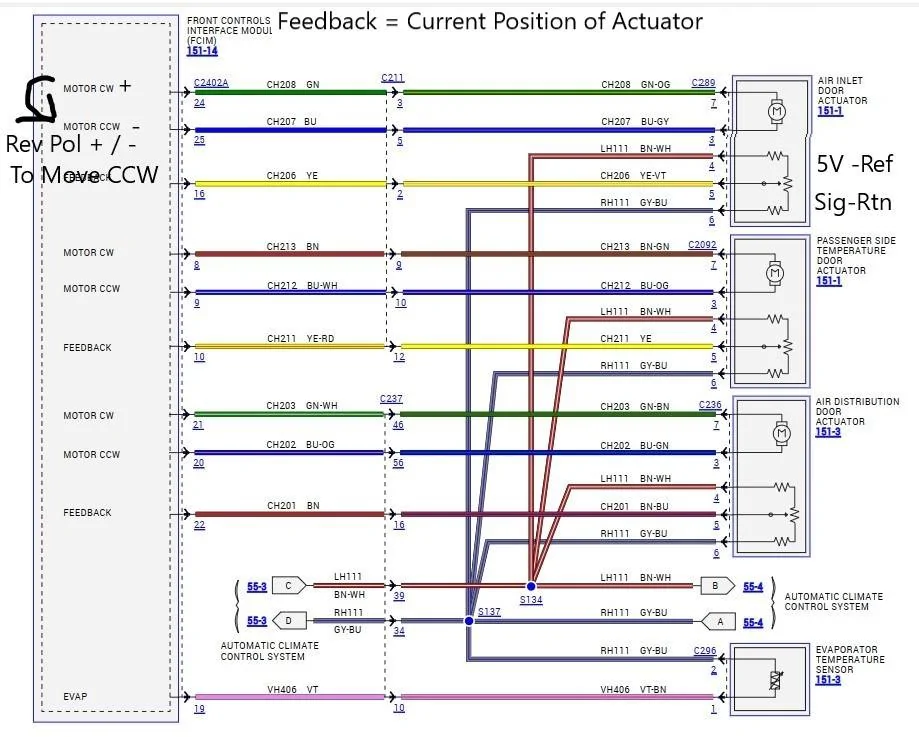
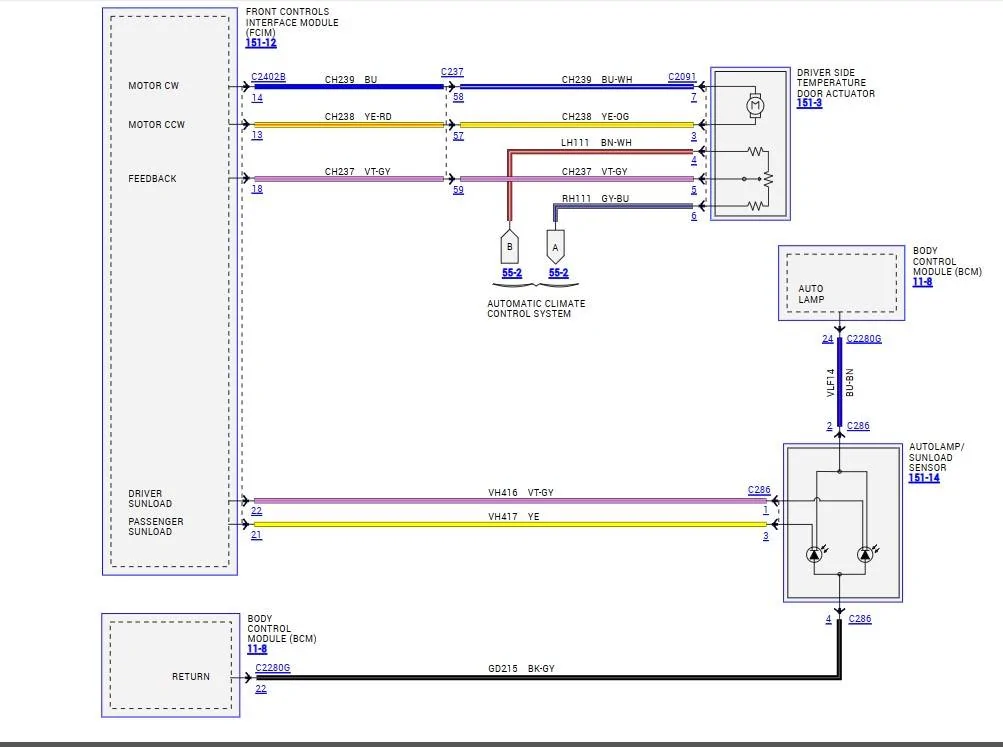
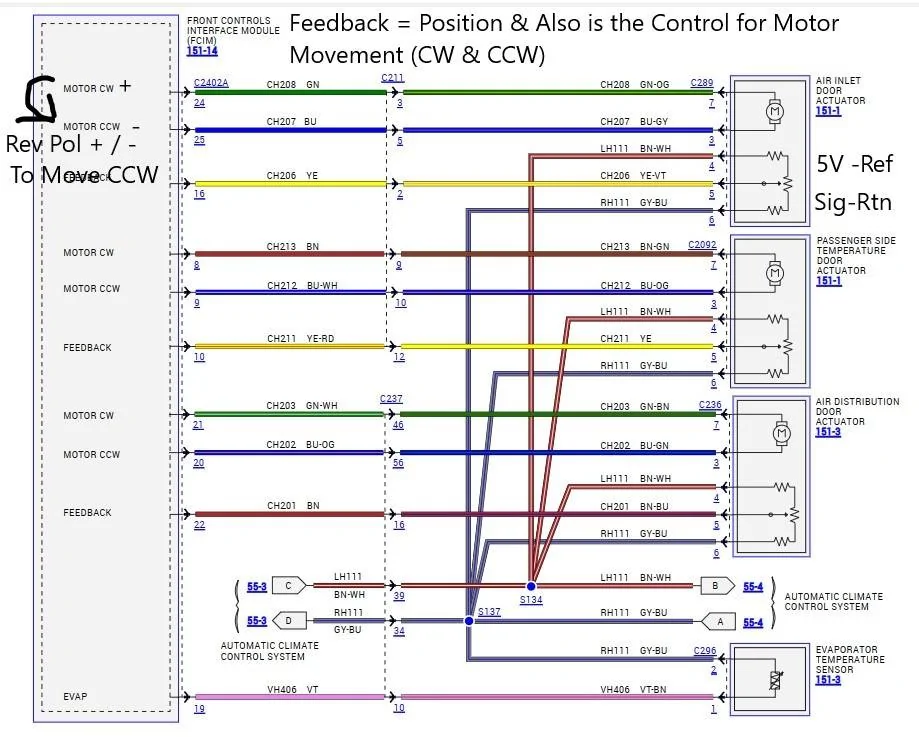
Thanks so much for doing this!I completed the job of replacing my heater box this past weekend. Earlier in this thread someone (@airline tech ?) asked for a video showing the operation of the blend doors - once I had my old one out, I removed the motors from it and shot this video:
A few tips for anyone who attempts this job:
It's a pretty big one. I set aside both Sat and Sun to get it done. I started around noon on Sat, and worked for about 6 hours on it that day. Stopped after removal of the old blend box and install of new one, but left dash removed. On Sunday I started up around 10 am, and was completely finished with all the tools cleaned up before 3:30. I was not in a particular rush, and ran in to a few tricky complications due to some custom wiring I've added to this truck (trailer brake controller, amp power steps, dash cam, auto-fold mirrors, etc etc) that all have wiring running in and around the driver side footwell/dash... as a result, I could not easily completely remove the dashboard from the truck, and had to leave the driver side pretty close to the firewall. I was able to swing the passenger side all the way out far enough to give plenty of access, but it was a little tight sliding the old blend box off the AC condenser as a result.
Take LOTS of pictures with your cell phone as you go. Especially useful were the photos I took of specific wiring loom routing. When you pull the dash off, all the factory looms attached to the dash will be unplugged and all the routing will be changed up when you go to re-install. Having reference photos for what went where saved me a lot of frustration and time.
All the electrical connectors from the factory have some sort of release mechanism that should be *easy* to use...i.e, very little actual force is required. Sometimes though, it's really difficult to tell where the release tab is, or what direction to move it. My rule of thumb was if it took more than a little pressure from 1 finger, I was not doing it right, and should re-think how the connector worked. I did not break any electrical connectors during this entire job.
If you don't own a headlamp, buy 2 rechargeable ones before you start this job. Keep one charging while you use the other one. You'll need extra light basically the entire time.
You do NOT have to drain coolant or evacuate the A/C to complete this repair.
Chock the tires, and put the truck in neutral *before* you disconnect the battery. You have to chock the tires because you will have to release the parking brake to remove the center console and to make clearance to put the dash on the seats when you get to that point. If the truck is left in park, you'll have a really hard time getting the center console out...but there is a secret release mechanism:
There are 2 screws on the blend box itself that have to be both removed and re-installed by feel - they are on the firewall side of the box, sandwiched between the box and the firewall. There is *just* enough space to get a super stubby screwdriver back there, or, if you have a mini ratchet with a phillips bit, that will work well (and is what I used):
The single bolt that is located near where the dashboard meets the windshield on the passenger side was the single biggest pain-in-the-neck fastener in the entire project. I recommend just using an allen wrench/key to back the bolt out a half turn at a time until you are about to hit the windshield with the wrench, then switch to a pair of pliers to just grab the head of the bolt and spin.
You WILL need another set of hands to both remove the dash and re-install it. It's heavy, it's awkward, and lining things up on re-install was especially challenging. My wife helped me, and I'm happy to report that in spite of the experience we are still married.
I'm also pleased to report that the new blend box is working perfectly, and my truck's climate control is back to doing what it's supposed to.
There are no new rattles, and the only casualties were a couple of broken clips on the door sill plastic plates that sit at the bottom of the doors next to the seats, and a small piece broke off a light pipe on the passenger-side footwell for the interior ambient lighting. You can tell I'm all broken up about this horrible damage. ;-)
All in all, I'm VERY glad I did this job myself instead of both trusting and paying a dealer to do it. If you are at all handy, have some time and patience, you can do this job too.
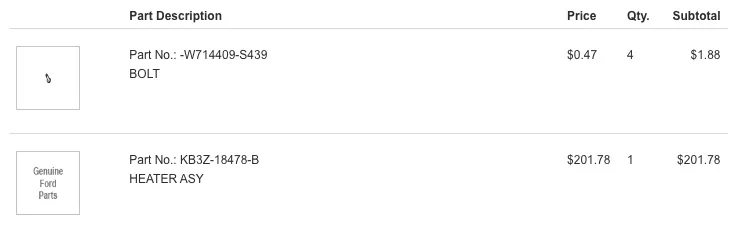
There is 1 bolt that the shop manual says should be discarded and replaced with a new one. It's the bolt that holds the steering column linkage together, and I did get a new one to replace it. Ford won't sell you just 1 though, as they come in a pack of 4 - but a bag of 4 is still pretty cheap. Here's a screenshot of the 2 parts I ordered - the bolts and the heater box. Note that this heater box is for trucks with dual climate control.... if yours has single zone, it's a slightly different part number:Was the replacement heater box the only part required?
No replacement weatherstripping or insulation?
Could you see an obvious difference in the quality of the plastic from the old box to the new one?
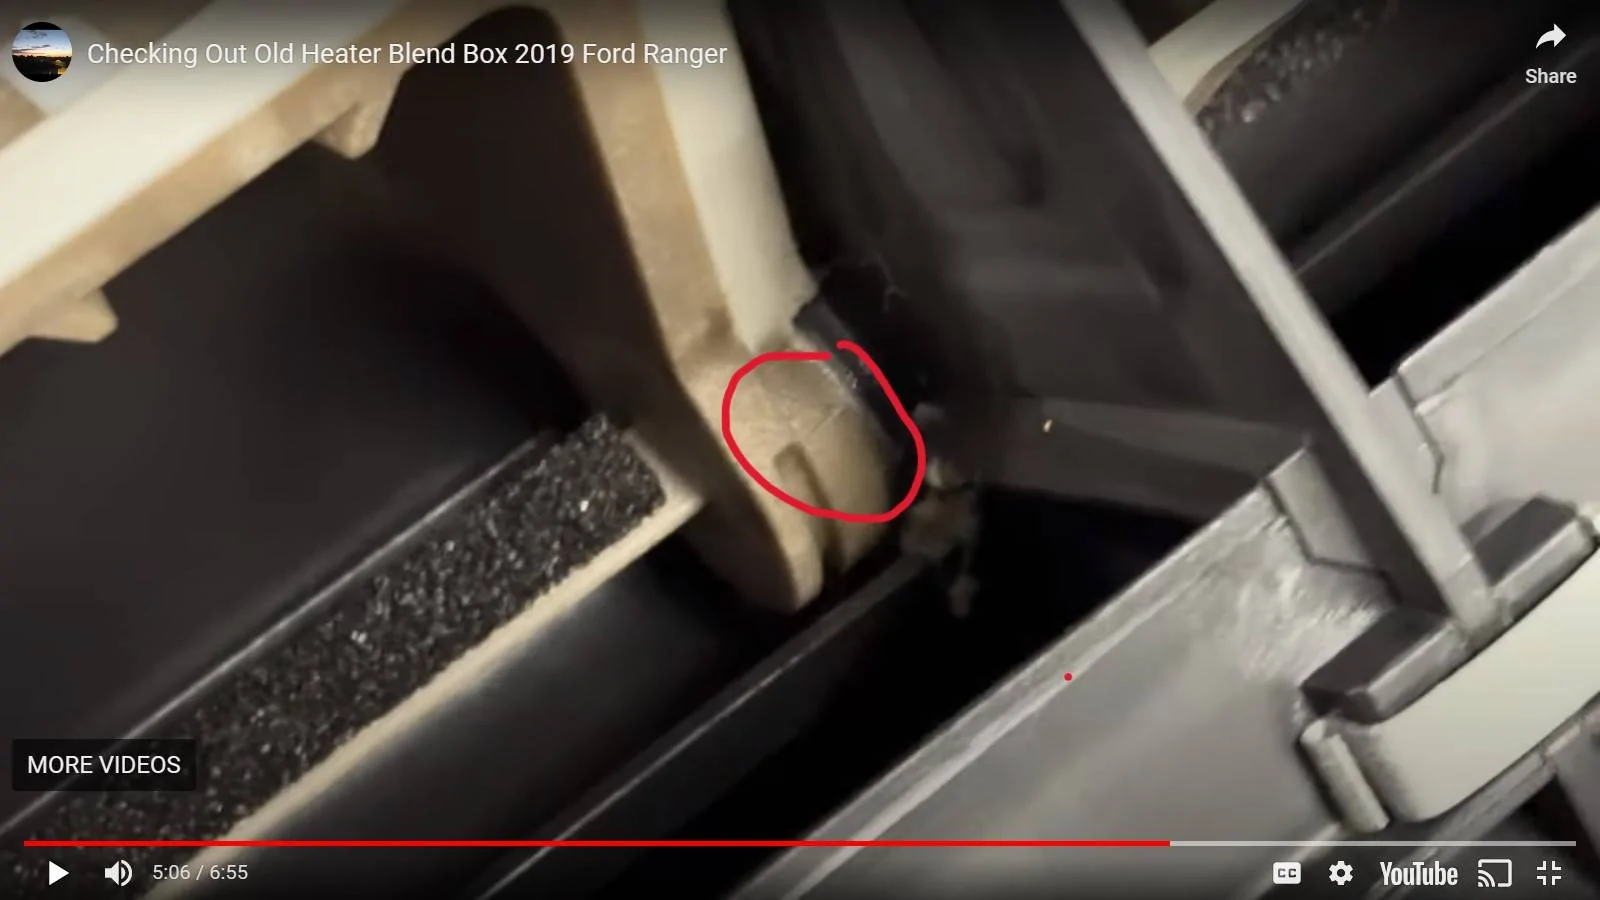
Oh really? The lines coming to the lower one look like they are the same as the A/C lines inside the engine compartment. The ones going to the rear heat exchanger looked more like coolant lines. It's entirely possible I'm completely wrong, though.FYI: You have the Heater Core and Evap Core - backwards on where they mount.
Heater Core is the Bottom, and the Evap Core is mounted vertically.
No, it was only on the driver's side. If I went into the climate screen, and selected to *only* have it blow out the floor vents, the passenger side would do that but the driver side would still come out the front dash vents.As I am trying to determine the cause for your second issue, and that is air not being delivered to the feet. Was that both sides?
The issue with it not coming out the floor vents was not temperature-dependent. It was intermittent, though.... some days it would work, others it would not. When it was not working, I tried setting the temp all the way to HI, and all the way to LO, as well as cycling through defrost vents, front vents, floor vents... and on the driver's side it would blow air out the defrost vent or front vent when commanded, but when I commanded floor vents it would stay coming out the front vents.If you had the selected temp set to cold, might explain why the airflow would not change to the floor vents or as far as the actuator feedback position was seeing the door in cold position as it probably popped and clicked due to the binding door, and it lost actual position feedback.
*This* Is where things get super odd. In playing with the old box mechanism (which is at home, so I can't confirm at the moment) It seemed that ALL the airflow directors were locked together... which is super puzzling how it was possible that I was getting the symptoms I was where it *would* blow out the passenger floor vents but not the driver's. I'll take another look at the box when I'm home and see if I can determine how that was possible. It *could* be that the airflow director flaps were getting jammed partially closed such that they sealed pretty well on the passenger side but not the driver's, and while I could still feel airflow out the front vents I could not really feel any out the foot vents, though possibly there was *some* air moving there.Can any of the mode doors (airflow) move independently or are they on one single shaft driving both sides?
I've never seen this specific set of symptoms... but I'll poke around in the old box some more and see what I can learn.The reason I ask is I am trying to understand how in this example we can have no airflow from the passenger vents.
Dual Auto: 72 Deg
Drivers: Panel Vent Air - (flowing)
Passenger Panel Vent Air - (nothing) and (Floor Vents - nothing)
Dial Up: Passenger Temp - (Airflow Moves to the Floor - Both Sides)
Dial Down Passenger Temp - (Airflow Moves to Panel Vents - Both Sides)
I didn’t replace the steering bolt but I didn’t know I was supposed to. I’m not so sure the single pain in the ass bolt at the windshield needs completely removed. The heater core is on the bottom and I can confirm that from grabbing one of the lines and learning the hard way. Glad the job went well. Halfway through I was a little worried with all the wiring. I also broke the clips on the door step plastic and Ford only sells them in four packsThere is 1 bolt that the shop manual says should be discarded and replaced with a new one. It's the bolt that holds the steering column linkage together, and I did get a new one to replace it. Ford won't sell you just 1 though, as they come in a pack of 4 - but a bag of 4 is still pretty cheap. Here's a screenshot of the 2 parts I ordered - the bolts and the heater box. Note that this heater box is for trucks with dual climate control.... if yours has single zone, it's a slightly different part number:

This bolt is not torqued terribly tightly (around 12-13 ftlb, iirc) so it's not a torque to yield.. but it does come with blue thread locker pre-installed on the bolt threads, so I suspect the reason Ford says to replace it is so you get fresh thread locker on the joint. If you are comfortable with just re-using the old bolt, use some fresh lock tite. For $1.88 though, I decided just not to mess with re-using the old bolt. Peace of mind and all that.
I did not need to replace any weatherstripping or insulation. I also could not see anything obviously different between the 2 boxes... the plastic looked/felt the same, etc. The new box does have a bit of a mild odor... it's hard to describe other than "newish plastic/industrial/foam". I noticed it when I first pulled it out of the box, but didn't really think much about it. However, now that it's installed the truck interior does smell a bit ... different - but it's fading quickly.

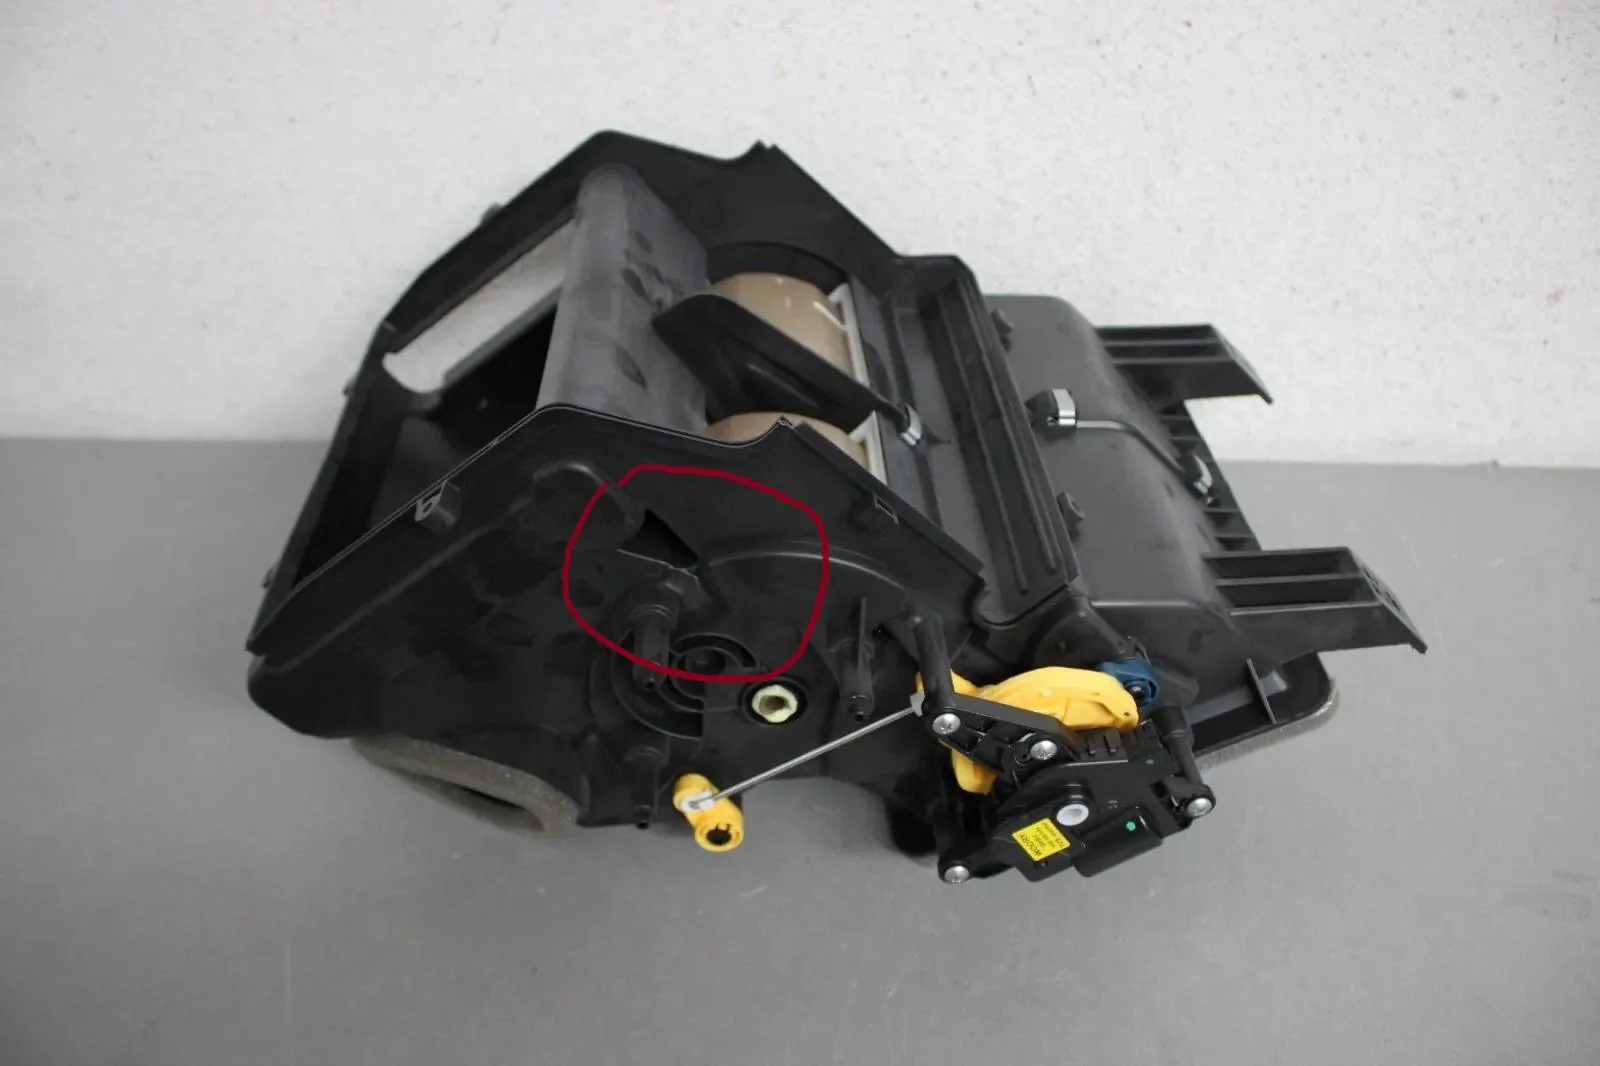
That’s not an actual hole. It’s just a cavity. No air can pass. That would be a horrible design that would still allow air to flow and probably make a lot of noise. The actual problem is the driver side blend door not working. A new blend box is requiredI am thinking that when airflow distribution is - (Not Equal) the airflow is being expelled here.
(Circled)
If in the same scenario as above, Drivers Air - Flowing and Passenger Air - Nothing.
If you dial up the blower motor speed, you can hear the air in the ductwork but no flow.
I would have to check if it is being expelled here when it is in that scenario.
It is something simple in the control of airflow that we are not seeing, and it may be a pressure thing (unequal pressure) in the box that will allow the floor doors (?) to rotate separately. blocking off airflow from traveling up to the top of the box (panel vents)
The unequal pressure is generated by the Temp Doors Positions.
Just Guessing here, to give you a possible idea to look at when moving the doors. ?
Note:
It is not a failure; I feel it is designed that way for better temperature control, but if a temperature door actuator is failing, this split airflow control may not be work correctly as a result.

Ok , so that’s just a cavity.That’s not an actual hole. It’s just a cavity. No air can pass. That would be a horrible design that would still allow air to flow and probably make a lot of noise. The actual problem is the driver side blend door not working. A new blend box is required