Sponsored

EGR DPFE Sensor Assembly Replacement Write-Up (LB5Z-9J433-B)

got3fords

Well-Known Member
First Name
James
Joined
Apr 12, 2021
Threads
131
Messages
5,366
Reaction score
14,000
Location
22973
Vehicle(s)
2026 Marsh Gray Ranger Raptor, 1995 Harley XLH1200
Occupation
Mom Joke Professional
What was the code you had?
and
What was the DPFE sensor reading (Live Data)?

or was this a blindly changed shot gunned part?

Generally, the associated codes for the DPFE - P139A - P139B - P139C and P0401 - P0402 will clear on their own after 3 drive cycles with EGR events - (light will go out) and 40 warm up cycles to fully clear from history.

I am about 90% complete on my EGR System operation guide - so posting soon.
Since you didn't quote, not sure who your question is addressed to.
Sponsored


airline tech

Well-Known Member
Joined
Aug 24, 2022
Threads
28
Messages
4,499
Reaction score
8,592
Location
Midwest - KS
Vehicle(s)
2022 Ranger Lariat-Super Crew, Cactus Gray
Occupation
Aircraft Tech
Is there @ny sort of code reset or is it pretty much just plug and play reset?
What was the code you had?
and
What was the DPFE sensor reading (Live Data)?

or was this a blindly changed shot gunned part?

Generally, the associated codes for the DPFE - P139A - P139B - P139C and P0401 - P0402 will clear on their own after 3 drive cycles with EGR events - (light will go out) and 40 warm up cycles to fully clear from history.

I am about 90% complete on my EGR System operation guide - so posting soon.
 

got3fords

Well-Known Member
First Name
James
Joined
Apr 12, 2021
Threads
131
Messages
5,366
Reaction score
14,000
Location
22973
Vehicle(s)
2026 Marsh Gray Ranger Raptor, 1995 Harley XLH1200
Occupation
Mom Joke Professional
What was the code you had?
and
What was the DPFE sensor reading (Live Data)?

or was this a blindly changed shot gunned part?

Generally, the associated codes for the DPFE - P139A - P139B - P139C and P0401 - P0402 will clear on their own after 3 drive cycles with EGR events - (light will go out) and 40 warm up cycles to fully clear from history.

I am about 90% complete on my EGR System operation guide - so posting soon.
I don't think he had any codes, he was just inquiring further into the DPFE thing in general after I brought up.
 

Mike1

Member
First Name
Mike
Joined
Aug 24, 2019
Threads
0
Messages
5
Reaction score
13
Location
Georgia
Vehicle(s)
Ranger XLT SPORT
Shout out to Trash Panda. Great write up. I have a 2019 that has been running like crap for months. I ran across this thread and ordered the replacement sensor from Amazon. The ad did not show a brand but when received, it was Branded FOMOCO, Malaysia just like the original. I shredded my arms trying to get the lower lines off but nothing a few band-aids and time won't fix. Anyway, The result is fantastic. This simple fix made an unbelievable difference in the way my truck drives now.
Big thanks to everyone who has added to this thread. I was able to glean A LOT of very useful info from this thread alone.
Mike1
 

got3fords

Well-Known Member
First Name
James
Joined
Apr 12, 2021
Threads
131
Messages
5,366
Reaction score
14,000
Location
22973
Vehicle(s)
2026 Marsh Gray Ranger Raptor, 1995 Harley XLH1200
Occupation
Mom Joke Professional
Shout out to Trash Panda. Great write up. I have a 2019 that has been running like crap for months. I ran across this thread and ordered the replacement sensor from Amazon. The ad did not show a brand but when received, it was Branded FOMOCO, Malaysia just like the original. I shredded my arms trying to get the lower lines off but nothing a few band-aids and time won't fix. Anyway, The result is fantastic. This simple fix made an unbelievable difference in the way my truck drives now.
Big thanks to everyone who has added to this thread. I was able to glean A LOT of very useful info from this thread alone.
Mike1
I had about 75k miles on mine when I replaced my DPFE sensor. I had no real reason to replace it, except for a couple weird shifts here and there. After I replaced it, I have noticed no noticeable difference, but perhaps maybe the slightest improvement is overall performance.


Sabertooth

Member
Joined
Feb 25, 2020
Threads
0
Messages
7
Reaction score
20
Location
Northern Virginia
Vehicle(s)
2019 Saber Lariat
I have around 86k and had just gotten used to a few hard or delayed shifts when I first started out or an occasional slow or hard shift in day to day use. Saw this thread while trolling and thought I would give it a try. NIGHT AND DAY! I forgot how smooth this truck could shift. It truly feels like a new truck and I had the trans service done at 75k with no big change in performance. Thanks for this post.
 

lariat

Well-Known Member
Joined
Dec 17, 2023
Threads
10
Messages
345
Reaction score
672
Location
Western US
Vehicle(s)
Ranger Lariat
Occupation
student
I purchased a new sensor 2 years ago and haven't installed it yet, but need to. I'm always worried I'll mess something up and will be left with a truck I can't drive even though I'm very mechanically inclined, race bikes, etc, but it's such a tight area to work in.
 
OP
OP
Trash Panda

Trash Panda

Well-Known Member
First Name
Cody
Joined
Aug 8, 2021
Threads
12
Messages
178
Reaction score
729
Location
Alabama
Vehicle(s)
2019 Ranger Lariat
I purchased a new sensor 2 years ago and haven't installed it yet, but need to. I'm always worried I'll mess something up and will be left with a truck I can't drive even though I'm very mechanically inclined, race bikes, etc, but it's such a tight area to work in.
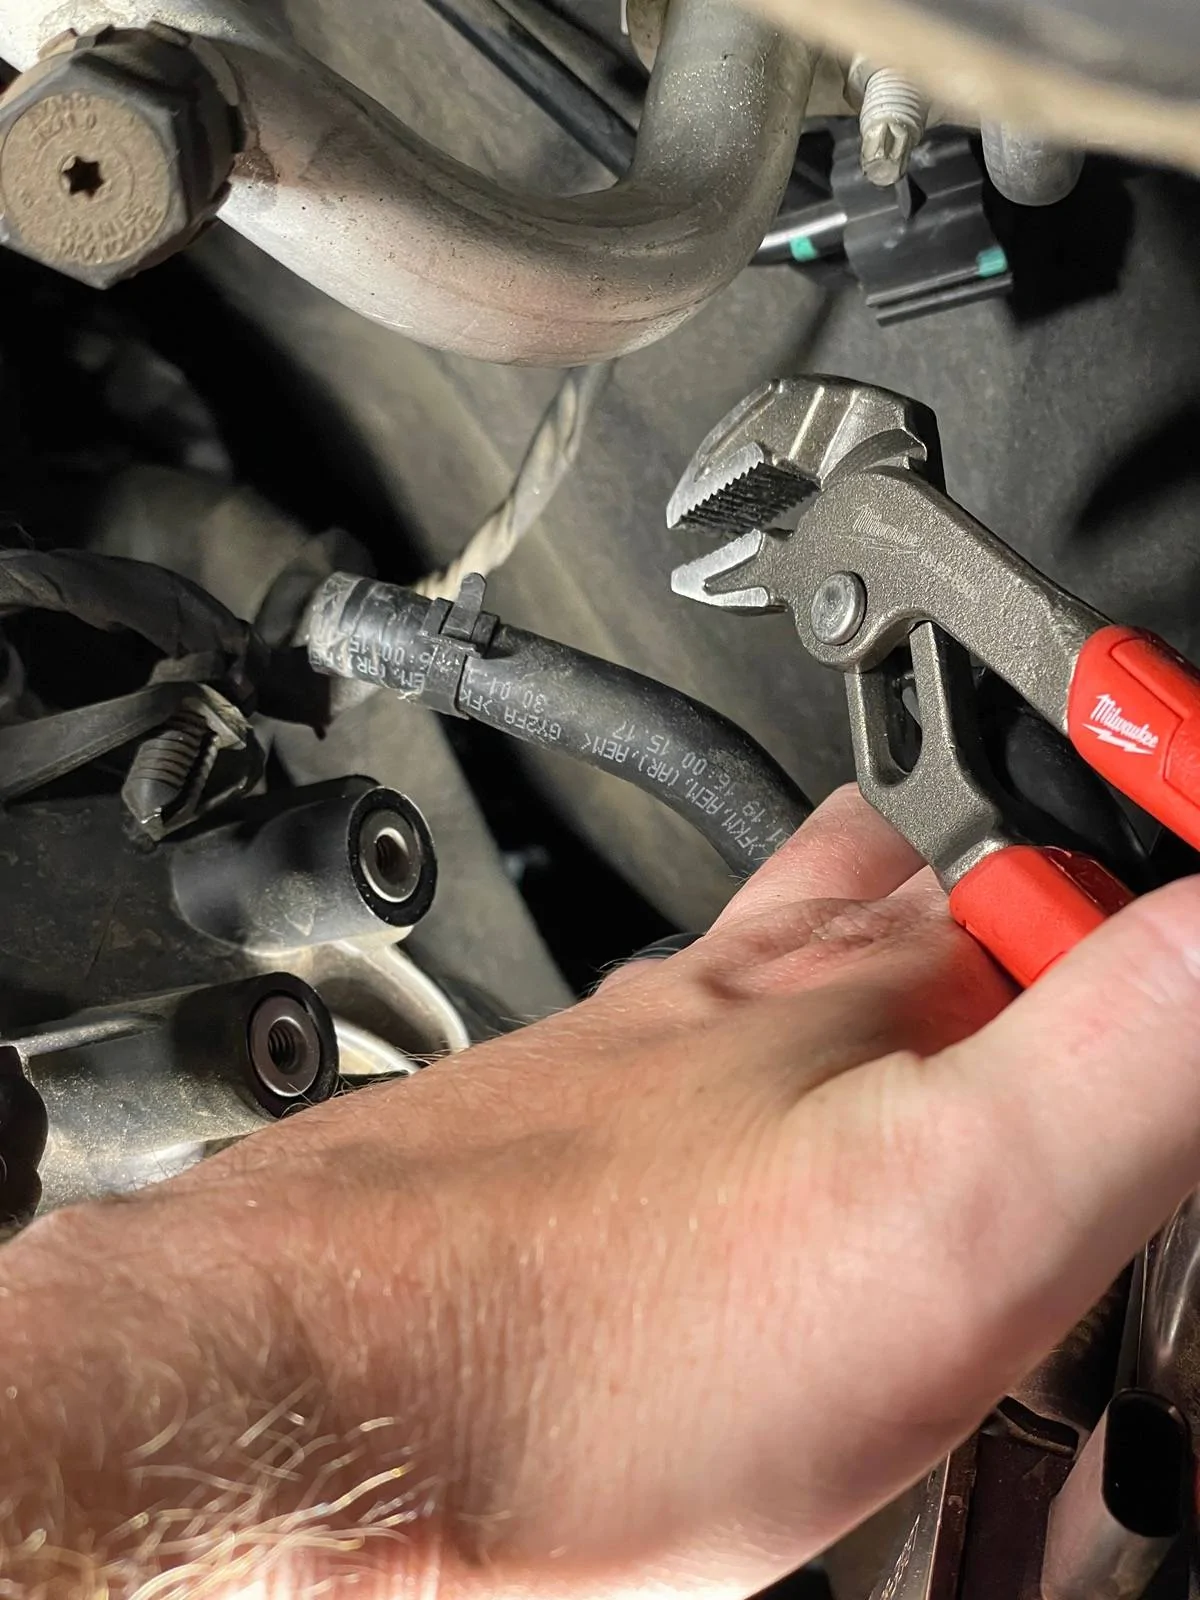
Don’t overthink it ; just take it slow and follow the instructions. The hardest part is taking the hoses loose and the trick is to be wearing a headlamp for visibility and use one hand to compress the clamps with your pliers and the other hand to pull the hose to the right!
 

TJC

Well-Known Member
First Name
Tony
Joined
Aug 28, 2020
Threads
46
Messages
3,978
Reaction score
10,028
Location
North Carolina
Vehicle(s)
93 Miata, 05 Ranger 4x4, 20 Ranger 4x4, 23 CX-5
I purchased a new sensor 2 years ago and haven't installed it yet, but need to. I'm always worried I'll mess something up and will be left with a truck I can't drive even though I'm very mechanically inclined, race bikes, etc, but it's such a tight area to work in.
It is one of the easier parts to replace (just the sensor). And once it is done, the next time you need to do it will require only 10 minutes. No need to pull the hoses, just the sensor... which is almost trivial.

Pull the sensor and the hoses the first time around, replace the sensor reusing the original hoses. Use small replacement hose clamps on the sensor hose connections, and orient the clamps head so they easily reached with a nut driver. Easy Peezy!

I'm 5'8" and needed a step stool to reach over the engine to get to it, but I need that step stool to get to most anything under the hood! Even adding/checking the oil! :LOL:
 

CLopey

Well-Known Member
First Name
Christian
Joined
Mar 29, 2024
Threads
18
Messages
92
Reaction score
107
Location
Los Angeles
Vehicle(s)
2019 Ford Ranger XLT
Occupation
Coach
Greetings All,

Dropping another one of my write-ups on the infamous bucking/surging epidemic our Rangers seem to have.
Check out the "Bucking/Surging Epidemic" thread started by @Tim Vogt Sr. for every piece of information you could want.
https://www.ranger5g.com/forum/threads/bucking-surging-epidemic.14581/
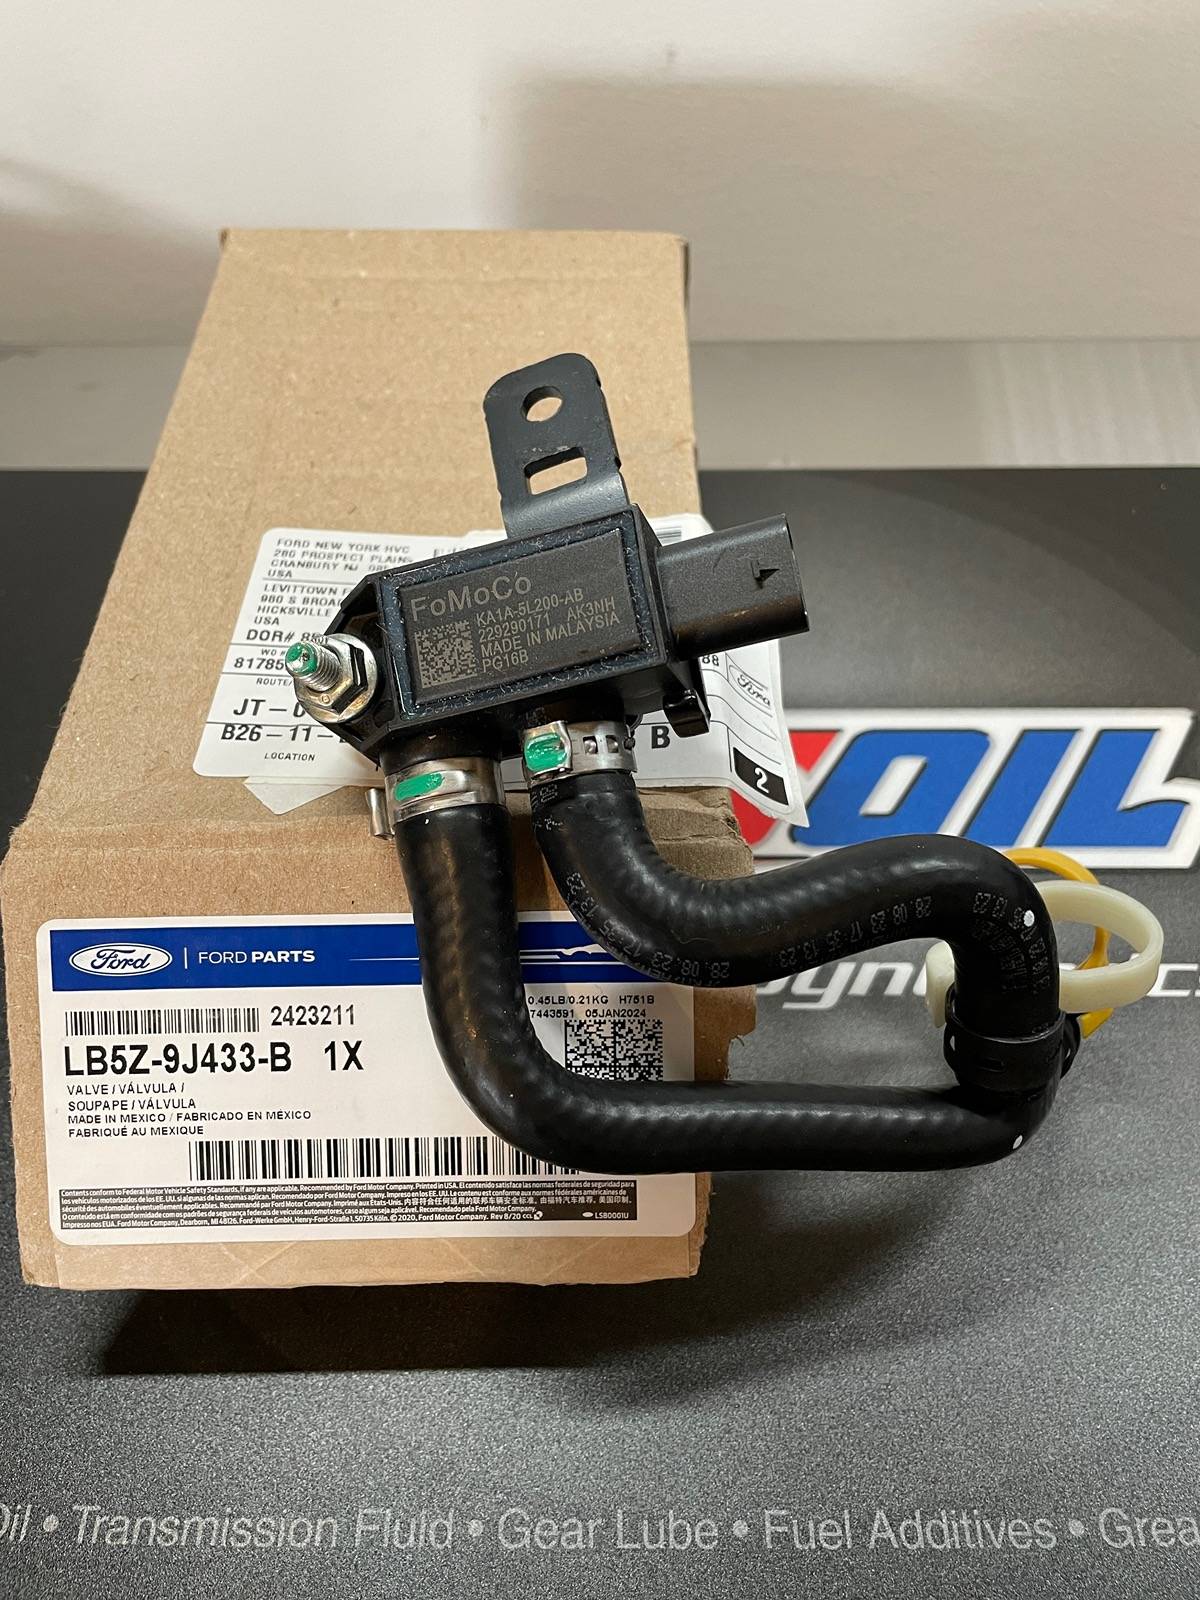
There are two ways to do this job, simply the replacing the DPFE Sensor itself (Ford KA1Z-5L200-A or KA1A-5L200-AB) or the entire assembly (Ford LB5Z-9J433-B). This write-up is geared towards replacing the entire assembly.

My symptoms were prevalent in the low RPM and low speed range. I drive like a peepaw and slowly pulling out of my driveway I would get a "misfire" feeling but no check engine light. I did my plugs last week so an actual misfire would be highly unlikely so my next step was the DPFE sensor. The transmission would search for gears at low RPMs and sometimes it would feel like driving a manual in too high of a gear through my neighborhood.

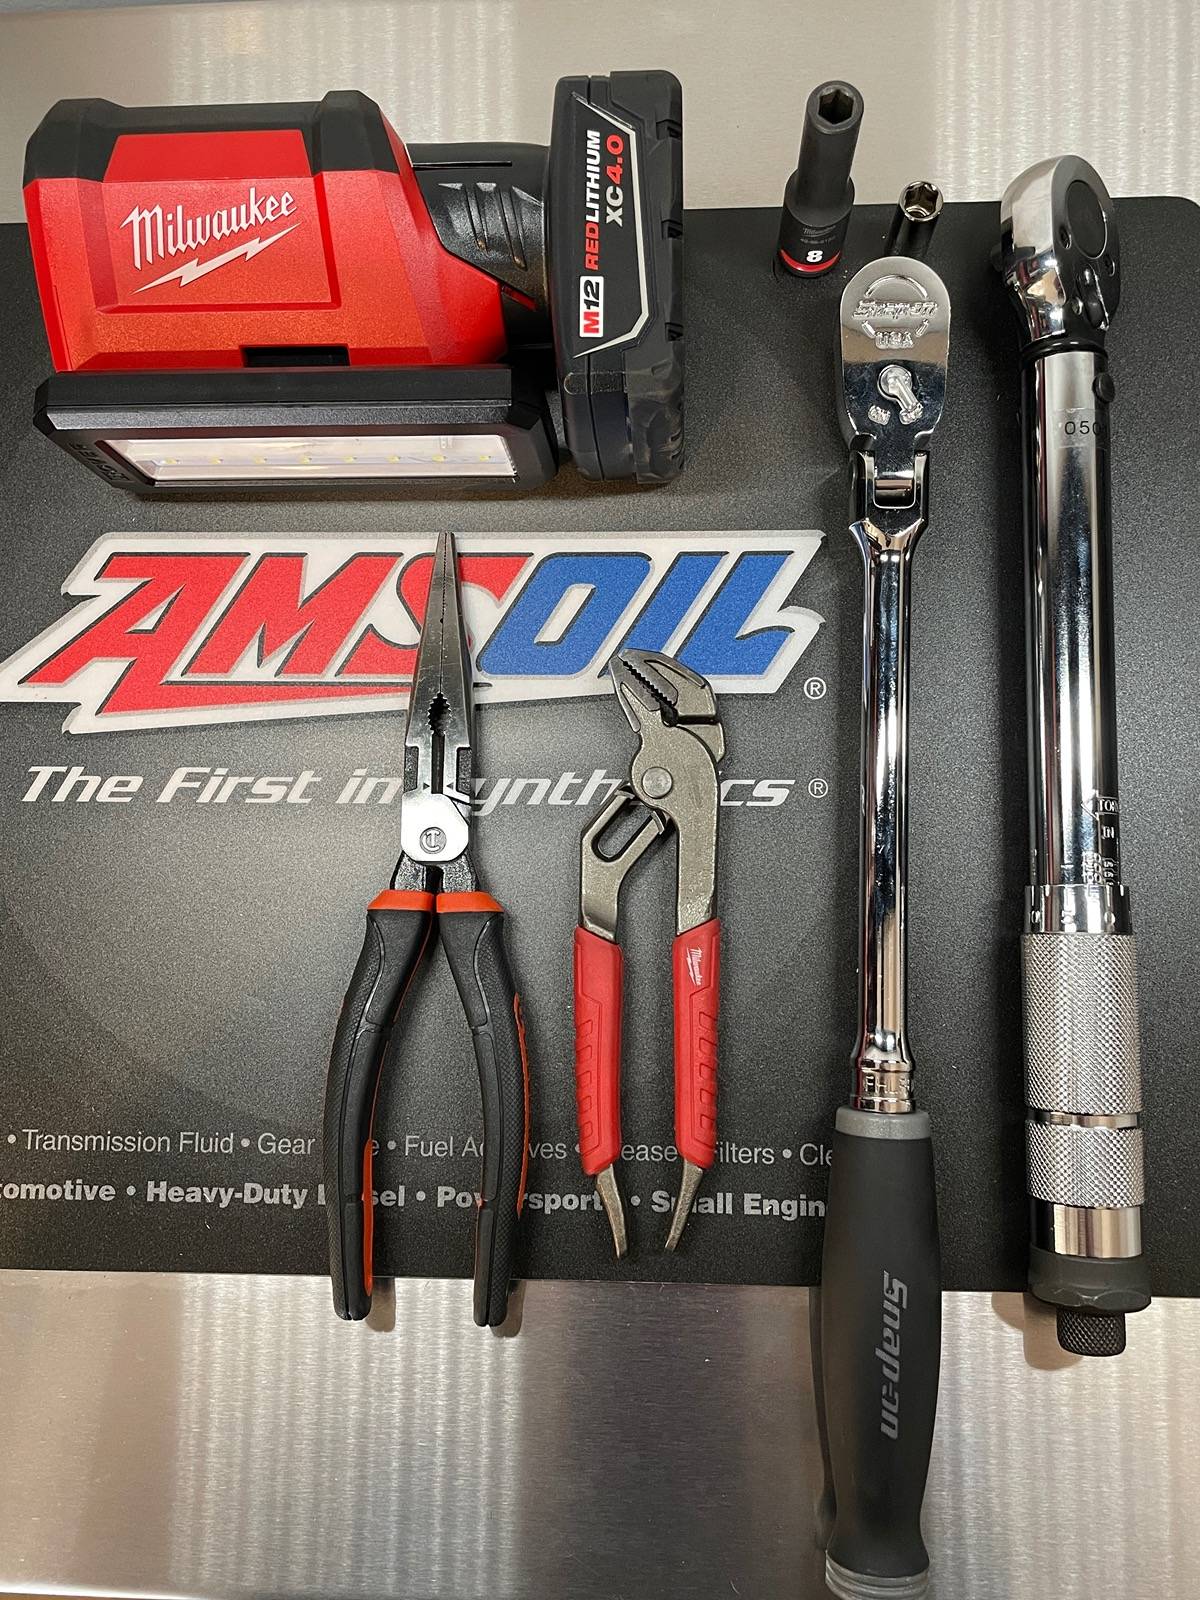
Supplies Needed :
-DPFE Sensor Assembly (Ford LB5Z-9J433-B) ($97 on @LevittownFordParts.com)
-3/8" or 1/4" Ratchet
-8mm shallow and deep sockets
-1.5" extension (if desired)
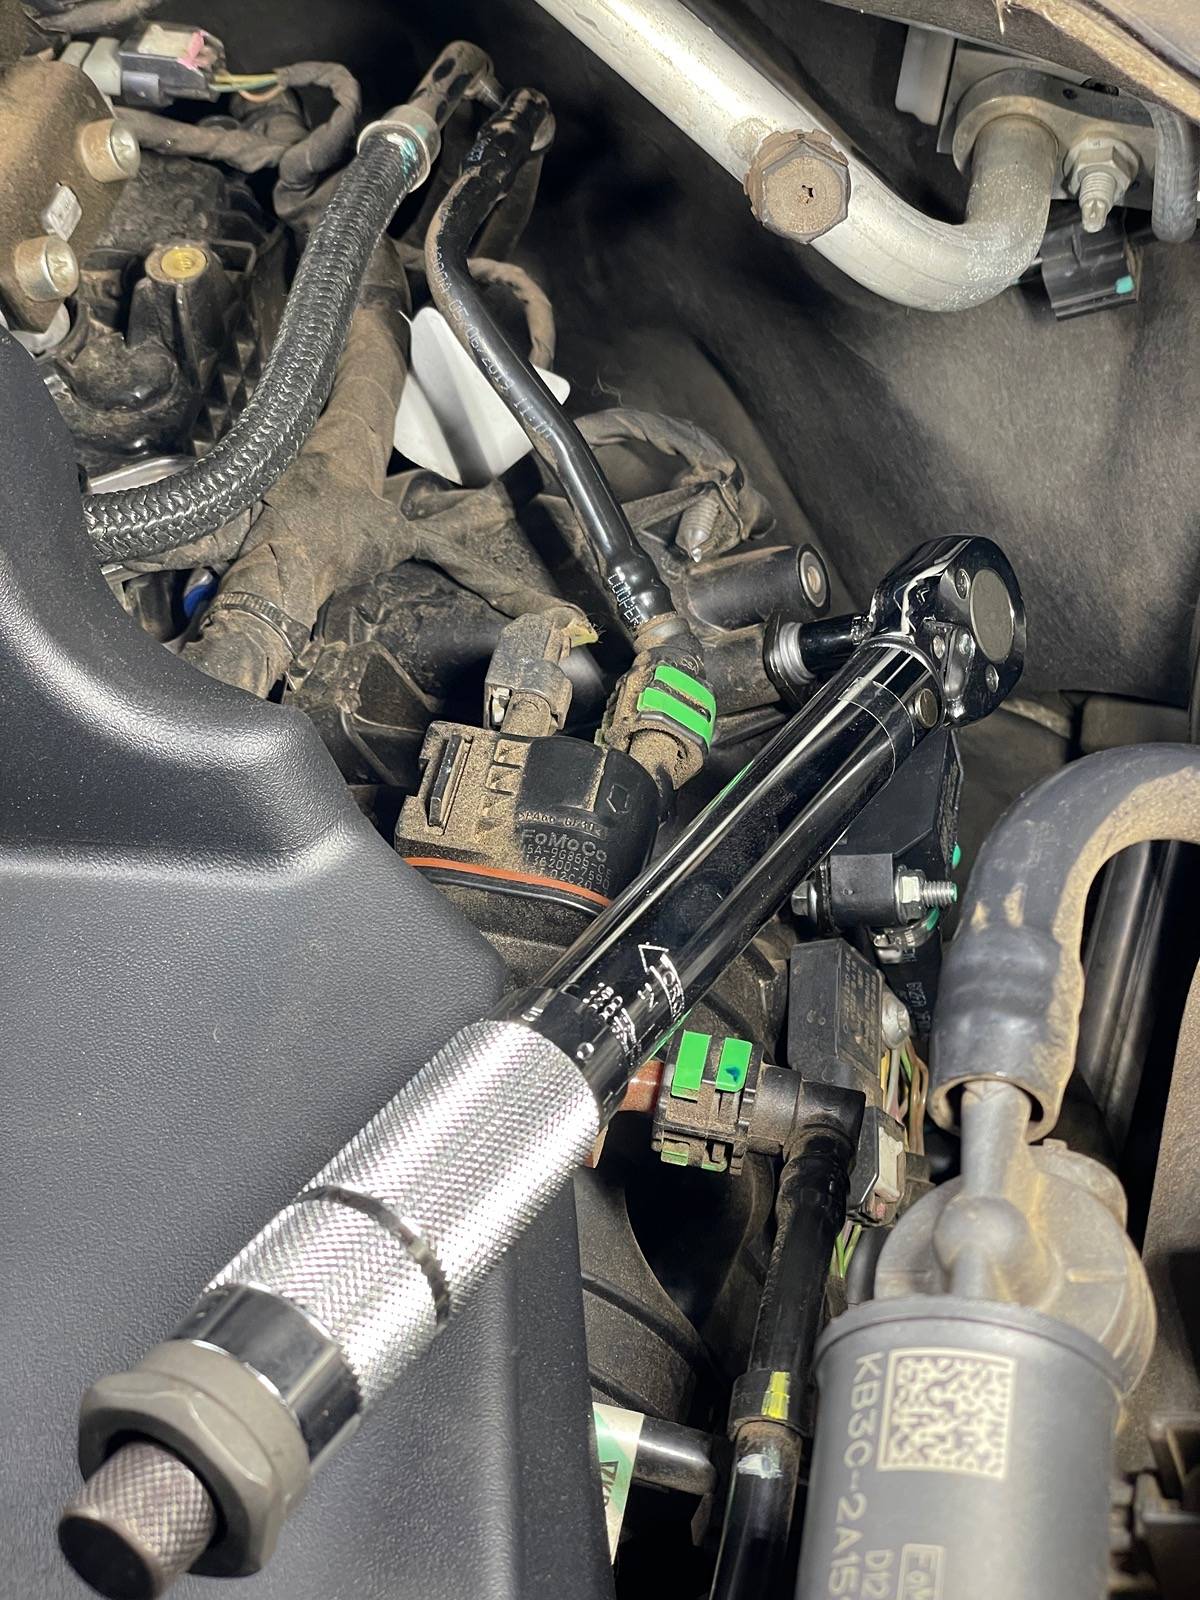
-Torque Wrench set to 97 in.lbs
-Needle Nose Pliers
-Straight-Jaw Pliers (I used my Milwaukee 6" 48-22-6306 pliers)
-LIGHT (Headlamp, Milwaukee Rover, etc)
-Work Platform or Step Ladder

IMG_2475.jpeg
IMG_2457.jpeg


Step One :

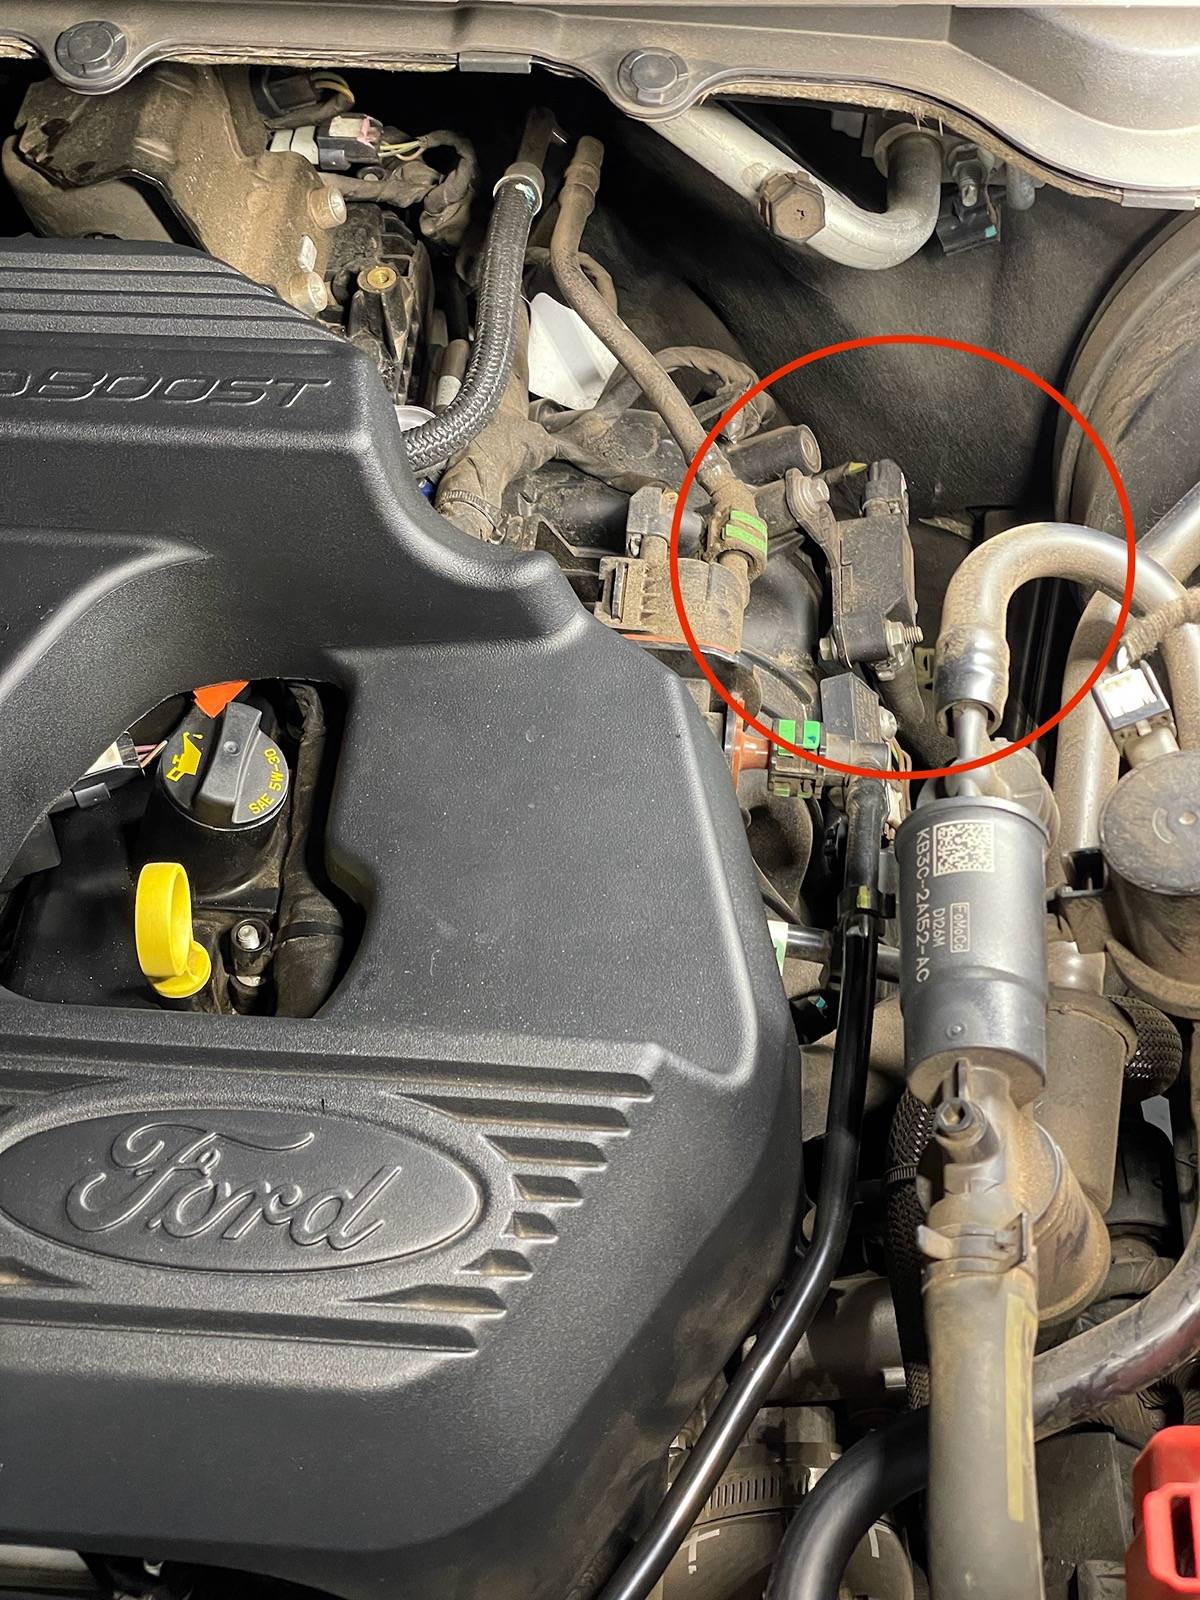
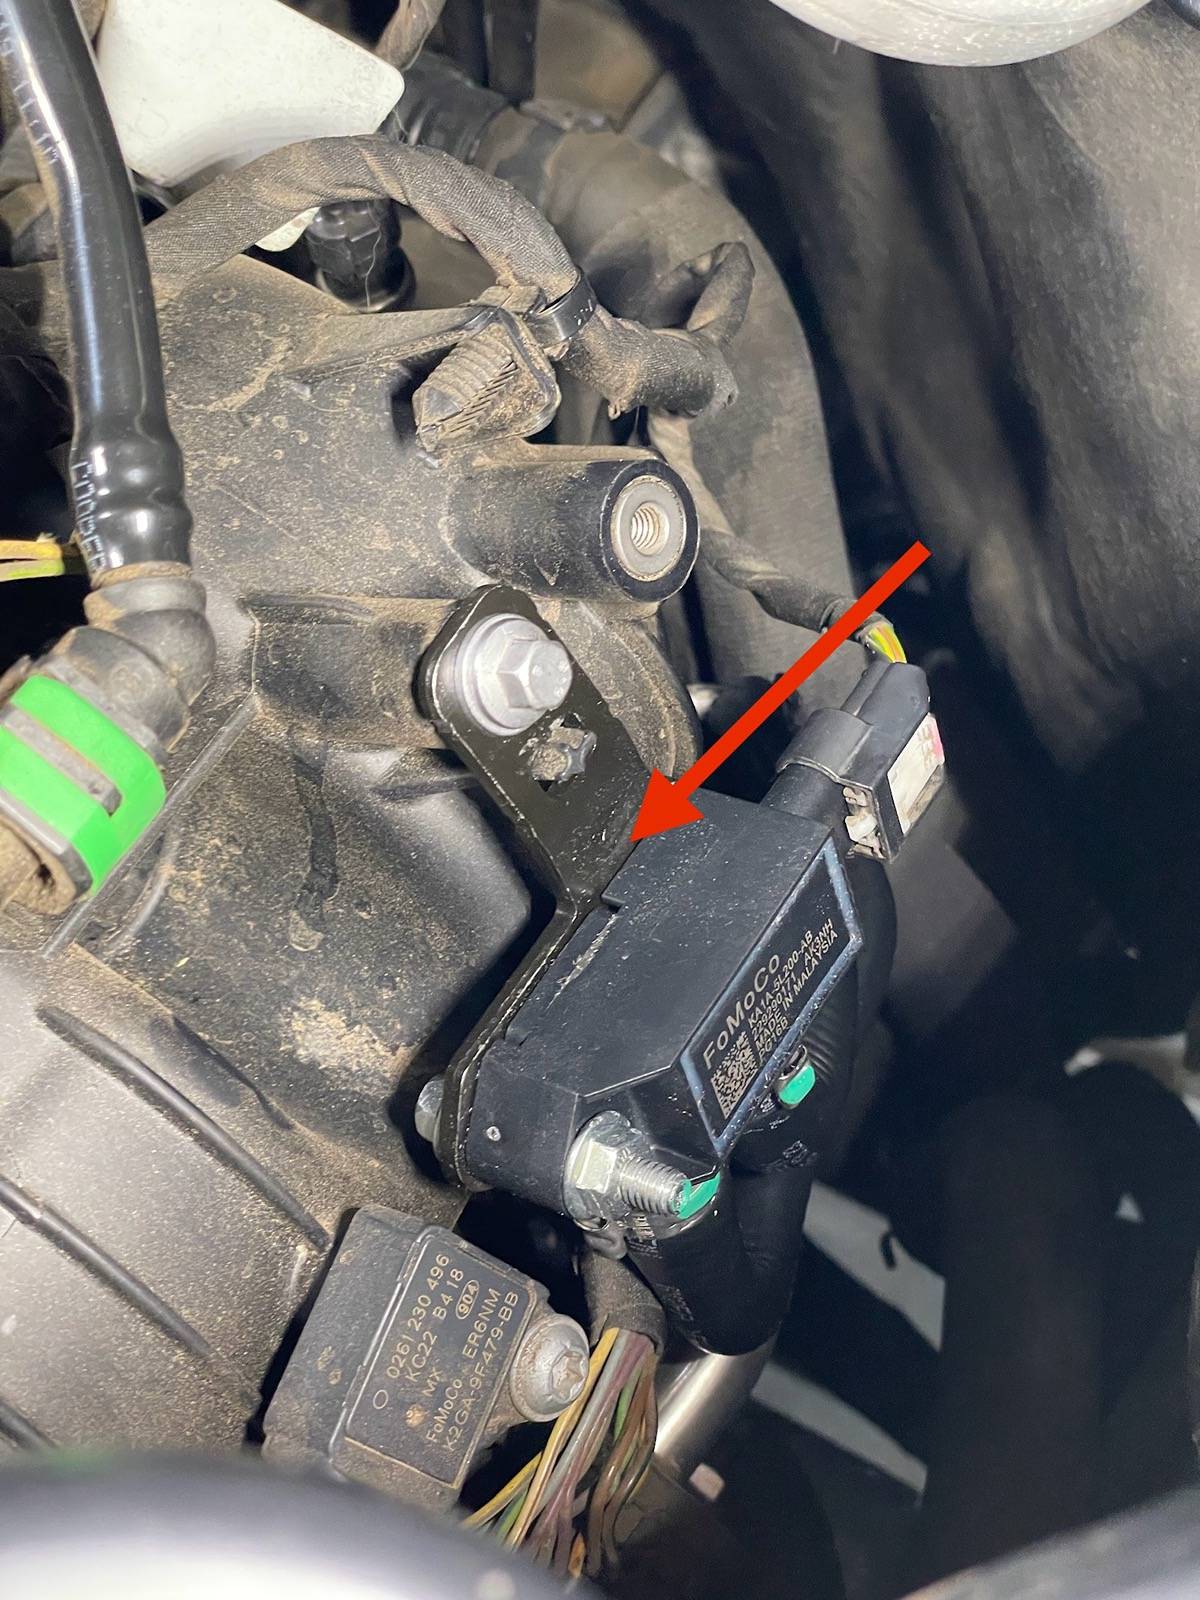
Pop the hood and locate the DPFE sensor. It is located near the back side of the engine on the driver's side of your Ranger near the brake booster.

IMG_2452.jpeg
IMG_2455.jpeg


STEP TWO : (*You could swap this with Step Three if desired)

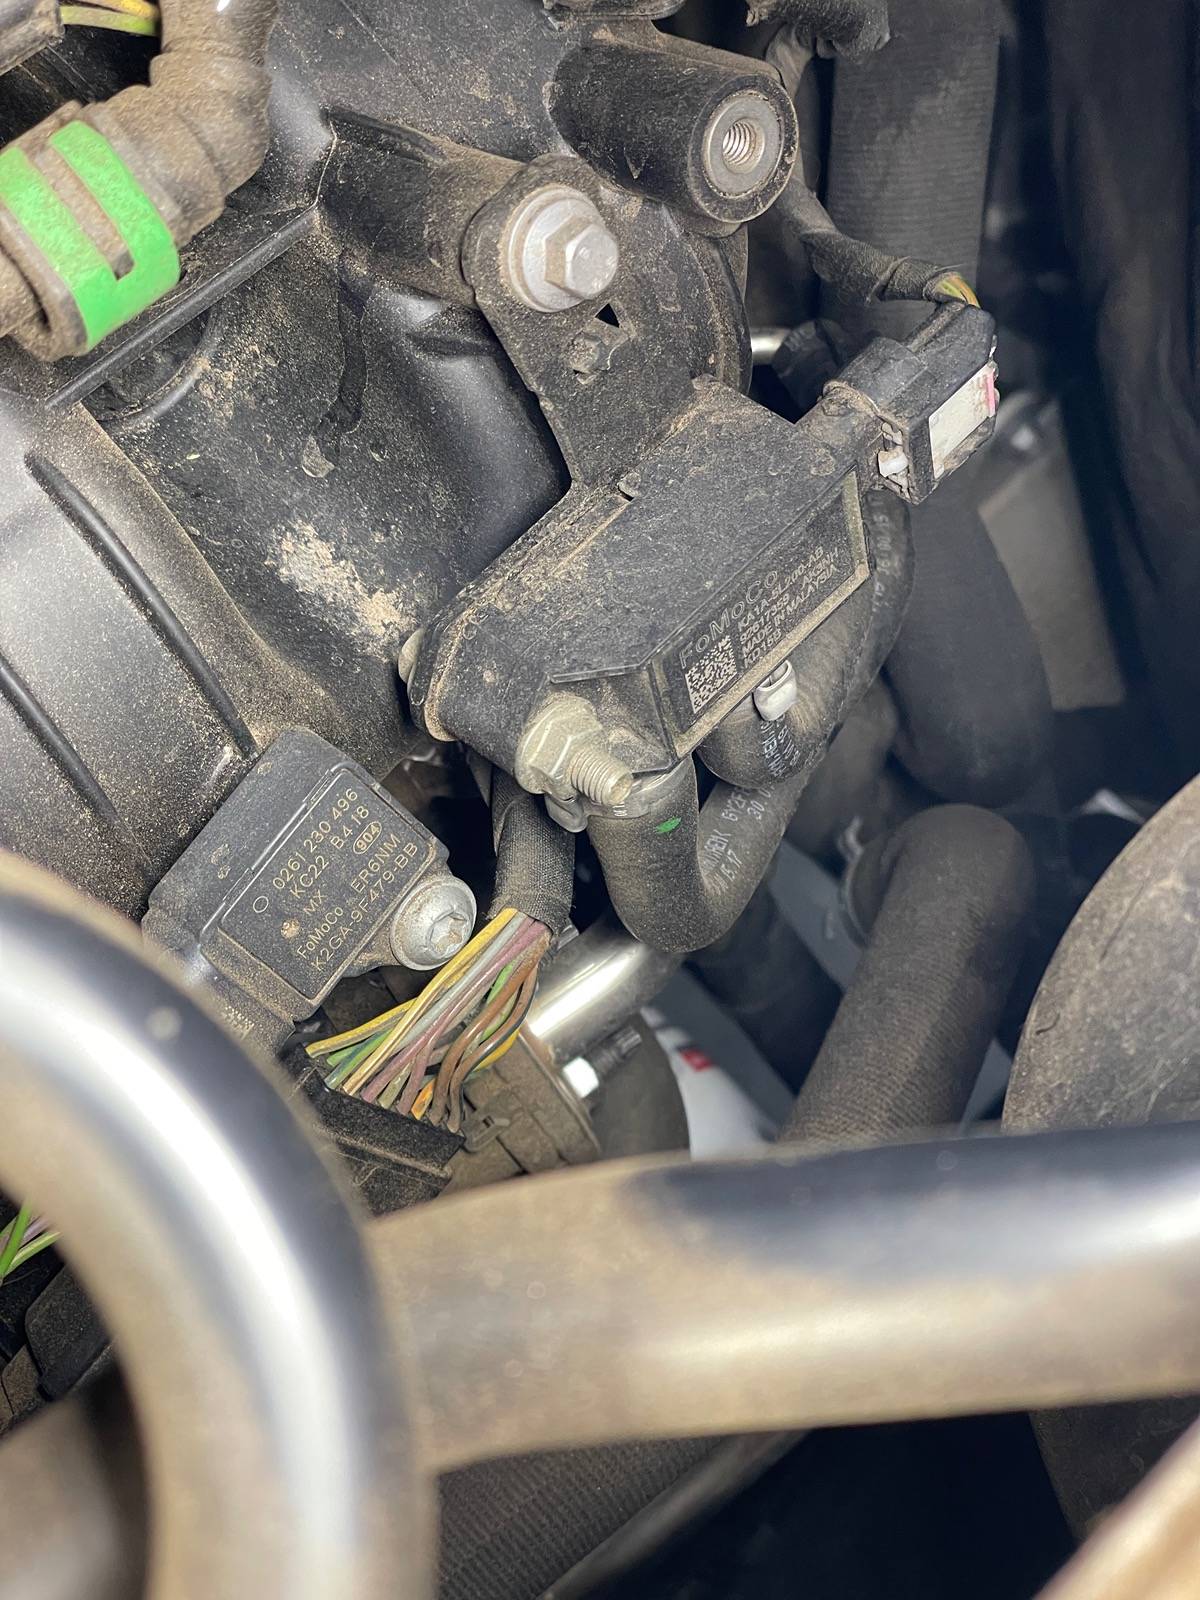
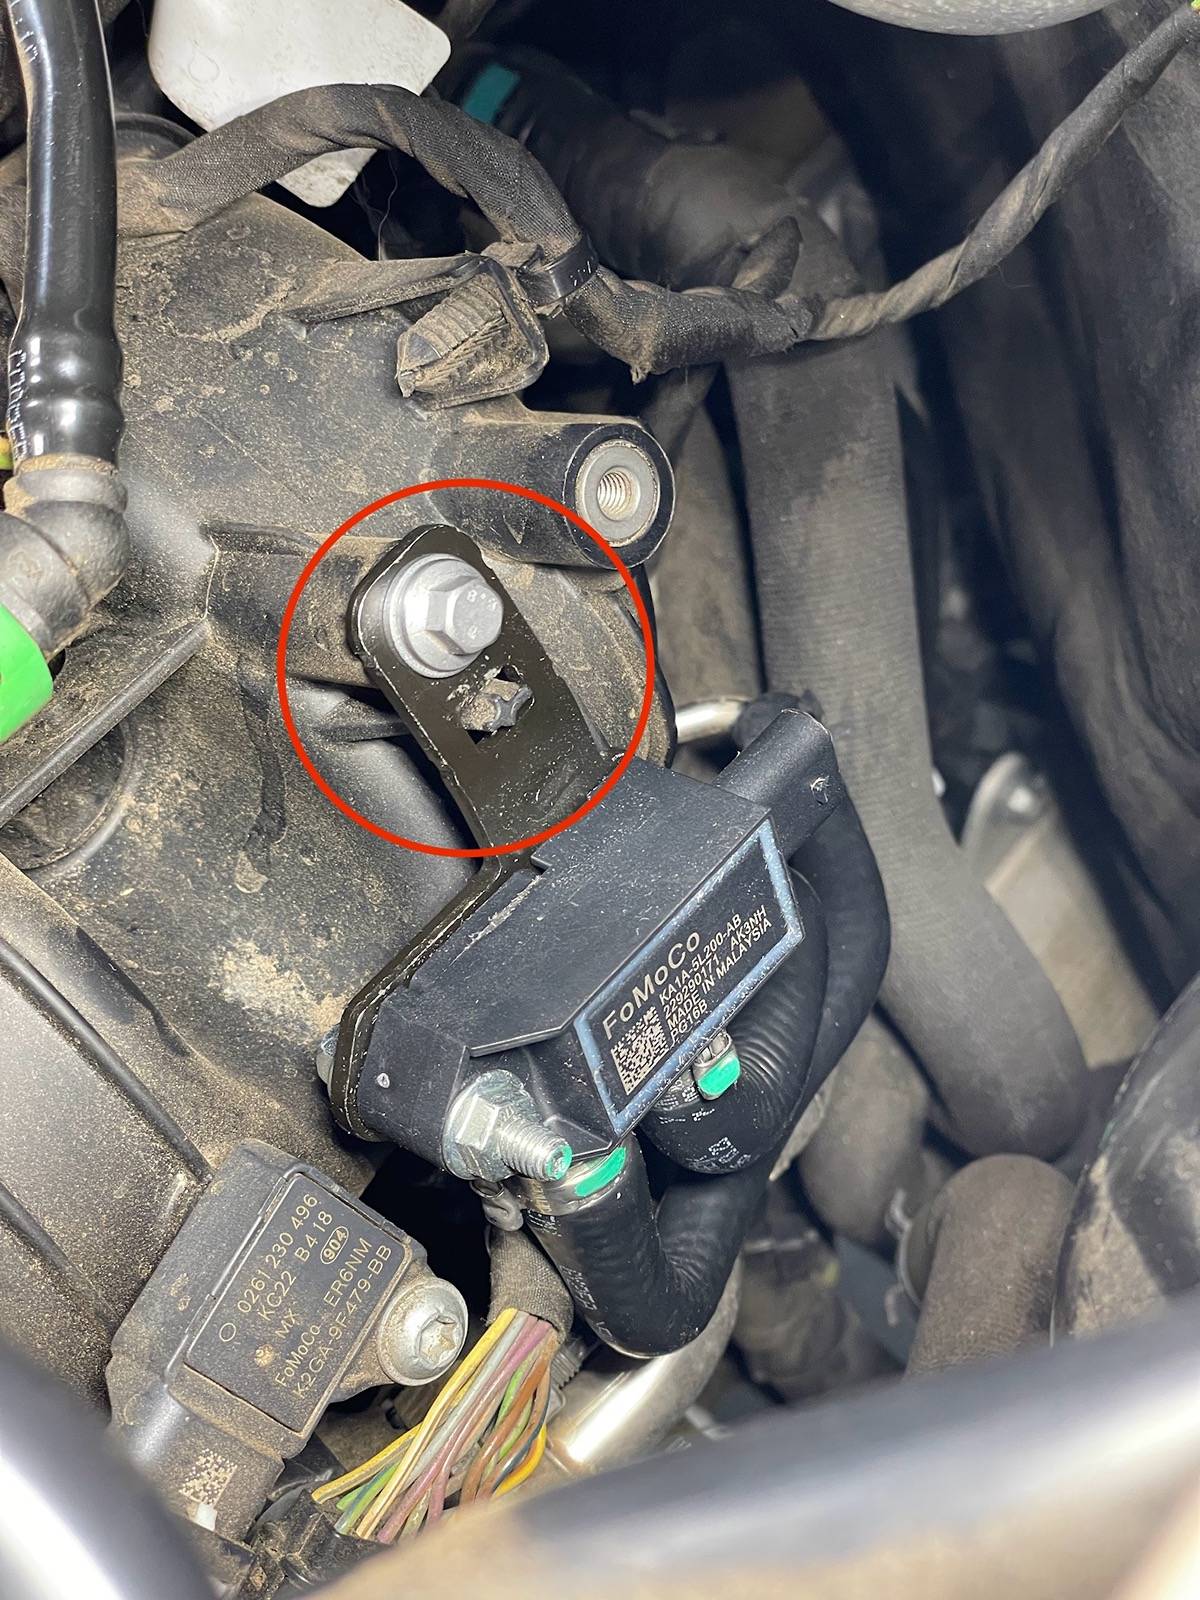
Use your Ratchet and 8mm socket to loosen the single mounting bolt on the top. A deep socket is perfect for this without the brake booster being in the way.
Once you loosen the 8mm bolt, you can easily unthread it all the way using your fingertips to reduce the chances of dropping a socket or the bolt in to the engine bay.

*NOTE there is a washer with the 8mm bolt so be sure to not drop it.

IMG_2458.jpeg


STEP THREE : (*You could swap this with Step Two if desired)

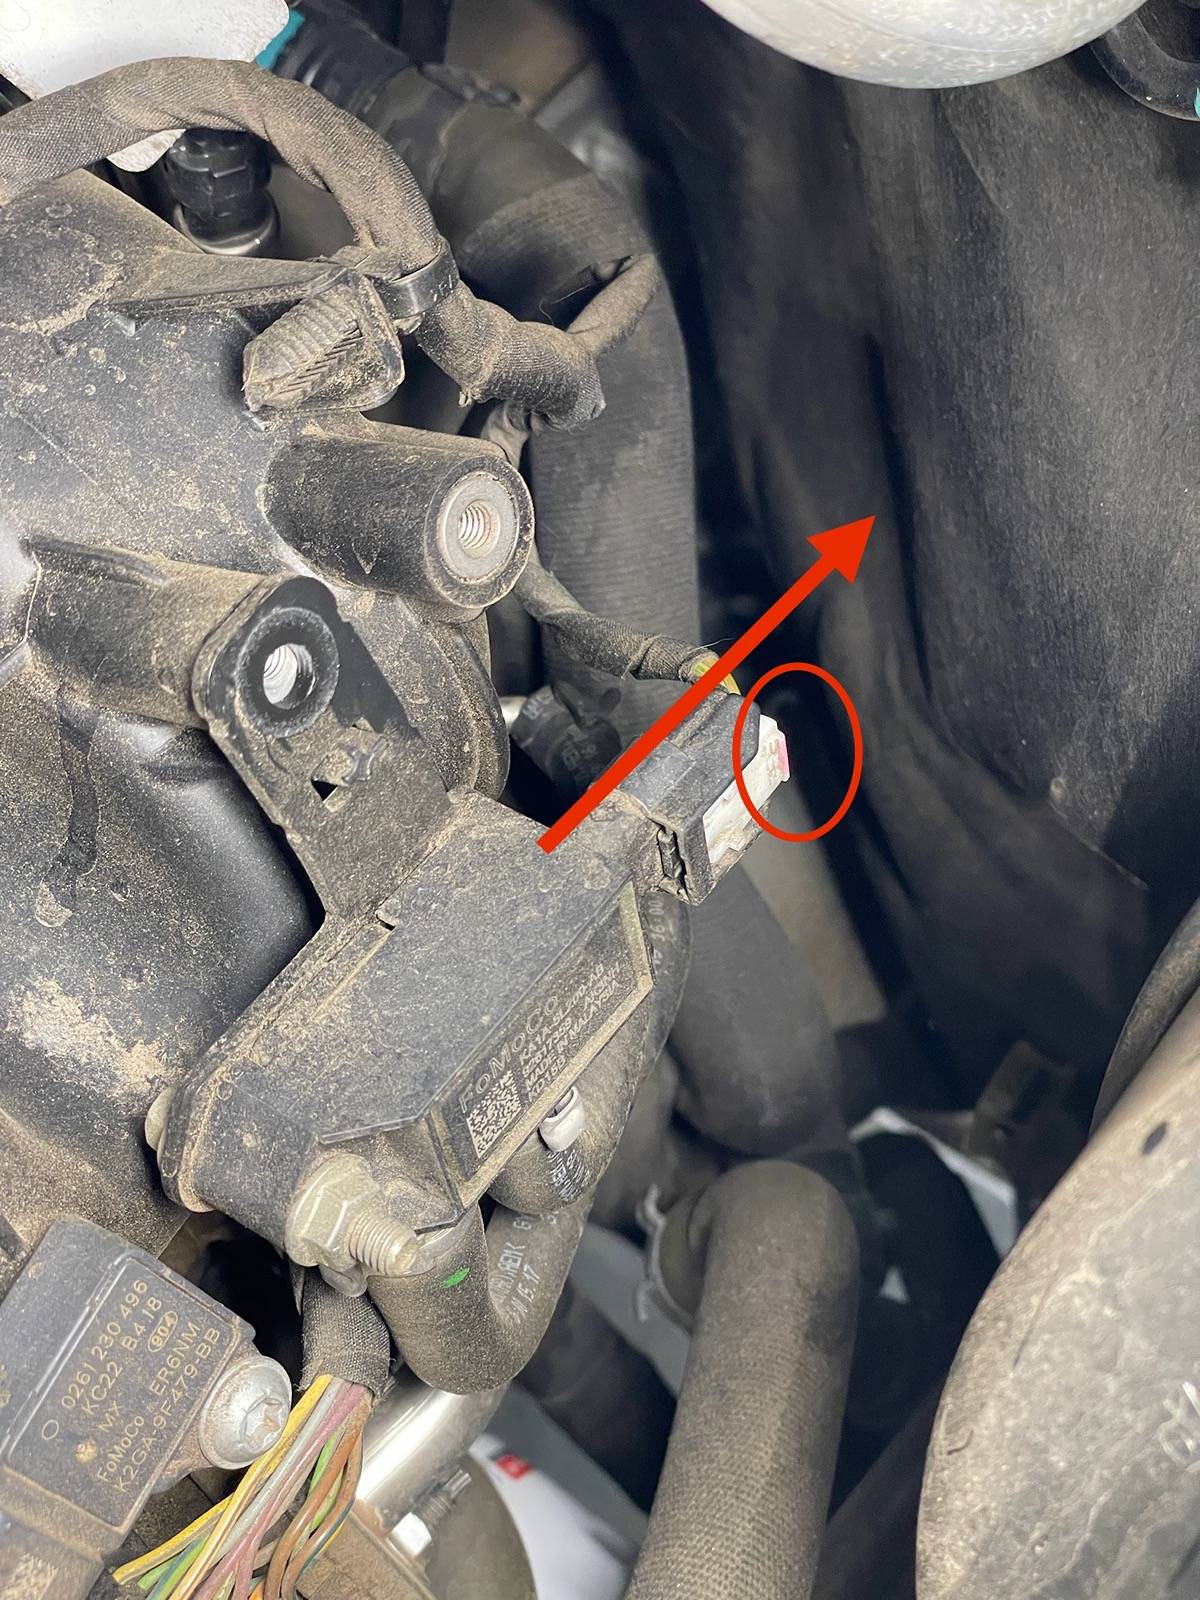
Remove the connector from the DPFE sensor. If you read my Spark Plug write up, the connector works just like the coil pack connectors. Use your fingernail to slide the locking tab out (circled) and wiggle the connector off.
You can hang the connector out of the way on the metal line in the top right of the photo below to prevent damage.

IMG_2460.jpeg


STEP FOUR :

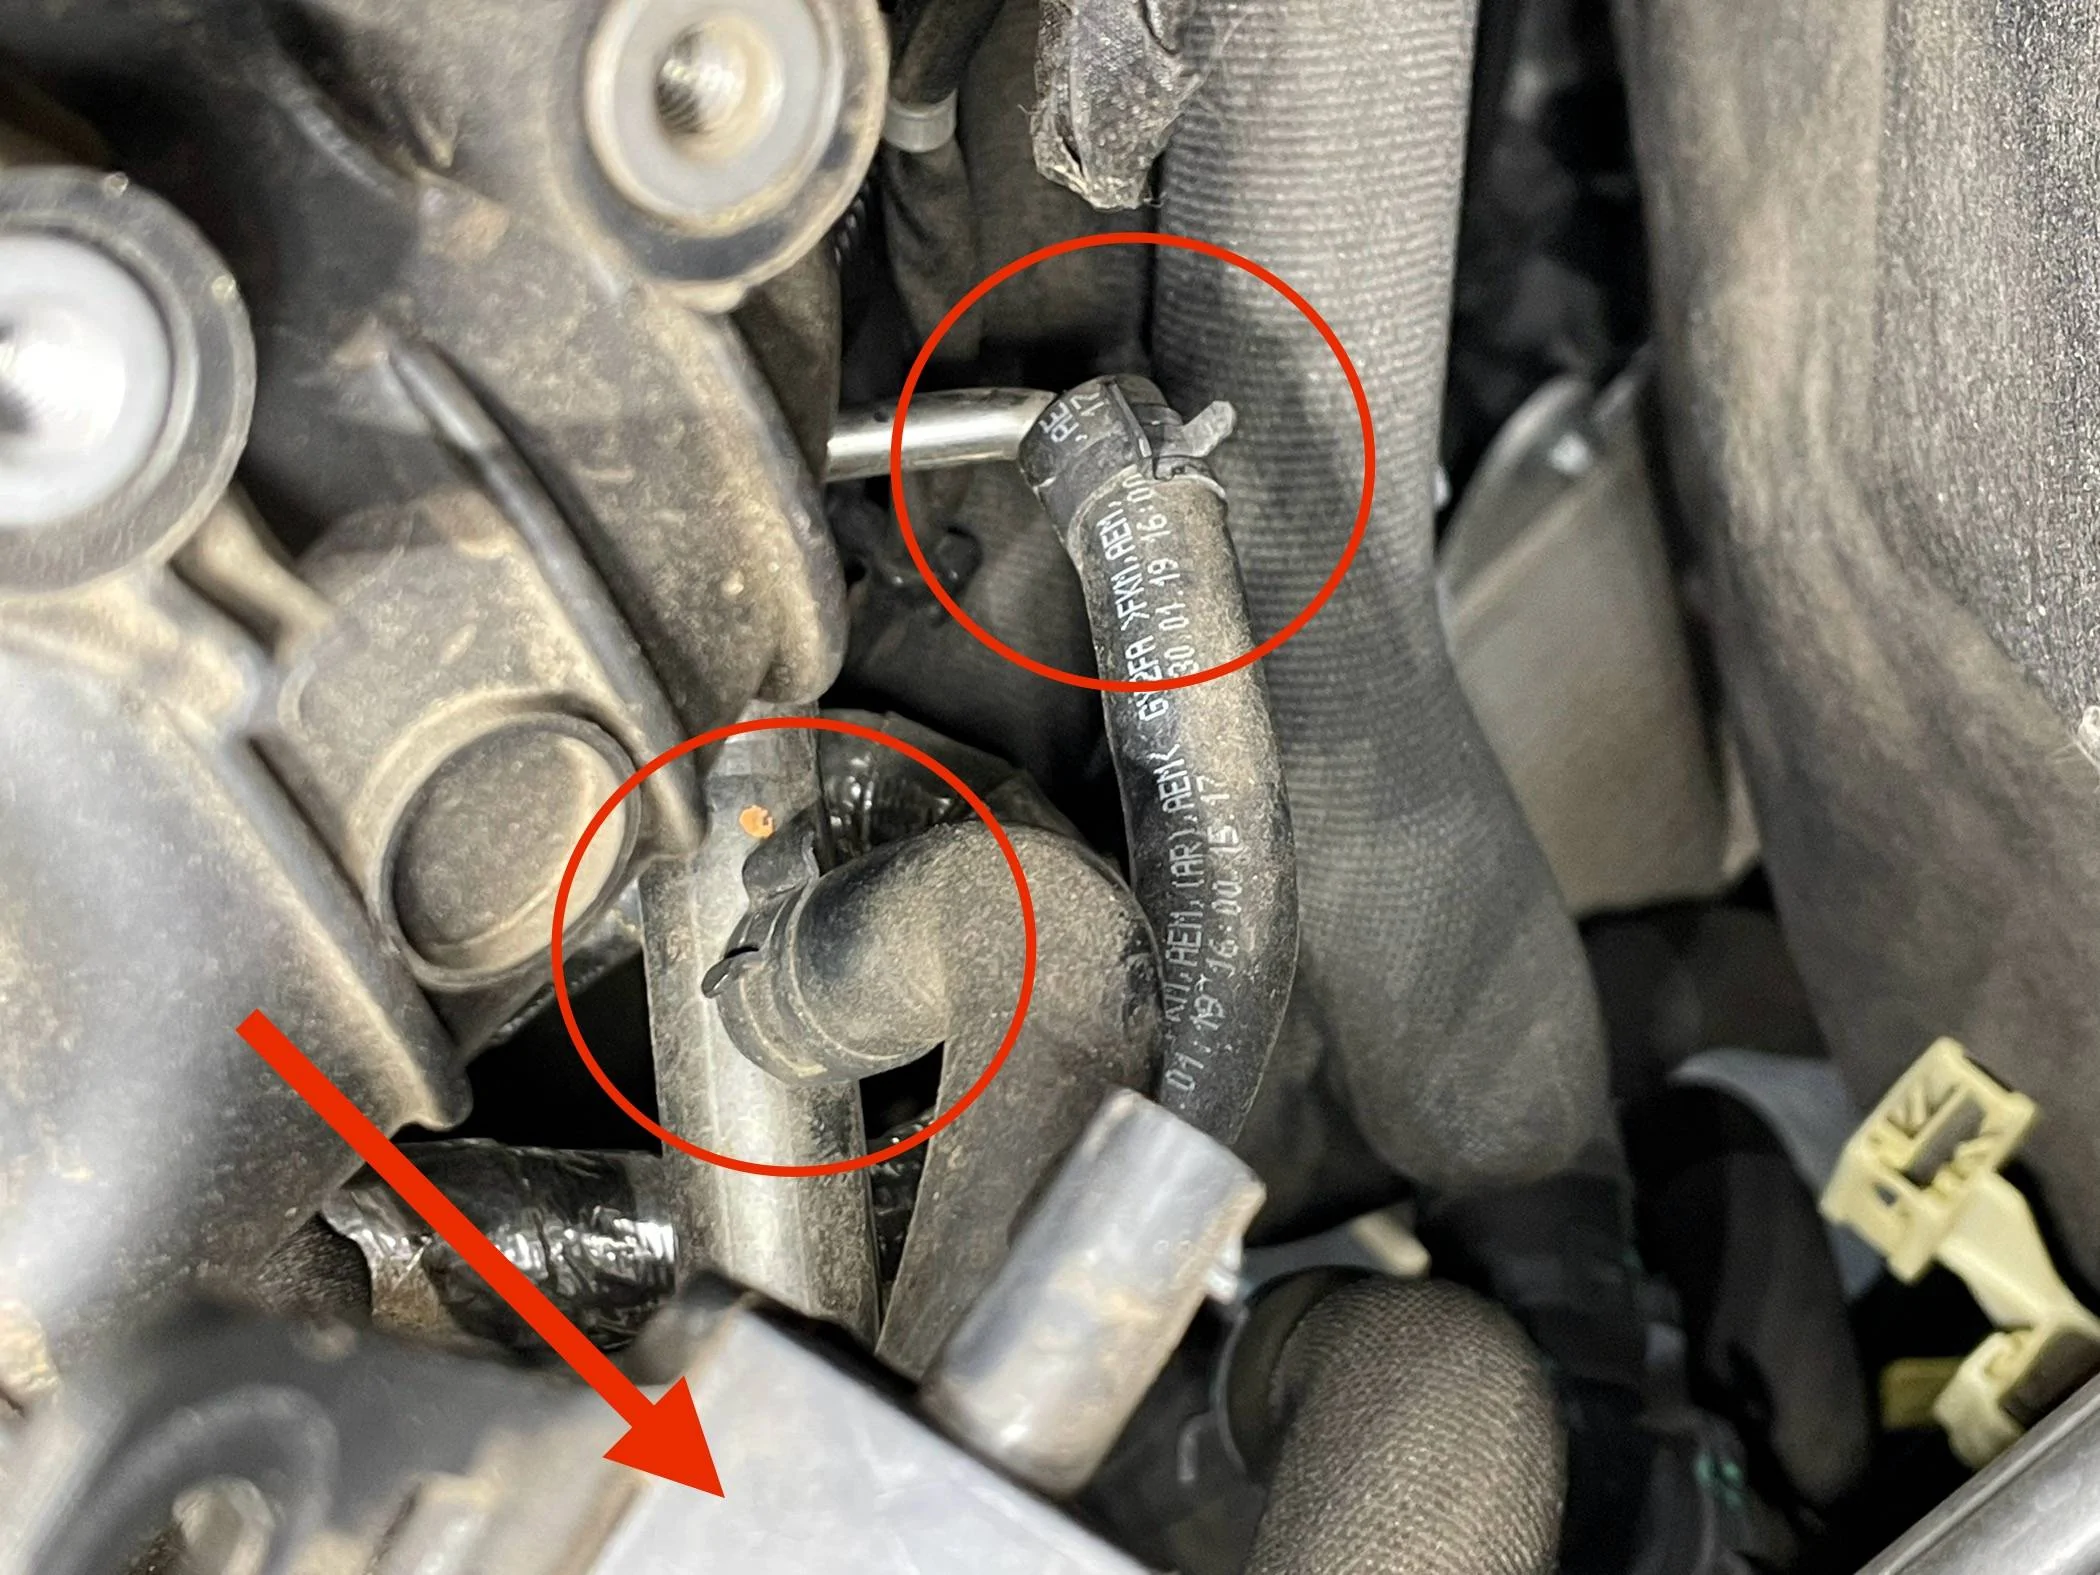
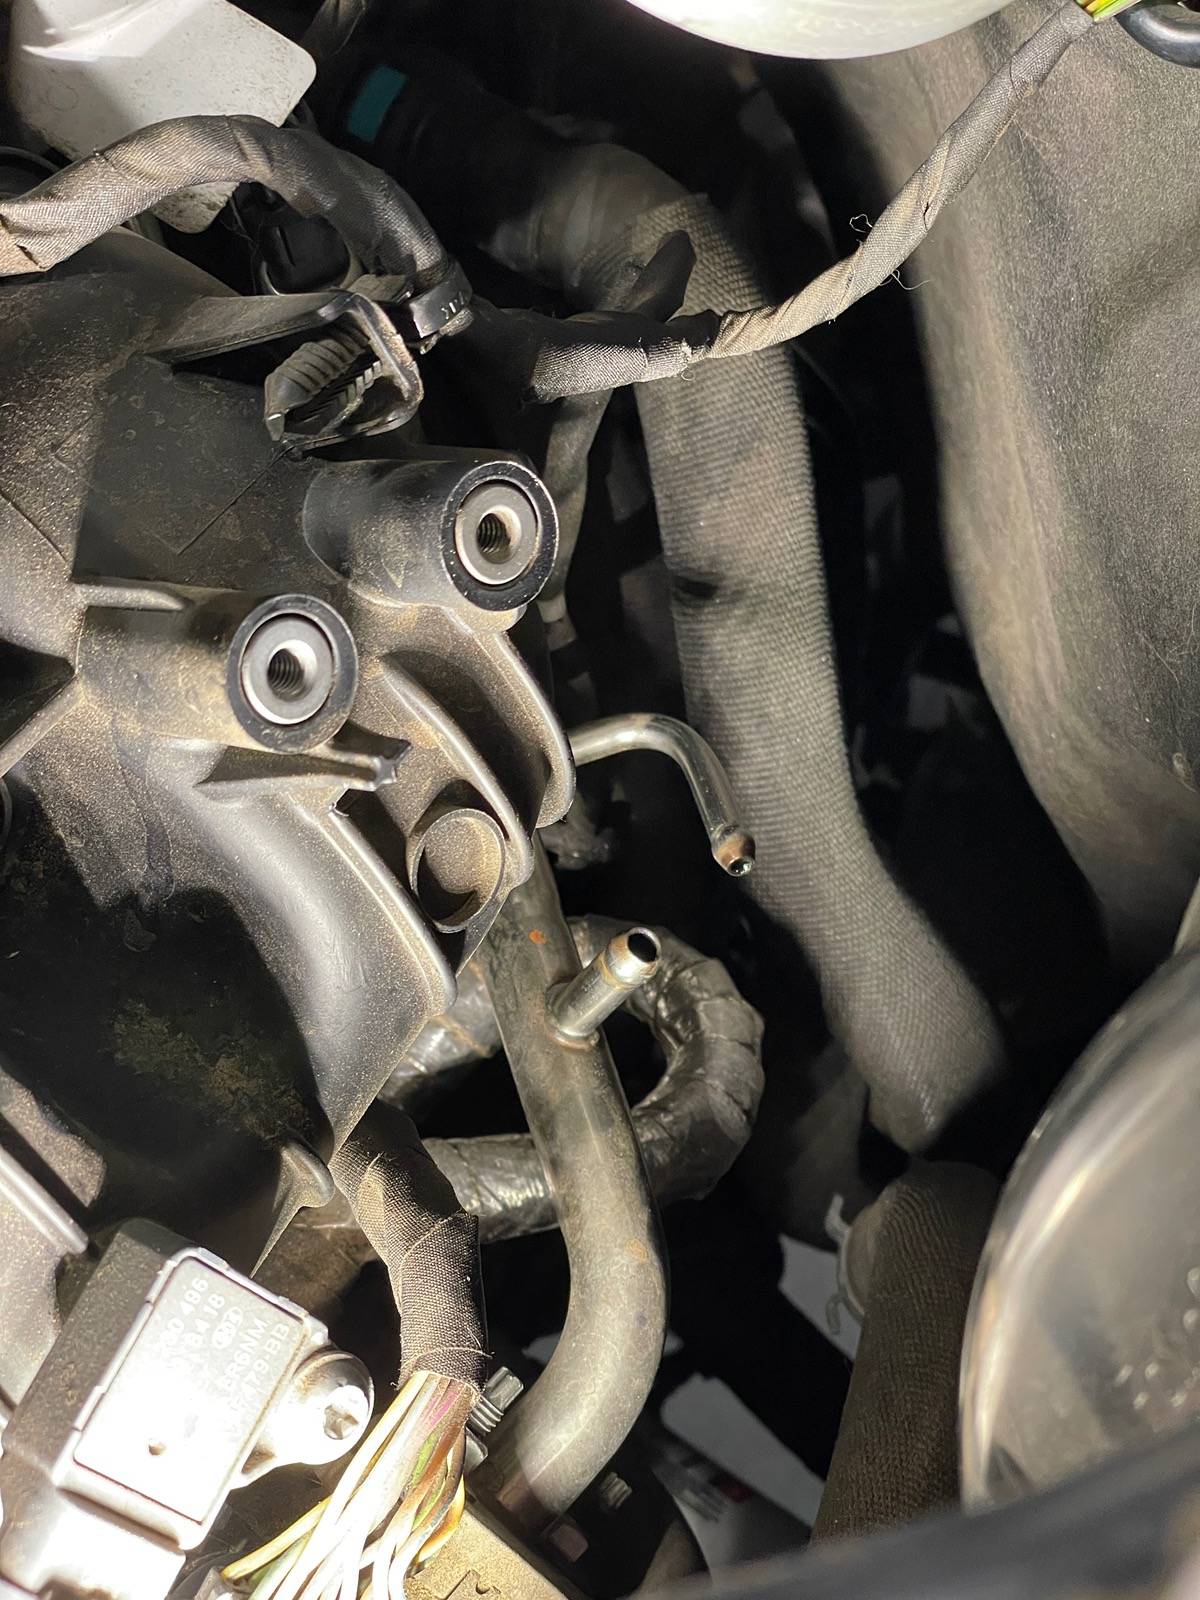
With the DPFE sensor unbolted and unplugged you can pull it out of the way to give you room to access the spring clamps on the hoses. This is where having a light is necessary. Take note of how the spring clamps are oriented. Mine were both facing relatively face-up. Removing the clamps is the most difficult part of the job so just stay calm and take it slow. I started with the shorter hose first to give me more leverage on the longer hose.

IMG_2462.jpeg


STEP FIVE :

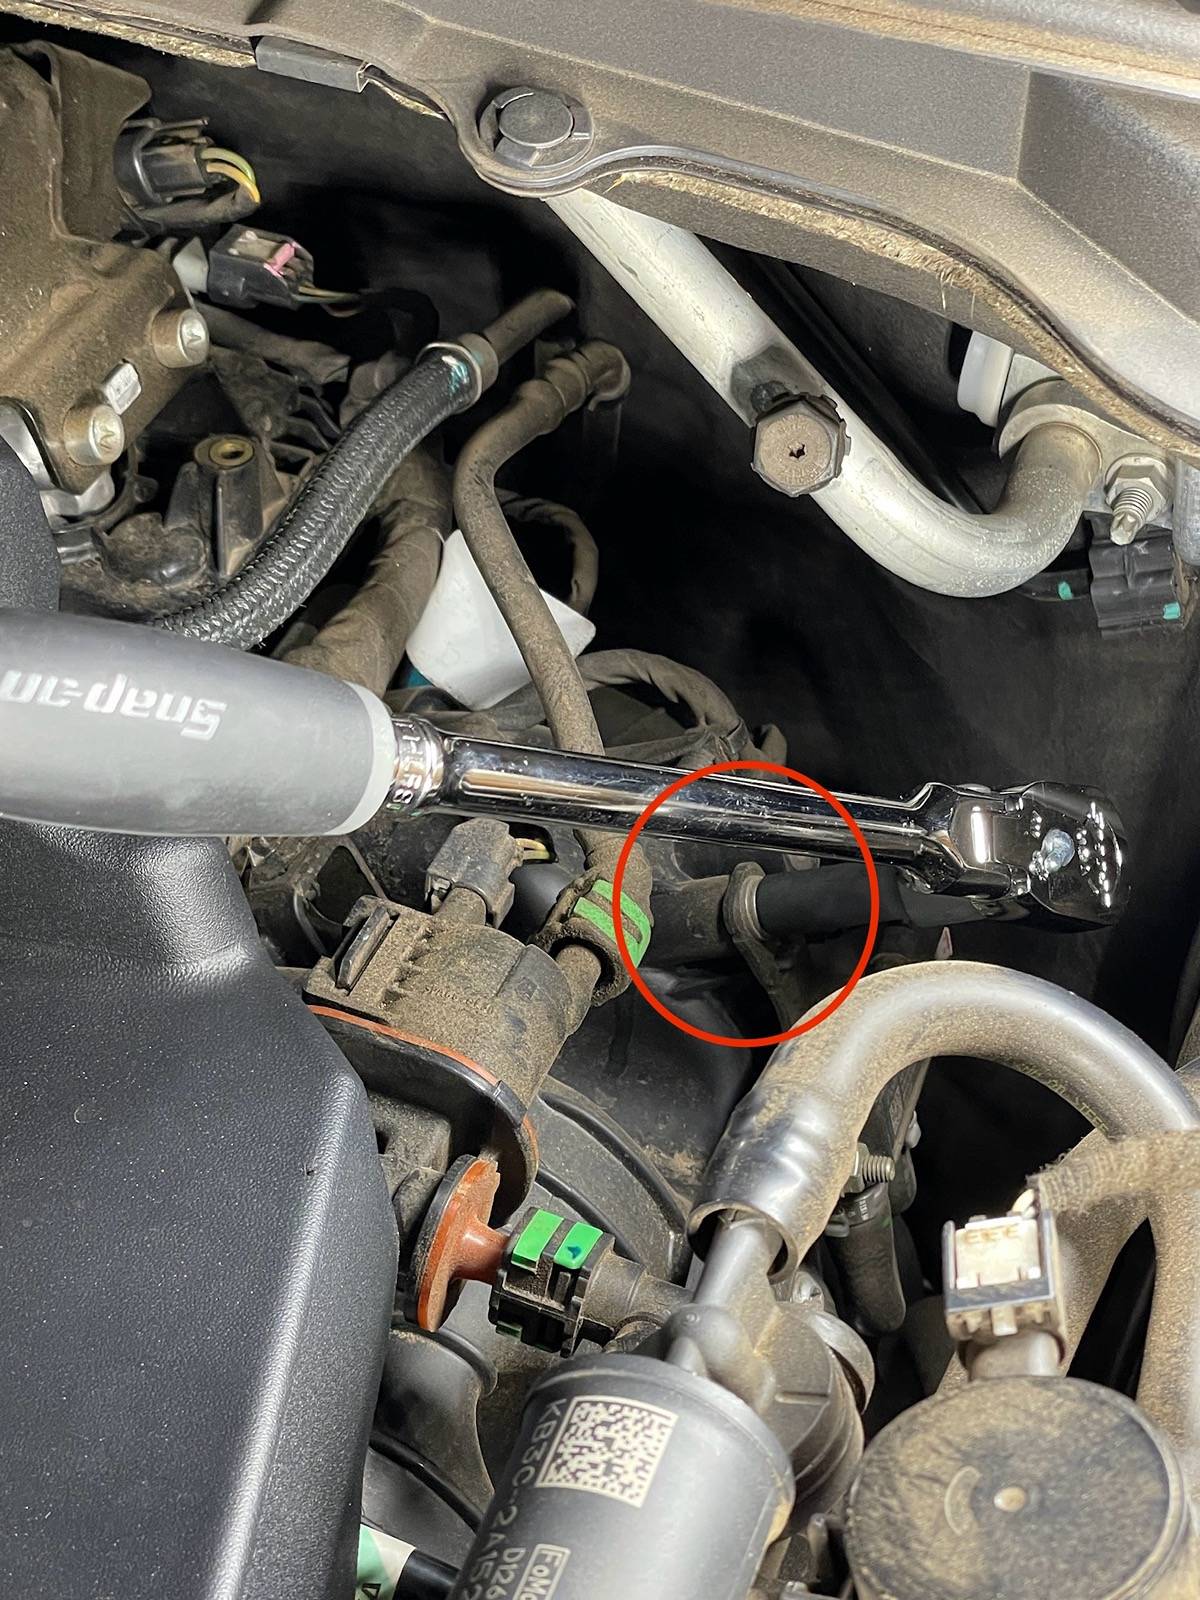
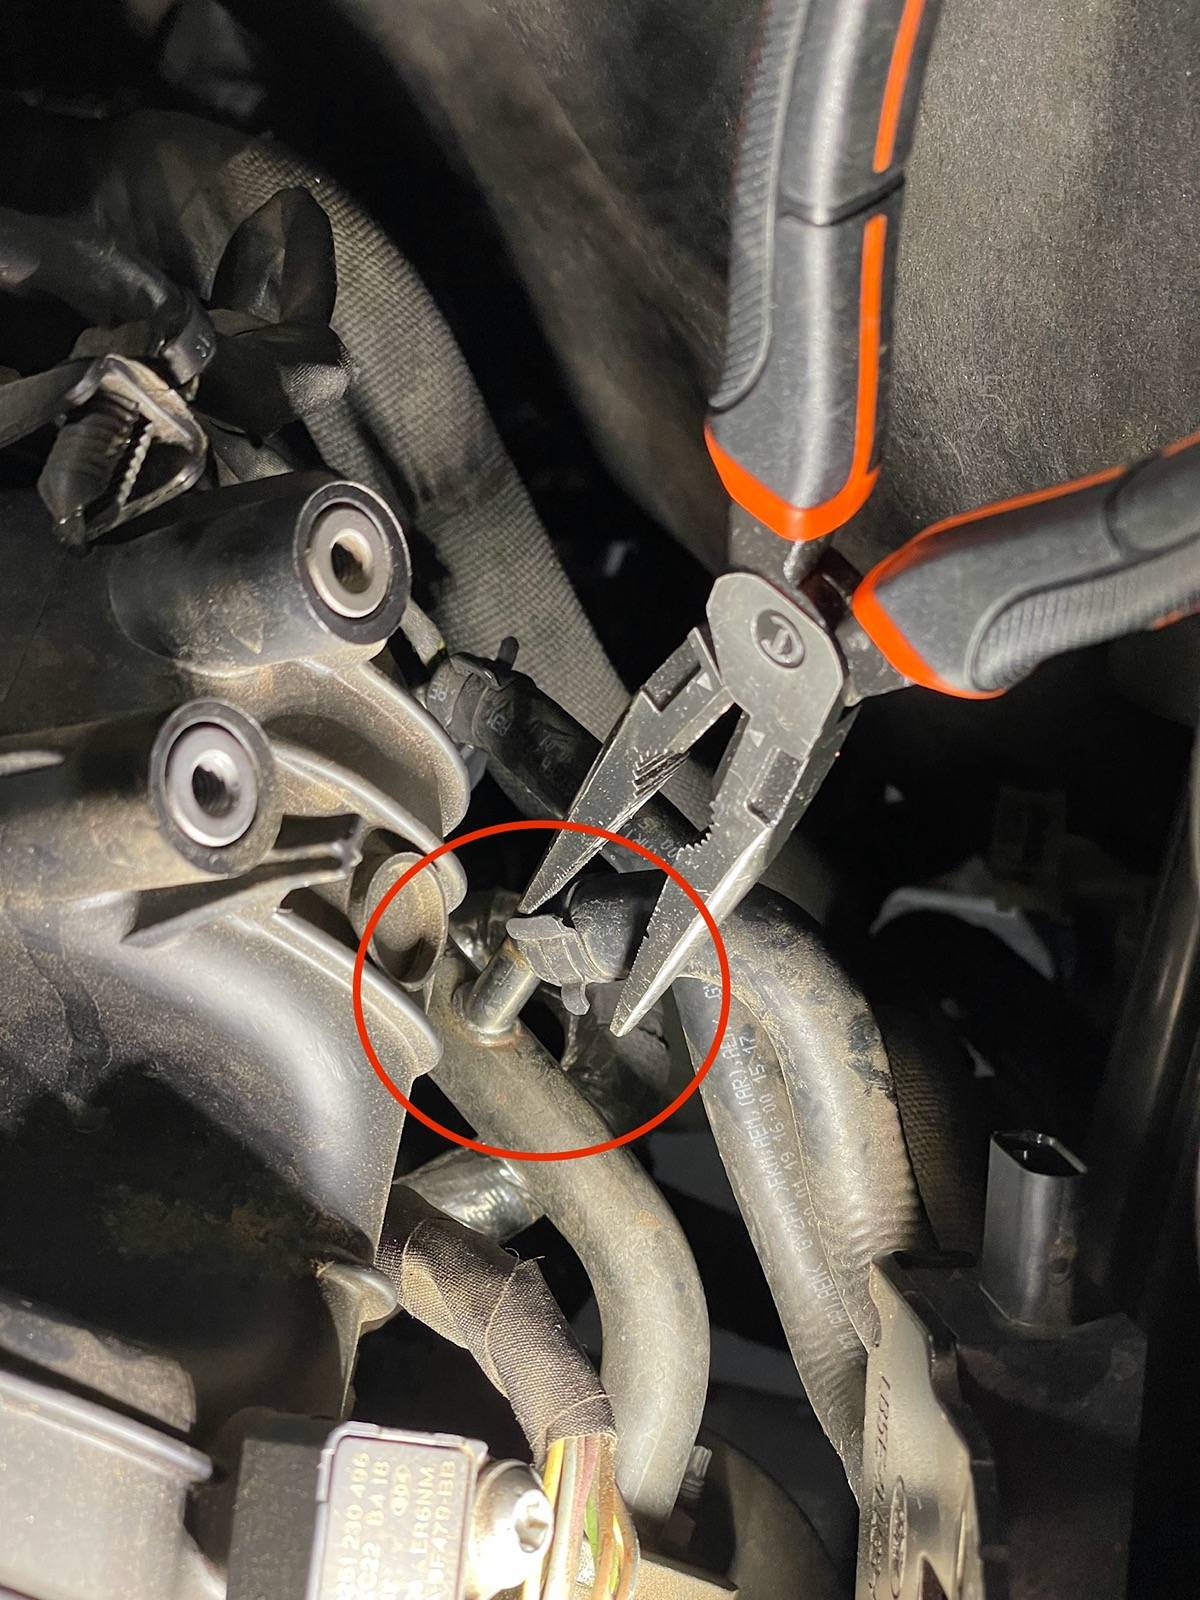
Start with the smaller hose (closest to you) and go straight down with a pair of needle nose pliers (longer ones seemed to work better). When I pinched the spring clamp and pulled up the hose came right off. I did not have to fight it at all. Once the hose is off you can also place it to the side or out of the way to give you the most access to the long hose.

IMG_2463.jpeg


STEP SIX :

Remove the spring clamp on the longer hose (furthest from you). What worked for me was compressing the spring clamp, pliers in my right hand and pulling the hose horizontally to the right with my left hand. The DPFE sensor is now fully removed.

IMG_2464.jpeg
IMG_2465.jpeg


STEP SEVEN :

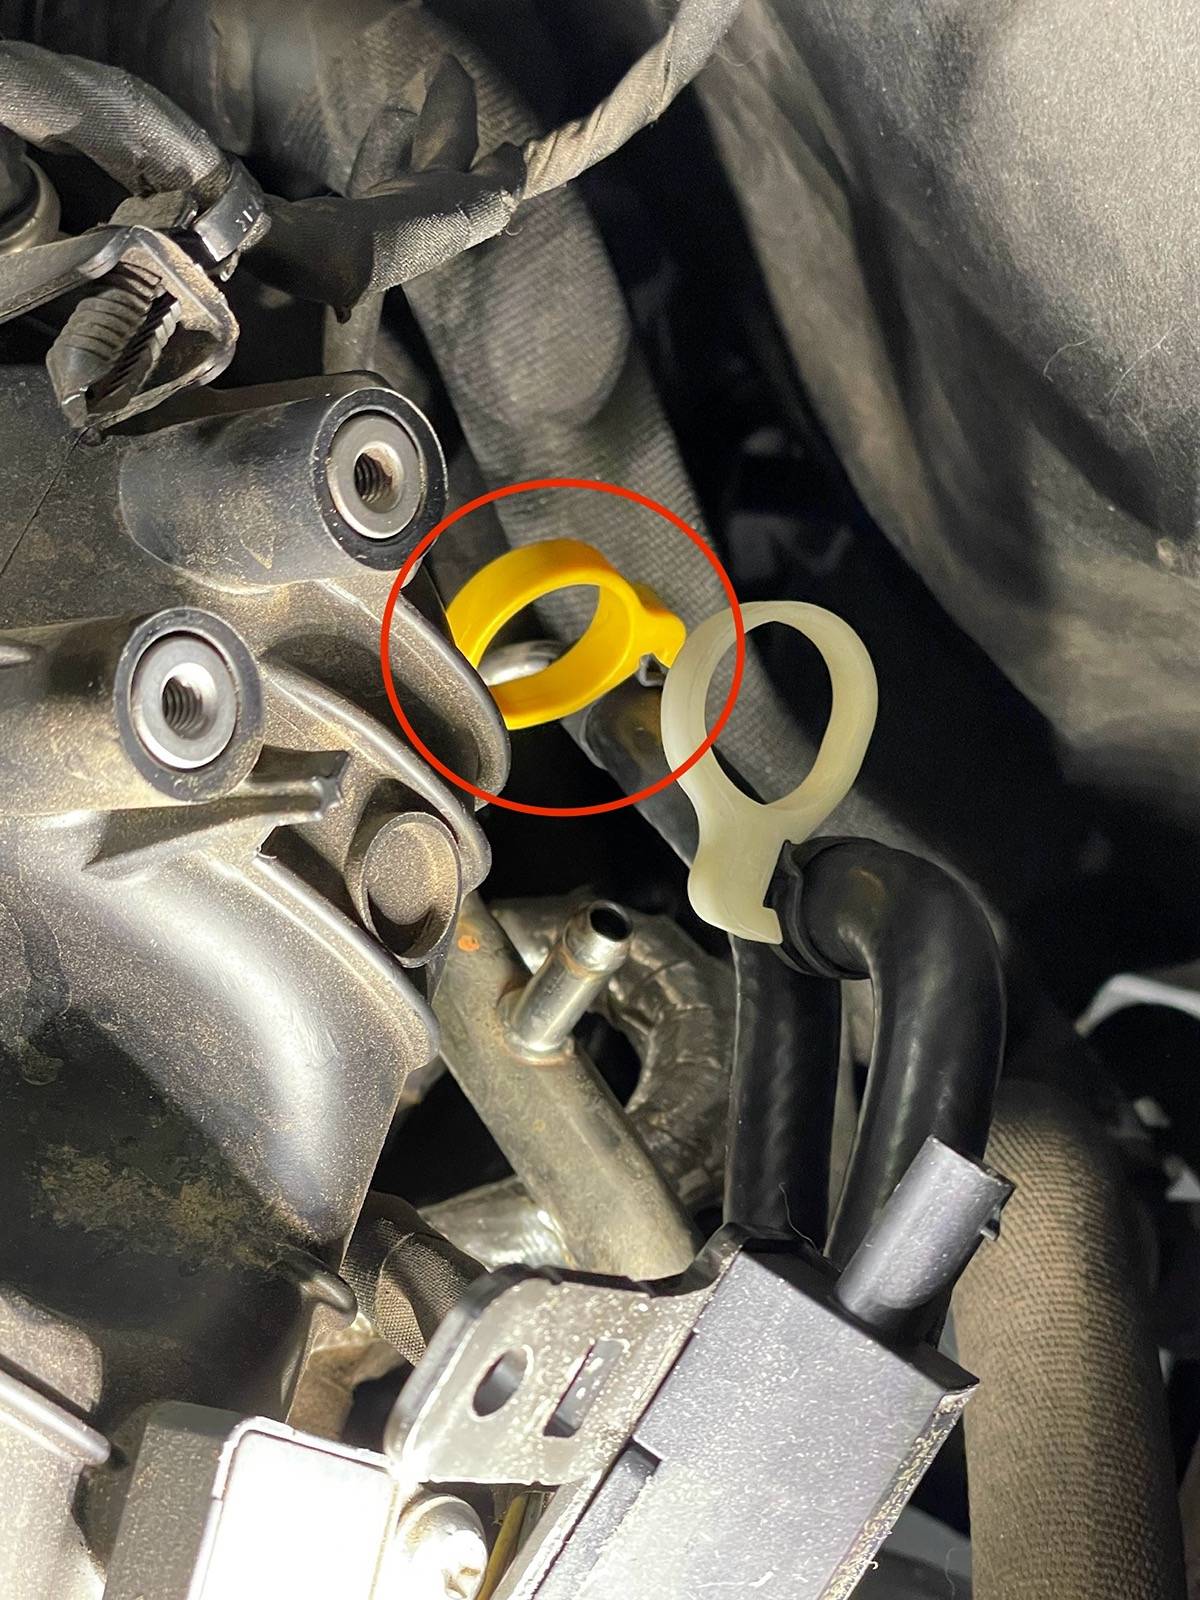
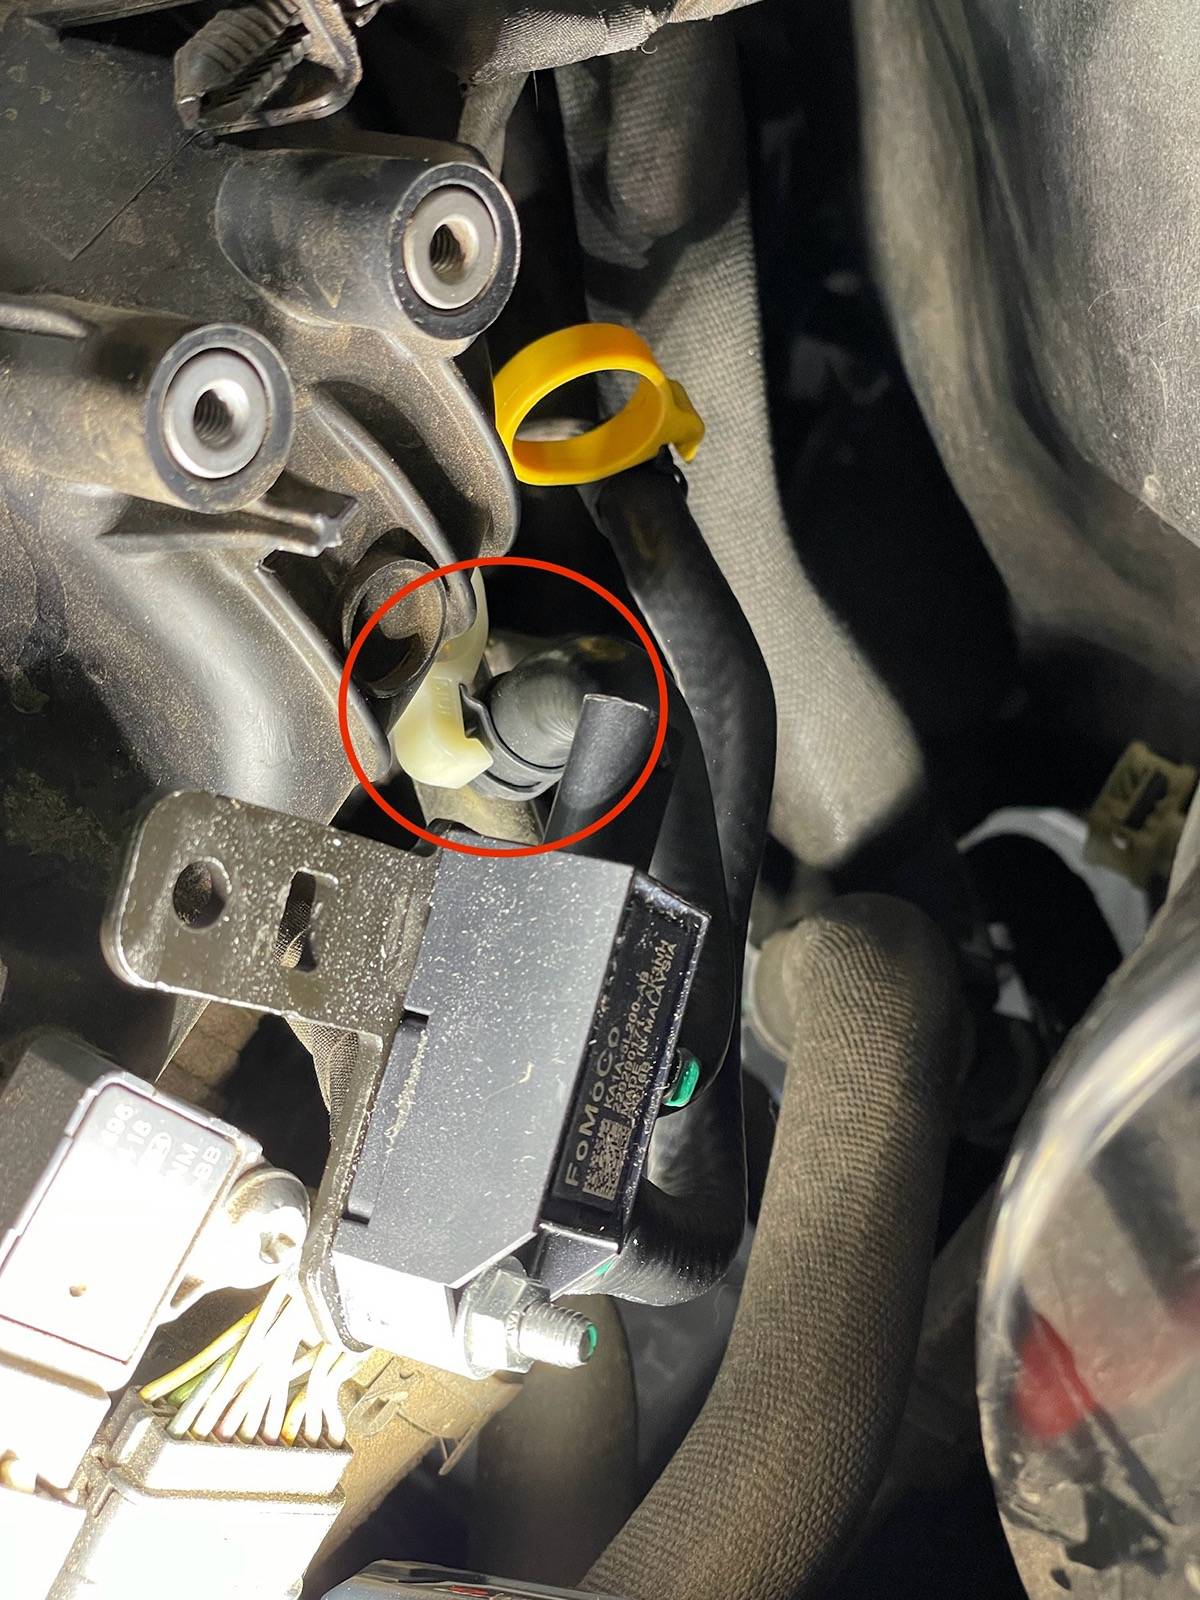
Reverse what you just did in Steps FIVE & SIX and take the new DPFE sensor and slide the long hose(Furthest from you) (yellow clip) on first and the short hose (closest to you) (white clip) on next.
Align the spring clamps facing upward as much as possible to make the job easier the next time you have to potentially perform it.
When the hoses are pushed on as far as possible twist the yellow and white clips clockwise to remove and engage the spring clamps.

IMG_2466.jpeg
IMG_2467.jpeg


STEP EIGHT :

Re-mount your new DPFE sensor using the guide pin and hand thread the 8mm bolt until snug to prevent cross threading. Take your torque wrench set to 97 in.lbs and torque the 8mm bolt. (It takes no effort at all and should click in a second or two)

IMG_2469.jpeg
IMG_2471.jpeg


STEP NINE :

Reconnect the DPFE connector. Slide the connector on until you hear a "click" and use your finger to engage the white locking tab by pushing it from the back towards you.
Crank your Ranger to see if a check engine light or any error message appears. Take a test drive around the neighborhood to see if there is an improvement in the surging/bucking in a low gear. I noticed an instant improvement on my Ranger and it drives like a brand new truck. Time will tell how long the replacement lasts.

IMG_2472.jpeg


That's it! Grab a cold one and enjoy a job well done! :sunglasses::beer:
Yet again it took me longer to write this write-up / take pictures than the actual job did. I would say it is a 30 - 45 minute job as long as you do not lose a socket or bolt in the engine bay. :crackup:
Thanks for this! Going to do it later today. Hoping it resolves the bucking.

Do you have to adjust anything with Forscan after installing new sensor?
 
OP
OP
Trash Panda

Trash Panda

Well-Known Member
First Name
Cody
Joined
Aug 8, 2021
Threads
12
Messages
178
Reaction score
729
Location
Alabama
Vehicle(s)
2019 Ranger Lariat
Thanks for this! Going to do it later today. Hoping it resolves the bucking.

Do you have to adjust anything with Forscan after installing new sensor?
I do not have / use Forscan so I do not think so. I did not even unplug the battery and it still made a pretty instant difference.


Top