Redarc Tow Pro Elite Install

MT19RANGER

Well-Known Member
First Name
JERRY
Joined
Nov 10, 2018
Threads
2
Messages
778
Reaction score
570
Location
SIDNEY, MT
Vehicle(s)
2019 Ranger Lariat
Occupation
Oilfield Service Company Area Supervisor
Vehicle Showcase
1
Wonder if we could start a thread or poll as to who has a brake controller installed and what brand and if it does actually work
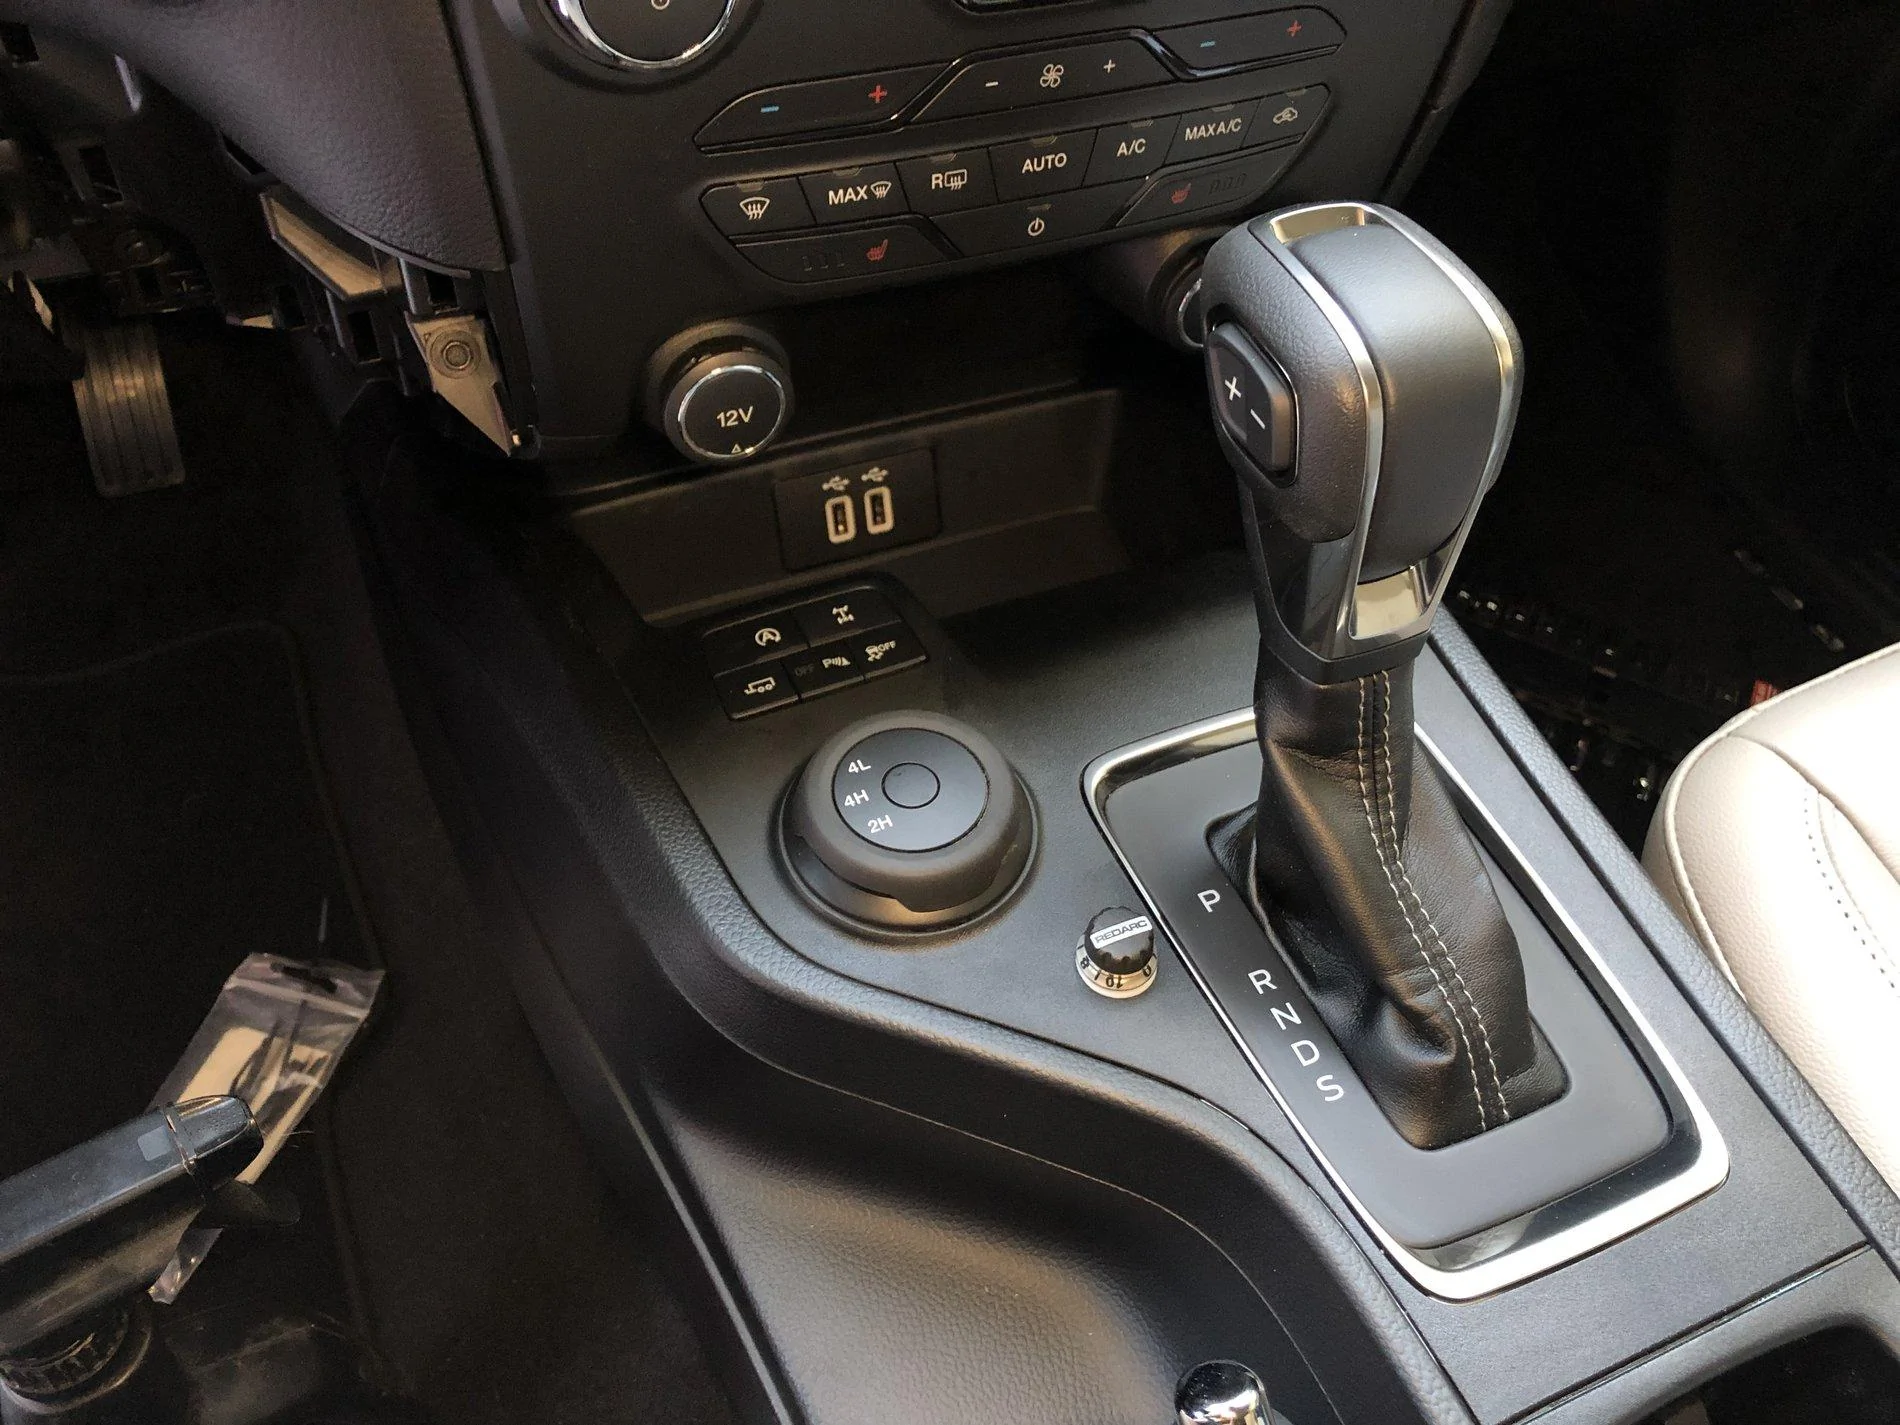
I don't think a poll can be fill in the blank for like a brand you could put in. @rangerdanger can you help out?
Sponsored


Claudess

Well-Known Member
First Name
Claude
Joined
Mar 6, 2019
Threads
1
Messages
65
Reaction score
100
Location
The Plains, VA
Vehicle(s)
Ford
This would help for sure.

Have you been able to test your brake controller to see if itā€™s working correctly?
Will try that tomorrow. I have several trailers. The newest that I know has everything working electrically is a utility trailer with a 7,000lb directional drill on it. So I can hook up to test, but I'm not doing to pull it far with the new Ranger. I'll also try on another trailer but not sure everything electrical works on that trailer.
 

rangerdanger

Well-Known Member
Joined
Oct 9, 2018
Threads
194
Messages
3,489
Reaction score
2,635
Location
SF Bay Area
Vehicle(s)
2019 Ford Ranger SuperCrew XLT FX4
Vehicle Showcase
1
OP
OP
oggvorbis

oggvorbis

Well-Known Member
First Name
Pablo
Joined
Feb 2, 2019
Threads
10
Messages
126
Reaction score
174
Location
Victorville, CA
Vehicle(s)
2019 Ford Ranger Lariat FX4
Vehicle Showcase
1
Mine is also BLUE wire to match the industry standard color for the trailer brake wire.
This change caused me a lot of digging around.

@FX4Offroad and @oggvorbis Is there anyway you can update your threads to mention that the wire is green/white on early builds but solid Blue on later build dates? Would save folks with newer trucks a lot of digging around.
Done, Updated to mention how the Ford Service Manual states that the TBCO Wire is supposed to be blue (industry standard) and how earlier Rangers may have a green/black wire. Also linked the tow wiring diagrams from the service manuals and a picture of it in the writeup.
 

Srgraham1

Well-Known Member
First Name
Steve
Joined
May 15, 2019
Threads
4
Messages
86
Reaction score
143
Location
Livonia MI
Vehicle(s)
2019 Ford Ranger XL STX
Vehicle Showcase
1
I'm coming up on about a month of ownership with my Ranger and I love it. 7,500lb towing capacity is great but in most states you won't be able to tow anything past 1,500lbs (legally). A big mis-step by Ford is not offering or including a trailer brake controller at launch, and at the very least the uncertainty and/or mis-information by salesman, parts and service staff, vendors, etc. The install was in my opinion very easy and straight forward and could be installed by someone with basic electrical skills. Took me a little over an hour from start to finish, including replacing the fascia below the radio. I'm hoping that this post might help anyone that might be considering going after market or may be a little hesitant in installing a brake controller themselves.

I decided to go with the Redarc Tow Pro Elite https://www.etrailer.com/Brake-Controller/Redarc/331-EBRH-ACCV2.html ($202.10) because of it's small foot print and ease of install. I'm a pretty stocky guy and downgrading to a mid-size truck, I was concerned with constantly banging my knees on a brake controller module or having it rattle around over time on off-road trails. The Redarc module can be tucked away and mounted in any position and the remote module is very small and can be easily mounted anywhere with a few inches of clearance. While I thought that I would miss a screen readout of the braking status, the times I've been in vehicles with the Tow Pro Elite, the feedback from the color changing LED from the remote gives just the same amount of information as my old controller but in a much simpler way. We also regularly tow an off-road tear drop trailer so having that second user control mode where the trailer does not brake proportionally when the truck brakes that I can control manually and independently on the trailer is handy off-road, especially during steeper descents or climbs when I'm trying to maintain inertia of my truck but need to brake the trailer.

I originally intended to mount the remote controller in the center console right below the Trail Control knob. This is also where Ford installed their Redac brake controllers on their Ranger tow vehicles at pre-release media and sneak-peak events. I would have preferred some place higher on the dash within eye level but I didn't think there that had enough rear clearance for it. I didn't really like the idea of having to look that far down while towing to get visual feedback, so I ended up ordering a Lightforce fascia kit from Australia for their Rangers hoping that it would fit, prepared to mount it in the center console if it didn't. Luckily it fit like a glove and the details to it were posted here:

https://www.ranger5g.com/forum/threads/lightforce-switch-faschia.1908/

Here's a link for the Redarc Pro Elite's instruction manual:
https://www.redarc.com.au/Content/Images/uploaded/Manuals/EBRH-ACCV2 Instruction Manual.pdf

Ford Service Manual Towing Wiring Diagrams thanks to @FLEngineer :
https://www.ranger5g.com/forum/attachments/wiring-diagram-towing-7pin-pg4-pdf.3922/
https://www.ranger5g.com/forum/attachments/wiring-diagram-towing-7pin-pg2-pdf.3923/
https://www.ranger5g.com/forum/attachments/wiring-diagram-towing-4pin-pg1-pdf.3924/
https://www.ranger5g.com/forum/attachments/wiring-diagram-towing-7pin-pg3-pdf.3925/

On to the install:

1. Disconnect the negative terminal of the battery. Make sure you have something preventing it from arcing back over to the terminal.

2. Locate the four trailer wires on the driver's side kick panel on the left side. Yellow/Orange(Red), Green/Black, and White were taped together, coming out of the firewall. The first time I looked for the wires, I missed the Violet/White because it's actually taped to a different harness to the left of the three other wires. On my Ranger, the whole butt connector end was taped over so it looked like one continuous normal wire.

AC51DE76-4FBF-4CA0-949E-0BD02345646B.jpeg


The four wires are:
  1. White - Ground
  2. Yellow/Orange(Red) - 12V Power
  3. Green/Black (Solid Blue according to Ford Service Wiring Diagrams) - Trailer Brake Controller Out
  4. Violet/White - Brake Light Trigger (Brake On/Off)
Note: On my truck (Purchased 01/2019), Trailer Brake Controller Out Wire is Green/Black. According to Ford Service wiring diagrams, the wire is supposed to be blue. On newer NA Rangers, it has been reported that the TBCO Wire is Blue.

Tow Wiring Diagram.PNG


Photo Feb 21, 1 10 05 AM.jpg


The Tow Pro Elite comes with a wiring harness that plugs in to the main unit and the other end has 4 wires that you will be splicing to the Ranger's tow wires. The wires on the harness are:
  1. White - Ground
  2. Black - 12V Power
  3. Blue - Trailer Brake Controller Out
  4. Red - Brake Light Trigger (Brake On/Off)
tpe wiring harness.PNG


3. Butt splice the wires from the included wiring harness of the Tow Pro Elite to the corresponding four wires in the kick panel. BE SURE THERE IS NO POWER RUNNING IN TO YOUR WIRES BY MAKING SURE THE BATTERY IS DISCONNECTED. Cut off the black ends of the four wires of your Ranger. I used Crimp & Heat Shrink Waterproof Butt Splice Connectors because I was originally planning on routing the wires under the carpet in the footwell and because of snow and post-surf days when it's too cold too properly towel off and I just jump in to my truck wet. Although regular butt splice connectors are probably fine.

If you've never butt-spliced wires before it's pretty straightforward. You strip off about .3" of the wire sheath exposing the copper wire. Insert the exposed wire in to the barrel. Do the same with the wire that you will be splicing together into the other end of the connector. Then crimp down on the barrel. Slight tug to mke sure that you crimped down hard enough and that the wires aren't loose. If using heat shrink tubing, heat shrink the tubing with a heat gun, making sure to evenly heat all sides of the connector. Careful if using an open flame. If you mess up, you can always cut the wire and re-strip. Be mindful of where you cut and splice the wires, the more wire length you keep, the easier it'll be when routing it towards the main unit wherever you decide to place it.

Photo Feb 21, 1 55 33 AM.jpg


4. Find a suitable place to mount the Remote Control Assembly. You'll need a minimum for 46.5mm plus a recommended distance of 43.5 for the RG45 cable that connects the main unit to the remote head assembly.

head assembly.PNG
6a00d83451b3c669e2022ad3a9efe6200d-800wi.jpg


5. Once you've chosen a spot for the remote assembly, you'll need to drill 2 holes in to the console panel/dash panel/knockout switch. One 10mm in diameter and another 3.5mm, the center of the holes 7.5mm apart. It's obviously easier if you can remove the panel first. I purchased the Lightforce Switch Fascia so I drilled the holes at the center of a knockout switch blank that was included.

1.PNG

Photo Feb 20, 9 46 52 PM.jpg


6. Once the holes are drilled, place the Remote Head Assembly behind the trim panel, with the Control Knob shaft and LED coming up through the holes. Place the Remote Bezel over your panel covering the LED. Some people skip this step, but I like using the bezel to remind me what level gain I'm currently at (12 o'clock position). Screw the Remote Head Nut on to the Remote Head Assembly. Torque to 0.8Nm. Turn the knob fully counterclockwise. Place the Remote Head Knob on the shaft with "0" in the 12 o'clock position, alligned with the bezel (if you chose to install it).

2.PNG

3.PNG

Photo Feb 20, 11 14 08 PM.jpg


7. Find a suitable location to mount the Main Unit. You can mount the unit in any orientation as long as it's secure and doesn't move at all. It also needs to be in a location where it reaches both wiring harness and the RG45 cable to the Remote Head Unit. I used an empty hole behind and above the gas pedal in the footwell. I fastened it with a #8-32 screw 3/4" long (could easily use a 1/2" long screw), a 1/8"x1" fender washer, and a #8 locking nylon nut. I just happened to have those lying around, so that's what I used. I don't think you could go any larger of a screw to fit the main control unit, maybe an M4 screw. This was probably the most difficult part for me because there's not a lot of room to work. I also had to use a really small socket wrench to fit behind the hole in the bracket while screwing down the screw.

23213.PNG

Photo Feb 21, 6 21 08 AM.jpg

q.jpg


8. After securely mounting the Main Unit, you can now run the wire harness to the main unit and plug it in. I ran mine behind the fuse box, below the steering column and dropping down to the Main Unit.

Photo Feb 21, 6 50 18 AM.jpg


9. Plug in your included RG45 cable to Main Unit, route it towards your Remote Control Head, and plug it in to the back of the Remote Control Head.

Photo Feb 20, 11 55 36 PM.jpg


10. Install your Remote Control Unit in its final place and replace all trims.

Photo Feb 21, 7 54 54 AM.jpg

11. Reconnect the negative terminal of your battery.

12. Pat yourself on the back for a job well done!

The Tow Pro will calibrate itself automatically and takes about 20 brake applications before it's calibrated. Consult your manual for more info!

You can use any cat5 RG45 cable to connect the main unit to the remote head. At first I used a 3' purple cable I had lying around. I then switched it to a 3' flat cable since the switch fascia didn't leave for much room, and while it could have worked, I decided to use the flat cable to leave more room for possible wiring projects. The 3' cable left me with about 10" of extra cable at the main unit to the fascia. I bought the cable here ($0.89!):

https://www.monoprice.com/product?c_id=301&cp_id=30102&cs_id=3010201&p_id=9547&seq=1&format=2

Update: Had zero issues after install and the REDARC Tow Pro Elite works just as expected. Trailer brakes are applied in proportion to the truck's brakes and trailer brakes can also be applied by pushing down on the REDARC Remote Assembly button. LED gives visual feedback on braking power applied. Have towed three different trailers with brakes, including an almost 1000 mile trip to and from the Grand Canyon from Southern California with no issues.

Happy Towing!
Photo Apr 14, 1 10 48 PM.jpg
Thanks for updating! It will save people alot of time! Your post got me through my install (thank you for the detailed post) but the wiring change by Ford burned alot of time and digging through the firewall wire bundle. The spliced end of the blue wire was very well hidden too. Bruised ribs lasted for days after digging around under the dash so long.


DentonB

Well-Known Member
First Name
Denton
Joined
Mar 4, 2019
Threads
5
Messages
109
Reaction score
95
Location
Tulsa OK USA
Vehicle(s)
2019 Ranger Lariat FX4, 2019 Ram 4x4 Cummins), 2015 Audi A3 convertible
Working on the install now and am stumped with how to get the fascia off. Any help?
 

dmeyer302

Well-Known Member
First Name
Daniel
Joined
Feb 18, 2019
Threads
21
Messages
689
Reaction score
1,632
Location
Carthage, MO
Vehicle(s)
2014 Escape, 2016 Odyssey
Occupation
Mechanical Engineer
Vehicle Showcase
1
Working on the install now and am stumped with how to get the fascia off. Any help?
Two screws on the outsides and pull...use your new fascia as a guide for where the clips are.
 

DentonB

Well-Known Member
First Name
Denton
Joined
Mar 4, 2019
Threads
5
Messages
109
Reaction score
95
Location
Tulsa OK USA
Vehicle(s)
2019 Ranger Lariat FX4, 2019 Ram 4x4 Cummins), 2015 Audi A3 convertible
Two screws on the outsides and pull...use your new fascia as a guide for where the clips are.
Thanks for that. A little bit of liquid coverage helped too.
 

DentonB

Well-Known Member
First Name
Denton
Joined
Mar 4, 2019
Threads
5
Messages
109
Reaction score
95
Location
Tulsa OK USA
Vehicle(s)
2019 Ranger Lariat FX4, 2019 Ram 4x4 Cummins), 2015 Audi A3 convertible
Anyone have their auto up/down drivers window stop after the install?
 

rooster

Well-Known Member
Joined
Oct 8, 2018
Threads
9
Messages
239
Reaction score
532
Location
BOS
Vehicle(s)
STX FX4 SuperCrew
Occupation
engineering systems admin
Vehicle Showcase
1
I mounted mine on the cross structure just above yer shins, used one existing hole, drilled a second for 4mm fasteners. Pic is with tilt steering all the way down, decent clearance for connectors and wiring. Working on the routing and mounting of the control knob now.

7322E2B4-3A1F-4028-93A7-BCCAFFE85674.jpeg


882FA37F-50F3-4E87-AB4E-C114D1E0E434.jpeg


FFB34D8F-8E92-4DC6-8A98-2A4EBF4AD830.jpeg
 

rooster

Well-Known Member
Joined
Oct 8, 2018
Threads
9
Messages
239
Reaction score
532
Location
BOS
Vehicle(s)
STX FX4 SuperCrew
Occupation
engineering systems admin
Vehicle Showcase
1
Control knob... after much debate I positioned on the fuse panel pull relief. I searched behind the left ac vent, near the mirror controls, but there is no space up there due to switches and dash structure. Anyways, sharing as another option, itā€™s viewable from my driving position.

2662839A-7741-42B9-951A-160D1F89D817.jpeg


7455641F-B999-4479-9332-57D9CBFE3127.jpeg


DA4296EF-AF55-4462-A2AF-00FD342250BF.jpeg
 

Hambone437

Well-Known Member
Joined
Jun 5, 2019
Threads
5
Messages
136
Reaction score
286
Location
California
Vehicle(s)
ā€˜19 Ranger Lariat 4x4 Magnetic Gray / 2020 Explorer Limited RWD Magnetic Gray
Vehicle Showcase
1
Glad I found this post. Thanks for all the details, Iā€™m going to do this in my truck. When I asked the salesman about why ford doesnā€™t offer a brake control on the Rangers, he told me that these truck brake so well you donā€™t need a brake controller on a 7500lbs trailer. Are you kidding me! I told him I completely disagree and he is giving false information to customers.
 

Hambone437

Well-Known Member
Joined
Jun 5, 2019
Threads
5
Messages
136
Reaction score
286
Location
California
Vehicle(s)
ā€˜19 Ranger Lariat 4x4 Magnetic Gray / 2020 Explorer Limited RWD Magnetic Gray
Vehicle Showcase
1
I thought I would share my installation of the Redarc brake controller. I decided to install it on the center console behind the 4x4 selector knob. It seemed like the cleanest location to install in my opinion.

I found the four wires under the dash on the left side behind the fuse panel.
1D428AC9-3604-415F-92AF-804DA2C5A647.jpeg


I attached the wire harness from the stock Redarc brake controller.


This is the pic after connecting the Redarc wire harness.


I then removed the top of the center console and installed the control knob


This is the final install. In my opinion it is in the best location. Clean and factory looking. Thank you to all the previous posters to this thread. Without it I wouldnā€™t have had the courage to do this install.

D3BE81EA-EF4A-46D2-8E63-85AC91F21608.jpeg


B1295781-60B5-4DB8-AD7C-ED13D32B69D3.jpeg


A4885AE0-61FB-4AC3-A03C-FE3A91E488FA.jpeg


490B5C5A-4635-4249-AD59-5C30A0D37D77.jpeg


6DC440CE-6AC2-4515-8F18-5039A21E275B.jpeg


3B40B7C2-E39A-42F4-AC29-3CC615484C71.jpeg


F7DE3E44-BA2D-4080-A72E-56CC958B8AA7.jpeg
 
Last edited:

Max Pigman

New Member
First Name
Max
Joined
Jun 6, 2019
Threads
1
Messages
3
Reaction score
11
Location
59601
Vehicle(s)
2019 Ford Ranger
Occupation
Brewery Owner
Nice, clean install I think Iā€™ll do the same, I like the placement better than up on the dash
Sponsored


Top