Sponsored

EGR DPFE Sensor Assembly Replacement Write-Up (LB5Z-9J433-B)

MrBusses

Well-Known Member
Joined
Jan 5, 2023
Threads
11
Messages
136
Reaction score
496
Location
Florida
Vehicle(s)
2019 Ranger 4dr FX4
Occupation
Ford SMT
Just wondering if taking the sensor and tube's of and lightly blowing compressed air trough tube's and sensor would remedy the problem. I've been looking all over the place and seems there is nothing available.
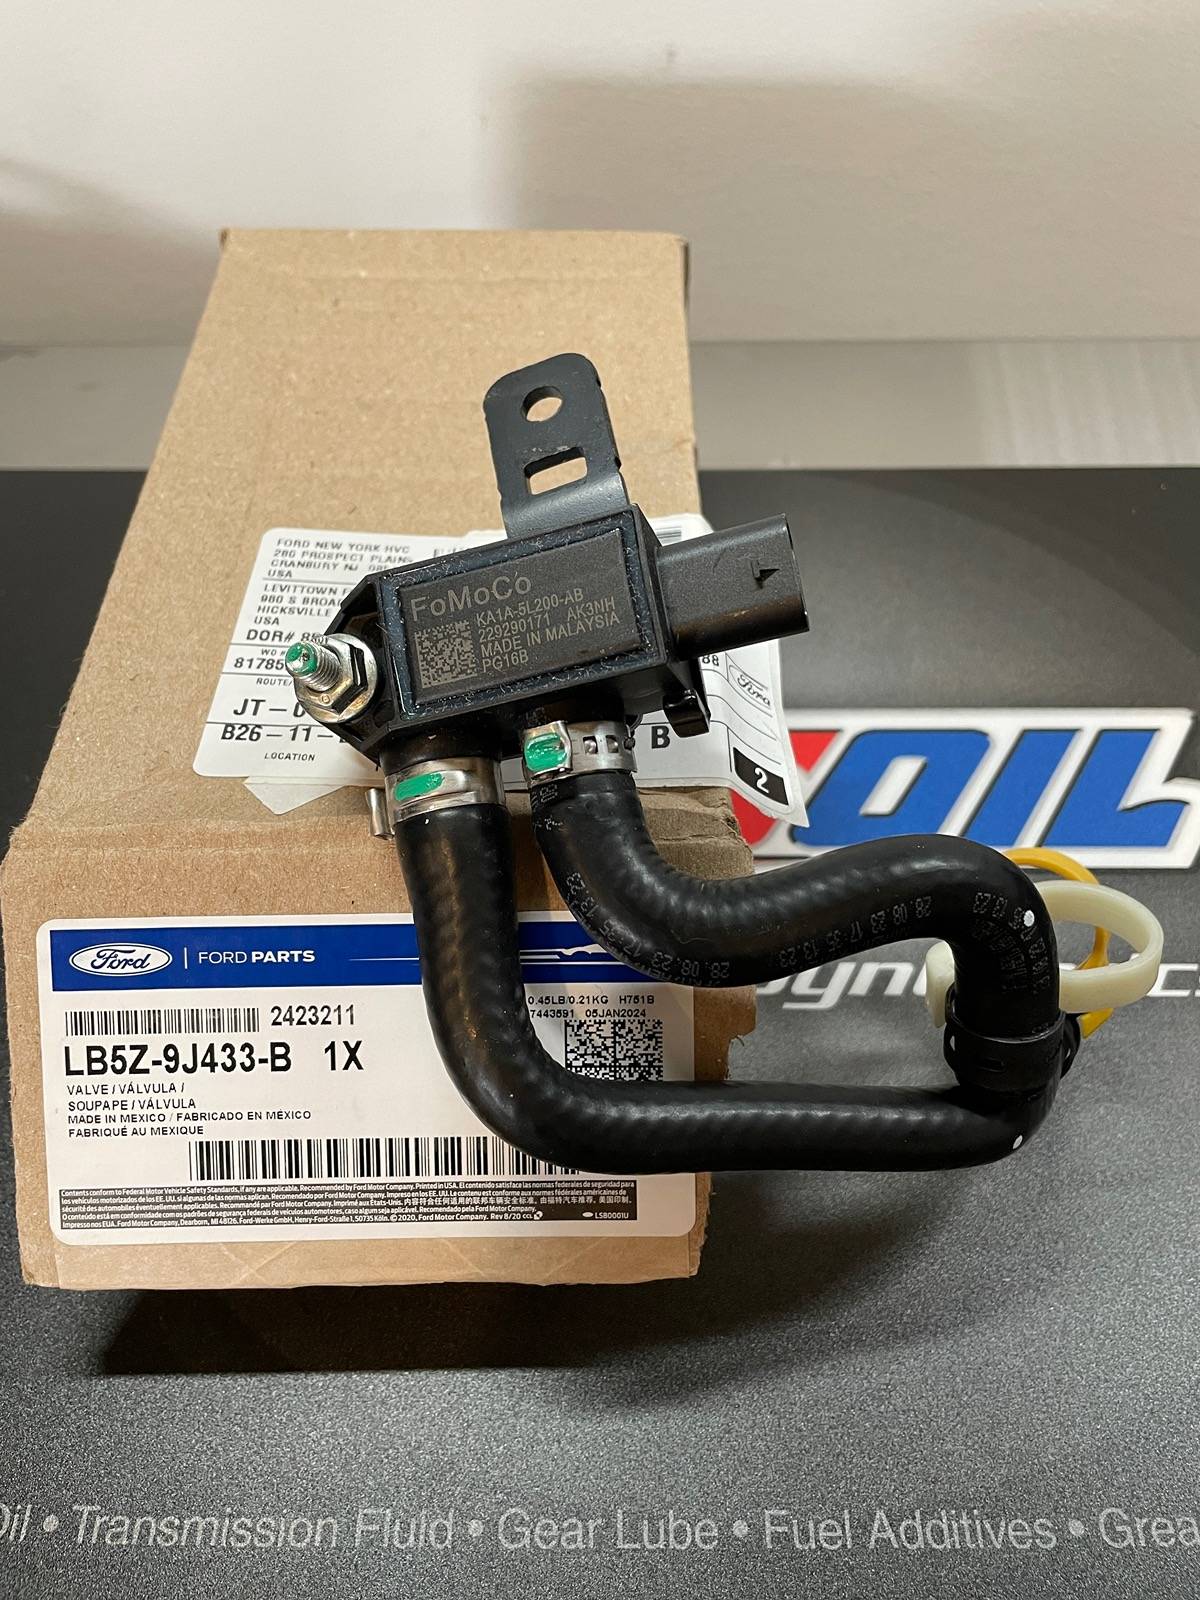
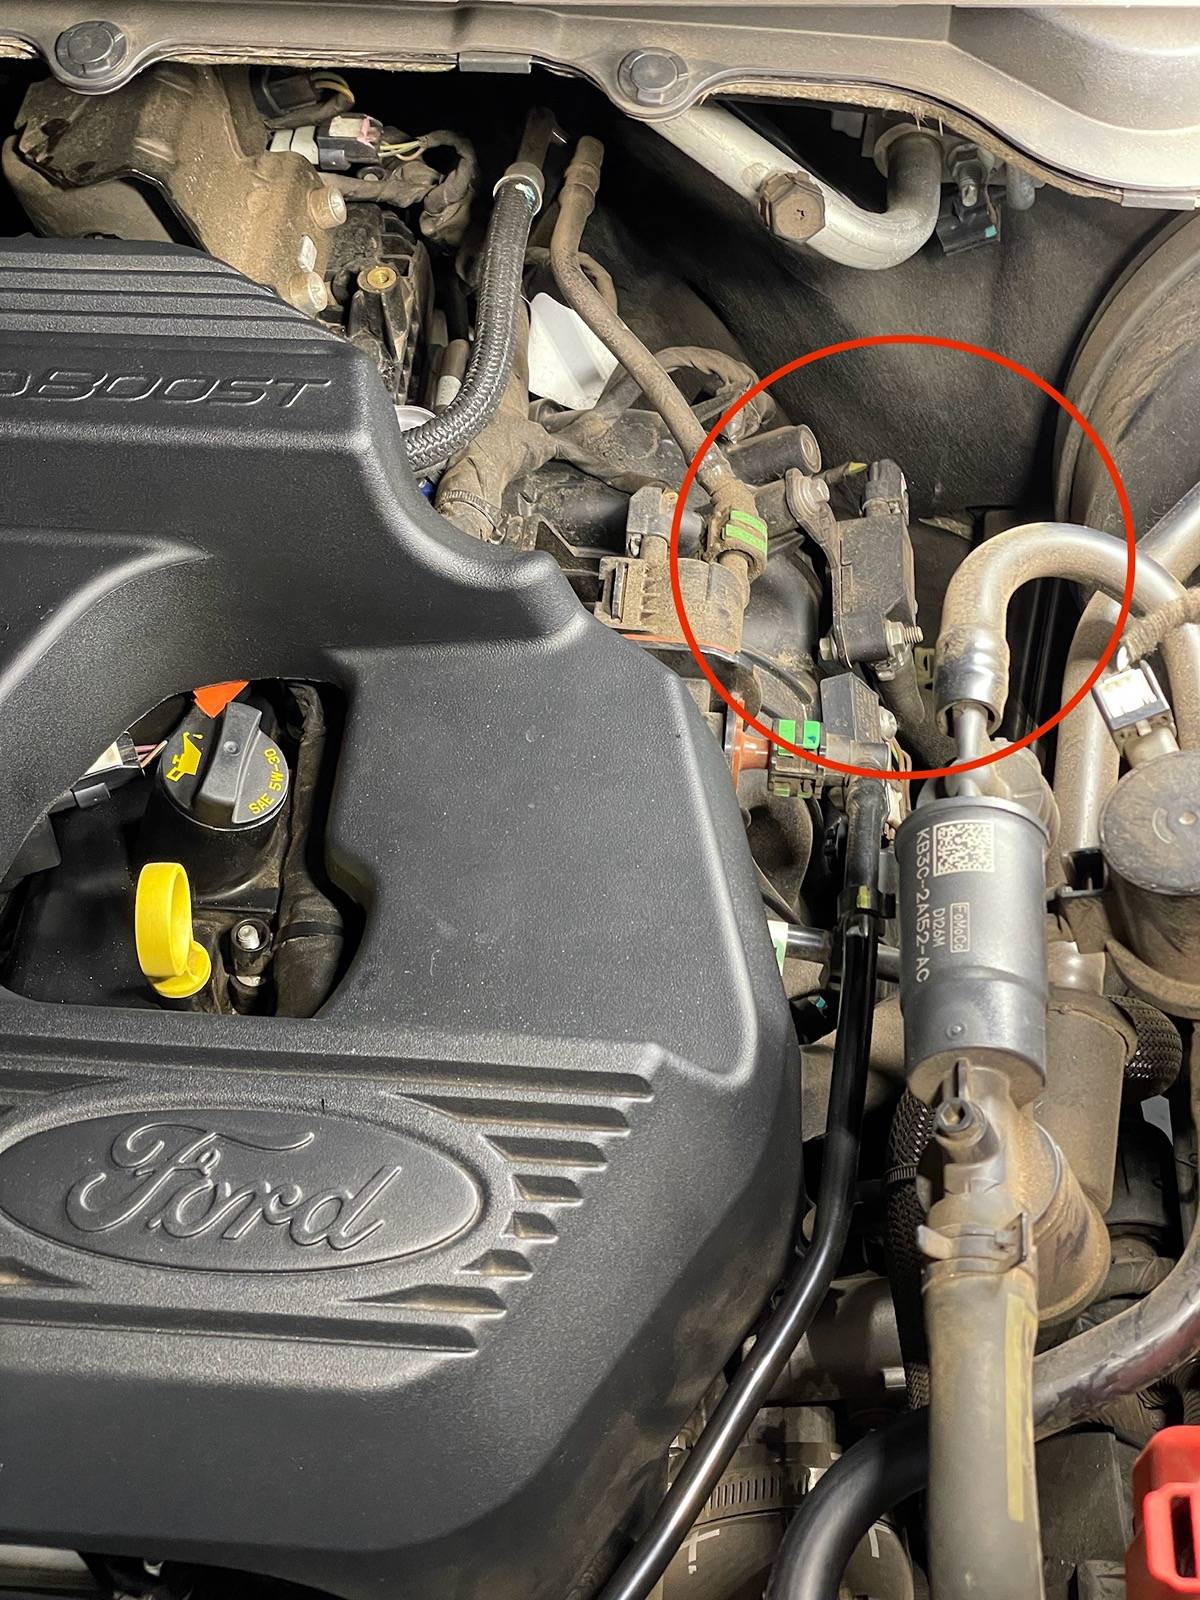
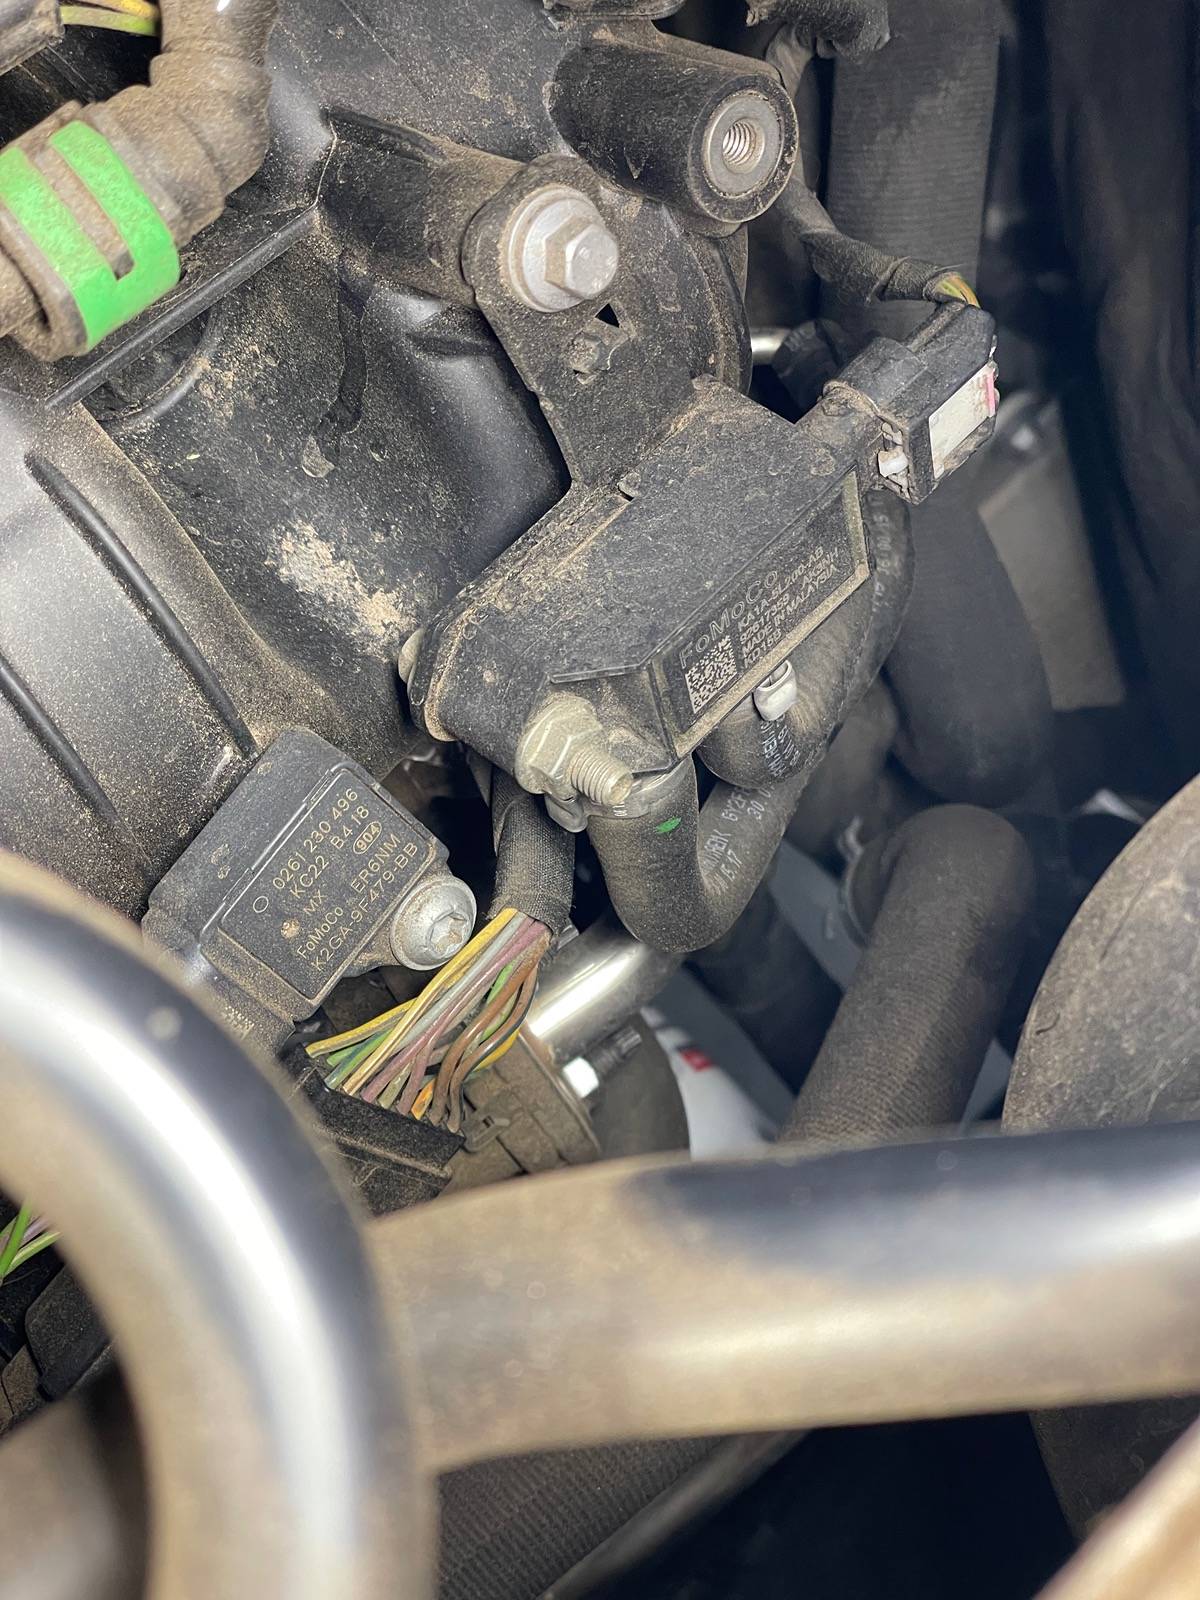
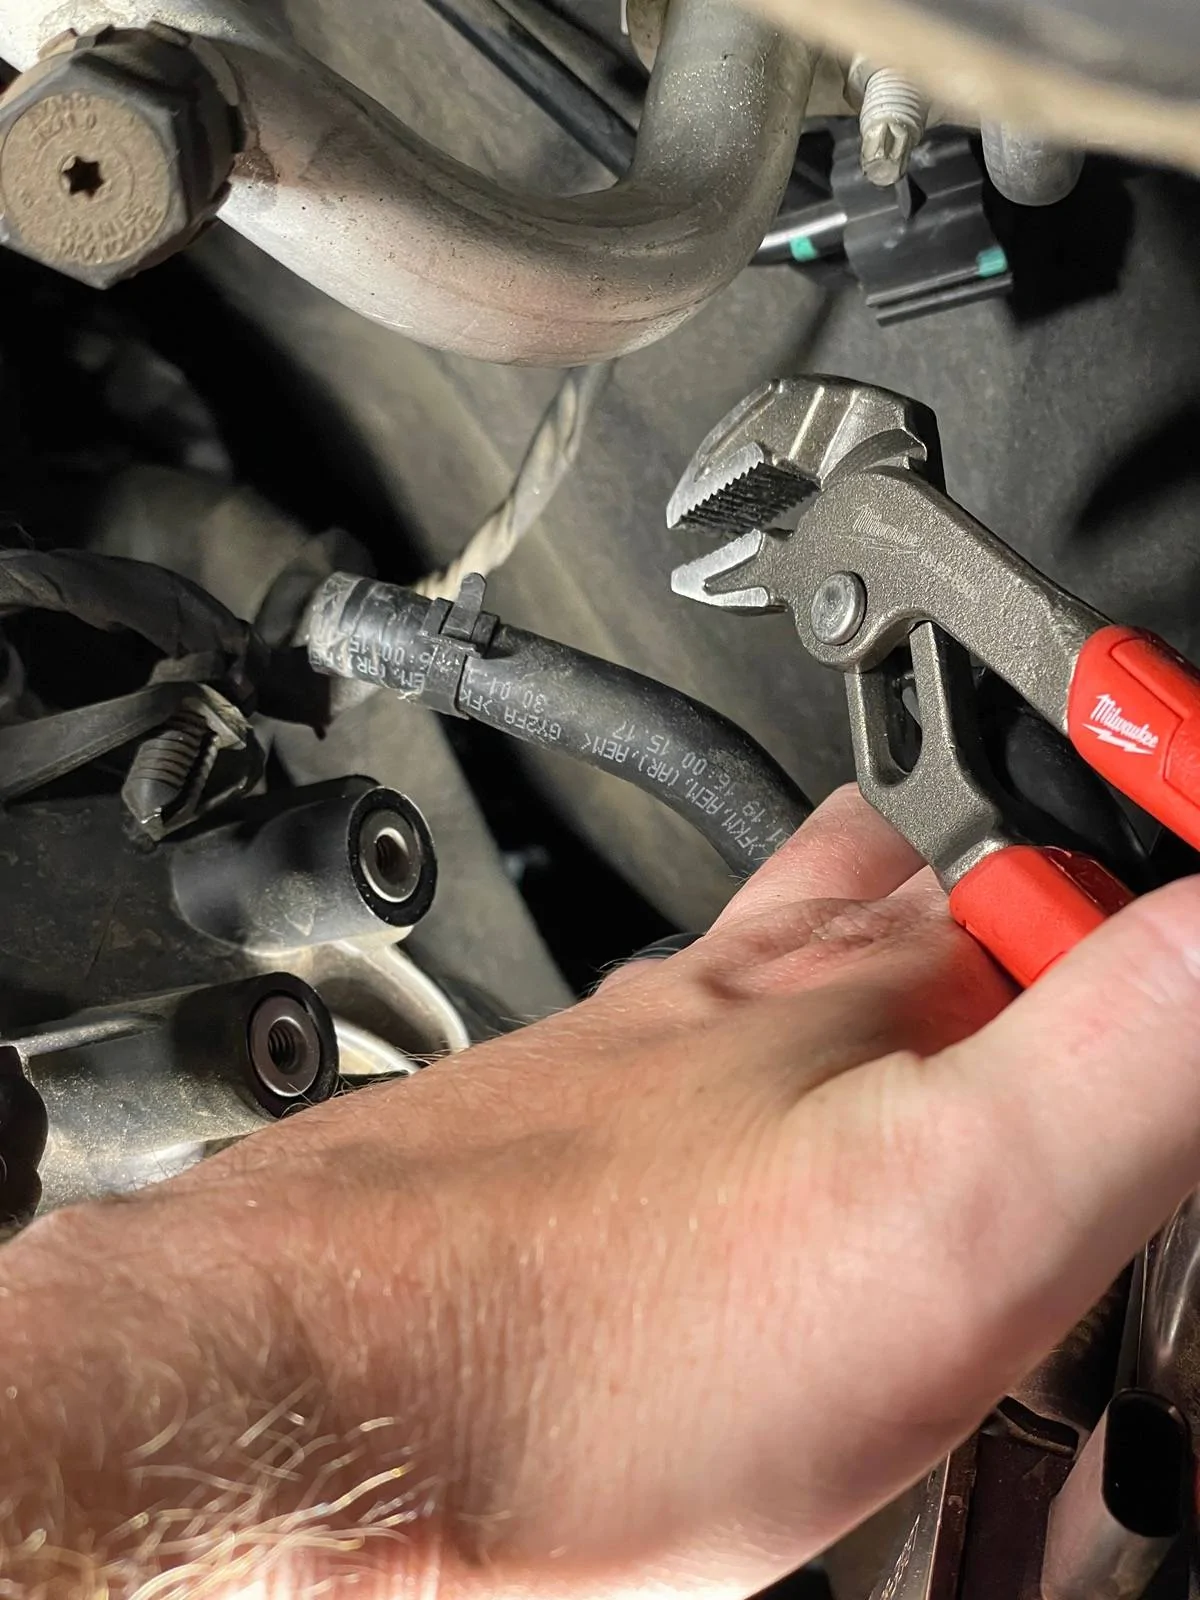
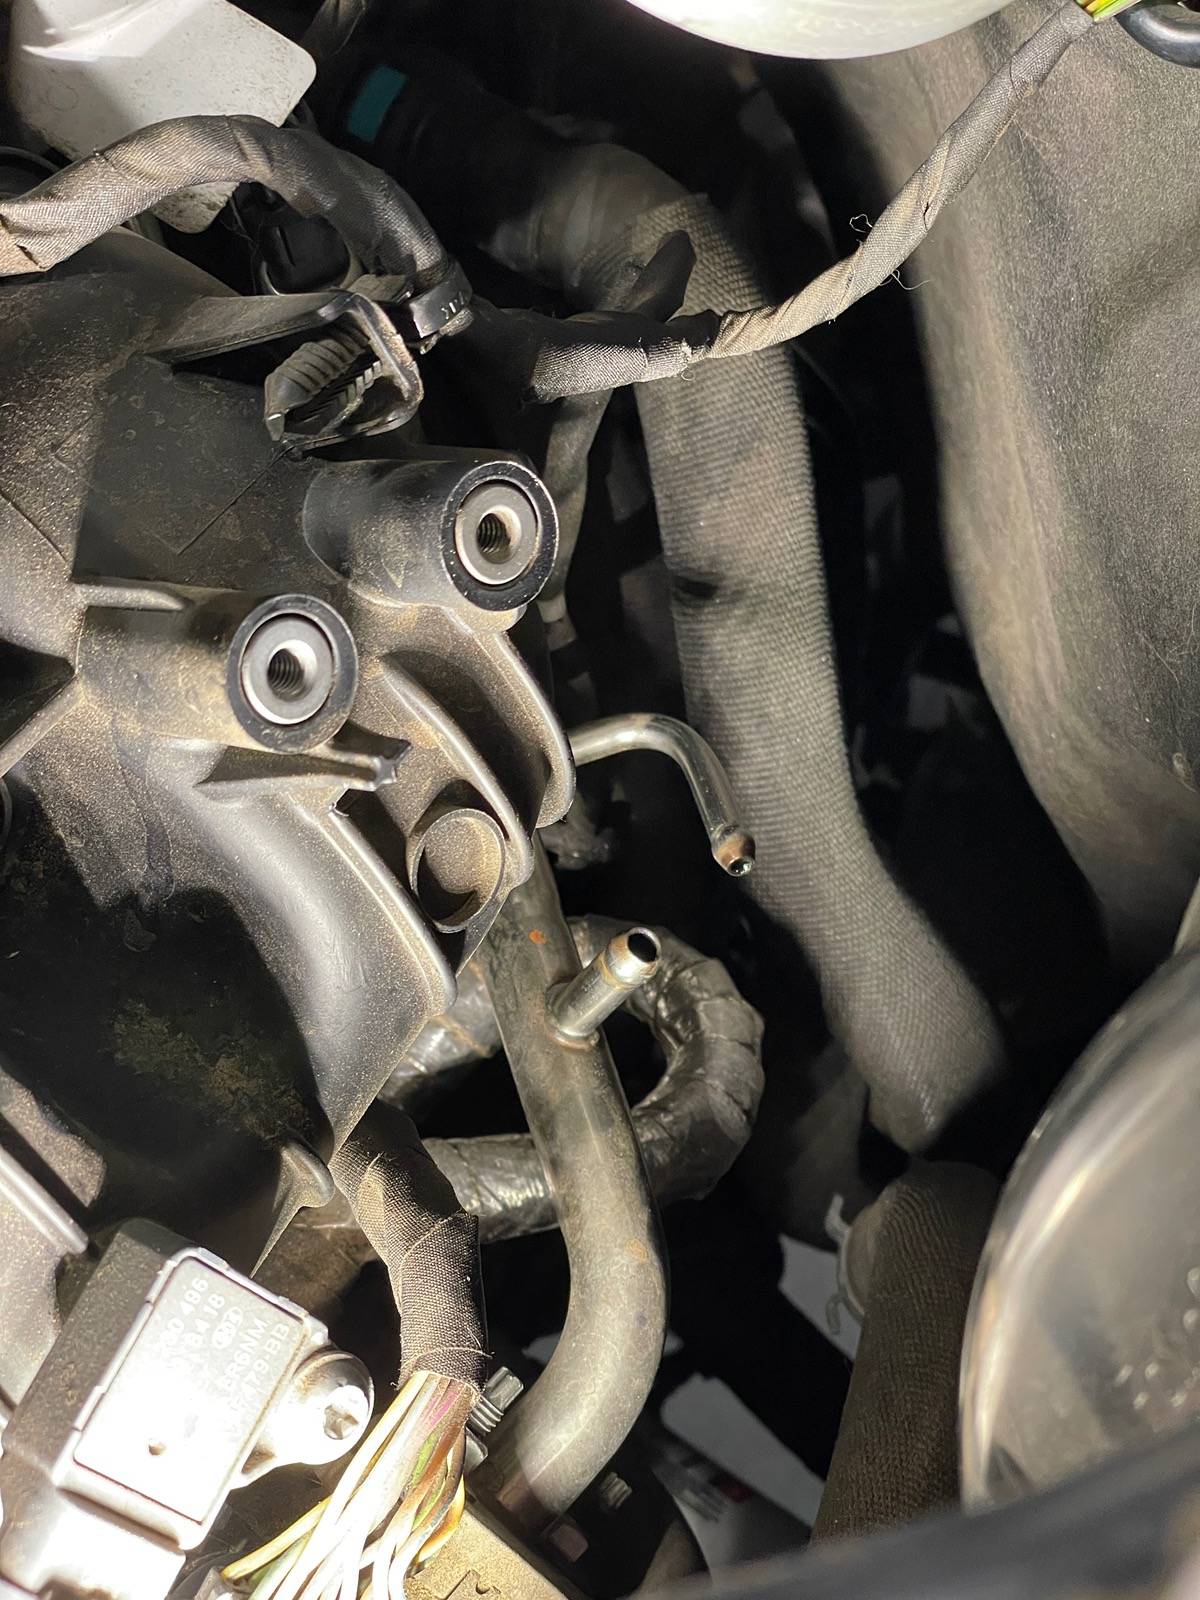
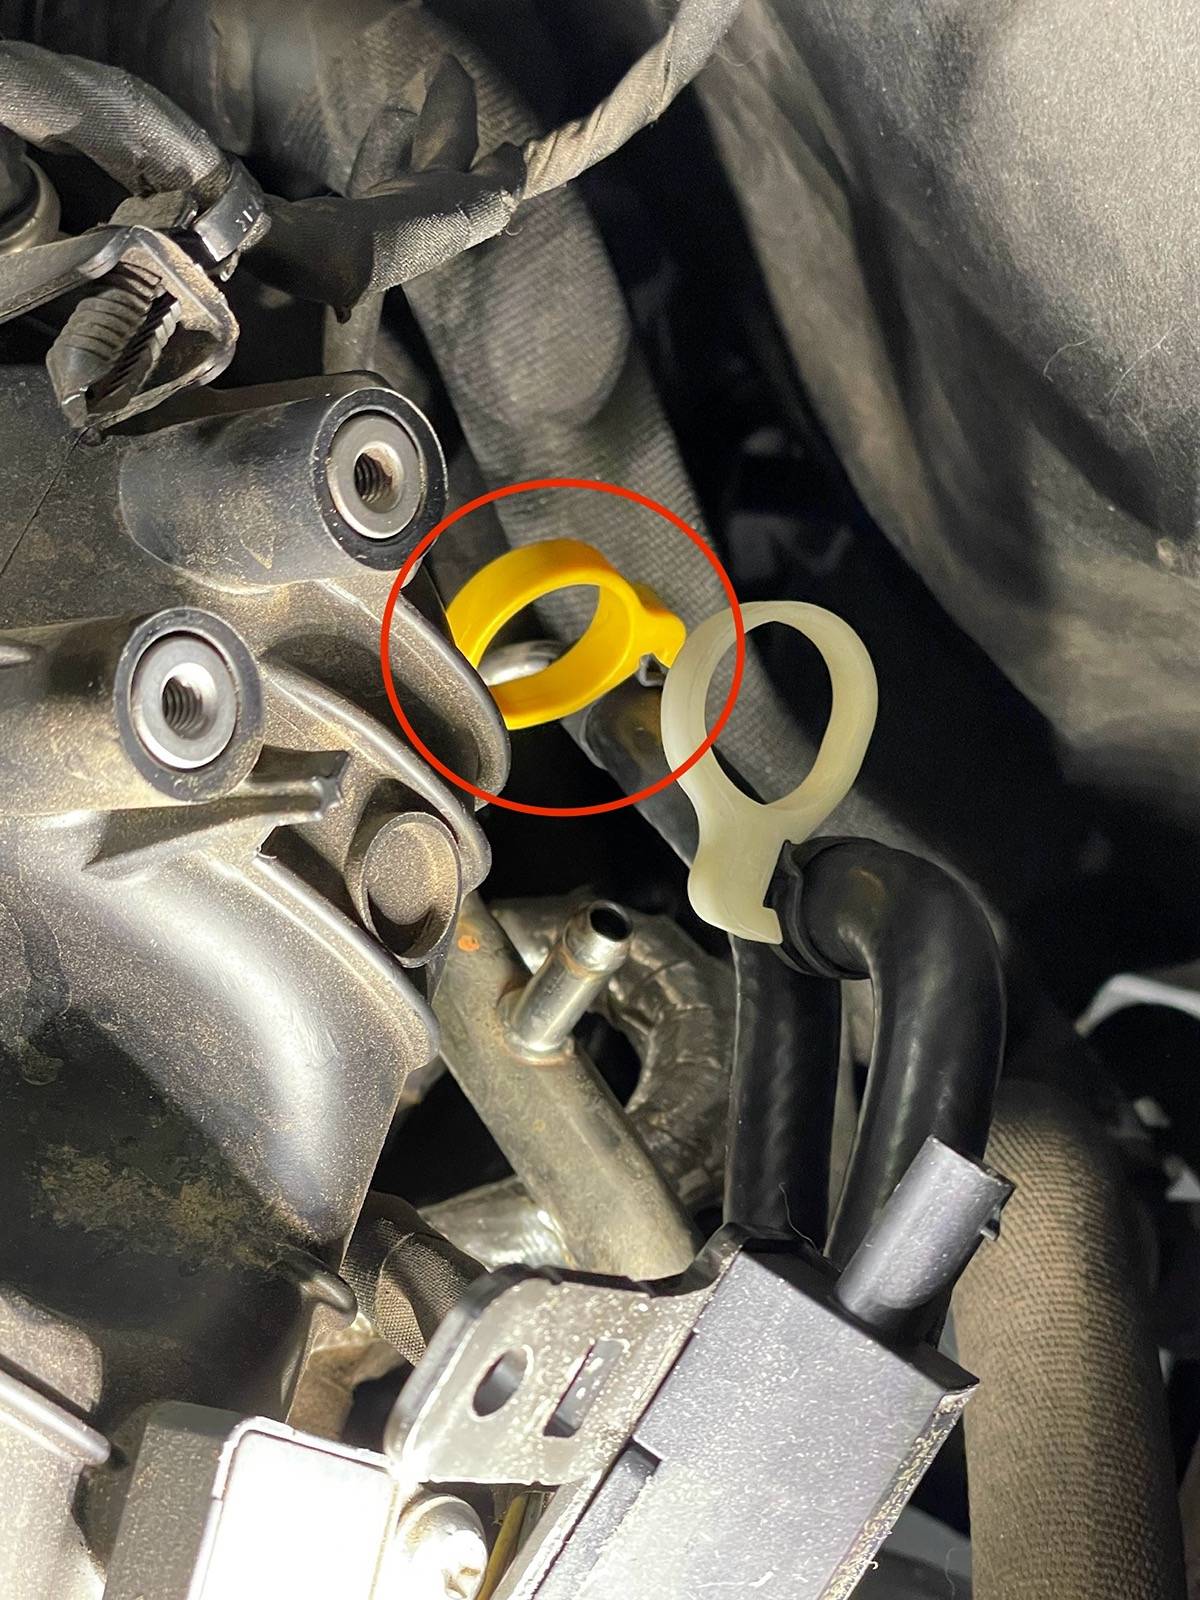
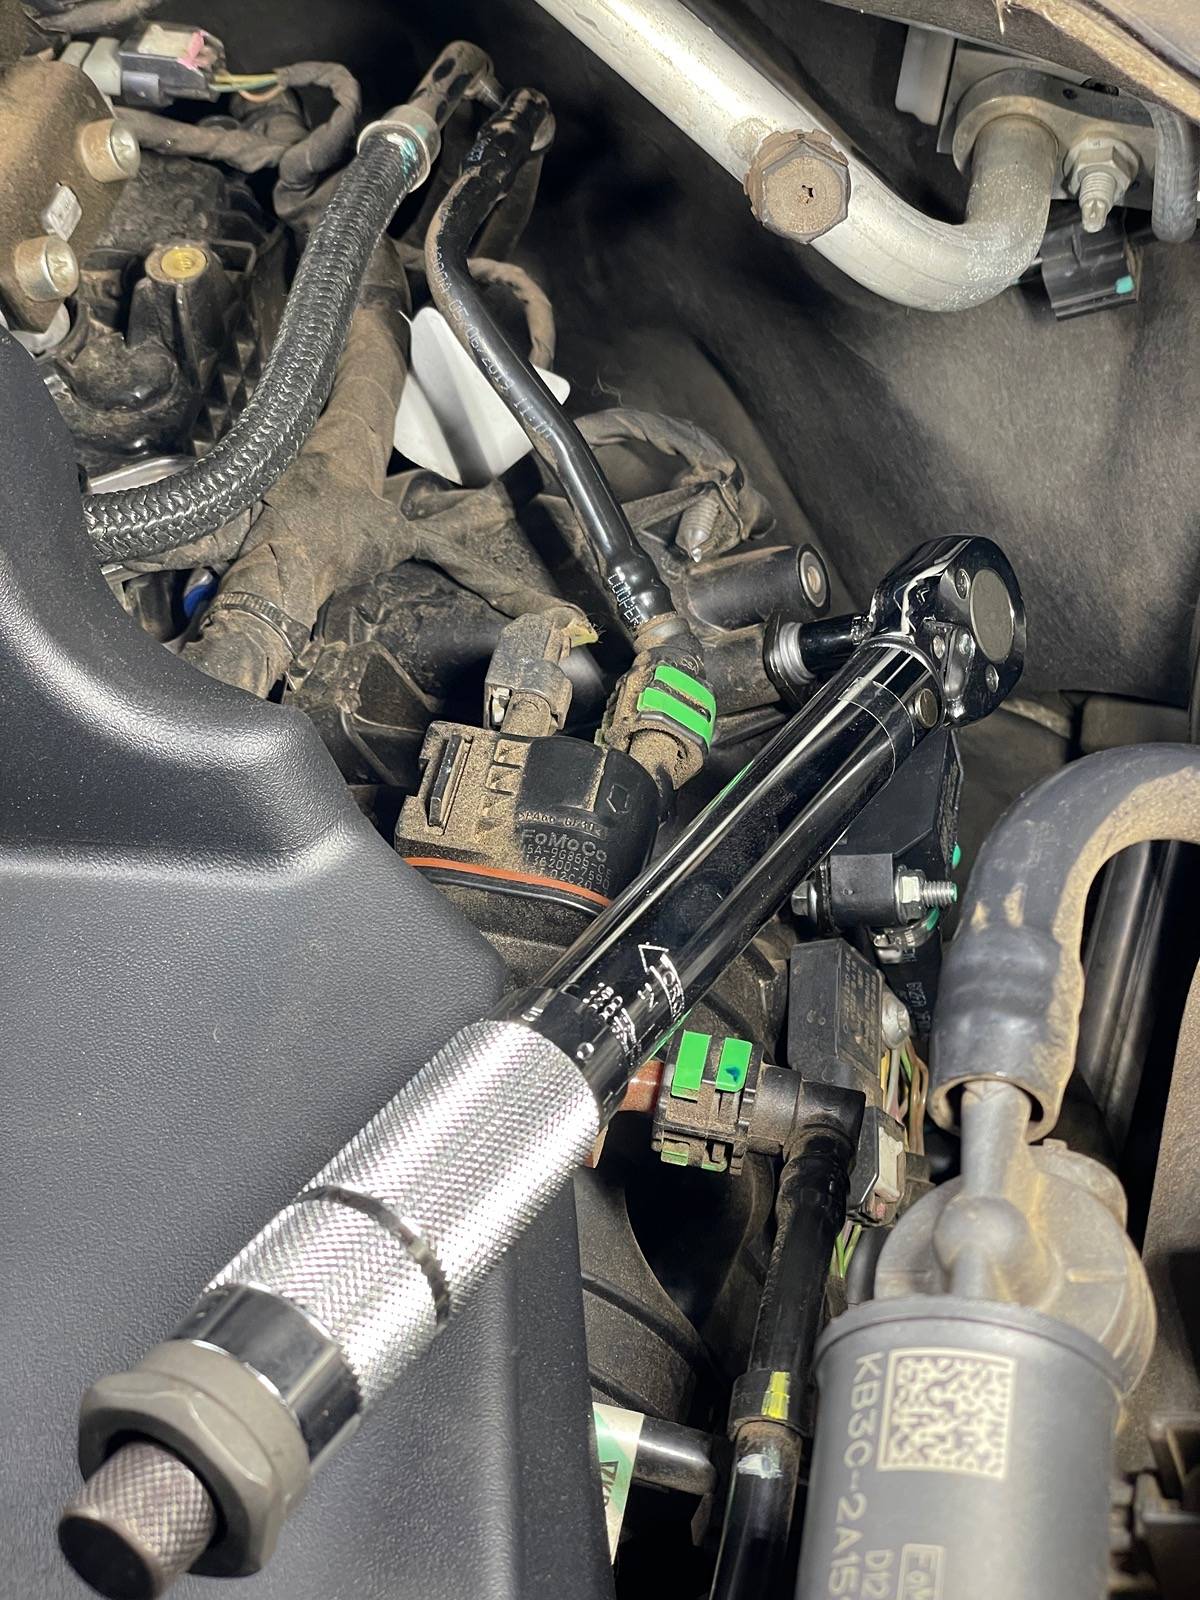
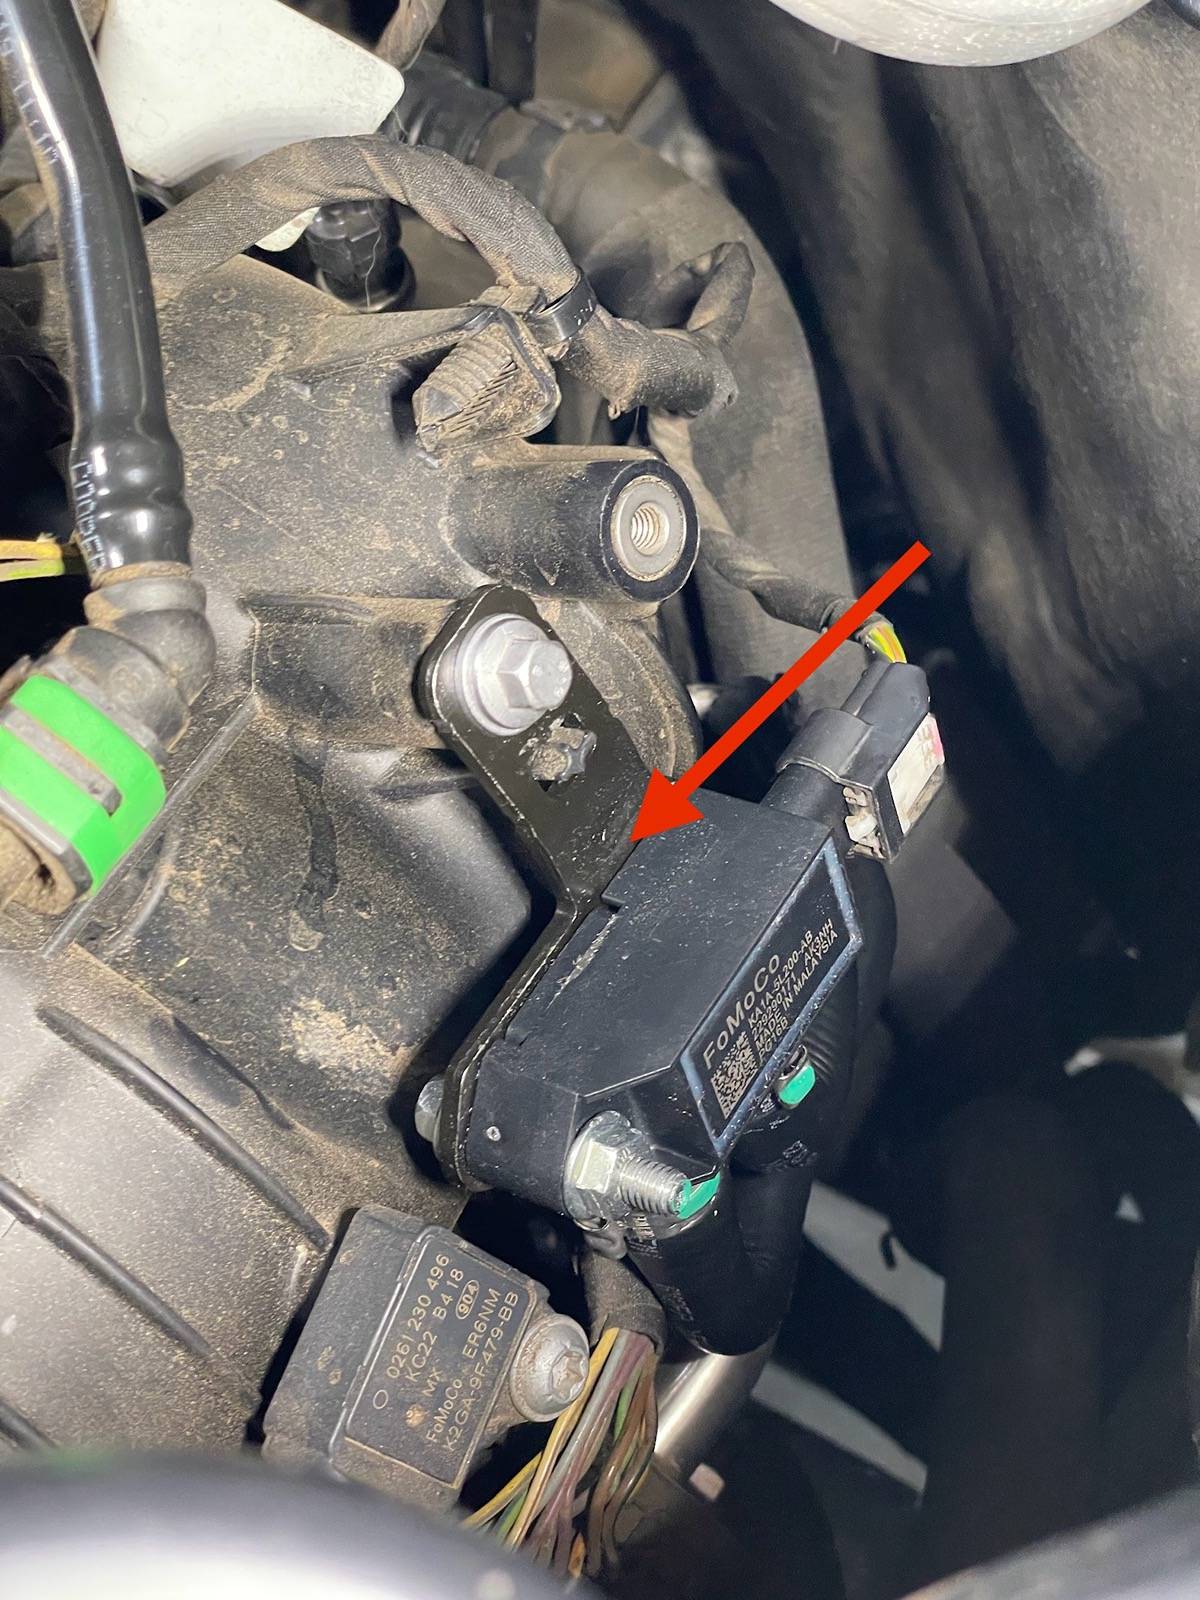
It's carbon build up you are not blowing it out. Dealer has the part there is no aftermarket.
Sponsored


LawnMM

Well-Known Member
First Name
Rich
Joined
Oct 9, 2023
Threads
9
Messages
945
Reaction score
3,031
Location
Colorado
Vehicle(s)
'23 Ranger Tremor
Looks like 0.25in for I.D. and 0.50in for O.D. per my Amazon calipers.
What kind of hose does this need to be? Regular vacuum line hose? There's no oil running through it, correct? so we don't need oil rating. I'd prefer to buy some clips and a box of hose myself and just cut and replace as I go as well.

$70 for a kit is stupid I've found the sensors for like $25
 
OP
OP
Trash Panda

Trash Panda

Well-Known Member
First Name
Cody
Joined
Aug 8, 2021
Threads
12
Messages
167
Reaction score
668
Location
Alabama
Vehicle(s)
2019 Ranger Lariat
What kind of hose does this need to be? Regular vacuum line hose? There's no oil running through it, correct? so we don't need oil rating. I'd prefer to buy some clips and a box of hose myself and just cut and replace as I go as well.

$70 for a kit is stupid I've found the sensors for like $25
It looked like a fuel line hose to me.
 

Shadowace

Member
First Name
John
Joined
May 24, 2024
Threads
3
Messages
16
Reaction score
10
Location
St johns
Vehicle(s)
2019 ranger lariat
Occupation
Driver
OK I c
What kind of hose does this need to be? Regular vacuum line hose? There's no oil running through it, correct? so we don't need oil rating. I'd prefer to buy some clips and a box of hose myself and just cut and replace as I go as well.

$70 for a kit is stupid I've found the sensors for like $25
We're did you fund the sensor from ?
 

notsolinear

Well-Known Member
Joined
Apr 1, 2023
Threads
3
Messages
77
Reaction score
95
Location
Illinois
Vehicle(s)
2021 Ford Ranger Lariat
Just wondering if taking the sensor and tube's of and lightly blowing compressed air trough tube's and sensor would remedy the problem. I've been looking all over the place and seems there is nothing available.
There is no “through” path between the two pipes, so you don’t want to do that. If air passes through something is broken.


RedlandRanger

Moderator
First Name
Rob
Joined
Nov 14, 2018
Threads
42
Messages
5,111
Reaction score
11,105
Location
Oregon
Vehicle(s)
2019 Ford Ranger Lariat FX4, 1973 Mercury Capri
Vehicle Showcase
1

GreyAreaRanger

Well-Known Member
Joined
Jul 25, 2023
Threads
9
Messages
237
Reaction score
346
Location
Houston
Vehicle(s)
2019 Ford Ranger XLT
Occupation
Surgical Nurse
Just replaced mine and now my transmission is shifting smoother than it ever has. I had the fluid and filter changed on it last month and since then had a lot of bucking and harsh shifts at partial throttle which helped me get around to replacing the sensor faster. Not sure why changing the trans fluid and filter cause the egr sensor to go erratic but all is right now.
 
OP
OP
Trash Panda

Trash Panda

Well-Known Member
First Name
Cody
Joined
Aug 8, 2021
Threads
12
Messages
167
Reaction score
668
Location
Alabama
Vehicle(s)
2019 Ranger Lariat
Just replaced mine and now my transmission is shifting smoother than it ever has. I had the fluid and filter changed on it last month and since then had a lot of bucking and harsh shifts at partial throttle which helped me get around to replacing the sensor faster. Not sure why changing the trans fluid and filter cause the egr sensor to go erratic but all is right now.
Keep an eye on it. Mine is on Week 2 waiting debug from my Ford Dealer. A few weeks after posting this I can still feel it and I skip 4th gear every now and then completely. I am pretty sure there is an actual manufacturing defect internal to the CDF drum on early Rangers. I am within 1000 miles of my power train warranty end so I figured now was the time to have it looked at.
 

GreyAreaRanger

Well-Known Member
Joined
Jul 25, 2023
Threads
9
Messages
237
Reaction score
346
Location
Houston
Vehicle(s)
2019 Ford Ranger XLT
Occupation
Surgical Nurse
Keep an eye on it. Mine is on Week 2 waiting debug from my Ford Dealer. A few weeks after posting this I can still feel it and I skip 4th gear every now and then completely. I am pretty sure there is an actual manufacturing defect internal to the CDF drum on early Rangers. I am within 1000 miles of my power train warranty end so I figured now was the time to have it looked at.
I will, I did buy an extended warranty last summer when I bought the Ranger. Like I said, it was shifting fine and then I had the trans fluid and filter changed and after that is when I started experiencing the bucking and harsh shifts. If that returns then I'll have it looked at by the dealer as I do not want to be left on the side of the road. I knew that if anything, I was replacing a part as preventive maintenance for the engine more than anything. I'll have to pay more attention to see if it skips fourth or not. I think mine typically goes from 1st to 3rd to 6th or 7th I think.
 

gtyates

Well-Known Member
First Name
Greg
Joined
May 14, 2022
Threads
2
Messages
88
Reaction score
224
Location
Tennessee
Vehicle(s)
Ranger, Explorer, Sport Trac
Occupation
Manager
Greetings All,

Dropping another one of my write-ups on the infamous bucking/surging epidemic our Rangers seem to have.
Check out the "Bucking/Surging Epidemic" thread started by @Tim Vogt Sr. for every piece of information you could want.
https://www.ranger5g.com/forum/threads/bucking-surging-epidemic.14581/
There are two ways to do this job, simply the replacing the DPFE Sensor itself (Ford KA1Z-5L200-A or KA1A-5L200-AB) or the entire assembly (Ford LB5Z-9J433-B). This write-up is geared towards replacing the entire assembly.

My symptoms were prevalent in the low RPM and low speed range. I drive like a peepaw and slowly pulling out of my driveway I would get a "misfire" feeling but no check engine light. I did my plugs last week so an actual misfire would be highly unlikely so my next step was the DPFE sensor. The transmission would search for gears at low RPMs and sometimes it would feel like driving a manual in too high of a gear through my neighborhood.

Supplies Needed :
-DPFE Sensor Assembly (Ford LB5Z-9J433-B) ($97 on @LevittownFordParts.com)
-3/8" or 1/4" Ratchet
-8mm shallow and deep sockets
-1.5" extension (if desired)
-Torque Wrench set to 97 in.lbs
-Needle Nose Pliers
-Straight-Jaw Pliers (I used my Milwaukee 6" 48-22-6306 pliers)
-LIGHT (Headlamp, Milwaukee Rover, etc)
-Work Platform or Step Ladder

IMG_2475.jpeg
IMG_2457.jpeg


Step One :

Pop the hood and locate the DPFE sensor. It is located near the back side of the engine on the driver's side of your Ranger near the brake booster.

IMG_2452.jpeg
IMG_2455.jpeg


STEP TWO : (*You could swap this with Step Three if desired)

Use your Ratchet and 8mm socket to loosen the single mounting bolt on the top. A deep socket is perfect for this without the brake booster being in the way.
Once you loosen the 8mm bolt, you can easily unthread it all the way using your fingertips to reduce the chances of dropping a socket or the bolt in to the engine bay.

*NOTE there is a washer with the 8mm bolt so be sure to not drop it.

IMG_2458.jpeg


STEP THREE : (*You could swap this with Step Two if desired)

Remove the connector from the DPFE sensor. If you read my Spark Plug write up, the connector works just like the coil pack connectors. Use your fingernail to slide the locking tab out (circled) and wiggle the connector off.
You can hang the connector out of the way on the metal line in the top right of the photo below to prevent damage.

IMG_2460.jpeg


STEP FOUR :

With the DPFE sensor unbolted and unplugged you can pull it out of the way to give you room to access the spring clamps on the hoses. This is where having a light is necessary. Take note of how the spring clamps are oriented. Mine were both facing relatively face-up. Removing the clamps is the most difficult part of the job so just stay calm and take it slow. I started with the shorter hose first to give me more leverage on the longer hose.

IMG_2462.jpeg


STEP FIVE :

Start with the smaller hose (closest to you) and go straight down with a pair of needle nose pliers (longer ones seemed to work better). When I pinched the spring clamp and pulled up the hose came right off. I did not have to fight it at all. Once the hose is off you can also place it to the side or out of the way to give you the most access to the long hose.

IMG_2463.jpeg


STEP SIX :

Remove the spring clamp on the longer hose (furthest from you). What worked for me was compressing the spring clamp, pliers in my right hand and pulling the hose horizontally to the right with my left hand. The DPFE sensor is now fully removed.

IMG_2464.jpeg
IMG_2465.jpeg


STEP SEVEN :

Reverse what you just did in Steps FIVE & SIX and take the new DPFE sensor and slide the long hose(Furthest from you) (yellow clip) on first and the short hose (closest to you) (white clip) on next.
Align the spring clamps facing upward as much as possible to make the job easier the next time you have to potentially perform it.
When the hoses are pushed on as far as possible twist the yellow and white clips clockwise to remove and engage the spring clamps.

IMG_2466.jpeg
IMG_2467.jpeg


STEP EIGHT :

Re-mount your new DPFE sensor using the guide pin and hand thread the 8mm bolt until snug to prevent cross threading. Take your torque wrench set to 97 in.lbs and torque the 8mm bolt. (It takes no effort at all and should click in a second or two)

IMG_2469.jpeg
IMG_2471.jpeg


STEP NINE :

Reconnect the DPFE connector. Slide the connector on until you hear a "click" and use your finger to engage the white locking tab by pushing it from the back towards you.
Crank your Ranger to see if a check engine light or any error message appears. Take a test drive around the neighborhood to see if there is an improvement in the surging/bucking in a low gear. I noticed an instant improvement on my Ranger and it drives like a brand new truck. Time will tell how long the replacement lasts.

IMG_2472.jpeg


That's it! Grab a cold one and enjoy a job well done! :sunglasses::beer:
Yet again it took me longer to write this write-up / take pictures than the actual job did. I would say it is a 30 - 45 minute job as long as you do not lose a socket or bolt in the engine bay. :crackup:
Thanks for this write-up! I did this about 2 years ago but had forgotten that they key is to remove the top tube first. Also, I bought an angled spring clip tool which helped tremendously! Why in the world this sensor goes bad this frequently is beyond me to understand. Our '21 Explorer Limited with essentially the same power train has never had this issue and we have 50k miles on it.
 
OP
OP
Trash Panda

Trash Panda

Well-Known Member
First Name
Cody
Joined
Aug 8, 2021
Threads
12
Messages
167
Reaction score
668
Location
Alabama
Vehicle(s)
2019 Ranger Lariat
Thanks for this write-up! I did this about 2 years ago but had forgotten that they key is to remove the top tube first. Also, I bought an angled spring clip tool which helped tremendously! Why in the world this sensor goes bad this frequently is beyond me to understand. Our '21 Explorer Limited with essentially the same power train has never had this issue and we have 50k miles on it.
I will say if you are still under warranty might want to go to the dealer and have them reflash the transmission (Steps 1 & 2 of TSB 24-2046). That is ultimately what has helped.
 

gtyates

Well-Known Member
First Name
Greg
Joined
May 14, 2022
Threads
2
Messages
88
Reaction score
224
Location
Tennessee
Vehicle(s)
Ranger, Explorer, Sport Trac
Occupation
Manager
I will say if you are still under warranty might want to go to the dealer and have them reflash the transmission (Steps 1 & 2 of TSB 24-2046). That is ultimately what has helped.
Thanks for that suggestion, but I had the reflash done last year. I have 73k miles now, so long out of Ford warranty. I do have an extended warranty, so if transmission goes I am covered. When I replaced this sensor 2 years ago I had the exact same symptoms, bucking at low speed and rpm in 1500-2000 range. I also am a Forscan user, and scanning my system shows no codes anywhere, which seems to also match the DPFE sensor, at least until it completely goes bad. lol!
 

Chris073

Active Member
First Name
Chris
Joined
Oct 10, 2021
Threads
3
Messages
25
Reaction score
104
Location
Beavercreek Ohio
Vehicle(s)
2020 Ranger XLT Sport 4x4 SuperCrew
Occupation
Chemist
I just changed mine out today for the same symptoms. Fixed my issues instantly. Thanks for taking the time to write up the instructions they were super helpful.

FYI the hoses have different i.d. one looks to be 1/8" and the other one 1/4". Earlier I considered reusing the original hoses but those two top clamps are permanent and I didn't feel like fighting with all that in that tight space. It was easily worth the extra $$ to buy the whole assembly even though it is way overpriced. (Levittown, $100). I laughed when you said to stay calm and you're right, it's easy to start flinging tools trying to get the hoses off the barbs ?
 
OP
OP
Trash Panda

Trash Panda

Well-Known Member
First Name
Cody
Joined
Aug 8, 2021
Threads
12
Messages
167
Reaction score
668
Location
Alabama
Vehicle(s)
2019 Ranger Lariat
I just changed mine out today for the same symptoms. Fixed my issues instantly. Thanks for taking the time to write up the instructions they were super helpful.

FYI the hoses have different i.d. one looks to be 1/8" and the other one 1/4". Earlier I considered reusing the original hoses but those two top clamps are permanent and I didn't feel like fighting with all that in that tight space. It was easily worth the extra $$ to buy the whole assembly even though it is way overpriced. (Levittown, $100). I laughed when you said to stay calm and you're right, it's easy to start flinging tools trying to get the hoses off the barbs ?
That’s the worst part, ESPECIALLY if you’re doing the job in the summer time with sweat rolling down your head and hands too. ?
 

bechtelsf

New Member
First Name
Scott
Joined
Jul 25, 2024
Threads
0
Messages
1
Reaction score
2
Location
Ohio
Vehicle(s)
2019 Ranger XLT
Greetings All,

Dropping another one of my write-ups on the infamous bucking/surging epidemic our Rangers seem to have.
Check out the "Bucking/Surging Epidemic" thread started by @Tim Vogt Sr. for every piece of information you could want.
https://www.ranger5g.com/forum/threads/bucking-surging-epidemic.14581/
There are two ways to do this job, simply the replacing the DPFE Sensor itself (Ford KA1Z-5L200-A or KA1A-5L200-AB) or the entire assembly (Ford LB5Z-9J433-B). This write-up is geared towards replacing the entire assembly.

My symptoms were prevalent in the low RPM and low speed range. I drive like a peepaw and slowly pulling out of my driveway I would get a "misfire" feeling but no check engine light. I did my plugs last week so an actual misfire would be highly unlikely so my next step was the DPFE sensor. The transmission would search for gears at low RPMs and sometimes it would feel like driving a manual in too high of a gear through my neighborhood.

Supplies Needed :
-DPFE Sensor Assembly (Ford LB5Z-9J433-B) ($97 on @LevittownFordParts.com)
-3/8" or 1/4" Ratchet
-8mm shallow and deep sockets
-1.5" extension (if desired)
-Torque Wrench set to 97 in.lbs
-Needle Nose Pliers
-Straight-Jaw Pliers (I used my Milwaukee 6" 48-22-6306 pliers)
-LIGHT (Headlamp, Milwaukee Rover, etc)
-Work Platform or Step Ladder

IMG_2475.jpeg
IMG_2457.jpeg


Step One :

Pop the hood and locate the DPFE sensor. It is located near the back side of the engine on the driver's side of your Ranger near the brake booster.

IMG_2452.jpeg
IMG_2455.jpeg


STEP TWO : (*You could swap this with Step Three if desired)

Use your Ratchet and 8mm socket to loosen the single mounting bolt on the top. A deep socket is perfect for this without the brake booster being in the way.
Once you loosen the 8mm bolt, you can easily unthread it all the way using your fingertips to reduce the chances of dropping a socket or the bolt in to the engine bay.

*NOTE there is a washer with the 8mm bolt so be sure to not drop it.

IMG_2458.jpeg


STEP THREE : (*You could swap this with Step Two if desired)

Remove the connector from the DPFE sensor. If you read my Spark Plug write up, the connector works just like the coil pack connectors. Use your fingernail to slide the locking tab out (circled) and wiggle the connector off.
You can hang the connector out of the way on the metal line in the top right of the photo below to prevent damage.

IMG_2460.jpeg


STEP FOUR :

With the DPFE sensor unbolted and unplugged you can pull it out of the way to give you room to access the spring clamps on the hoses. This is where having a light is necessary. Take note of how the spring clamps are oriented. Mine were both facing relatively face-up. Removing the clamps is the most difficult part of the job so just stay calm and take it slow. I started with the shorter hose first to give me more leverage on the longer hose.

IMG_2462.jpeg


STEP FIVE :

Start with the smaller hose (closest to you) and go straight down with a pair of needle nose pliers (longer ones seemed to work better). When I pinched the spring clamp and pulled up the hose came right off. I did not have to fight it at all. Once the hose is off you can also place it to the side or out of the way to give you the most access to the long hose.

IMG_2463.jpeg


STEP SIX :

Remove the spring clamp on the longer hose (furthest from you). What worked for me was compressing the spring clamp, pliers in my right hand and pulling the hose horizontally to the right with my left hand. The DPFE sensor is now fully removed.

IMG_2464.jpeg
IMG_2465.jpeg


STEP SEVEN :

Reverse what you just did in Steps FIVE & SIX and take the new DPFE sensor and slide the long hose(Furthest from you) (yellow clip) on first and the short hose (closest to you) (white clip) on next.
Align the spring clamps facing upward as much as possible to make the job easier the next time you have to potentially perform it.
When the hoses are pushed on as far as possible twist the yellow and white clips clockwise to remove and engage the spring clamps.

IMG_2466.jpeg
IMG_2467.jpeg


STEP EIGHT :

Re-mount your new DPFE sensor using the guide pin and hand thread the 8mm bolt until snug to prevent cross threading. Take your torque wrench set to 97 in.lbs and torque the 8mm bolt. (It takes no effort at all and should click in a second or two)

IMG_2469.jpeg
IMG_2471.jpeg


STEP NINE :

Reconnect the DPFE connector. Slide the connector on until you hear a "click" and use your finger to engage the white locking tab by pushing it from the back towards you.
Crank your Ranger to see if a check engine light or any error message appears. Take a test drive around the neighborhood to see if there is an improvement in the surging/bucking in a low gear. I noticed an instant improvement on my Ranger and it drives like a brand new truck. Time will tell how long the replacement lasts.

IMG_2472.jpeg


That's it! Grab a cold one and enjoy a job well done! :sunglasses::beer:
Yet again it took me longer to write this write-up / take pictures than the actual job did. I would say it is a 30 - 45 minute job as long as you do not lose a socket or bolt in the engine bay. :crackup:
Thank you - Thank you - Thank you!!! My 2019 Ranger XLT started acting up at about 110K miles and I thought for sure it was the transmission. Then I found your post and it was identical to my problem. I ordered the part, replaced it in a matter of 15 minutes and the truck was back to normal! When I removed the old one I could see water inside one of the tubes and when I shook it more drops came out. Thanks again!
Sponsored


Top