Sponsored

What did you do to your Ranger today?

DukeCanBuildit

Well-Known Member
First Name
Duke
Joined
Jul 27, 2020
Threads
66
Messages
9,627
Reaction score
46,071
Location
Kitchener, Ontario
Vehicle(s)
2019 XLT SuperCab - FTW!
Occupation
Retired (P/T) Caregiver (F/T)
Vehicle Showcase
1
Dave,
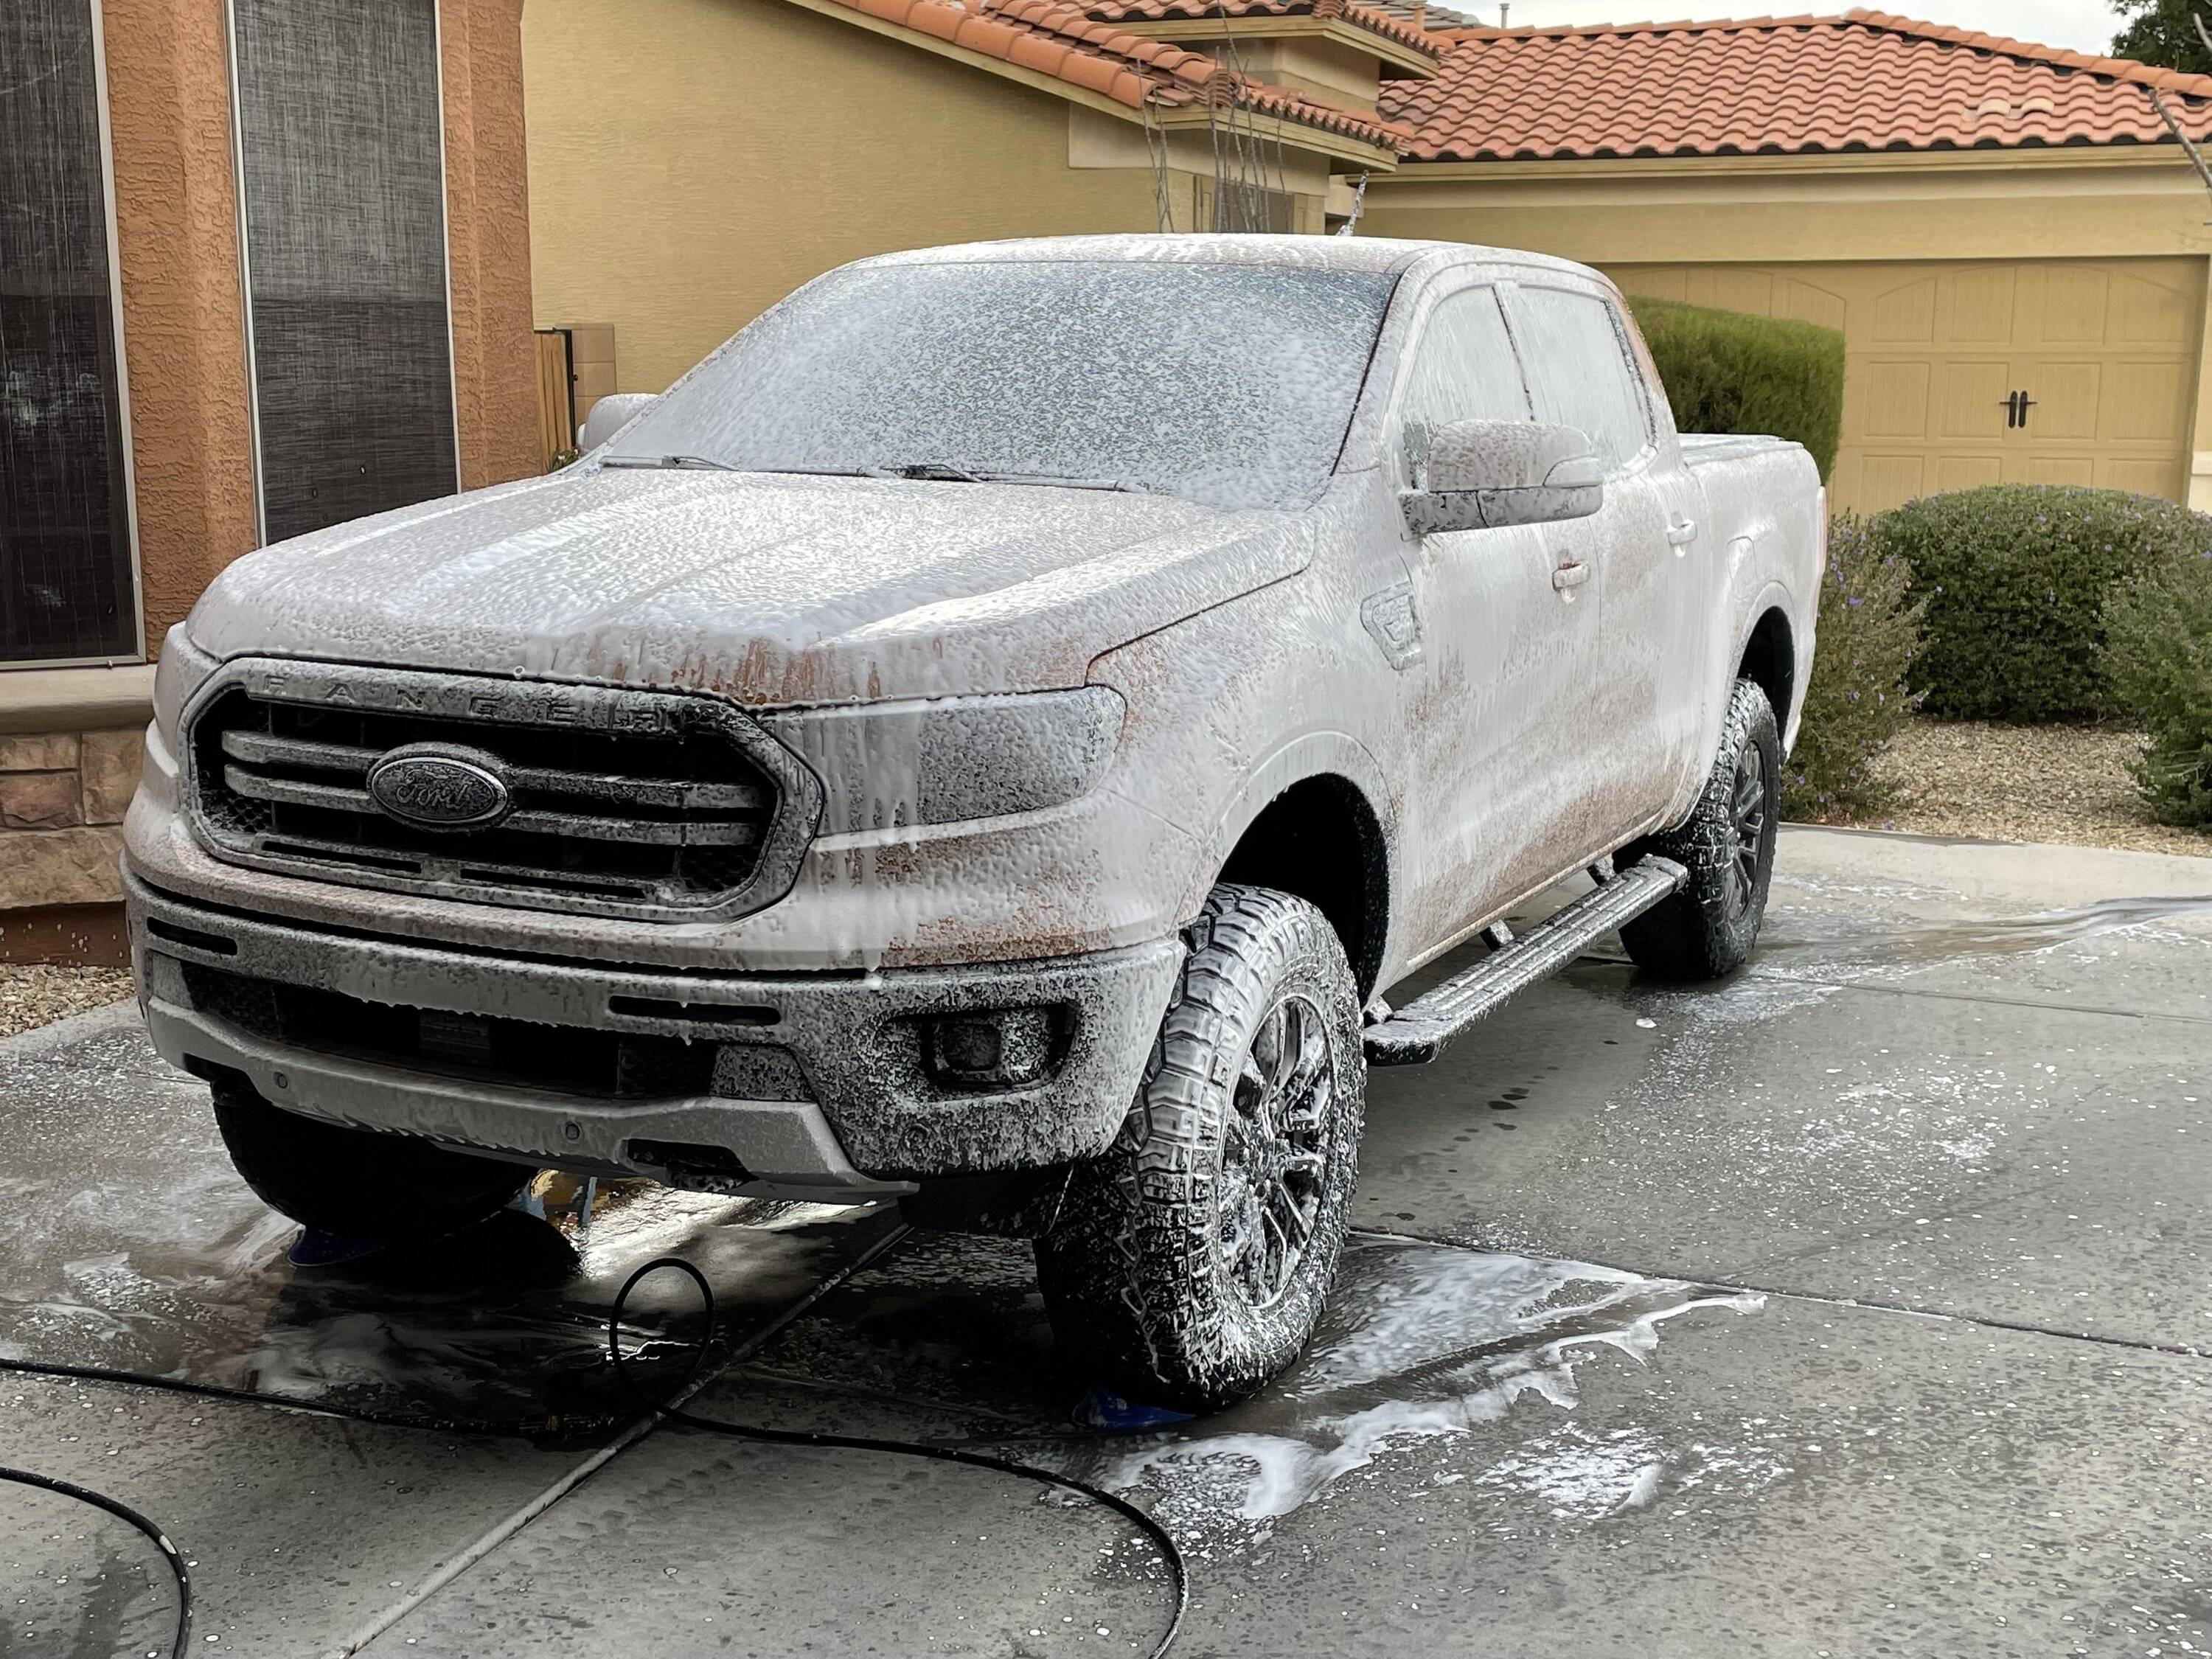
Whats the purpose of "foaming" up a vehicle like that? I've seen a lot of people doing it.
Would the soap not dry to the truck?
I'm coming from the bucket ans sponge era :D
Hey Tony,

Same principle as soap and sponge but the foam cannon soaps work better and give you full coverage, quickly.

Foam suspends the dirt particles away from the paint and slowly drips down, similar to the pre-soak cycle at the touchless car wash.

Proper foaming car wash soaps have sudsing agents to maximize this effect when used with a foam cannon, which intruduces air and creates snow-like foam.
Sponsored


SteveH

Well-Known Member
First Name
Steve
Joined
Jul 5, 2022
Threads
7
Messages
232
Reaction score
1,057
Location
Newark, NY
Vehicle(s)
2021 Ford Bronco sport. 2022 Ford Ranger
Occupation
Master technician
If it doesn't try this from Chemical Guys. While you can use most car wash soaps through a foam cannon they don't always foam up good. You want it to foam up and look like snow (that's why most are labeled Snow Foam) so it attaches itself to the dirt and drops it down off the vehicle. I tried using my normal car wash soap and it barely foamed up at all then switched to this stuff.

IMG_4927.jpg
I went ahead and bought a jug of it. Thanks for the link!
 

alan0614

Well-Known Member
First Name
Alan
Joined
May 30, 2020
Threads
14
Messages
245
Reaction score
838
Location
Granite Falls
Vehicle(s)
2019 Magnetic Lariat, 2017 GT350, 2016 Subaru Legacy
Occupation
Product and Training Manager
I finally installed the pair of Element "fire extinguishers" using Gorilla tape (fingers crossed).

IMG_20220708_160711776_HDR.jpg


IMG_20220708_160736264.jpg
I've got one as well, need to grab a couple more. I hope I never have to use it and that it lives up to the reviews.
 

Blmpkn

Well-Known Member
Joined
Jan 4, 2021
Threads
30
Messages
1,337
Reaction score
3,625
Location
Maine
Vehicle(s)
2010 ranger
20220709_192612.jpg


Slapped some new shoes on it that I got from @Ian-NH the end of last week.

+18 offset 18x9 method mr316s wrapped in 275/65 general grabbers.

20220709_192637.jpg


Got a wicked good deal, thanks man!
 
Last edited:


5G Dan-O

Well-Known Member
First Name
Dan
Joined
Nov 20, 2021
Threads
10
Messages
216
Reaction score
280
Location
Morrisville, NY
Vehicle(s)
2020 Ranger
Occupation
Ford ASSET Instructor - Program Director
Added Kilmat 50 mil sound deadening to all 4 doors today.
Holy cow - what a difference.
Bugged the crap out of me how the doors sounded like a tin can when you close it. There was no sound deadening in any of the doors. Now they close with a solid thud.

Minimal weight added.
Each front door took 4 sheets and the rear doors were 3 1/2 sheets.
I didn't do any deadening on the inside panels, they have the factory foam sheet/vapor barrier. I'm sure the door panels could take a little to improve them but I was working to eliminate the cheap sound when you close the door.

Kilmat.webp
 

subquark

Well-Known Member
First Name
David
Joined
Jan 28, 2022
Threads
11
Messages
4,544
Reaction score
23,071
Location
Portsmouth, NH
Website
subQuark.com
Vehicle(s)
Soupie! Race Red '22 XL 101A Scab 4X2 w/steelies
Occupation
game publisher
I've got one as well, need to grab a couple more. I hope I never have to use it and that it lives up to the reviews.
I was a Texas certified volunteer firefighter and have always carried an extinguisher (there's a 30 year old one in my old FJ-40, I'm sure it's pretty far gone).

And I do like a regular extinguisher because it has some force to it, for blowing through a grill or wheel well. But since I've never put out my own vehicle fire, I hope my chances are slim I ever will. BUT having the Element is that peace of mind with it never expiring or needing maintenance.

It's not certified in the US but supposedly it is in Europe.

Like you say, I hope to never use it, and if I do, I hope it lives up to its hype.

Let us know where you mount it, I have a feeling mine may get yanked off in the spot.
 

subquark

Well-Known Member
First Name
David
Joined
Jan 28, 2022
Threads
11
Messages
4,544
Reaction score
23,071
Location
Portsmouth, NH
Website
subQuark.com
Vehicle(s)
Soupie! Race Red '22 XL 101A Scab 4X2 w/steelies
Occupation
game publisher
Added Kilmat 50 mil sound deadening to all 4 doors today.
Holy cow - what a difference.
Bugged the crap out of me how the doors sounded like a tin can when you close it. There was no sound deadening in any of the doors. Now they close with a solid thud.

Minimal weight added.
Each front door took 4 sheets and the rear doors were 3 1/2 sheets.
I didn't do any deadening on the inside panels, they have the factory foam sheet/vapor barrier. I'm sure the door panels could take a little to improve them but I was working to eliminate the cheap sound when you close the door.

Kilmat.jpg
How hard was it to pull the panels? Keep in mind I'm pretty useless at trim and it seems a bit puzzling to me (but I do have a nice set of trim tools, just no patience to go with it).

I'd love to get rid of that tin sound and maybe gain a bit of insulation for New England winters.
 

Bob902

Well-Known Member
First Name
Bob
Joined
May 6, 2021
Threads
12
Messages
3,744
Reaction score
20,747
Location
St. Louis
Vehicle(s)
2021 Ranger XLT
Occupation
RETIRED!!!!
Added Kilmat 50 mil sound deadening to all 4 doors today.
Holy cow - what a difference.
Bugged the crap out of me how the doors sounded like a tin can when you close it. There was no sound deadening in any of the doors. Now they close with a solid thud.

Minimal weight added.
Each front door took 4 sheets and the rear doors were 3 1/2 sheets.
I didn't do any deadening on the inside panels, they have the factory foam sheet/vapor barrier. I'm sure the door panels could take a little to improve them but I was working to eliminate the cheap sound when you close the door.

Kilmat.jpg
This is an easy, fairly cheap upgrade. I'm glad I did mine.
 

DukeCanBuildit

Well-Known Member
First Name
Duke
Joined
Jul 27, 2020
Threads
66
Messages
9,627
Reaction score
46,071
Location
Kitchener, Ontario
Vehicle(s)
2019 XLT SuperCab - FTW!
Occupation
Retired (P/T) Caregiver (F/T)
Vehicle Showcase
1
20220709_192612.jpg


Slapped some new shoes on it that I got from @Ian-NH the end of last week.

-18 offset 18x9 method mr316s wrapped in 275/65 general grabbers.

20220709_192637.jpg


Got a wicked good deal, thanks man!
I’m pretty sure you meant +18mm offset, right?
 

5G Dan-O

Well-Known Member
First Name
Dan
Joined
Nov 20, 2021
Threads
10
Messages
216
Reaction score
280
Location
Morrisville, NY
Vehicle(s)
2020 Ranger
Occupation
Ford ASSET Instructor - Program Director
How hard was it to pull the panels? Keep in mind I'm pretty useless at trim and it seems a bit puzzling to me (but I do have a nice set of trim tools, just no patience to go with it).

I'd love to get rid of that tin sound and maybe gain a bit of insulation for New England winters.
It's not complicated but you will need some patience.
You pop the little trim door off behind the door handle - one Torx 25 screw
Pop the door pull cover off and then remove two Torx 25 screws
2 Torx screws at the bottom edge of the door panel


The 'hard' part is knowing how hard and where to pull on the pull handle cover and the door panel to disengage the plastic retainers.

On the front doors there's a tiny connector that you need to pry the connector out. It's the LED light. You actually pry VERY carefully on the light by the connector and the engagement pin will disengage and the connector will come off. The other connectors are self-explanatory (Squeeze the release tab - connector slides out)

The door handle pops off the door panel, the first one will confuse you, the rest will be wicked easy - it's a great design.

I took the speakers out - three 7mm screws - gives you a ton of extra room to work. Also, the foam vapor barrier is easy to tear so pull it away carefully.

There's got to be a YouTube video of this process I bet.
 

subquark

Well-Known Member
First Name
David
Joined
Jan 28, 2022
Threads
11
Messages
4,544
Reaction score
23,071
Location
Portsmouth, NH
Website
subQuark.com
Vehicle(s)
Soupie! Race Red '22 XL 101A Scab 4X2 w/steelies
Occupation
game publisher
It's not complicated but you will need some patience.
You pop the little trim door off behind the door handle - one Torx 25 screw
Pop the door pull cover off and then remove two Torx 25 screws
2 Torx screws at the bottom edge of the door panel


The 'hard' part is knowing how hard and where to pull on the pull handle cover and the door panel to disengage the plastic retainers.

On the front doors there's a tiny connector that you need to pry the connector out. It's the LED light. You actually pry VERY carefully on the light by the connector and the engagement pin will disengage and the connector will come off. The other connectors are self-explanatory (Squeeze the release tab - connector slides out)

The door handle pops off the door panel, the first one will confuse you, the rest will be wicked easy - it's a great design.

I took the speakers out - three 7mm screws - gives you a ton of extra room to work. Also, the foam vapor barrier is easy to tear so pull it away carefully.

There's got to be a YouTube video of this process I bet.
Thanks for the details and really clear instructions. Knowing the Torx and 7mm sizes is a big help to keep me from running back and forth. And those connectors, that's good info (I probably don't have the LED one - I have an XL, but I certainly have the other one).

Is that vapor barrier attached with like a tar ribbon? Not sure that's what it's called. I had an older car that had a bead of a sticky tarry material that held a plastic sheet in place.

And you even inspired greater confidence in me by saying "wicked!" =)

Thanks!
 

5G Dan-O

Well-Known Member
First Name
Dan
Joined
Nov 20, 2021
Threads
10
Messages
216
Reaction score
280
Location
Morrisville, NY
Vehicle(s)
2020 Ranger
Occupation
Ford ASSET Instructor - Program Director
Thanks for the details and really clear instructions. Knowing the Torx and 7mm sizes is a big help to keep me from running back and forth. And those connectors, that's good info (I probably don't have the LED one - I have an XL, but I certainly have the other one).

Is that vapor barrier attached with like a tar ribbon? Not sure that's what it's called. I had an older car that had a bead of a sticky tarry material that held a plastic sheet in place.

And you even inspired greater confidence in me by saying "wicked!" =)

Thanks!
I was sure you would get the wicked joke. :)

Yes, the barrier is held on with a sticky rope - sometimes called thumb grade sealer. If you're careful it will come off. It's 85 here today in Central NY State so I bet being a little softer made it easier to come off.
 

Bob902

Well-Known Member
First Name
Bob
Joined
May 6, 2021
Threads
12
Messages
3,744
Reaction score
20,747
Location
St. Louis
Vehicle(s)
2021 Ranger XLT
Occupation
RETIRED!!!!
Thanks for the details and really clear instructions. Knowing the Torx and 7mm sizes is a big help to keep me from running back and forth. And those connectors, that's good info (I probably don't have the LED one - I have an XL, but I certainly have the other one).

Is that vapor barrier attached with like a tar ribbon? Not sure that's what it's called. I had an older car that had a bead of a sticky tarry material that held a plastic sheet in place.

And you even inspired greater confidence in me by saying "wicked!" =)

Thanks!
it's a pretty easy job. There is a video on how to do it. It's a guy overseas who also replaced the speakers at the same time.
Sponsored


Top