Sponsored

How to remove rear trim panel behind rear seat

mark_anderson_us

Well-Known Member
First Name
Mark
Joined
Oct 23, 2020
Threads
30
Messages
274
Reaction score
208
Location
Chicago
Vehicle(s)
Ford Ranger Lariat FX4 2020
Occupation
Software Developer
Hi All

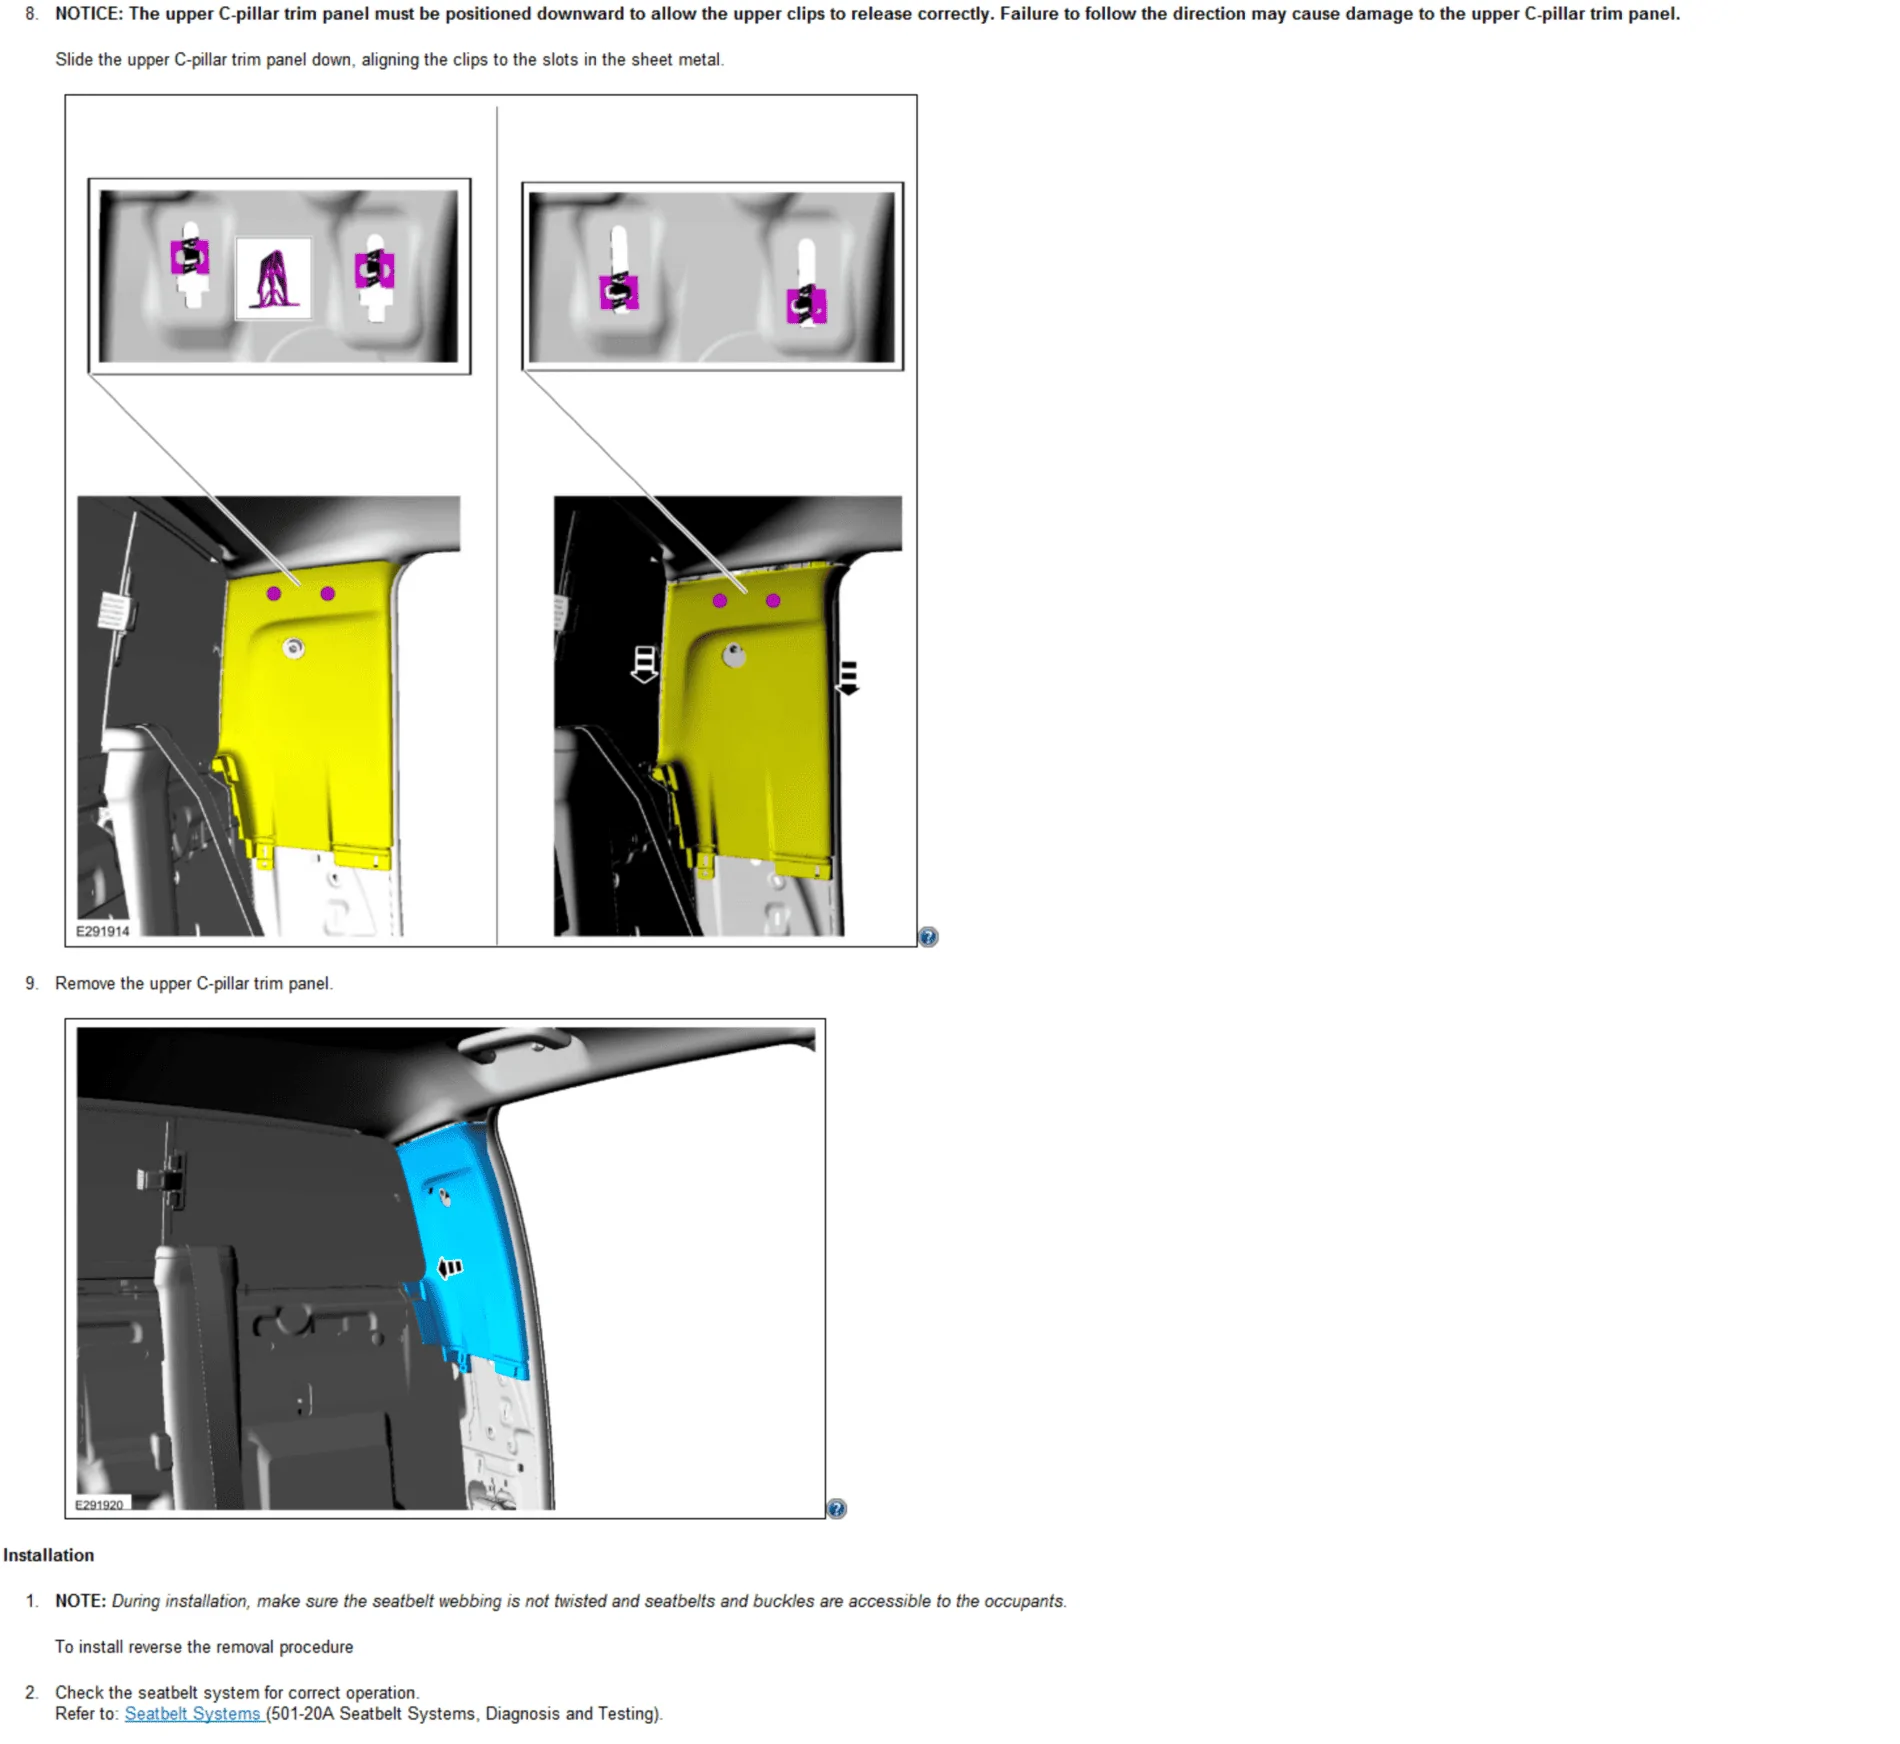
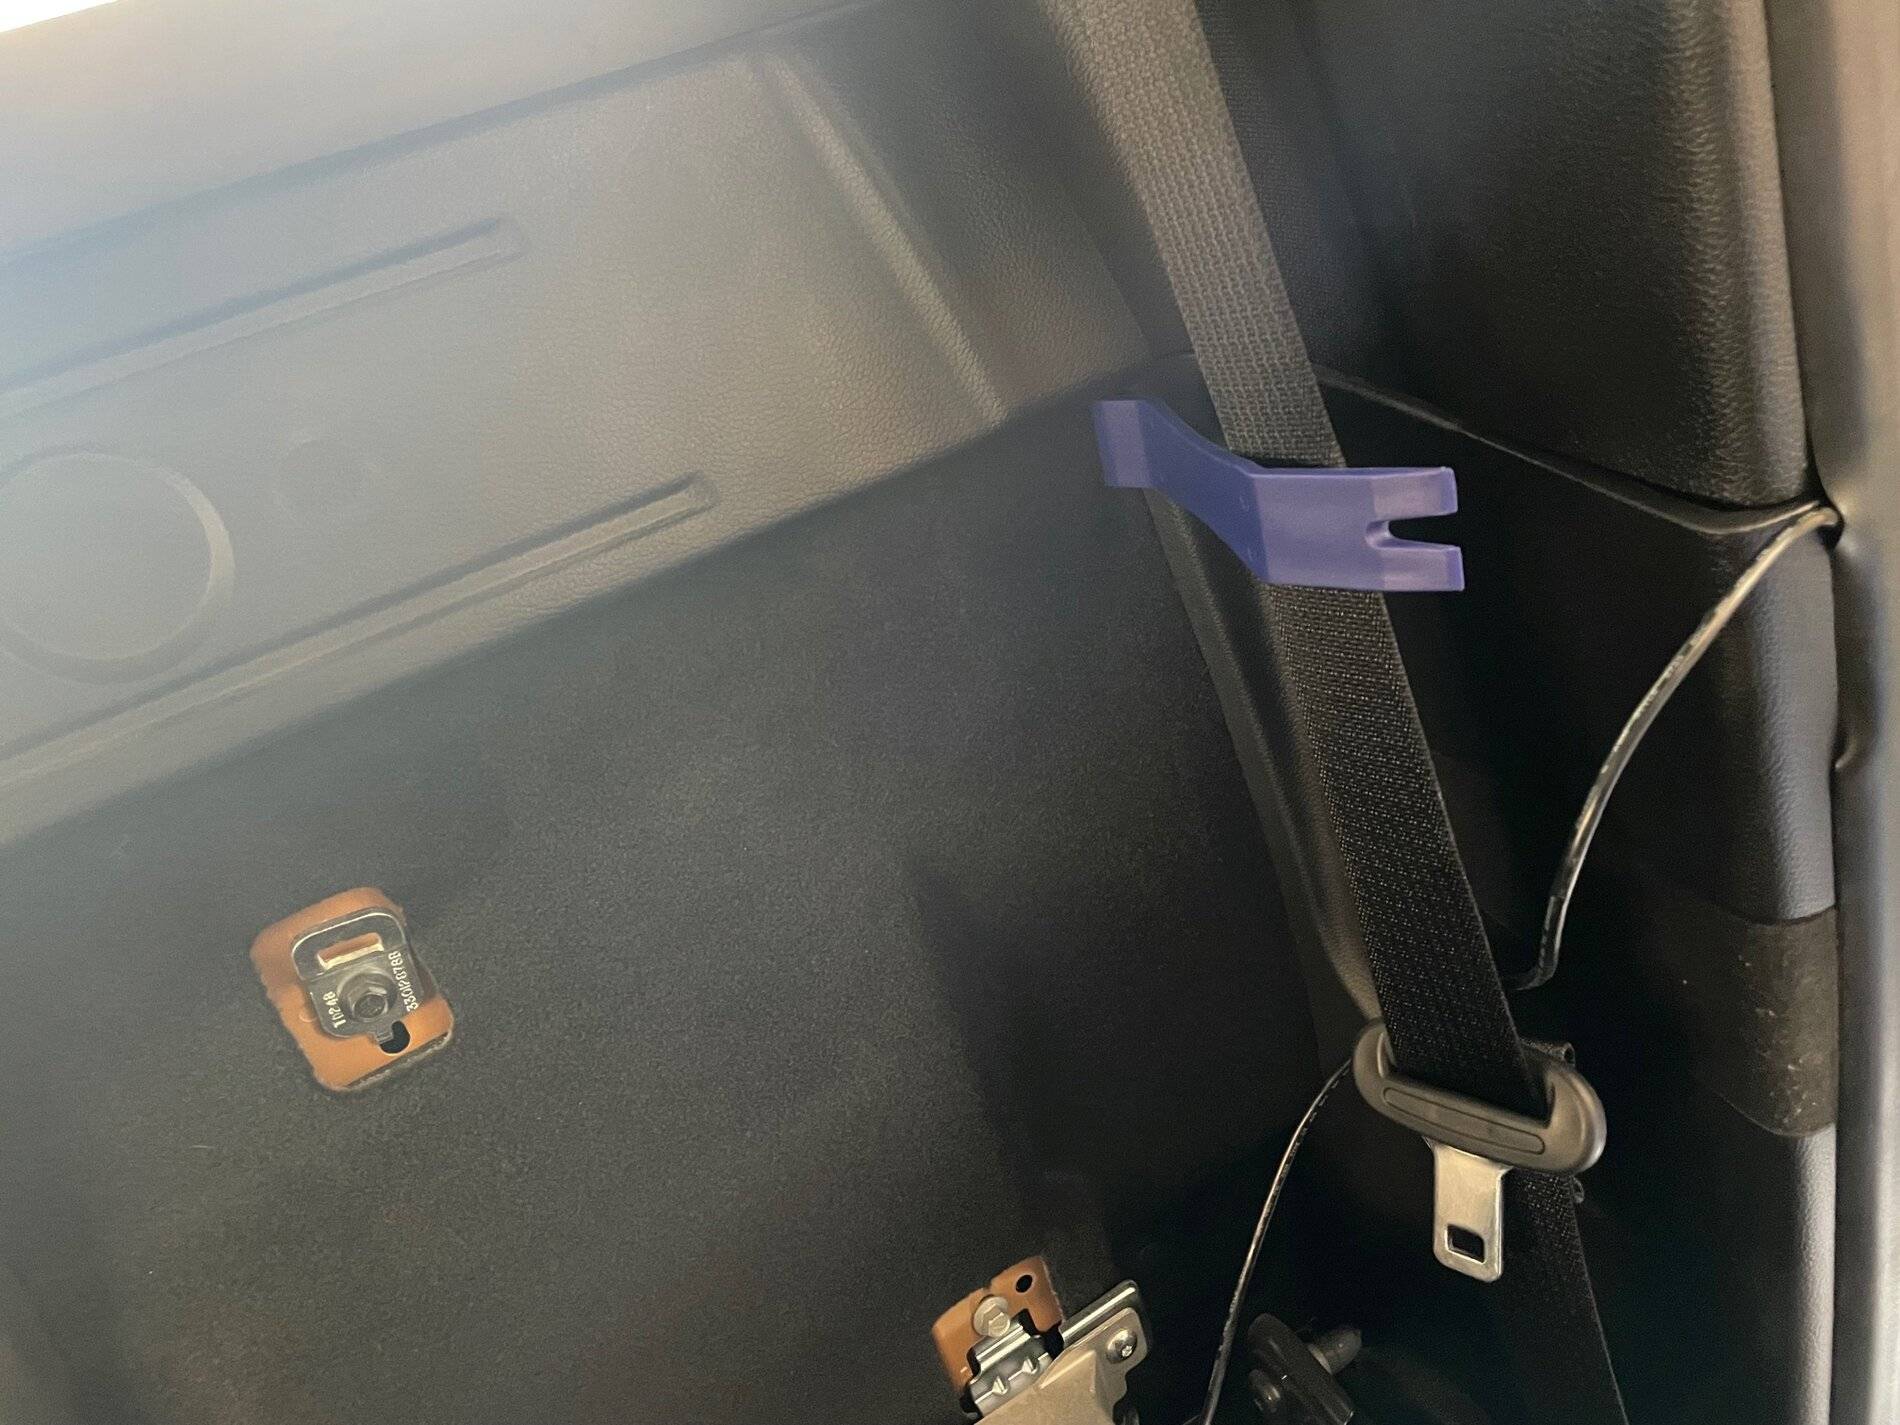
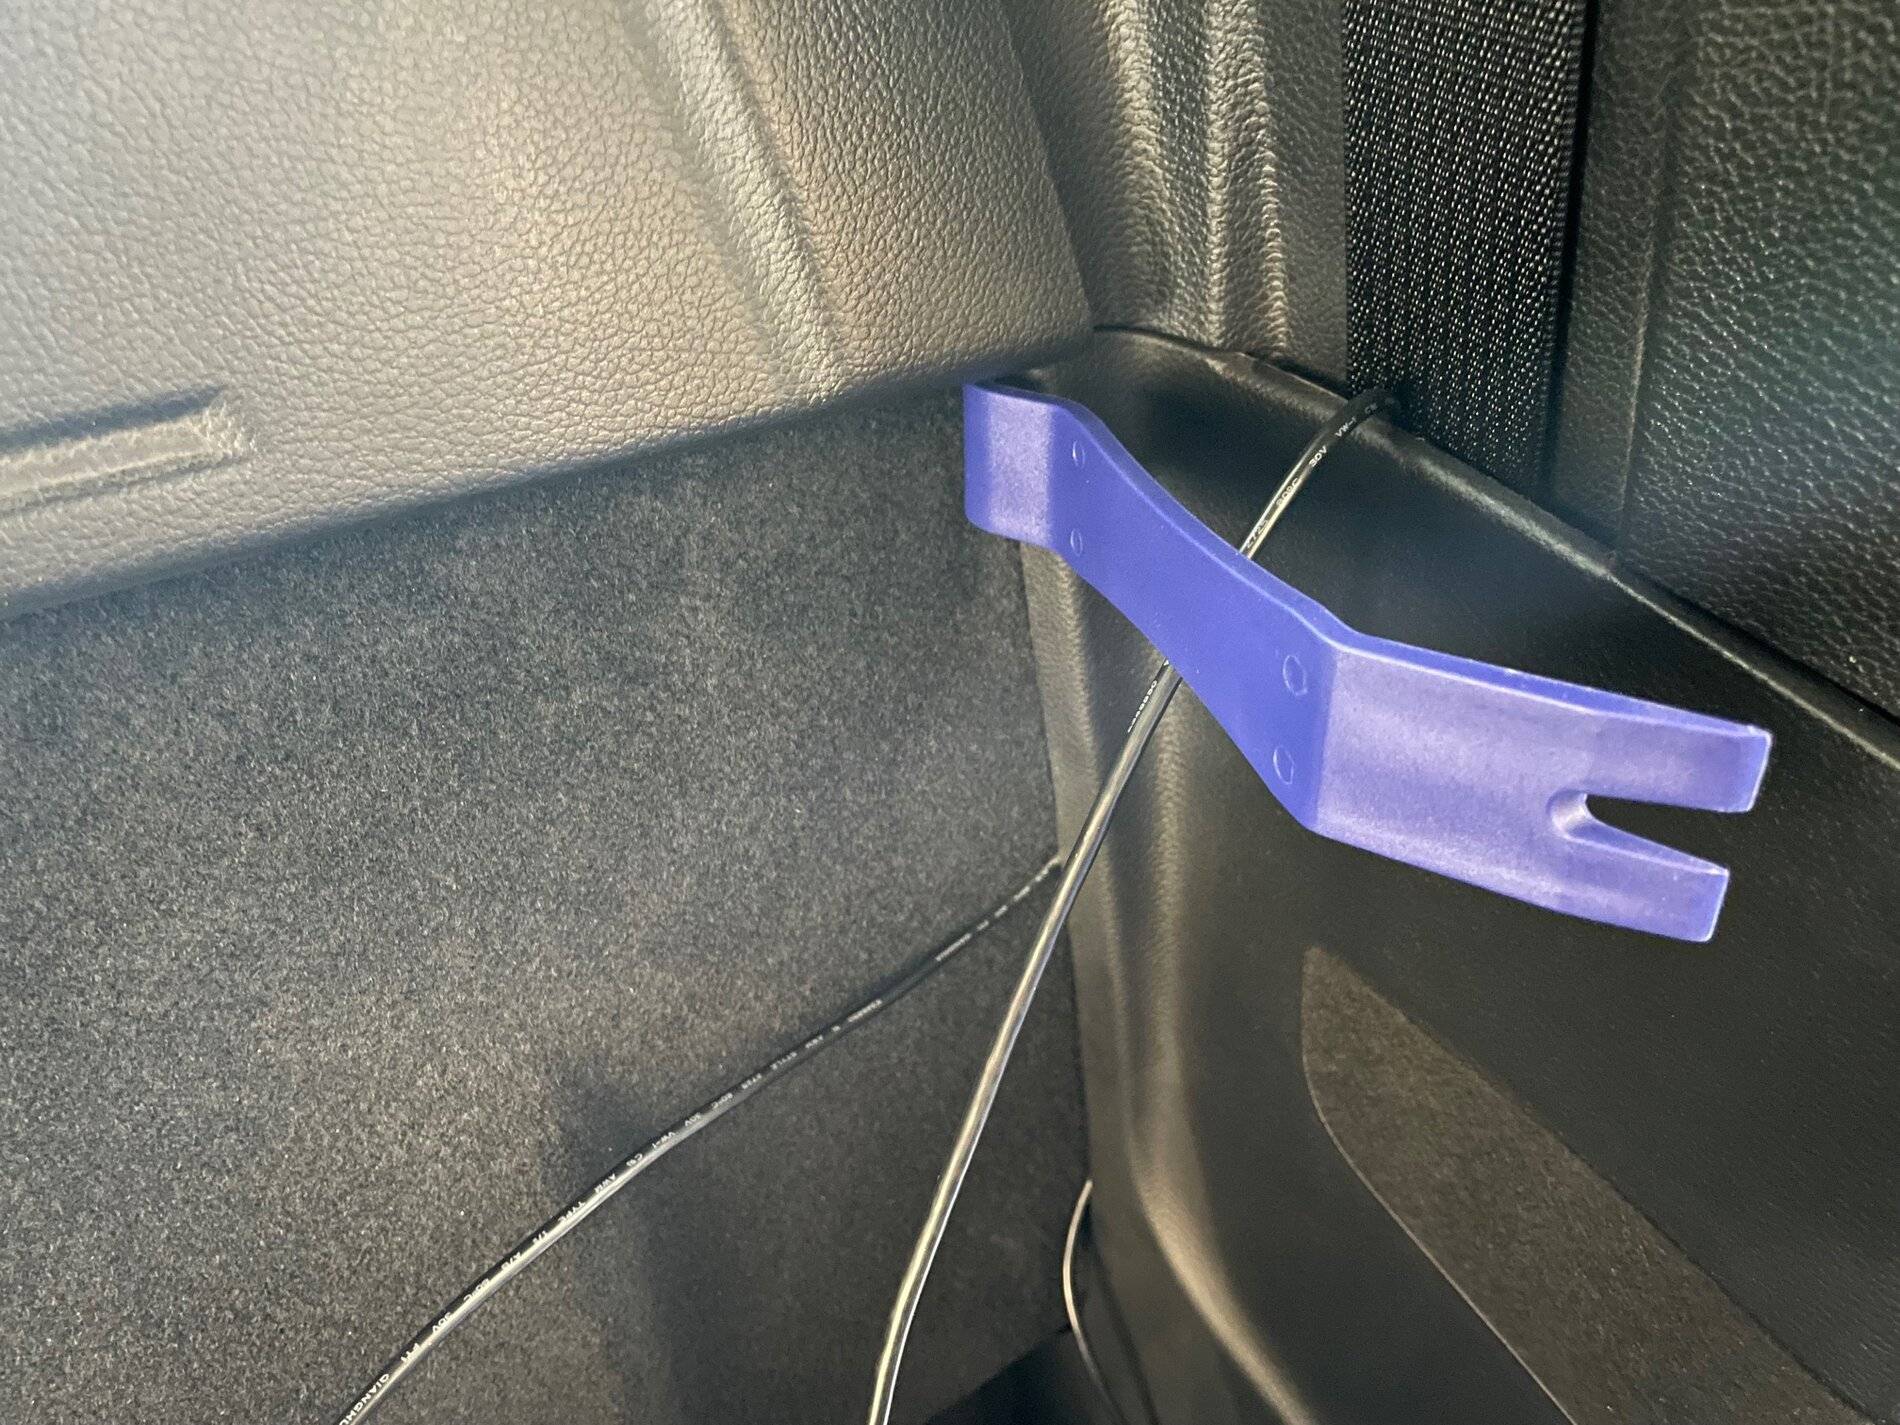
Need to run some wires behind rear seat in my FX4 Lariat (full size cab, also has amp and sub behind seat)

Anyone know what I need to do to remove the rear trim panel

Thanks

Mark
Sponsored


AzScorpion

Moderator
First Name
Dave
Joined
Jul 25, 2019
Threads
335
Messages
26,217
Reaction score
131,971
Location
Back Home In AZ!
Vehicle(s)
2023 Ford Ranger Tremor
Occupation
Retired...Full Time Slacker
OP
OP

mark_anderson_us

Well-Known Member
First Name
Mark
Joined
Oct 23, 2020
Threads
30
Messages
274
Reaction score
208
Location
Chicago
Vehicle(s)
Ford Ranger Lariat FX4 2020
Occupation
Software Developer

AzScorpion

Moderator
First Name
Dave
Joined
Jul 25, 2019
Threads
335
Messages
26,217
Reaction score
131,971
Location
Back Home In AZ!
Vehicle(s)
2023 Ford Ranger Tremor
Occupation
Retired...Full Time Slacker
The trim piece by the seat belt I just pried it back and snaked the wire through it but it does come off easy enough if you need to remove it. All the trim pieces just pop out of place, some might need a little more force than others but they do come out. I only needed to go to that point so I'm not sure what else you're going to need to take apart but it should be very easy.
 

TechnicallyReal

Well-Known Member
First Name
Ryan
Joined
Aug 20, 2020
Threads
6
Messages
460
Reaction score
609
Location
Eh?
Vehicle(s)
'19 Ranger Lariat 4x4
Occupation
Software Engineer / IT Admin


JACKSMYDOG

Well-Known Member
First Name
Jay
Joined
May 8, 2021
Threads
36
Messages
2,012
Reaction score
6,194
Location
Ontario
Vehicle(s)
2020 Ranger Lariat FX4 Black
Occupation
Retired
I bought a set of these from Amazon. I used the to install my dash camera and they worked out great.

IMG_4194.jpg
The lower piece of the rear trim just pops straight off. GENTLY pull toward the passenger side, using a plastic tool at the point of resistance if needed, but I pulled mine last week with no tools.

IIRC you'll need to remove the top door sil guard trim piece too. Again, pick an edge, lift gently.
 

AzScorpion

Moderator
First Name
Dave
Joined
Jul 25, 2019
Threads
335
Messages
26,217
Reaction score
131,971
Location
Back Home In AZ!
Vehicle(s)
2023 Ford Ranger Tremor
Occupation
Retired...Full Time Slacker
The lower piece of the rear trim just pops straight off. GENTLY pull toward the passenger side, using a plastic tool at the point of resistance if needed, but I pulled mine last week with no tools.

IIRC you'll need to remove the top door sil guard trim piece too. Again, pick an edge, lift gently.
The door sill guard comes off really easy and I'm glad I didn't crack mine because I pulled on it kind of hard.

I was able to snake the dash camera front to rear wire through the seat belt plastic without having to take it completely apart but the top edges pulled out really easy.
 

JACKSMYDOG

Well-Known Member
First Name
Jay
Joined
May 8, 2021
Threads
36
Messages
2,012
Reaction score
6,194
Location
Ontario
Vehicle(s)
2020 Ranger Lariat FX4 Black
Occupation
Retired
The door sill guard comes off really easy and I'm glad I didn't crack mine because I pulled on it kind of hard.

I was able to snake the dash camera front to rear wire through the seat belt plastic without having to take it completely apart but the top edges pulled out really easy.
Yes sir, I didn't mean to reply to your quote, just stealing the photo ;)

Trim pieces can be tricky. Most are just a straight pull, in the right place, but gentle. The cracking noise, normally means it was the wrong direction, lol.
 

AzScorpion

Moderator
First Name
Dave
Joined
Jul 25, 2019
Threads
335
Messages
26,217
Reaction score
131,971
Location
Back Home In AZ!
Vehicle(s)
2023 Ford Ranger Tremor
Occupation
Retired...Full Time Slacker
Yes sir, I didn't mean to reply to your quote, just stealing the photo ;)

Trim pieces can be tricky. Most are just a straight pull, in the right place, but gentle. The cracking noise, normally means it was the wrong direction, lol.
I try to not pull on the trim pieces with to much force because I've broke my share. I thought the door sill was on there tighter than it was but it came off easier than expected. Yeah that cracking noise usually means it just cost you more money to buy a new panel. lol
 

FoD

Well-Known Member
First Name
Terry
Joined
Jun 26, 2020
Threads
20
Messages
2,590
Reaction score
9,848
Location
Out There
Vehicle(s)
2019 Ranger XLT FX4
Occupation
Retired & Grandparenting 🤣
Vehicle Showcase
1
Here's from Service Manual on back panel, do you need to remove the C pillar also?

1624397552762.png

1624397825980.png
 

AzScorpion

Moderator
First Name
Dave
Joined
Jul 25, 2019
Threads
335
Messages
26,217
Reaction score
131,971
Location
Back Home In AZ!
Vehicle(s)
2023 Ford Ranger Tremor
Occupation
Retired...Full Time Slacker
Here's from Service Manual on back panel, do you need to remove the C pillar also?

1624397552762.png

1624397825980.png
It depends on the route you're going with the wires. When I ran the wire that connects the front and rear dash cams together I just used the tools to pry around the edges of the A & B pillar and it tucked right in nice and clean. I then came down the B pillar and under the door sill protector and across where the two back panel pieces split.
 

FoD

Well-Known Member
First Name
Terry
Joined
Jun 26, 2020
Threads
20
Messages
2,590
Reaction score
9,848
Location
Out There
Vehicle(s)
2019 Ranger XLT FX4
Occupation
Retired & Grandparenting 🤣
Vehicle Showcase
1
Here's C Pillar

1624397961376.png

1624397996204.png

1624398149959.png

1624398317411.png


Good luck!!
 

FoD

Well-Known Member
First Name
Terry
Joined
Jun 26, 2020
Threads
20
Messages
2,590
Reaction score
9,848
Location
Out There
Vehicle(s)
2019 Ranger XLT FX4
Occupation
Retired & Grandparenting 🤣
Vehicle Showcase
1
It depends on the route you're going with the wires. When I ran the wire that connects the front and rear dash cams together I just used the tools to pry around the edges of the A & B pillar and it tucked right in nice and clean. I then came down the B pillar and under the door sill protector and across where the two back panel pieces split.
And I have run wiring from the amp area under the carpet, under the storage area and under carpet again to center console and up to dash. Just all depends on where/what you are connecting up.

Could always just throw the wire over the drivers seat and tape it to headliner (or staple) :crazy:
 

AzScorpion

Moderator
First Name
Dave
Joined
Jul 25, 2019
Threads
335
Messages
26,217
Reaction score
131,971
Location
Back Home In AZ!
Vehicle(s)
2023 Ford Ranger Tremor
Occupation
Retired...Full Time Slacker
And I have run wiring from the amp area under the carpet, under the storage area and under carpet again to center console and up to dash. Just all depends on where/what you are connecting up.

Could always just throw the wire over the drivers seat and tape it to headliner (or staple) :crazy:
Why to the center console? You can run the wire from the fusebox under the drivers door sill protector and then under the carpet to the underside of the drivers seat to connect to the battery pack.
 

AzScorpion

Moderator
First Name
Dave
Joined
Jul 25, 2019
Threads
335
Messages
26,217
Reaction score
131,971
Location
Back Home In AZ!
Vehicle(s)
2023 Ford Ranger Tremor
Occupation
Retired...Full Time Slacker
And I have run wiring from the amp area under the carpet, under the storage area and under carpet again to center console and up to dash. Just all depends on where/what you are connecting up.

Could always just throw the wire over the drivers seat and tape it to headliner (or staple) :crazy:

Why do I picture yours looking like this? ?


Wires.jpg
Sponsored


Top