DukeCanBuildit
Well-Known Member
- First Name
- Duke
- Joined
- Jul 27, 2020
- Threads
- 66
- Messages
- 9,653
- Reaction score
- 46,173
- Location
- Kitchener, Ontario
- Vehicle(s)
- 2019 XLT SuperCab - FTW!
- Occupation
- Retired (P/T) Caregiver (F/T)
- Vehicle Showcase
- 1
- Thread starter
- #1
Yeah, something cool showed up in the mail today and it wasn’t a tailgate damper.
I received my Wolfbox G900 Tripro mirror dashcam so it’s time get to work to install it and post a review. I’ll post updates as I go through different stages of the process from unboxing to dry-fitting, as well as permanent installation.
Unboxing the G900 Tripro
Part 1 - You’ve Got Mail
Well, let’s continue, shall we?
Part 2 - The Package
Now, where was I? Oh yeah…
Part 3 - The Parts List
This is a Specific Application
There are a few things to know about the configuration of my Ranger before diving into the full installation.
Dry Fitting the G900 Tripro & Choosing Camera Locations
Before getting into the full installation, you want to connect everything to the mirror camera, including power, to test that it all works.
You can mount the G900 directly to your existing rearview mirror with straps or mount it to a stalk that attaches to the windshield. As well, you can use a 12v plug-in or hardwire the system. The flexibility here allows you to do an easy dry fitting and lets you experiment with different camera locations before committing to the removal of trim panels and fishing wires around and through the cab.
After strapping the G900 over my existing mirror, I was happy that it wasn’t as bulky as I heard it might be. My non-dimming mirror is much thinner than the auto-dimming version. I likely won’t bother with mounting it on a stalk.
With wires dangling everywhere and cameras in random locations in the cab, I tested everything and it all worked as it should. My next task was to establish my camera mounting locations. I hung the cables out the window and experimented with various front and rear camera locations. I settled on a mid-grille mount up front and a high mount on the Rhino Rack Pioneer Platform on my topper.
It all kind of came together like this…
Hard Wiring the Cameras, Power, and GPS Module
Cable Routing
I’m installing a front camera in the grille, a rear camera above my topper’s third brake light, a GPS module, and 12V power. All cables and wires start at the mirror camera unit but where do they go from there?

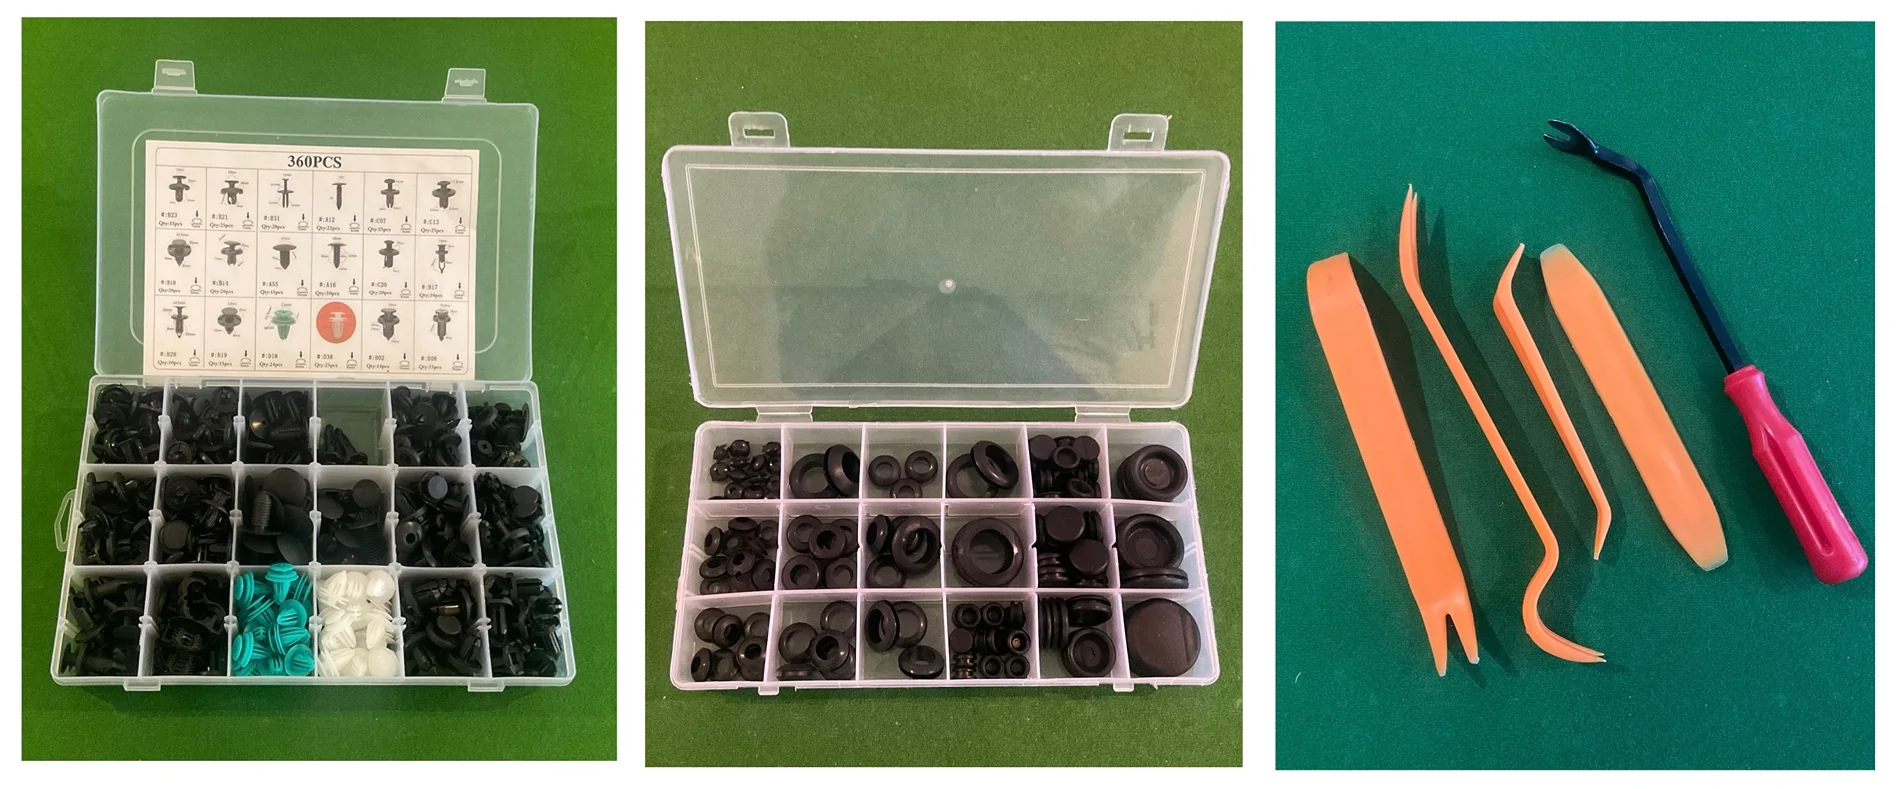
You need to remove more trim panels than you might think in order to make this job easier. You will be removing a lot of items, so you need patience and a good set of trim tools, including a metal push pin remover. It’s also a good idea to have an assortment of spare push pins and for this install, some rubber grommets might come in handy.

You will be removing the following trim panels/items:
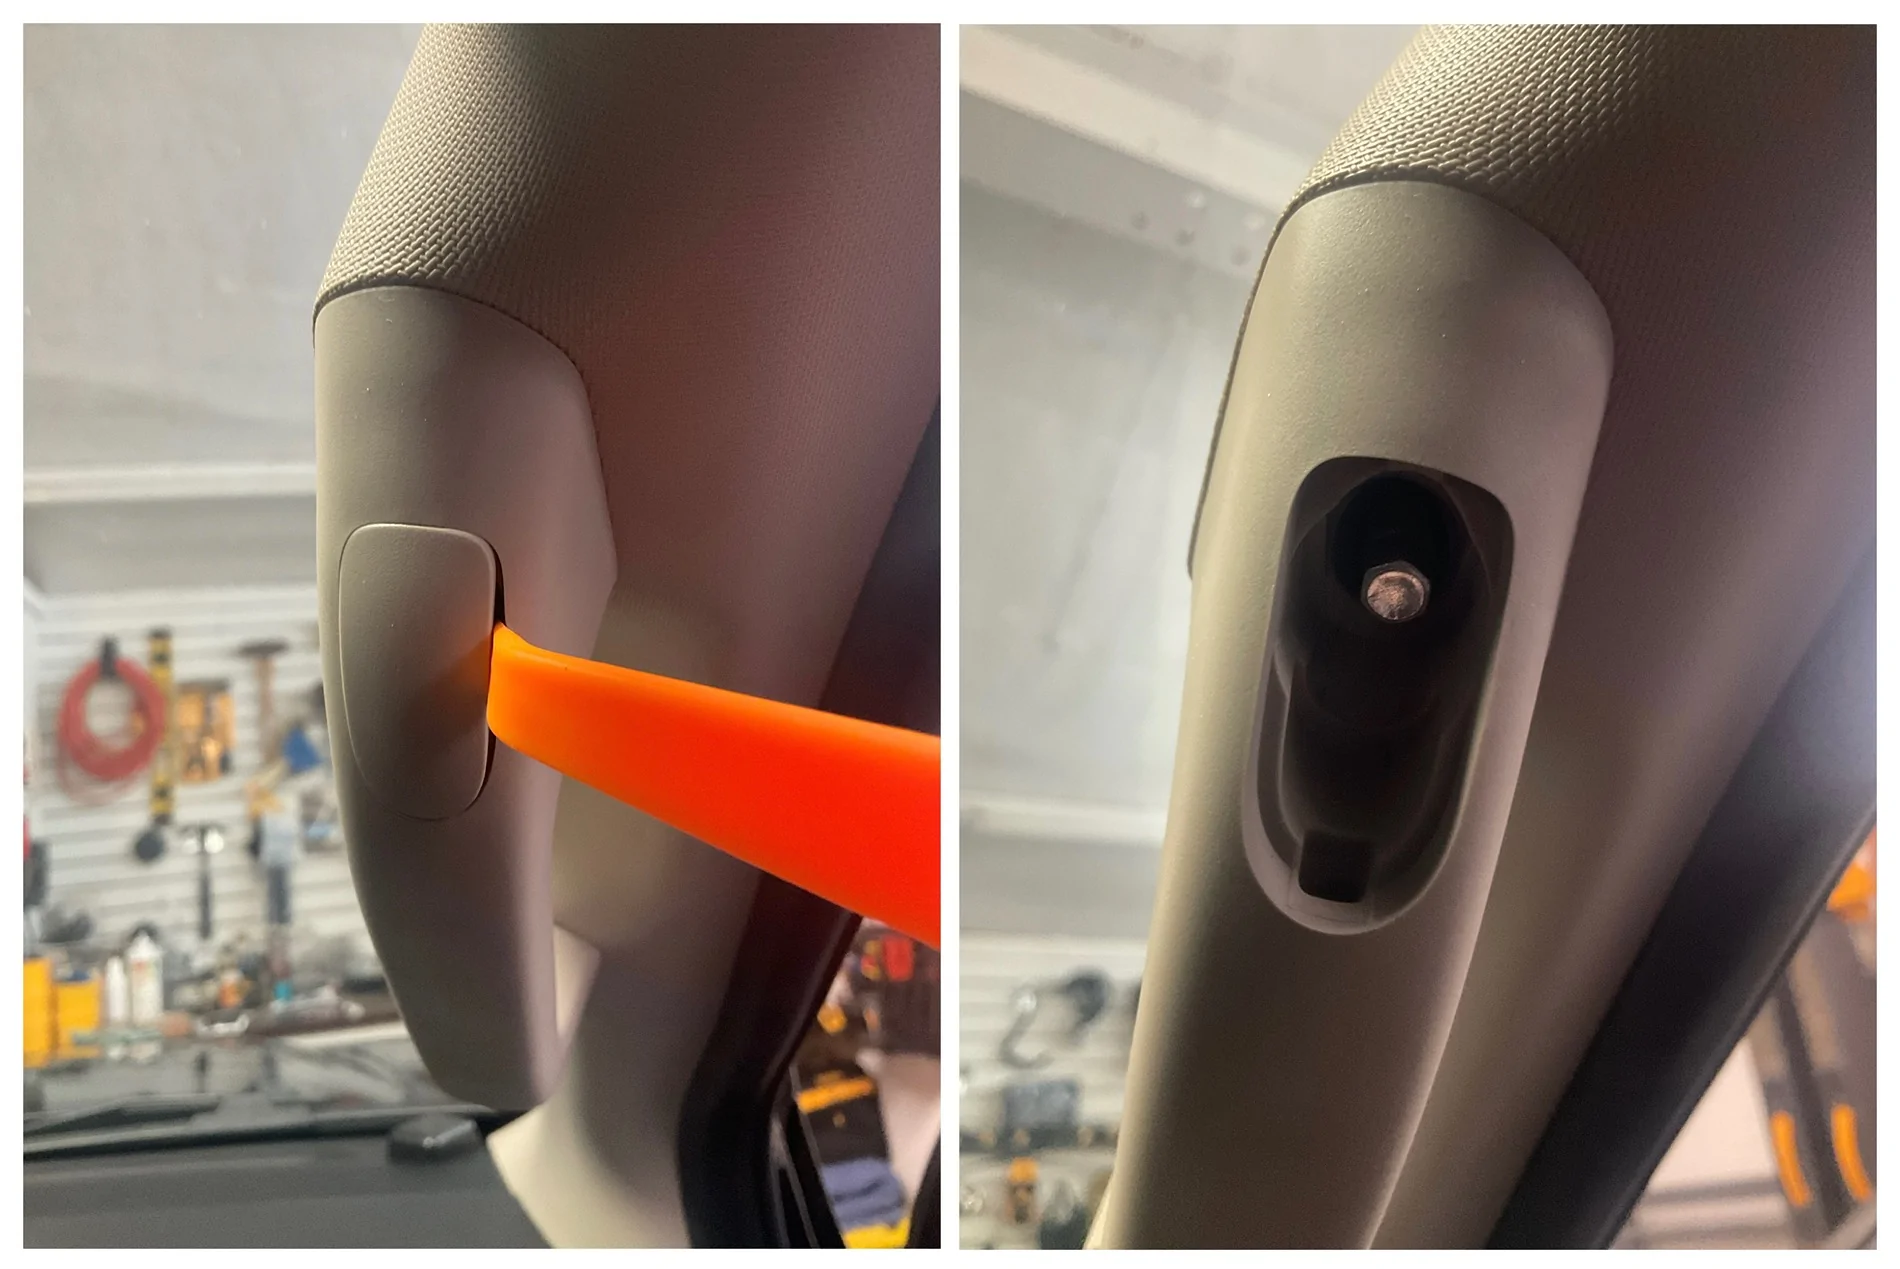
Leave the driver side door open and, starting at the top, squeeze the trim panel together, pulling out and slightly down toward the steering wheel. Do this slowly but with firm pressure. It has two clips at the top and two tethers. If you yank on it, the tethers will catch, just as they do if it deploys. Once it’s loose, pull it upward until the two long tabs at the bottom clear their slots. Leave it tethered - there’s plenty of room to do your work.

It is similar for the passenger side but you must remove the grab handle first. You need a 6mm 1/4” socket, a nut driver, and an extension. Remove the plugs to expose the studs for the grab handle with the 6mm. The material is soft, use a trim tool.

Removal of the passenger side A Pillar cover trim is the same as the other side. There is only one clip at the top and it is not tethered (the grab handle holds it in place when it deploys).
Use the extension to thread the studs back in - finger tips only - it is very easy to strip these because you can’t see what you’re screwing into or your angle of approach. I used the nut driver and got in trouble and had to chase the threads from the backside of the welded nut.
Fuse Box Area Cover - this is hinged at the bottom. Pry it downward with two hands. There are several clips but they release without much effort or trouble. This provides a lot of room to work but removing it completely is better. It’s also easy. There are two Phillips screw-type 2-pce push pins holding it to the dash at the bottom. These are similar to the wheel well liner pins that people report having trouble with. Poke your fingernail under the edge of the centre screw part of the pin and apply upward force. You are raising it so the screw’s threads will catch. Slowly back out the screw, without pushing down on the screwdriver, then pull the push pin out. Repeat. Set the panel aside.
Glove Box - taking this out is easy and gives you room to work. Empty the glove box completely. If it has the damper, reach up on the right side to feel for the cord that is looped around a post on the side of the glove box. Pull it over the catch on the end of the post and let go.

Squeeze the sides of the glovebox and pull toward you and down. It should fall away from the dash to the floor. Squeeze the ends of the two white plastic hinge pins and push them out. The glove box should release. Set it aside but insert the hinge pins back into the hinge on the dash so you don’t misplace them.
Kick Panel - a tab aligns the pointed part in the footwell under the dash and a clip holds it to the door jamb. Pull the front tip of the panel back to release the tab and pull the top of the kick straight back away from the jamb to release the clip. There is a pin securing it to the rocker, under the driver side sill panel. Remove that sill panel and you will see this pin. It will then be possible to remove the kick after the sill is removed.
Door Sill Trim - the trim piece has a clip at each end and two pins in the middle. All four are located close to the door opening. Pry up on the ends close to the door to release the two end clips. Carefully pry from the edge by the door about a third of the way in from each end to release the pins. Remove the final pin in the Kick Panel. Set both pieces aside.
Rear Seat Bottom - pull on the strap at the front of the seat to release latch. Push seat bottom toward rear of cab to unhook and lift up. Set aside.
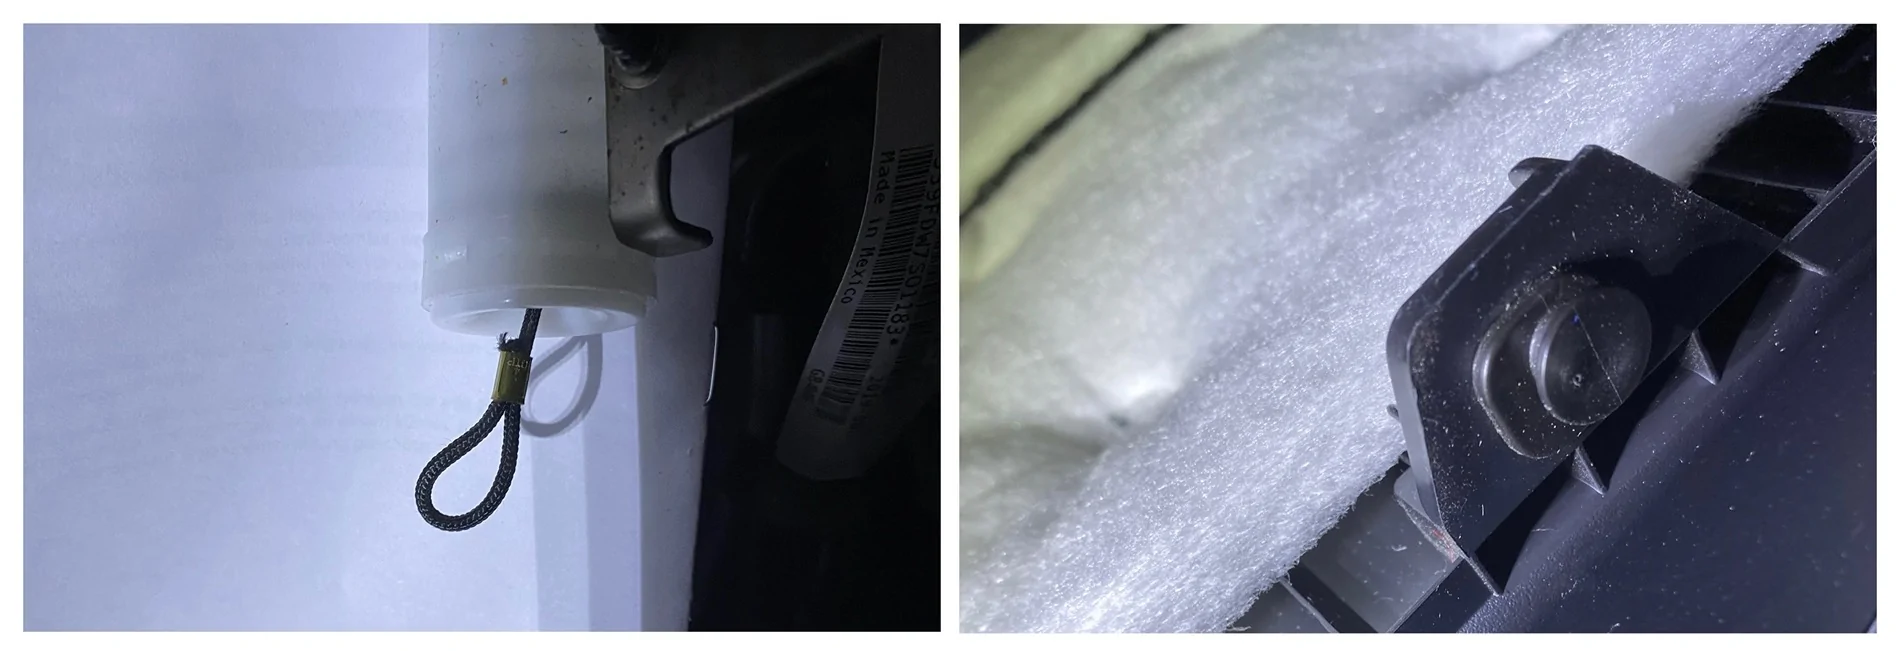
Rear Seat Back - There is one bolt at the top, one clip centred near the top, and two loops that hook into spring clips at the bottom. Lift the Velcro flap below the headrest to access the child seat restraint bolt. Fish the loop of nylon out of the opening. Use a 1/2” socket with a small extension to remove the bolt. Pull sharply on the seat as if folding it forward and down. You will likely break the clip. It isn’t critical - it just holds the seat back in place when installing a child seat. With the seat back just slightly tipped forward (5° or 10°), grip the sides of the seat back and rock it sharply to one side to release the lower loop from its spring clip. Then, sharply pull the seat straight up to release the other clip - they are sprung steel - you won’t hurt them. Set aside.
Jack Storage Area Lid - Turn lock dial as shown on the lid. Lift lid. Set aside.
Jack Storage Area Frame - using a push pin removal tool, pop the three pins holding the frame in place. Two of these pins hold the Rear Door Sill Trim in place. The frame fits snugly in the end of the opening furthest from the door opening. Wiggle it loose to remove. Set aside.
Rear Door Sill Trim (Reminder - SuperCab) - with the Jack Storage Area Frame removed, you can now remove this door sill. There are our pins close to the door opening as with the other sill. They are all on the lower flat piece. One at the front end, two in the middle, and one under the curve where the trim turns up toward the seat bottom. Carefully pry from the edge by the door to release the pins. Set aside.
Rear Side Corner Trim - there are five clips and one push pin. There are two clips at the very top, one just below them near the front edge, another halfway down along the rear edge, and another at the top front corner of the grille vents. I found evidence of a push pin location near the top of the grille vent at the back of the panel as well as a mounting tab with a hole for a push pin sticking out from the back wall. I did not find the push pin, broken or intact. Maybe Ford missed it - maybe I removed it during a previous rear sear delete mod. The white pins in the box above fit this location. Gently pry this panel from the top, working your way down. Set aside.
Radiator/Grille Shroud - There are five push pins and two bolts from the air intake holding this in place. Remove the two bolts with a T30 Torx head. Leave the scoop where it is. Remove the five 2-pce push pins. Pry out the centre post of the pin to unlock it, then pry out the remaining part of the pin. Set aside.
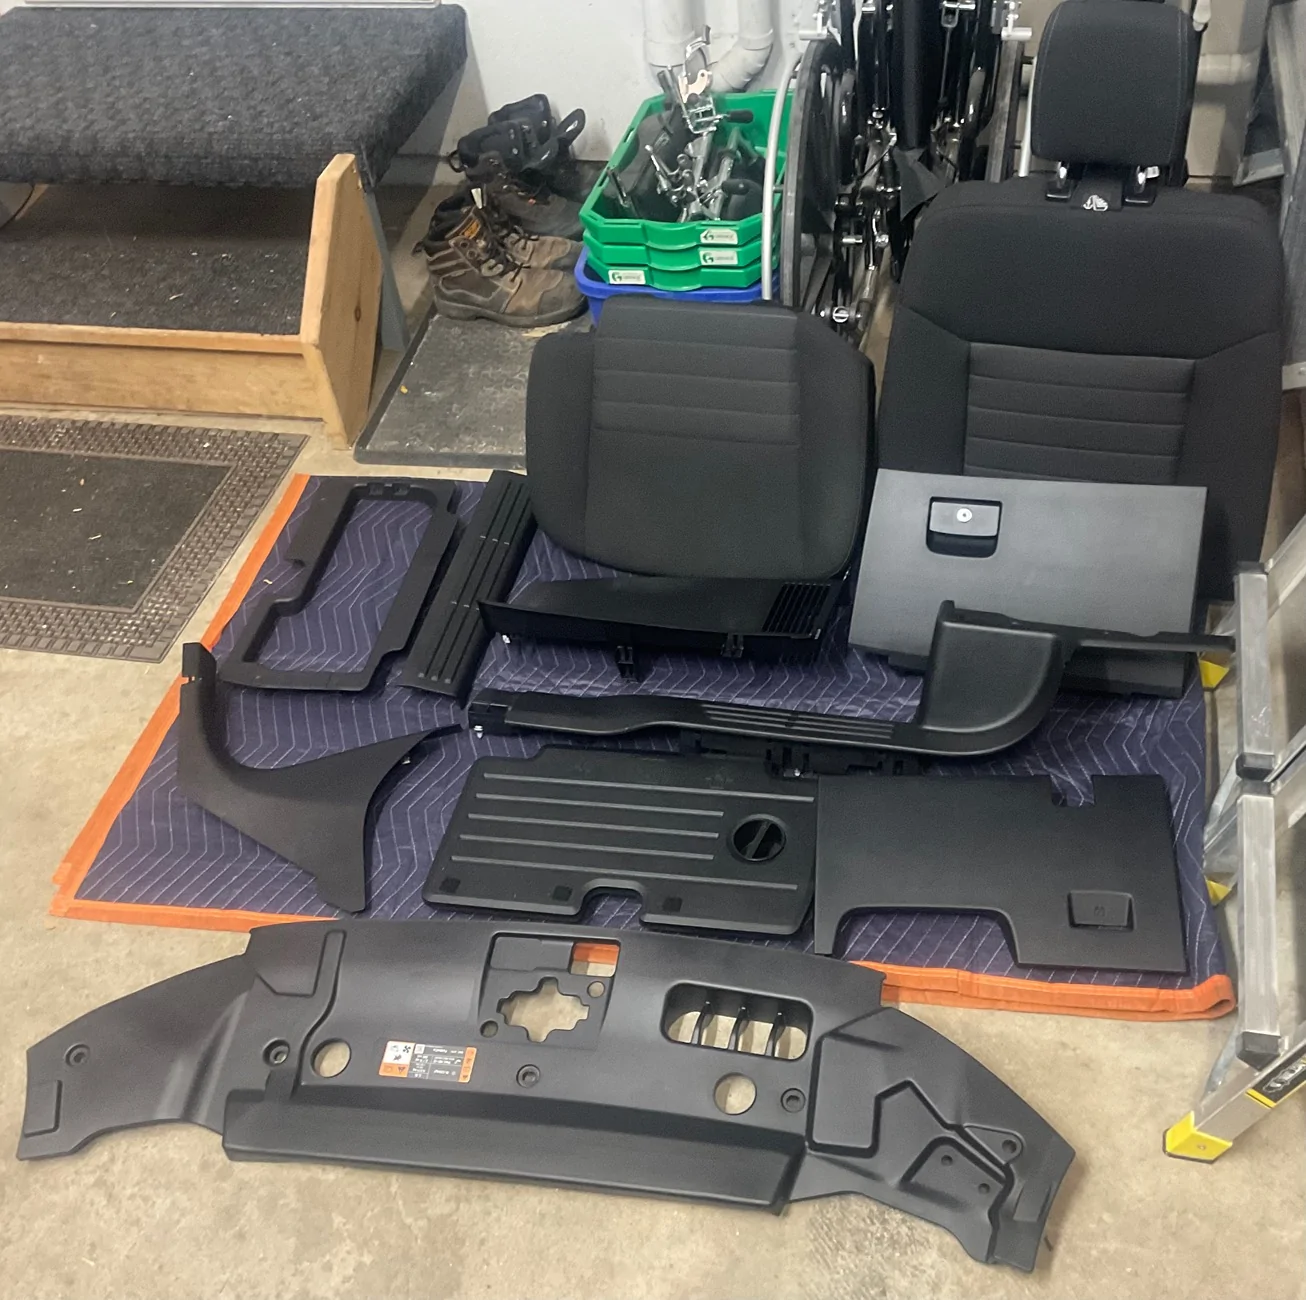
You should have a collection of items that looks like this…

I‘ve posted pictures of the back of each trim panel for anyone who might find them helpful while removing them. Yep, you’re welcome.
Routing Cables Through the Firewall and Back of the Cab
If you don’t feel like reading everything below, here’s a video with a Reader’s Digest version…
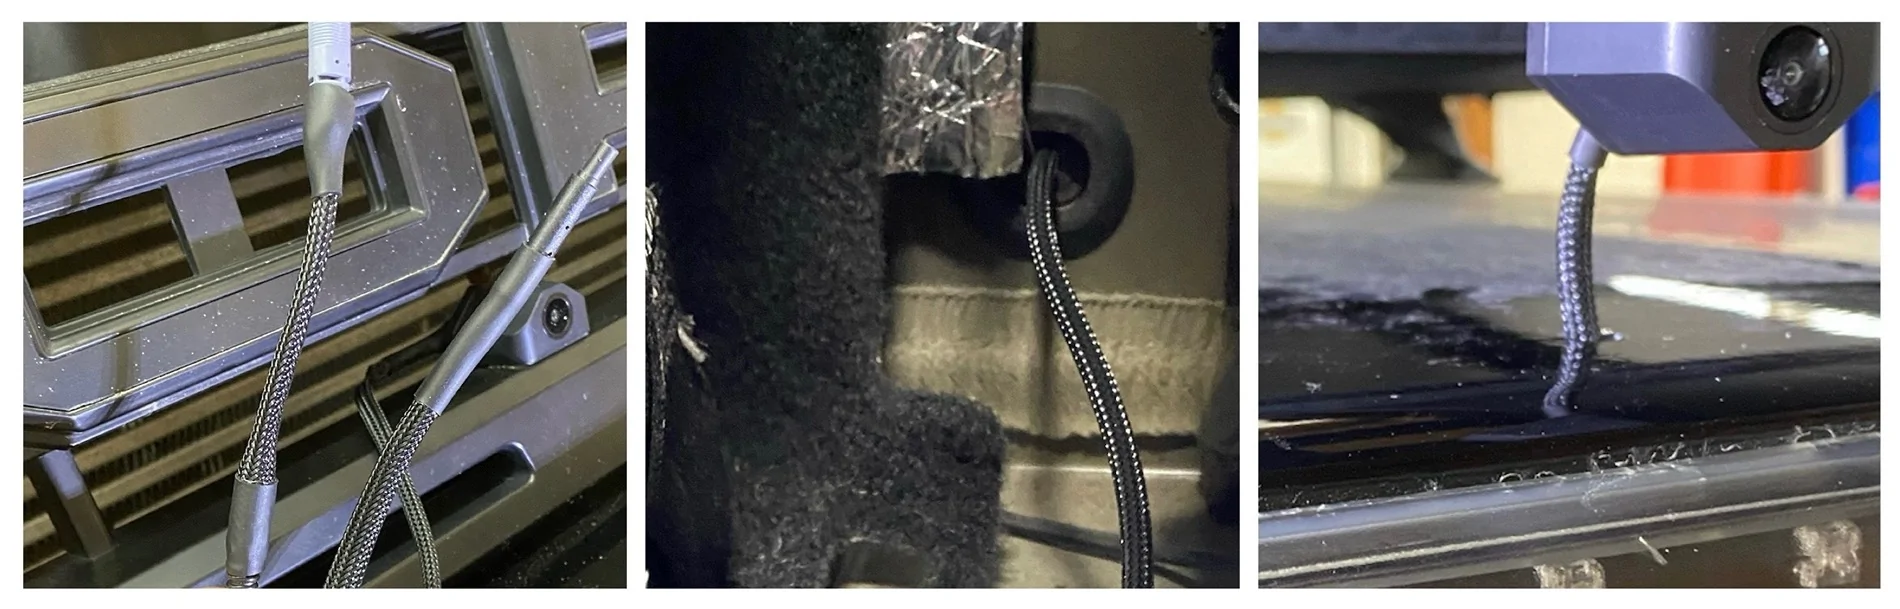
Note: I covered the exterior and other vulnerable sections of my cables with Expandable Braided PET Cable Sleeve - as such, in certain photos, the cables will look different than what is supplied.

Firewall
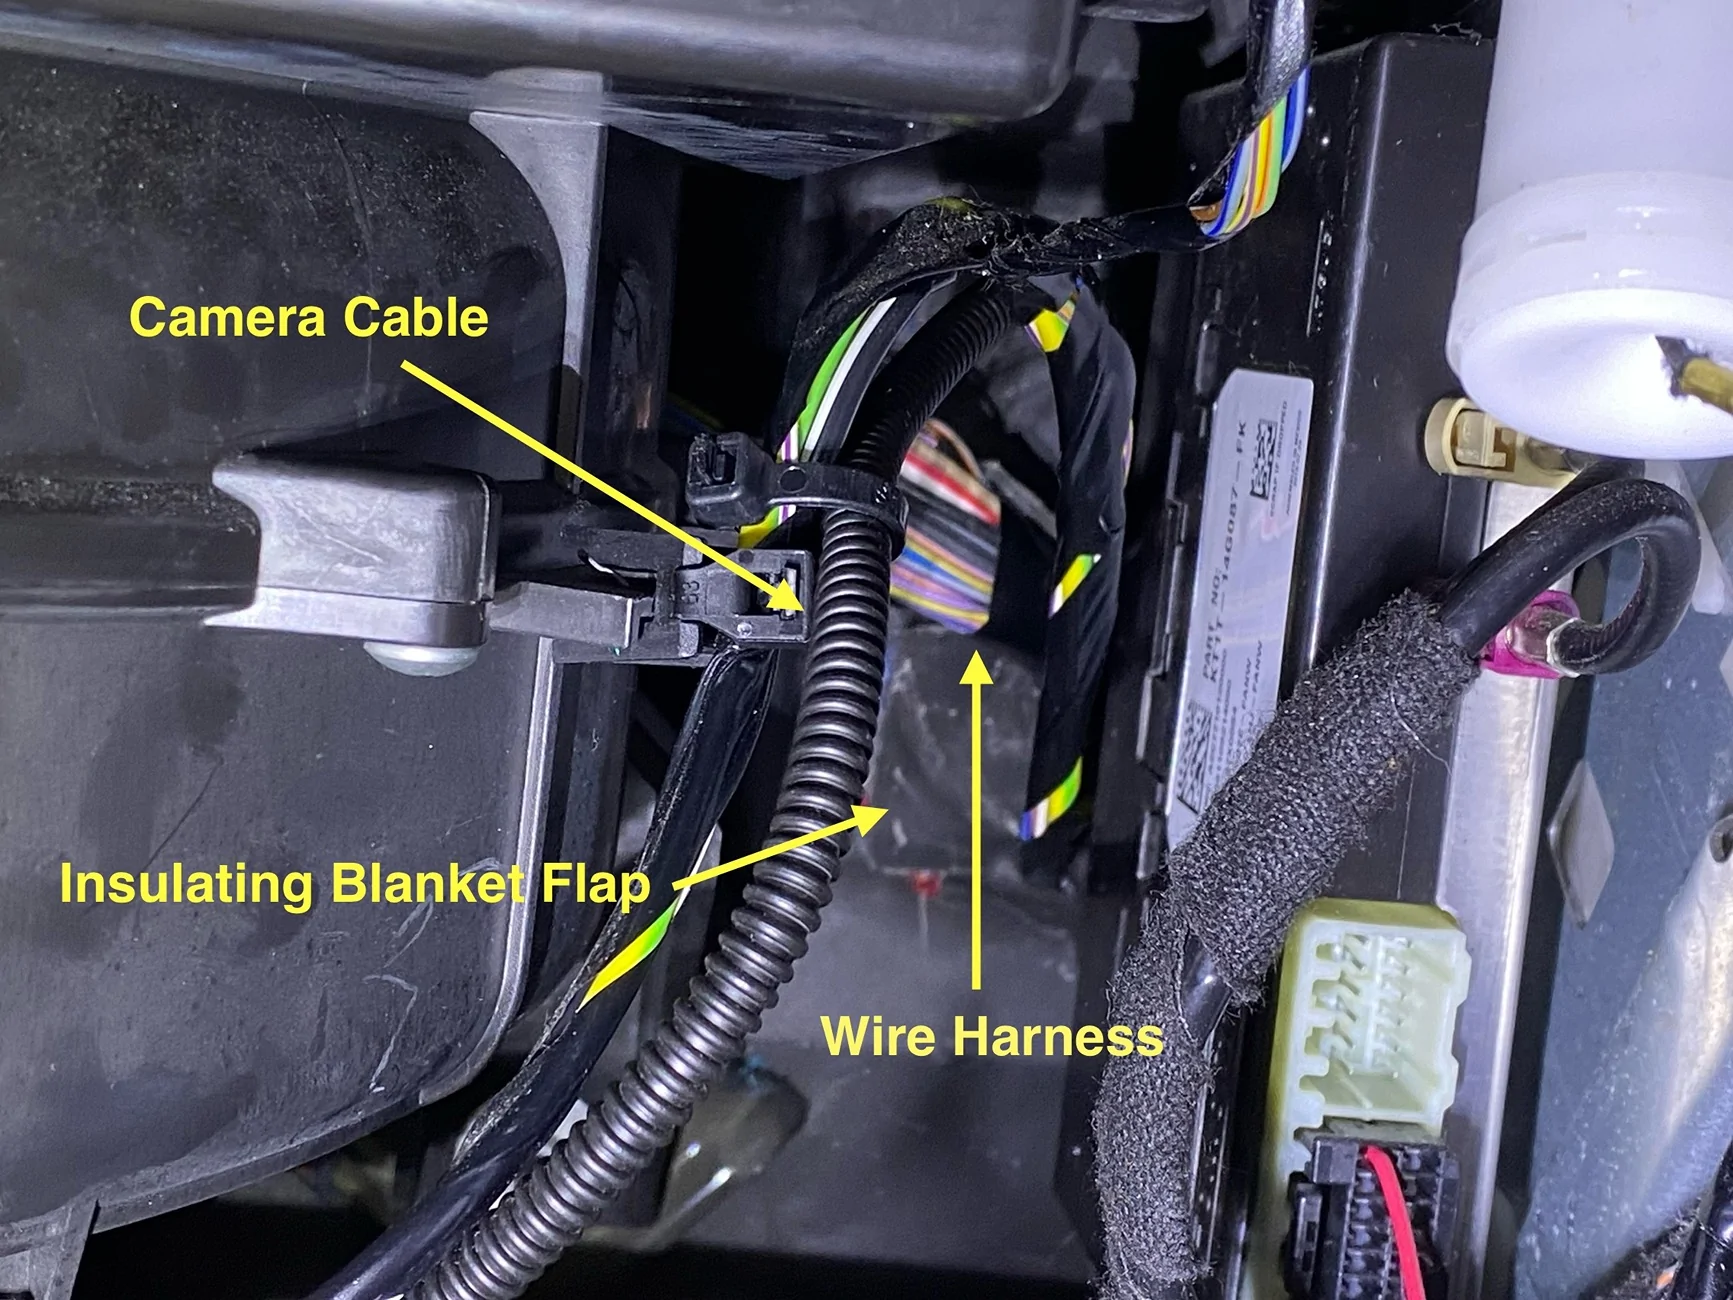
There is a “secret“ grommet for passing wires through the firewall. It is located behind the glovebox and enters the engine bay behind the coolant reservoir. It's difficult to see but my bore scope helped me locate it. A large wire harness passes through it but there is an extra port for a cable. Grab, twist, and pull the tab on this port to tear it off. Shout out to @Nomadjohn for posting his pic about this port.

Feed a wire through the new port into the cab so you can fish your cable into the engine bay. Fold back the insulating blanket flap on the inside of the cab, tape your camera cable to the wire, and fish it into the engine bay.

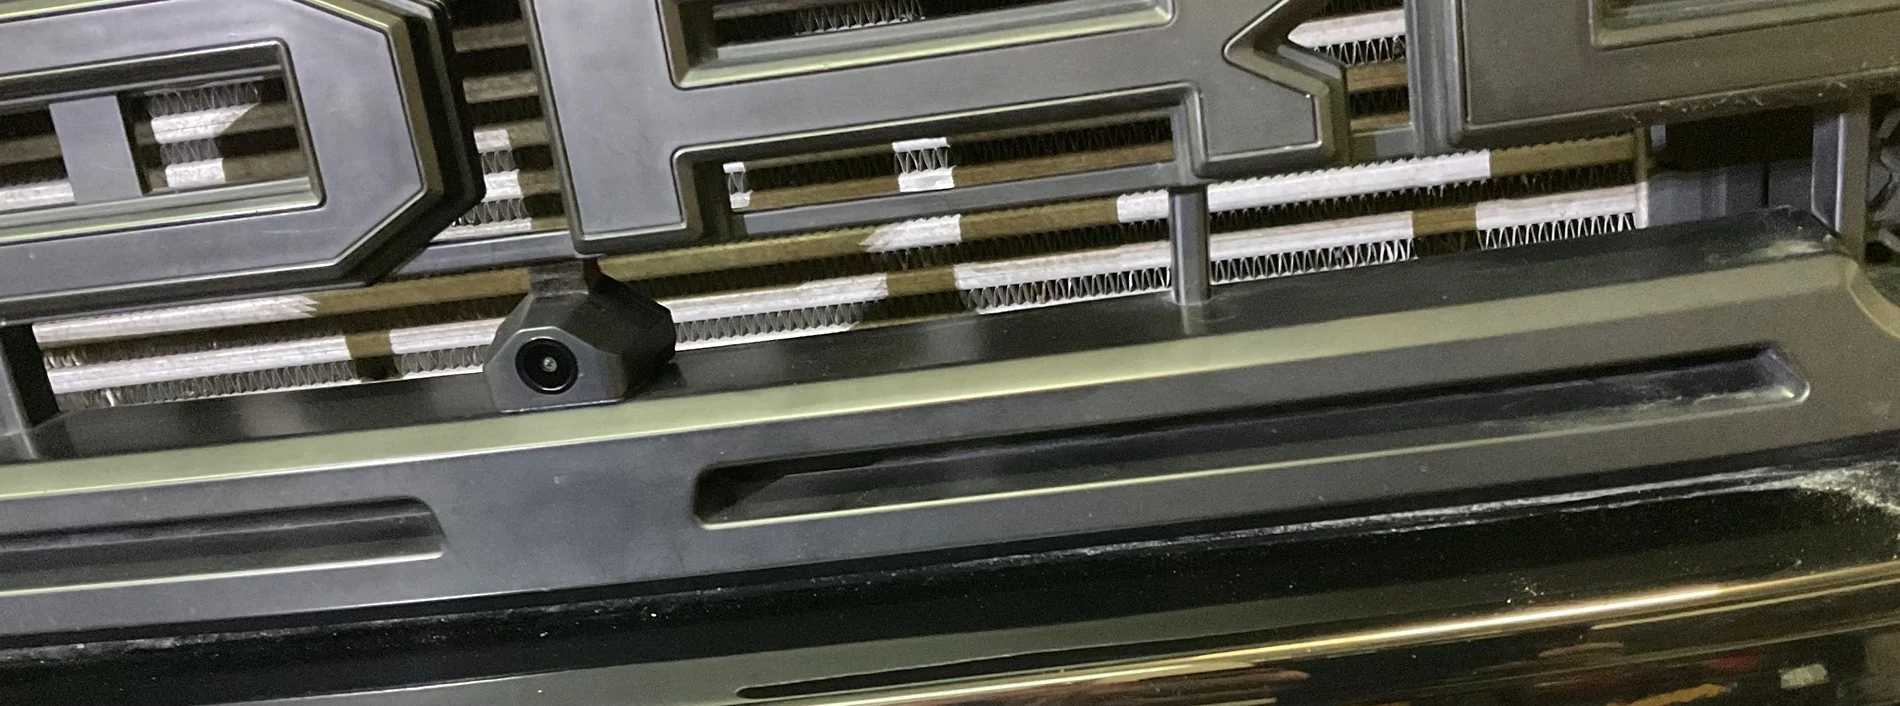
Route it under the coolant tank and air intake boxes to the front of the truck and down to your grille or bumper and connect your camera.

Rear Wall of Cab
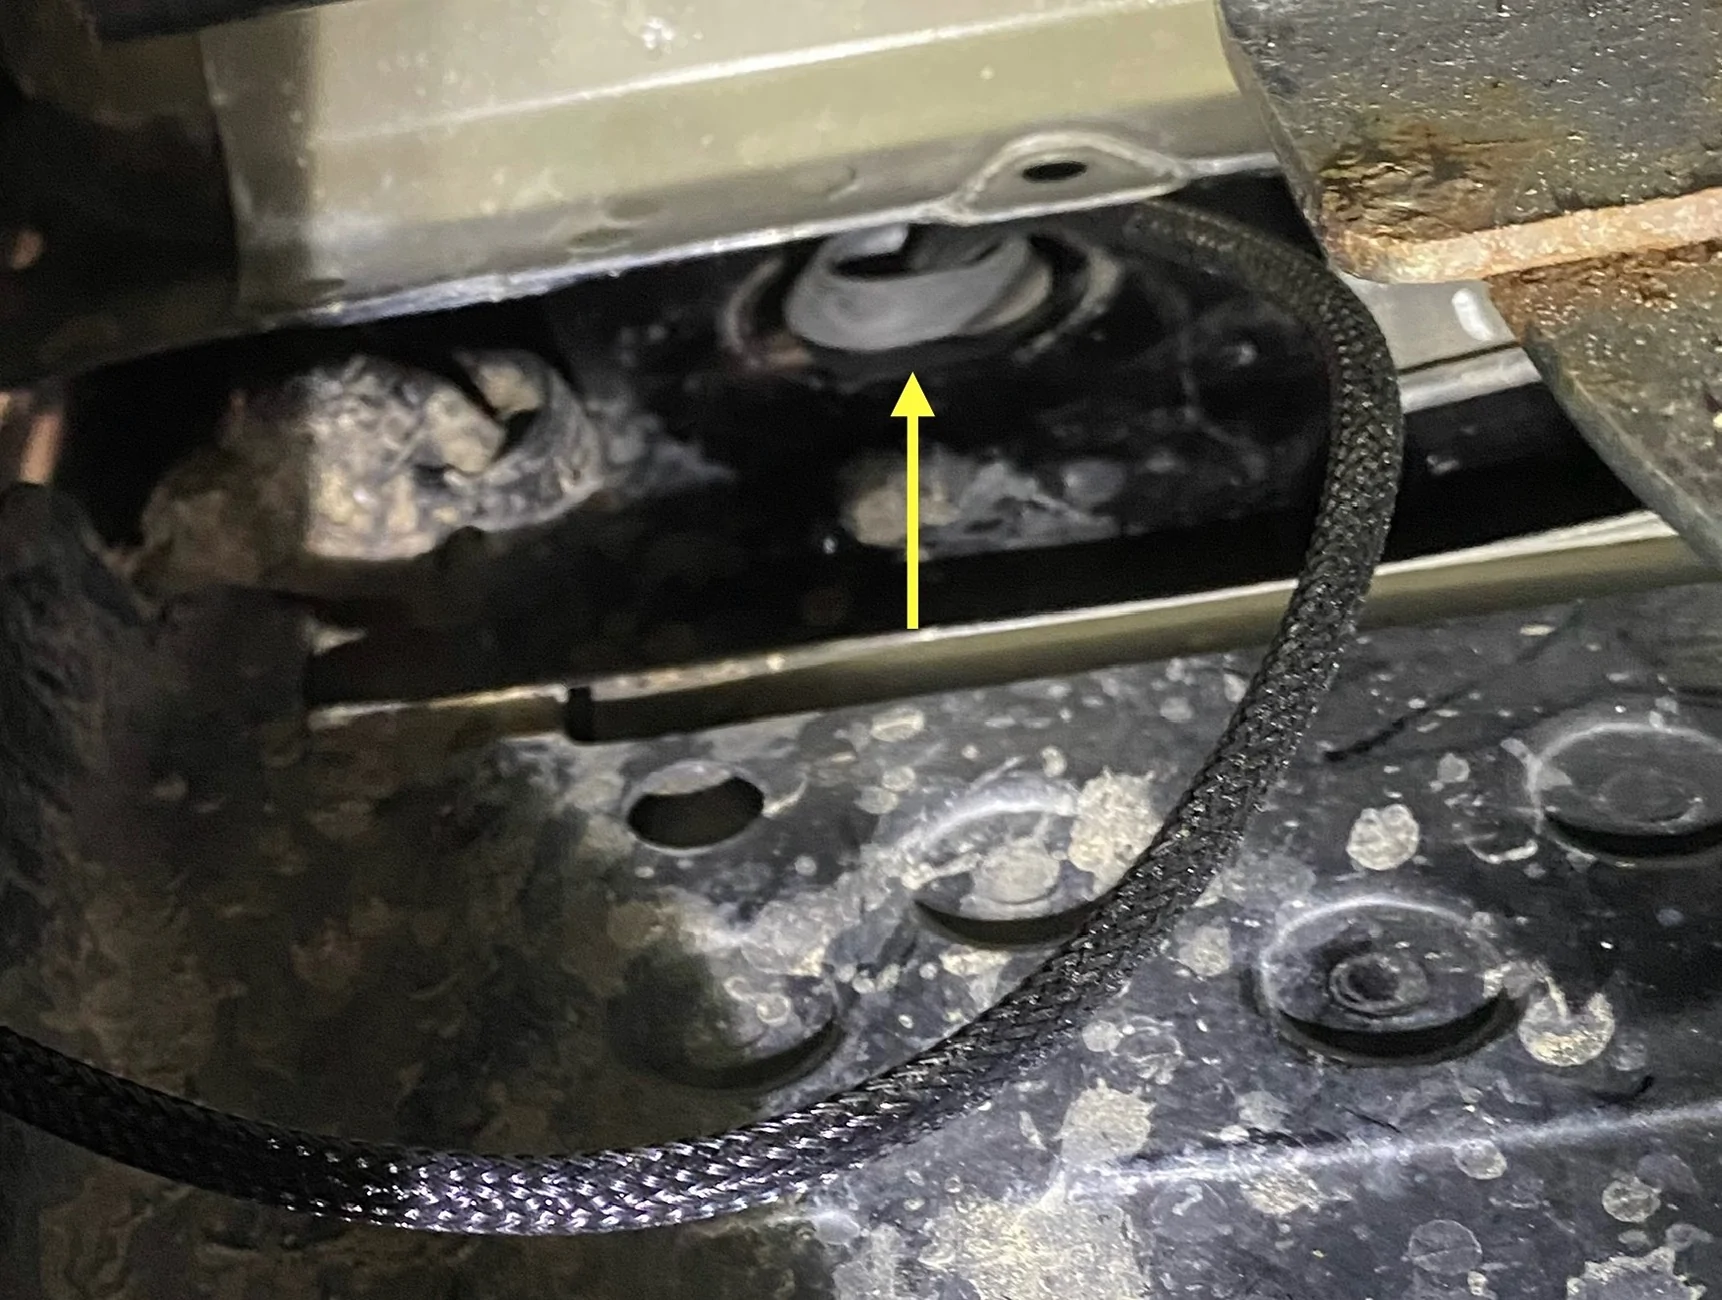
Everything from the Kick Panel back is removed so the rear camera cable can be routed to the back of the SuperCab and out the rear wall. There is an oval plug that exits the cab, shown below. This is your escape route. There is a plug on the passenger side also. The SuperCrew has plugs in similar places and plugs higher up, closer to the window, on each side. The SuperCab might also have them but they were not evident due to how the seat back attaches to the back wall.

Pierce it with an awl or a hot soldering iron if you’re fancy and you’re set. It exits the rear wall between the box and the bed. From there, you can take it where needed. I ran it up over the wheel well liner to the rear of the bed.

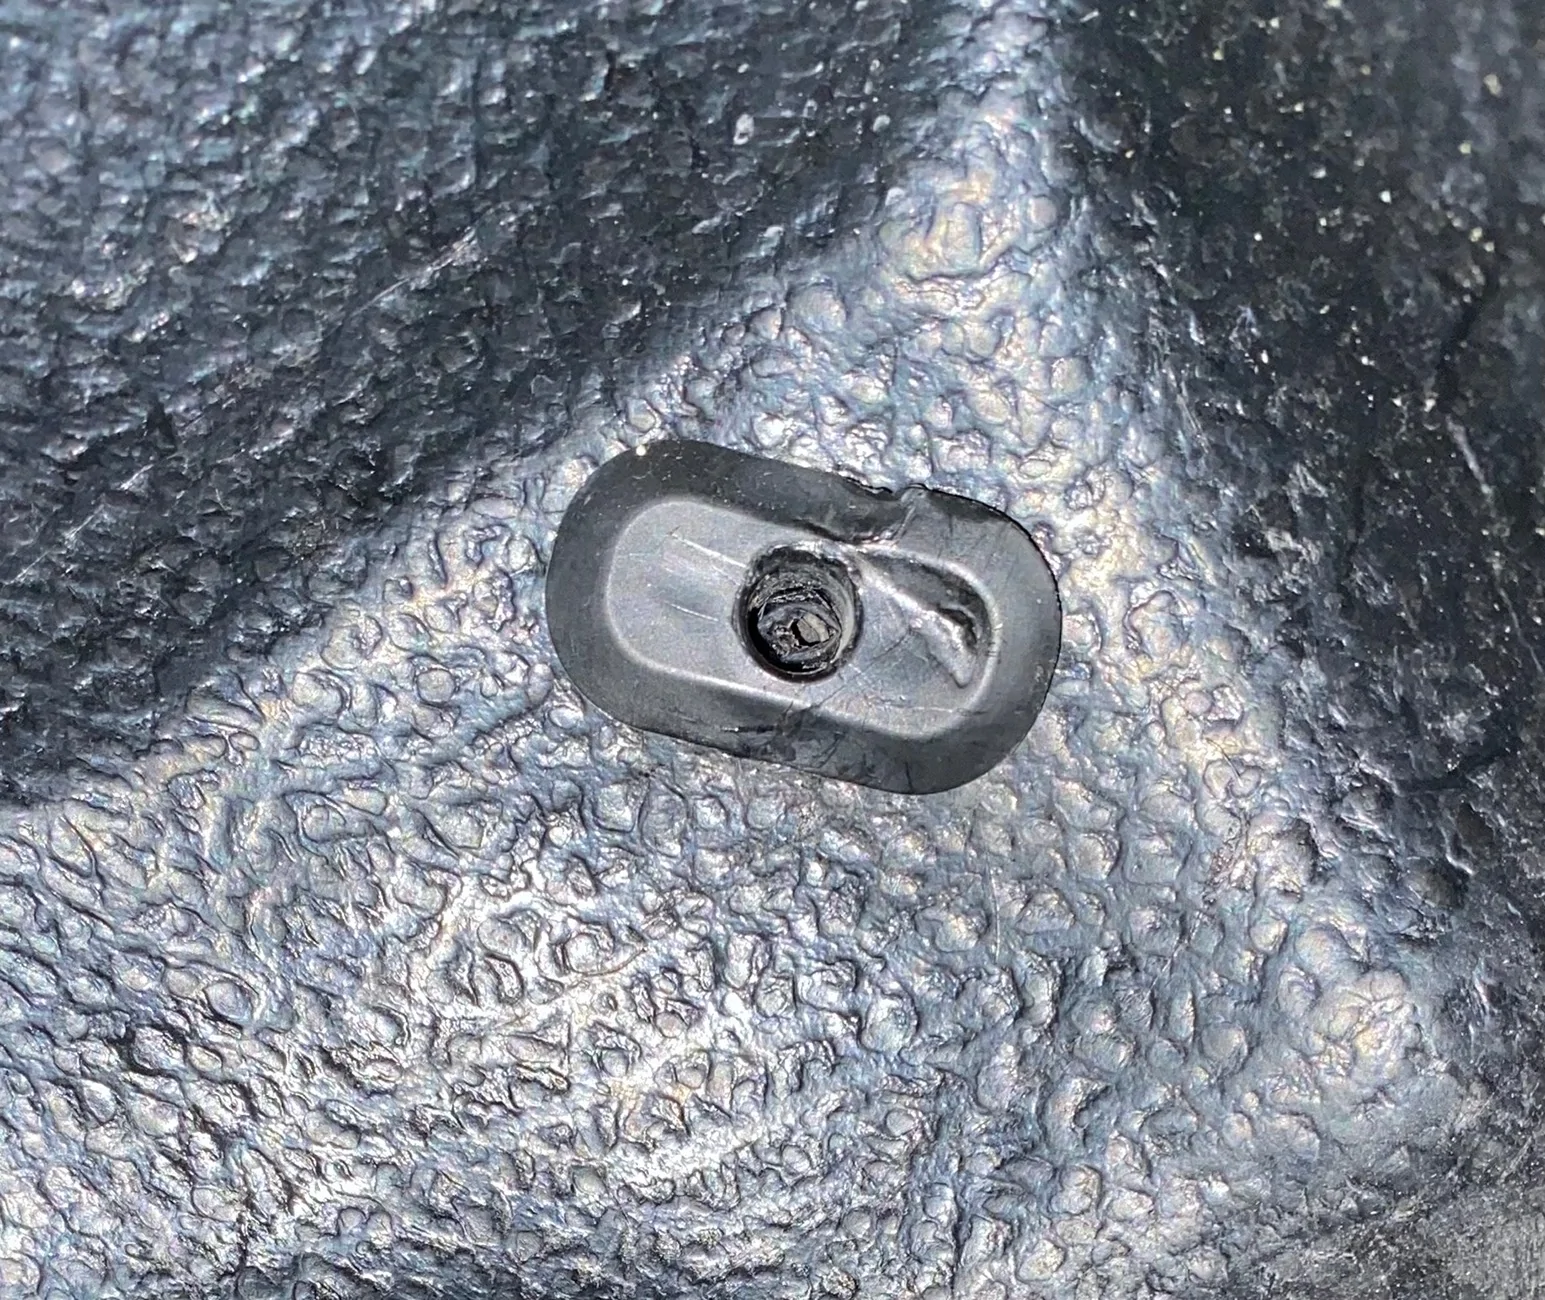
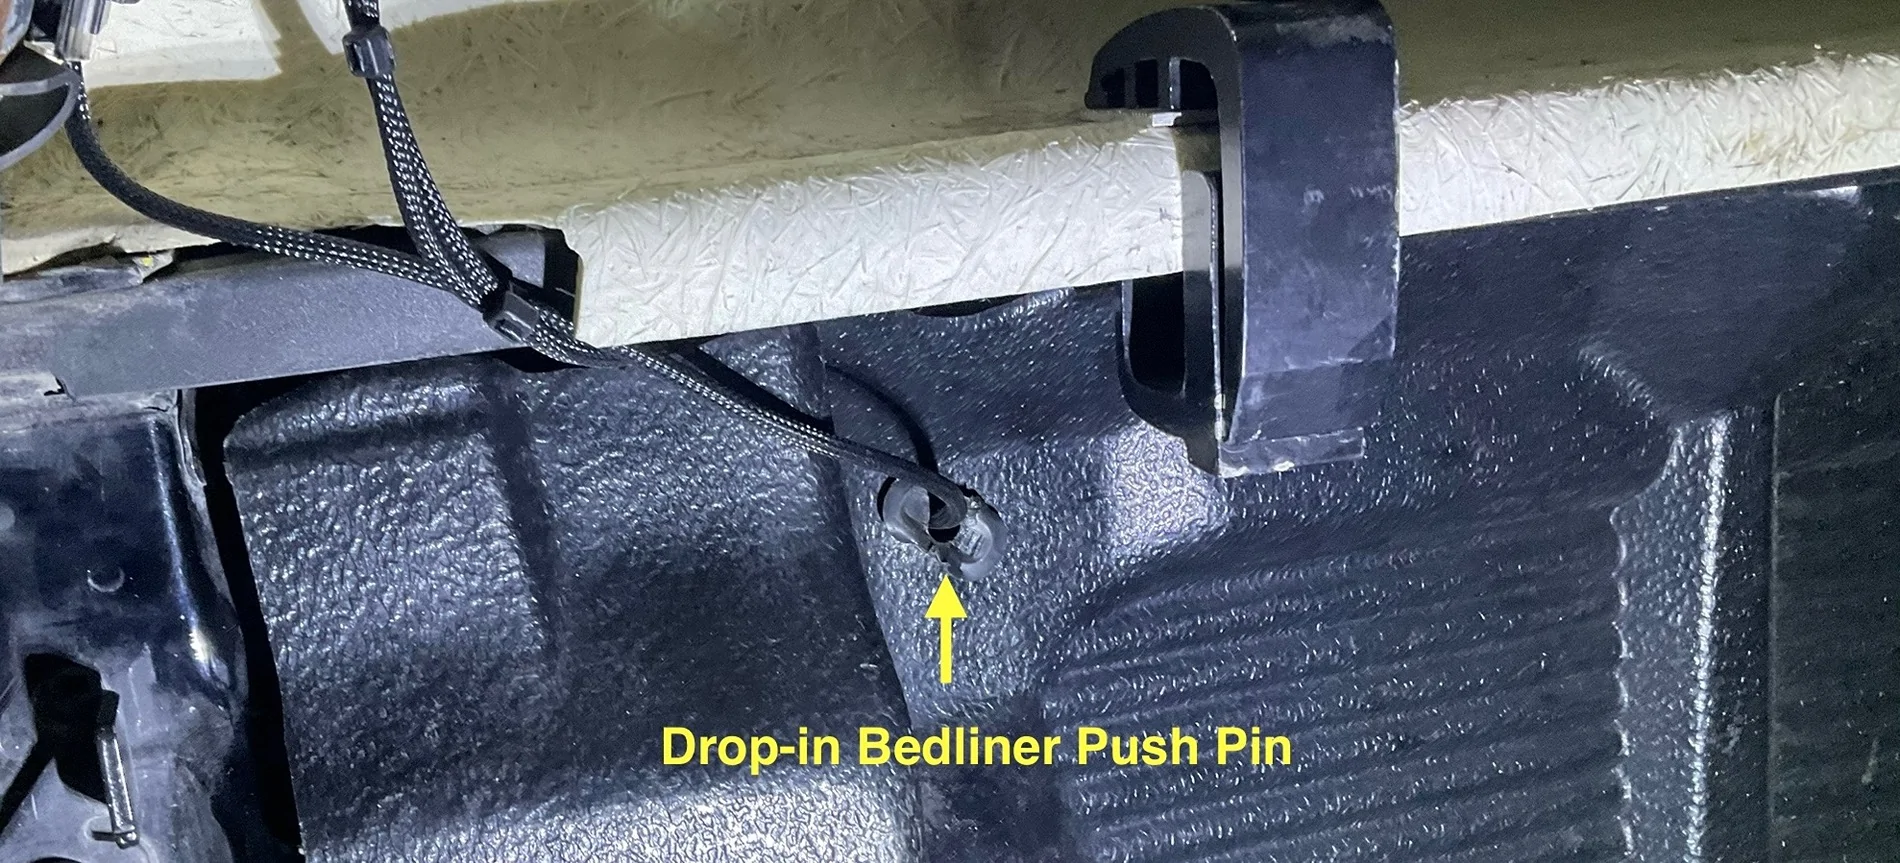
At the back of the bed, I ran it up to an existing hole in the bed that was easy to access. I have a full drop-in bed liner that covers up any access plugs in the bed. However, there is a large push pin that holds the side of the bed liner to the side of the bed. It is big enough that a camera cable can be passed through it if is drilled out to 3/8”.

After a tough time removing it (these are meant to go in and stay in), and mangling it somewhat, I was able to drill it out.

Not my best work but it was like pulling tiger’s teeth. After drilling, filing and sanding to smooth the edges, I re-inserted the plug and fed the cable through. It inserted well enough despite its appearance. I originally planned on using 2 grommets for this access point (one in bedside wall and another in the bed liner) but this solution worked out better.

I used the supplied clips to run the cable along the window frame to the roof where I drilled a 3/8” hole to feed it to the camera on my platform rack and sealed it up with black RTV Silicone outside, white RTV Silicone inside.

Running Power to Where it’s Needed
For a clean install and full functionality of the Wolfbox, hard-wired power is a must. Perform all wiring before re-installing the trim panels.
Mirror Camera Power
You can always use the supplied 12V socket but I prefer a clean, hard-wired install. Run the cable under the headliner to the driver side A Pillar, and down to the footwell.
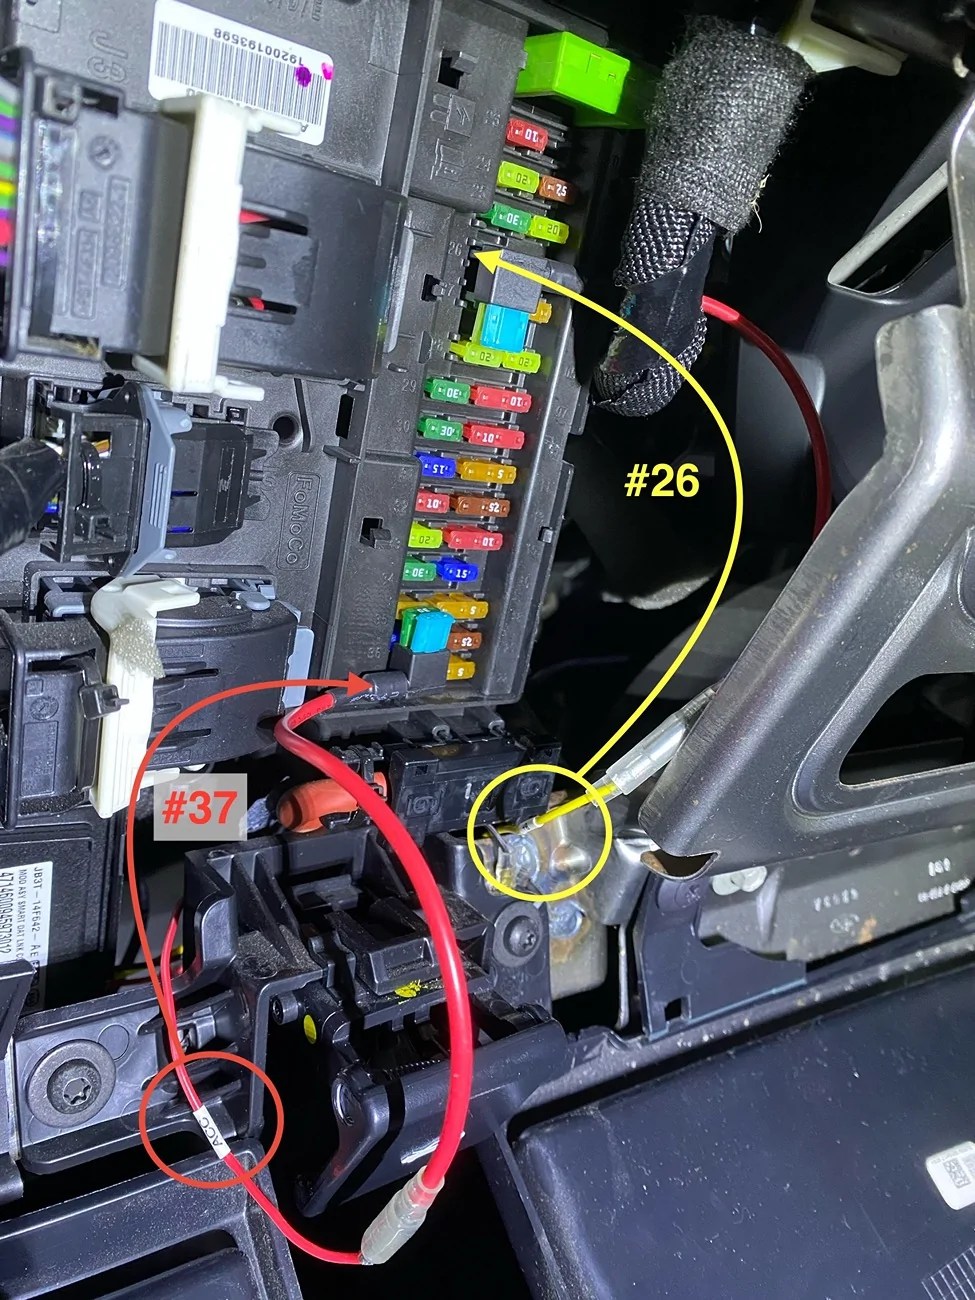
Pull fuse #37 (requires ignition) and put it in the slot in the supplied fuse tap. Plug the fuse tap into #37 and attach the fuse tap lead to the red wire labeled ACC.
Pull fuse #26 (always on) and put it in the slot in the supplied fuse tap. Plug the fuse tap into #26 and attach the fuse tap lead to the yellow wire labeled B+.
Attach the ground terminal to bare metal.

Rear Camera Lead Power
To obtain full functionality of backup and parking assist features, hook the red lead to power from the reverse light. This will allow the mirror to function much like our backup screens, with guidance lines zooming features, etc.
The wires from my topper’s third brake light were tapped into my driver side taillight so I was able to find the entry point to the back of the taillight assembly. It’s up in the top corner at the back of the bed - just big enough for small wires. Remove the two screws of the taillight and carefully pull it back and out at an angle. There are two push pins holding it in place - do not try to hinge it out. It takes a bit of force but it will pop out.
Remove the harness to make it easier to work on things. Pull the red tab back on the connector to unlock it. Then, press your thumb on the grooved tab and wriggle the connector off. Set the taillight aside - somewhere safe!
Power for the reverse light power is in pin location #5. Shoutout to @BcP28 for the photo below - thanks Bennet.

Tap into that wire and test it all before putting things back together.

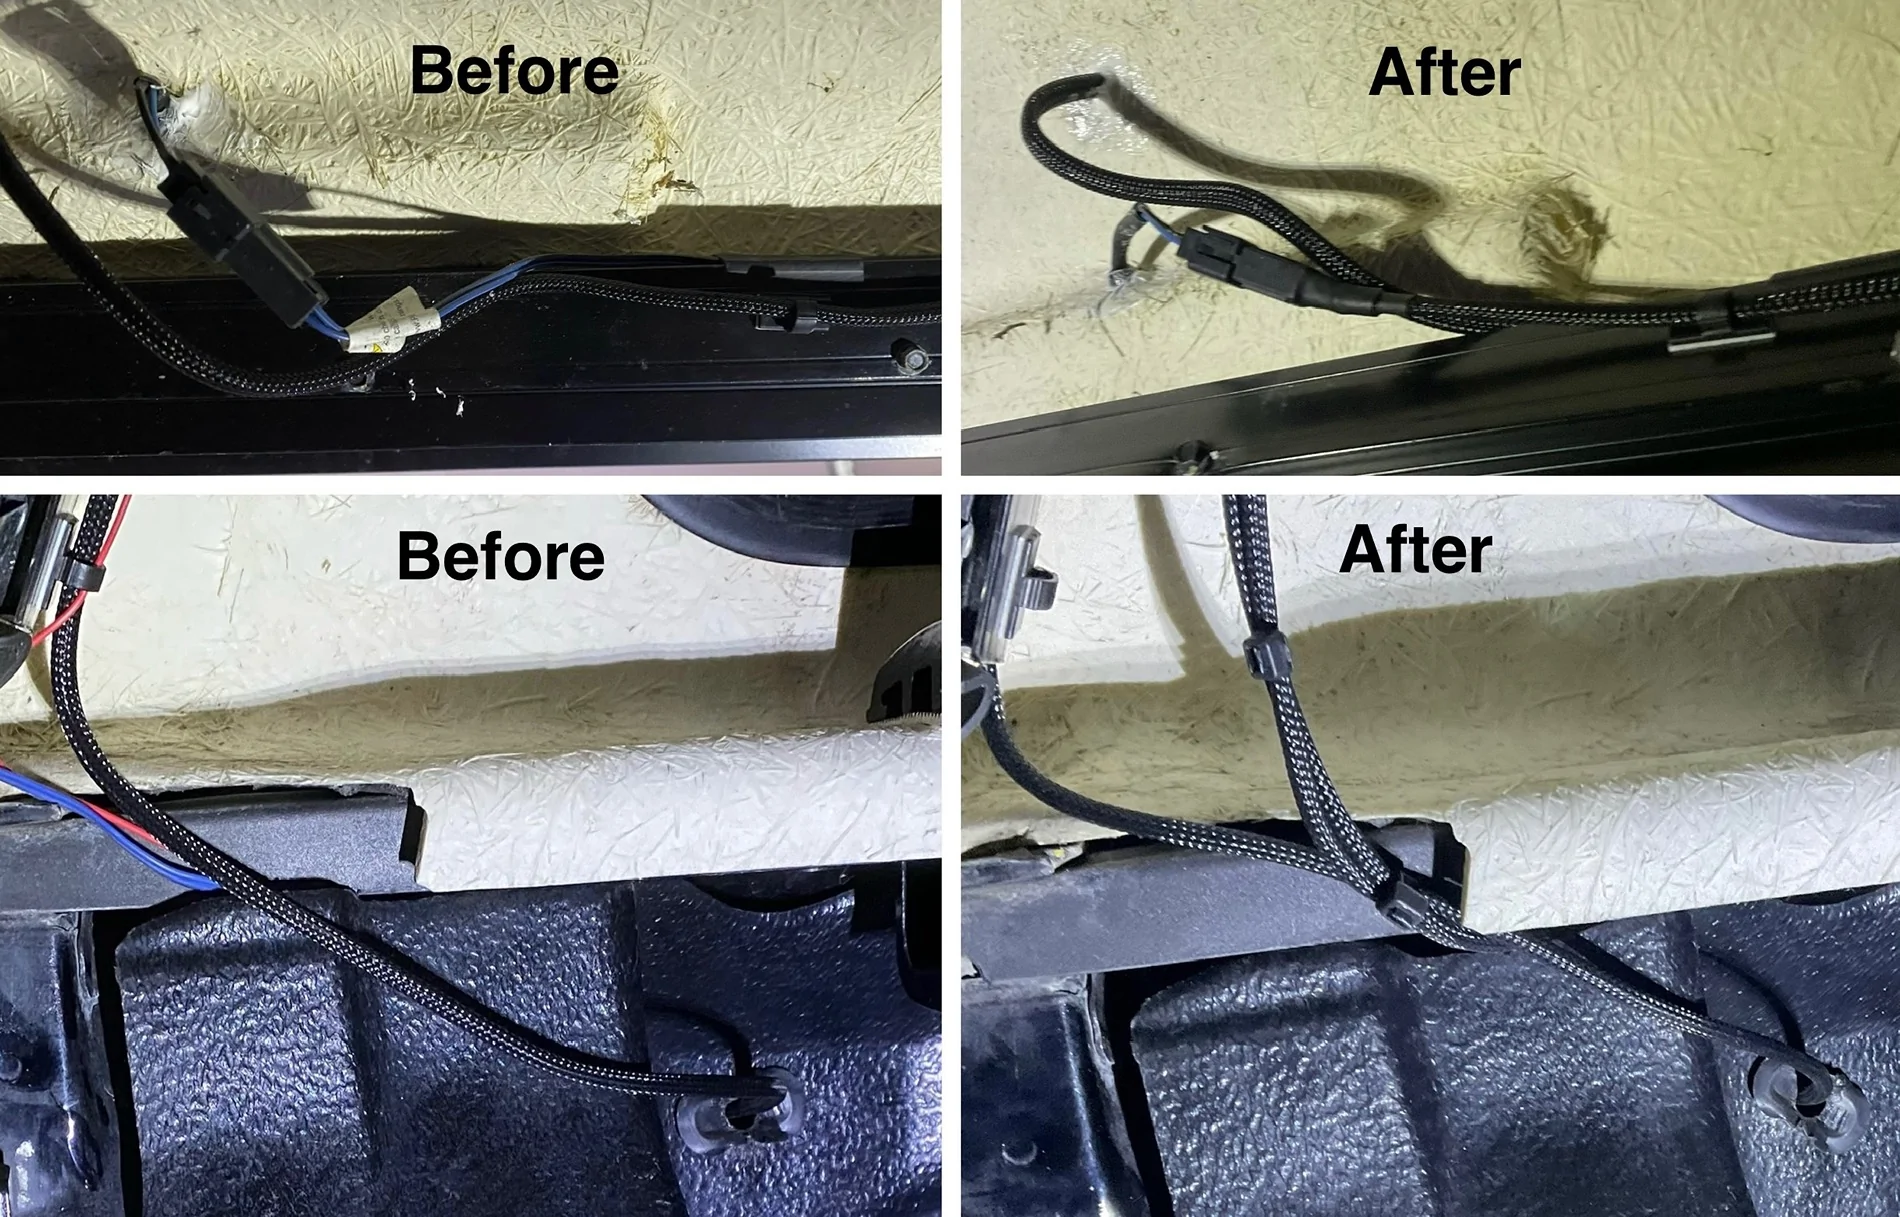
Since I was covering this lead with Expandable Braided PET Cable Sleeve, I took the time to clean up and improve on the third brake light wiring the topper folks installed.

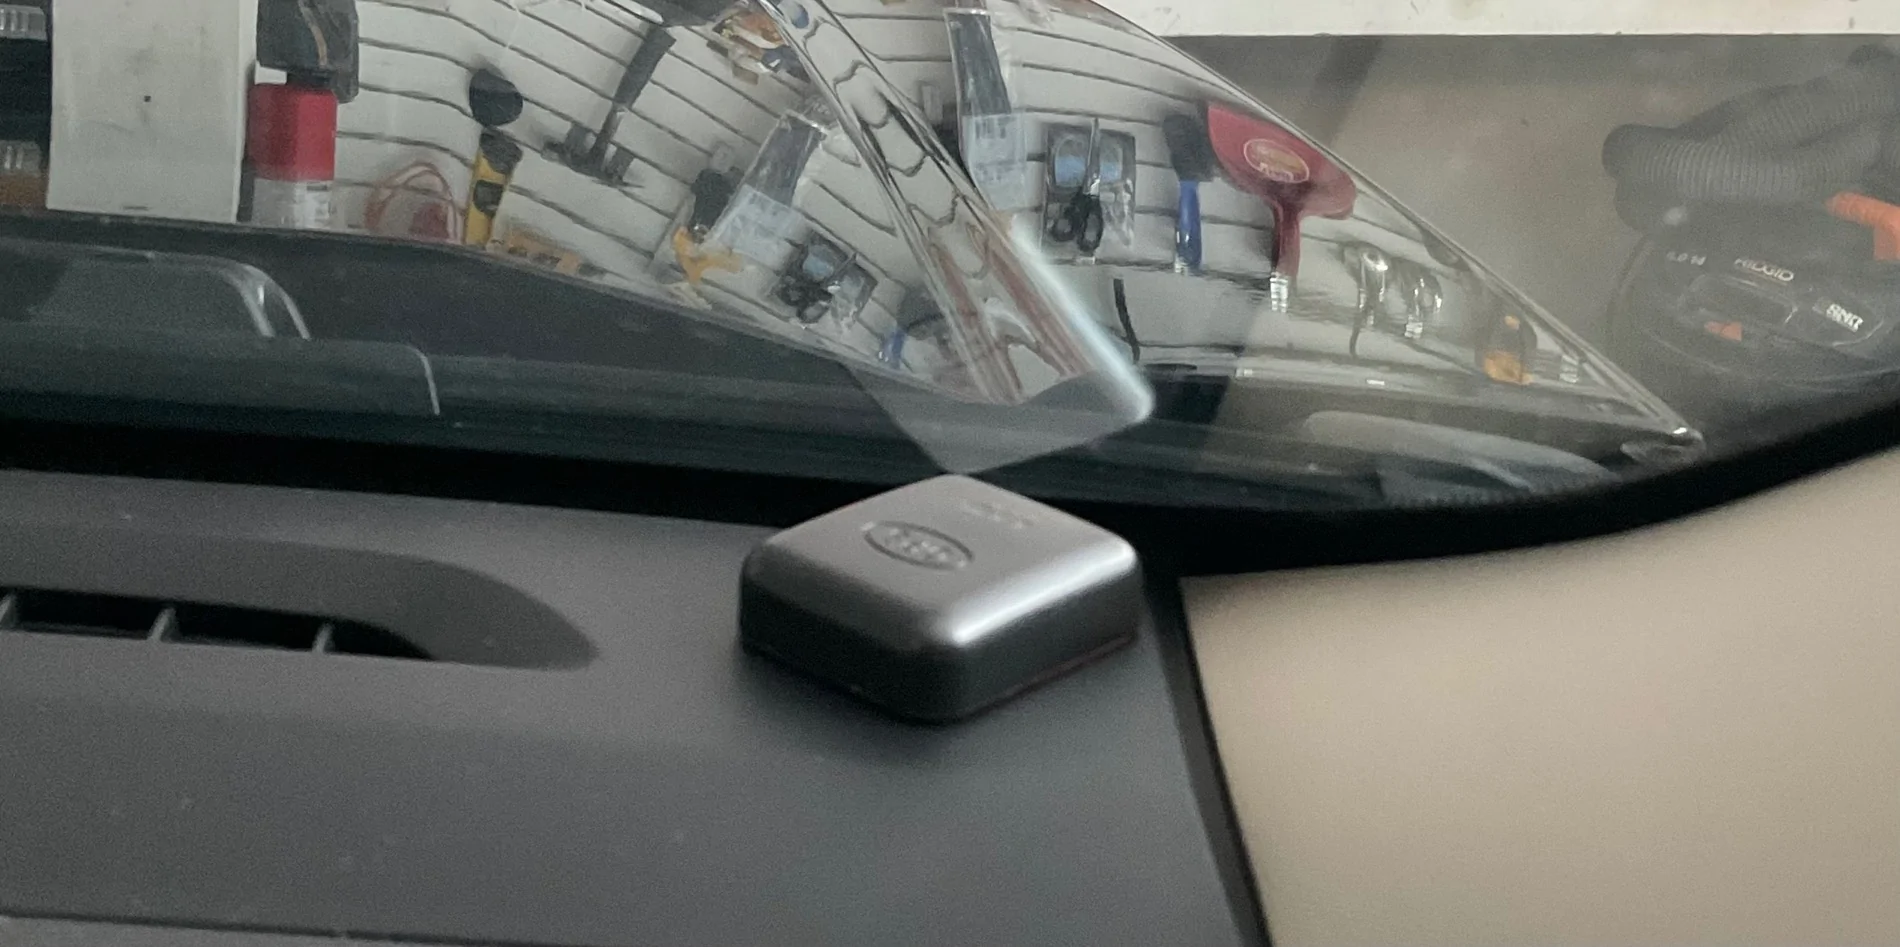
GPS Module
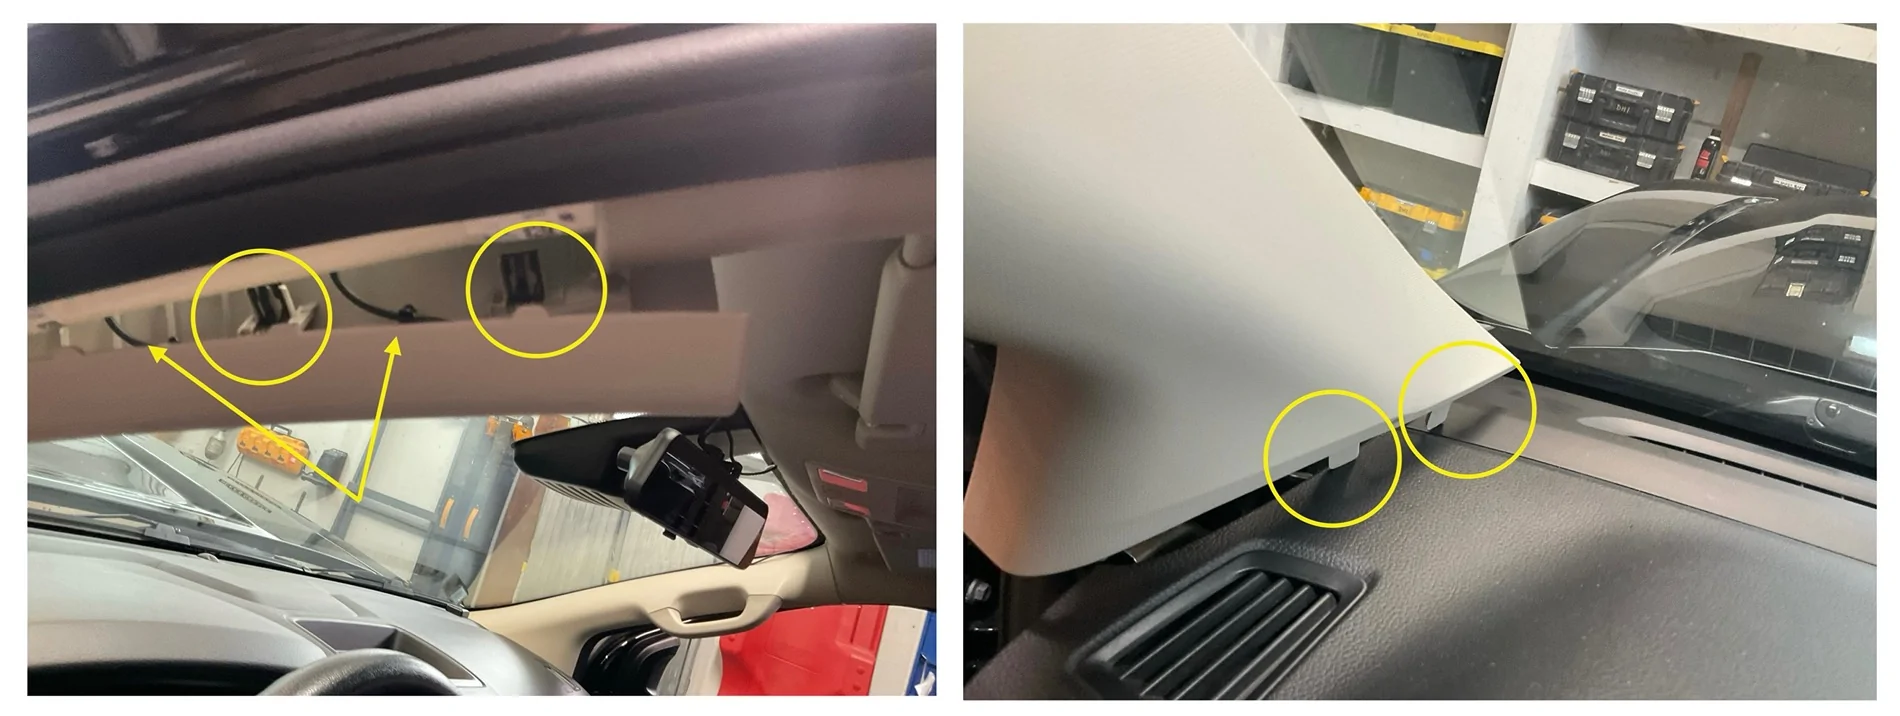
Run the wires under the headliner to the passenger side A Pillar and down to the dash closest to the windshield. Leave a length of loose cable under the bottom of the A Pillar cover to allow for positioning closer to the centre of the dash. I left mine tight to the A Pillar and did not fix it in place with the 3M tape on the back - if it moves around, I will.

Factory Rearview Mirror
Option 1
The only thing I could do to make this install “complete” is to mount the Wolfbox on the provided mirror stalk. It is a universal mount that glues to the windshield. This would put it below the pre-collision system cover and far too low for my liking. In addition, it would limit the driver’s field of vision.
Option 2 - Ranger Mirror Stalk
I could use my Ranger’s mirror stalk with the Wolfbox mounting plate. This requires sacrificing my mirror (or a donor mirror) to detach the stalk. The ball mount is smaller than the receiving end of the Wolfbox and some MacGyvering is required.
Option 3 - Adapter
I could purchase an aftermarket adapter that works with the supplied mount and the Ranger’s windshield mounting plate. However, the stalk sits high and cutting of the pre-collision system cover is required. There are also a few threads that mention it can come loose and vibrate or wobble.
Option 4 - Strapped to OEM Mirror
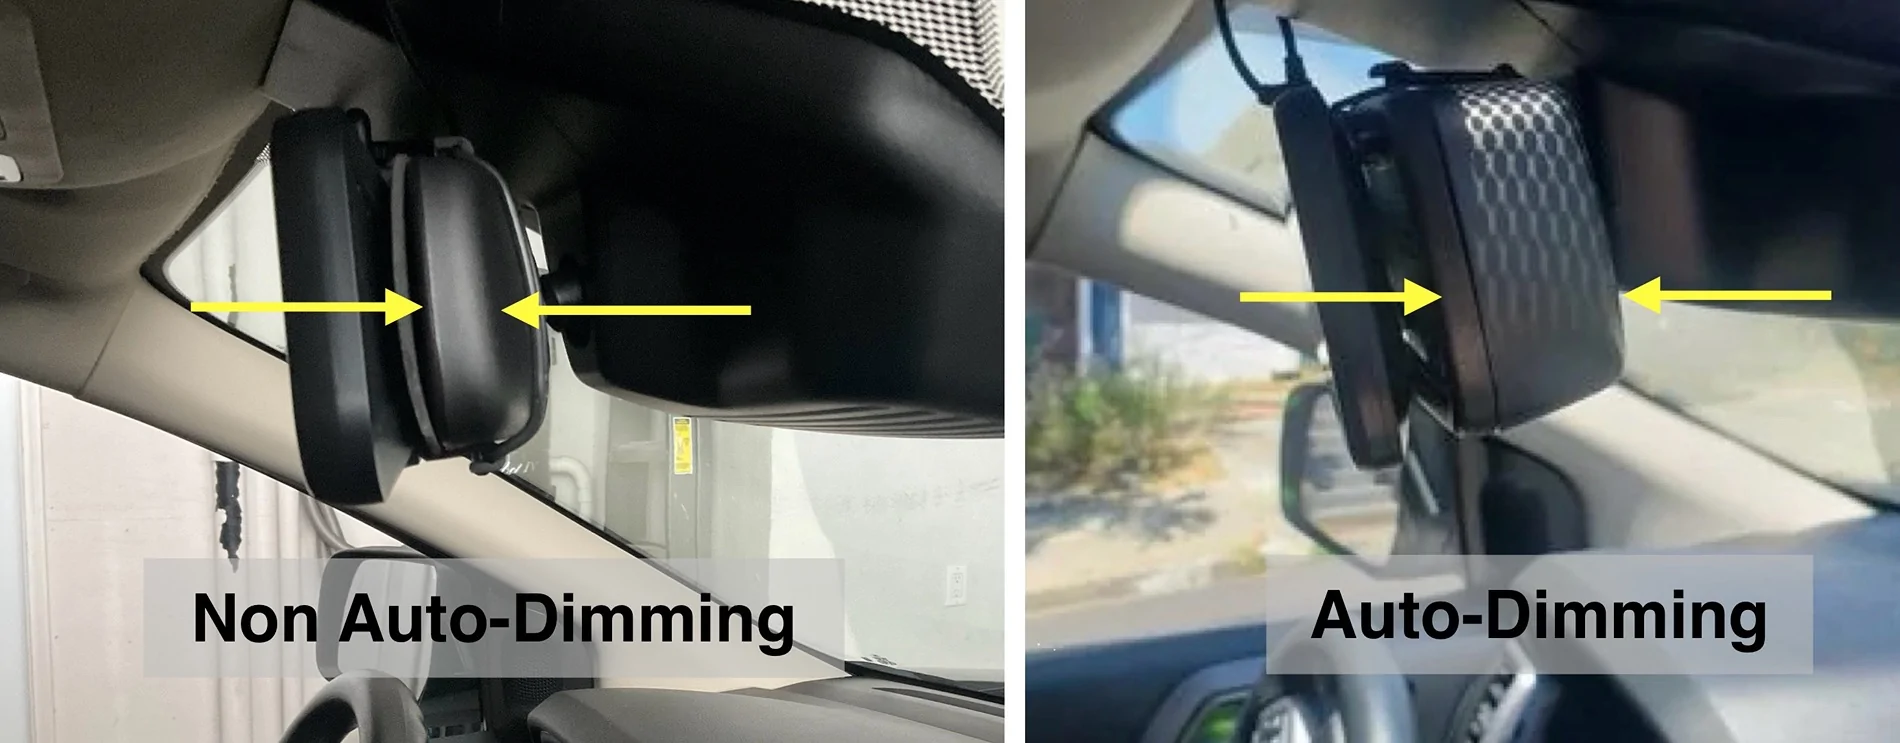
My Ranger‘s manual-dimming rearview mirror is much slimmer than the auto-dimming version and I’m happy with simply using the shorter of the supplied rubber mounting straps to hold it in place. The toolbox drawer liner I used to protect the OEM mirror during the dry-fitting works nicely and also prevents the Wolfbox from sliding around. Thin cork, felt or other suitable material could be used instead of toolbox drawer liner.

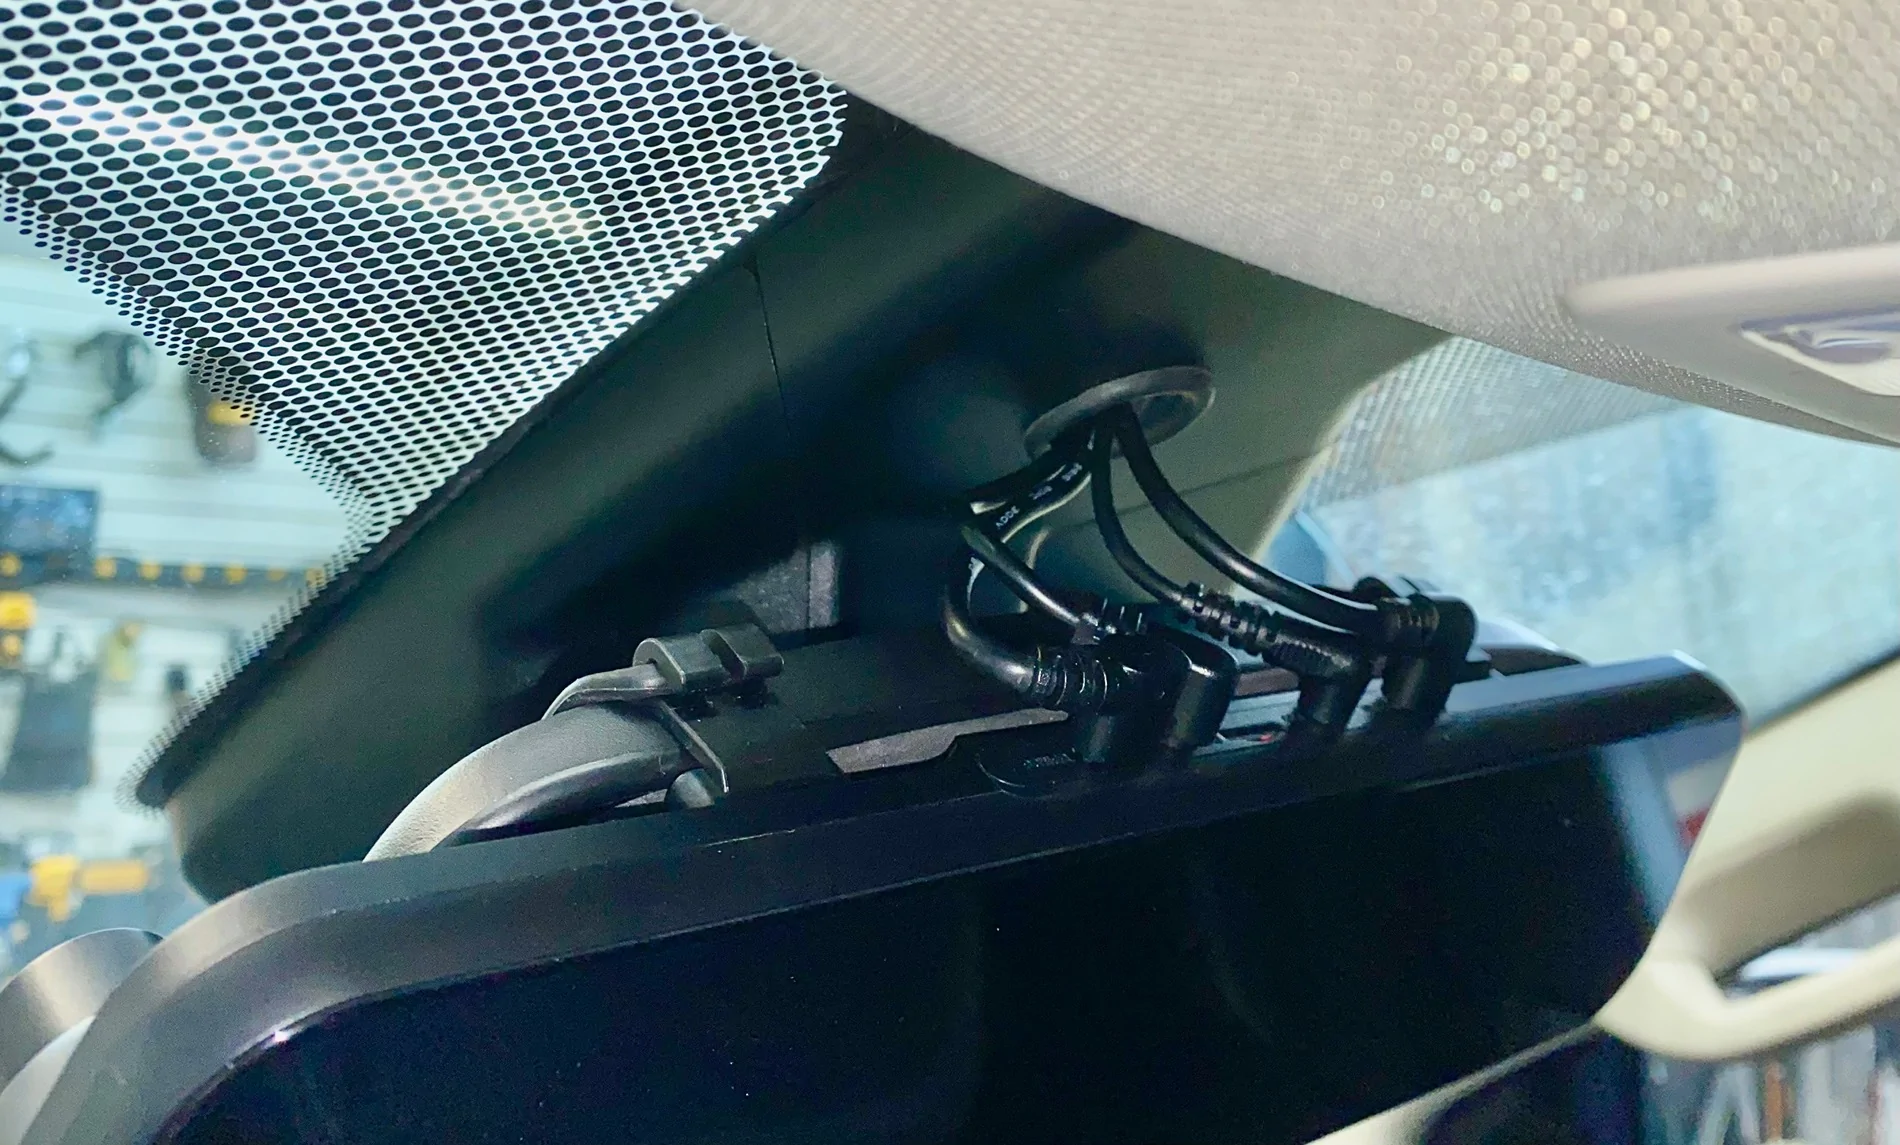
I chose Option 4 and I’m happy with the result. To finish it off, I borrowed an idea from @RealRigsRattle and fished the cables through a large 1-1/4” grommet that fits in a 1” hole drilled into the upper pre-collision system cover. Thanks for posted about it Tim.

Congratulations - You’re Done!
Fix or replace any trim clips or push pins you lost or damaged while removing them and put everything back together. Now, stand back and admire your work and your Ranger.
Thanks for reading. If you’re installing a Wolfbox mirror dashcam and have any questions, PM me. I’d be happy to help in any way I can.
Duke
I received my Wolfbox G900 Tripro mirror dashcam so it’s time get to work to install it and post a review. I’ll post updates as I go through different stages of the process from unboxing to dry-fitting, as well as permanent installation.
Unboxing the G900 Tripro
Part 1 - You’ve Got Mail
Well, let’s continue, shall we?
Part 2 - The Package
Now, where was I? Oh yeah…
Part 3 - The Parts List
This is a Specific Application
There are a few things to know about the configuration of my Ranger before diving into the full installation.
- It’s a SuperCab - the rear trim pieces and cable exit locations behind the back seats are different than a SuperCrew. The principles of installation are the same
- It has a fibreglass topper - having a rear-facing camera inside the truck’s back window just isn’t going to work.
- It also has a full drop-in bed liner - cable entry locations into the bed are not as accessible as trucks without a full drop-in bed liner. The principles of installation are the same.
- It does not have an auto-dimming mirror - using a dongle to route power from behind the pre-collision cover would also require installing a new wiring harness.
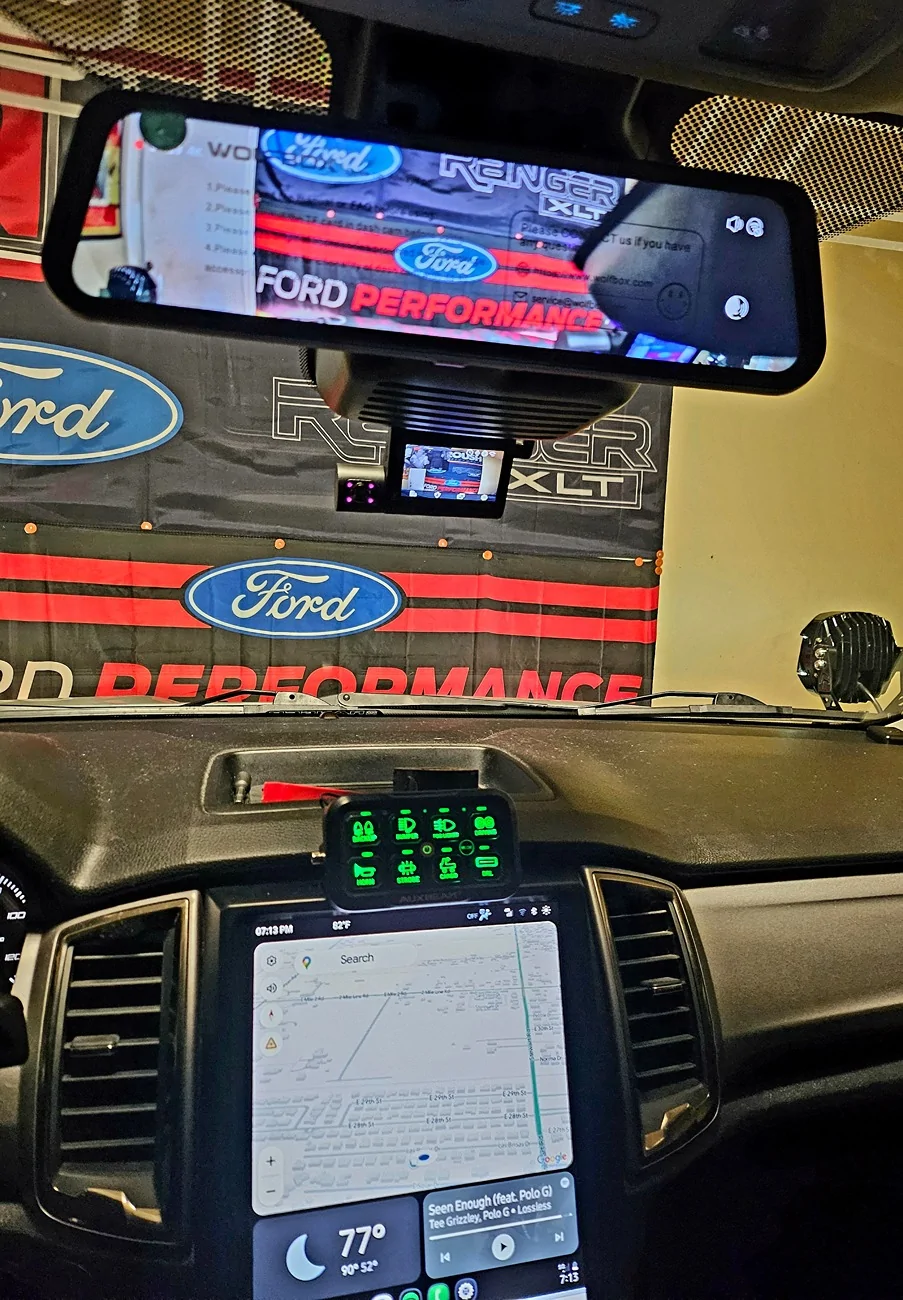
Dry Fitting the G900 Tripro & Choosing Camera Locations
Before getting into the full installation, you want to connect everything to the mirror camera, including power, to test that it all works.
You can mount the G900 directly to your existing rearview mirror with straps or mount it to a stalk that attaches to the windshield. As well, you can use a 12v plug-in or hardwire the system. The flexibility here allows you to do an easy dry fitting and lets you experiment with different camera locations before committing to the removal of trim panels and fishing wires around and through the cab.
After strapping the G900 over my existing mirror, I was happy that it wasn’t as bulky as I heard it might be. My non-dimming mirror is much thinner than the auto-dimming version. I likely won’t bother with mounting it on a stalk.
With wires dangling everywhere and cameras in random locations in the cab, I tested everything and it all worked as it should. My next task was to establish my camera mounting locations. I hung the cables out the window and experimented with various front and rear camera locations. I settled on a mid-grille mount up front and a high mount on the Rhino Rack Pioneer Platform on my topper.
It all kind of came together like this…
Hard Wiring the Cameras, Power, and GPS Module
Cable Routing
I’m installing a front camera in the grille, a rear camera above my topper’s third brake light, a GPS module, and 12V power. All cables and wires start at the mirror camera unit but where do they go from there?
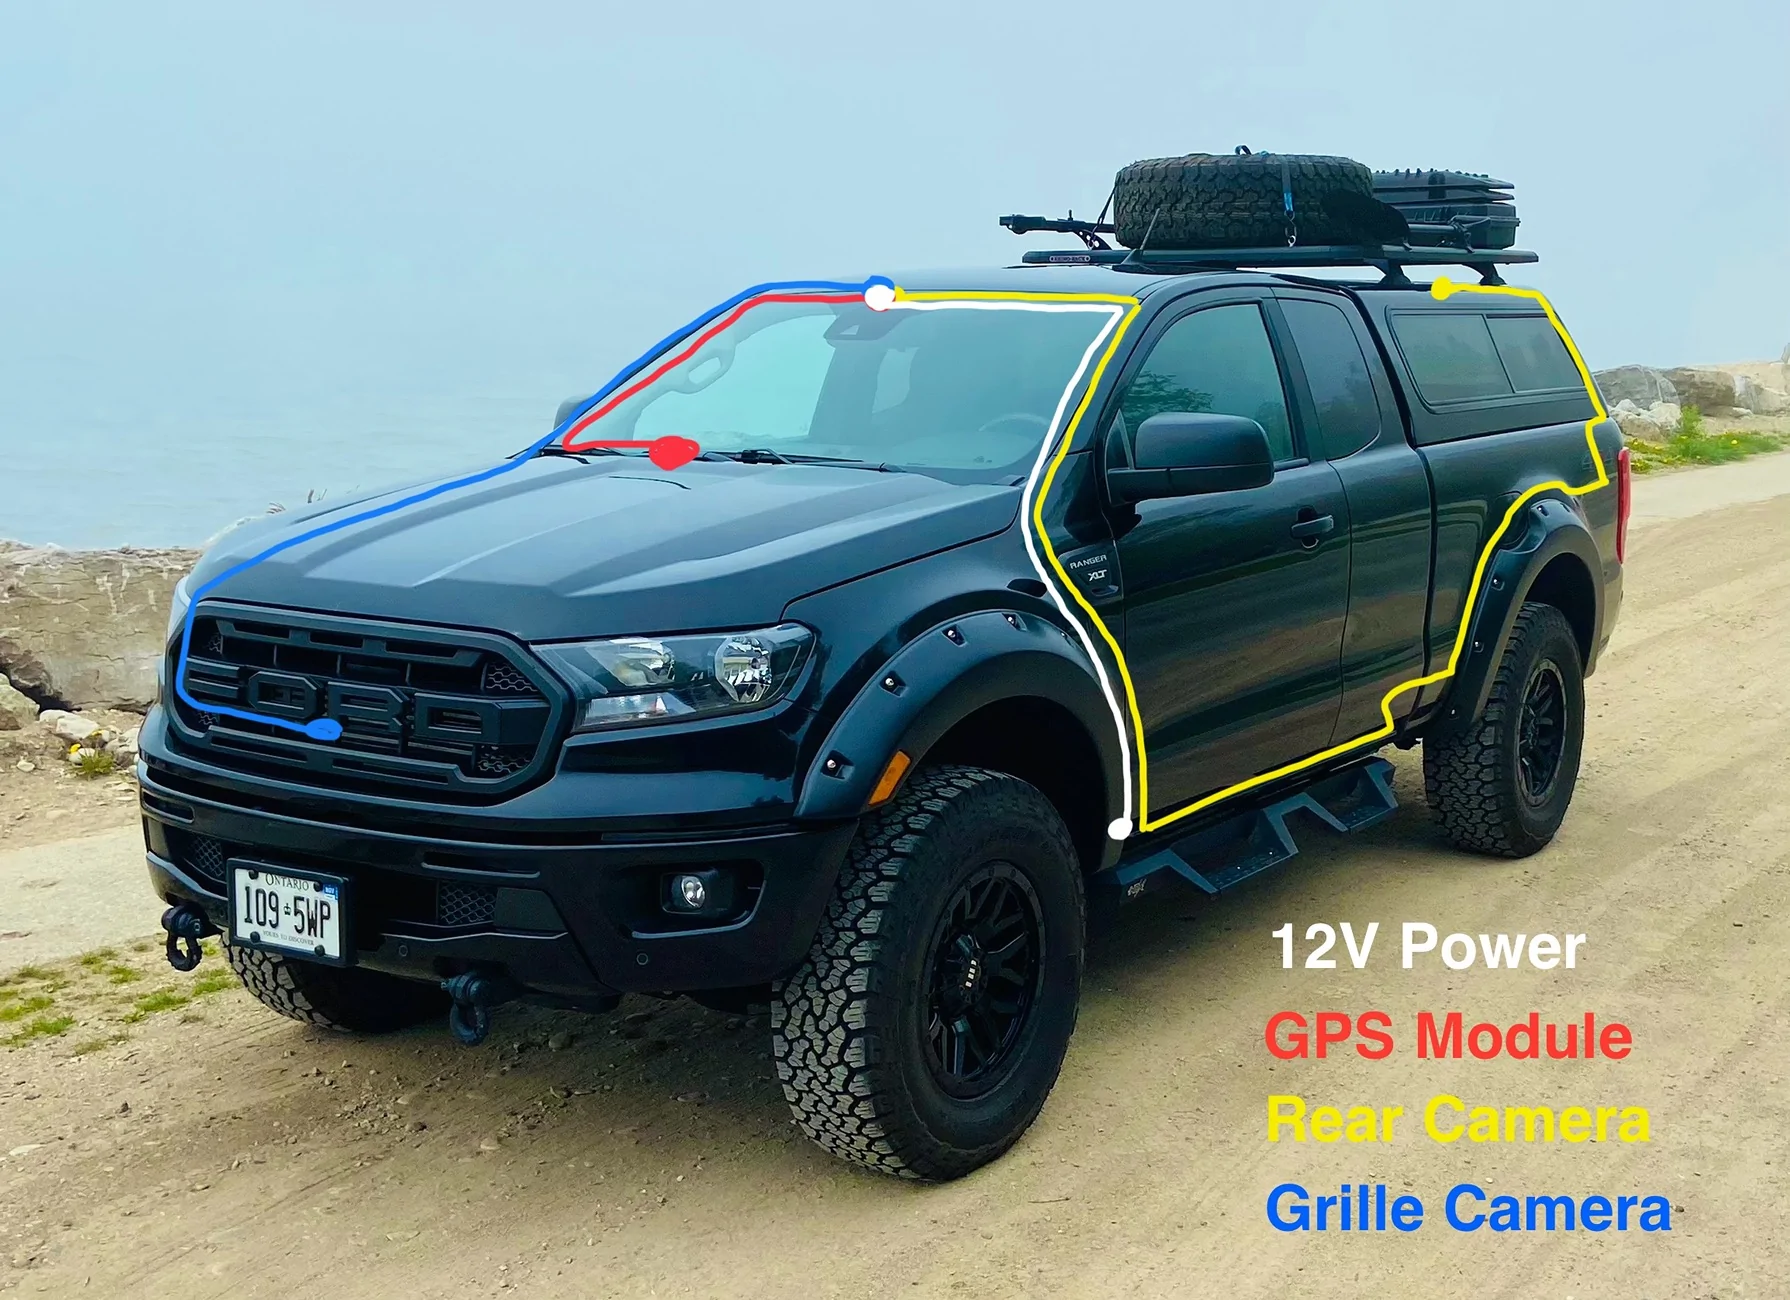
- Power - Fused 12V
- under the headliner to the driver side A pillar
- under the A pillar trim to the fuse box behind the trim panel below the steering wheel
- GPS Module
- under the headliner to the passenger side A pillar
- under the A pillar trim to the dash
- module lays flat on dash
- Rear Camera
- under the headliner to the driver side A pillar
- under the A pillar trim to the kick panel
- behind the kick panel
- under the driver side door sill trim
- under the rear driver side sill trim
- behind the rear passenger side corner trim
- through a rubber plug in the back wall of the cab
- up and over the wheel well liner to the rear taillight
- through an access hole into the bed
- up and around the topper’s rear window trim
- through a hole you drill in the roof of the topper
- connected to camera
- Grille Camera
- under the headliner to the passenger side A pillar
- under the A pillar trim and behind the glovebox
- through a “secret” access hole in the firewall
- under the coolant recovery tank
- under the air intake to the front right headlight assembly
- under the radiator/grille shroud
- connected to camera
You need to remove more trim panels than you might think in order to make this job easier. You will be removing a lot of items, so you need patience and a good set of trim tools, including a metal push pin remover. It’s also a good idea to have an assortment of spare push pins and for this install, some rubber grommets might come in handy.
You will be removing the following trim panels/items:
- A Pillar Cover - driver and passenger sides
- Fuse Box Area Cover - below steering wheel
- Glovebox
- Kick Panel - driver side
- Door Sill Trim - driver side
- Rear Seat Bottom - driver side
- Rear Seat Back - driver side
- Jack Storage Area Lid
- Jack Storage Area Frame
- Rear Door Sill Trim - driver side
- Rear Side Corner trim - driver side
- Radiator/Grille Shroud - engine bay
Leave the driver side door open and, starting at the top, squeeze the trim panel together, pulling out and slightly down toward the steering wheel. Do this slowly but with firm pressure. It has two clips at the top and two tethers. If you yank on it, the tethers will catch, just as they do if it deploys. Once it’s loose, pull it upward until the two long tabs at the bottom clear their slots. Leave it tethered - there’s plenty of room to do your work.
It is similar for the passenger side but you must remove the grab handle first. You need a 6mm 1/4” socket, a nut driver, and an extension. Remove the plugs to expose the studs for the grab handle with the 6mm. The material is soft, use a trim tool.
Removal of the passenger side A Pillar cover trim is the same as the other side. There is only one clip at the top and it is not tethered (the grab handle holds it in place when it deploys).
Use the extension to thread the studs back in - finger tips only - it is very easy to strip these because you can’t see what you’re screwing into or your angle of approach. I used the nut driver and got in trouble and had to chase the threads from the backside of the welded nut.
Fuse Box Area Cover - this is hinged at the bottom. Pry it downward with two hands. There are several clips but they release without much effort or trouble. This provides a lot of room to work but removing it completely is better. It’s also easy. There are two Phillips screw-type 2-pce push pins holding it to the dash at the bottom. These are similar to the wheel well liner pins that people report having trouble with. Poke your fingernail under the edge of the centre screw part of the pin and apply upward force. You are raising it so the screw’s threads will catch. Slowly back out the screw, without pushing down on the screwdriver, then pull the push pin out. Repeat. Set the panel aside.
Glove Box - taking this out is easy and gives you room to work. Empty the glove box completely. If it has the damper, reach up on the right side to feel for the cord that is looped around a post on the side of the glove box. Pull it over the catch on the end of the post and let go.
Squeeze the sides of the glovebox and pull toward you and down. It should fall away from the dash to the floor. Squeeze the ends of the two white plastic hinge pins and push them out. The glove box should release. Set it aside but insert the hinge pins back into the hinge on the dash so you don’t misplace them.
Kick Panel - a tab aligns the pointed part in the footwell under the dash and a clip holds it to the door jamb. Pull the front tip of the panel back to release the tab and pull the top of the kick straight back away from the jamb to release the clip. There is a pin securing it to the rocker, under the driver side sill panel. Remove that sill panel and you will see this pin. It will then be possible to remove the kick after the sill is removed.
Door Sill Trim - the trim piece has a clip at each end and two pins in the middle. All four are located close to the door opening. Pry up on the ends close to the door to release the two end clips. Carefully pry from the edge by the door about a third of the way in from each end to release the pins. Remove the final pin in the Kick Panel. Set both pieces aside.
Rear Seat Bottom - pull on the strap at the front of the seat to release latch. Push seat bottom toward rear of cab to unhook and lift up. Set aside.
Rear Seat Back - There is one bolt at the top, one clip centred near the top, and two loops that hook into spring clips at the bottom. Lift the Velcro flap below the headrest to access the child seat restraint bolt. Fish the loop of nylon out of the opening. Use a 1/2” socket with a small extension to remove the bolt. Pull sharply on the seat as if folding it forward and down. You will likely break the clip. It isn’t critical - it just holds the seat back in place when installing a child seat. With the seat back just slightly tipped forward (5° or 10°), grip the sides of the seat back and rock it sharply to one side to release the lower loop from its spring clip. Then, sharply pull the seat straight up to release the other clip - they are sprung steel - you won’t hurt them. Set aside.
Jack Storage Area Lid - Turn lock dial as shown on the lid. Lift lid. Set aside.
Jack Storage Area Frame - using a push pin removal tool, pop the three pins holding the frame in place. Two of these pins hold the Rear Door Sill Trim in place. The frame fits snugly in the end of the opening furthest from the door opening. Wiggle it loose to remove. Set aside.
Rear Door Sill Trim (Reminder - SuperCab) - with the Jack Storage Area Frame removed, you can now remove this door sill. There are our pins close to the door opening as with the other sill. They are all on the lower flat piece. One at the front end, two in the middle, and one under the curve where the trim turns up toward the seat bottom. Carefully pry from the edge by the door to release the pins. Set aside.
Rear Side Corner Trim - there are five clips and one push pin. There are two clips at the very top, one just below them near the front edge, another halfway down along the rear edge, and another at the top front corner of the grille vents. I found evidence of a push pin location near the top of the grille vent at the back of the panel as well as a mounting tab with a hole for a push pin sticking out from the back wall. I did not find the push pin, broken or intact. Maybe Ford missed it - maybe I removed it during a previous rear sear delete mod. The white pins in the box above fit this location. Gently pry this panel from the top, working your way down. Set aside.
Radiator/Grille Shroud - There are five push pins and two bolts from the air intake holding this in place. Remove the two bolts with a T30 Torx head. Leave the scoop where it is. Remove the five 2-pce push pins. Pry out the centre post of the pin to unlock it, then pry out the remaining part of the pin. Set aside.
You should have a collection of items that looks like this…
I‘ve posted pictures of the back of each trim panel for anyone who might find them helpful while removing them. Yep, you’re welcome.
Routing Cables Through the Firewall and Back of the Cab
If you don’t feel like reading everything below, here’s a video with a Reader’s Digest version…
Note: I covered the exterior and other vulnerable sections of my cables with Expandable Braided PET Cable Sleeve - as such, in certain photos, the cables will look different than what is supplied.
Firewall
There is a “secret“ grommet for passing wires through the firewall. It is located behind the glovebox and enters the engine bay behind the coolant reservoir. It's difficult to see but my bore scope helped me locate it. A large wire harness passes through it but there is an extra port for a cable. Grab, twist, and pull the tab on this port to tear it off. Shout out to @Nomadjohn for posting his pic about this port.
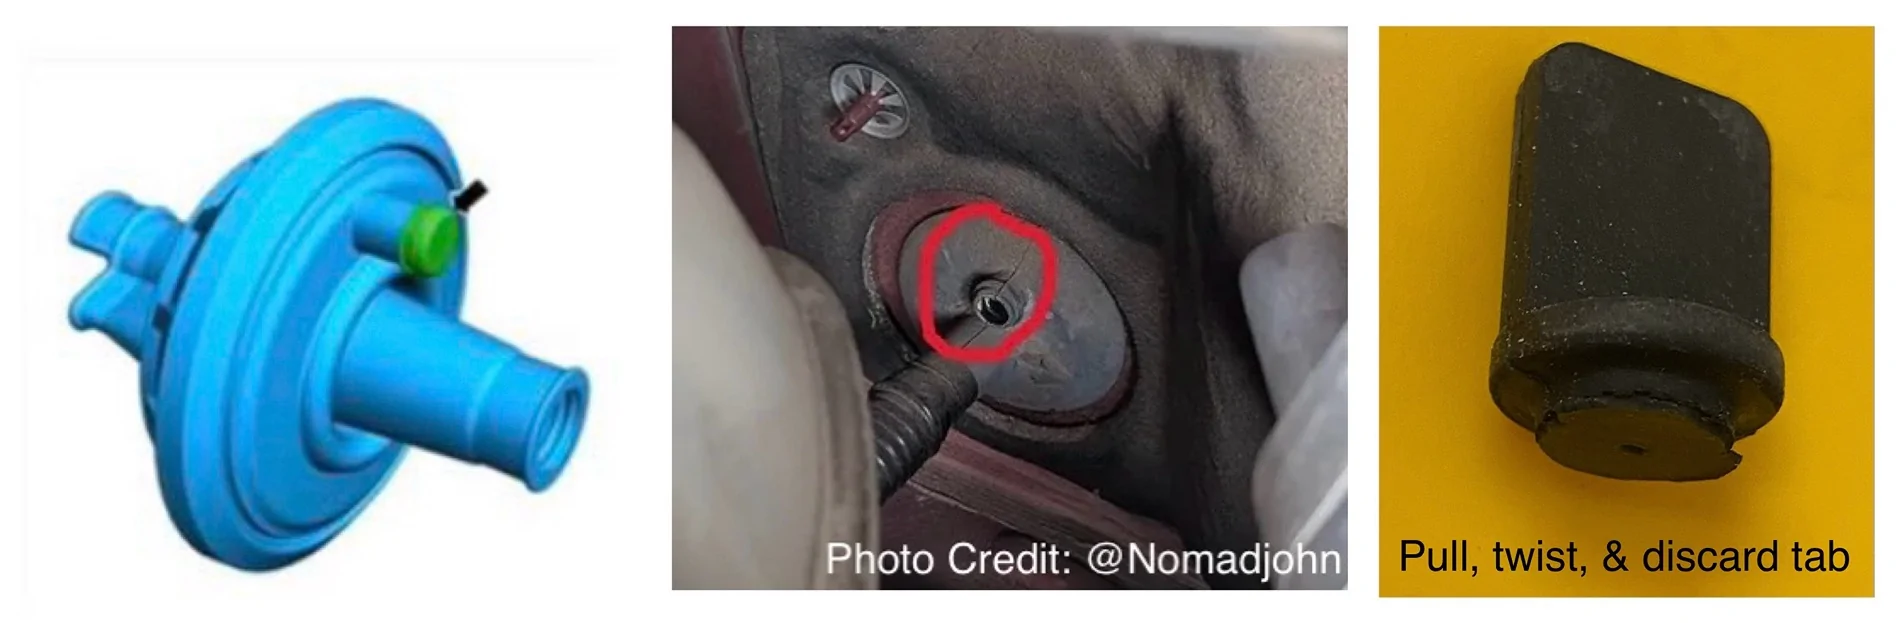
Feed a wire through the new port into the cab so you can fish your cable into the engine bay. Fold back the insulating blanket flap on the inside of the cab, tape your camera cable to the wire, and fish it into the engine bay.
Route it under the coolant tank and air intake boxes to the front of the truck and down to your grille or bumper and connect your camera.
Rear Wall of Cab
Everything from the Kick Panel back is removed so the rear camera cable can be routed to the back of the SuperCab and out the rear wall. There is an oval plug that exits the cab, shown below. This is your escape route. There is a plug on the passenger side also. The SuperCrew has plugs in similar places and plugs higher up, closer to the window, on each side. The SuperCab might also have them but they were not evident due to how the seat back attaches to the back wall.
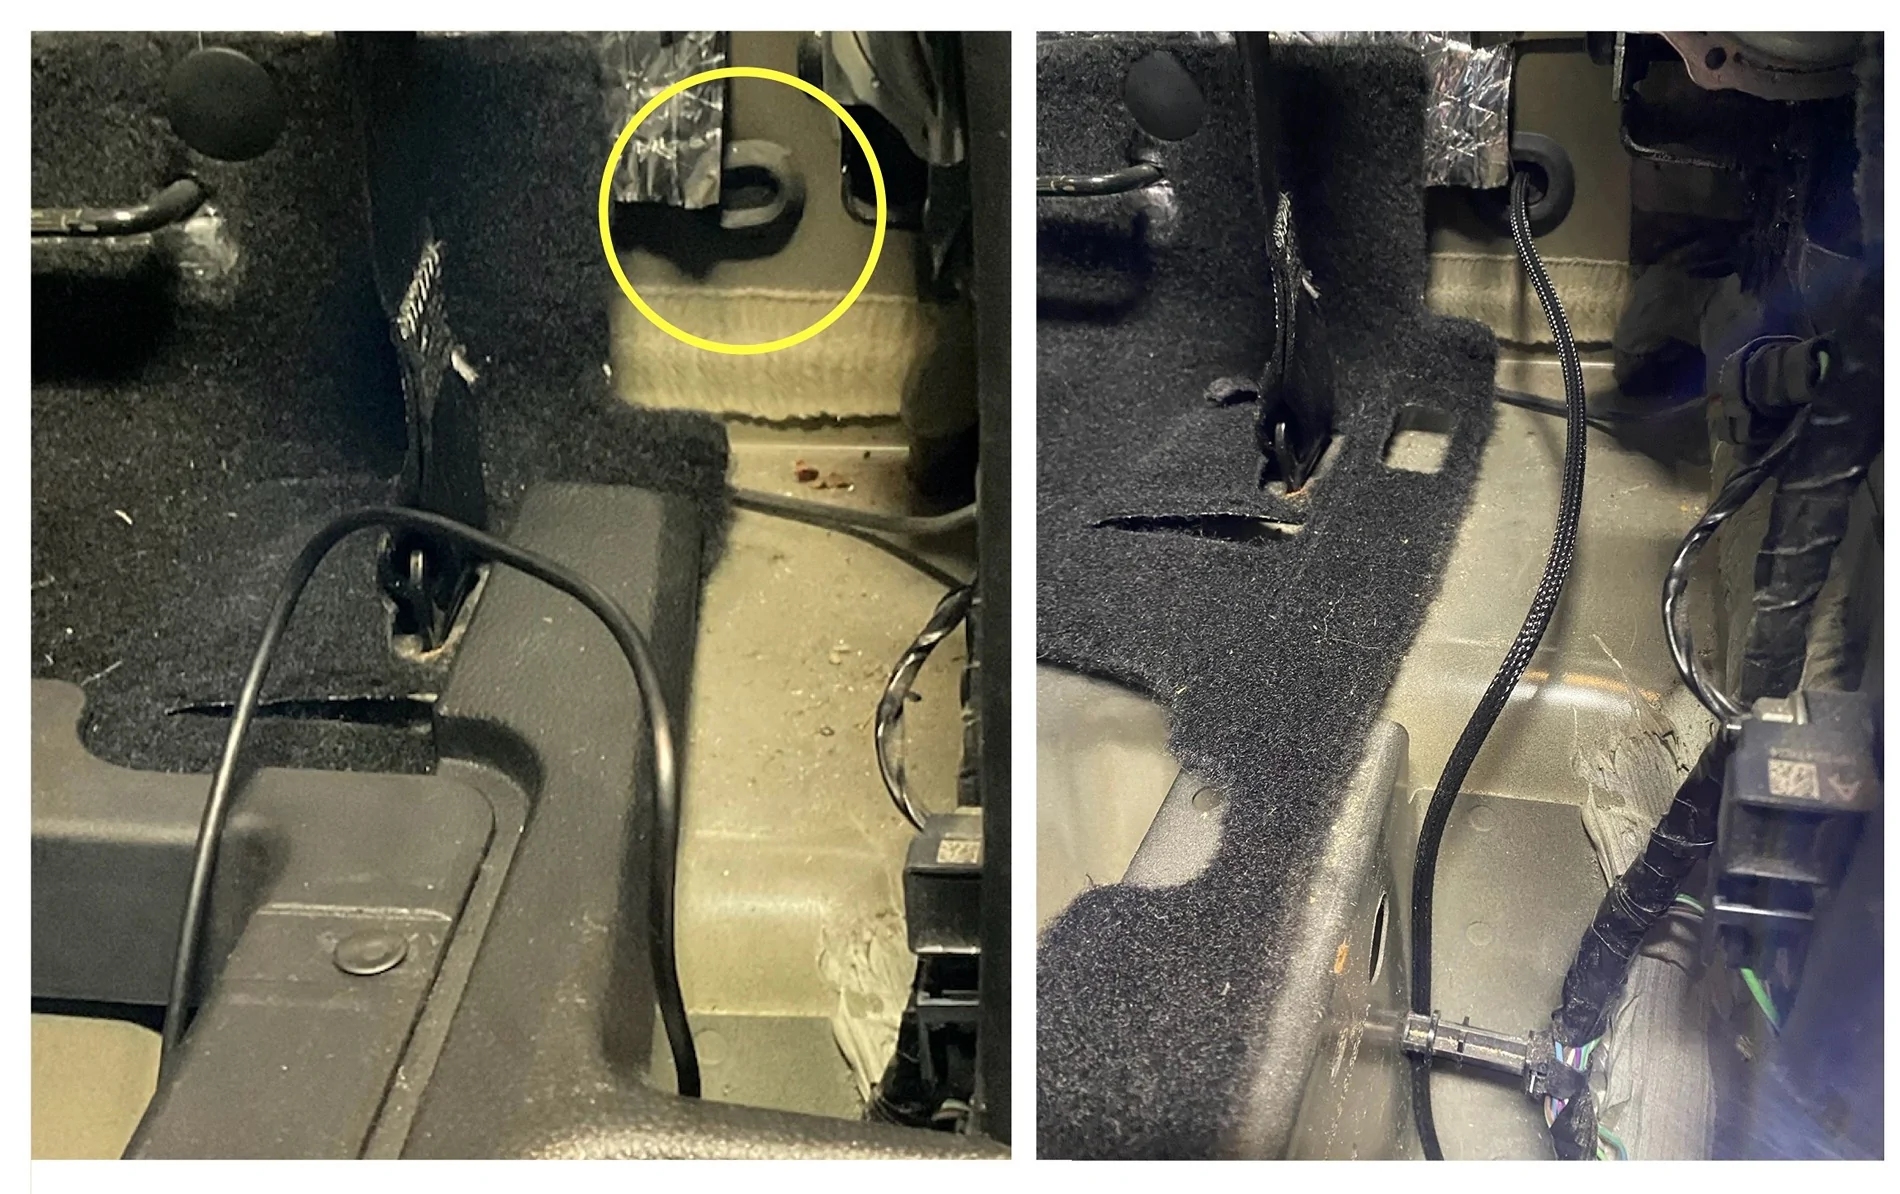
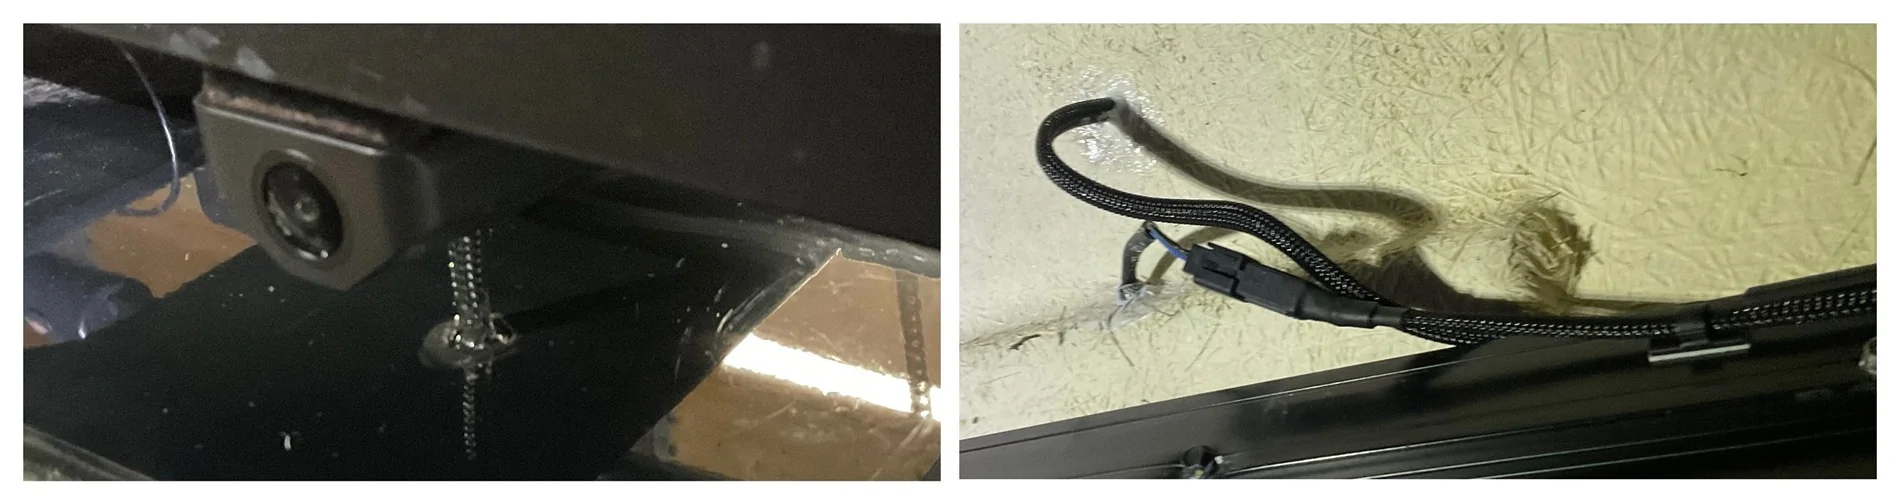
Pierce it with an awl or a hot soldering iron if you’re fancy and you’re set. It exits the rear wall between the box and the bed. From there, you can take it where needed. I ran it up over the wheel well liner to the rear of the bed.
At the back of the bed, I ran it up to an existing hole in the bed that was easy to access. I have a full drop-in bed liner that covers up any access plugs in the bed. However, there is a large push pin that holds the side of the bed liner to the side of the bed. It is big enough that a camera cable can be passed through it if is drilled out to 3/8”.
After a tough time removing it (these are meant to go in and stay in), and mangling it somewhat, I was able to drill it out.
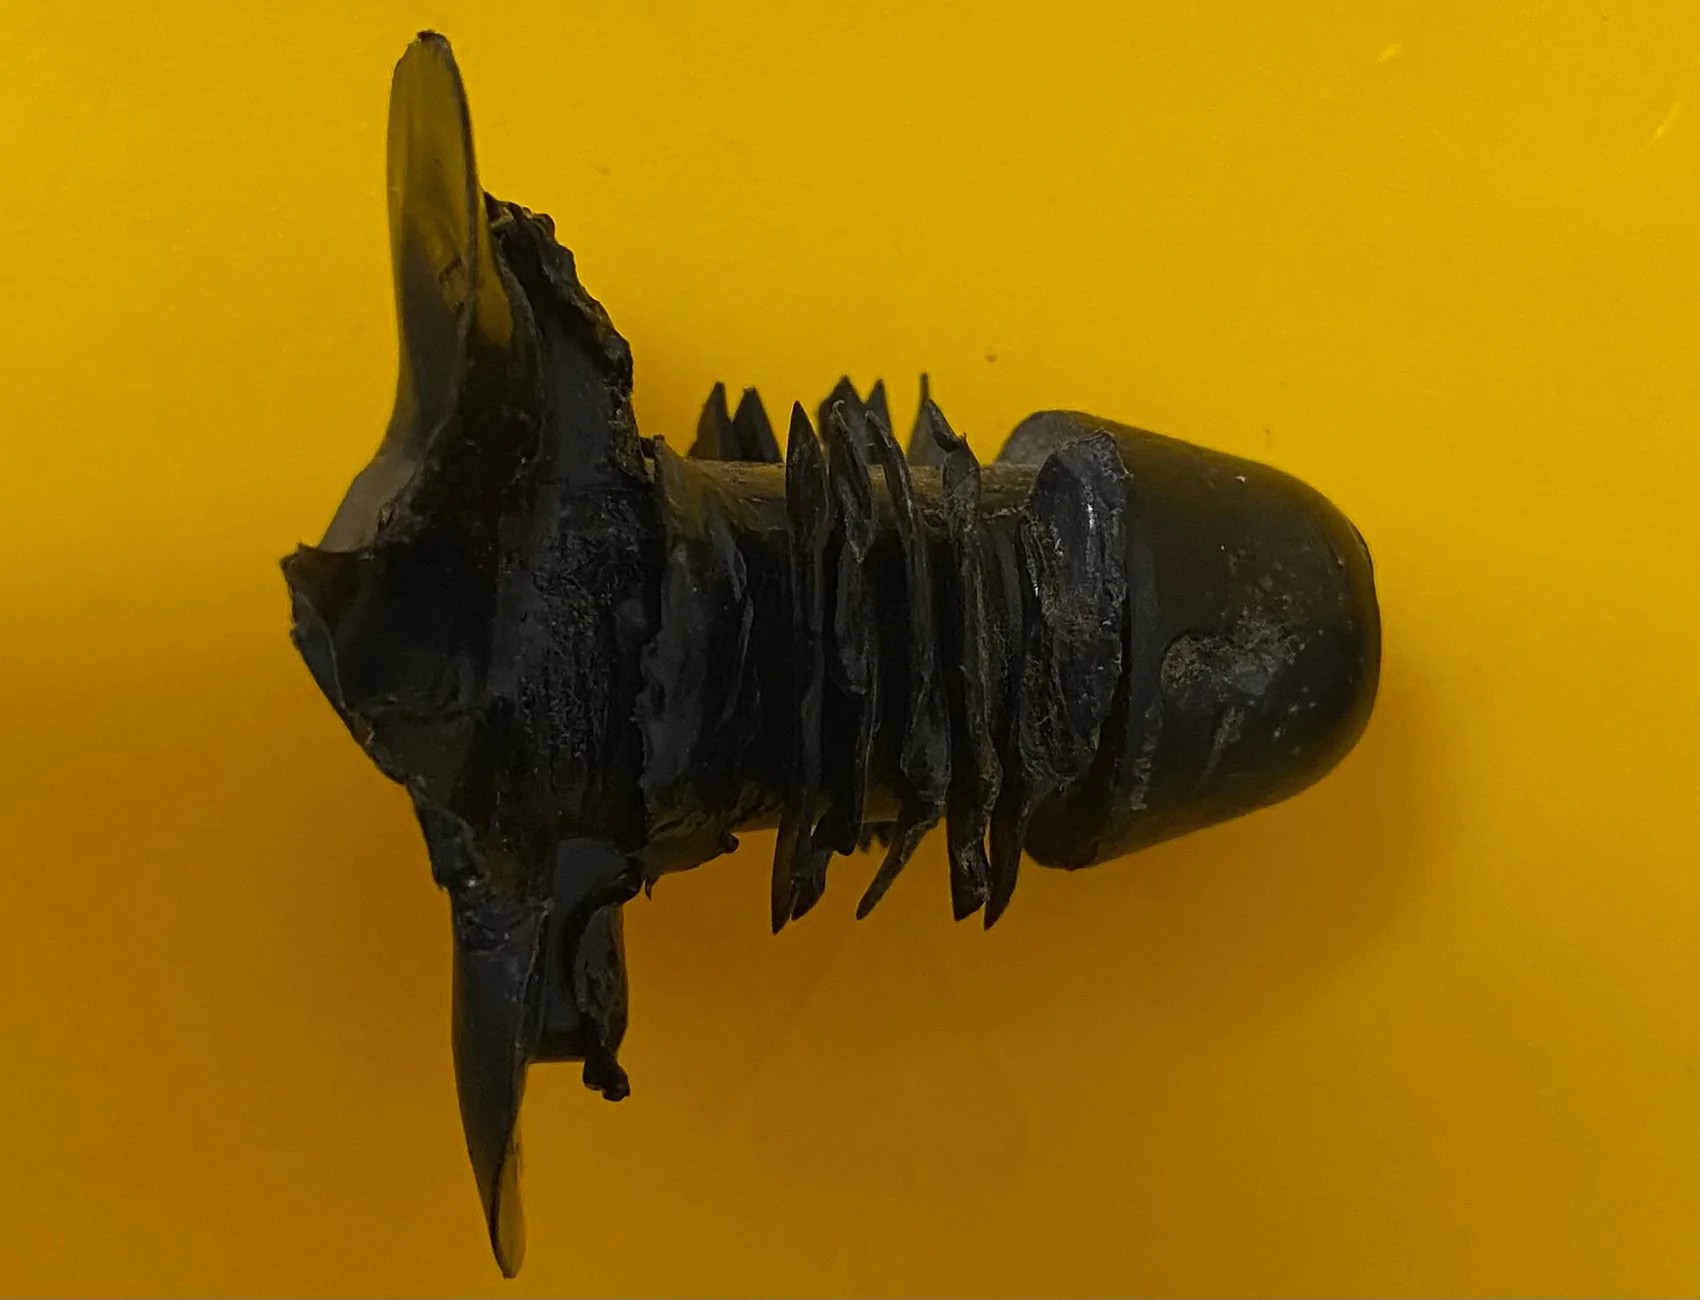
Not my best work but it was like pulling tiger’s teeth. After drilling, filing and sanding to smooth the edges, I re-inserted the plug and fed the cable through. It inserted well enough despite its appearance. I originally planned on using 2 grommets for this access point (one in bedside wall and another in the bed liner) but this solution worked out better.
I used the supplied clips to run the cable along the window frame to the roof where I drilled a 3/8” hole to feed it to the camera on my platform rack and sealed it up with black RTV Silicone outside, white RTV Silicone inside.
Running Power to Where it’s Needed
For a clean install and full functionality of the Wolfbox, hard-wired power is a must. Perform all wiring before re-installing the trim panels.
Mirror Camera Power
You can always use the supplied 12V socket but I prefer a clean, hard-wired install. Run the cable under the headliner to the driver side A Pillar, and down to the footwell.
Pull fuse #37 (requires ignition) and put it in the slot in the supplied fuse tap. Plug the fuse tap into #37 and attach the fuse tap lead to the red wire labeled ACC.
Pull fuse #26 (always on) and put it in the slot in the supplied fuse tap. Plug the fuse tap into #26 and attach the fuse tap lead to the yellow wire labeled B+.
Attach the ground terminal to bare metal.
Rear Camera Lead Power
To obtain full functionality of backup and parking assist features, hook the red lead to power from the reverse light. This will allow the mirror to function much like our backup screens, with guidance lines zooming features, etc.
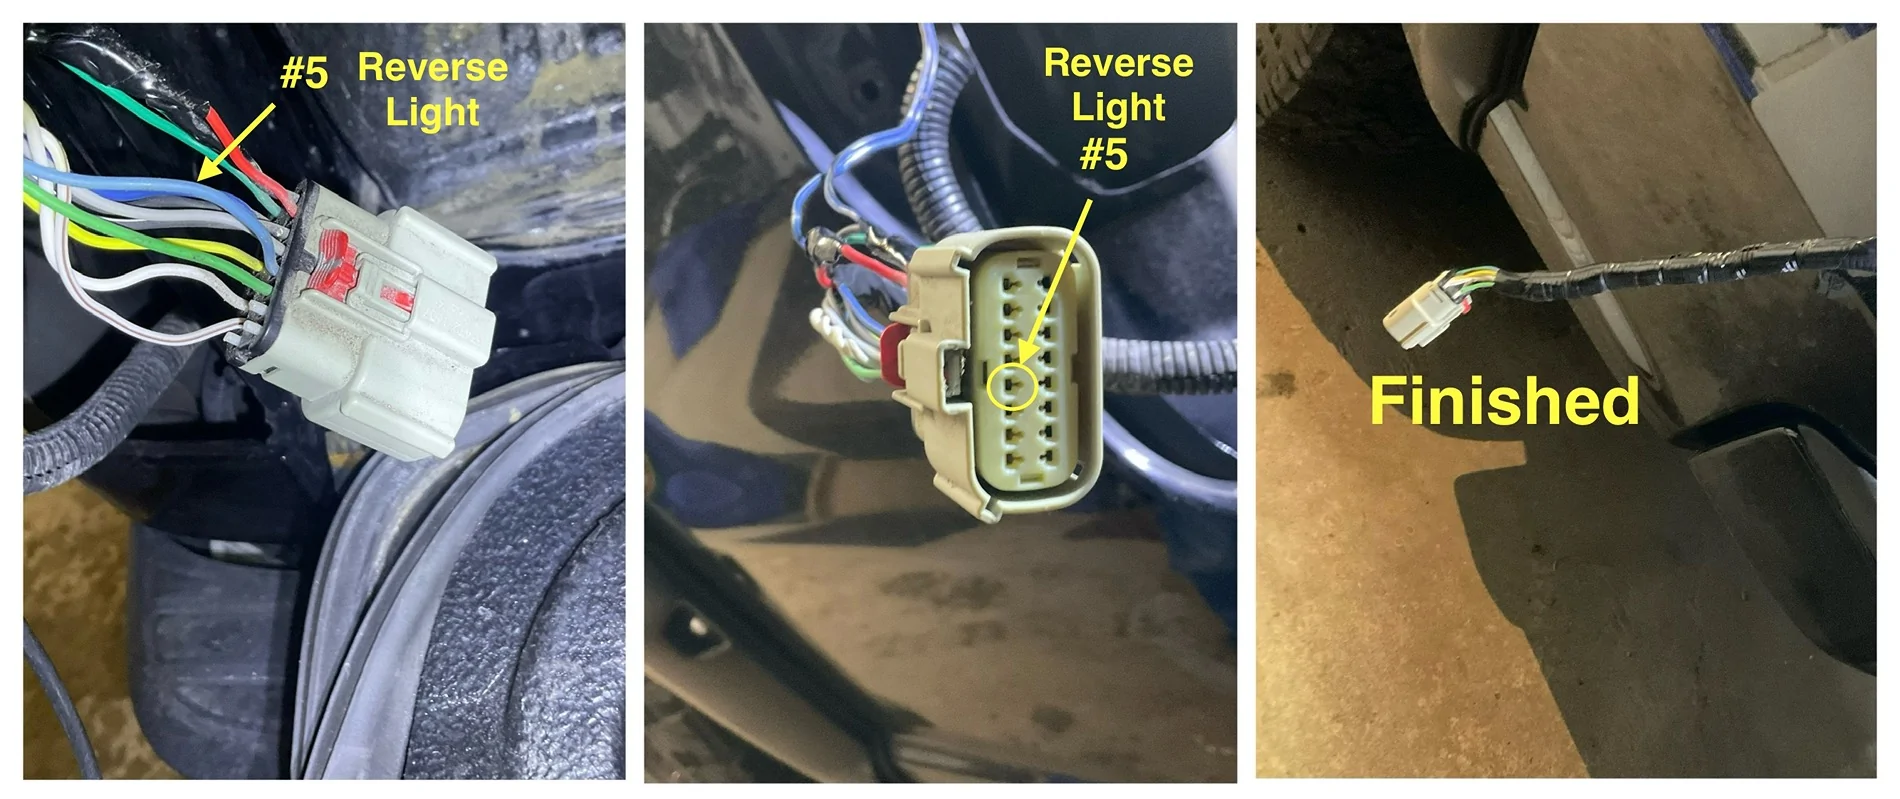
The wires from my topper’s third brake light were tapped into my driver side taillight so I was able to find the entry point to the back of the taillight assembly. It’s up in the top corner at the back of the bed - just big enough for small wires. Remove the two screws of the taillight and carefully pull it back and out at an angle. There are two push pins holding it in place - do not try to hinge it out. It takes a bit of force but it will pop out.
Remove the harness to make it easier to work on things. Pull the red tab back on the connector to unlock it. Then, press your thumb on the grooved tab and wriggle the connector off. Set the taillight aside - somewhere safe!
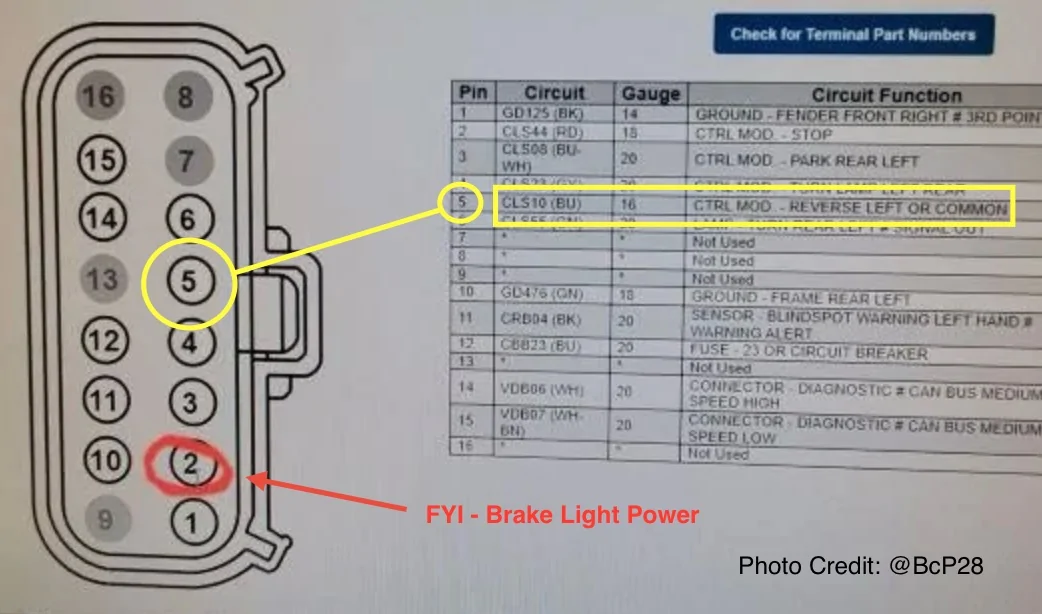
Power for the reverse light power is in pin location #5. Shoutout to @BcP28 for the photo below - thanks Bennet.
Tap into that wire and test it all before putting things back together.
Since I was covering this lead with Expandable Braided PET Cable Sleeve, I took the time to clean up and improve on the third brake light wiring the topper folks installed.
GPS Module
Run the wires under the headliner to the passenger side A Pillar and down to the dash closest to the windshield. Leave a length of loose cable under the bottom of the A Pillar cover to allow for positioning closer to the centre of the dash. I left mine tight to the A Pillar and did not fix it in place with the 3M tape on the back - if it moves around, I will.
Factory Rearview Mirror
Option 1
The only thing I could do to make this install “complete” is to mount the Wolfbox on the provided mirror stalk. It is a universal mount that glues to the windshield. This would put it below the pre-collision system cover and far too low for my liking. In addition, it would limit the driver’s field of vision.
Option 2 - Ranger Mirror Stalk
I could use my Ranger’s mirror stalk with the Wolfbox mounting plate. This requires sacrificing my mirror (or a donor mirror) to detach the stalk. The ball mount is smaller than the receiving end of the Wolfbox and some MacGyvering is required.
Option 3 - Adapter
I could purchase an aftermarket adapter that works with the supplied mount and the Ranger’s windshield mounting plate. However, the stalk sits high and cutting of the pre-collision system cover is required. There are also a few threads that mention it can come loose and vibrate or wobble.
Option 4 - Strapped to OEM Mirror
My Ranger‘s manual-dimming rearview mirror is much slimmer than the auto-dimming version and I’m happy with simply using the shorter of the supplied rubber mounting straps to hold it in place. The toolbox drawer liner I used to protect the OEM mirror during the dry-fitting works nicely and also prevents the Wolfbox from sliding around. Thin cork, felt or other suitable material could be used instead of toolbox drawer liner.
I chose Option 4 and I’m happy with the result. To finish it off, I borrowed an idea from @RealRigsRattle and fished the cables through a large 1-1/4” grommet that fits in a 1” hole drilled into the upper pre-collision system cover. Thanks for posted about it Tim.
Congratulations - You’re Done!
Fix or replace any trim clips or push pins you lost or damaged while removing them and put everything back together. Now, stand back and admire your work and your Ranger.
Thanks for reading. If you’re installing a Wolfbox mirror dashcam and have any questions, PM me. I’d be happy to help in any way I can.
Duke
Sponsored
Last edited:


 ... I want something that let's me know WHO I gotta write a song about ...