Wireless Charging Install

Mobius97

Well-Known Member
Joined
Aug 2, 2019
Threads
5
Messages
252
Reaction score
515
Location
Seattle
Vehicle(s)
Ranger Lariat Fx4-Lotus Evora-Lotus Elise-BMW X7 M
I wish we wireless carplay. Not sure why that isn't an option on Sync 3. I see Sync 4 will have it but I bet it won't be retroactive to the Sync 3.
Unfortunately it won't be because it is hardware based. I did just do a quick search on dongles tho. It looks like there are a few options by using a small USB receiver so that you can do wireless CarPlay and AA thru that. No research done on my part, so no idea on how well it works.
Sponsored


deeve

Well-Known Member
Joined
Nov 18, 2019
Threads
16
Messages
198
Reaction score
72
Location
USA
Vehicle(s)
Ford Ranger
hmmm...good thinking on the dongle. I will take a look
Thanks!
DAVE
 

A_Jake_Life

Banned
Banned
First Name
Jake
Joined
Jul 14, 2019
Threads
5
Messages
33
Reaction score
106
Location
Pennsylvania
Vehicle(s)
2019 Ford Ranger Lariat Fx4 in hot pepper red.
Vehicle Showcase
1
I had posted this a while back...it sits on the wires and is very stable..no issues. I put a couple pieces of small foam underneath as well.

2AF80D93-0C4D-45F3-9FAA-2E06F104CD85.jpeg
Where did you get that overlay for the dash/center pieces?
 

Stevie Gee

Well-Known Member
First Name
Steve
Joined
Nov 5, 2018
Threads
5
Messages
387
Reaction score
1,100
Location
Rancho Santa Margarita (Orange County),CA
Vehicle(s)
2019 Ranger Lariat SuperCrew FX4
Occupation
Retired Fed - H.U.D. (Housing and Urban Development)
Vehicle Showcase
1

@taypagano

New Member
First Name
Taylor
Joined
Feb 8, 2020
Threads
0
Messages
1
Reaction score
0
Location
Seattle
Vehicle(s)
2019 Ford Ranger XLT
Hi Gang,

When the 2019 Ranger was announced, I was appalled that Ford was not going to equip it a wireless phone charger. Since I brought my Ranger home, I have been on a quest to add this must-have feature (IMHO).

I chose the small tray directly below the climate control system (photo attached). My phone fits in there perfectly and I was already going to have that area disassembled to install my auto-stop eliminator. For those with larger phones, the tray in the dash above the radio could also be used.

I purchased a wireless charging pad and fast charge compatible USB power supply on Amazon (links are below). I don't have photos of the install procedure but here are step by step instructions:

(1) Disassemble the center console using the instructions provided in the installation doc for the auto-stop eliminator (link is below). You can detach the remaining wires and put the shifter in "S" to release the tray so you can get it out and have clear access to the bottom of it.

(2) Remove the 4 screws from the wireless charging pad (hidden under the tiny rubber feet) and remove the top plastic plate. This will expose the three charging coils. I did this to reduce the thickness of plastic the charger has to charge through. You can dispose of this piece, the screws, and the rubber feet.

(3) Plug the USB cable that came with the power supply into the micro USB port on the wireless charger.

(4) Plug one of the 12V ports (that you previously removed) back in off to the side so you can temporarily plug the power supply in to it. Plug the USB cable in so you now have temporary power to to the charging pad.

(5) With your phone in the tray where you plan to lay it (slid to one end or the other...I chose left), place the wireless charging pad under the tray and slide it around to find the sweet spot where it charges your phone. This pad is efficient enough to charge though the plastic in the bottom of the tray, the tray's rubber liner, and my phone's TPU case.

(6) Once you find the right spot, attached the charging pad in that spot. You can use any any method you are comfortable with. I used Gorilla tape because, well, I love Gorilla tape, and once you put it back together, it really can't move much anyway.

(7) Now for the power. I chose this power supply because it is fast charge compatible. I tried a wire-in step down regulator but I could not get it to work properly so I switched to this one and it did the trick. Rather that tearing it apart, I just soldered power connections onto the positive (end) and negative (side) connections on the power supply. I taped it up nice and zip-tied it behind the framework next to the fuse box.

I used a fuse tap (you can get one at your auto parts store, link below) to tap into fuse unused slot 35 with a 5A fuse on the top and 10A fuse on the bottom. Slot 35 is keyed to the ignition so it shuts off with the truck. The power supply has it's own fuse so, if you want, you could skip the fused tap and go directly to the load side if the fuse slot. It's your call.

Insert the tap into the fuse slot with the outgoing wire pointing to the right because the right side of the fuse is the load side. I attached the negative lead from power supply to a screw connector and attached it behind the screw that goes into clean metal in the framework right below the the steering wheel. You just have to ground it to metal somewhere. Plug the USB cable into one of the USB ports on the power supply.

(8) Zip tie it all to make it pretty and close it up.

I have done quite a bit of testing and, while the charger does generate some heat (as you would expect), it does not seem to be extreme or unsafe . I'll do more testing over the next few days.

Feel free to drop questions here if you have any and I'll try to answer them.

20190424_233657.jpg


Wireless Charging Pad:

Fast Charge Compatible Power Supply:

Fuse Tap:
https://www.autozone.com/electrical...ories/bussmann-fuse-and-accessories/32414_0_0

Auto-Stop Eliminator Install Instructions:
https://www.autostopeliminator.com/...019_ford_ranger_installation_instructions.pdf
Would Really love some photos of the wiring!


PAUL J CAIN

Well-Known Member
First Name
Paul
Joined
Feb 23, 2020
Threads
3
Messages
66
Reaction score
108
Location
GA
Vehicle(s)
2019 Ranger XLT 4x2
I would think wireless carplay or AA would work through the trucks wifi
 

DMK45

Well-Known Member
First Name
Dave
Joined
Dec 27, 2019
Threads
0
Messages
109
Reaction score
58
Location
ELIDA OHIO
Vehicle(s)
19 Ford Ranger XLT FX4 crew cab
Hi Gang,

When the 2019 Ranger was announced, I was appalled that Ford was not going to equip it a wireless phone charger. Since I brought my Ranger home, I have been on a quest to add this must-have feature (IMHO).

I chose the small tray directly below the climate control system (photo attached). My phone fits in there perfectly and I was already going to have that area disassembled to install my auto-stop eliminator. For those with larger phones, the tray in the dash above the radio could also be used.

I purchased a wireless charging pad and fast charge compatible USB power supply on Amazon (links are below). I don't have photos of the install procedure but here are step by step instructions:

(1) Disassemble the center console using the instructions provided in the installation doc for the auto-stop eliminator (link is below). You can detach the remaining wires and put the shifter in "S" to release the tray so you can get it out and have clear access to the bottom of it.

(2) Remove the 4 screws from the wireless charging pad (hidden under the tiny rubber feet) and remove the top plastic plate. This will expose the three charging coils. I did this to reduce the thickness of plastic the charger has to charge through. You can dispose of this piece, the screws, and the rubber feet.

(3) Plug the USB cable that came with the power supply into the micro USB port on the wireless charger.

(4) Plug one of the 12V ports (that you previously removed) back in off to the side so you can temporarily plug the power supply in to it. Plug the USB cable in so you now have temporary power to to the charging pad.

(5) With your phone in the tray where you plan to lay it (slid to one end or the other...I chose left), place the wireless charging pad under the tray and slide it around to find the sweet spot where it charges your phone. This pad is efficient enough to charge though the plastic in the bottom of the tray, the tray's rubber liner, and my phone's TPU case.

(6) Once you find the right spot, attached the charging pad in that spot. You can use any any method you are comfortable with. I used Gorilla tape because, well, I love Gorilla tape, and once you put it back together, it really can't move much anyway.

(7) Now for the power. I chose this power supply because it is fast charge compatible. I tried a wire-in step down regulator but I could not get it to work properly so I switched to this one and it did the trick. Rather that tearing it apart, I just soldered power connections onto the positive (end) and negative (side) connections on the power supply. I taped it up nice and zip-tied it behind the framework next to the fuse box.

I used a fuse tap (you can get one at your auto parts store, link below) to tap into fuse unused slot 35 with a 5A fuse on the top and 10A fuse on the bottom. Slot 35 is keyed to the ignition so it shuts off with the truck. The power supply has it's own fuse so, if you want, you could skip the fused tap and go directly to the load side if the fuse slot. It's your call.

Insert the tap into the fuse slot with the outgoing wire pointing to the right because the right side of the fuse is the load side. I attached the negative lead from power supply to a screw connector and attached it behind the screw that goes into clean metal in the framework right below the the steering wheel. You just have to ground it to metal somewhere. Plug the USB cable into one of the USB ports on the power supply.

(8) Zip tie it all to make it pretty and close it up.

I have done quite a bit of testing and, while the charger does generate some heat (as you would expect), it does not seem to be extreme or unsafe . I'll do more testing over the next few days.

Feel free to drop questions here if you have any and I'll try to answer them.

20190424_233657.jpg


Wireless Charging Pad:
https://www.amazon.com/gp/product/B07D2CWBS1/ref=ppx_yo_dt_b_asin_title_o03_s00?ie=UTF8&psc=1

Fast Charge Compatible Power Supply:
https://www.amazon.com/gp/product/B075KJ57Q1/ref=ppx_yo_dt_b_asin_title_o00_s00?ie=UTF8&psc=1

Fuse Tap:
https://www.autozone.com/electrical...ories/bussmann-fuse-and-accessories/32414_0_0

Auto-Stop Eliminator Install Instructions:
https://www.autostopeliminator.com/...019_ford_ranger_installation_instructions.pdf
That's alot of work for this feature.. altho I admit it would be nice to have on our high tech Rangers!
 
OP
OP
RangerCat

RangerCat

Well-Known Member
First Name
Brian
Joined
Jan 18, 2019
Threads
3
Messages
185
Reaction score
164
Location
Kansas
Vehicle(s)
2019 Ranger Lariat
That's alot of work for this feature.. altho I admit it would be nice to have on our high tech Rangers!
It actually took longer to write it up than it did to complete the install. :wink: 
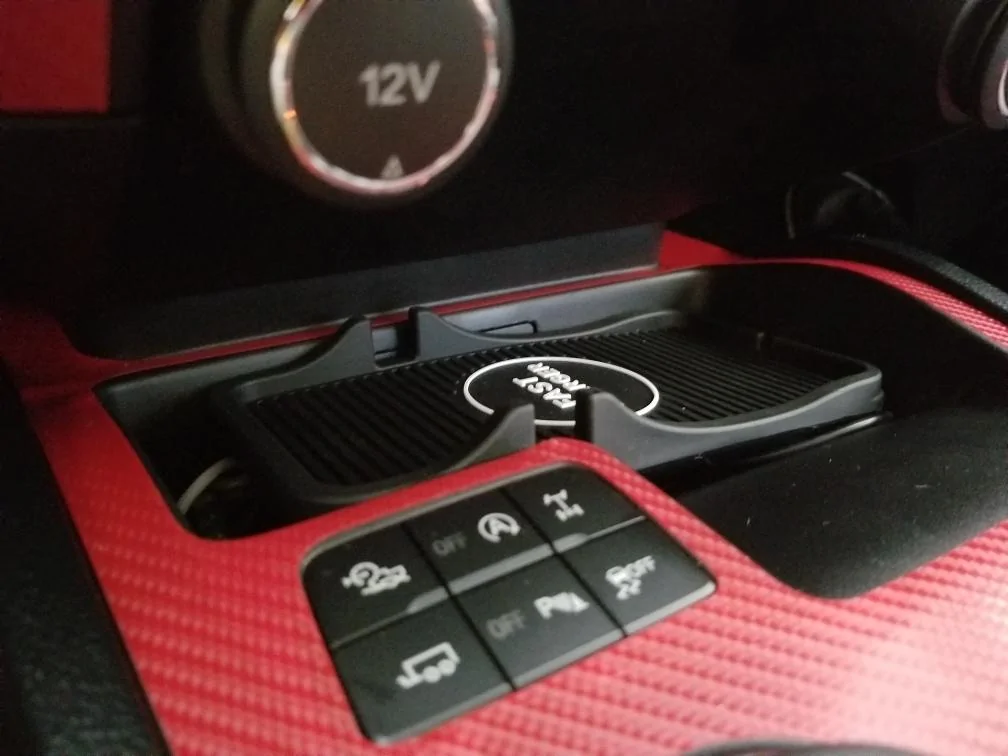
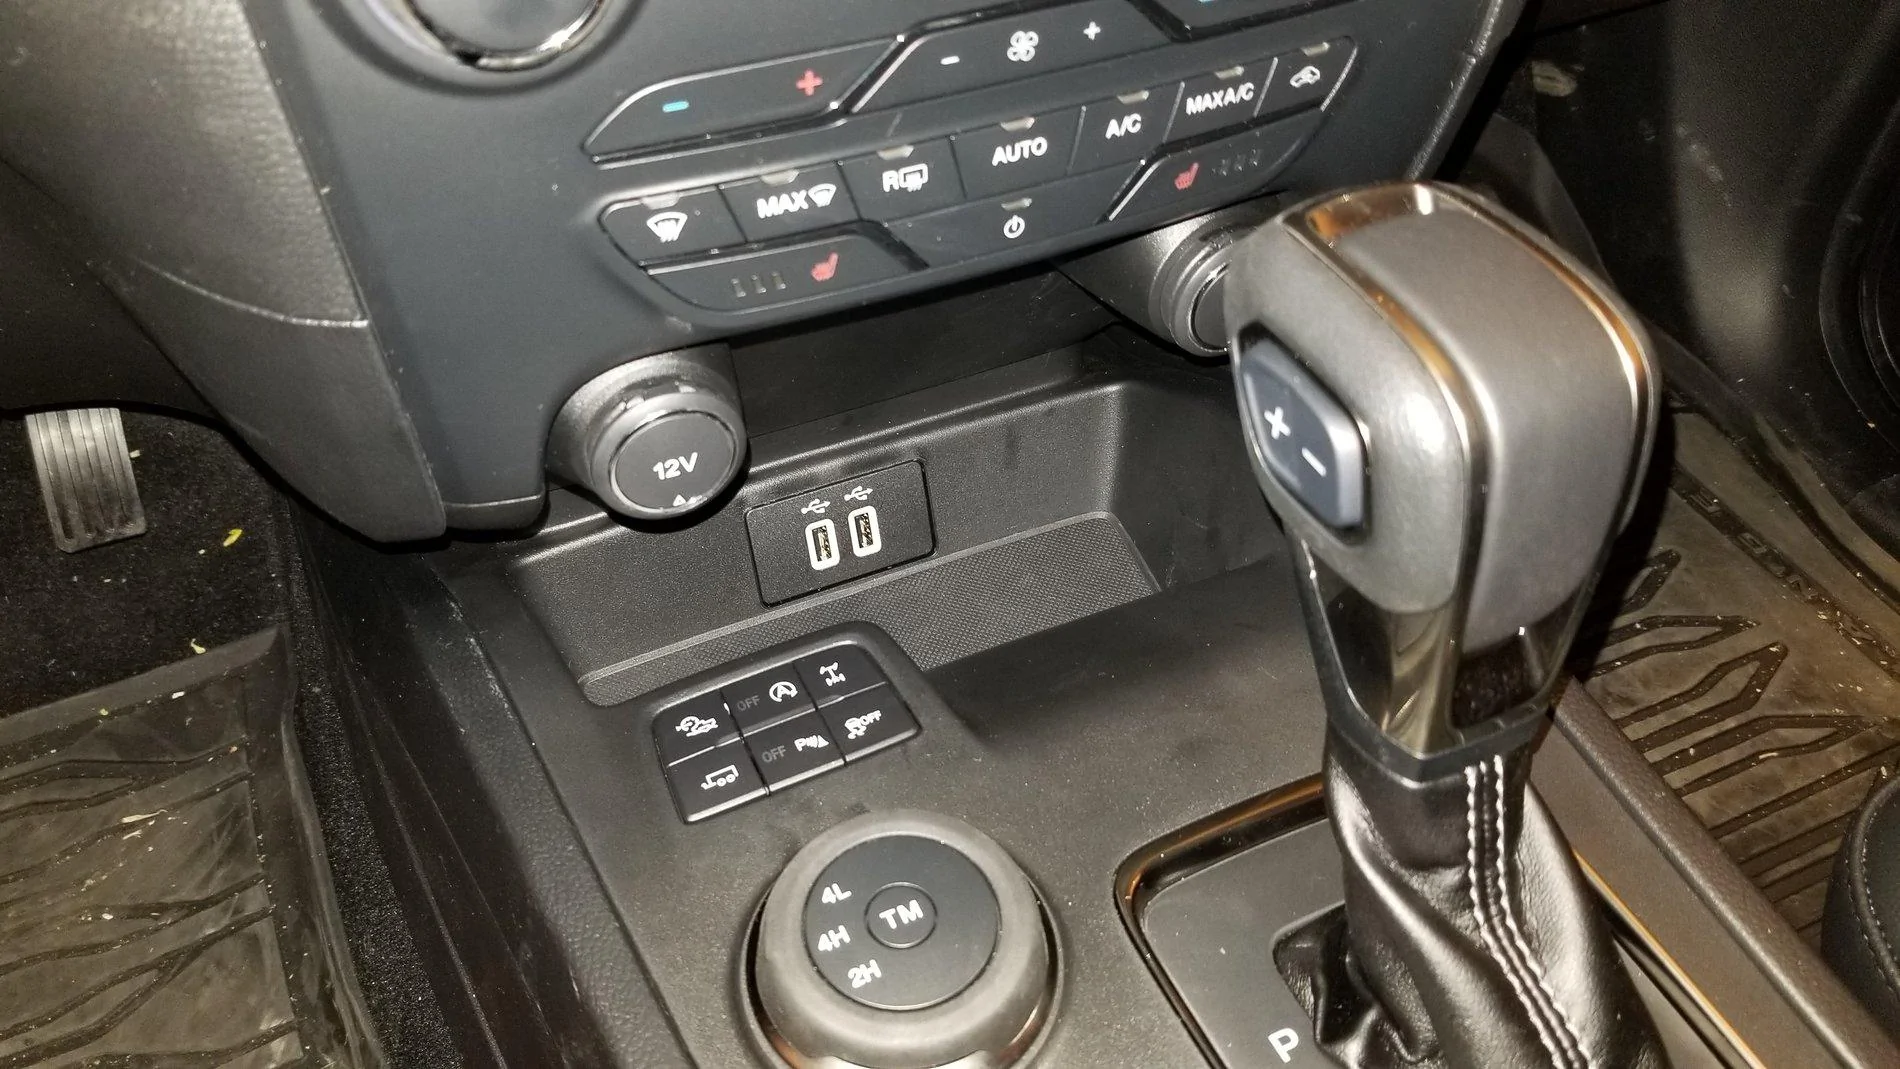
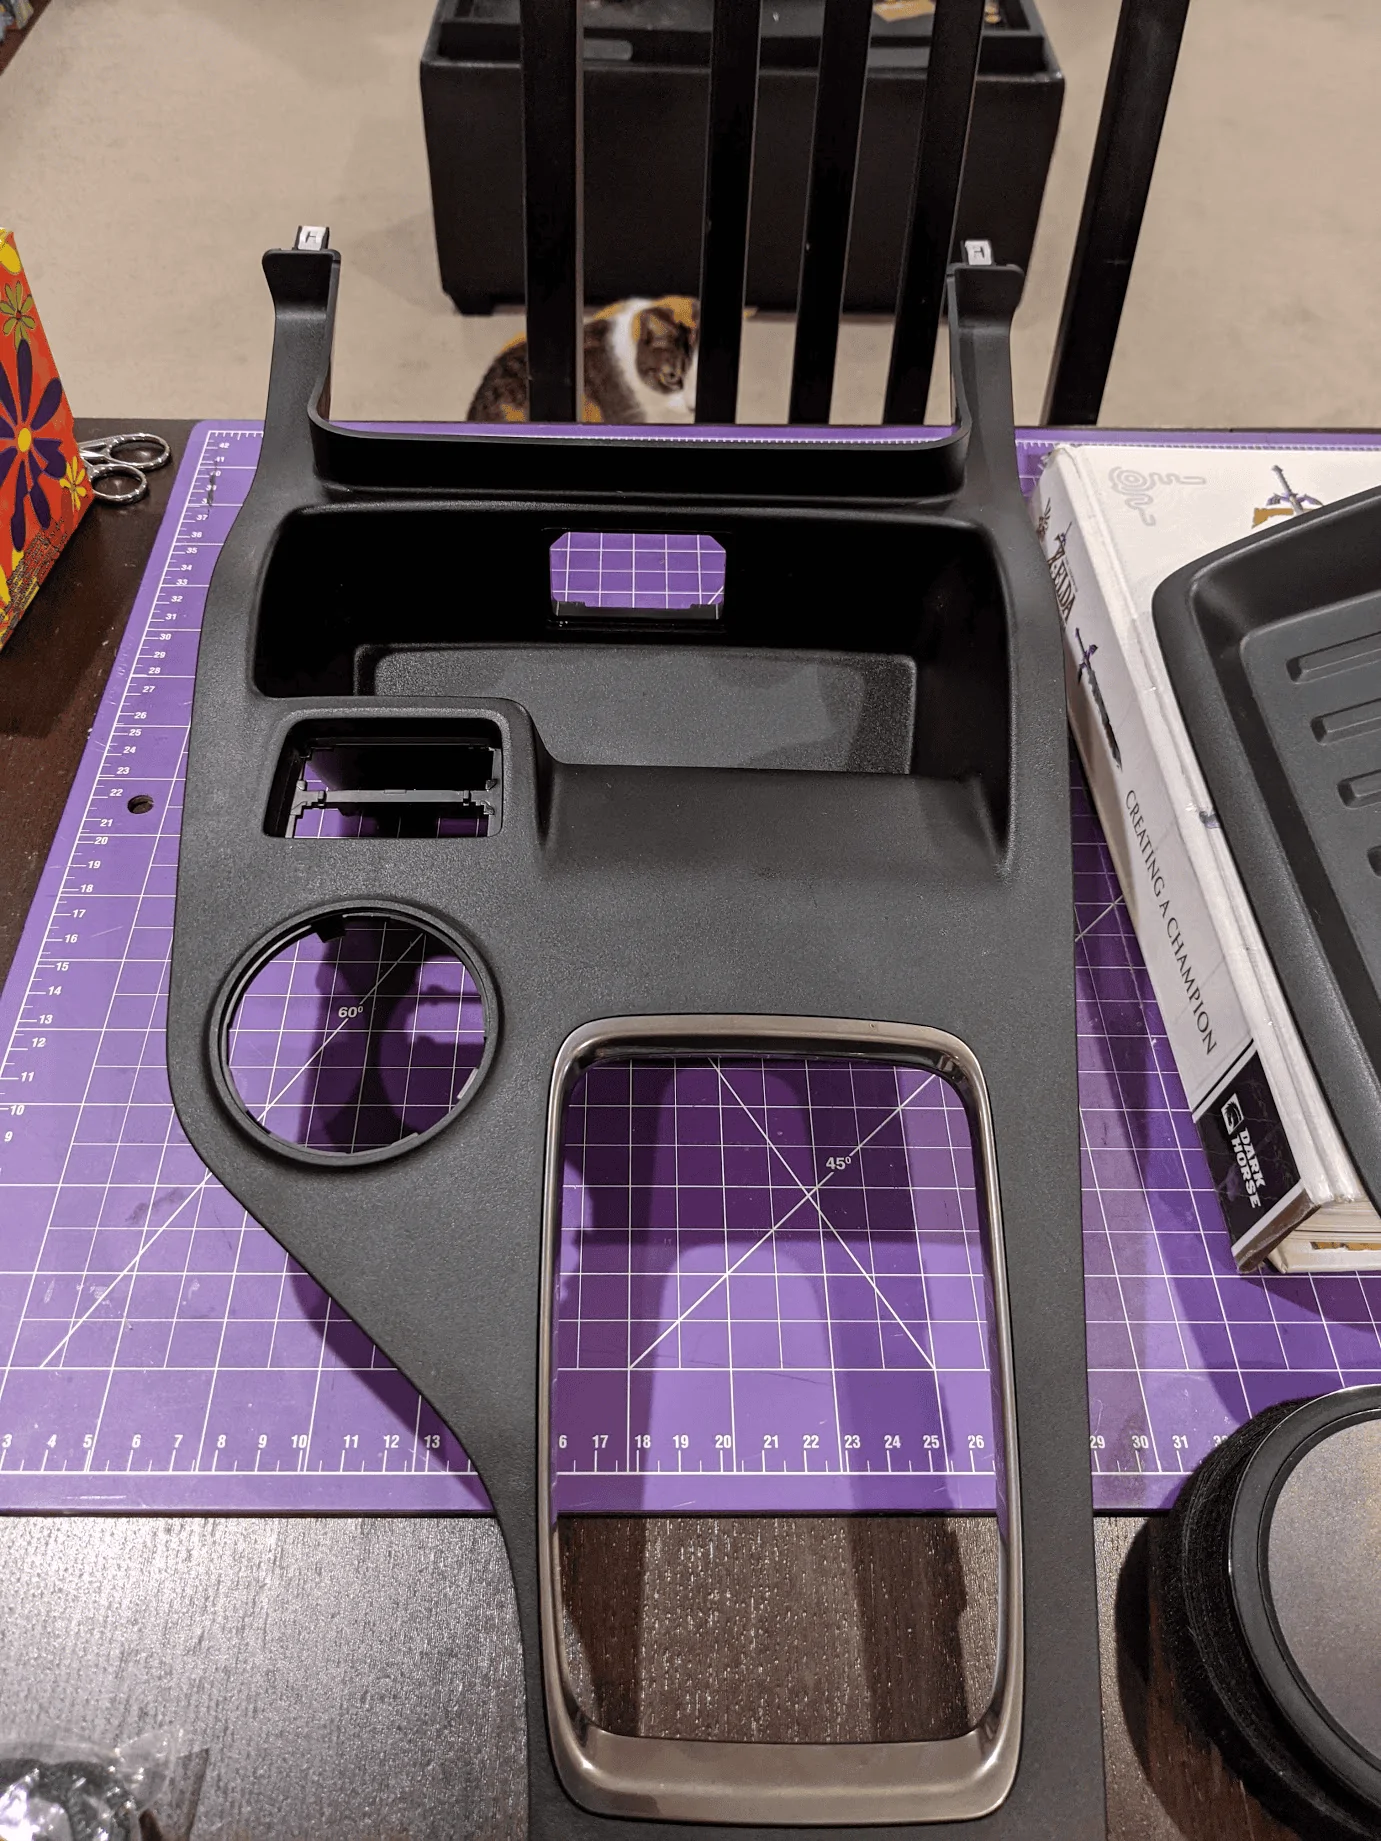
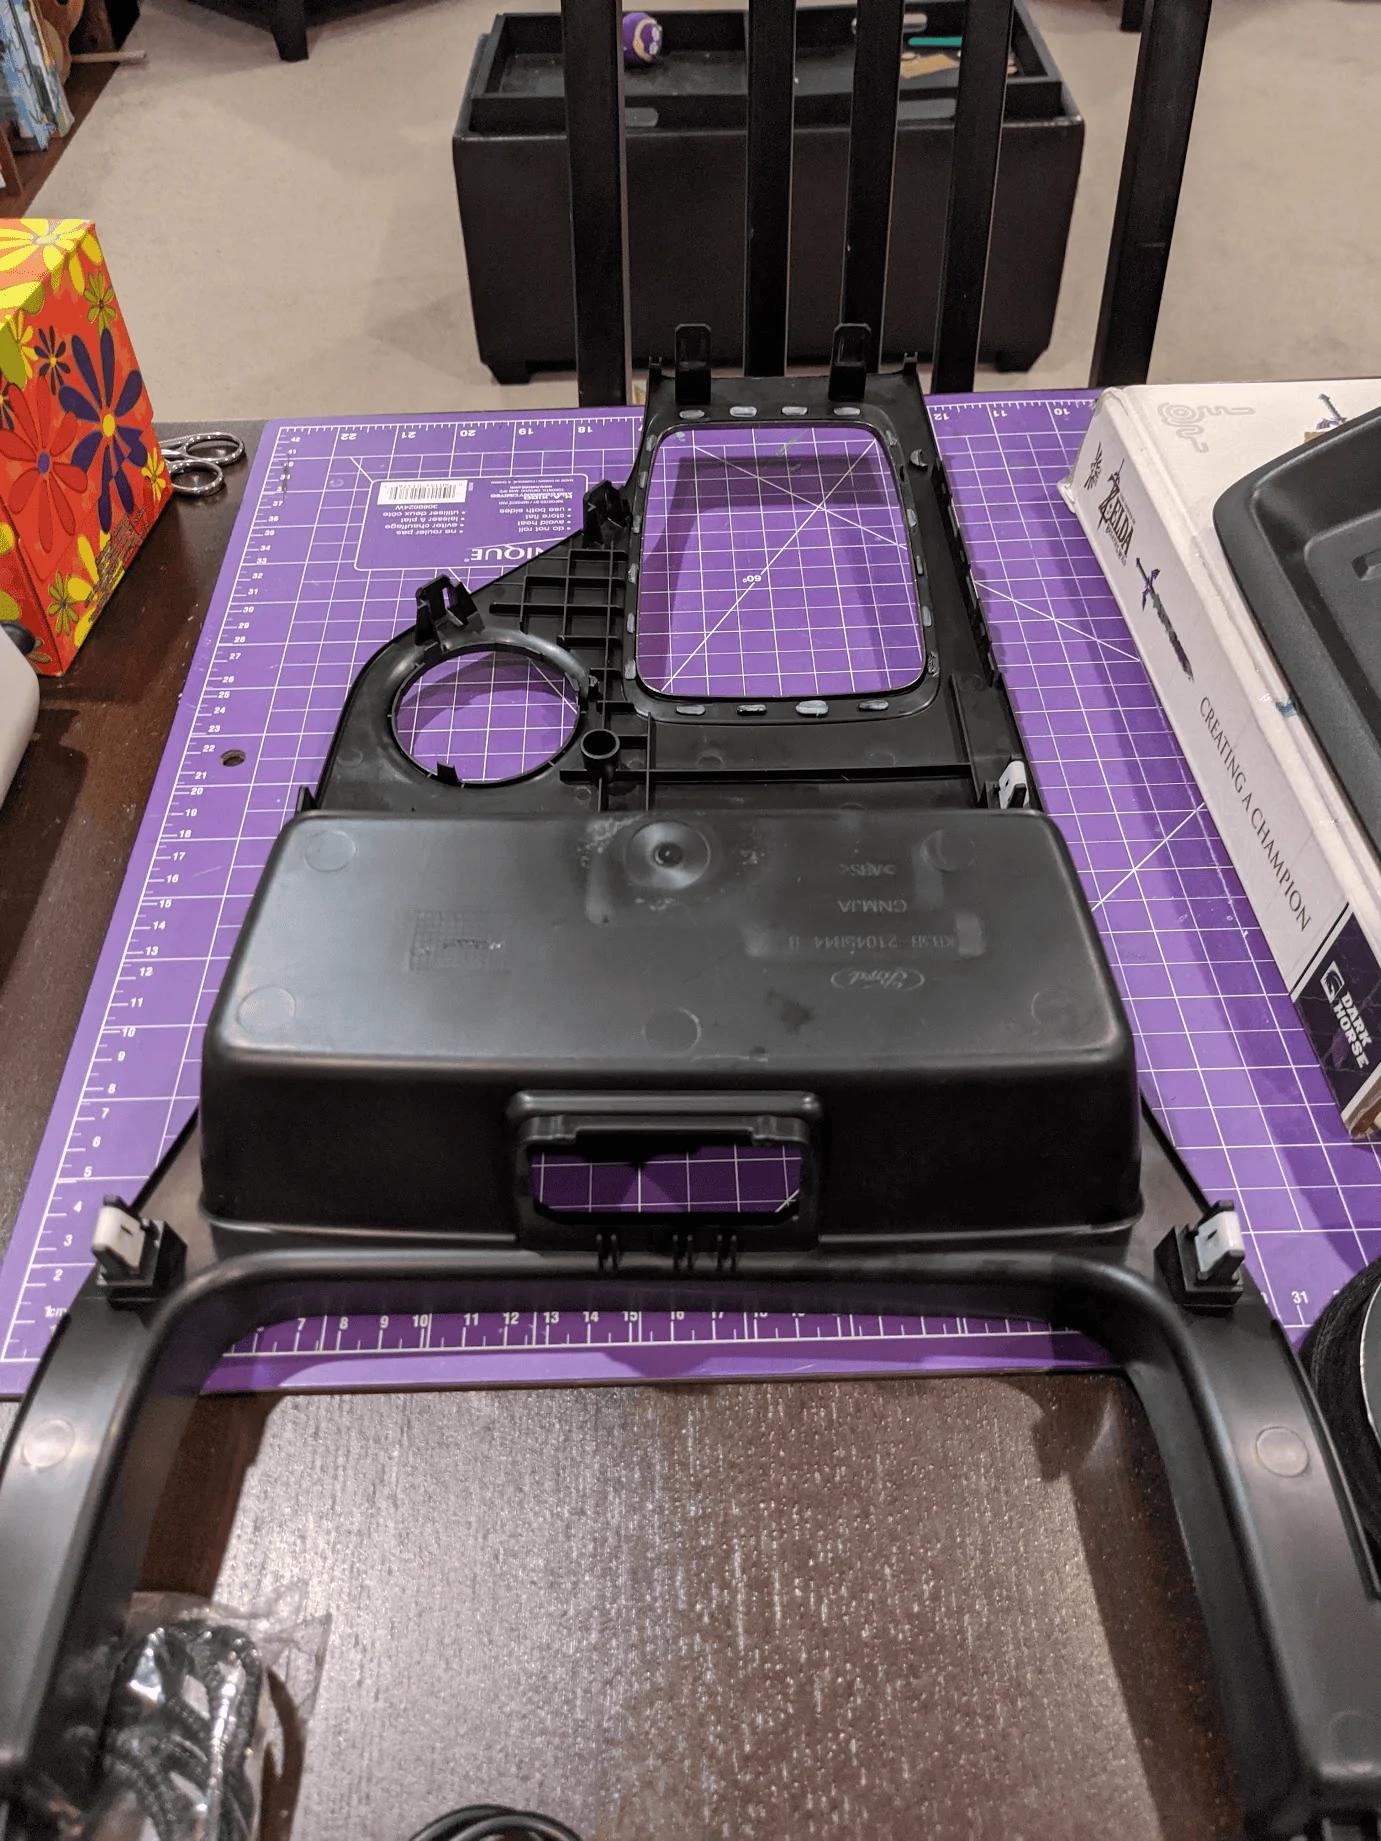
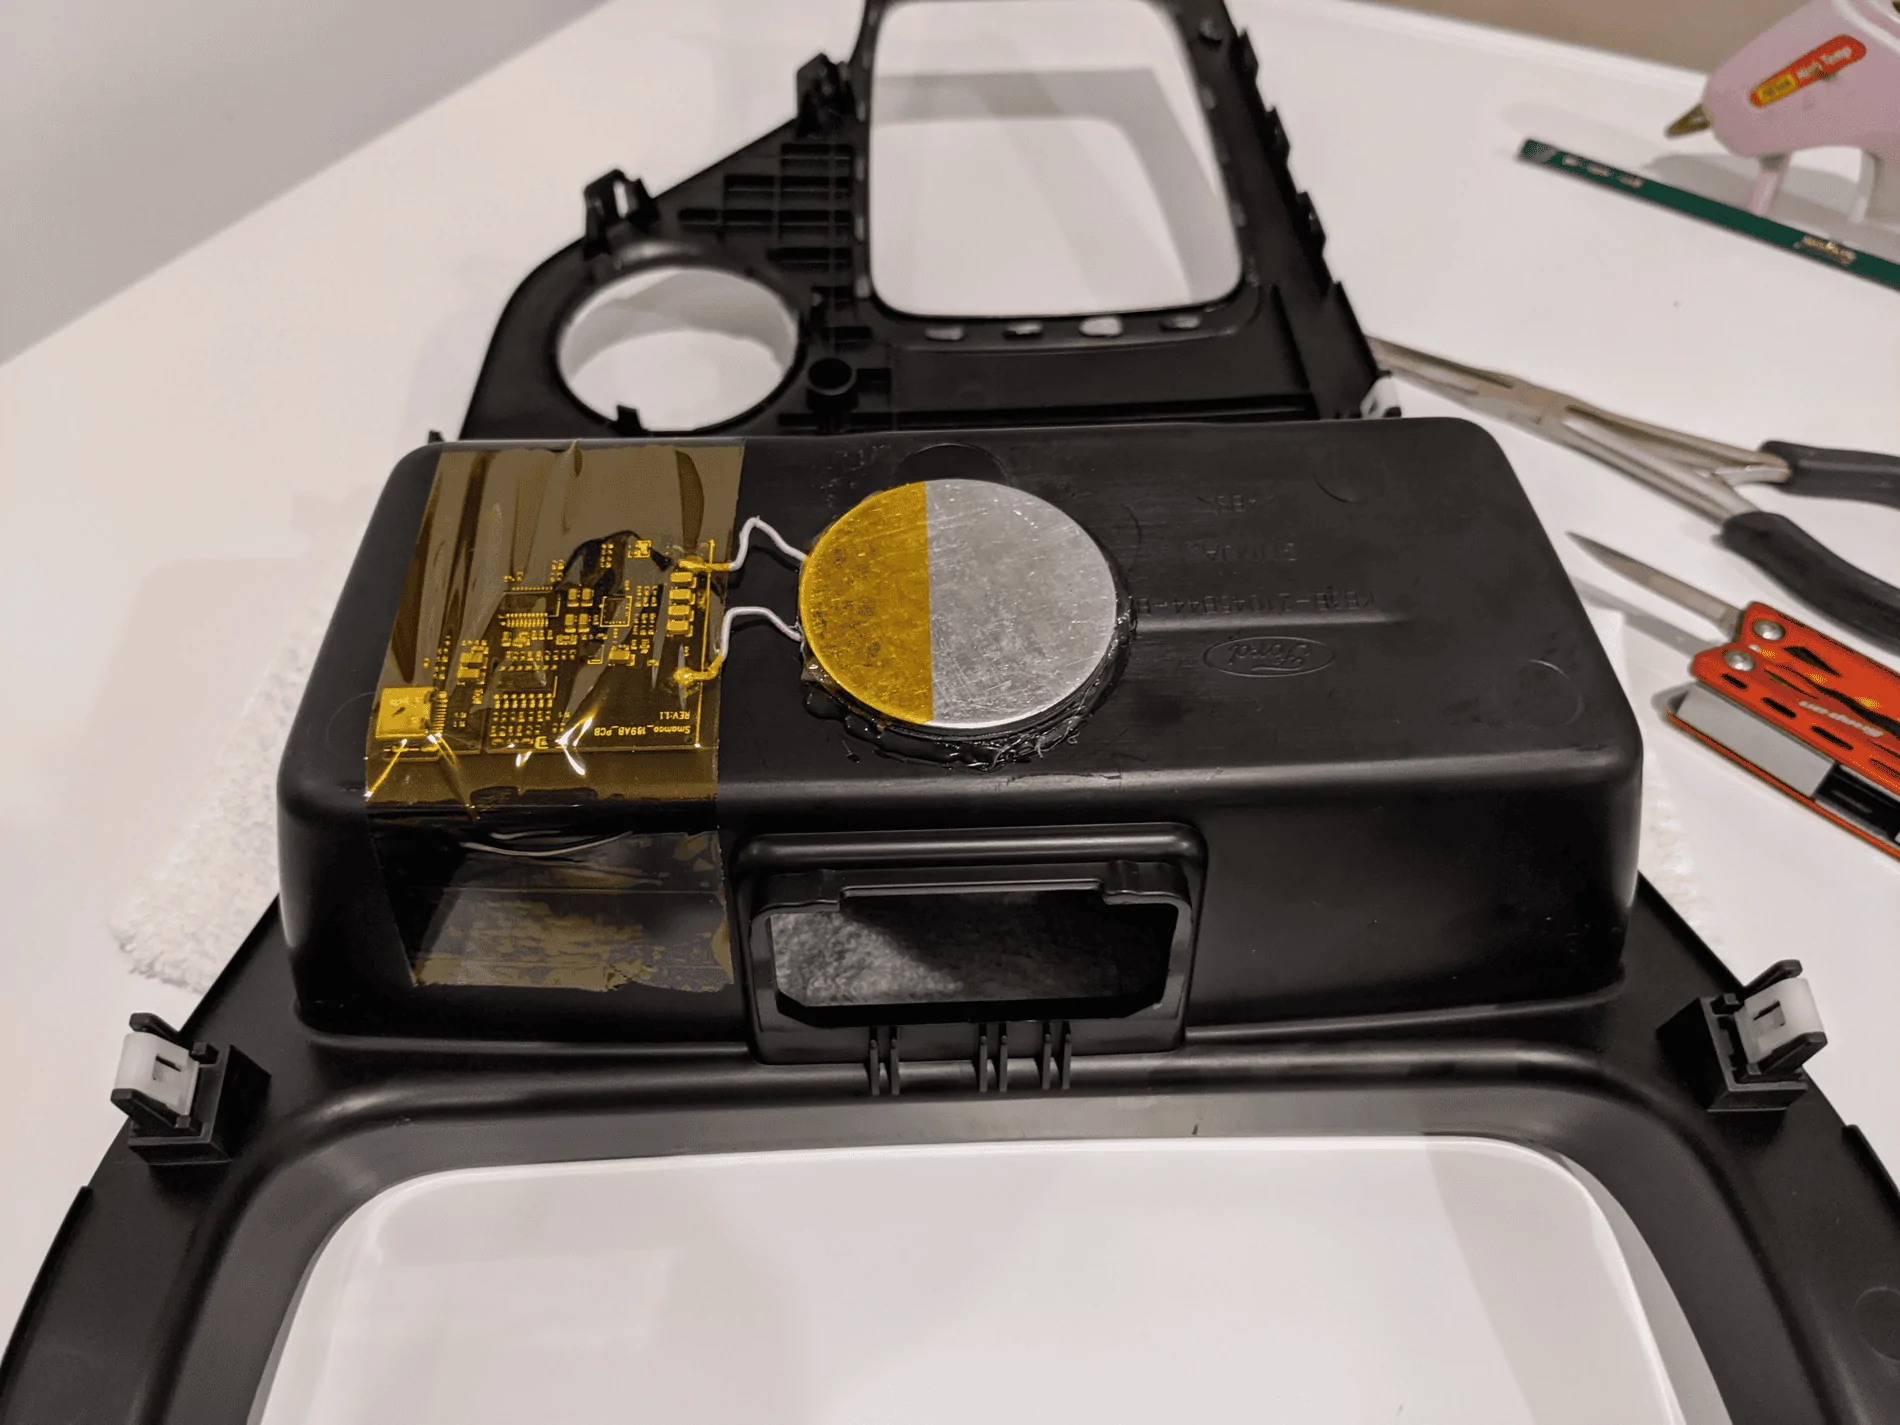
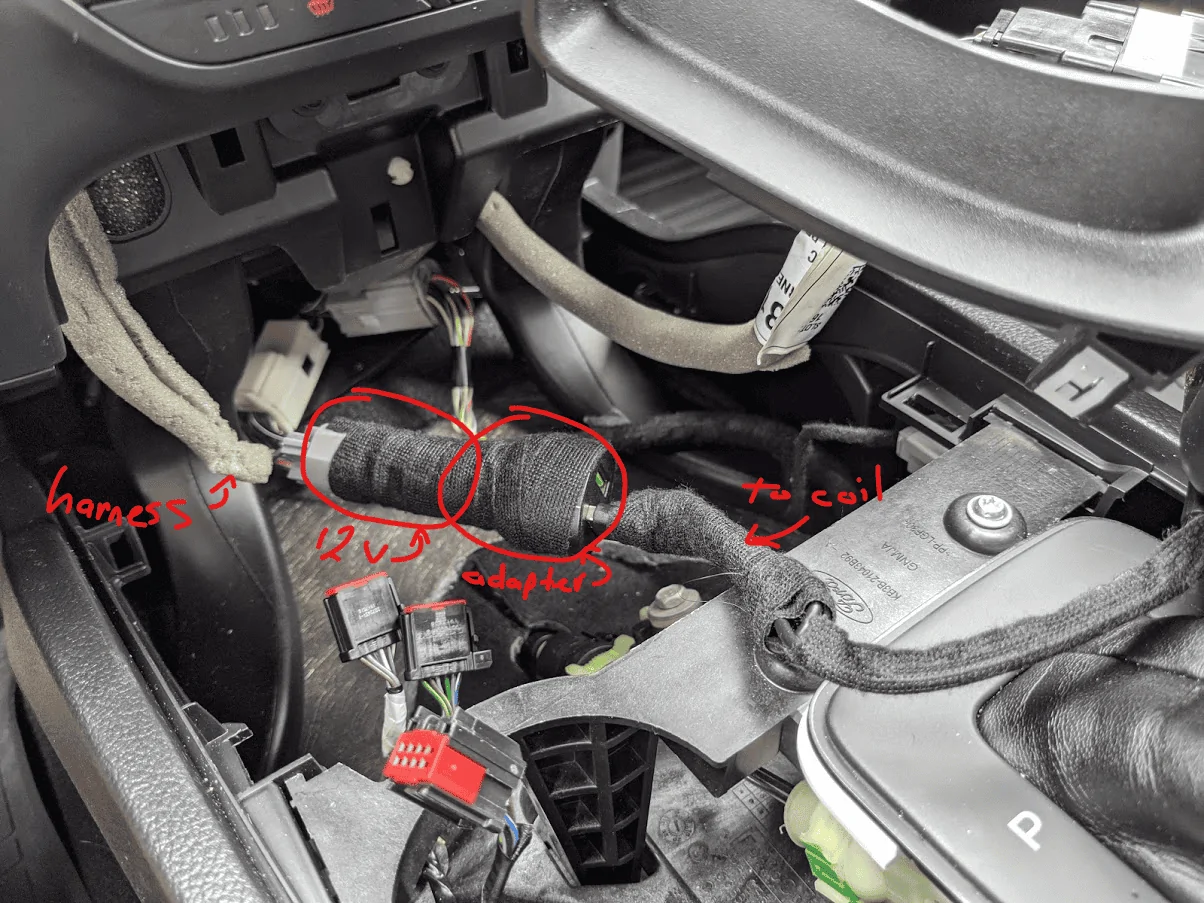
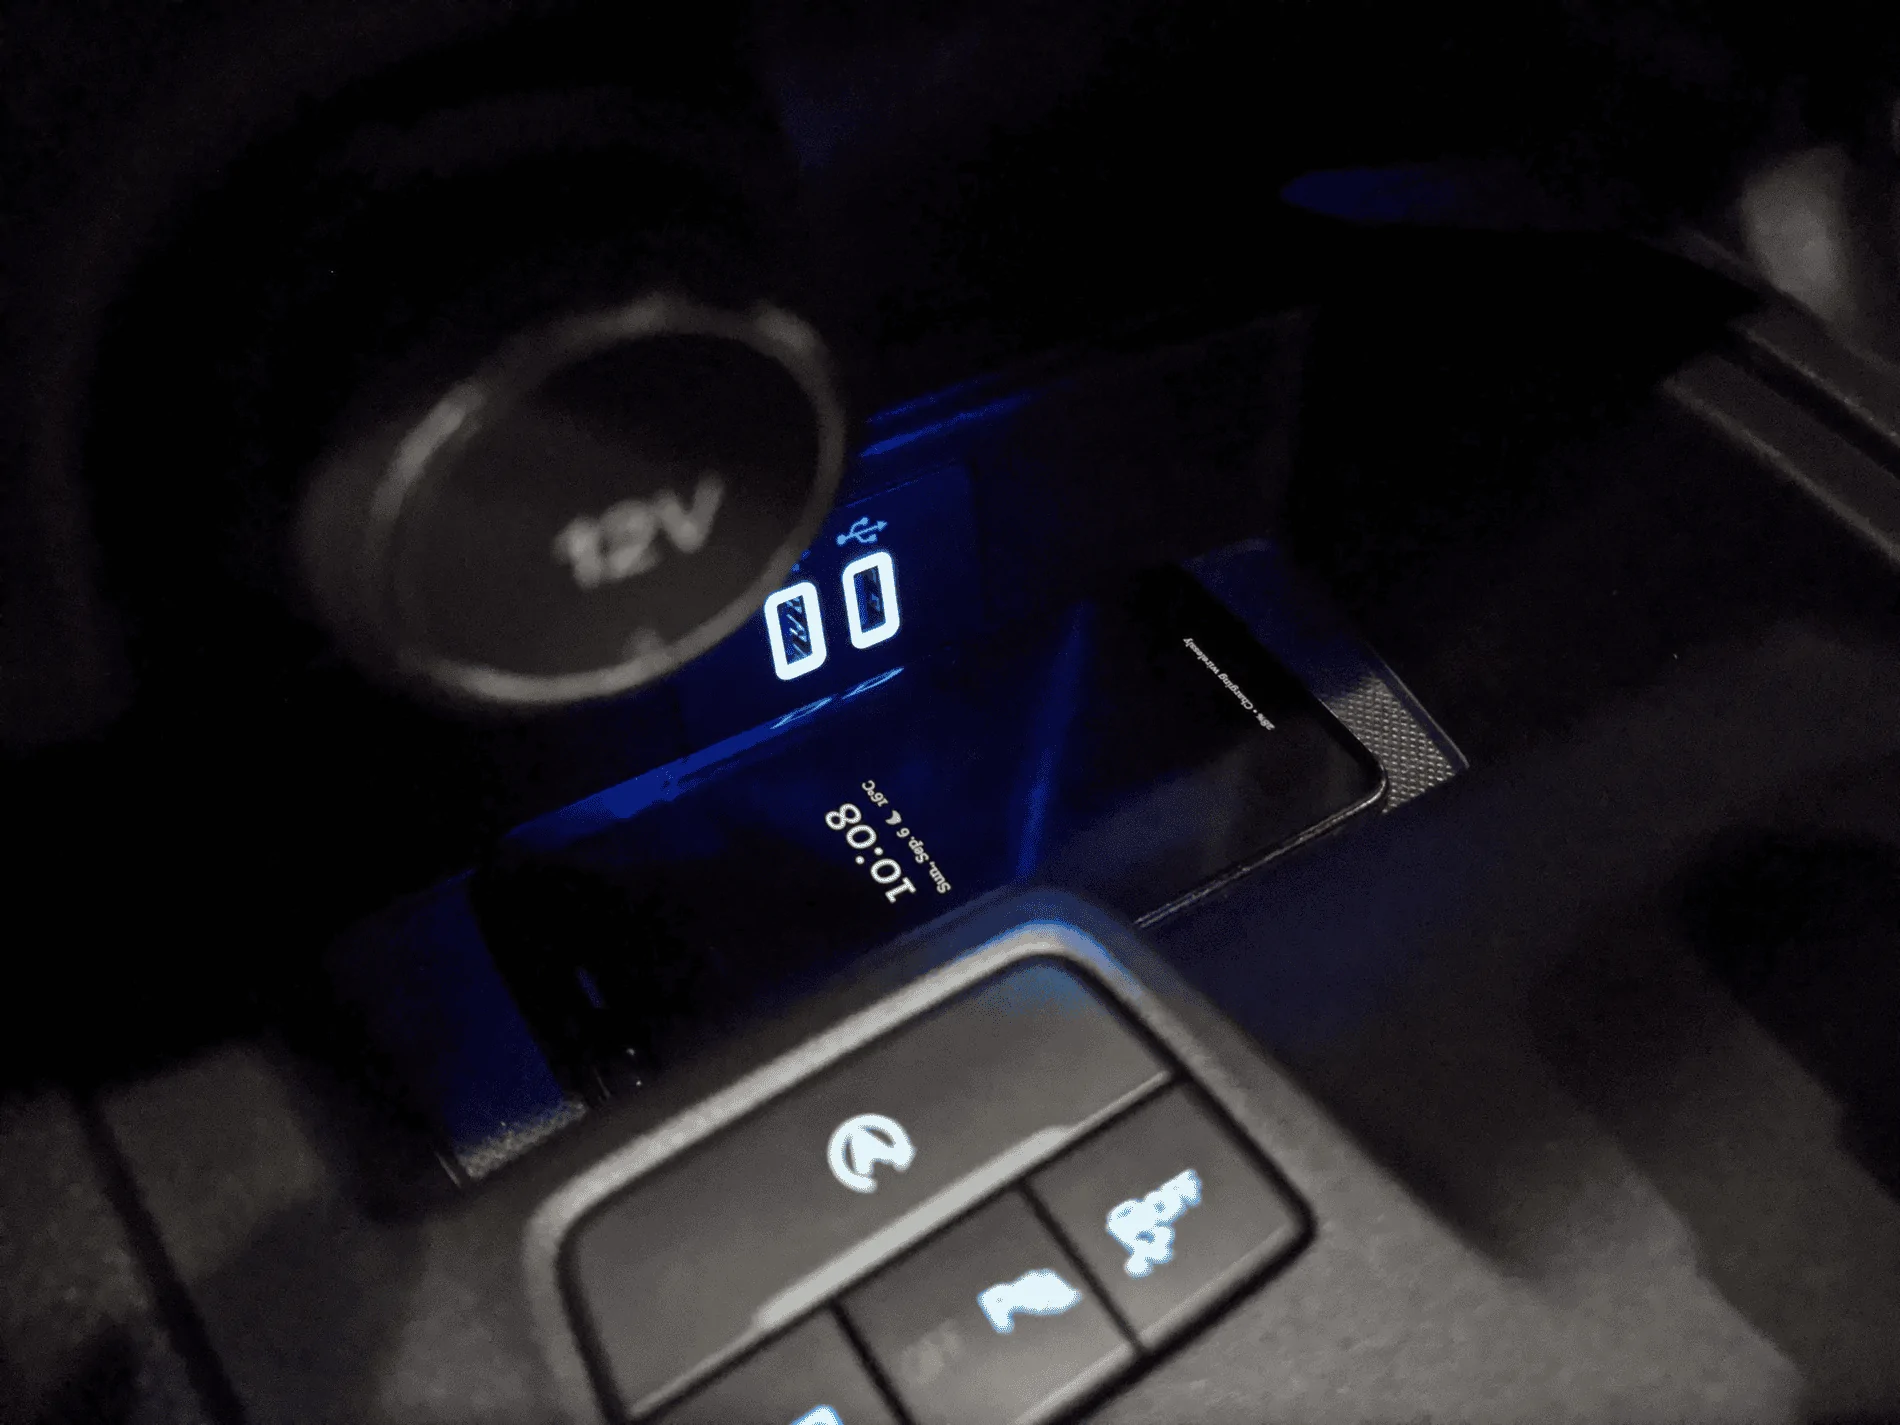
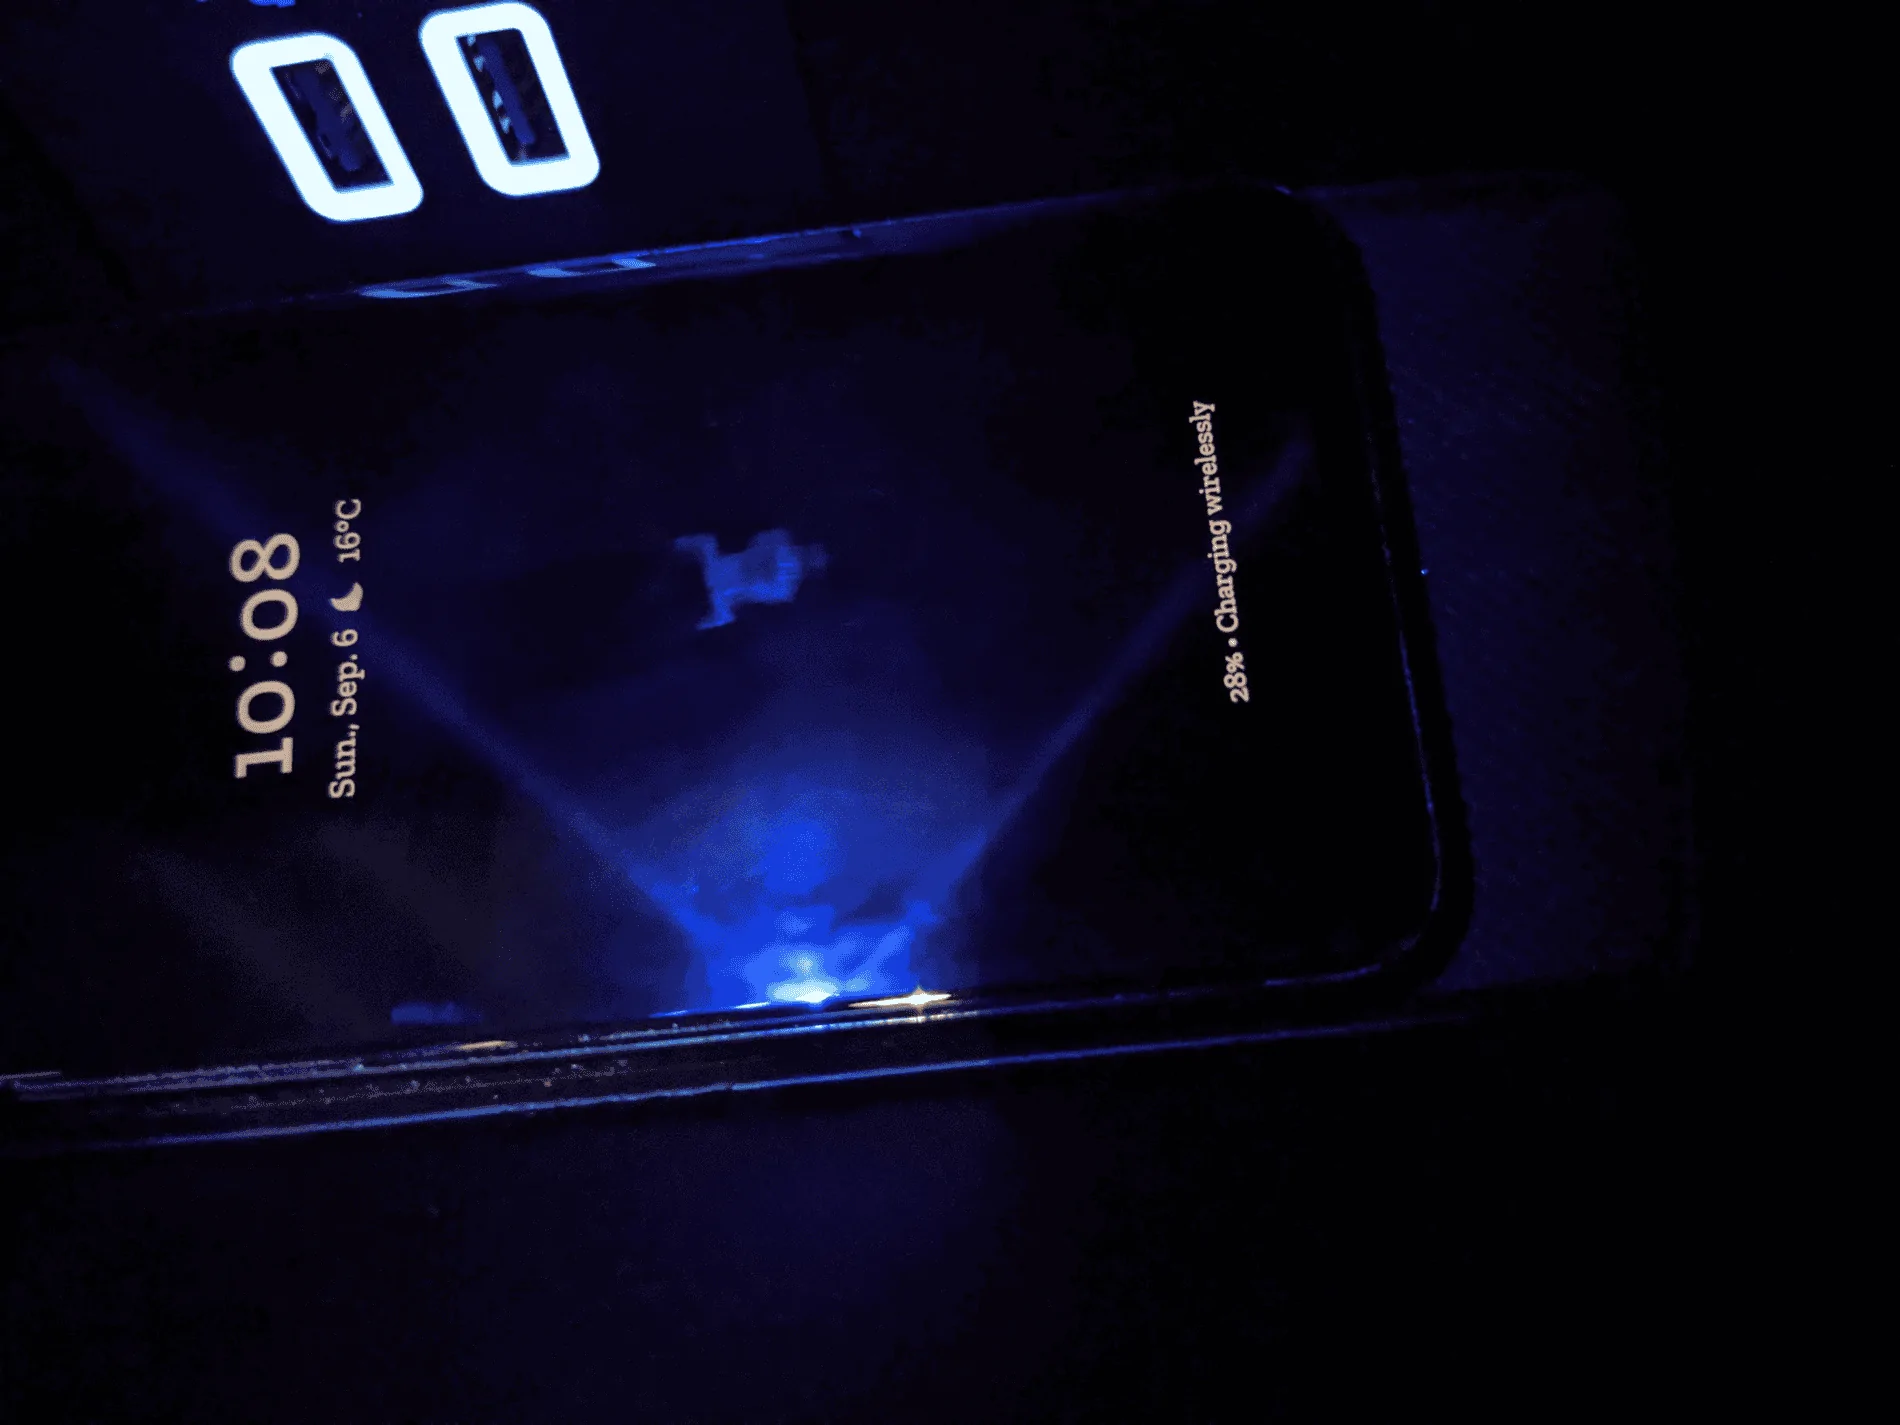
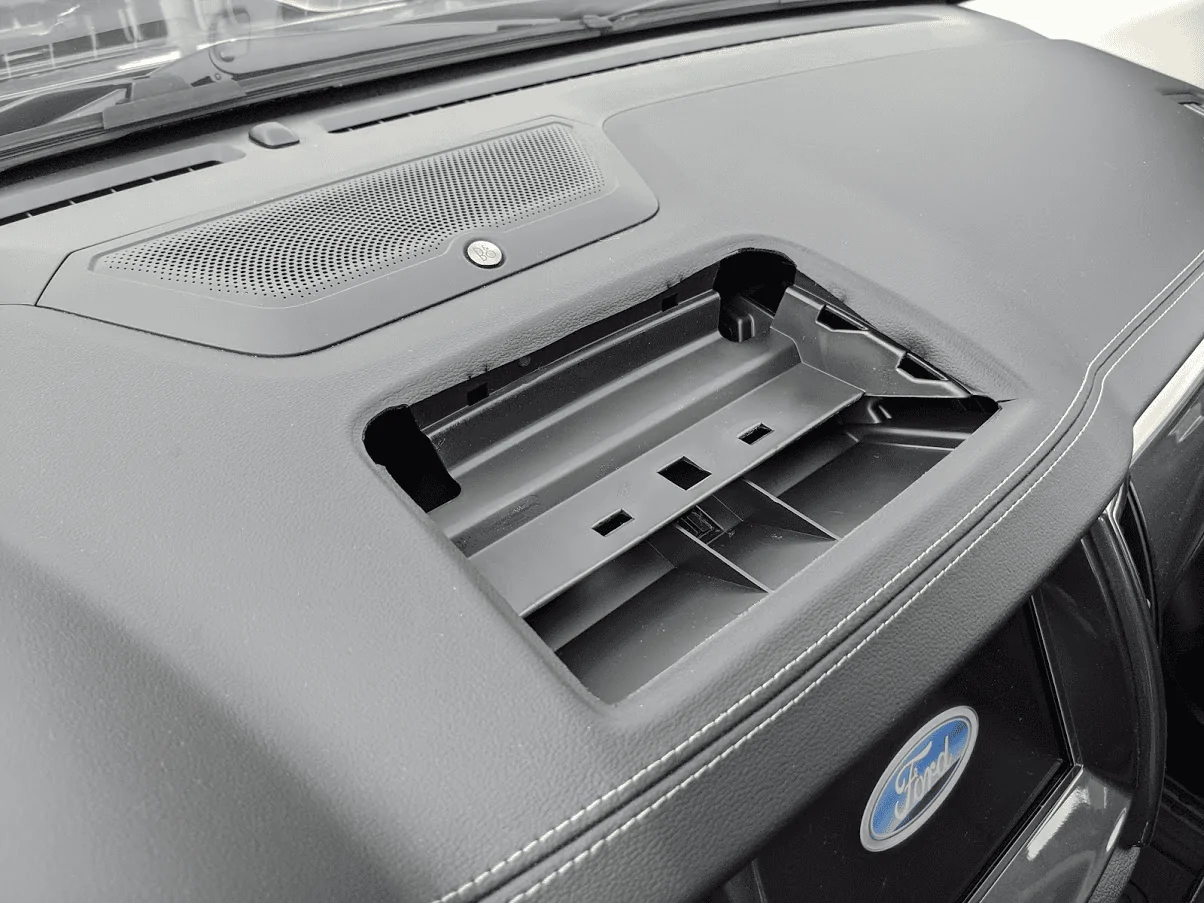
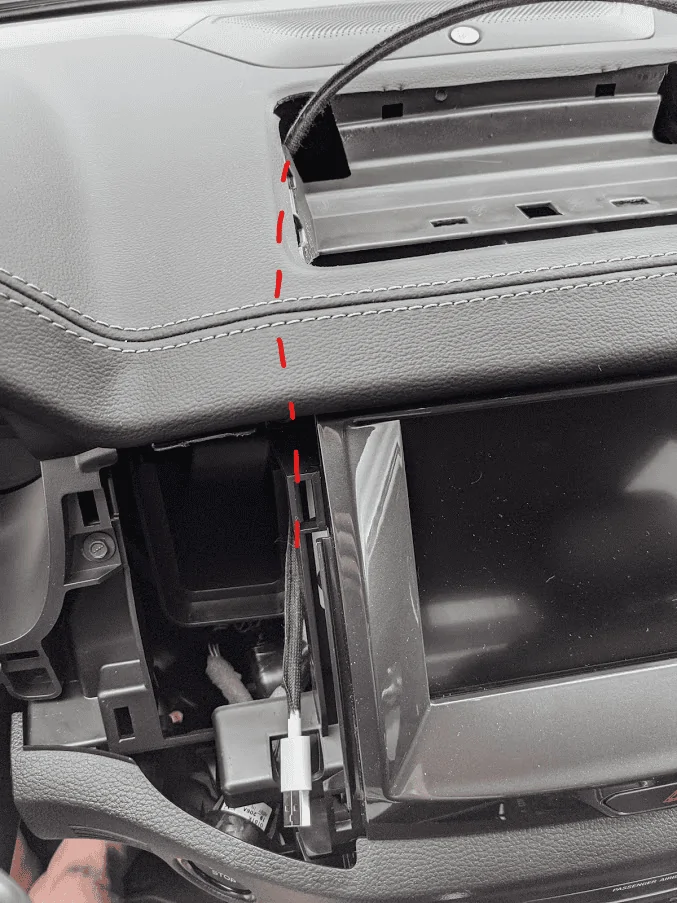
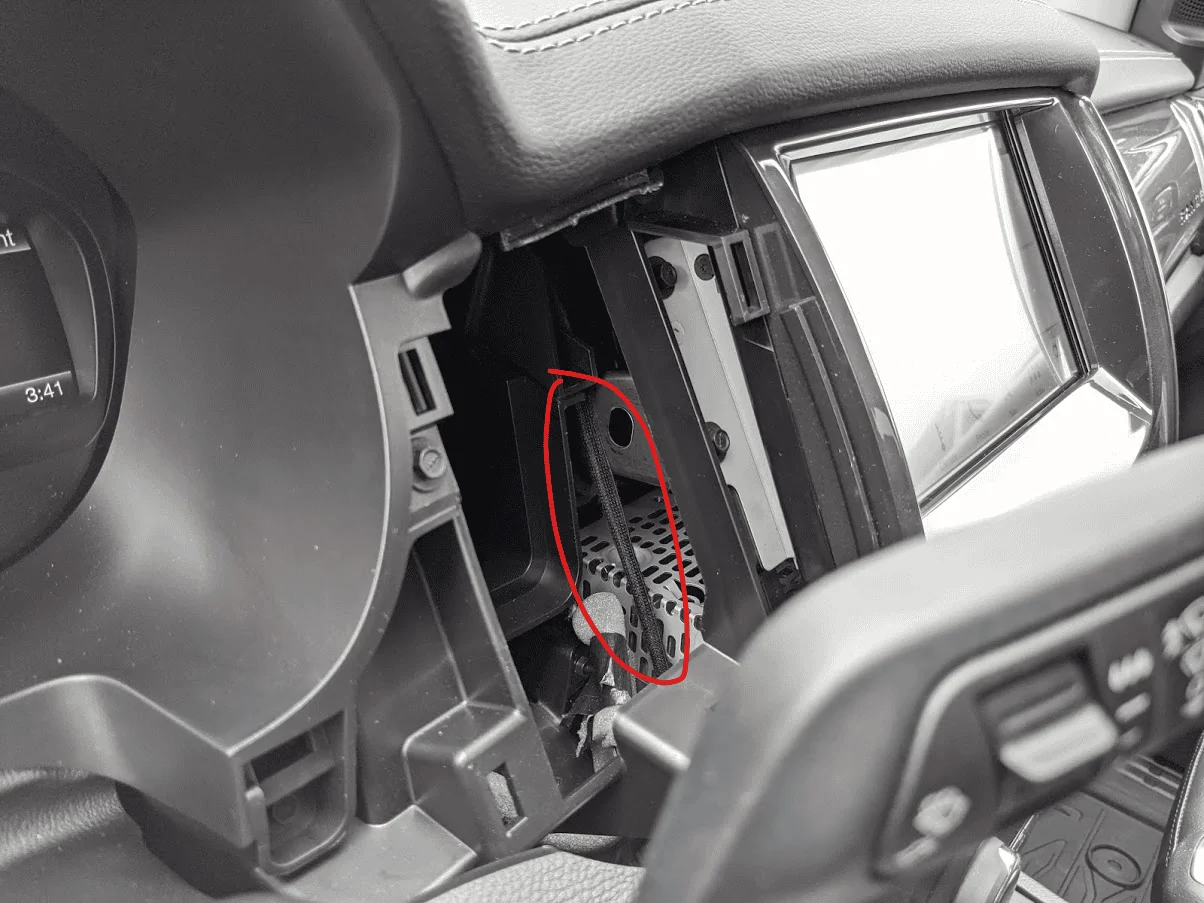
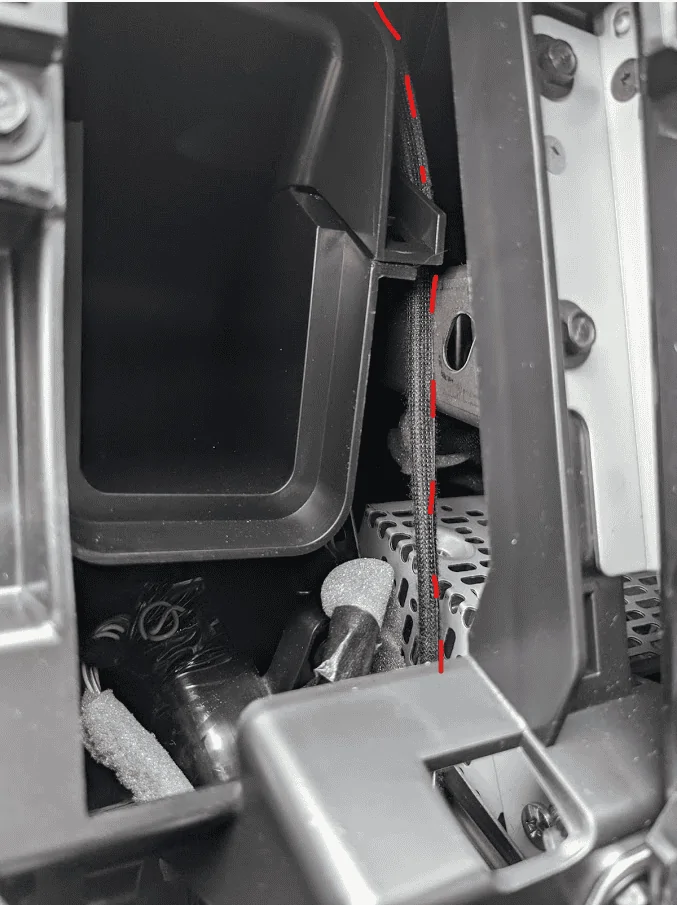
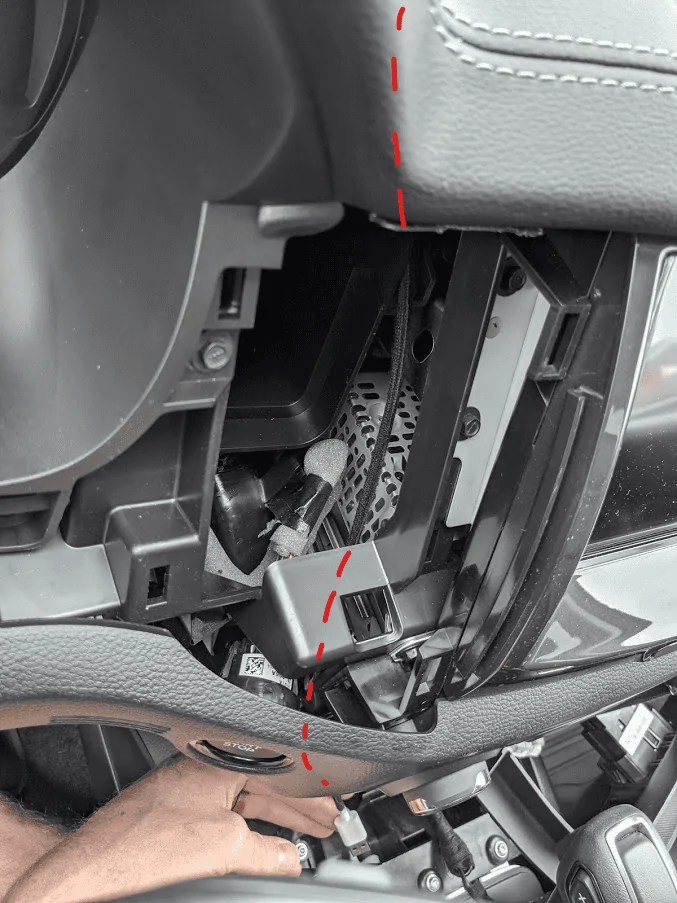
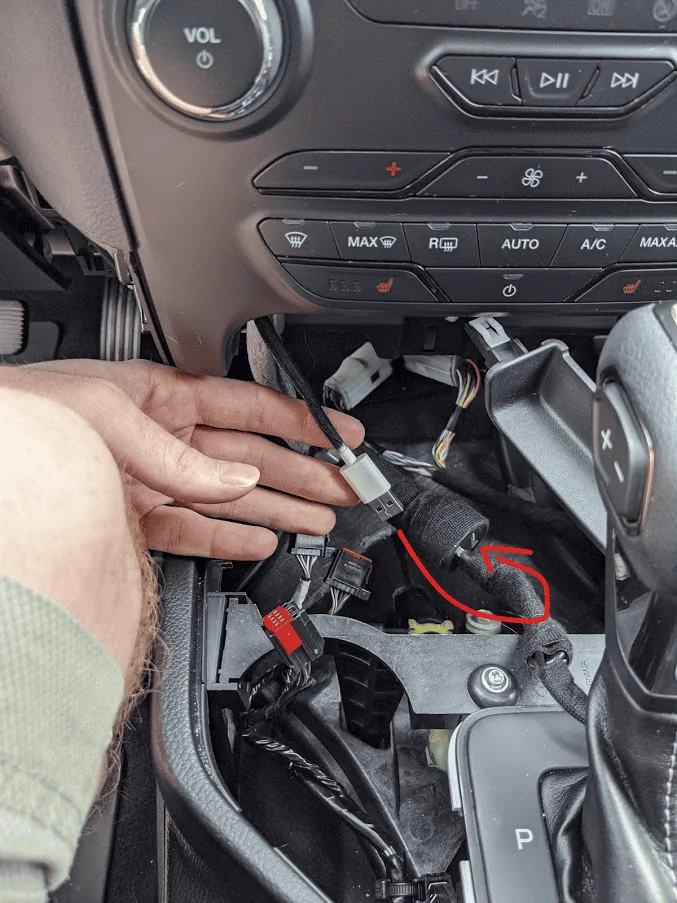
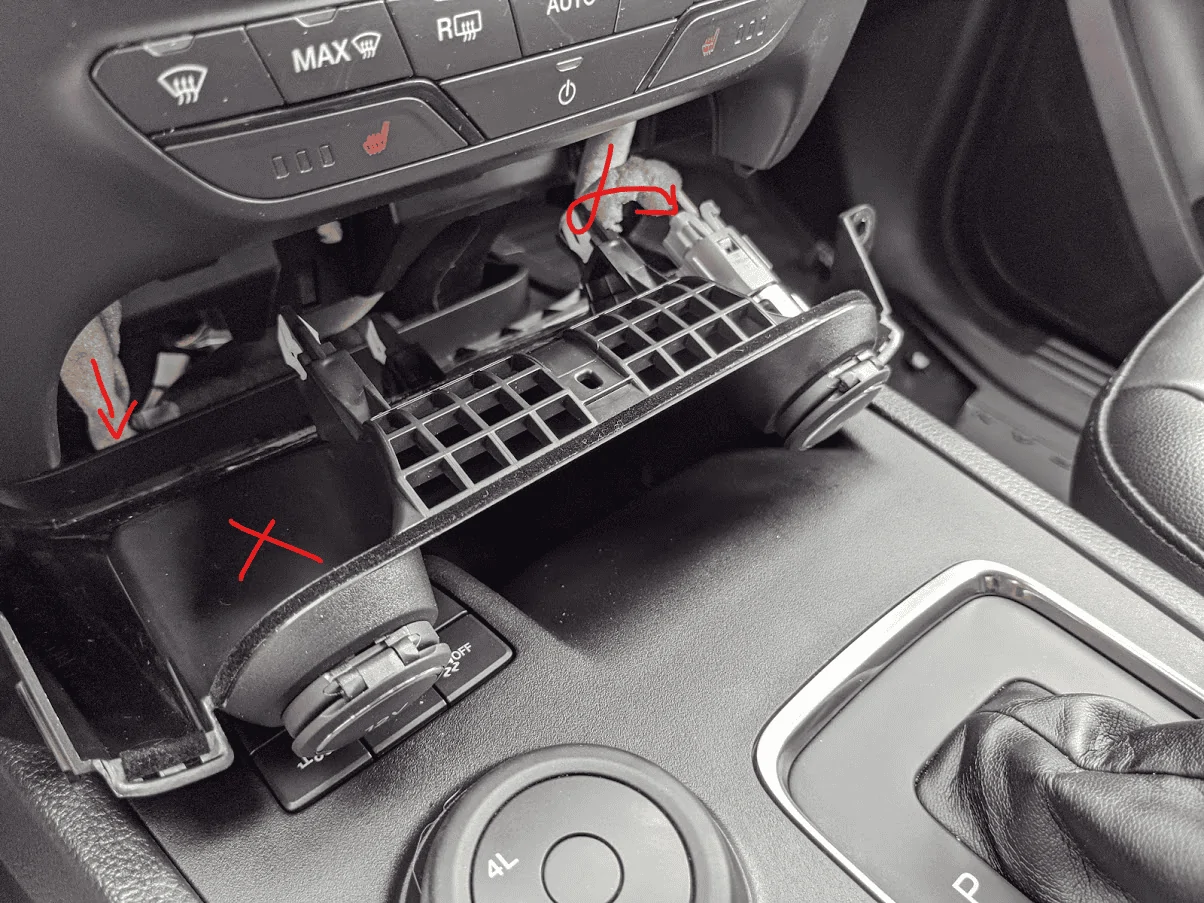
It was definitely worth it though. I have since upgraded my phone to a Galaxy S20 and I am happy to report that it fits in that space just like the S8 did. Admittedly, I let the width of the charging cubby dictate which phones I considered....
 

TechnicallyReal

Well-Known Member
First Name
Ryan
Joined
Aug 20, 2020
Threads
6
Messages
460
Reaction score
606
Location
Eh?
Vehicle(s)
'19 Ranger Lariat 4x4
Occupation
Software Engineer / IT Admin
I would think wireless carplay or AA would work through the trucks wifi
It could potentially work if the hardware is up to snuff and Ford wanted to do it. I think it may require 5Ghz WiFi and not 2.4Ghz, though.

Someone on XDA Developers has been working on a solution for non-wireless vehicles. They just got it onto indiegogo the other day. Eagerly awaiting this: AAWireless

I think having a wireless charger down by the USB ports as well as up on the dash would go very well with this :)
 

TechnicallyReal

Well-Known Member
First Name
Ryan
Joined
Aug 20, 2020
Threads
6
Messages
460
Reaction score
606
Location
Eh?
Vehicle(s)
'19 Ranger Lariat 4x4
Occupation
Software Engineer / IT Admin
Alright I forgot to take pics while pulling panels in the vehicle.. but here's my wireless charger installs (2 chargers, one in the expected spot and one up top above the screen). I didn't order triple-coil chargers (yet) so I'm just using single coil chargers for now.

The coil after prying open the charger it came in (Seneo 15W fast charger):
1599447070659.png


Panel that it'll be attached to:
1599447041611.png


Underside of the panel where the coil will go:
1599447059487.png


Coil hot-glued to the panel. I ran out of glue almost instantly so there's not much there. Used Kapton tape to hold the PCB on. I am just realizing now that I didn't center the coil very well in one direction..
1599447082154.png


I pulled the driver side 12V socket out of its panel and plugged it back into its harness behind the paneling, inserted in my Quick Charge 3.0 adapter into it, then wrapped it all in automotive felt tape. It's all hidden behind & below the paneling, with a USB-C cable connecting the wireless charger coil.

Removing the 12V socket was very easy. Just press in on the tabs inside of the socket, one at a time, while putting pressure on the rear of the socket to pop it out:
1599447098756.png

1599447105517.png


Here's the 12V socket connected to its harness and wrapped with automotive felt tape. My wireless charger is plugged in and the bundled cable also wrapped in the tape:
1619717671895.png


The lid remains and when its closed you can't tell anything is missing. I'll be putting my brake controller knob there one day anyway.
1599447125610.png

1599447132404.png


I haven't run a second USB cable up to the tray on top of the dash yet, nor did I remember to take any photos of the coil being attached to that tray. There's a tab right in the center of the bottom of that tray. I put the coil next to it so that my phone would have to be against the side of the tray that is closest to me, rather than fully centered in the tray. I wouldn't want to have to center my phone in the tray anyway. Makes more sense to have it against a side.

Once it's daytime and I have an idea of how to route the cable I'll take more photos of everything.
 
Last edited:
OP
OP
RangerCat

RangerCat

Well-Known Member
First Name
Brian
Joined
Jan 18, 2019
Threads
3
Messages
185
Reaction score
164
Location
Kansas
Vehicle(s)
2019 Ranger Lariat
Alright I forgot to take pics while pulling panels in the vehicle.. but here's my wireless charger installs (2 chargers, one in the expected spot and one up top above the screen). I didn't order triple-coil chargers (yet) so I'm just using single coil chargers for now.

Panel that it'll be attached to:
1599447041611.png


Also putting one under this upper tray:
View attachment 54287

Spot where the coil will go:
1599447059487.png


The coil after prying open the charger it came in (Seneo 15W fast charger):
1599447070659.png


Coil hot-glued to the panel. I ran out of glue almost instantly so there's not much there. Used kapton tape to hold the PCB on. I am just realizing now that I didn't center the coil very well in one direction.. ugh..
1599447082154.png


I pulled the driver side 12V socket out and hid it. Not pictured, but I plugged it back into the harness, plugged in my Quick Charge 3.0 adapter into it, and wrapped all of it in automotive felt tape. They're hidden behind/below the panels with a USB-C cable connecting them to the wireless charger.

Taking the 12V socket out was very easy. You press in on the tabs from the inside of the socket. One at a time, pressing out the socket from the rear of the panel.

1599447098756.png

1599447105517.png


The lid remains and when its closed you can't tell anything is missing. I'll be putting my brake controller knob there one day anyway.

1599447125610.png

1599447132404.png


I haven't run a USB cable up to the tray on top of the dash yet, nor did I remember to take any photos of the coil being put onto it. There's a tab right in the center of the bottom of that tray. I put the coil next to it so that my phone would have to be against the side of the tray that is closest to the screen in the dash, rather than fully centered in the tray. I wouldn't want to have to center my phone in the tray anyway. Makes more sense to have it against a side.

Once it's daytime and I have an idea of how to route the cable I'll take more photos of everything.
Nicely done and thanks for the write-up! I love being able to wireless charge in the lower tray. My concern about wireless charging in the dash tray is that the phone gets very warm from sunlight coming through the windshield. Add that to the heat generated by the wireless charging and it could turn out to be very hard on your phone.
 

TechnicallyReal

Well-Known Member
First Name
Ryan
Joined
Aug 20, 2020
Threads
6
Messages
460
Reaction score
606
Location
Eh?
Vehicle(s)
'19 Ranger Lariat 4x4
Occupation
Software Engineer / IT Admin
Nicely done and thanks for the write-up! I love being able to wireless charge in the lower tray. My concern about wireless charging in the dash tray is that the phone gets very warm from sunlight coming through the windshield. Add that to the heat generated by the wireless charging and it could turn out to be very hard on your phone.
Charging in the lower is definitely ideal but my phone doesn't actually fit in the lower one :(
 

TechnicallyReal

Well-Known Member
First Name
Ryan
Joined
Aug 20, 2020
Threads
6
Messages
460
Reaction score
606
Location
Eh?
Vehicle(s)
'19 Ranger Lariat 4x4
Occupation
Software Engineer / IT Admin
Today I ran the USB-C cable from the upper tray down to the my adapter in the hidden 12V socket:

1599509403502.png


I fished my automotive-felt-covered USB-C cable into the dash from the upper left area. The connector of my charging coil is actually at the lower left, but the route is better from the upper left. The excess cable will get coiled underneath anyway, so it's good this way.

1619717832304.png


Cable going downwards next to the radio head unit

1619717888176.png


1619717912017.png


And now peeking out below where I want it:

1619717953317.png


1619718002739.png


The excess cable coiled and now coming out from the lower left:

1599509467364.png


The empty driver-side 12V socket mount (and still-populated passenger-side mount):

1619718074641.png
 
Last edited:
OP
OP
RangerCat

RangerCat

Well-Known Member
First Name
Brian
Joined
Jan 18, 2019
Threads
3
Messages
185
Reaction score
164
Location
Kansas
Vehicle(s)
2019 Ranger Lariat
Today I ran the USB-C cable from the upper tray down to the my adapter in the hidden 12V socket:

1599509403502.png


I fished my automotive-felt-covered USB-C cable into the dash from the upper left area. The connector of my charging coil is actually at the lower left, but the route is better from the upper left. The excess cable will get coiled underneath anyway, so it's good this way.

View attachment 54412

Cable going downwards next to the radio head unit

View attachment 54418


View attachment 54413

And now peeking out below where I want it:

View attachment 54414

View attachment 54415

The excess cable coiled and now coming out from the lower left:

1599509467364.png


The 12V socket sitting sideways above the vehicle USB port module:

View attachment 54417

The empty driver-side 12V socket mount:

View attachment 54419
Very nice! Did you have any trouble with the upper tray seating back in correctly?


Top