
Dunneldeen
Well-Known Member
- Thread starter
- #1
Figured I would provide some pictures and other information for anyone looking to install a Yaesu or other radio that has a removable faceplate. The removeable faceplate allows for installation of the radio and the control unit in separate locations. This particular unit comes with a radio mounting bracket, 6m control cable, radio, head unit and a DC power cable (guessing about 6 feet long) with inline fuses.
I elected to feed power to the radio from my pre-installed Auxbeam controller.

The cable that comes with the radio was not long enough to get all the way to the battery from where I mounted the radio (under the drivers seat), so I ran some 12 gauge wire through the firewall grommet just underneath the dashboard, near the pedals. It takes about 5 feet of wire to get from the battery, through the firewall, and to where I did the splicing. The wire that came with my radio looks to also be 12 gauge.

I removed the lower trim panels under the A pillar and the driver side kickboard. I removed the included fuses (since it’s already fused at the Auxbeam distribution block) and spliced the wires so the splices would be located under the larger trim piece. I then routed the power wire to underneath the driver seat and into the radio. With all trim pieces back in place, the only part you can see is a tiny wire from the driver side trim to under the seat, nothing I’m going to stress about.
I mounted the radio under the driver seat to one of the support braces. I used zip ties to mount the radio bracket and they hold the bracket and radio very well, with no real movement.

I ran the head unit cable up and into the center console and from there to the dashboard.
The cable comes up behind the center left vent and out a notch I made in the fascia to accommodate it (alongside the cable for my Auxbeam).

I used Proclip mounts for both the Auxbeam and Yaesu controllers. Not exactly the cheapest solution, but I like the clean look and the ability to remove either (or both) controllers as I wish. The Proclip mounts snap in place very securely, but still allow for removal if needed.
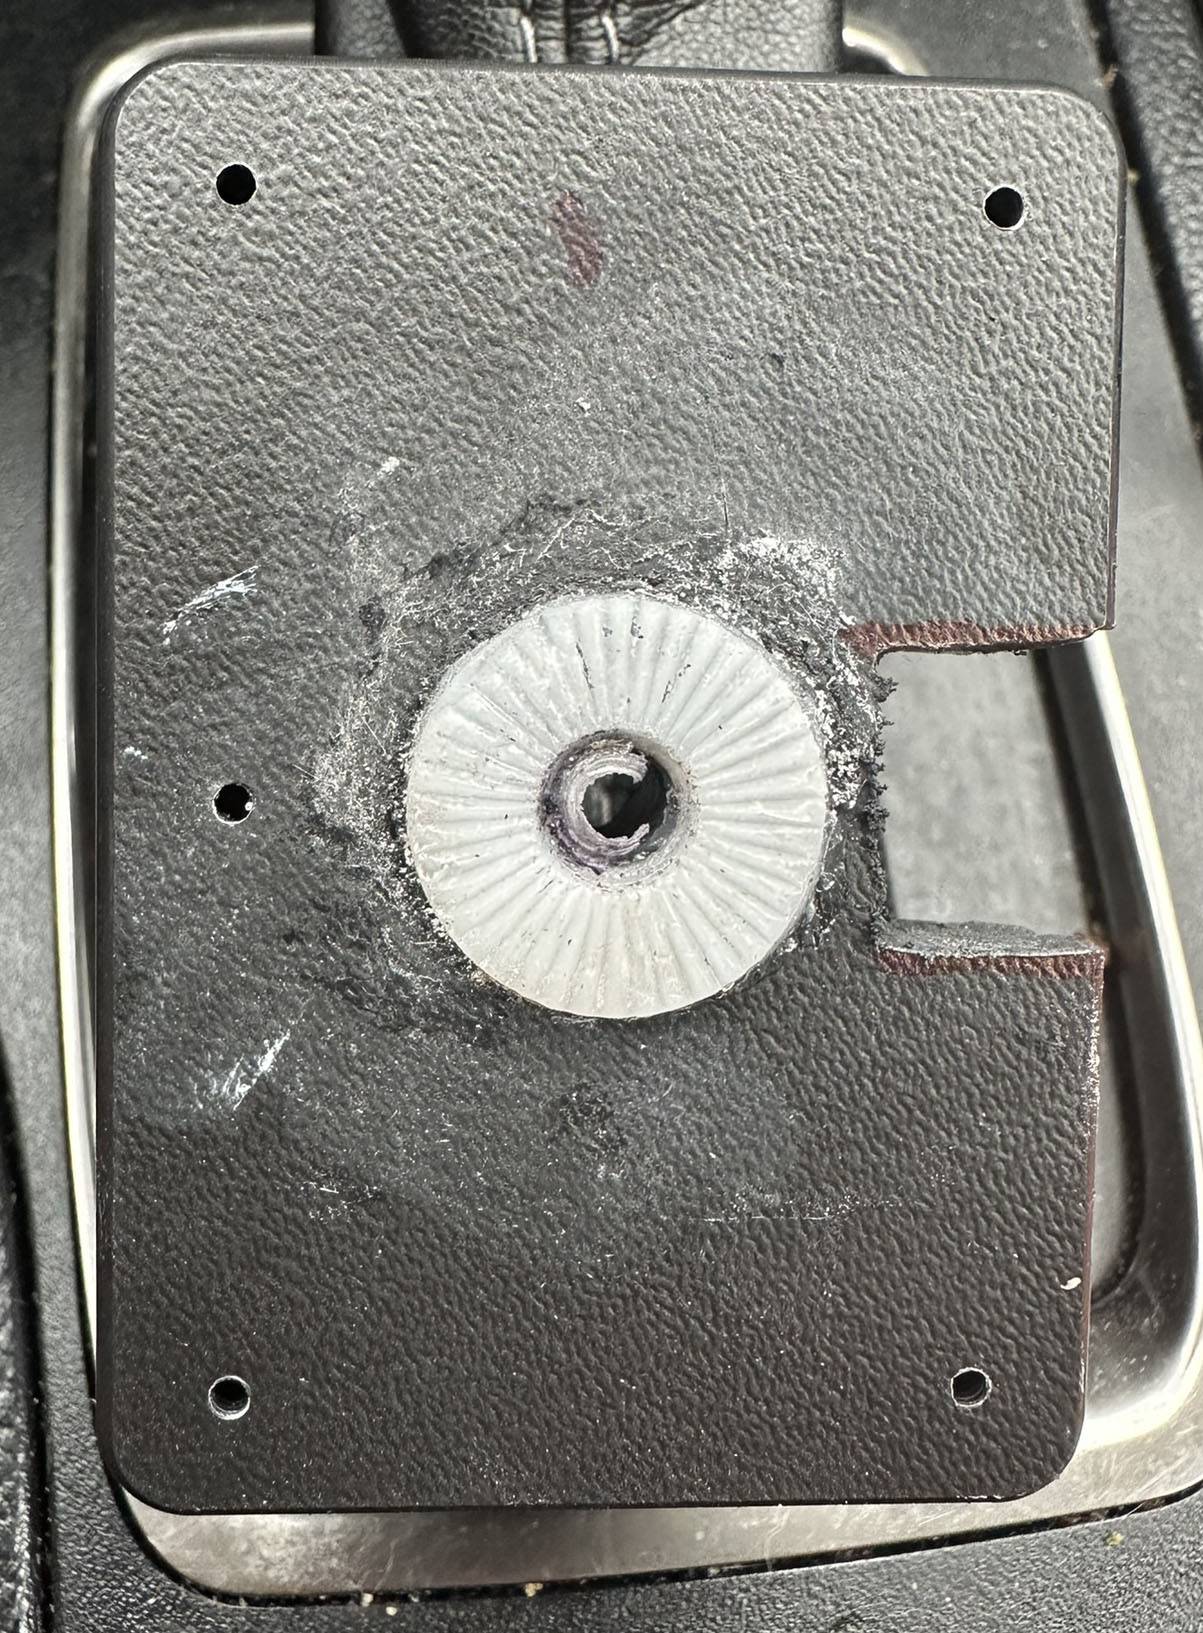
To mount the radio controller to the Proclip mount, I drilled a hole in it and used a 1/4-20 screw to hold it in place. To prevent the controller from spinning, I used some InstaMorph Moldable Plastic to create a nubbed grommet that was glued to the Proclip mount, around the screw hole. I also had to cut a notch out of the mount to fit the wire that goes into the radio control unit.

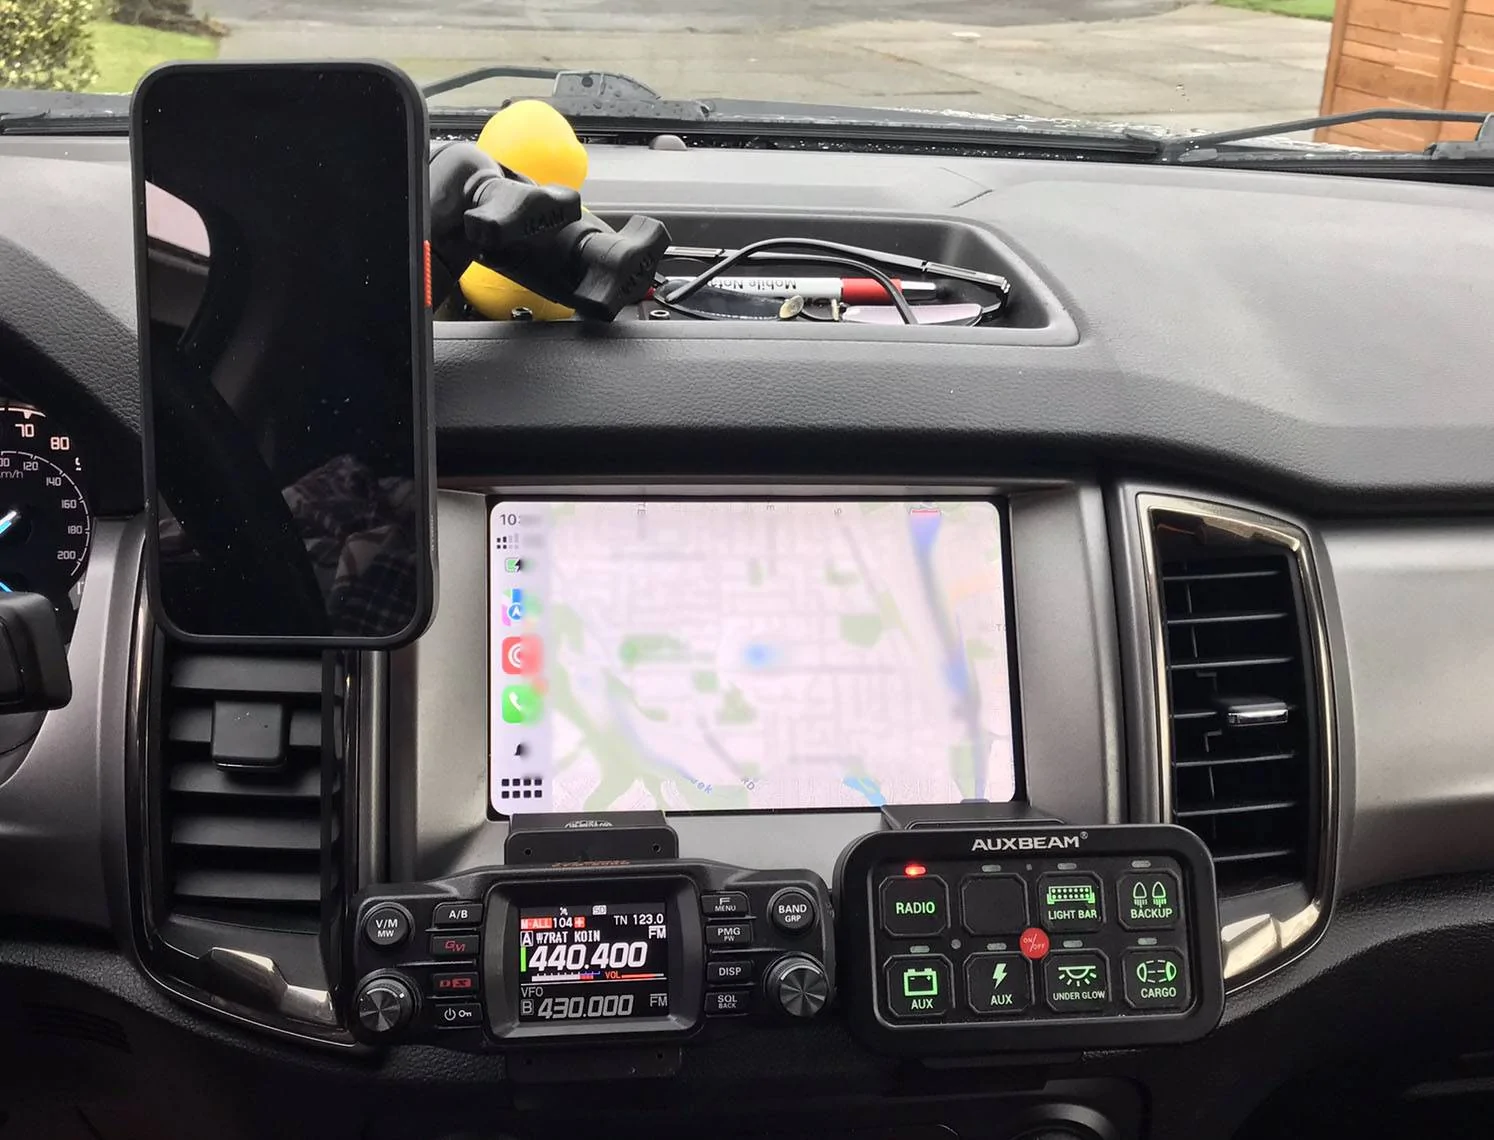
You can see an interior shot here with both units on. The radio remembers its last power state, so comes on automatically when I click the Auxbeam radio button. It leaves a very clean cable run that is not visible with both units mounted in place.

Additional Notes:
While both mounts together do cover up the hazard button, I can still reach under them easily to push the button. I use my hazards very frequently and have not found this to be an issue.
The Yaesu FTM-200 has a 3W speaker built in. It is sufficiently loud when turned all the way up (if a little distorted) and is easy to hear from the driver seat. I typically run it at about 2/3 volume. I have another project in the works to install a speaker for the radio in the dashboard, where a B&O center speaker would usually be.
Power draw (according to Yaesu) is 11A at 50W TX, well within what the Auxbeam can handle. I replaced the Auxbeam fuse with a 15A one, which is the same amperage as the ones included with the radio.
Getting the wire through the firewall can be challenging. I discovered a reproducible way to do it though. I push a straight, pointed, trim tool through the grommet from the inside to the engine bay (being careful to not nick any wires). I can then fit the female threaded part of a rigid fish rod (for running wires inside walls) over the point of the trim tool and push the rod back through the grommet to the inside. From there, I just tape the wires to the rod and pull them into the engine bay. It leaves a tight hole in the grommet that conforms around the wire, so I’m confident in it being water and fume tight.
You may notice multiple wire pairs in some of the pictures; I also ran another power and ground line from the Auxbeam to the rear seats to feed an Ecoflow battery that is used by a fridge, also in the rear cabin. I ran these wires at the same time I ran the wires for my radio.
I elected to feed power to the radio from my pre-installed Auxbeam controller.
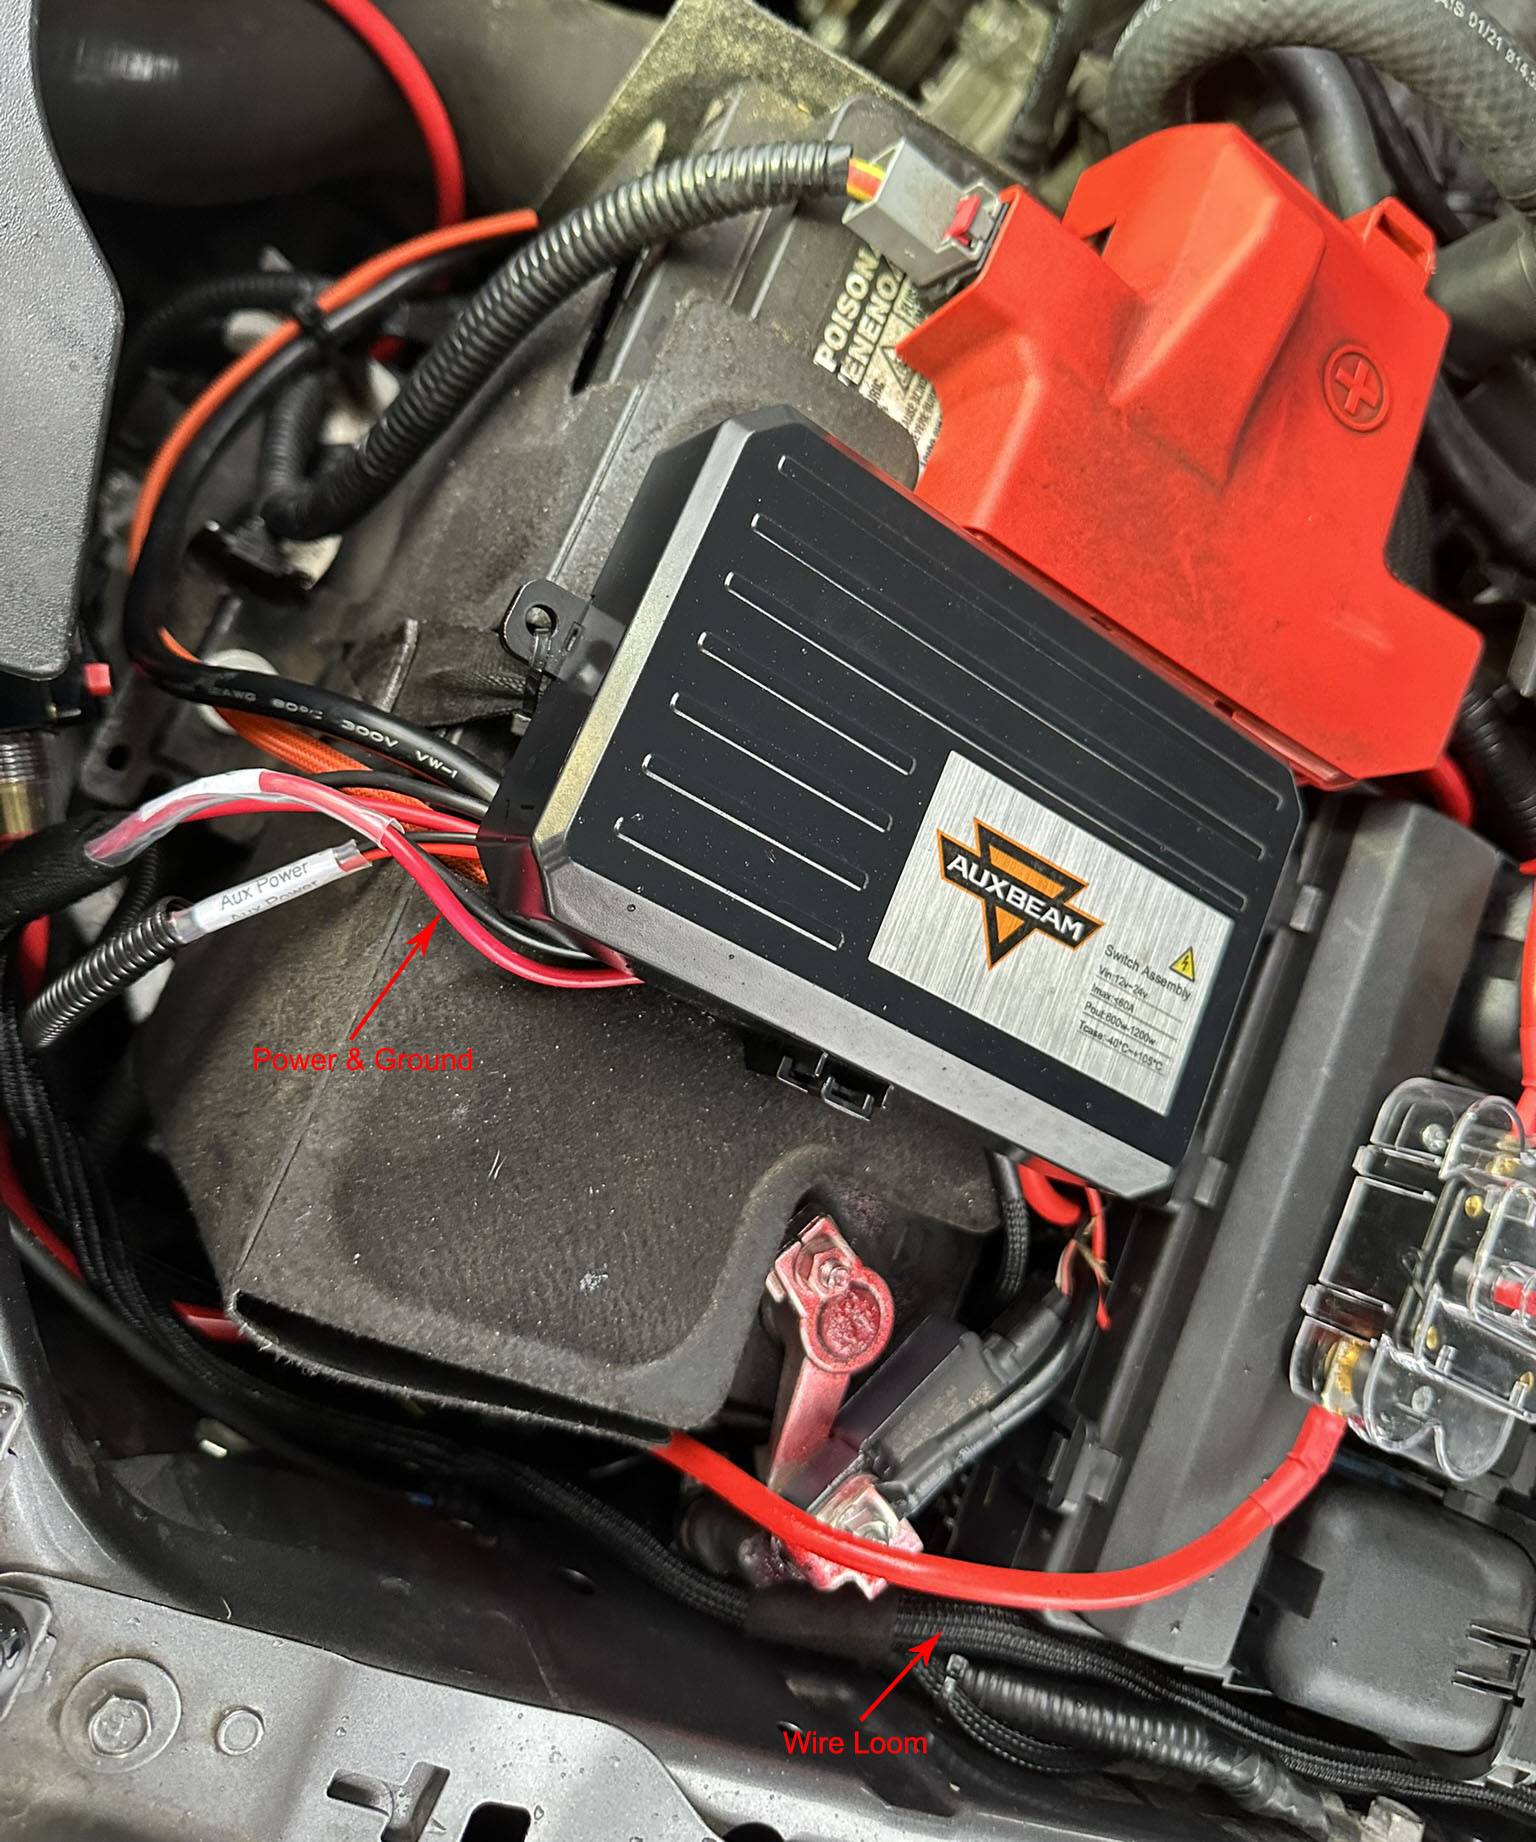
The cable that comes with the radio was not long enough to get all the way to the battery from where I mounted the radio (under the drivers seat), so I ran some 12 gauge wire through the firewall grommet just underneath the dashboard, near the pedals. It takes about 5 feet of wire to get from the battery, through the firewall, and to where I did the splicing. The wire that came with my radio looks to also be 12 gauge.
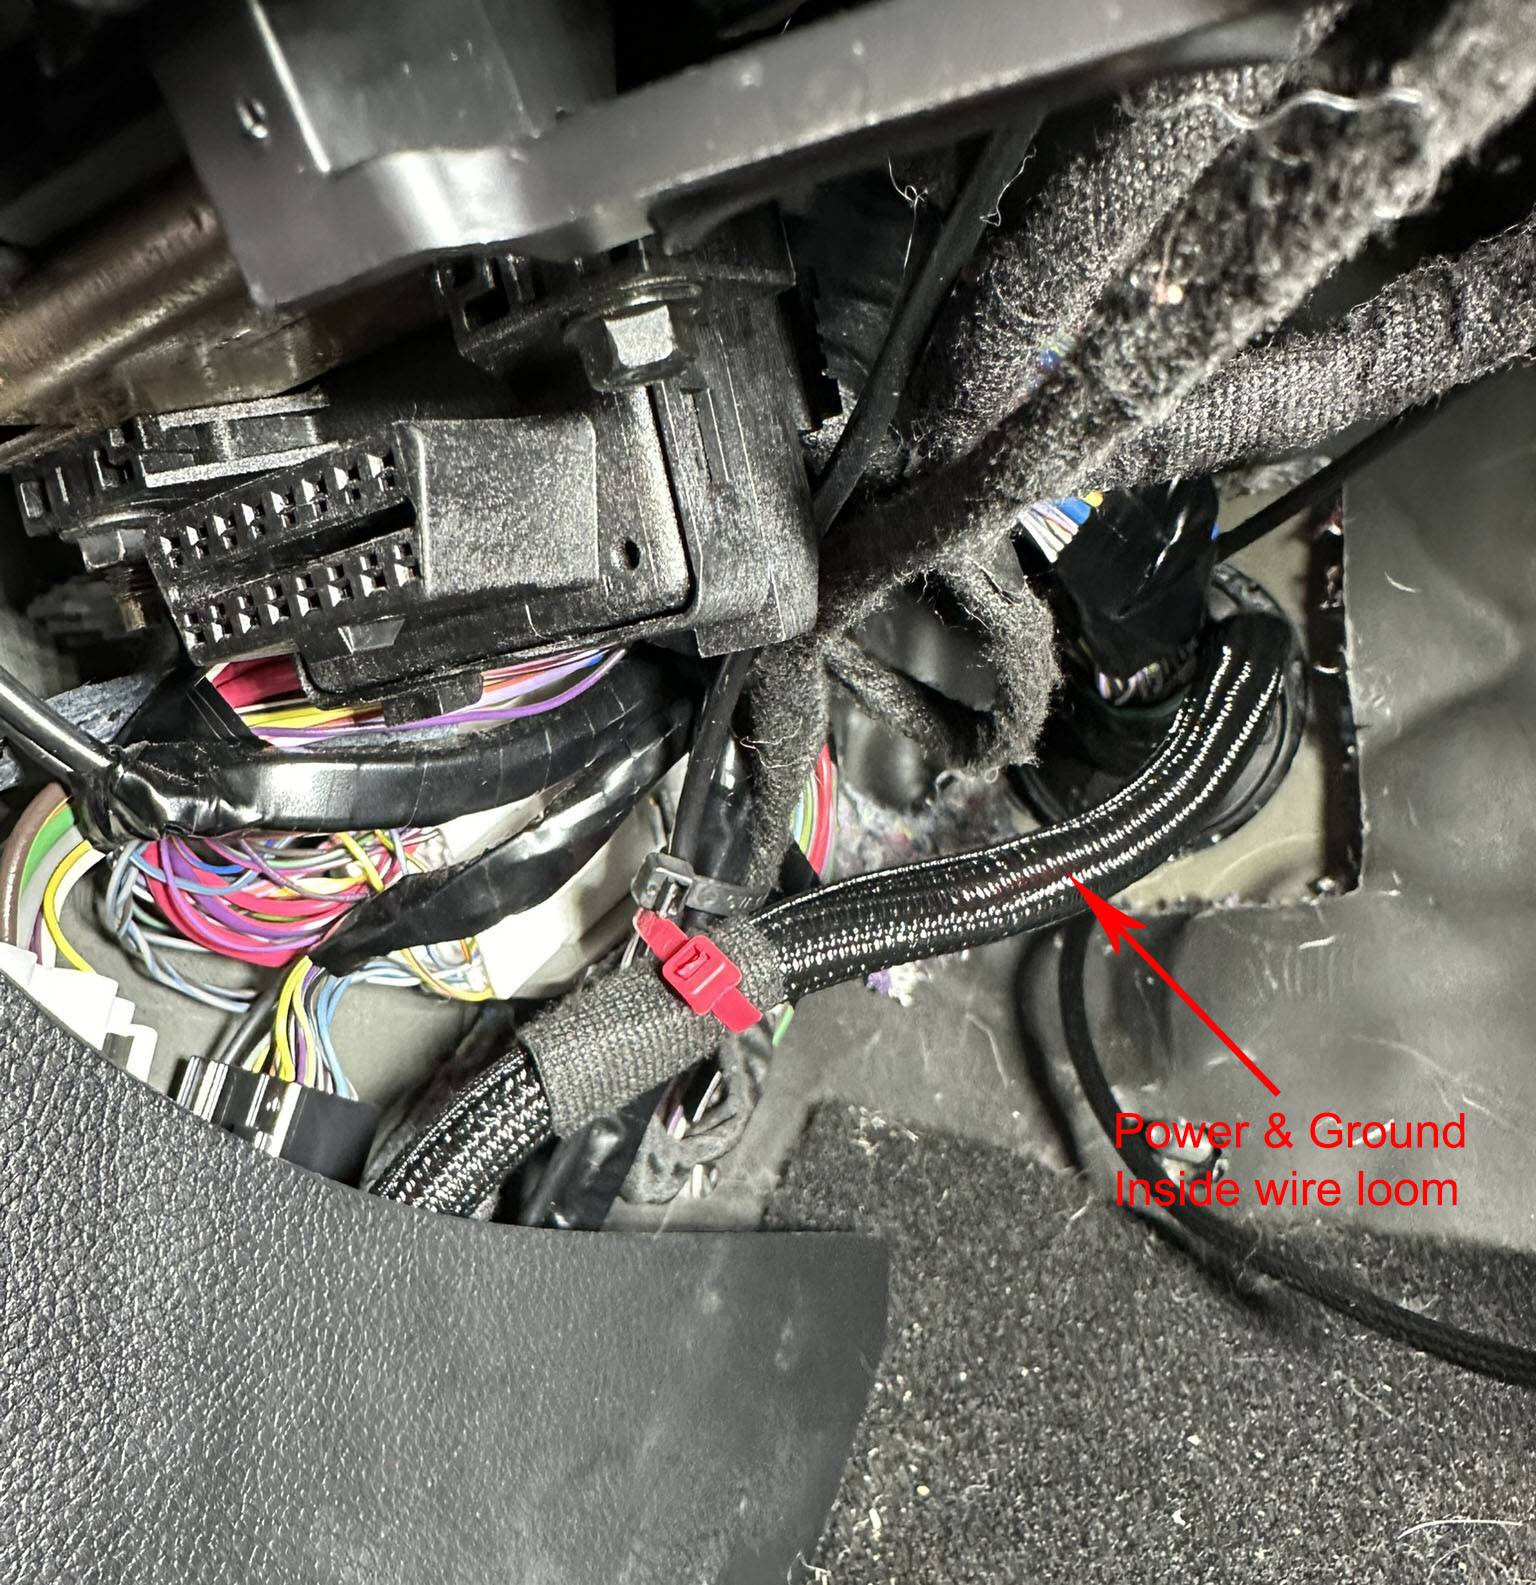
I removed the lower trim panels under the A pillar and the driver side kickboard. I removed the included fuses (since it’s already fused at the Auxbeam distribution block) and spliced the wires so the splices would be located under the larger trim piece. I then routed the power wire to underneath the driver seat and into the radio. With all trim pieces back in place, the only part you can see is a tiny wire from the driver side trim to under the seat, nothing I’m going to stress about.
I mounted the radio under the driver seat to one of the support braces. I used zip ties to mount the radio bracket and they hold the bracket and radio very well, with no real movement.
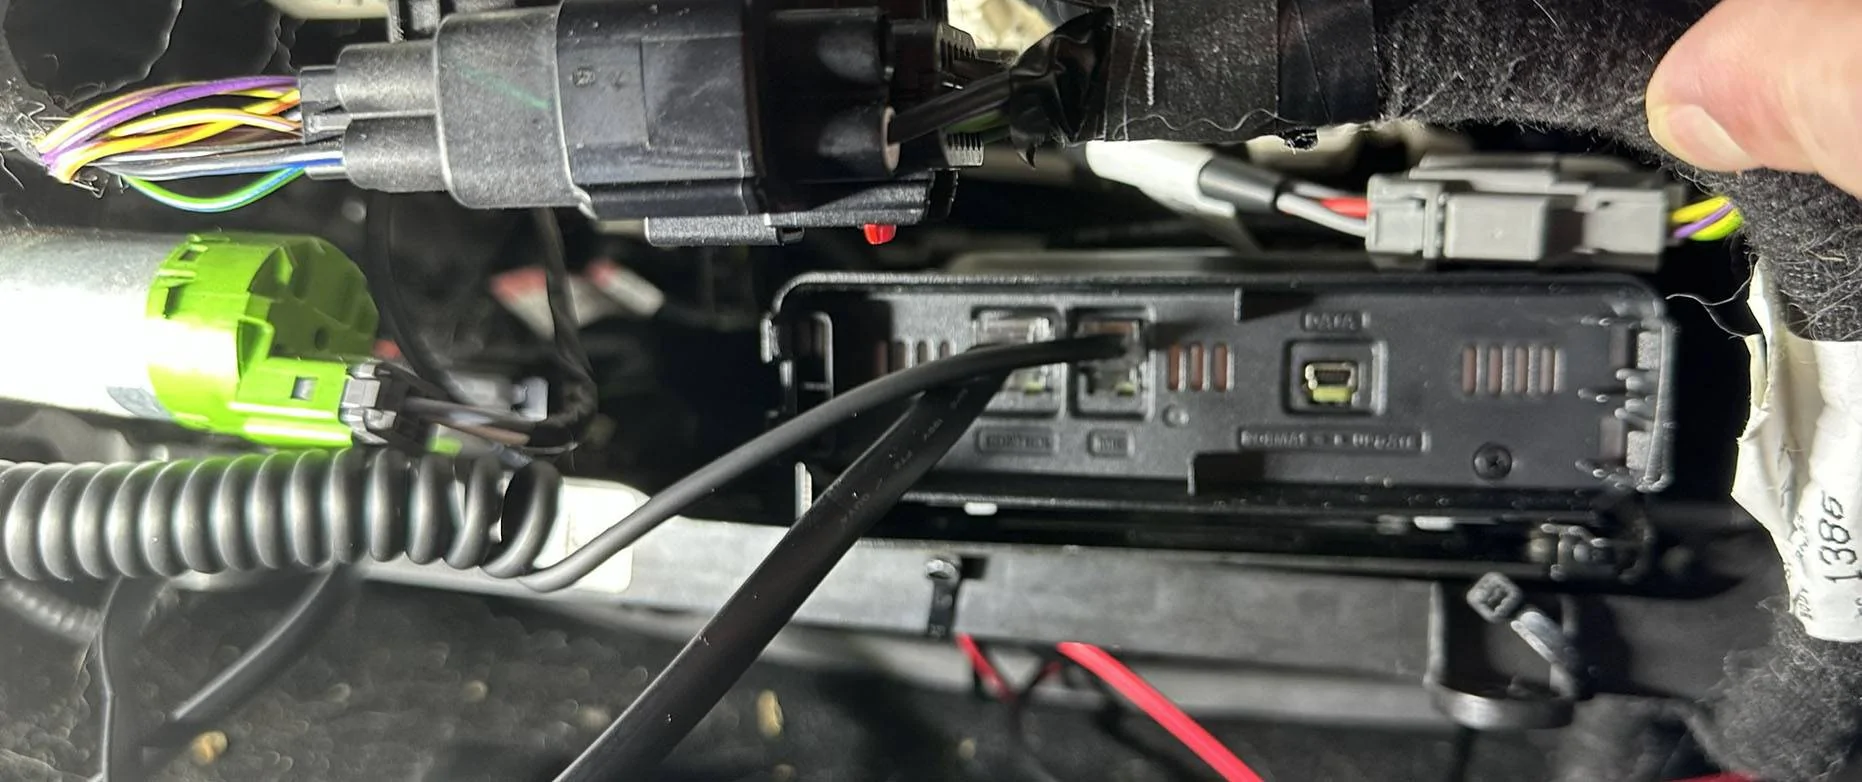
I ran the head unit cable up and into the center console and from there to the dashboard.
The cable comes up behind the center left vent and out a notch I made in the fascia to accommodate it (alongside the cable for my Auxbeam).
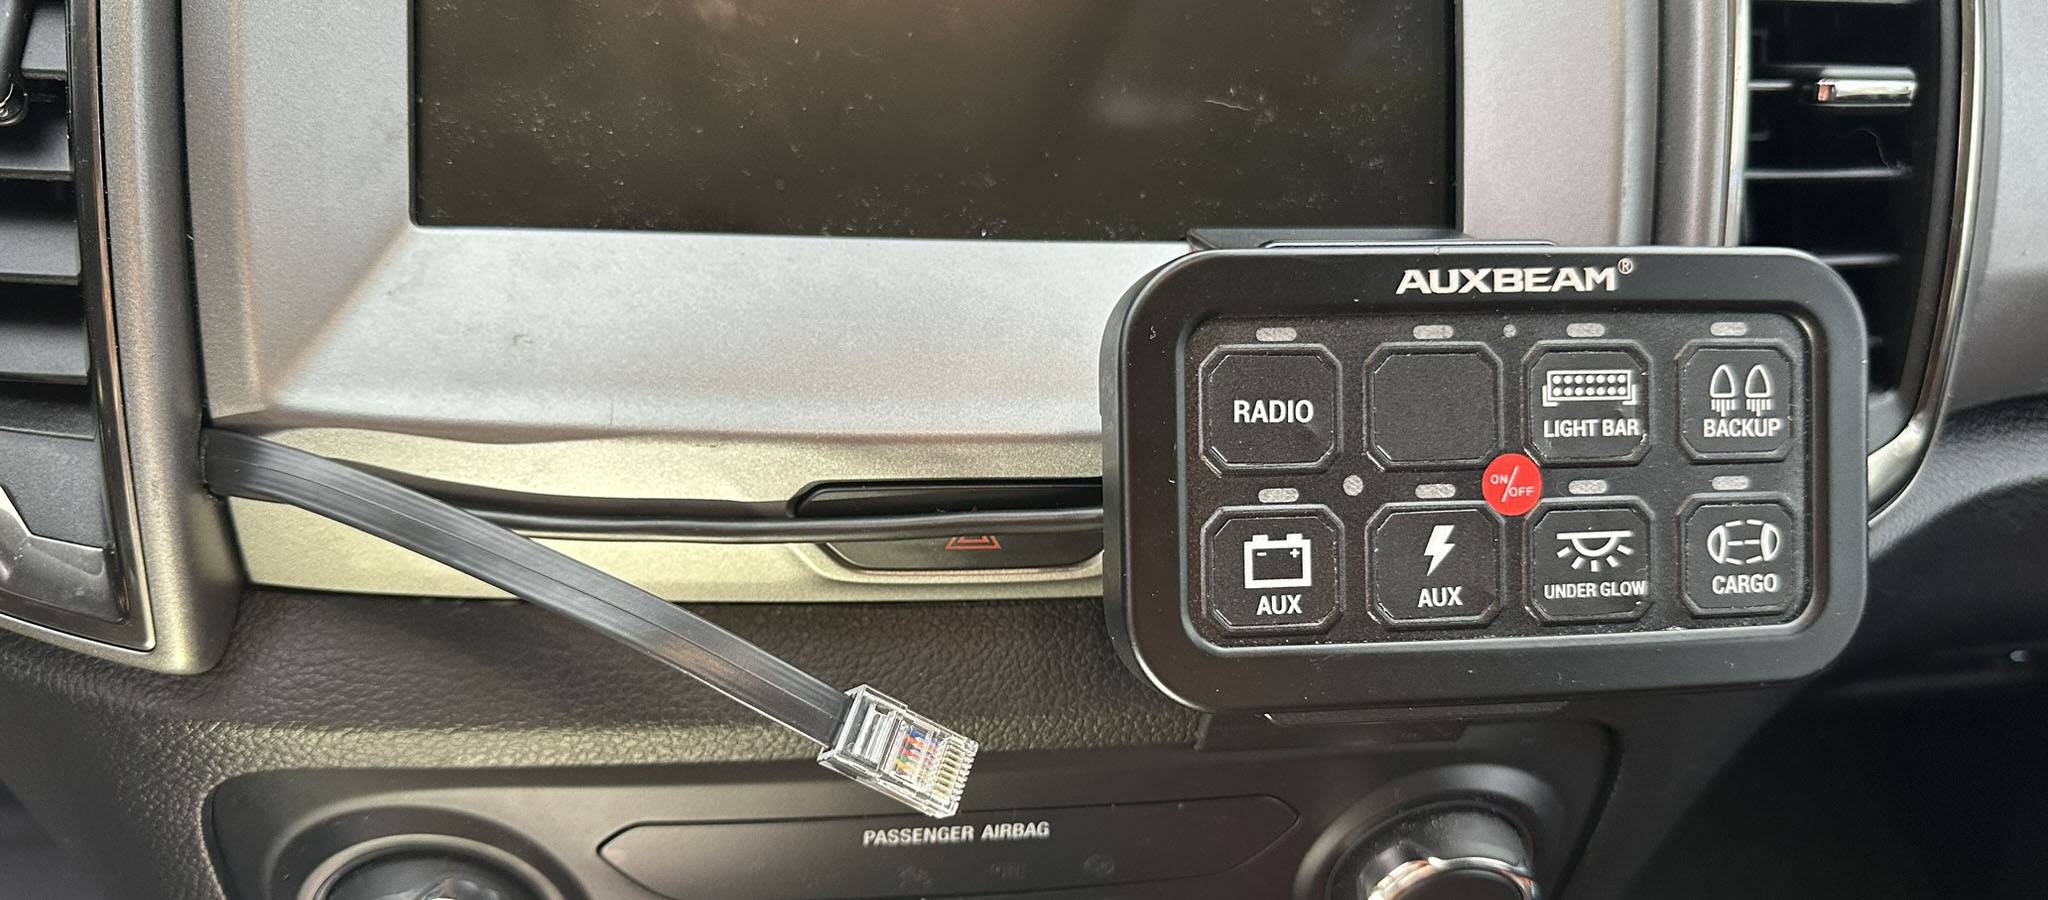
I used Proclip mounts for both the Auxbeam and Yaesu controllers. Not exactly the cheapest solution, but I like the clean look and the ability to remove either (or both) controllers as I wish. The Proclip mounts snap in place very securely, but still allow for removal if needed.
To mount the radio controller to the Proclip mount, I drilled a hole in it and used a 1/4-20 screw to hold it in place. To prevent the controller from spinning, I used some InstaMorph Moldable Plastic to create a nubbed grommet that was glued to the Proclip mount, around the screw hole. I also had to cut a notch out of the mount to fit the wire that goes into the radio control unit.
You can see an interior shot here with both units on. The radio remembers its last power state, so comes on automatically when I click the Auxbeam radio button. It leaves a very clean cable run that is not visible with both units mounted in place.
Additional Notes:
While both mounts together do cover up the hazard button, I can still reach under them easily to push the button. I use my hazards very frequently and have not found this to be an issue.
The Yaesu FTM-200 has a 3W speaker built in. It is sufficiently loud when turned all the way up (if a little distorted) and is easy to hear from the driver seat. I typically run it at about 2/3 volume. I have another project in the works to install a speaker for the radio in the dashboard, where a B&O center speaker would usually be.
Power draw (according to Yaesu) is 11A at 50W TX, well within what the Auxbeam can handle. I replaced the Auxbeam fuse with a 15A one, which is the same amperage as the ones included with the radio.
Getting the wire through the firewall can be challenging. I discovered a reproducible way to do it though. I push a straight, pointed, trim tool through the grommet from the inside to the engine bay (being careful to not nick any wires). I can then fit the female threaded part of a rigid fish rod (for running wires inside walls) over the point of the trim tool and push the rod back through the grommet to the inside. From there, I just tape the wires to the rod and pull them into the engine bay. It leaves a tight hole in the grommet that conforms around the wire, so I’m confident in it being water and fume tight.
You may notice multiple wire pairs in some of the pictures; I also ran another power and ground line from the Auxbeam to the rear seats to feed an Ecoflow battery that is used by a fridge, also in the rear cabin. I ran these wires at the same time I ran the wires for my radio.
Sponsored