OP
OP
OldHippy
Well-Known Member
- First Name
- Michael
- Joined
- Jan 23, 2025
- Threads
- 6
- Messages
- 144
- Reaction score
- 228
- Location
- Central Ga.
- Vehicle(s)
- 2020 Ranger XLT 4X4
- Occupation
- Retired
- Thread starter
- #31
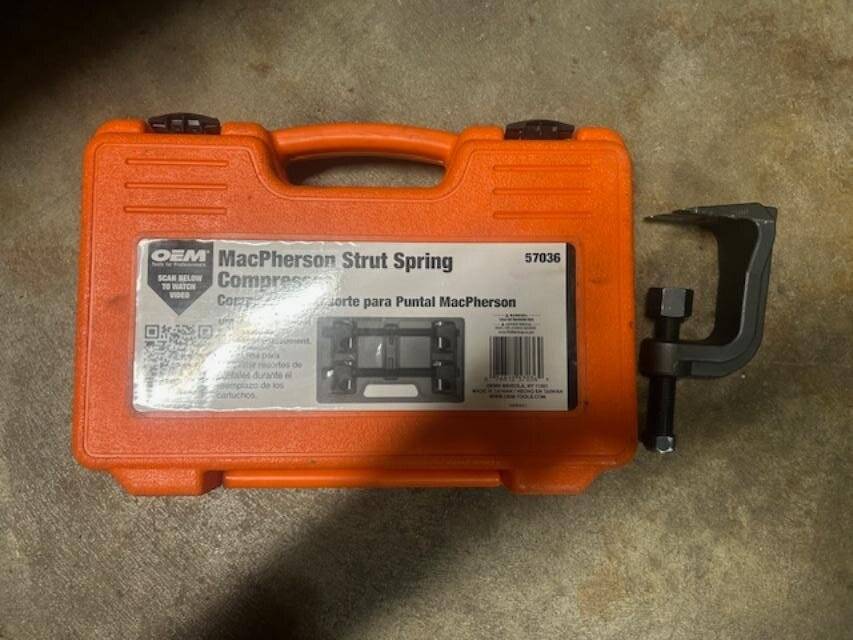
Thanks much for the details. I wont need the spring compressor due to installing complete unit. I did purchase the ball joint tool. Hell $12 at NAPA was well worth it. Thnx again.Copy & Paste from another thread
This is how I did mine
With the various posts about pulling the CV Joint apart, I decided to take extra steps to avoid this from happening.
So:
Pulled the Caliper & Rotor and Axle Nut
Disconnected the Upper Ball Joint & Tie Rod End and Sway Bar End Link
This allowed me to deflect the LCA down enough to get the shock assembly out from the upper tower once all was disconnected and the CV Shaft was pushed out of the hub.
Notes:
I am glad that I decided to procure every possible need (Tooling) as all disconnects were a fight to break loose.
The Passenger side was the easiest and less of a fight.
A. Both Upper Ball Joints - required more than just a whack with a hammer and needed to use my Ball Joint Tool - to get tension on it then a light tap with the hammer, and it popped loose.
So, I am glad I added this to my tool collection.
B. Drivers side Tie Rod End - also needed the same tool, Passenger Side (One Whack) and it popped loose.
I was able to get the CV Shaft out of the Hub, but the Tie Rod end was blocking me from getting the deflection needed to get the shock out of the upper tower, so extra time was spent getting the Tie Rod end to break free to get the deflection needed for the LCA to drop down enough
I only needed about 2 more inches, and it just was not going to happen unless I spent the extra effort on getting the Tie Rod disconnected.
Also noted that the (Ground Points) by the upper shock tower bolts somewhat limits access but it can be worked around without disconnecting them (Drivers Side)
C. Both Sway Bar End Links - Required me to hold the link with an Allen Key and then use a wrench to get the nut off as it just wanted to spin.
I did note (paid attention) with the sway bar end link connected how much of a throw the end link has (relating to various threads about steering wheel) not returning to center in a sharp turn.
My assumption of the end links being a possible source proved correct and noted that if the ball end of the link was galled (in that scenario) it would hang up wheel turned and body roll acting on the end link.
D. I also lubed my caliper sliders and noted driver's side was pretty dry as compared to the passenger side when going back together with it, I may pull the rears and lube them as preventing maintenance.
Note: I am at 19,900 miles, still 8mm on the front pads and no abnormal wear, so they were not sticking (YET)
I index marked the shock assembly before I compressed the spring to make it easier to get the proper alignment when going back together.
So, it took longer than expected to do it, but both sides complete in 4.5 Hours (on the floor and one side at a time -jacked)
Sourced all new hardware (especially the Axle Nuts)
I did not disconnect the control arms and only focused on the knuckle, so the alignment stayed intact, still drives straight- but with my 20K rotate and balance due, I am going to get it realigned anyway, that was part of the reason for me waiting to install the shocks, the passenger side was not fully blown it was just seeping fluid down the shock, yes it would be a warranty item but I wanted to upgrade anyway to match my rears, which were swapped out @ 6K miles
The Ball Joint Tool was an Ebay Find (used) - Ford Rotunda PN: 204-592
The Spring Compressor is AutoZone (Loan A Tool) with option to keep (I think I will keep it)
This fits over the coils perfectly and had no problems compressing the spring enough to get it apart.
When I did this professionally, we had a wall mounted compressor (much safer) than this, but it worked and just ensured I was taking it down slow and easy, and my safety pins stayed in place.


Sponsored


 ...
... really good website and everything went smoothly
  !
!
 mine fronts have been sitting in the garage for ~ year now. They keep getting pushed to the back burner as other projects take precedence.
 All this Titanium in my neck and back is starting to weigh me down. Especially in this 90+ degree heat.