760magneticranger
Active Member
- First Name
- Jared
- Joined
- Dec 9, 2022
- Threads
- 10
- Messages
- 38
- Reaction score
- 48
- Location
- Victorville, CA
- Vehicle(s)
- 2019 Ford Ranger FX4 Lariat
- Occupation
- Plant Operator
First, a caveat---This is how I do it....I've been doing it this way for 7-8 years with very good results. And the best part is I use rattle-cans that anyone can buy. I've had people comment that it looks just as good as the factory paint, even my uncle, and he's a real stickler for detail and will tell you the way it is, aka--no sugar coating. I've done the fender vents, the grill, and now the Tremor fender flares on my Ranger as well as other parts for other trucks I've owned. I will update this with some pics of the Tremor flares after I get them installed.
Here we go...
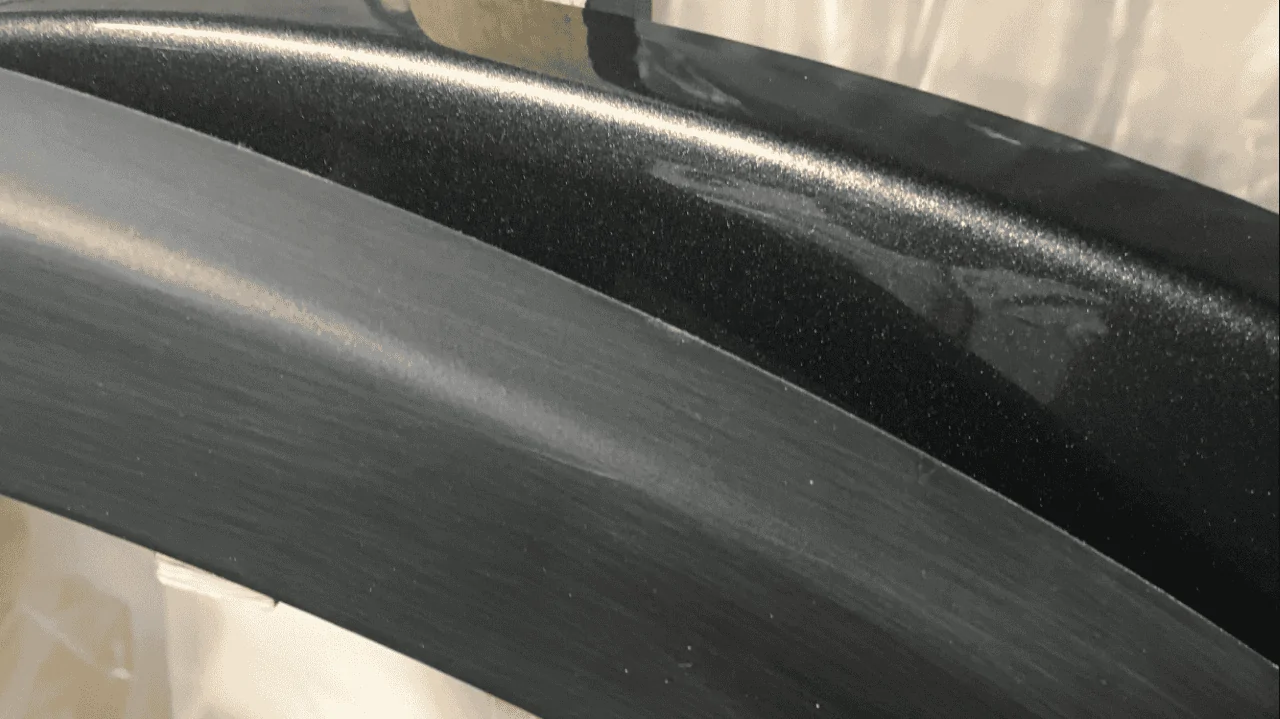
1--The item must be a paintable material. If it has factory paint, even better as they have already done the major part of the prep work and all you'll have to do is prep it for primer and paint. For prepping the surface, I've used the maroon 3M scuff pads before, but wet-sanding with 400 will work just as good, and it requires less elbow grease to do so. You'll want the ENTIRE surface to be painted to have NO shiny areas....it should be a fairly consistent dull/sanded look. Touch up any shiny areas so they are dull. The dull/sanded surface will allow the primer coat to stick (see pic below). On the Tremor fenders, I spent about 5-6 hrs just prepping. It's the foundation of any paint job and is well worth taking the time and doing it right. Paint and clearing, without including the flash times (allows the paint to dry just a little....it allows the solvents to "flash" off), took maybe 30 minutes.
2--Degreasing (prepping for primer). I just tried a new de-greaser this time, and it's basically water and soap. Wet/soak a paper towel, rub the part down good, and dry with a dry paper towel. Any fingerprints or sweat drips WILL ruin a paint job, so take the time to wipe it down/scrub it good without touching it with bare skin. I wear rubber or nitrile gloves when I do this. Last step before priming--wipe down lightly with a tack clothe to get any tiny bits of lint/dust, etc (available at any store that sells paint). Now, you are ready to prime.
3--Priming a piece gives the paint something to stick to. For all the already painted parts, I use a primer-sealer, which seals the paint under the new paint you're putting on. If you don't use a sealer, the paint underneath may "bleed" through into your new paint....it probably won't, but I prefer to avoid the issue by simply sealing it. If it's a new, raw, unpainted part, you'll need a primer with an adhesion promoter in it. If it is a part that flex/bend, using a primer that has a flex additive will help avoid cracking. The primer I used on the fender flares has sealer, adhesion and flex agent all added in. Metal parts that are raw will need to be prepped and use a self-etching primer, which literally etches the metal to get better adhesion. Once you have the parts primed, allow them to dry for a day or 2 so all the solvents are evaporated. If the surface is rough, you can sand it with 400, but be careful no to perforate the primer coat....if you do, just touch it up with a little of the primer you used.
4--Painting. Make sure the paint you use is compatible with the primer and paint it in the same position that it will be on the truck....if it's a hood scoop, paint it laying flat on a table, fender flares need to be "hung" vertically--this is so the metallic particles (if your paint has it) can settle correctly.....yes, it will look bad if you don't do this. It's hard to describe how to paint, so just search YouTube. The basics are still the same, except, you can't adjust the fan pattern or the air or paint flow with a rattle-can. It really is "ya just have to try it to do it"... Follow the directions on the can....hold 6-8 inches from the surface and move in a sweeping motion with about 50% overlap, blah blah.....
First, lightly wipe the part down with a tack clothe. The first coat, all I do is try to cover the primer by 50-75%. Let it flash for 15-20 min, add another coat that will fully cover the primer. At this point, I take my LED flashlight (on the 1000 lumen setting), and shine it on the paint and see if I can see the primer through the paint, and if I can, add another coat all over it. Let it flash again, and then re-check it with the flashlight. I do this until I can't see ANY primer, and then add a final wet coat...a little heavier/thicker coat....be careful, because this is where you can easily get runs in the paint. I let the last color coat flash/dry for about an hour before I clear coat it.
5--Clear-coating. I heard on one of the TV car shows, that clear coat is just paint, without the color. It does, of course, have UV inhibitors and hardeners in it. I try to get 3 good coats of clear on everything I paint, just incase I need to polish out any imperfections. The Tremor flares are drying as I type this, but I won't get them mounted for another couple weeks due to a trip to Louisiana this Friday.
As far as the paint and clear I use, I get mine from R&E Paint Supply online. The color matched spray cans are easy to use and the paint match has been perfect, as far as I can tell. Their customer service is great and they can answer just about any question you have about their products. They also sell a 2K clear coat that has a hardener in the can that you activate when your ready to clear coat. CAUTION !!!!--You MUST wear a good respirator and have good ventilation when painting/clearing !!!! Spend $30-$40 and INVEST in a good respirator....I use one made by 3M and can get the replacement filters where they sell the respirators. If I can smell ANY chemical scent, I change the main filters.....I change the little pre-filters after I paint and after I clear. I also use a "disposable" painter coverall when painting and clearing keeps your clothes clean and any lint from getting in the paint or clear.
Before and after prepping the factory paint--

I'll try to answer any questions any of you have, but it really boils down to just trying it and learning from your mistakes.....I've made plenty over the years.
Again, this is how I do it and it works for me. Your results may vary.
Sponsored
