XLT vs Lariat sun visor colors?

OP
OP
TexasTruck

TexasTruck

Active Member
Joined
Jan 10, 2020
Threads
1
Messages
32
Reaction score
55
Location
Central Texas
Vehicle(s)
2019 Ford Ranger XLT CC
Vehicle Showcase
1
Has anyone positively confirmed the wiring/connectors for the Lariat visors isn't included with the XLT trim or are we assuming the wiring/connectors for the visors aren't present in the XLT trim?
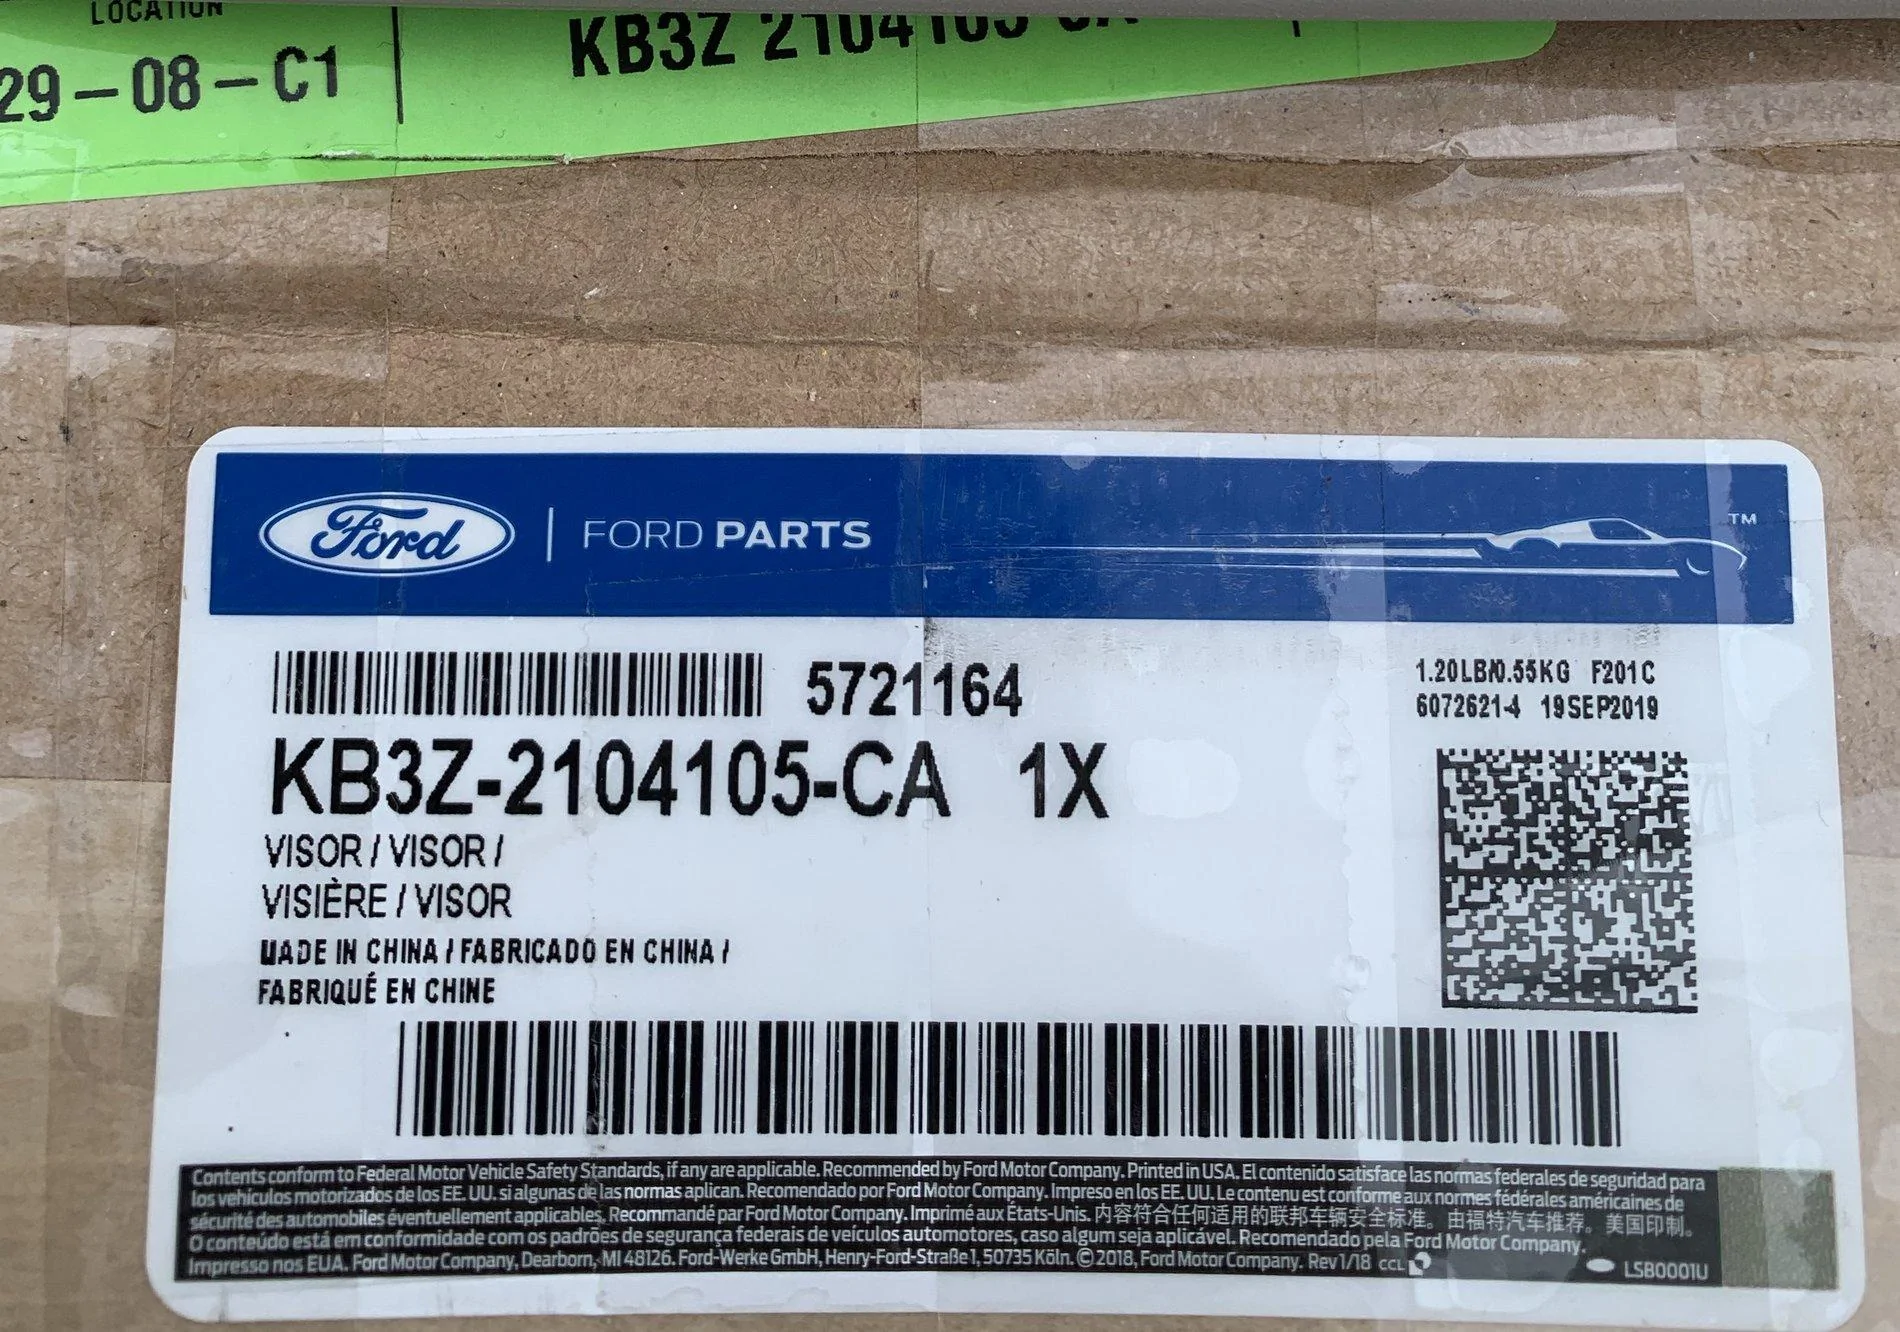
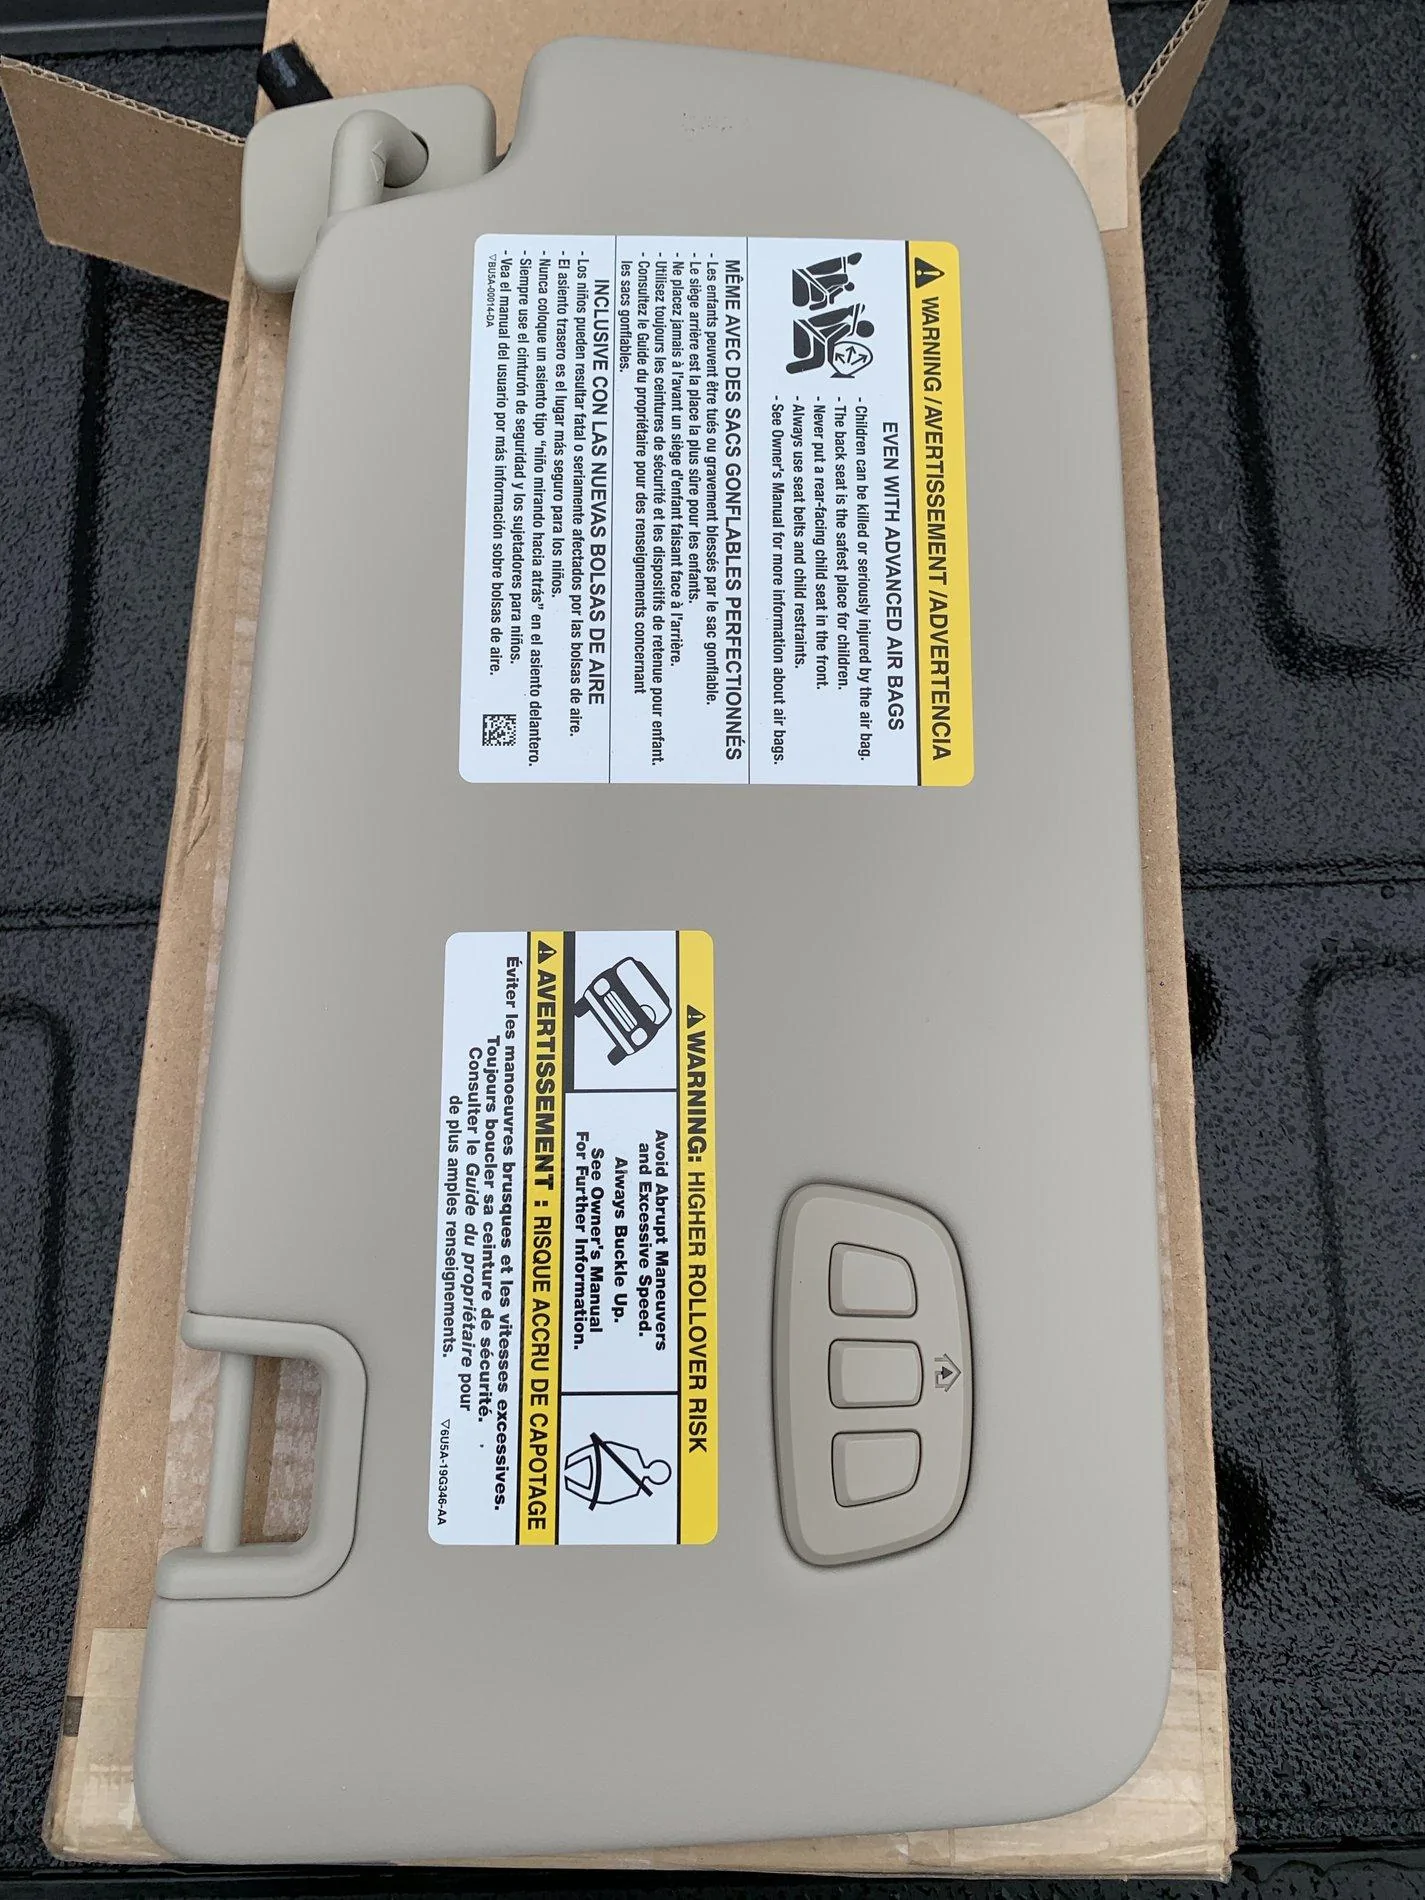
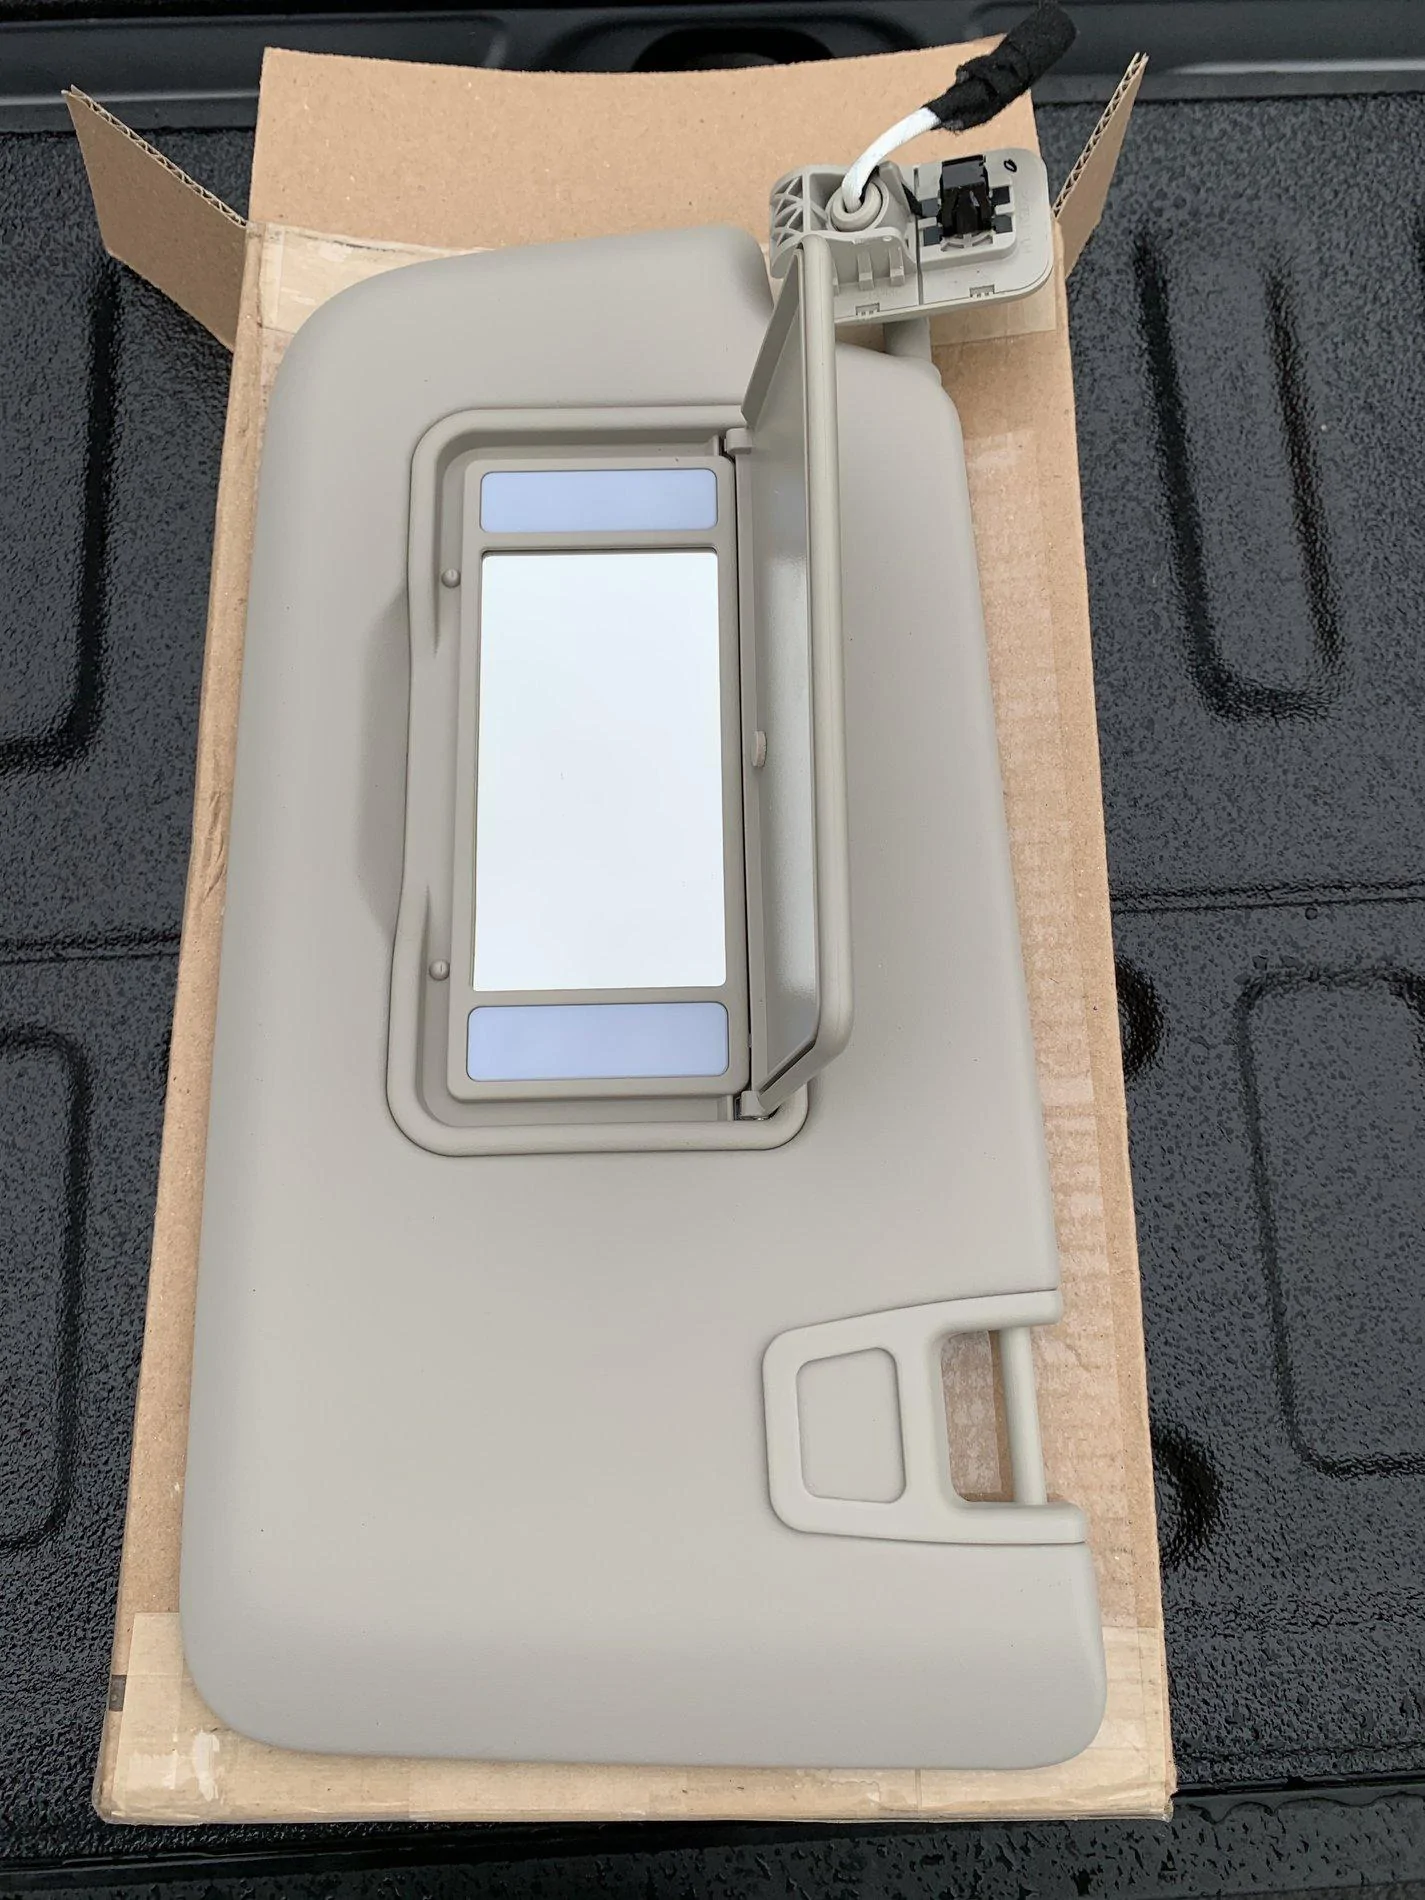
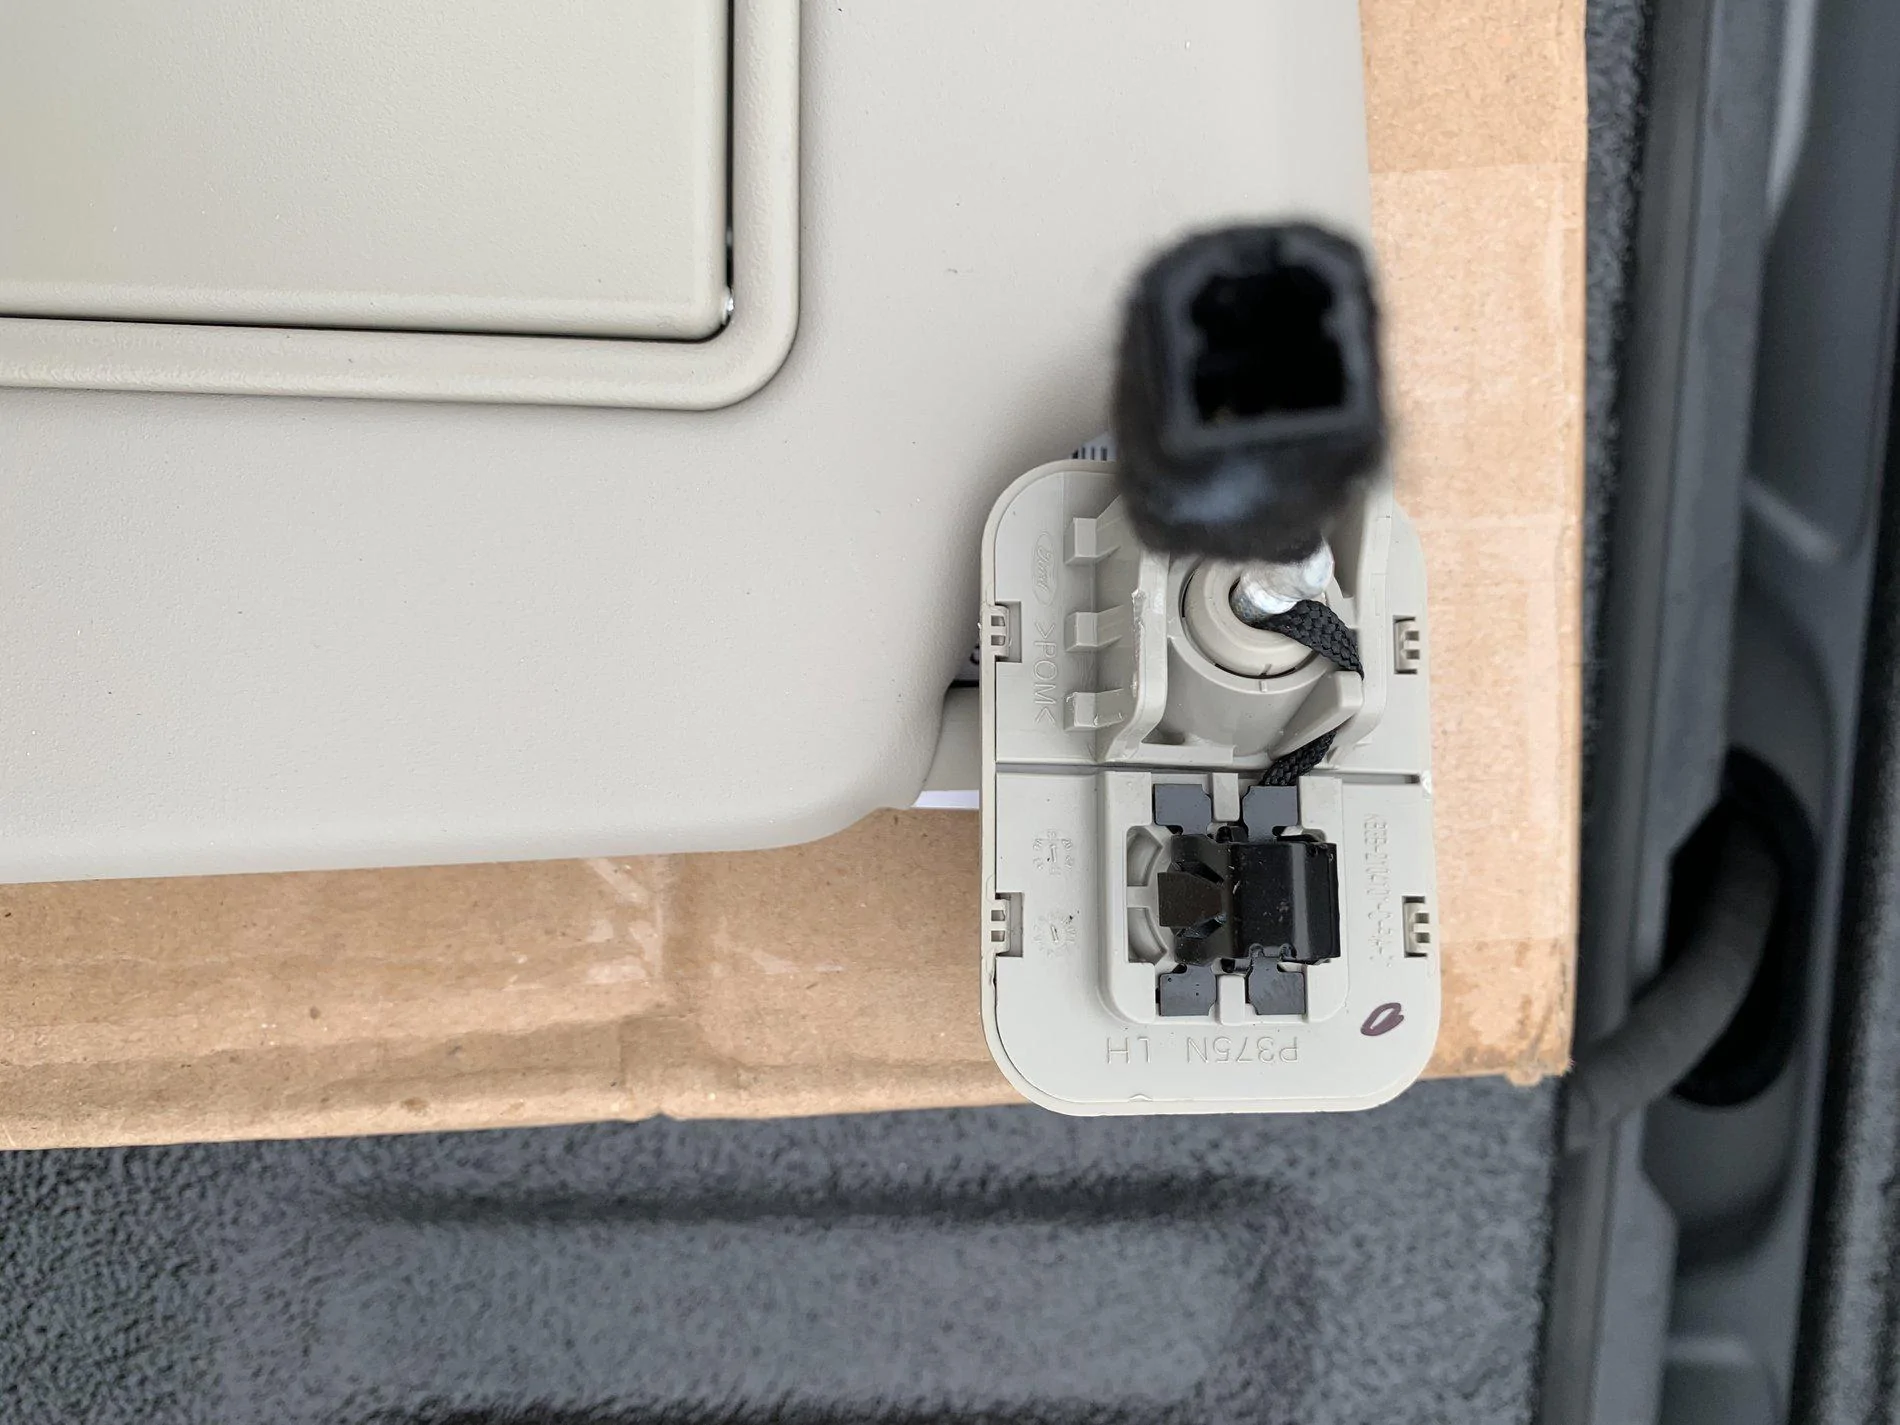
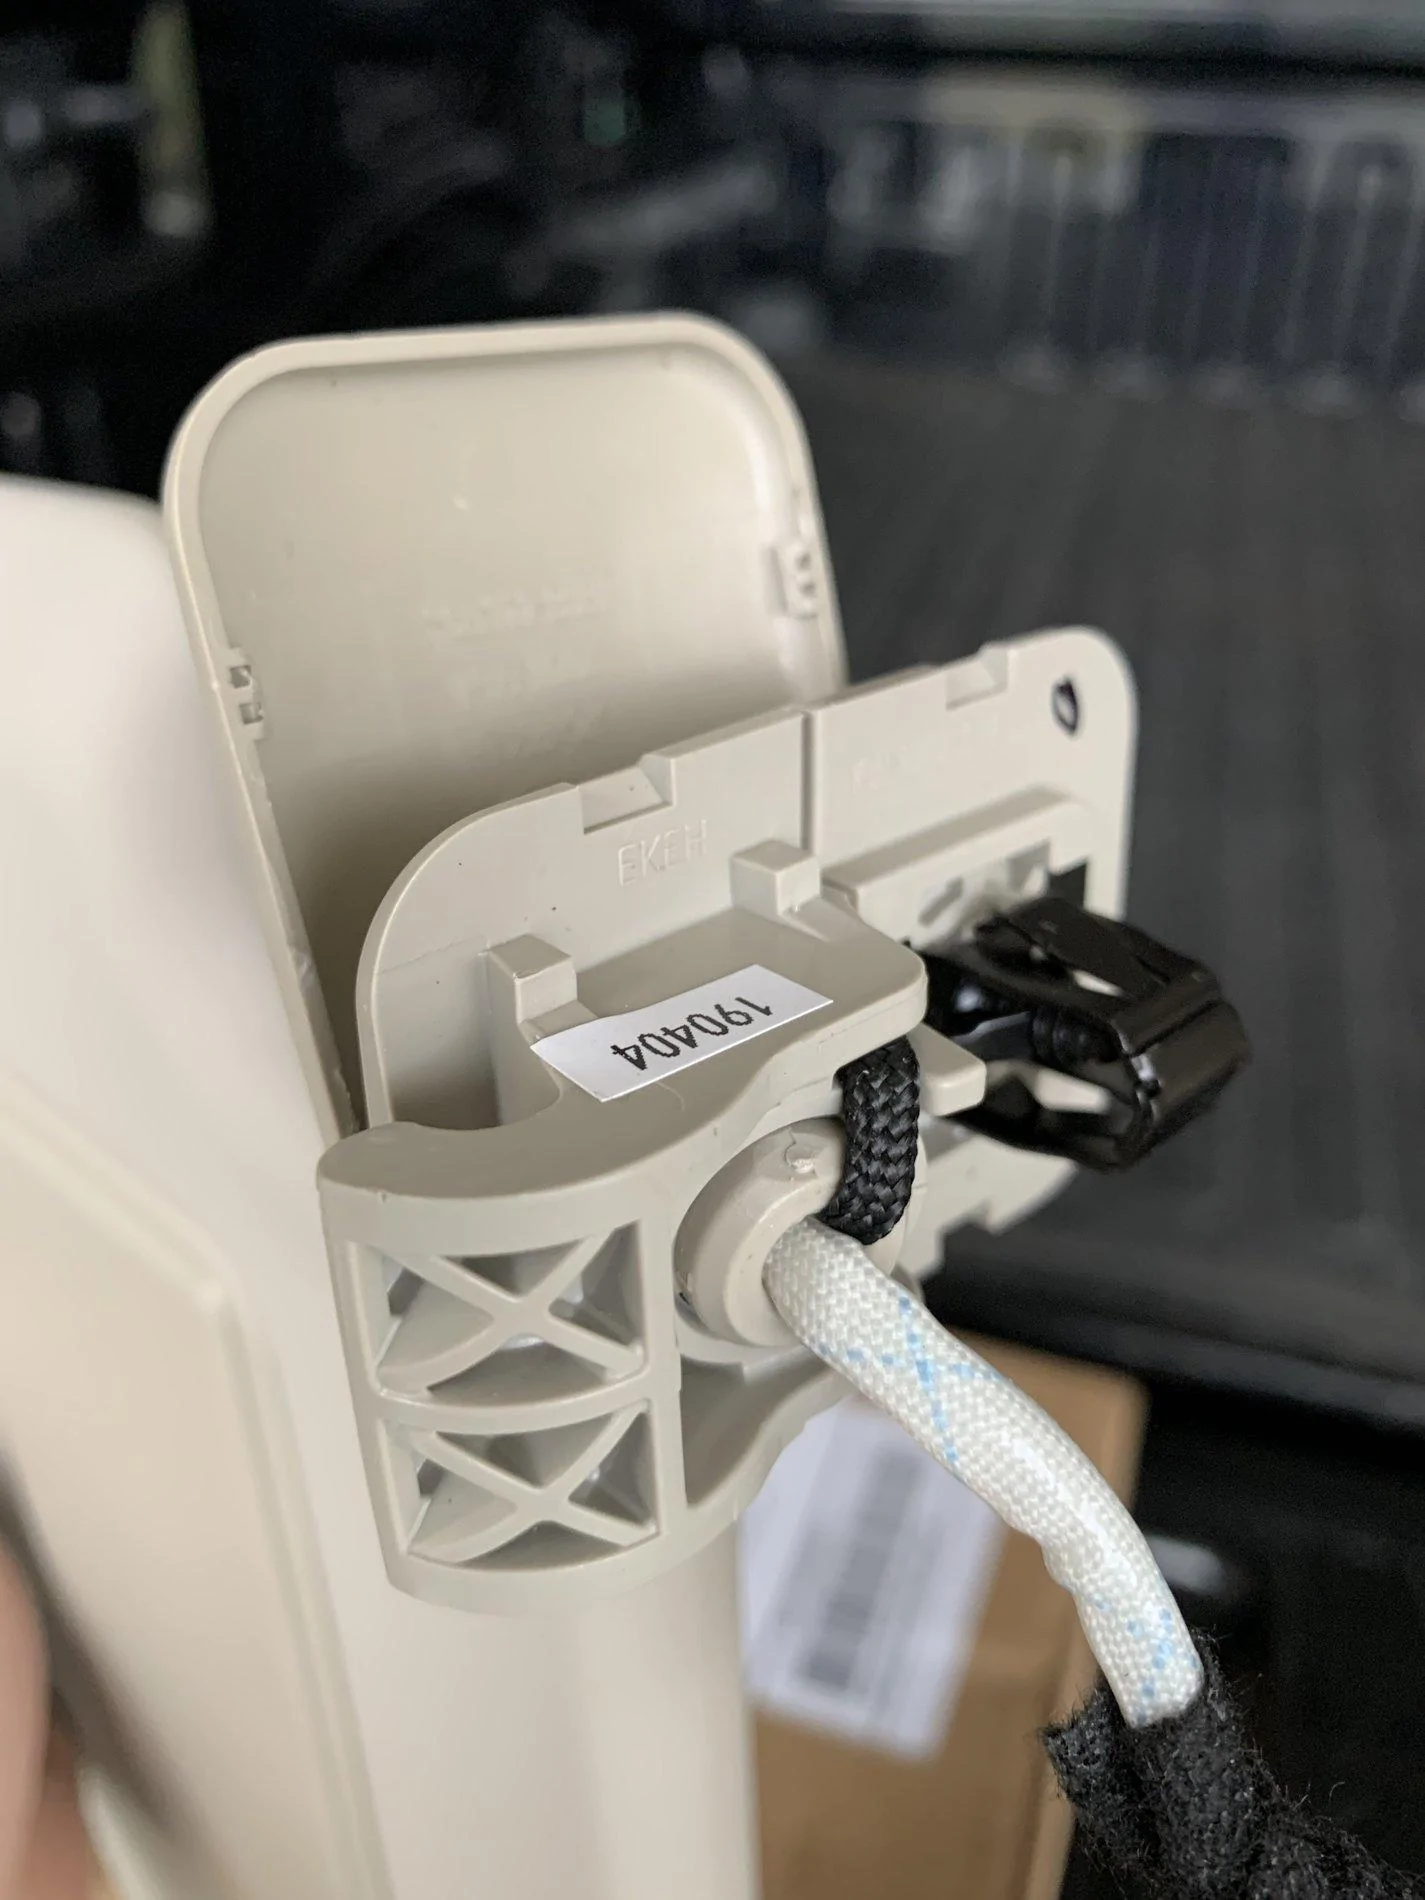
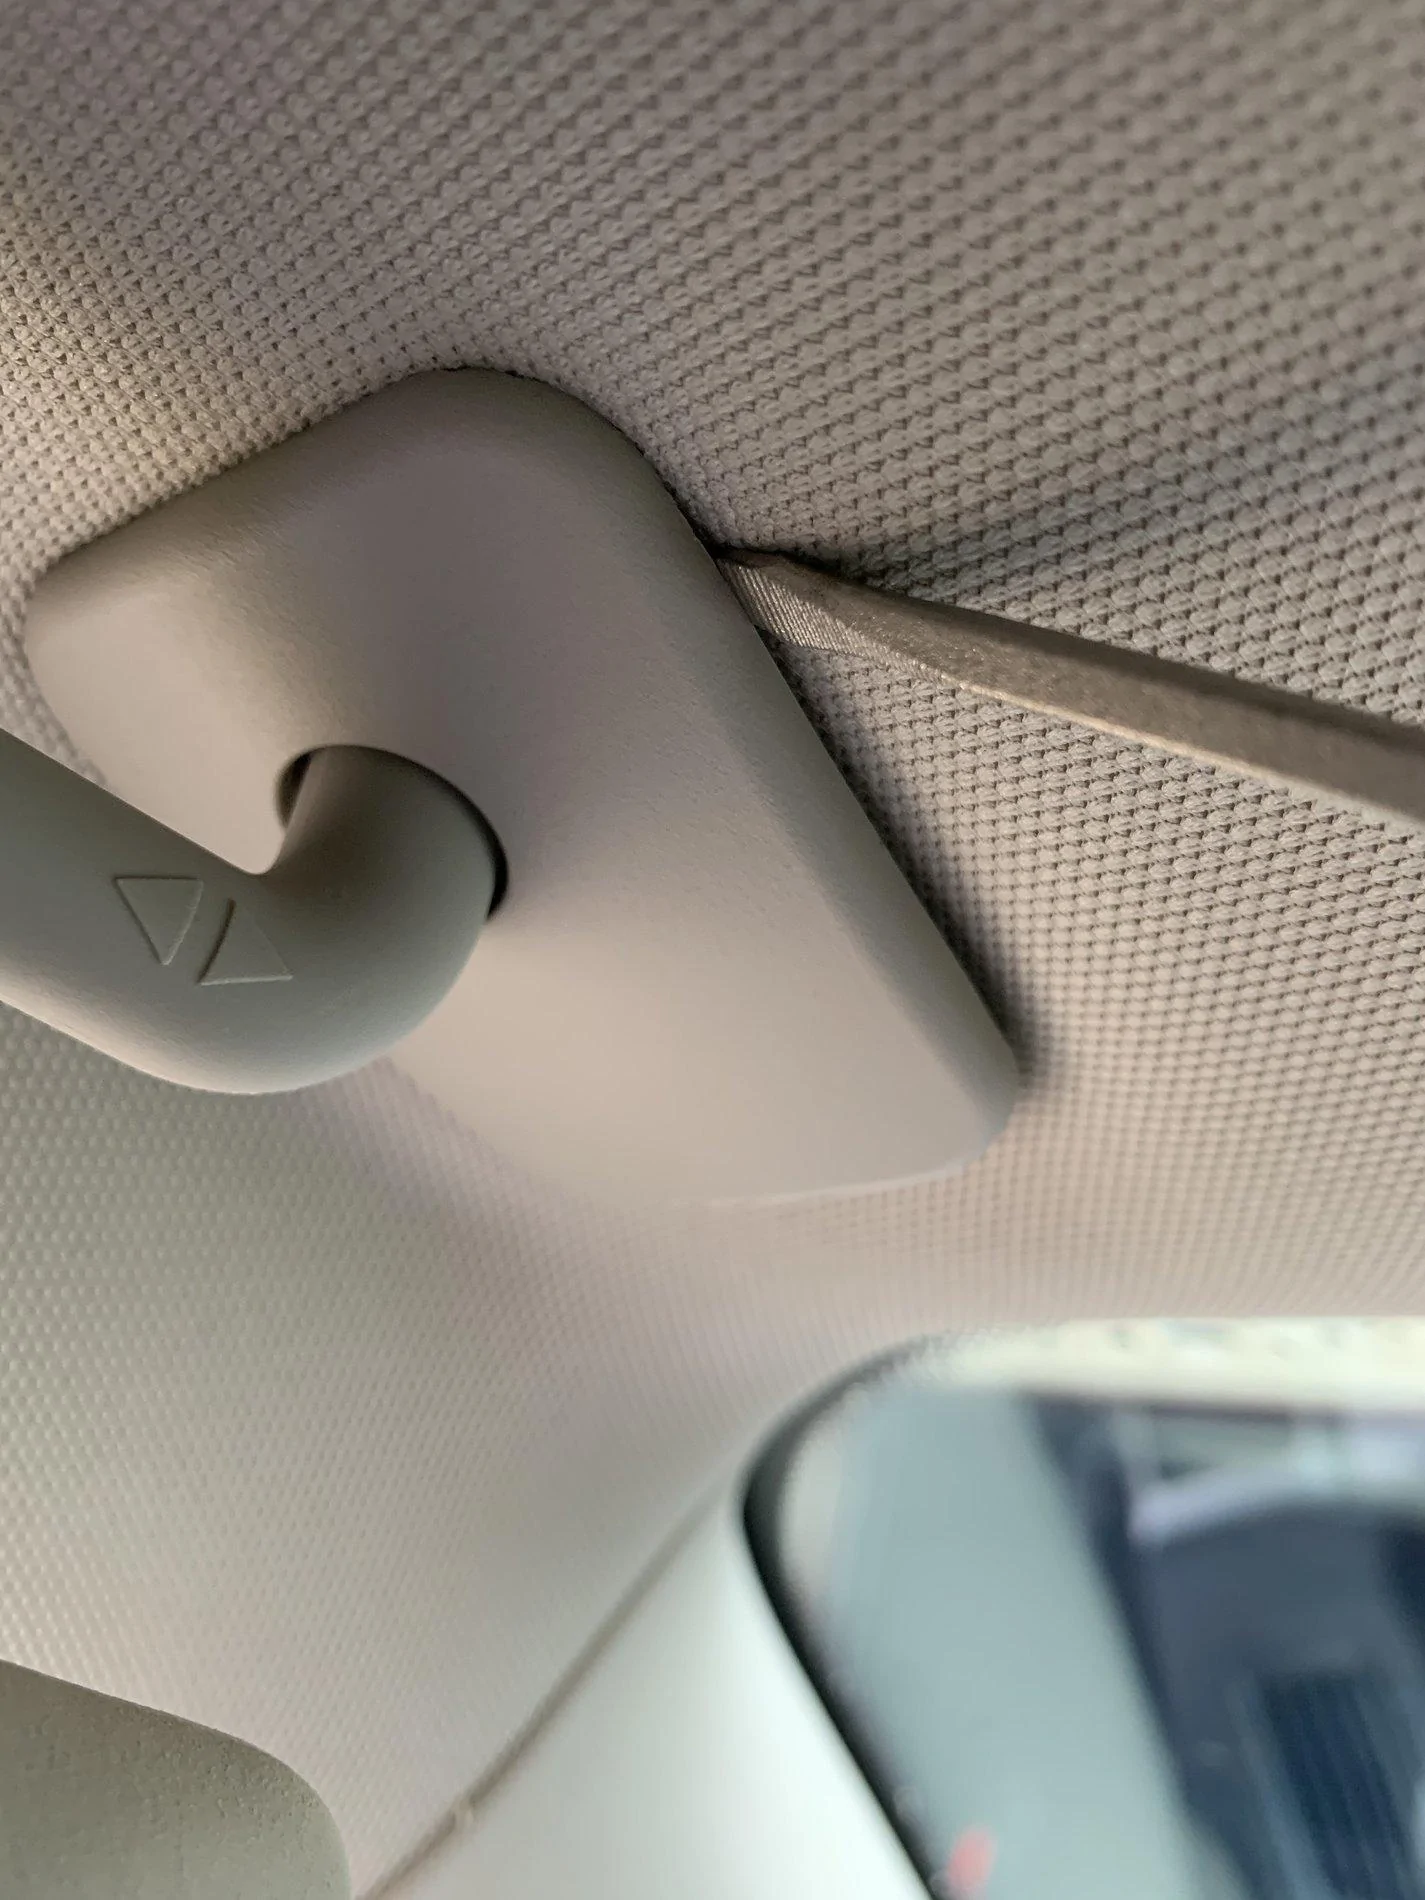
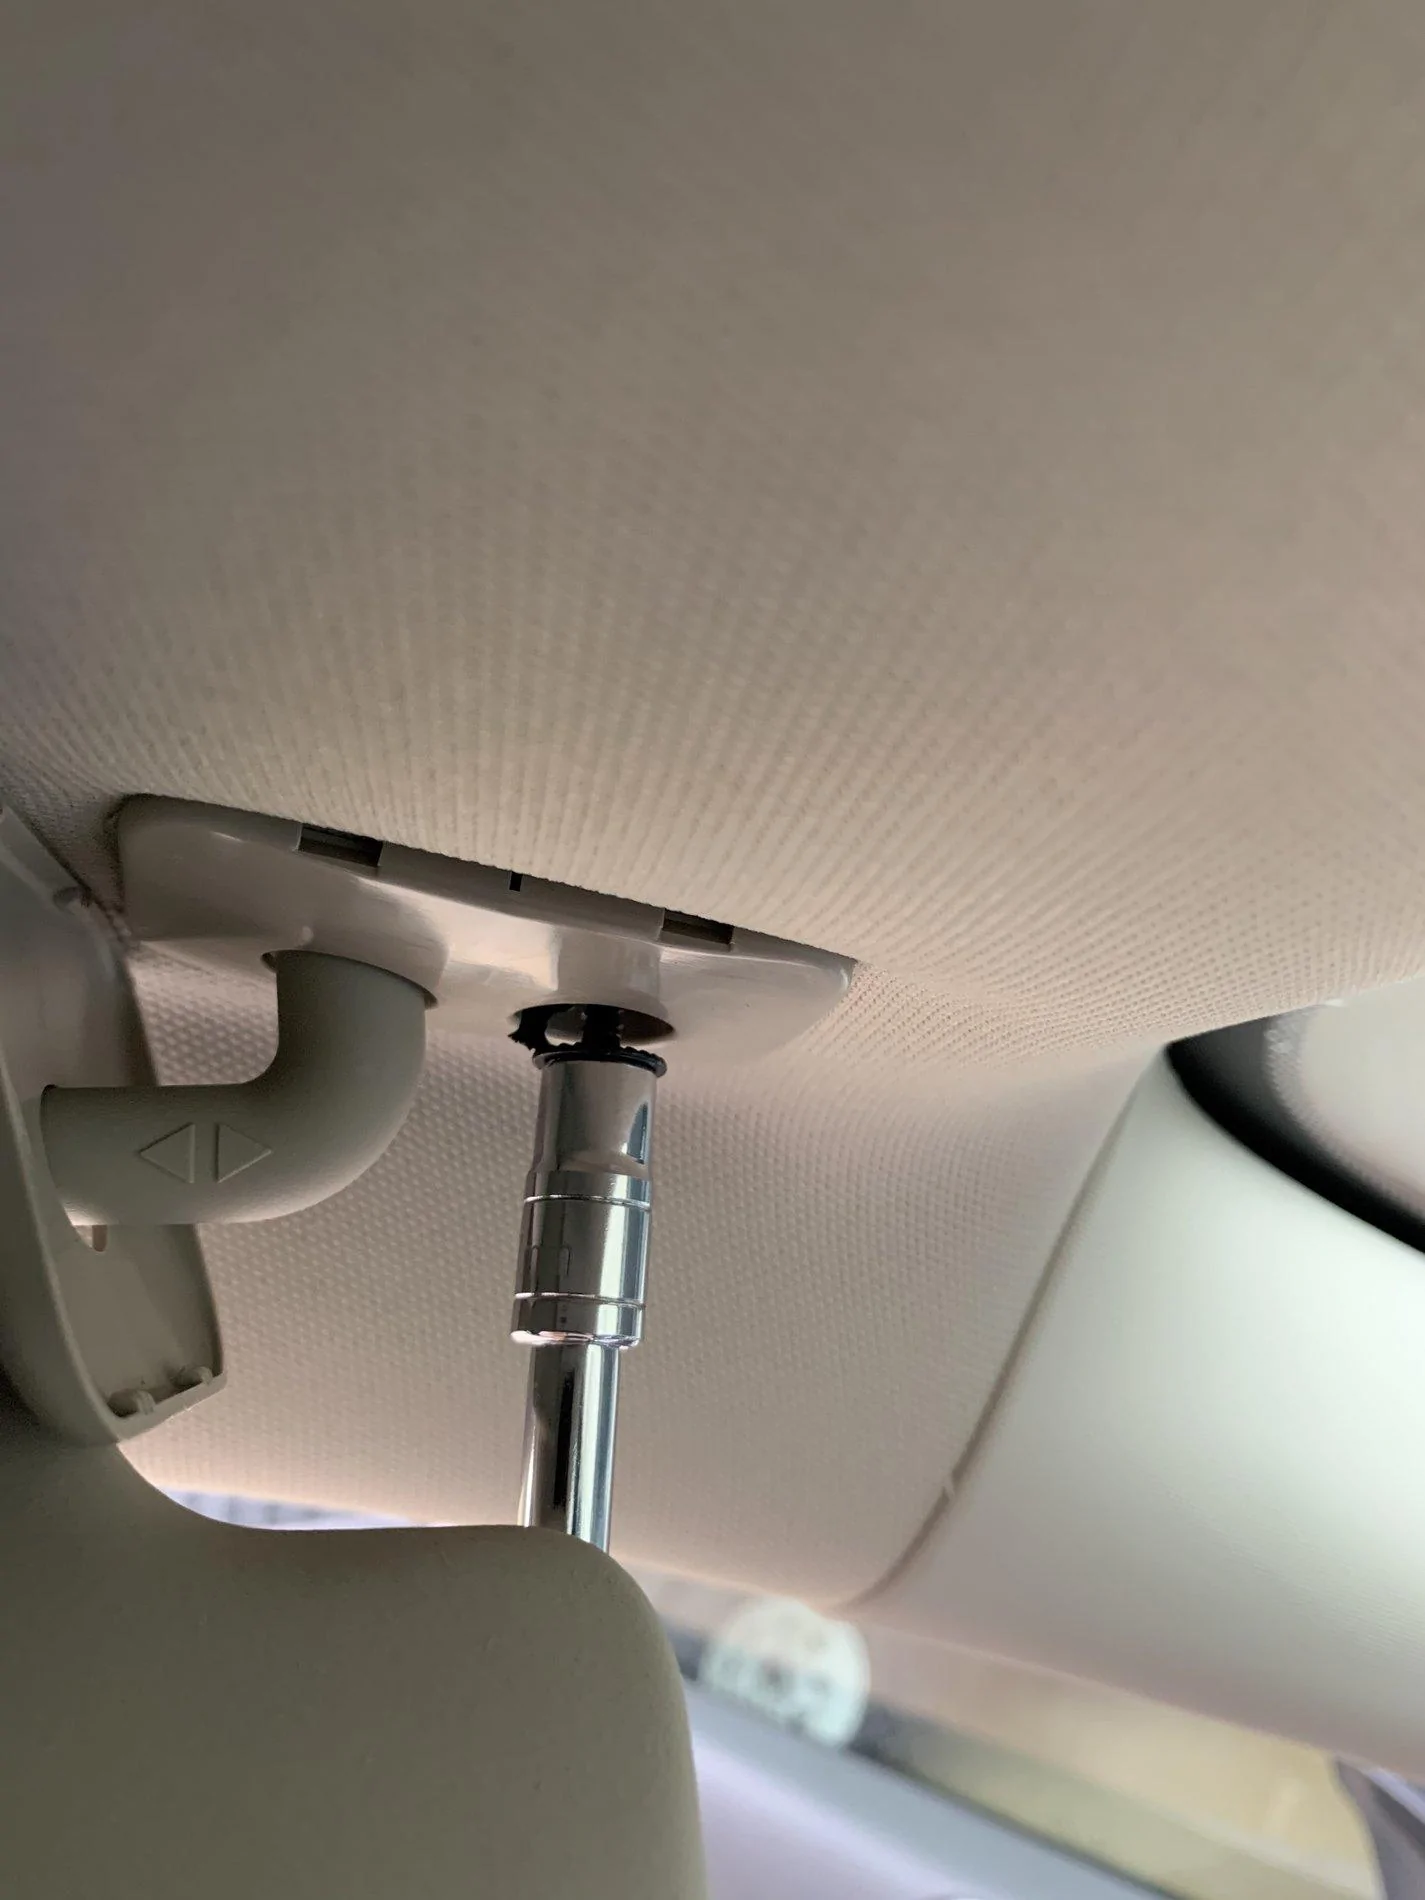
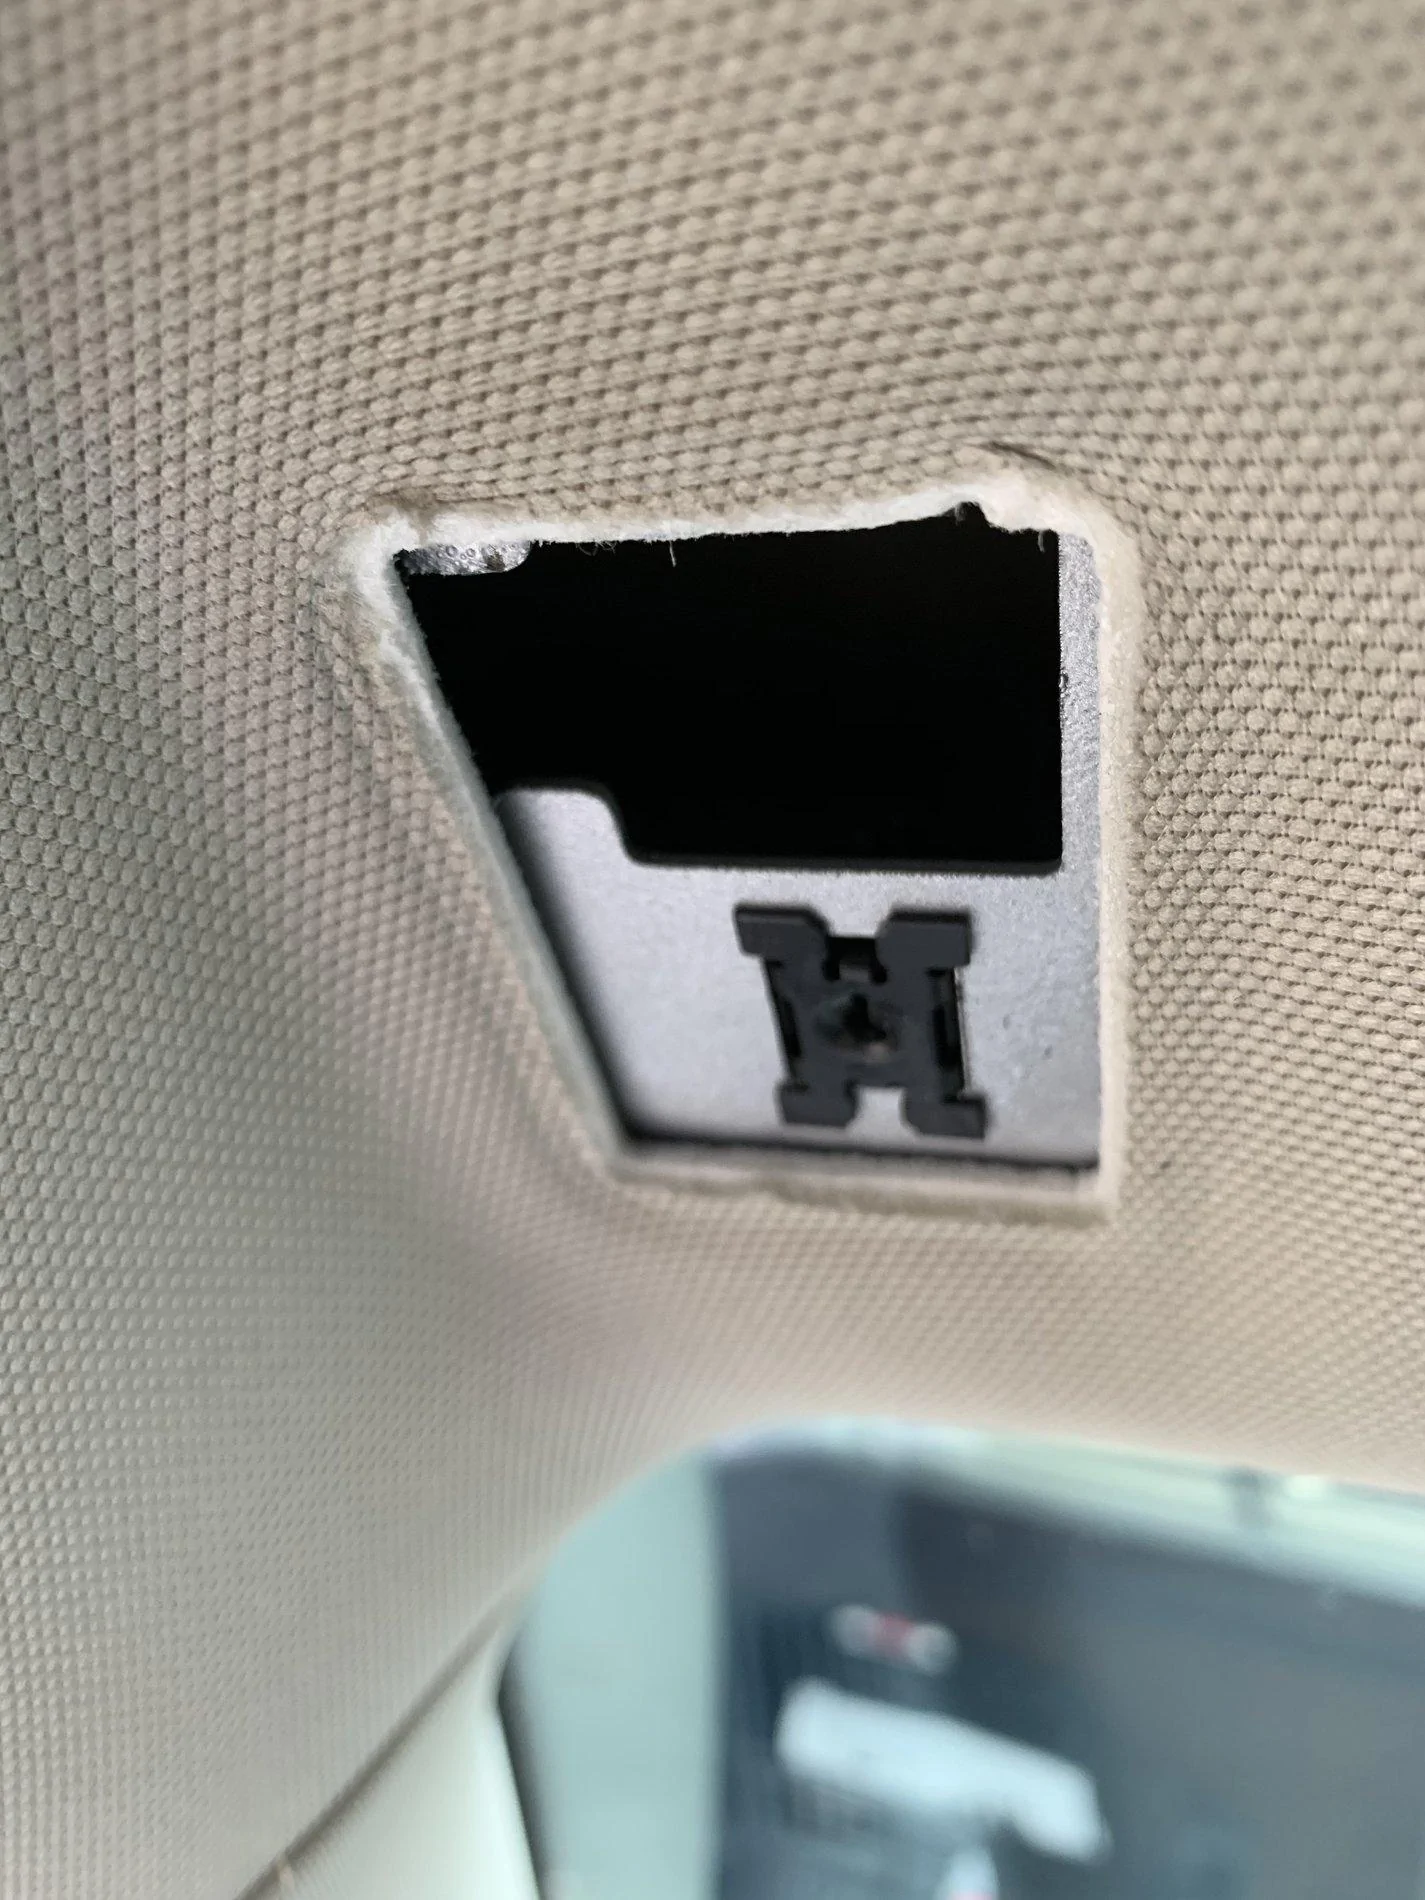
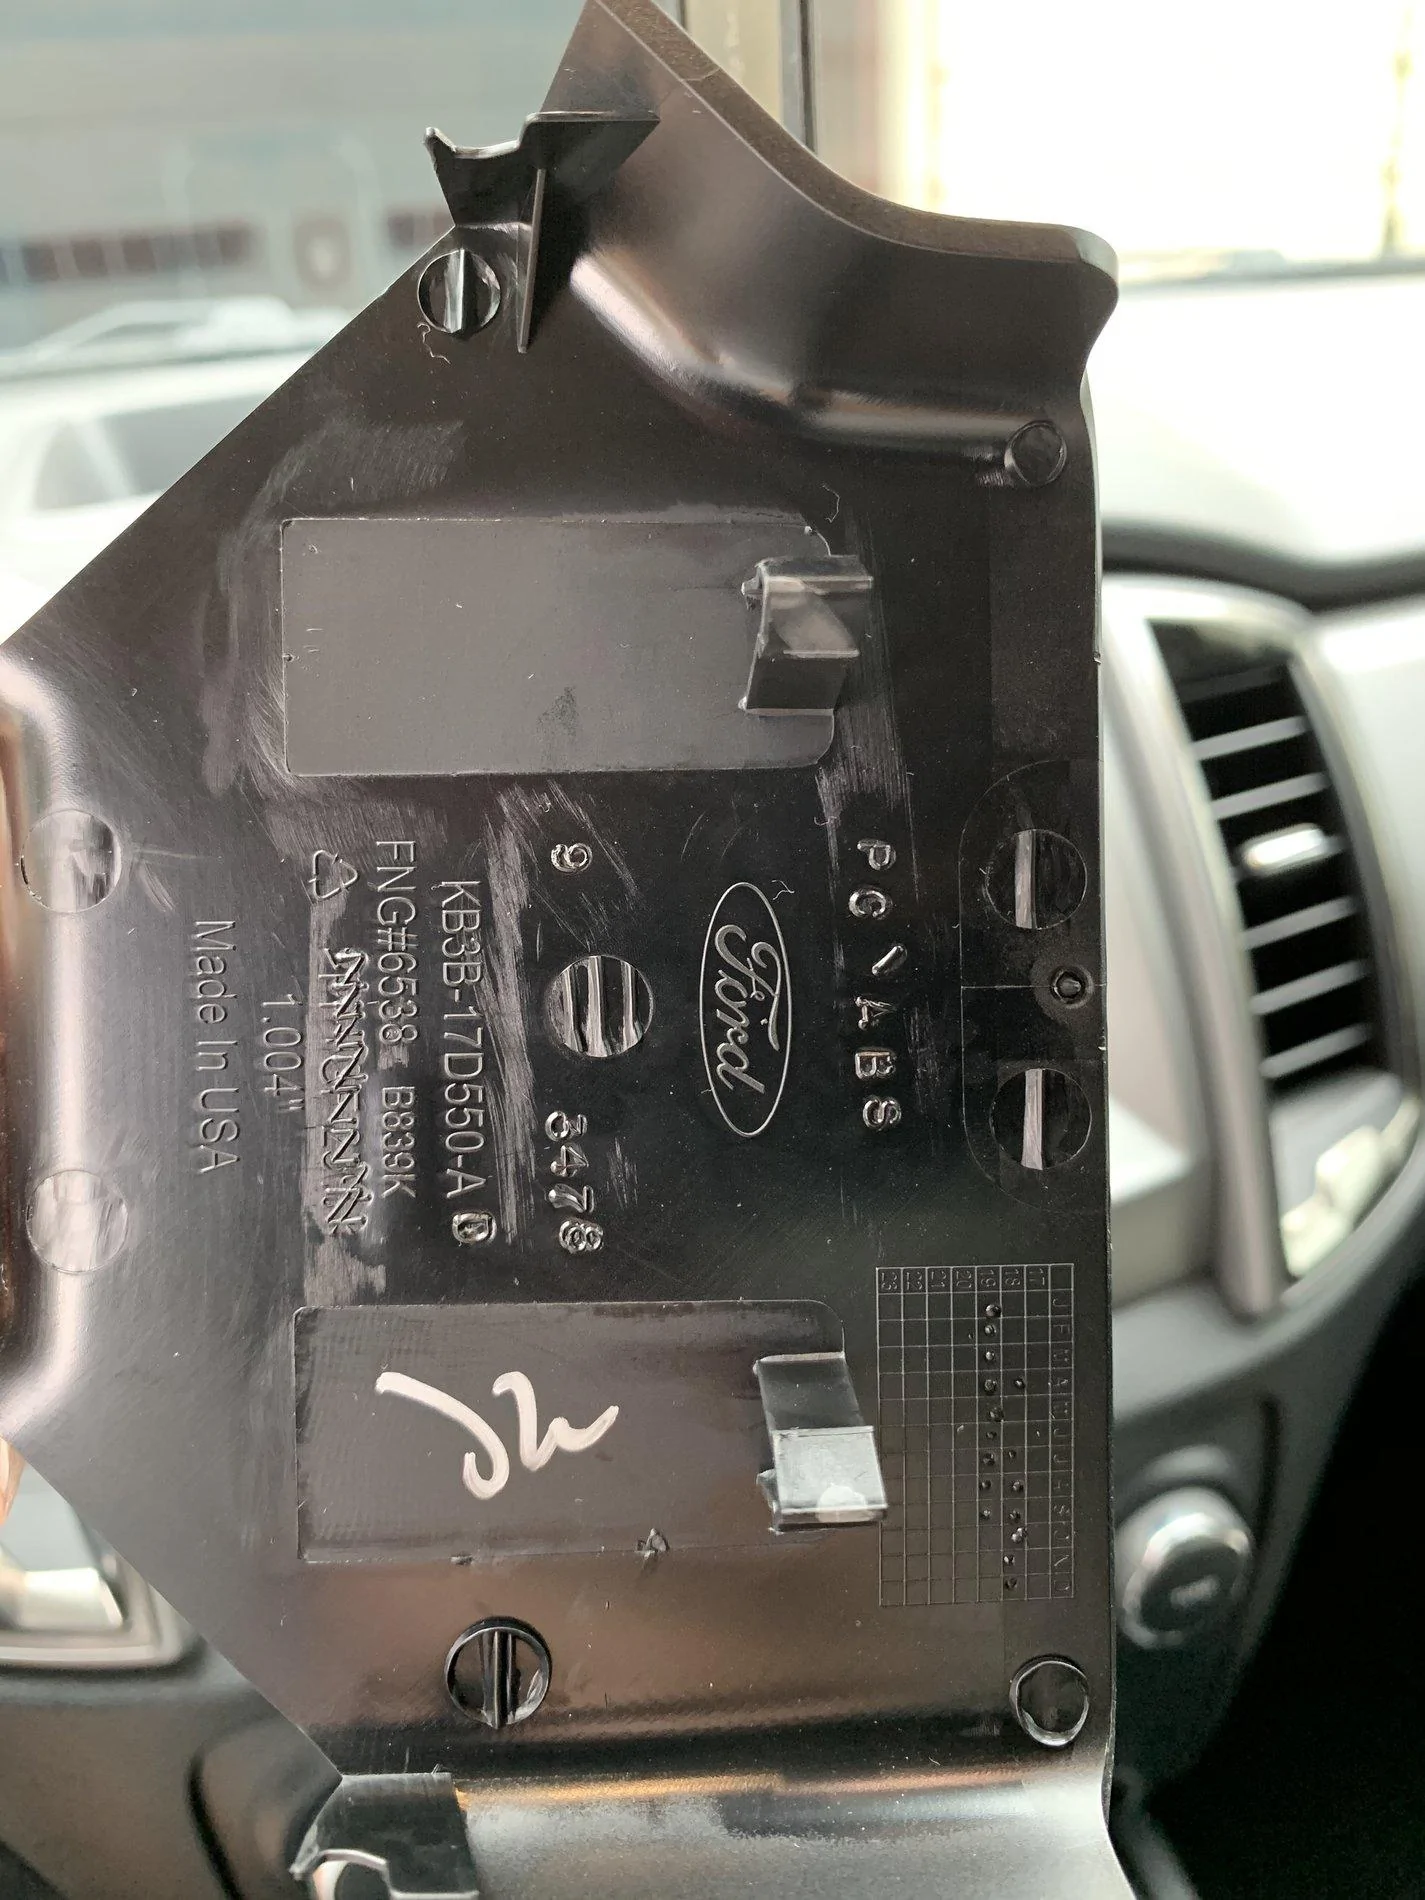
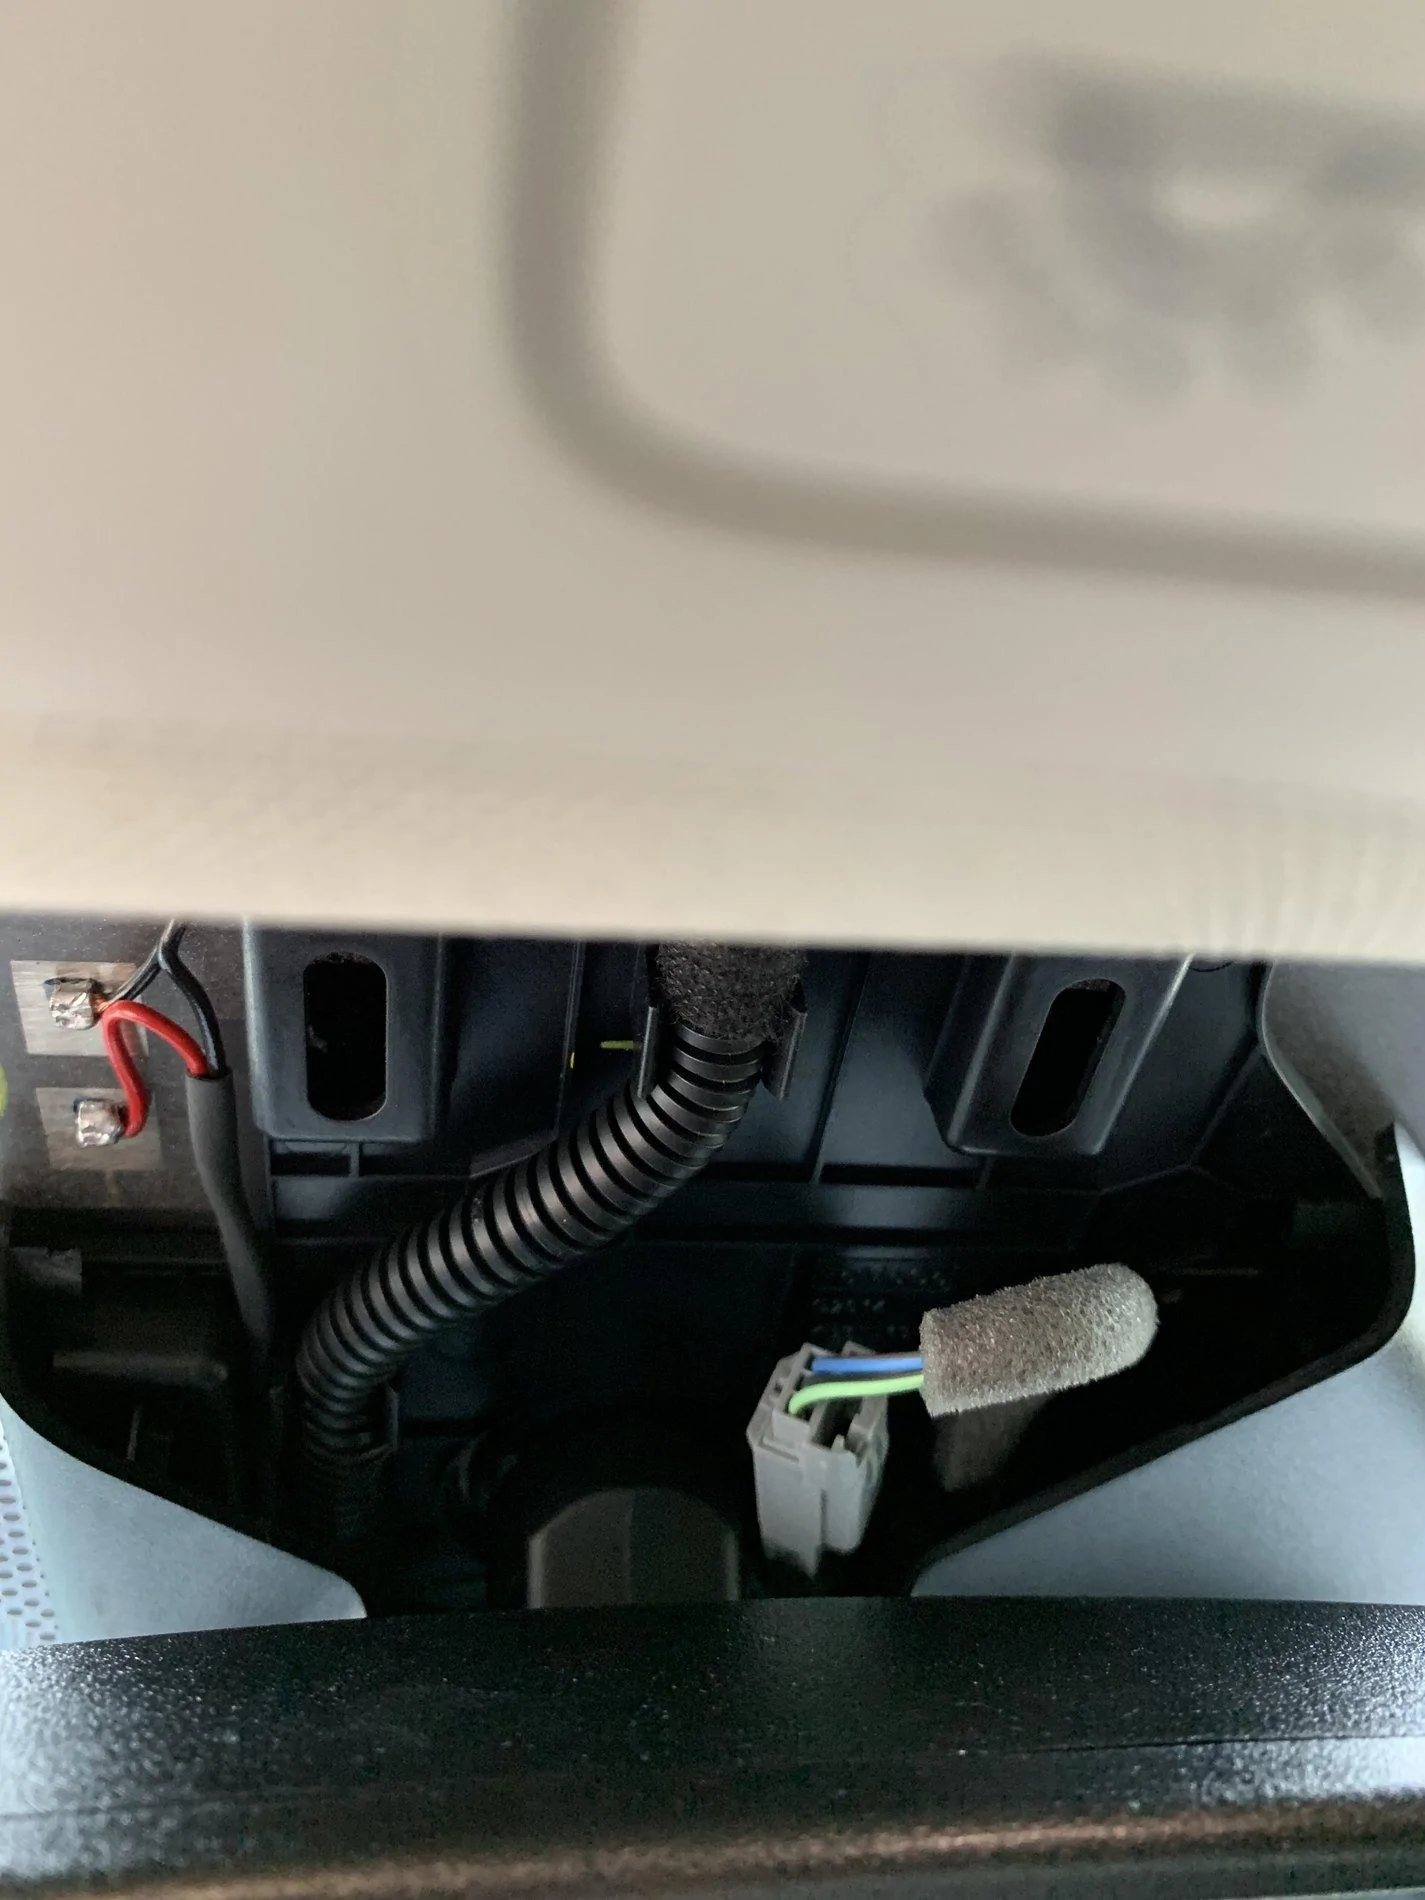
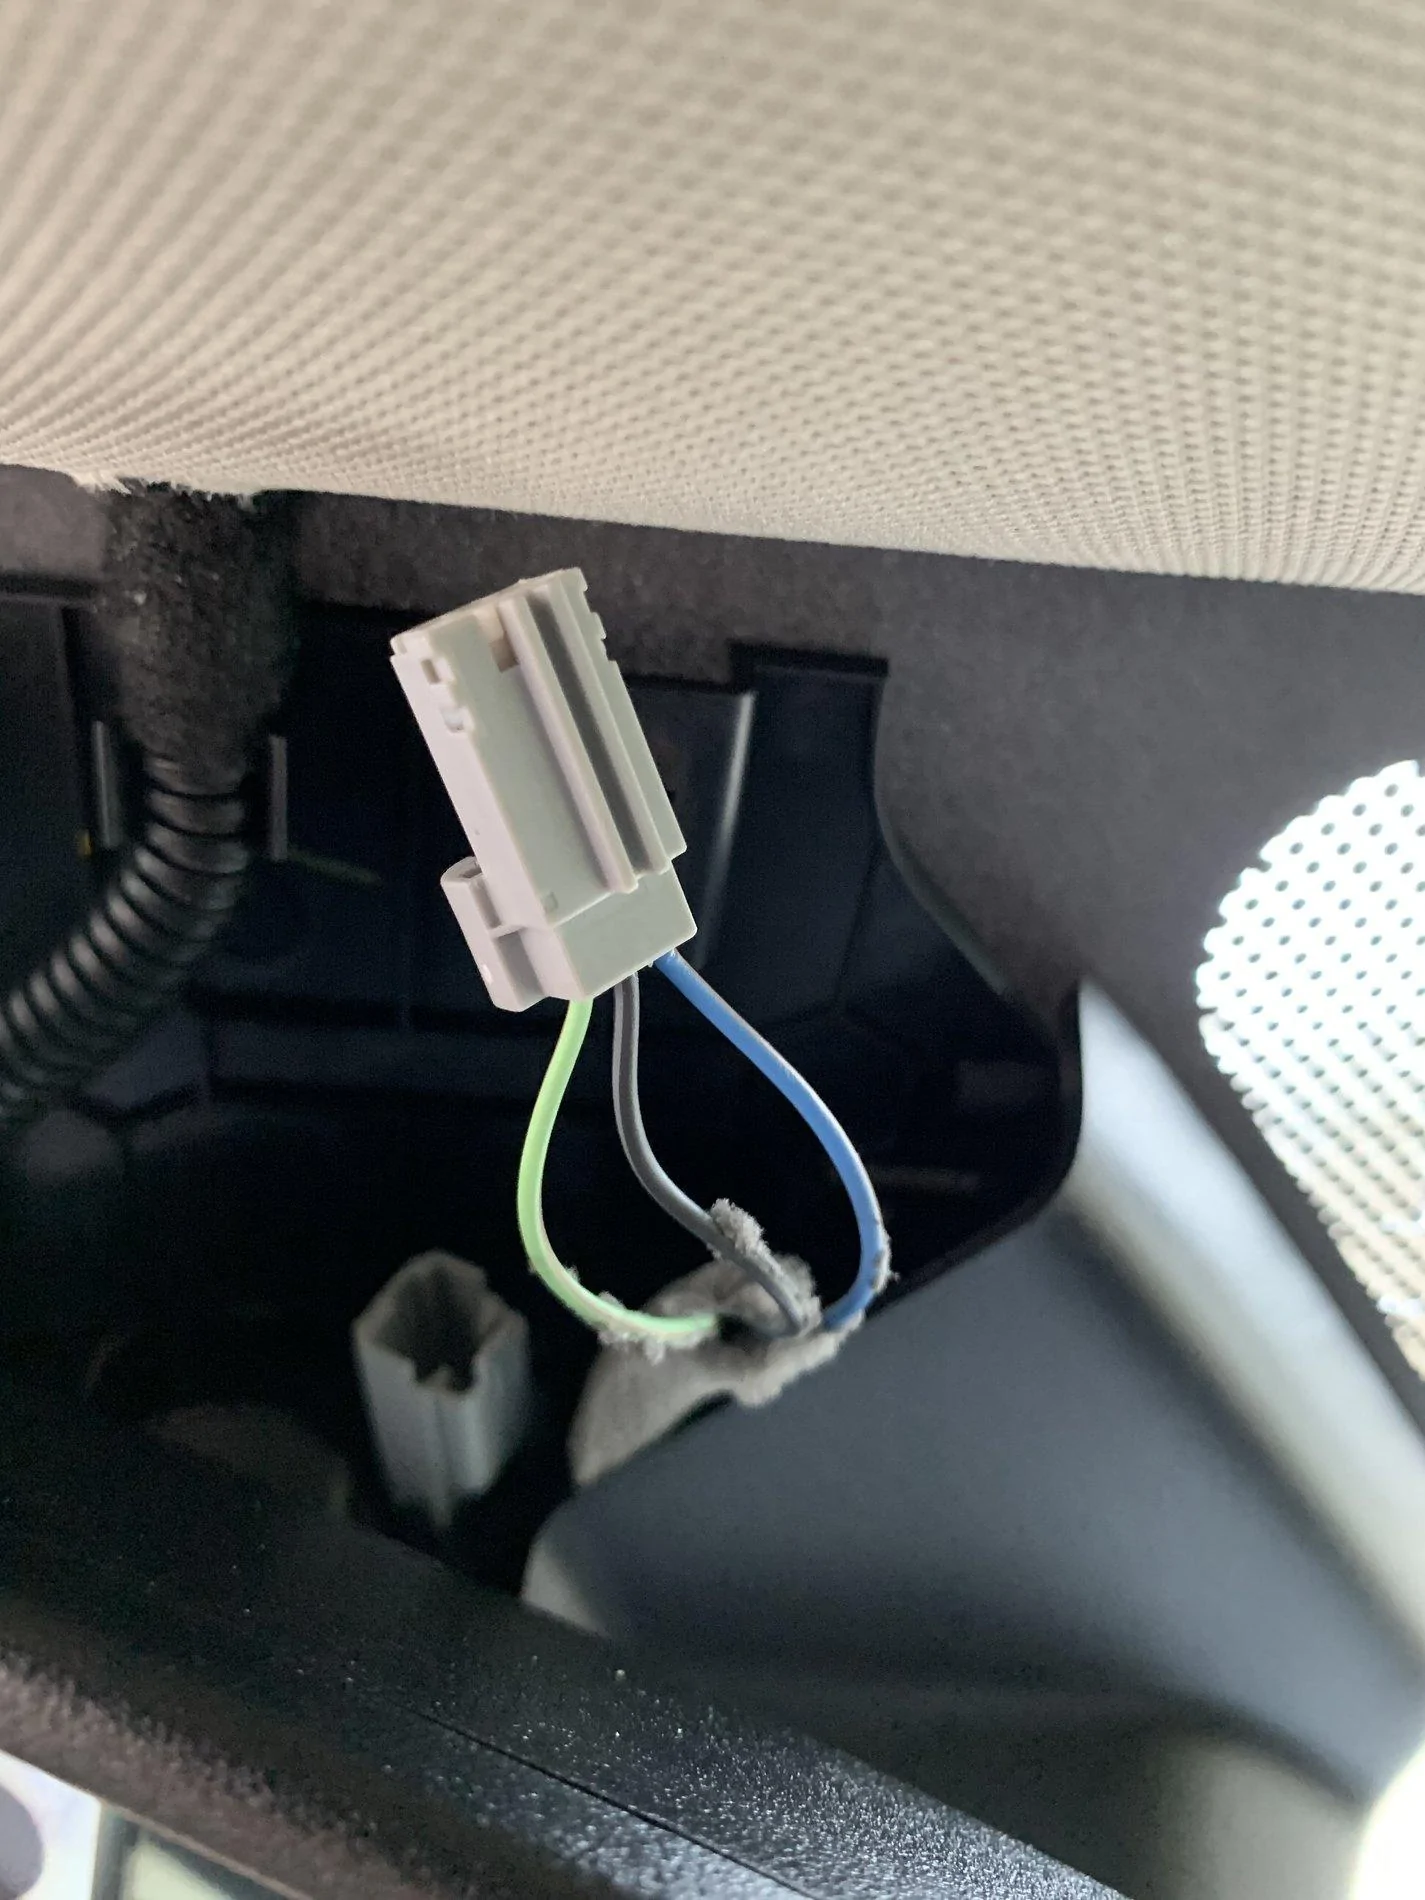
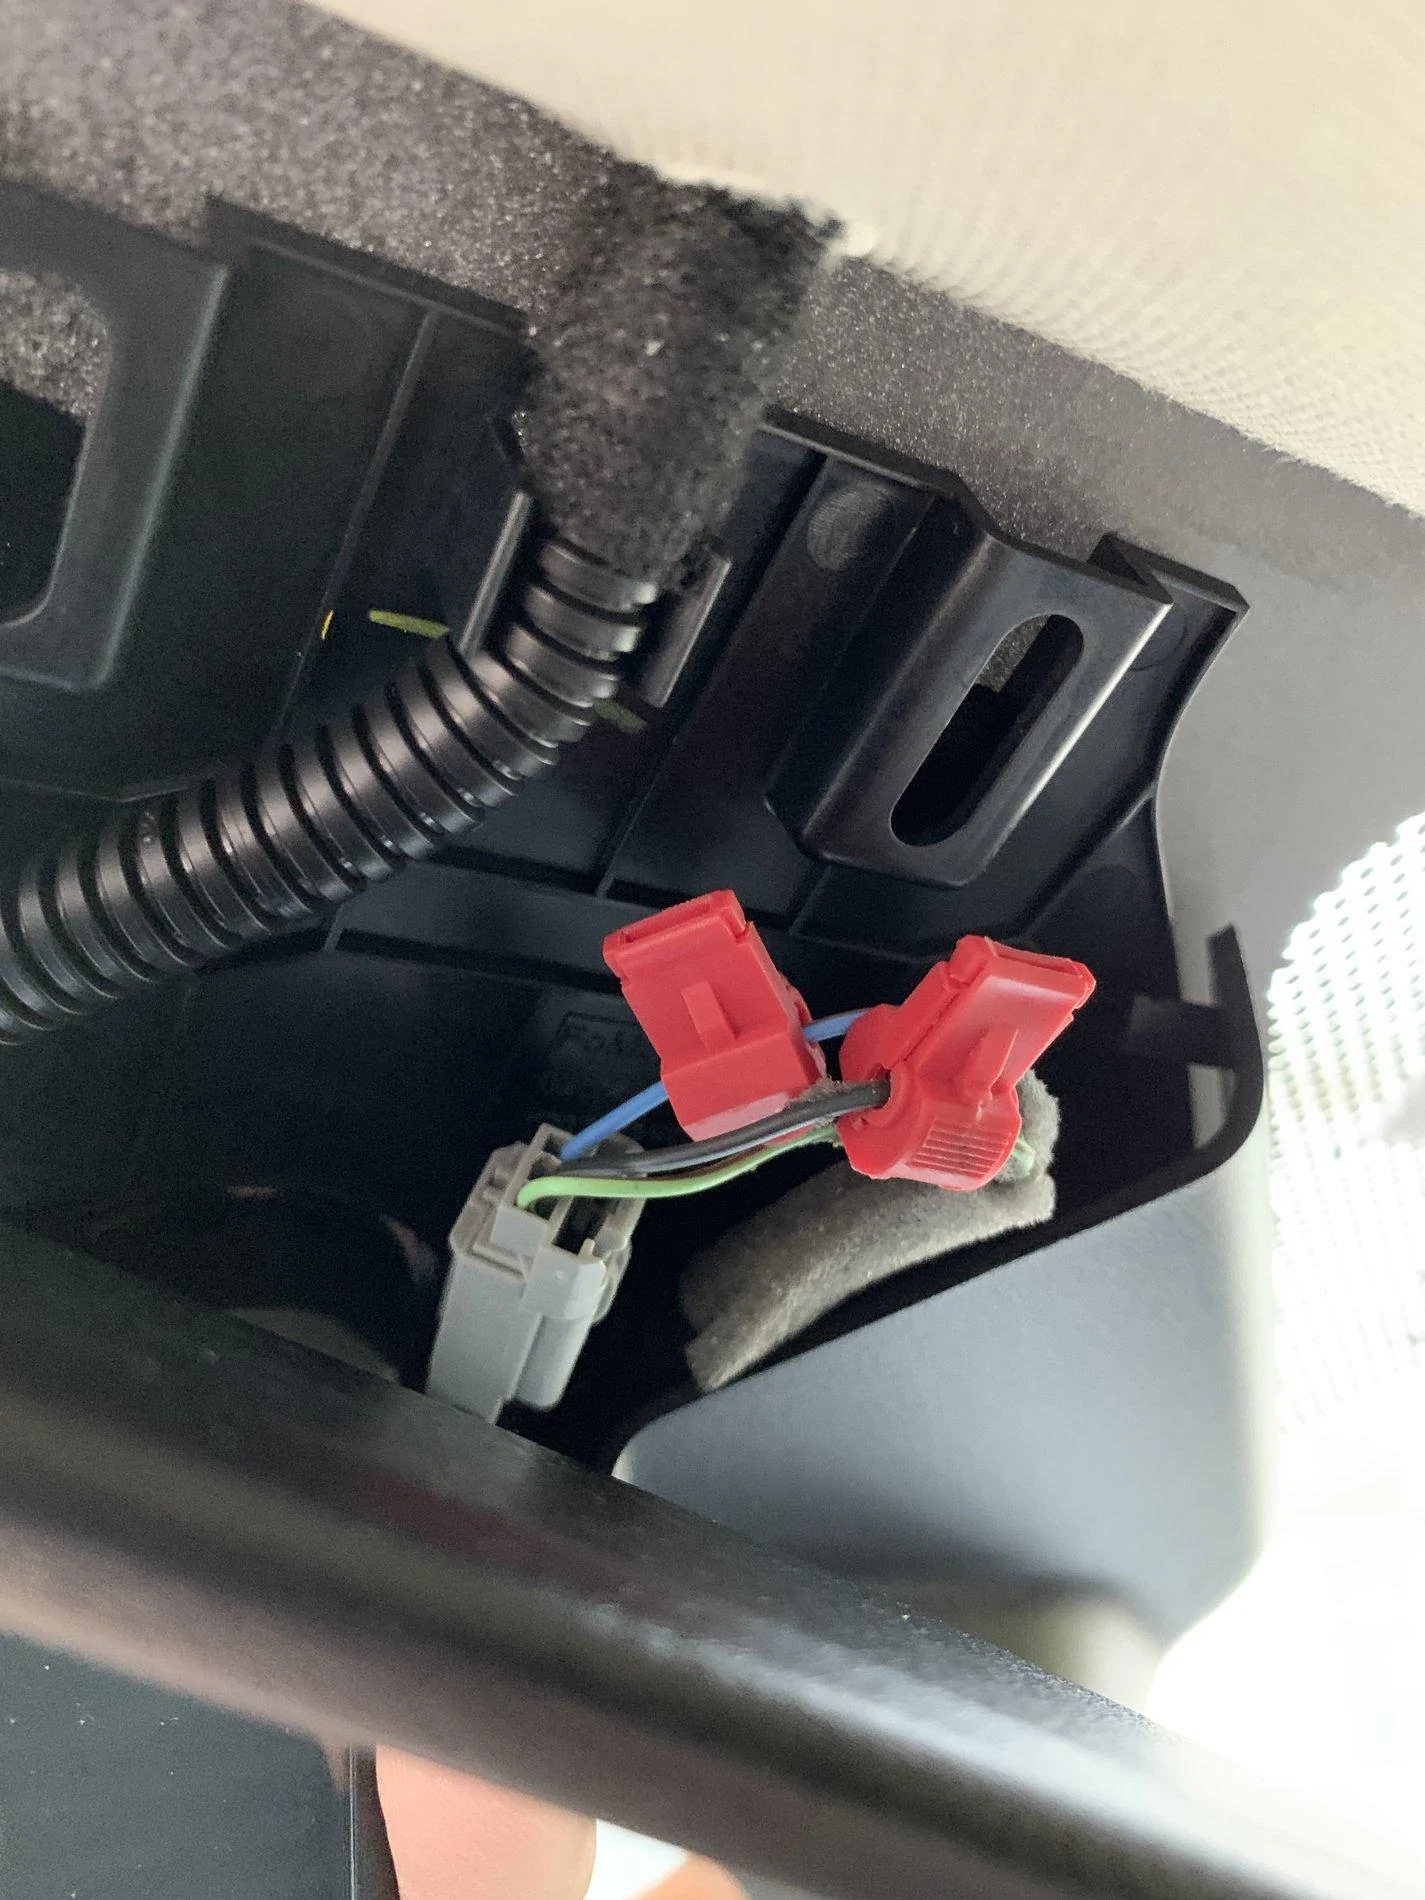
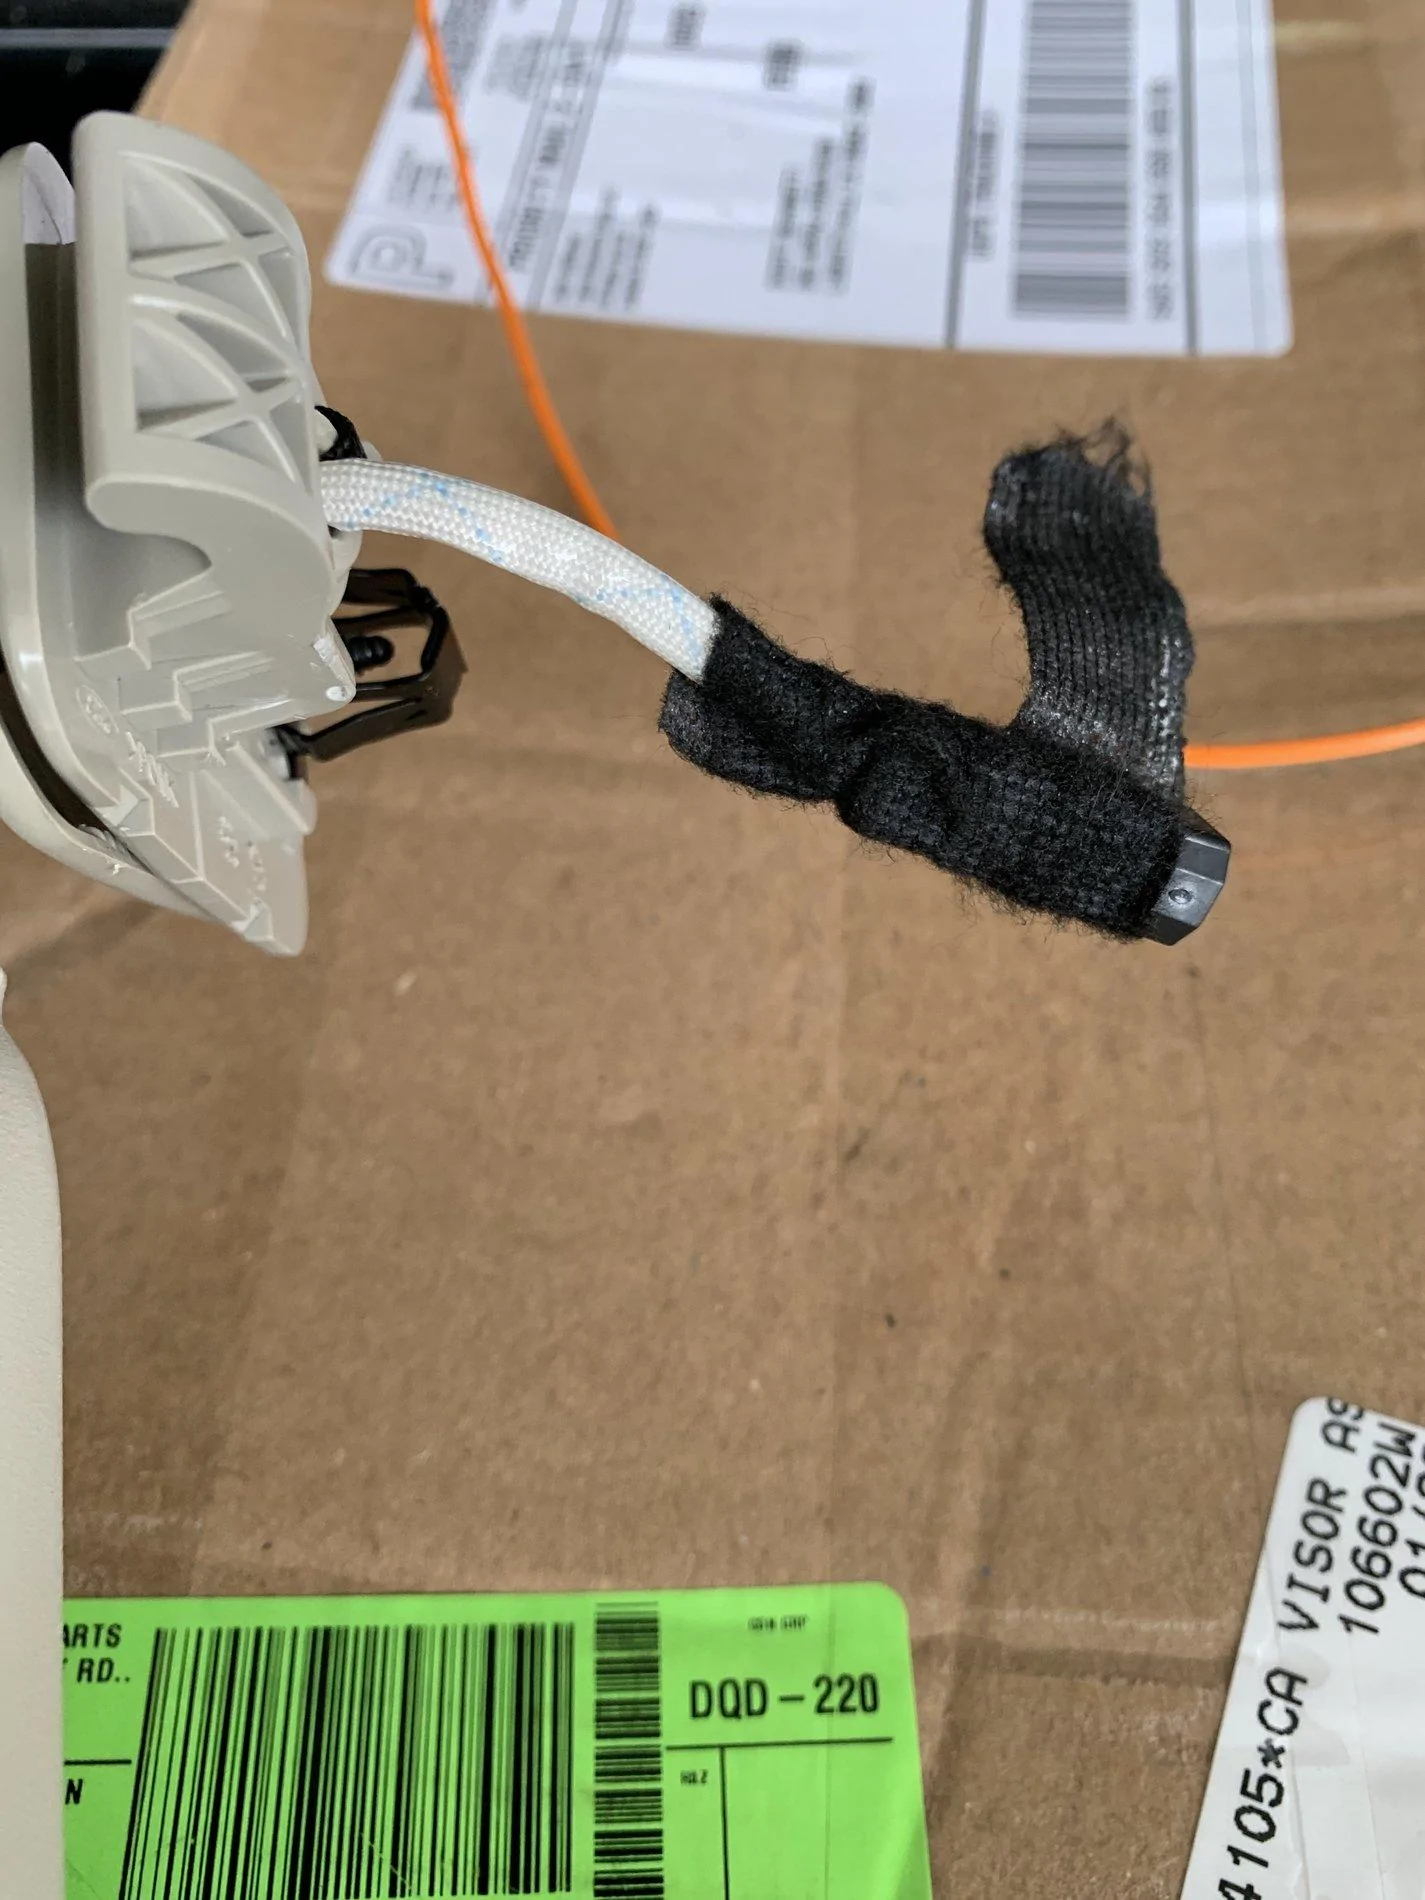
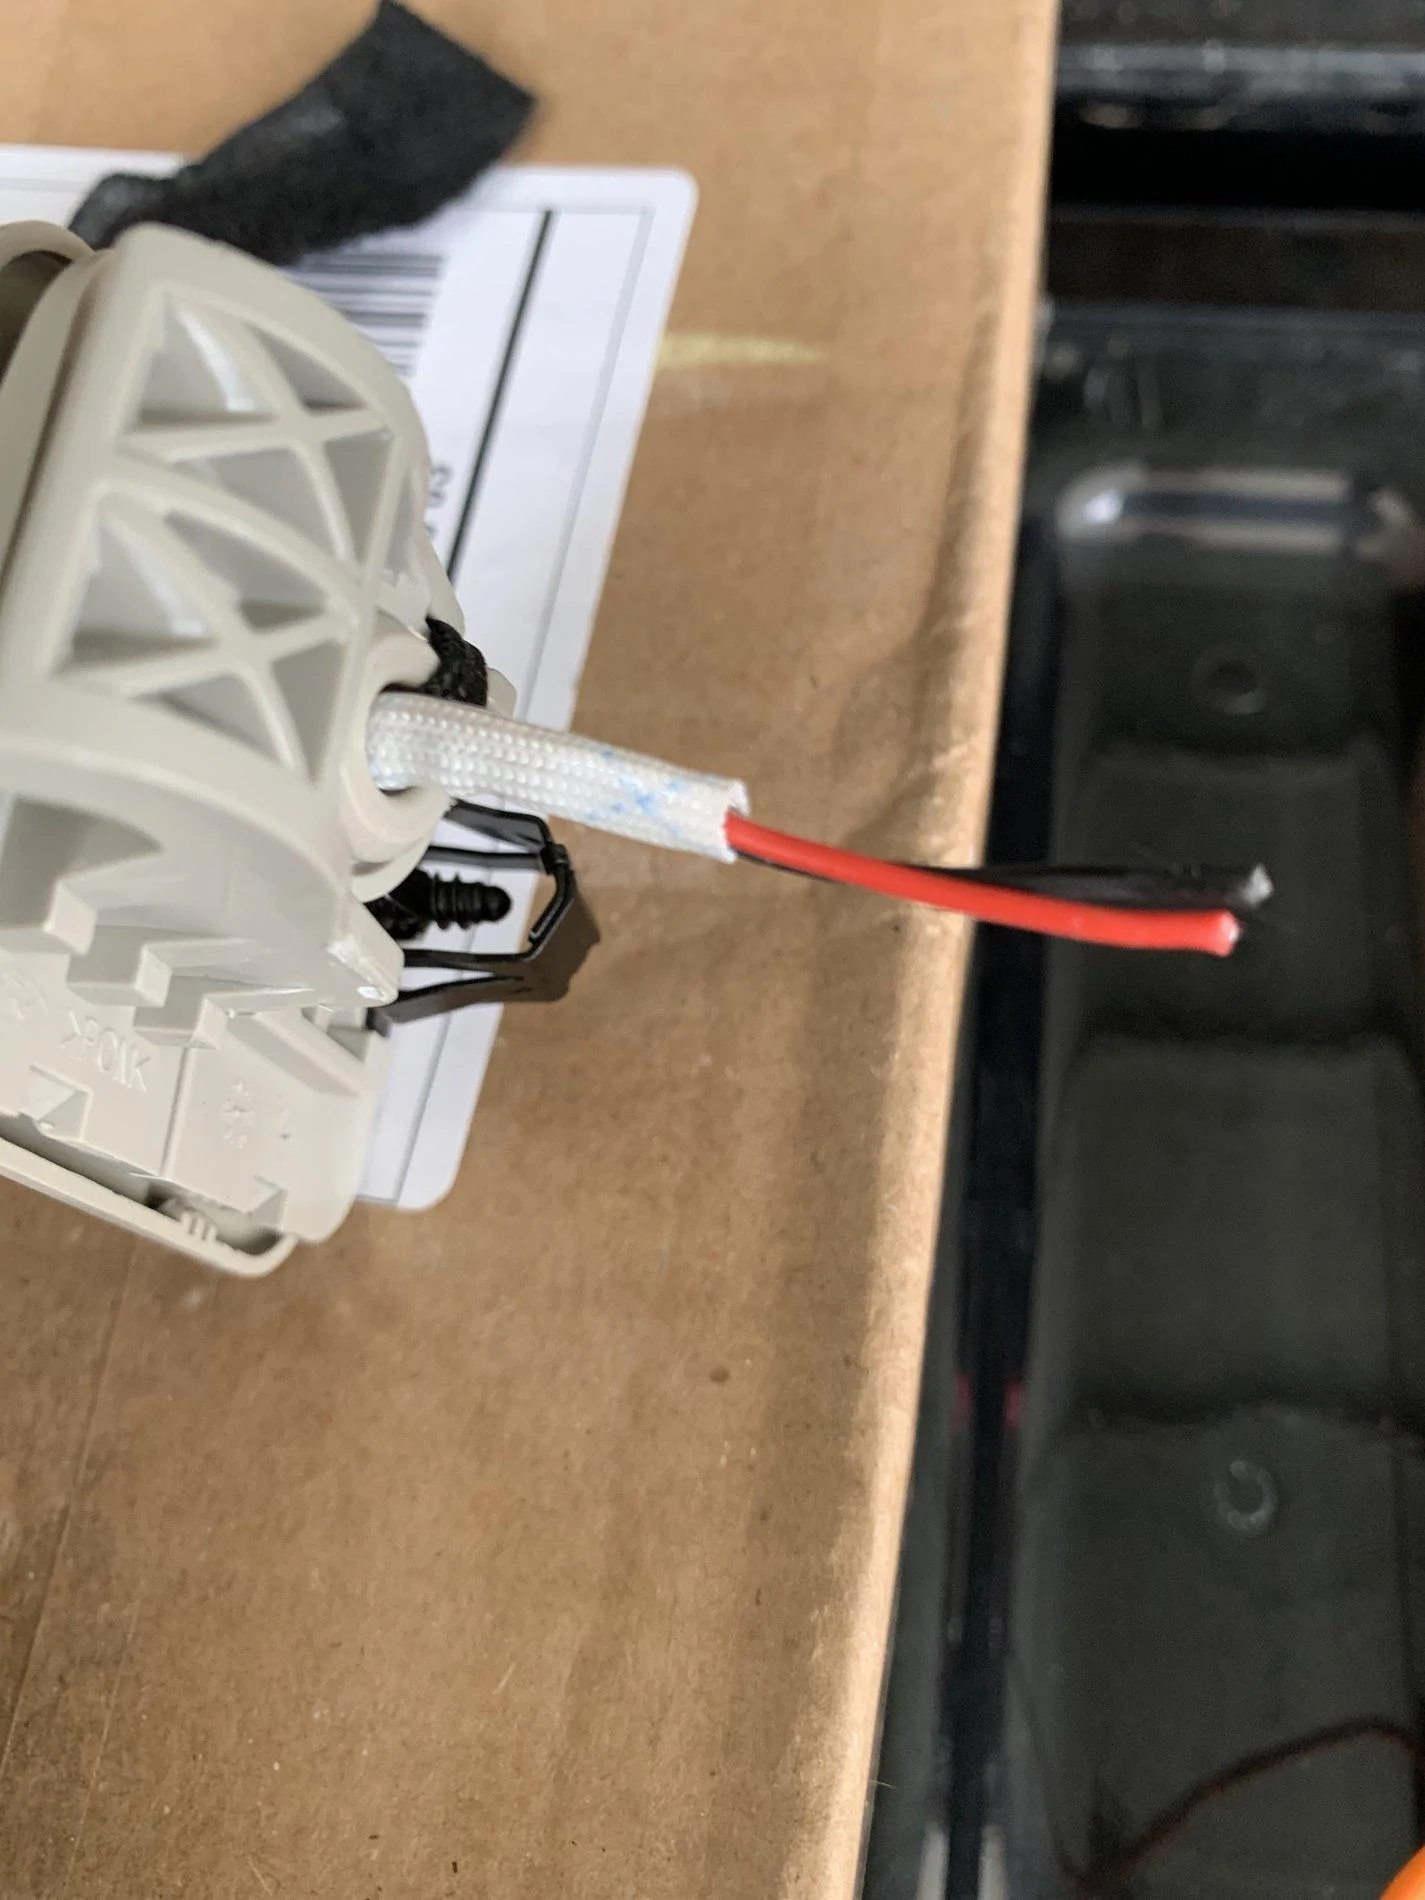
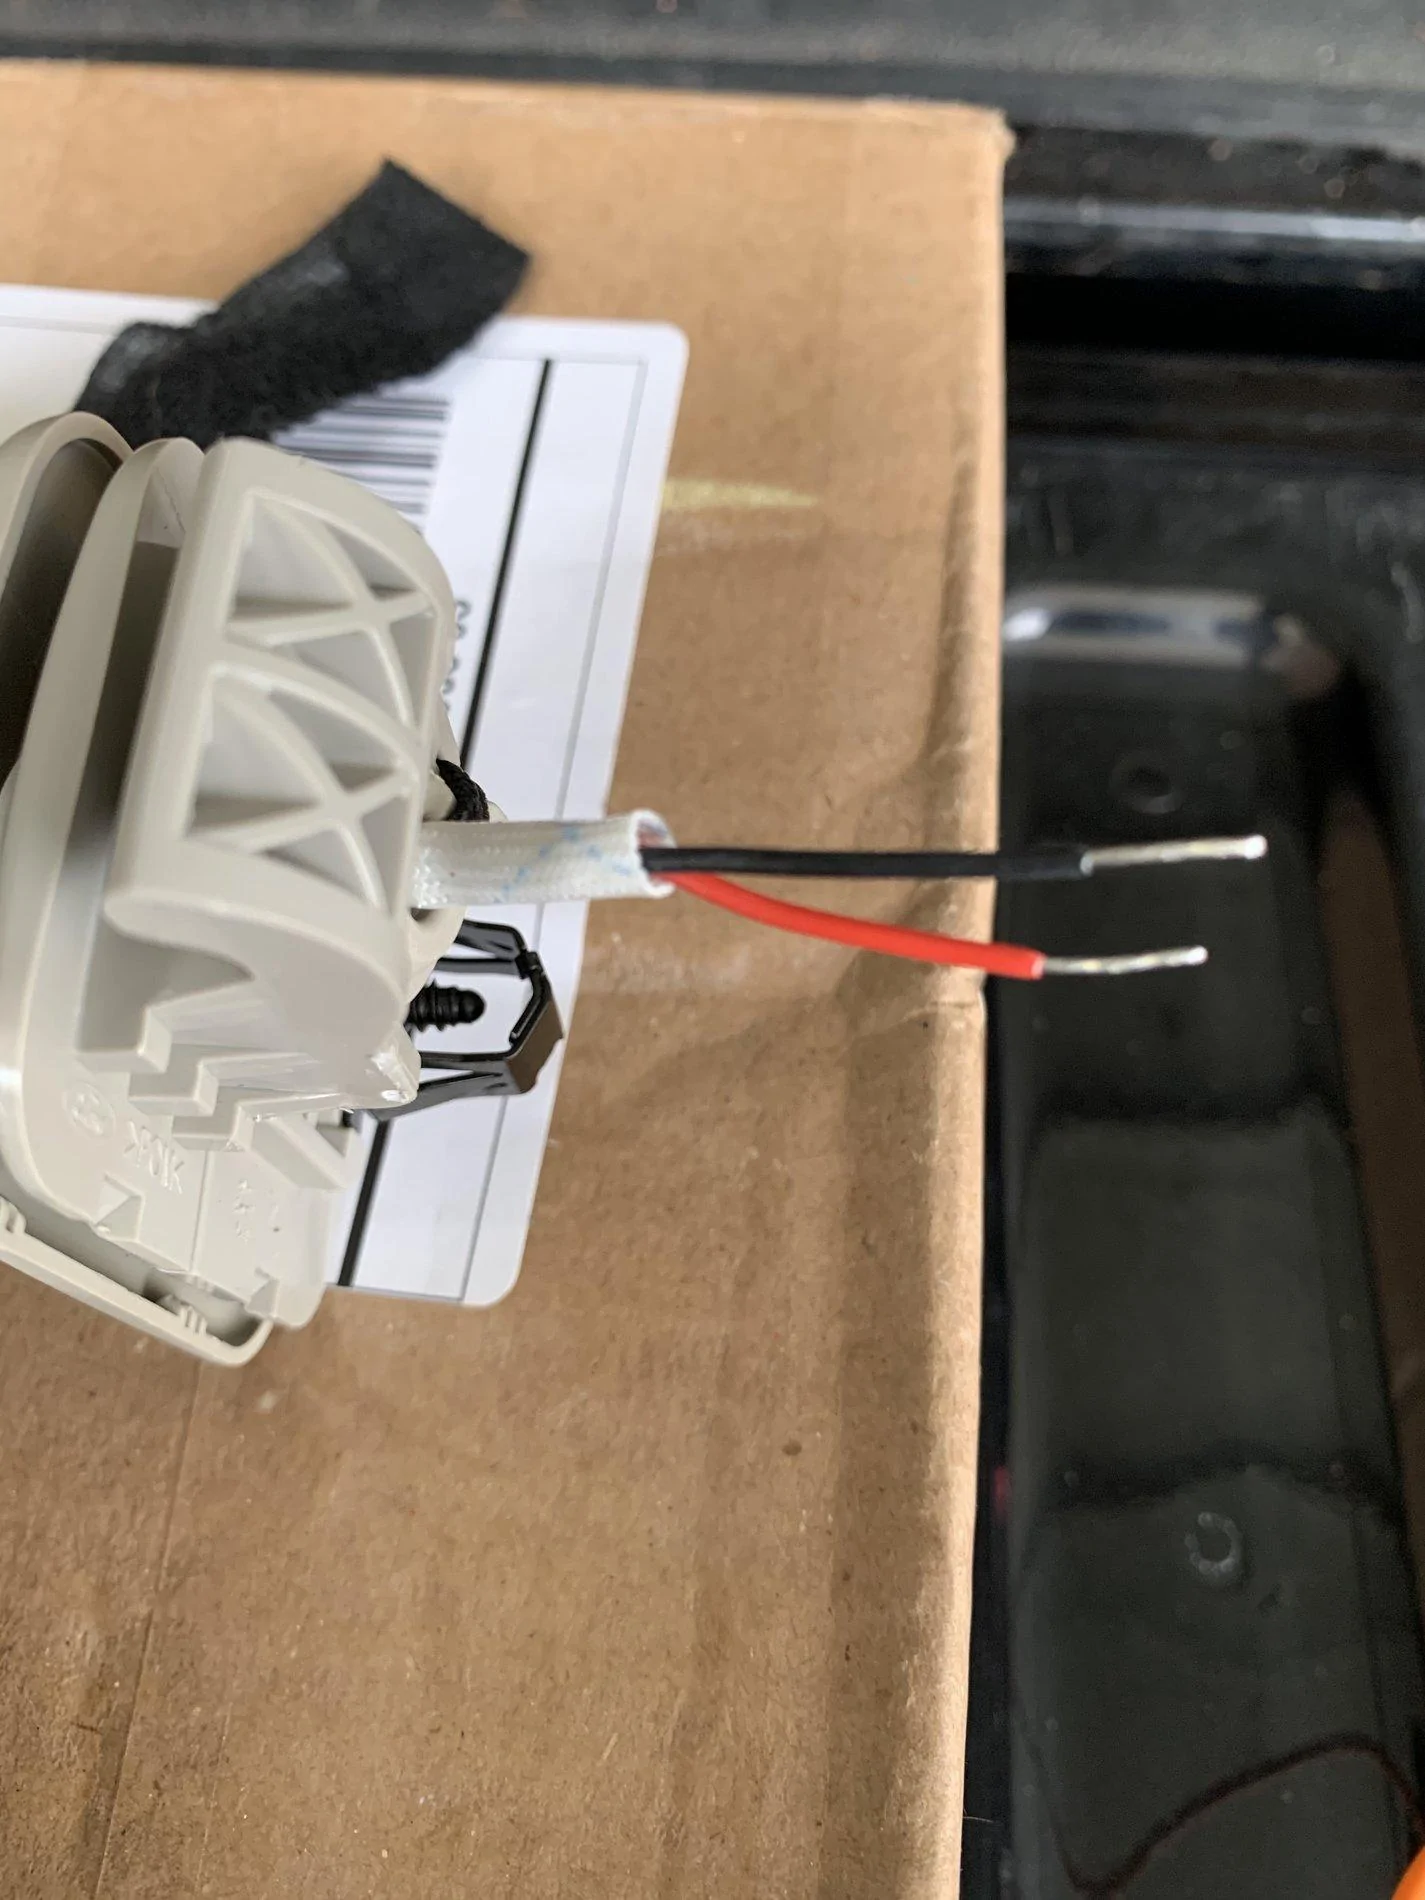
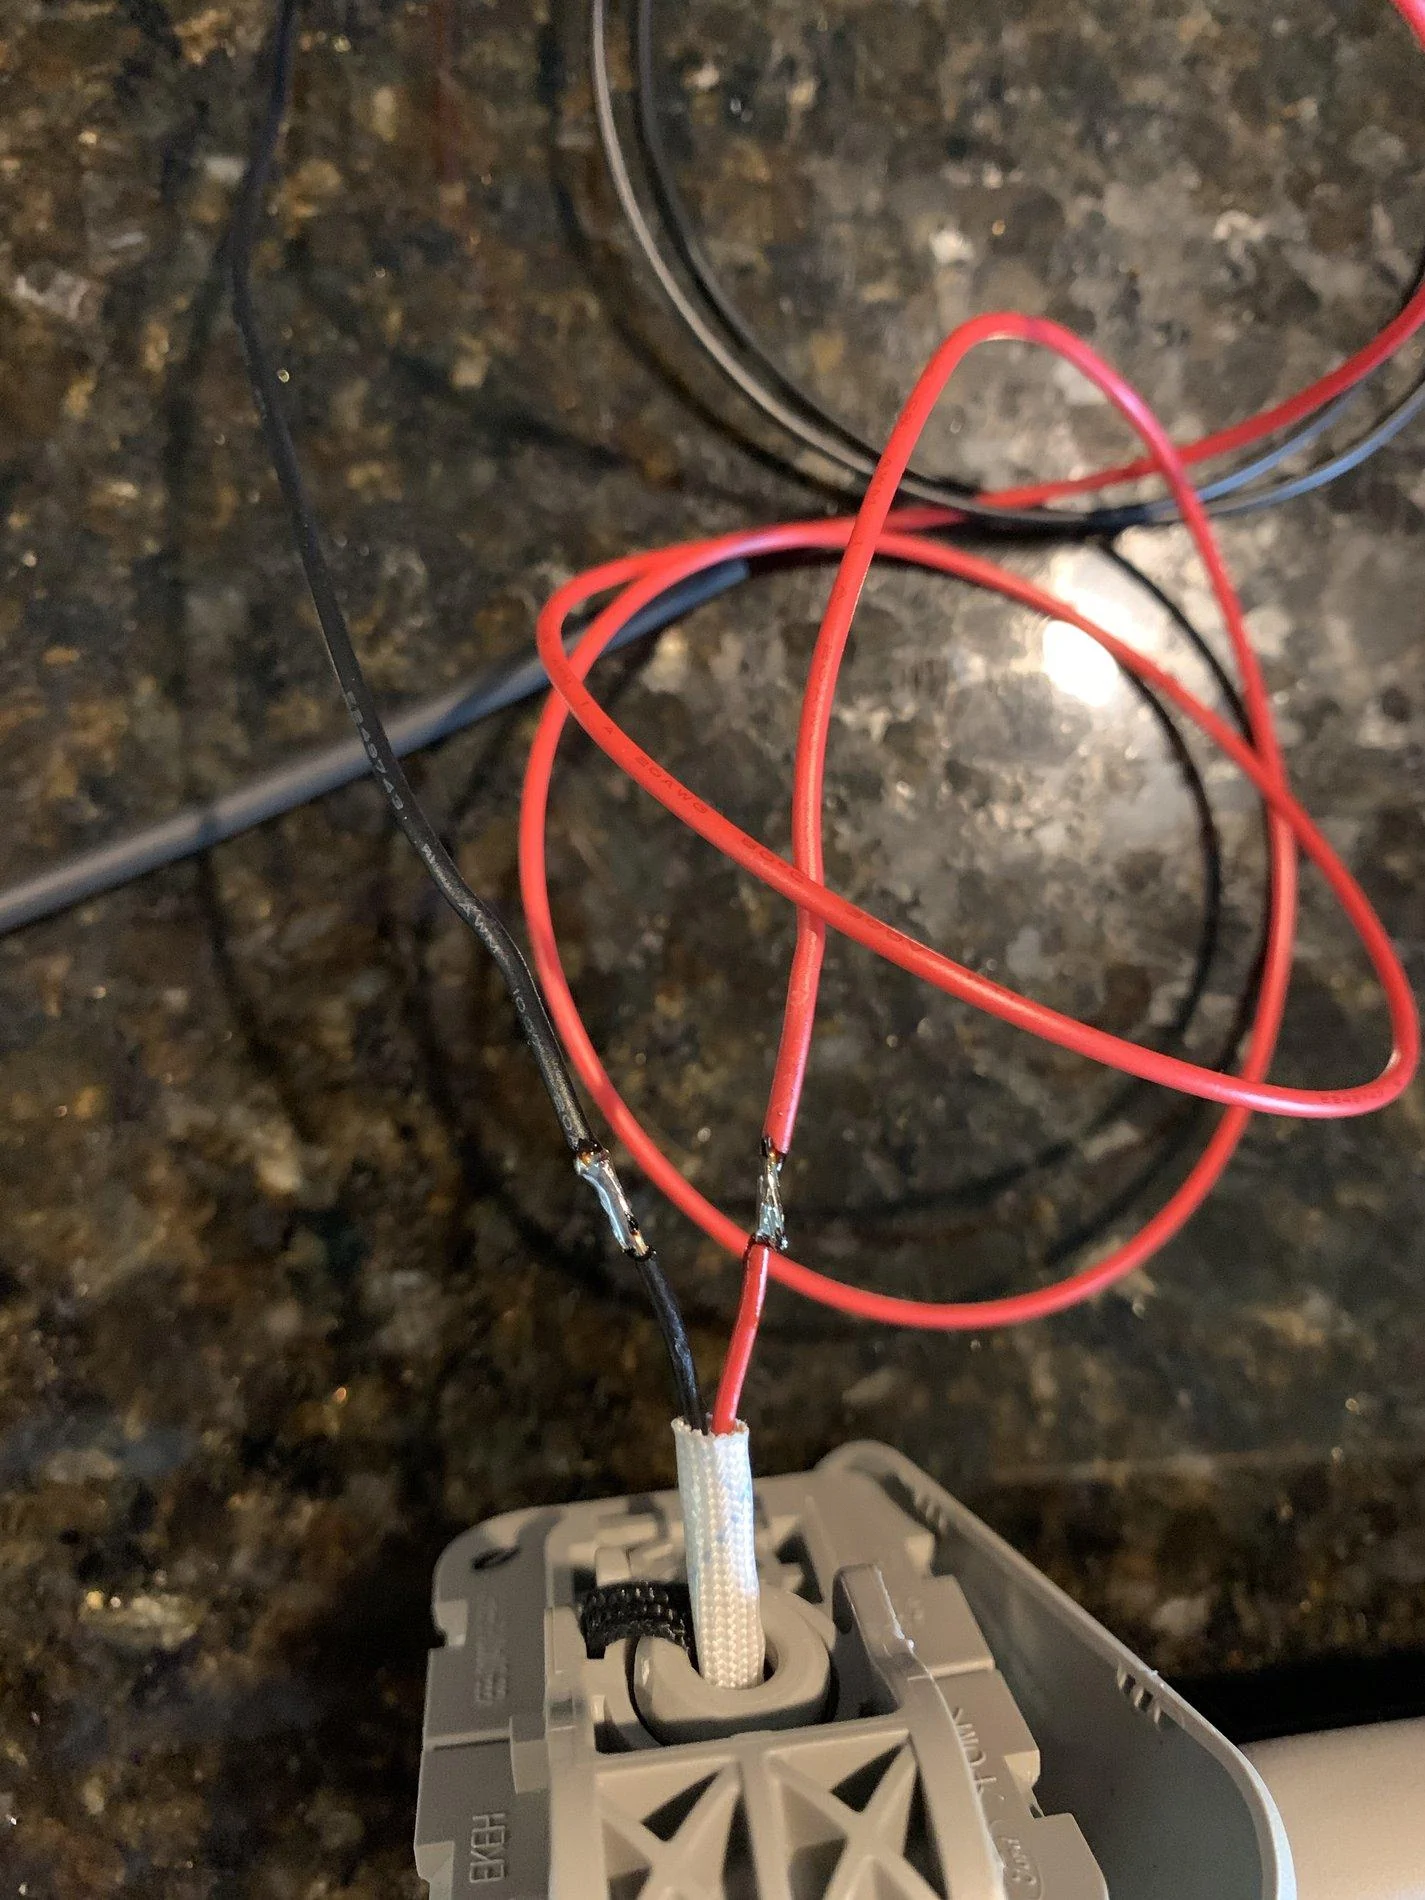
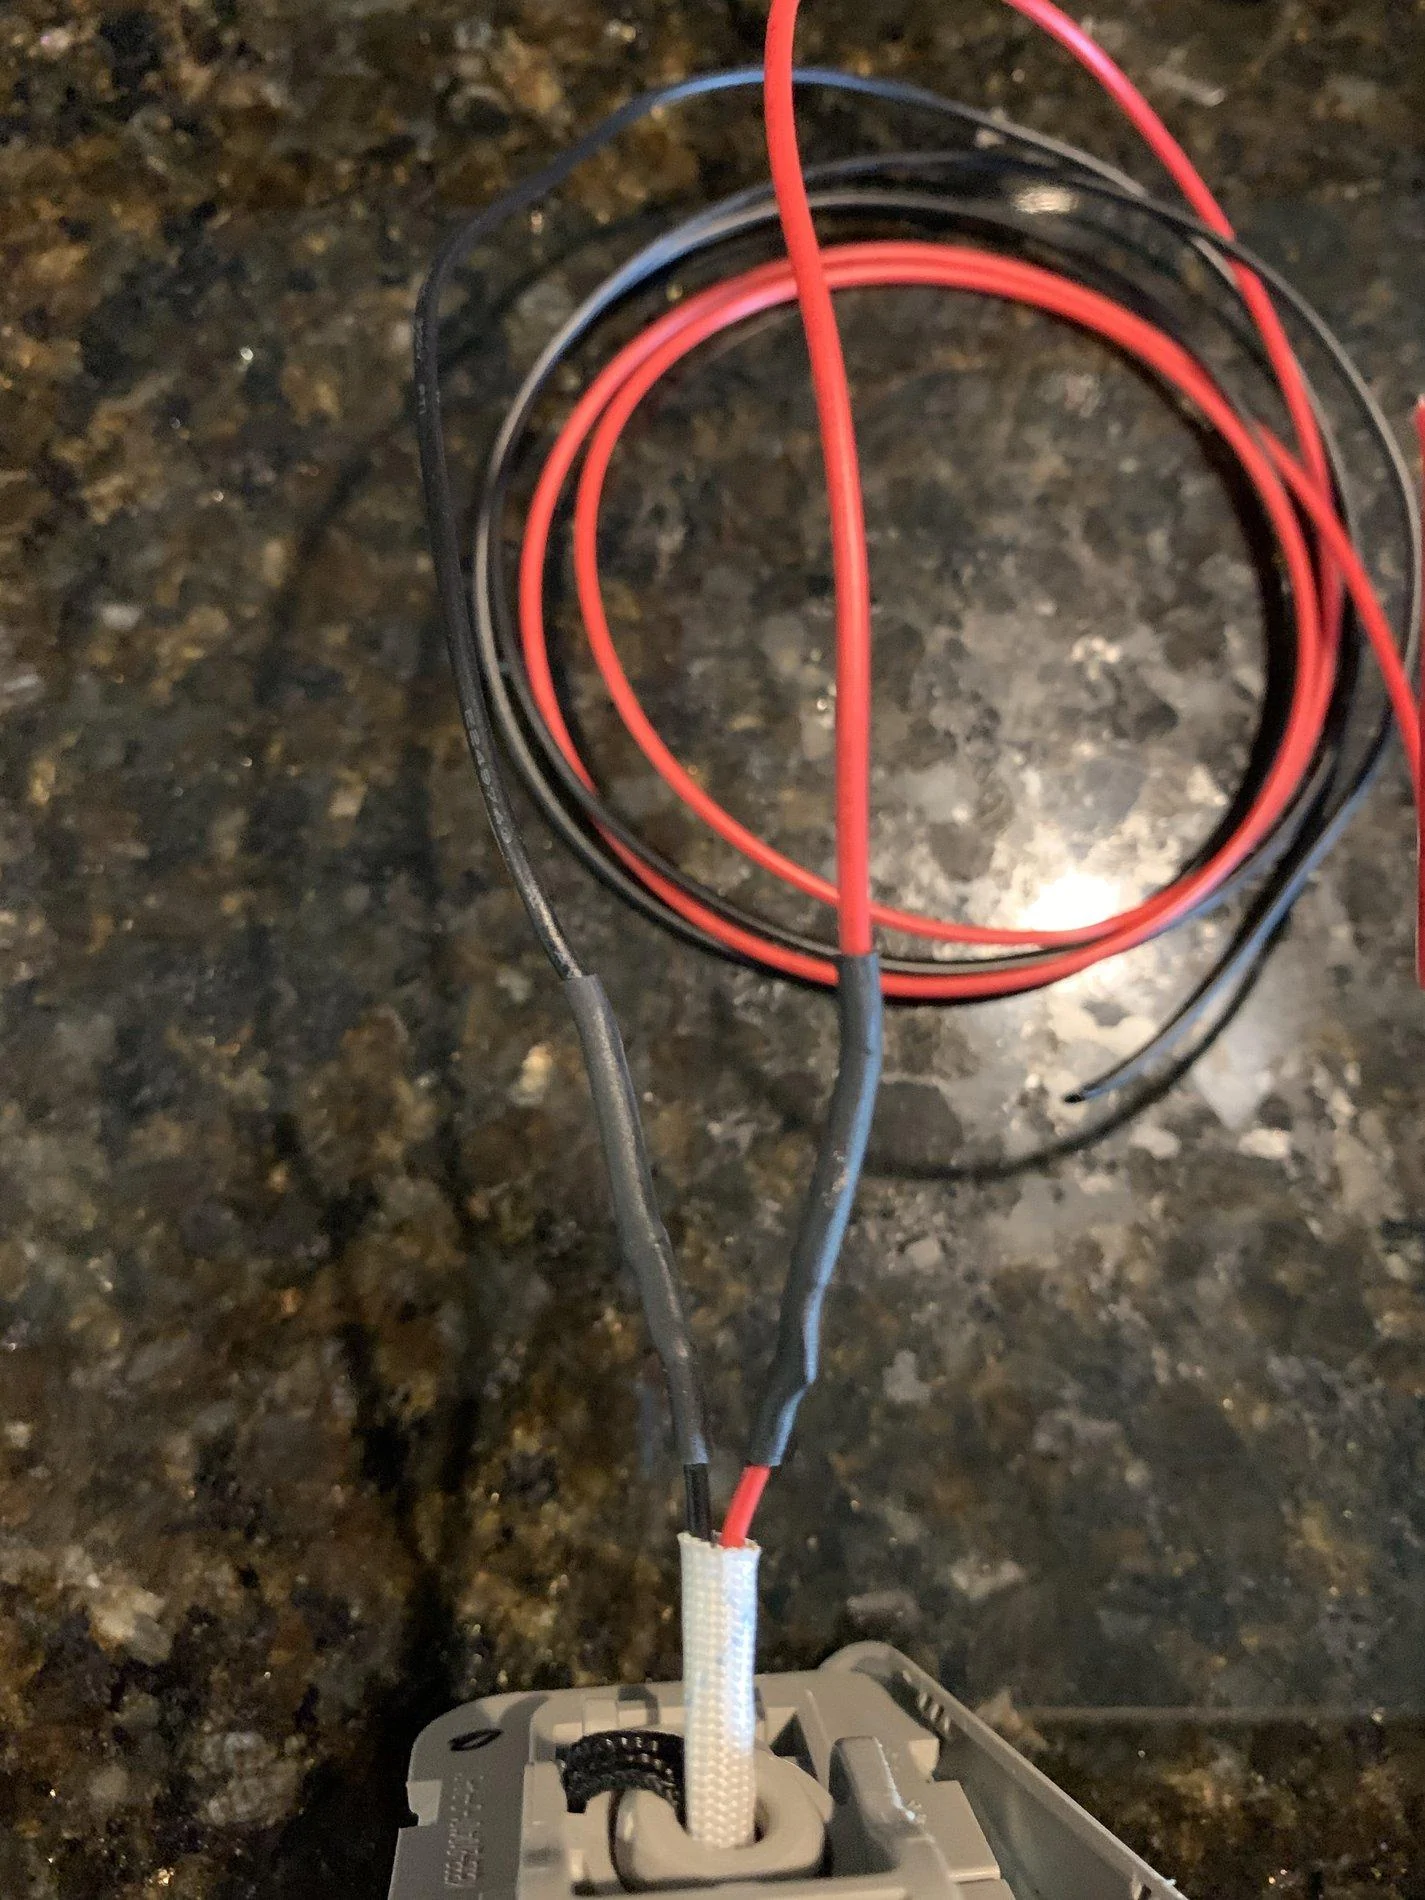
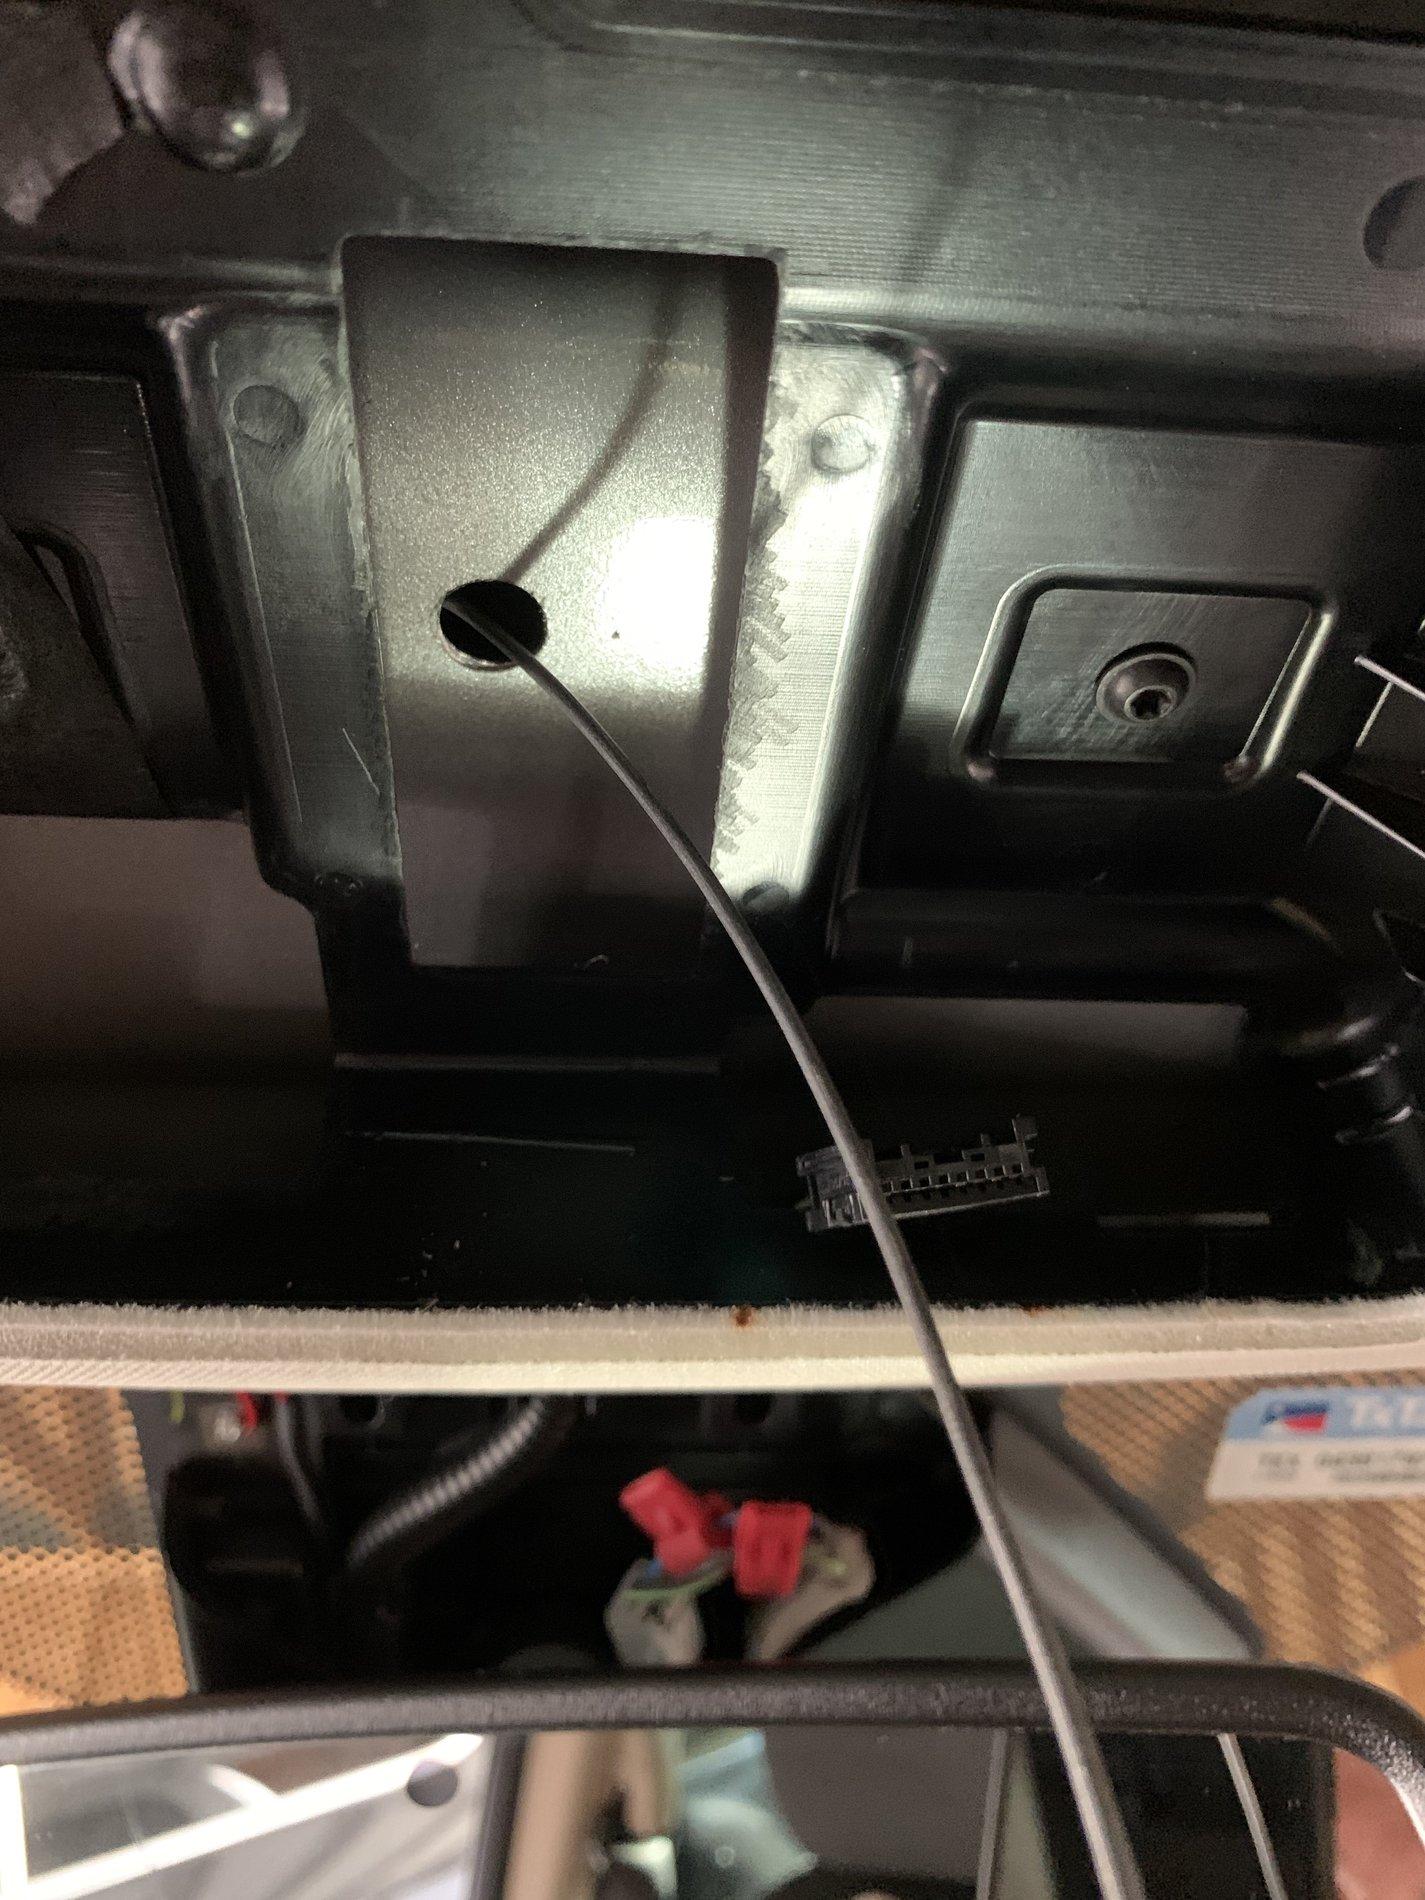
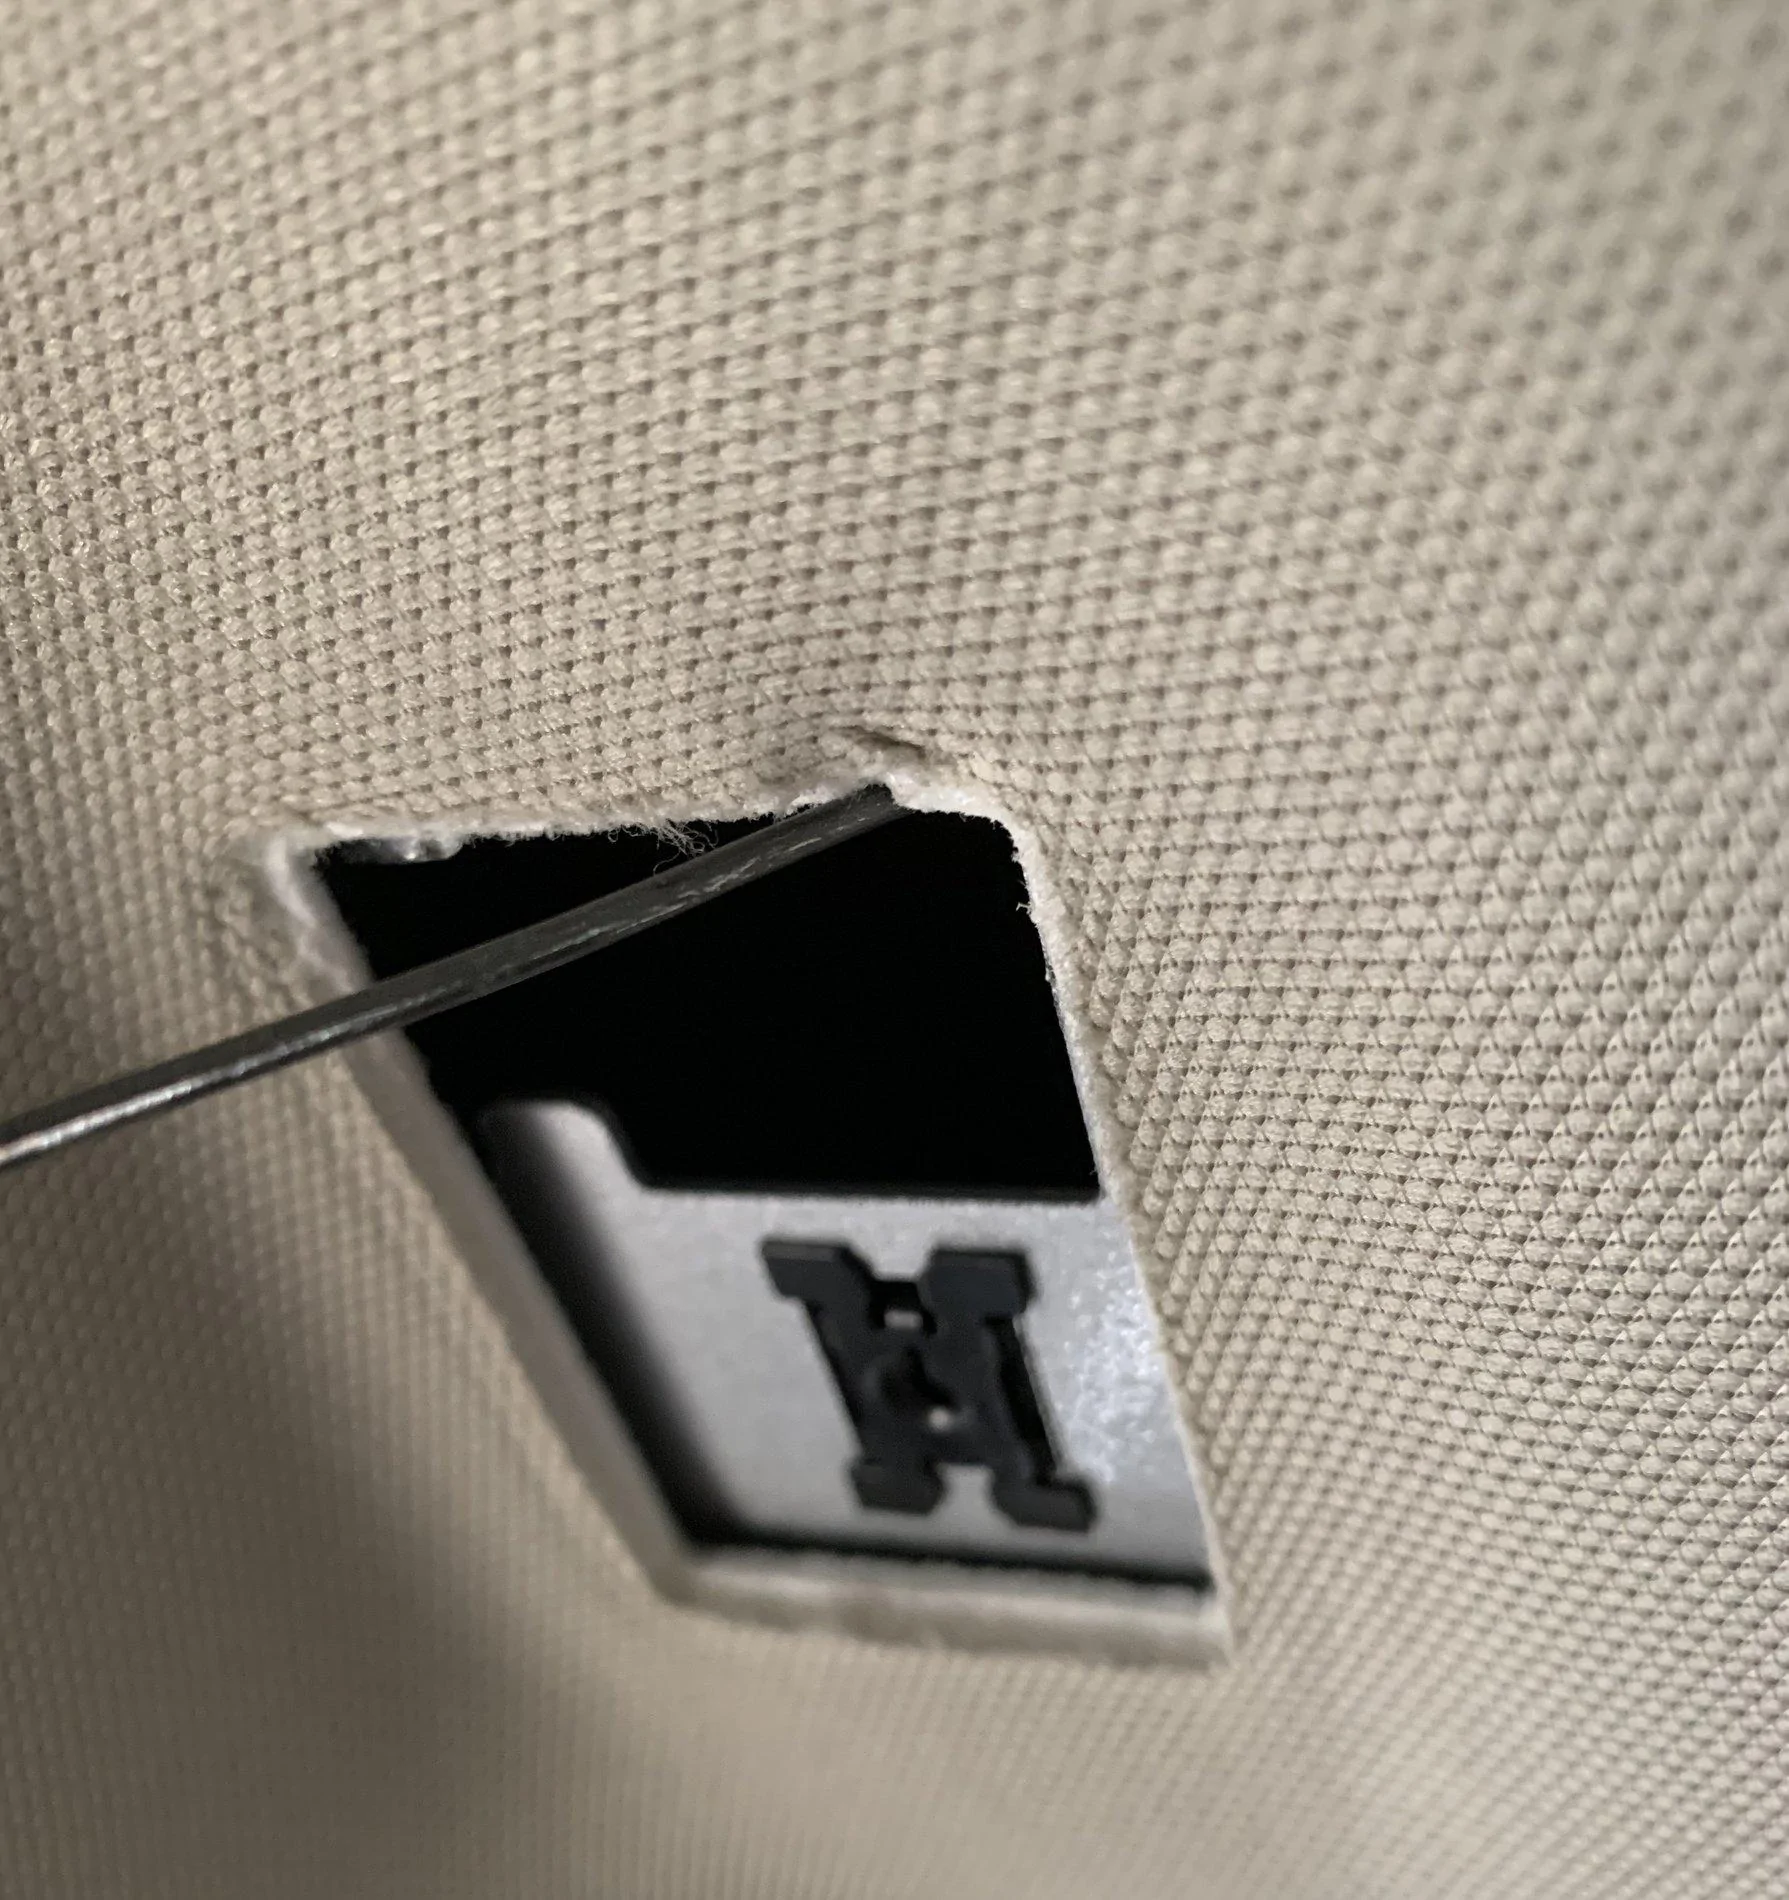
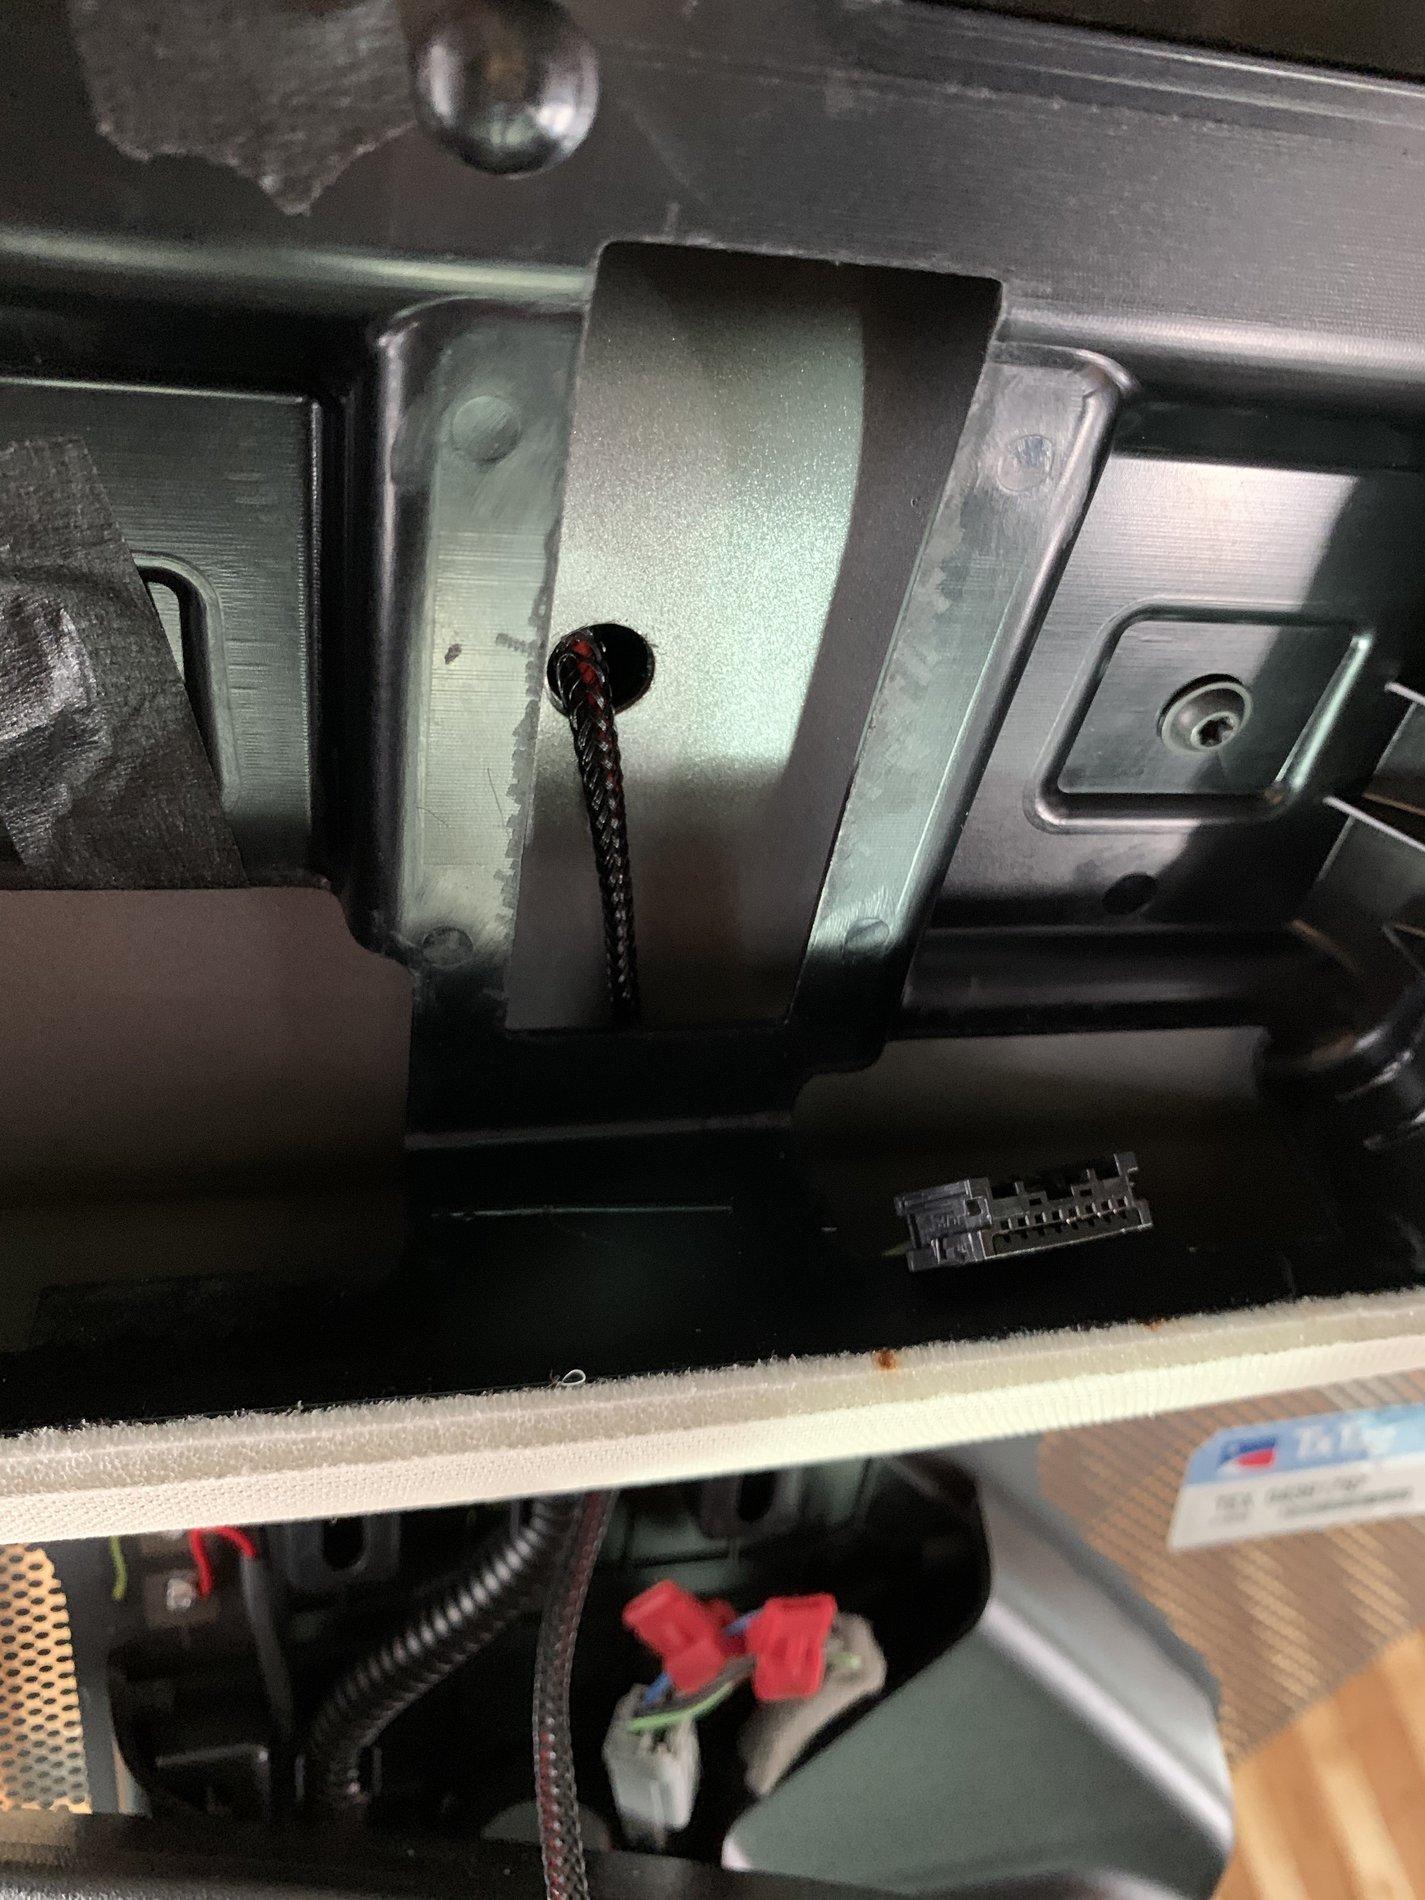
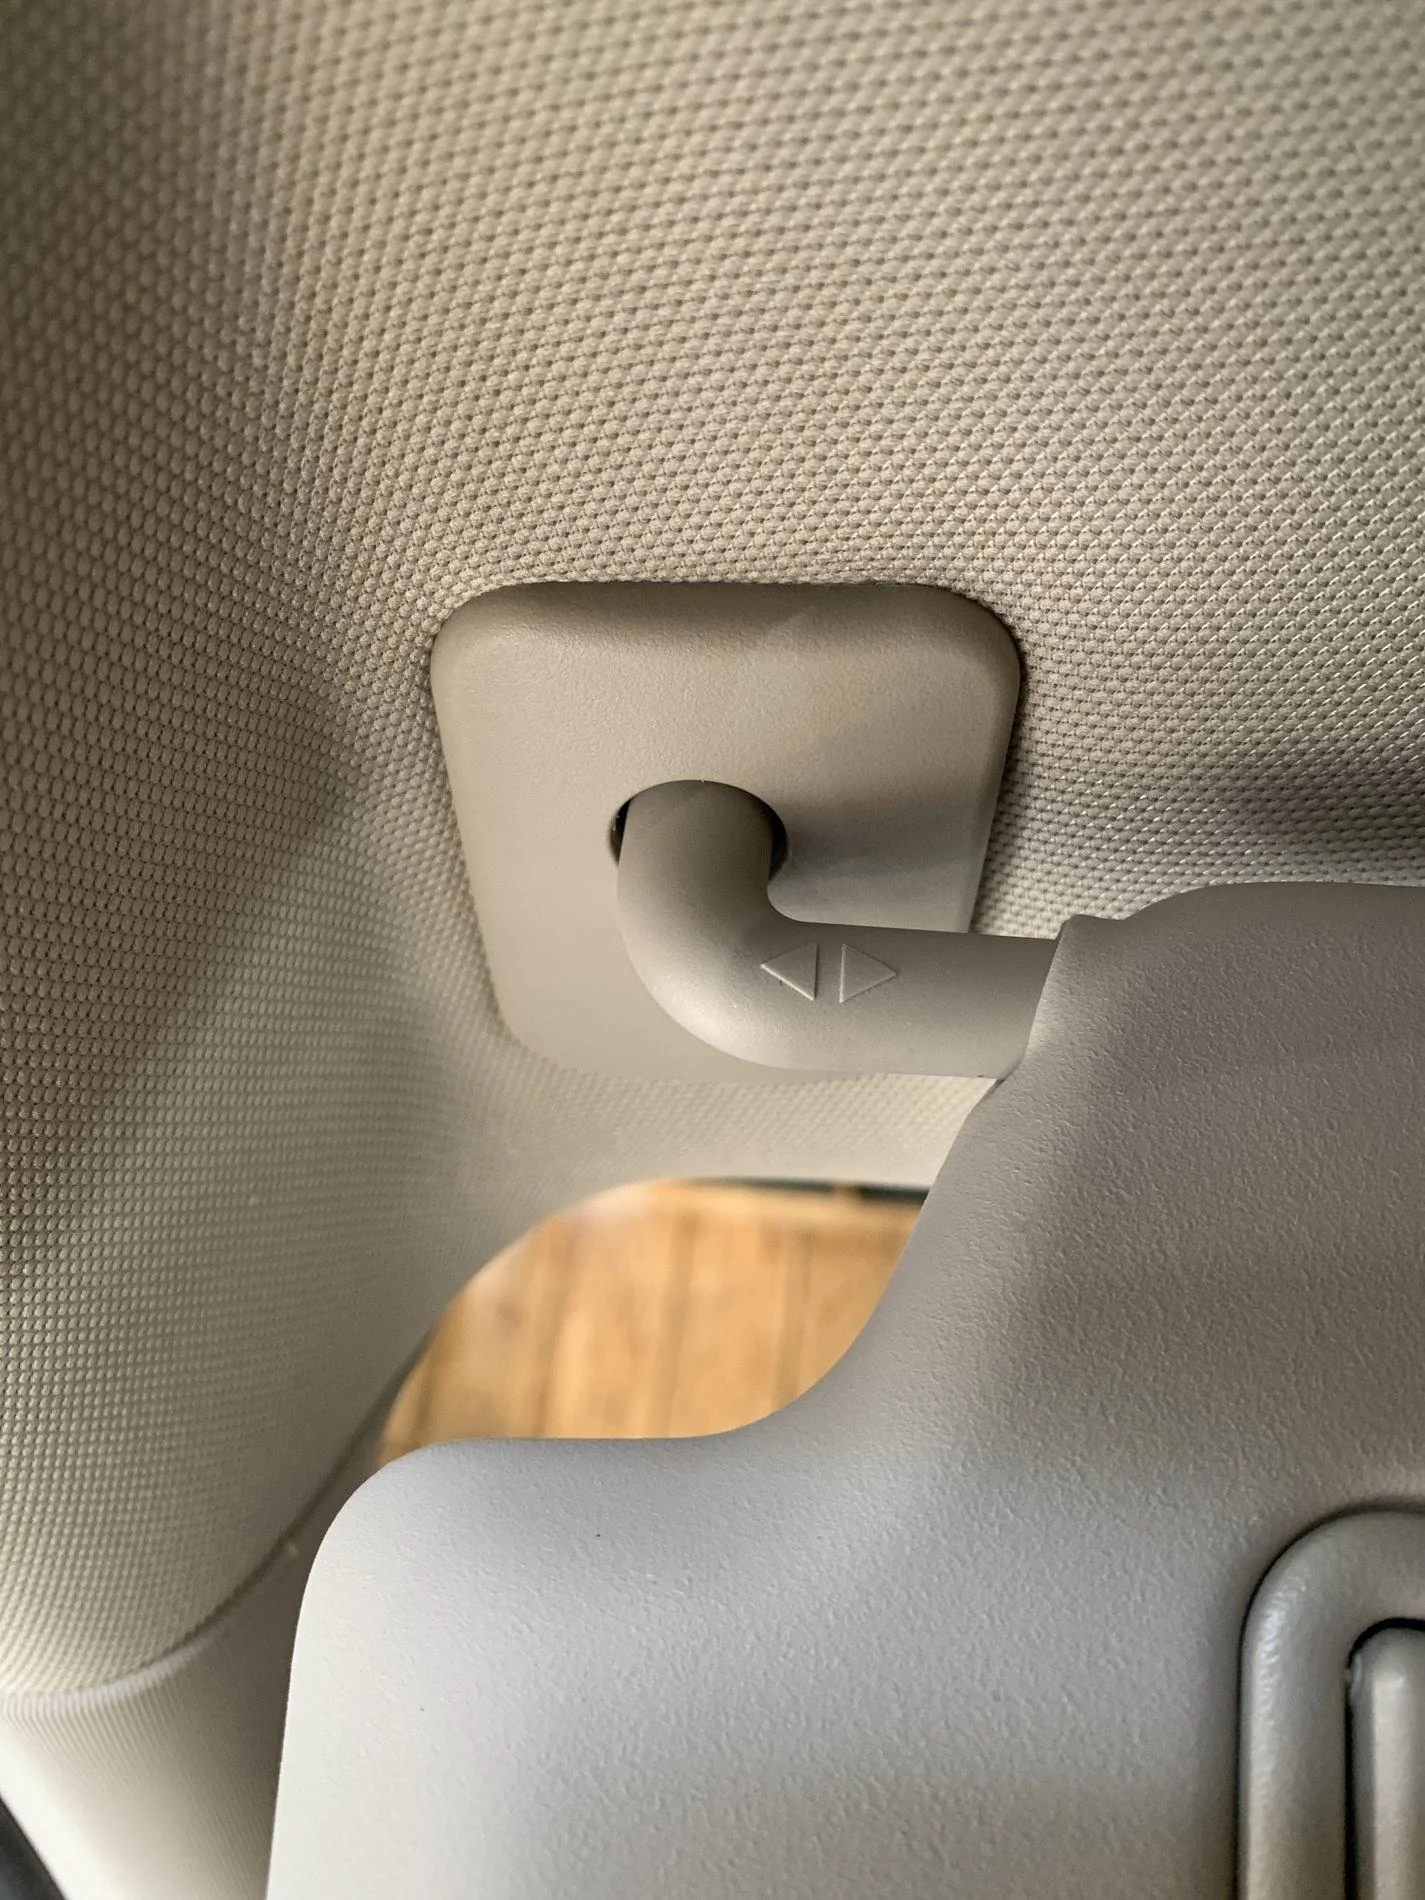
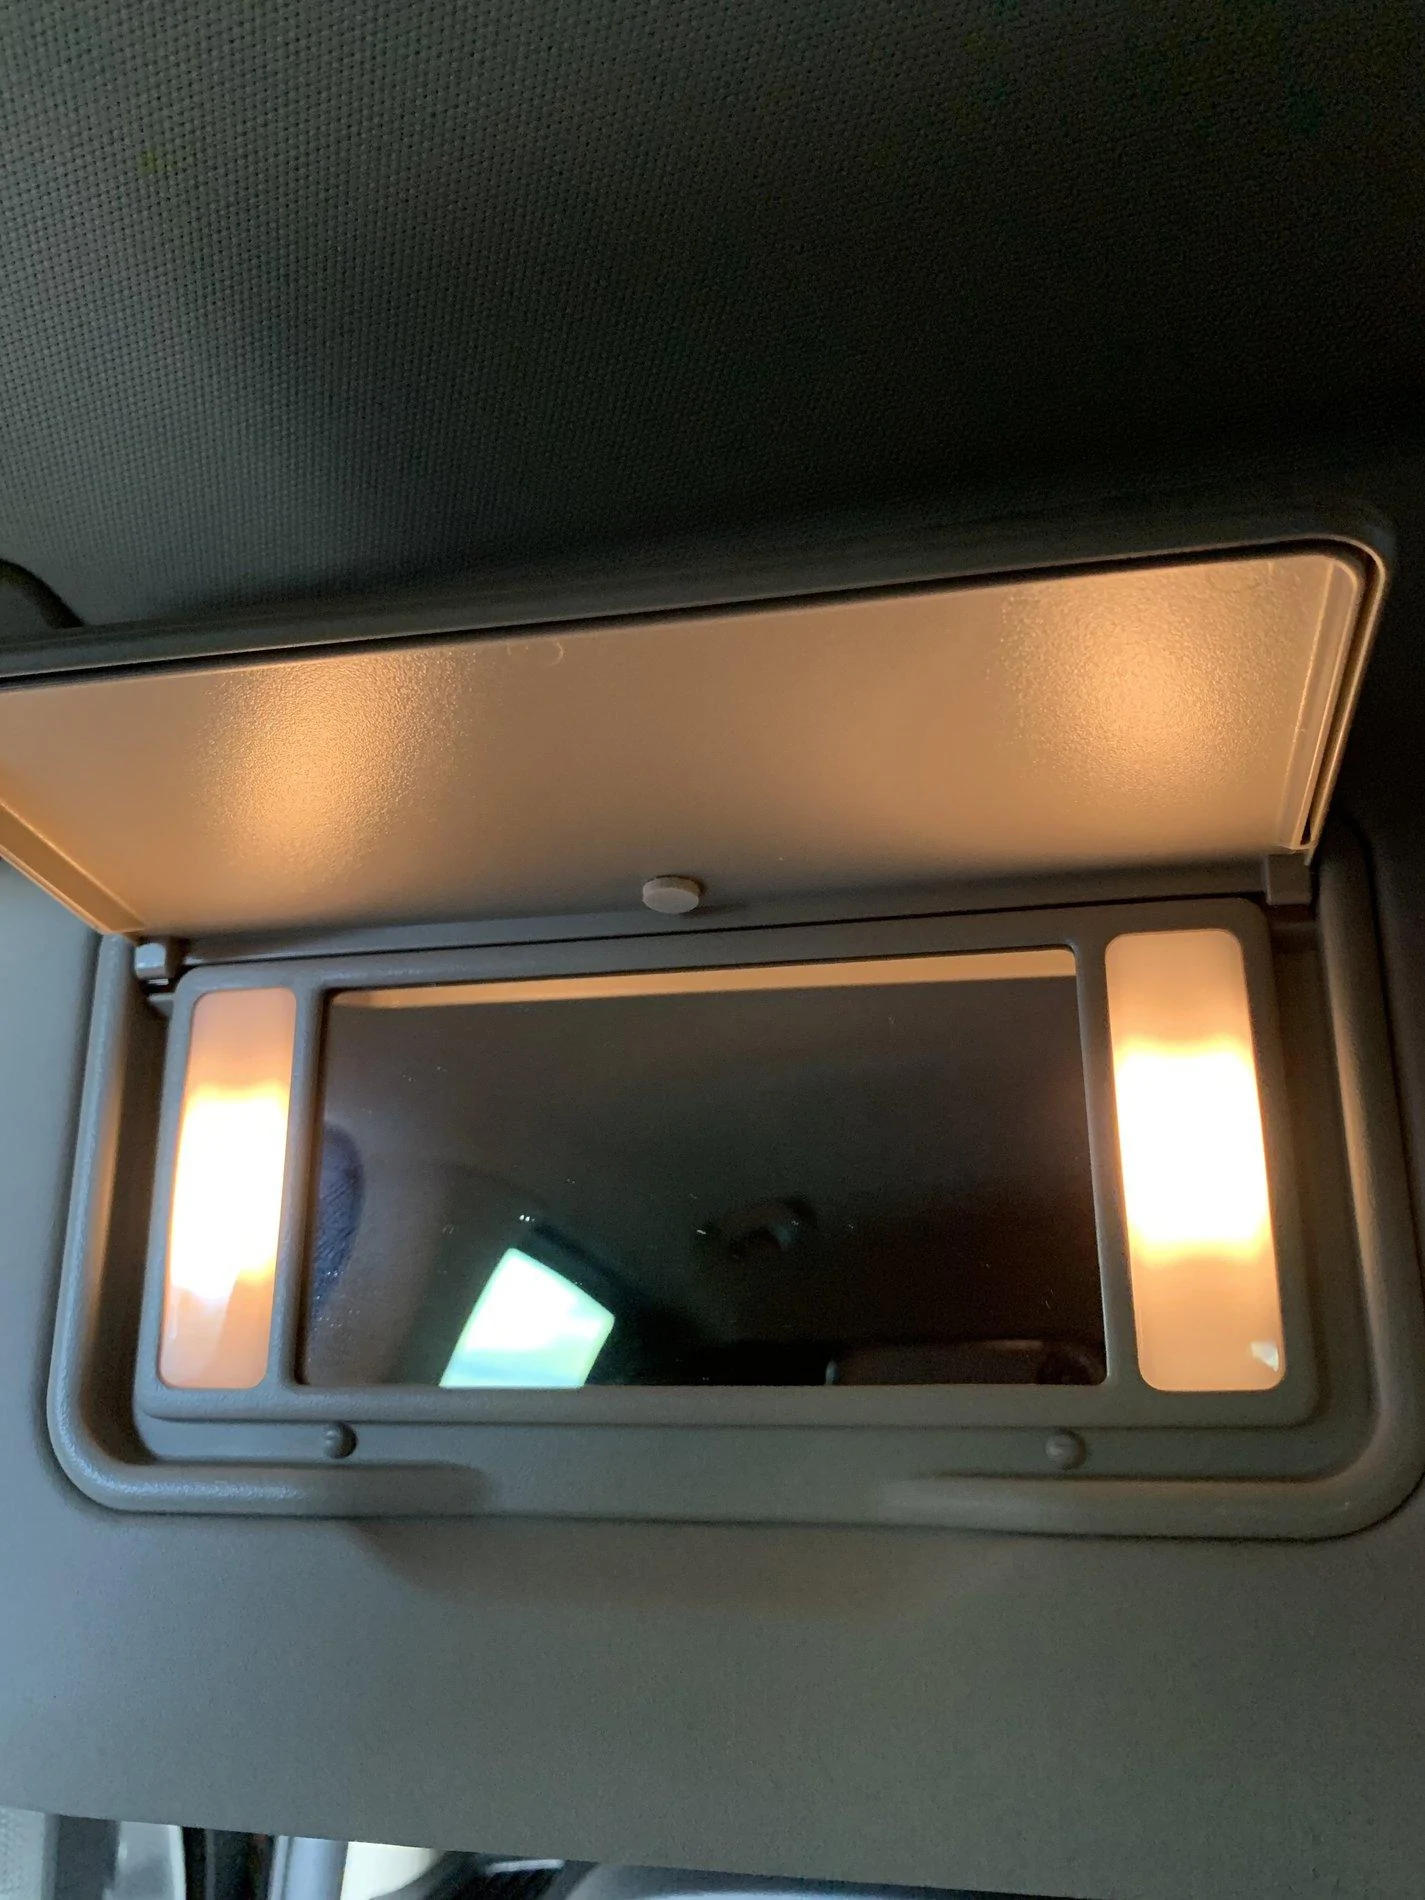
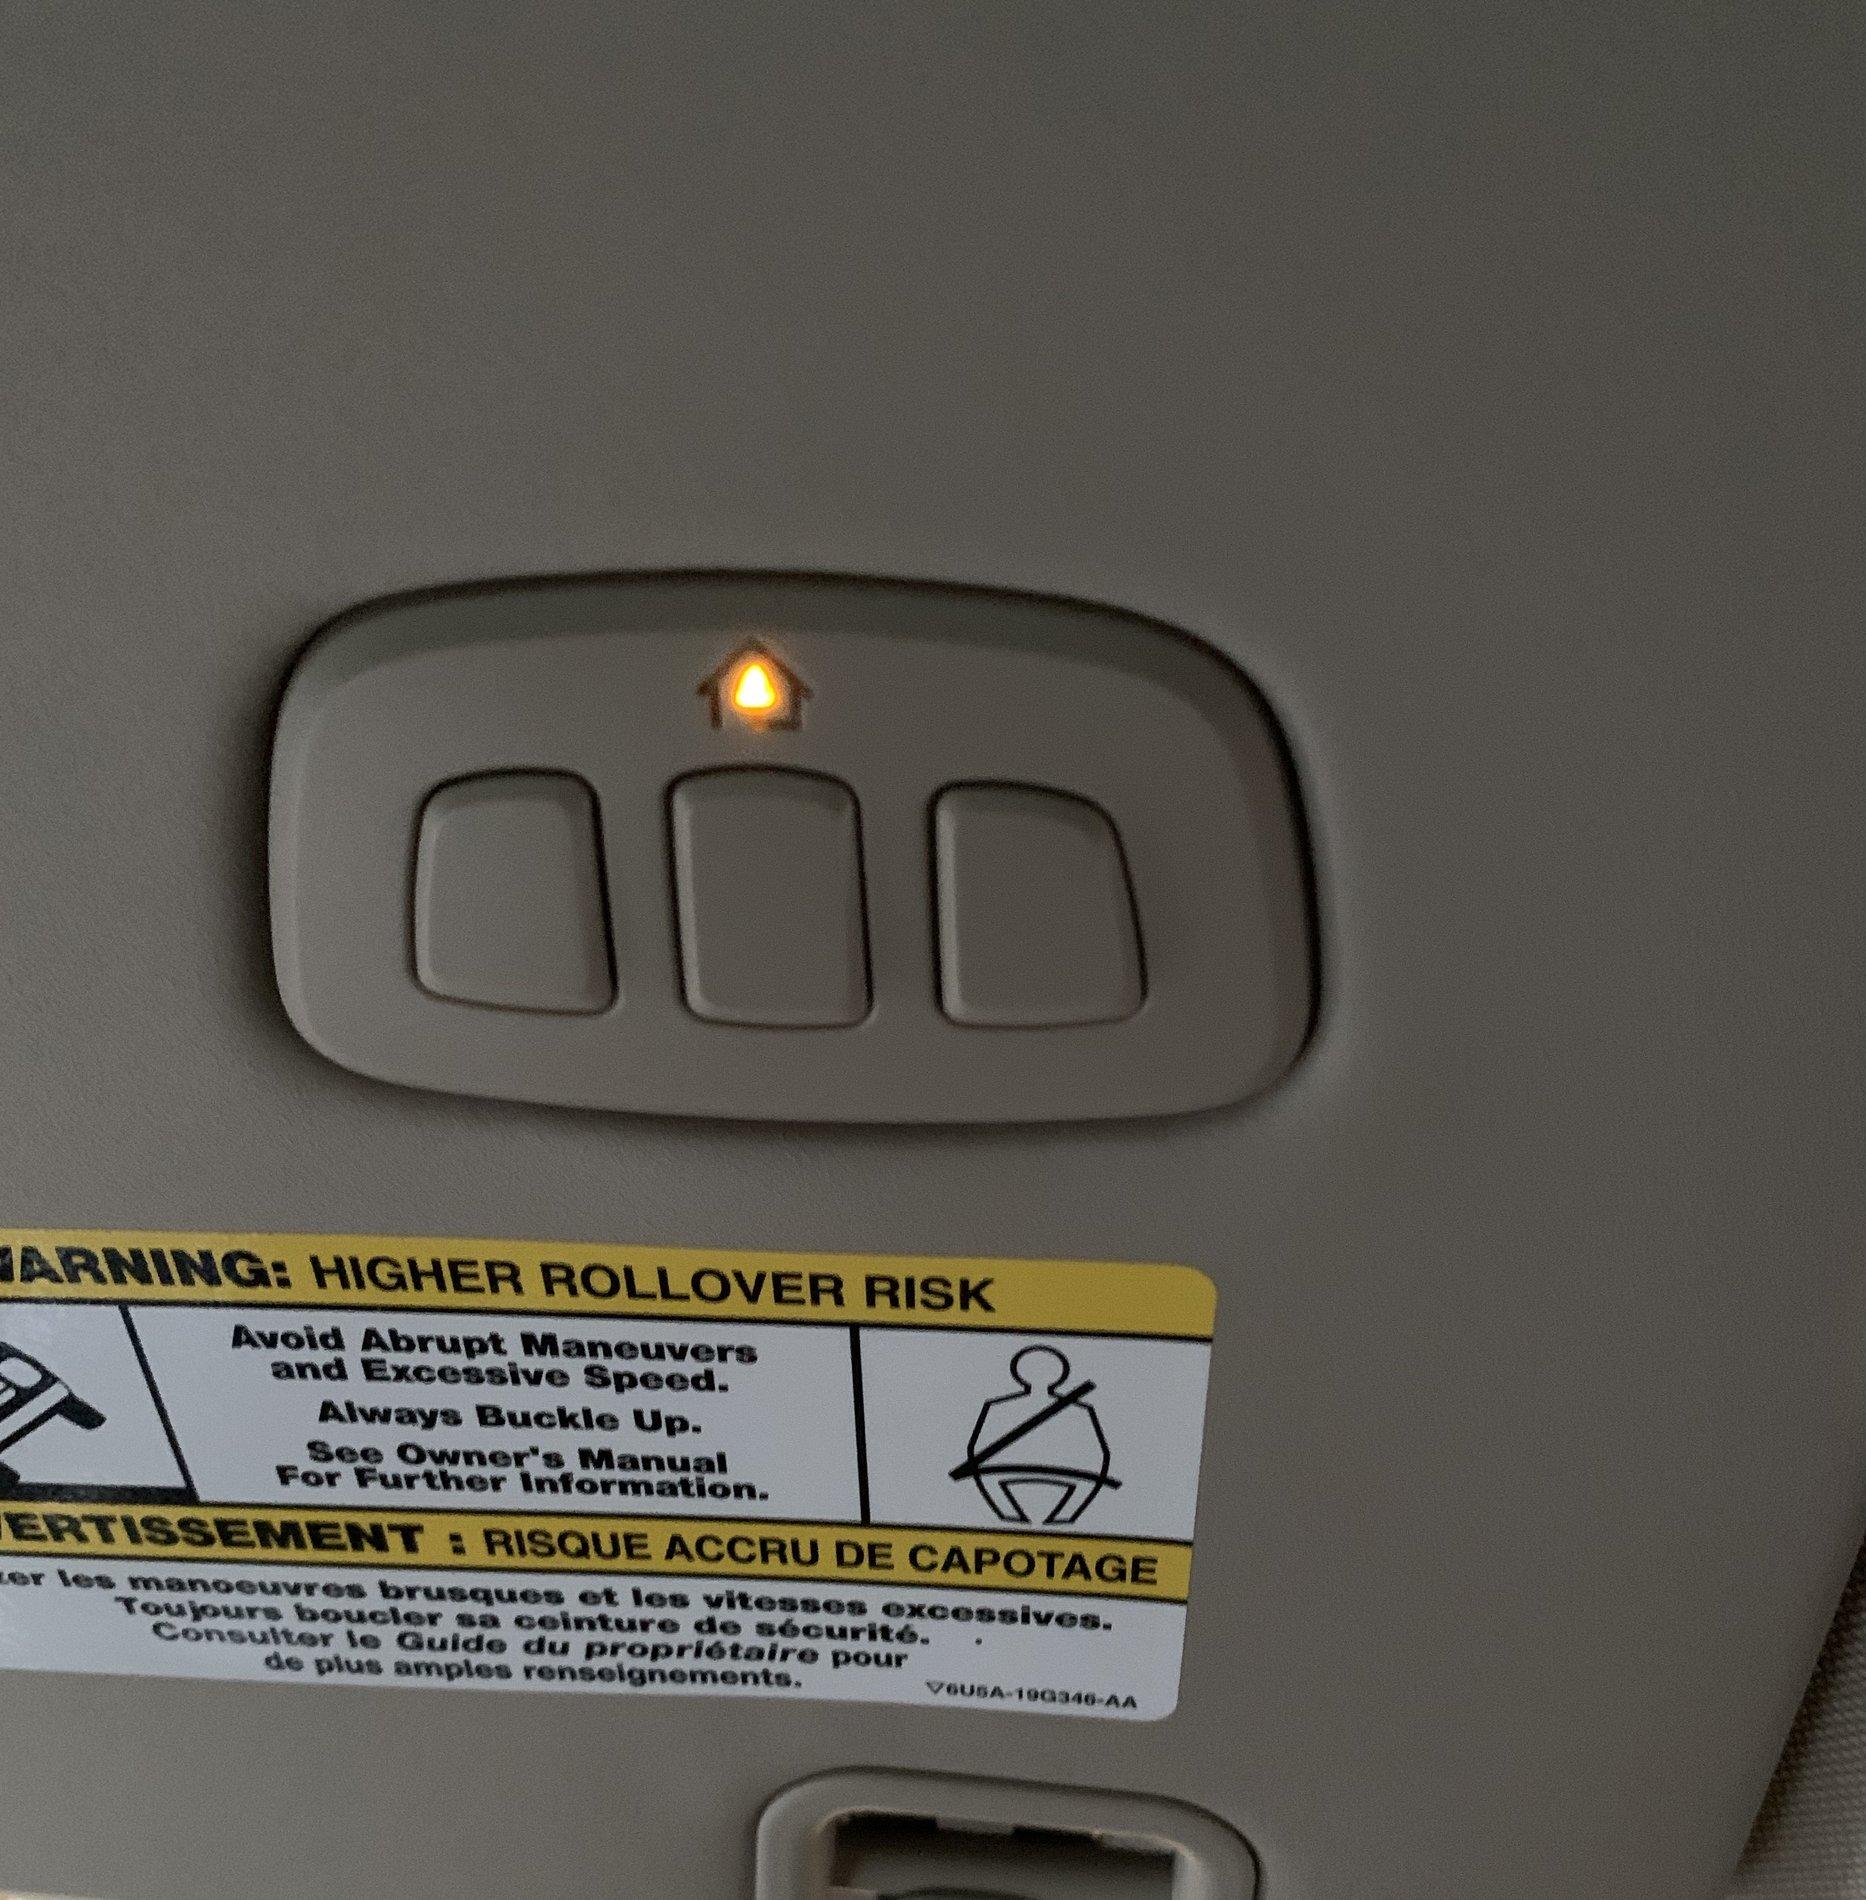
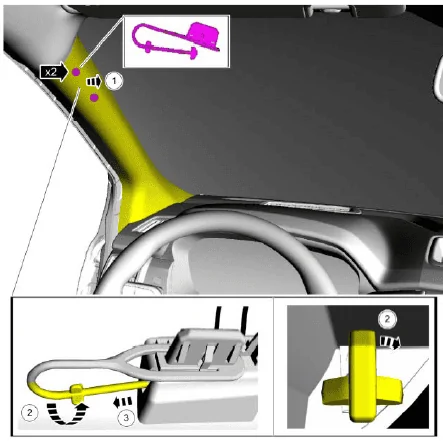
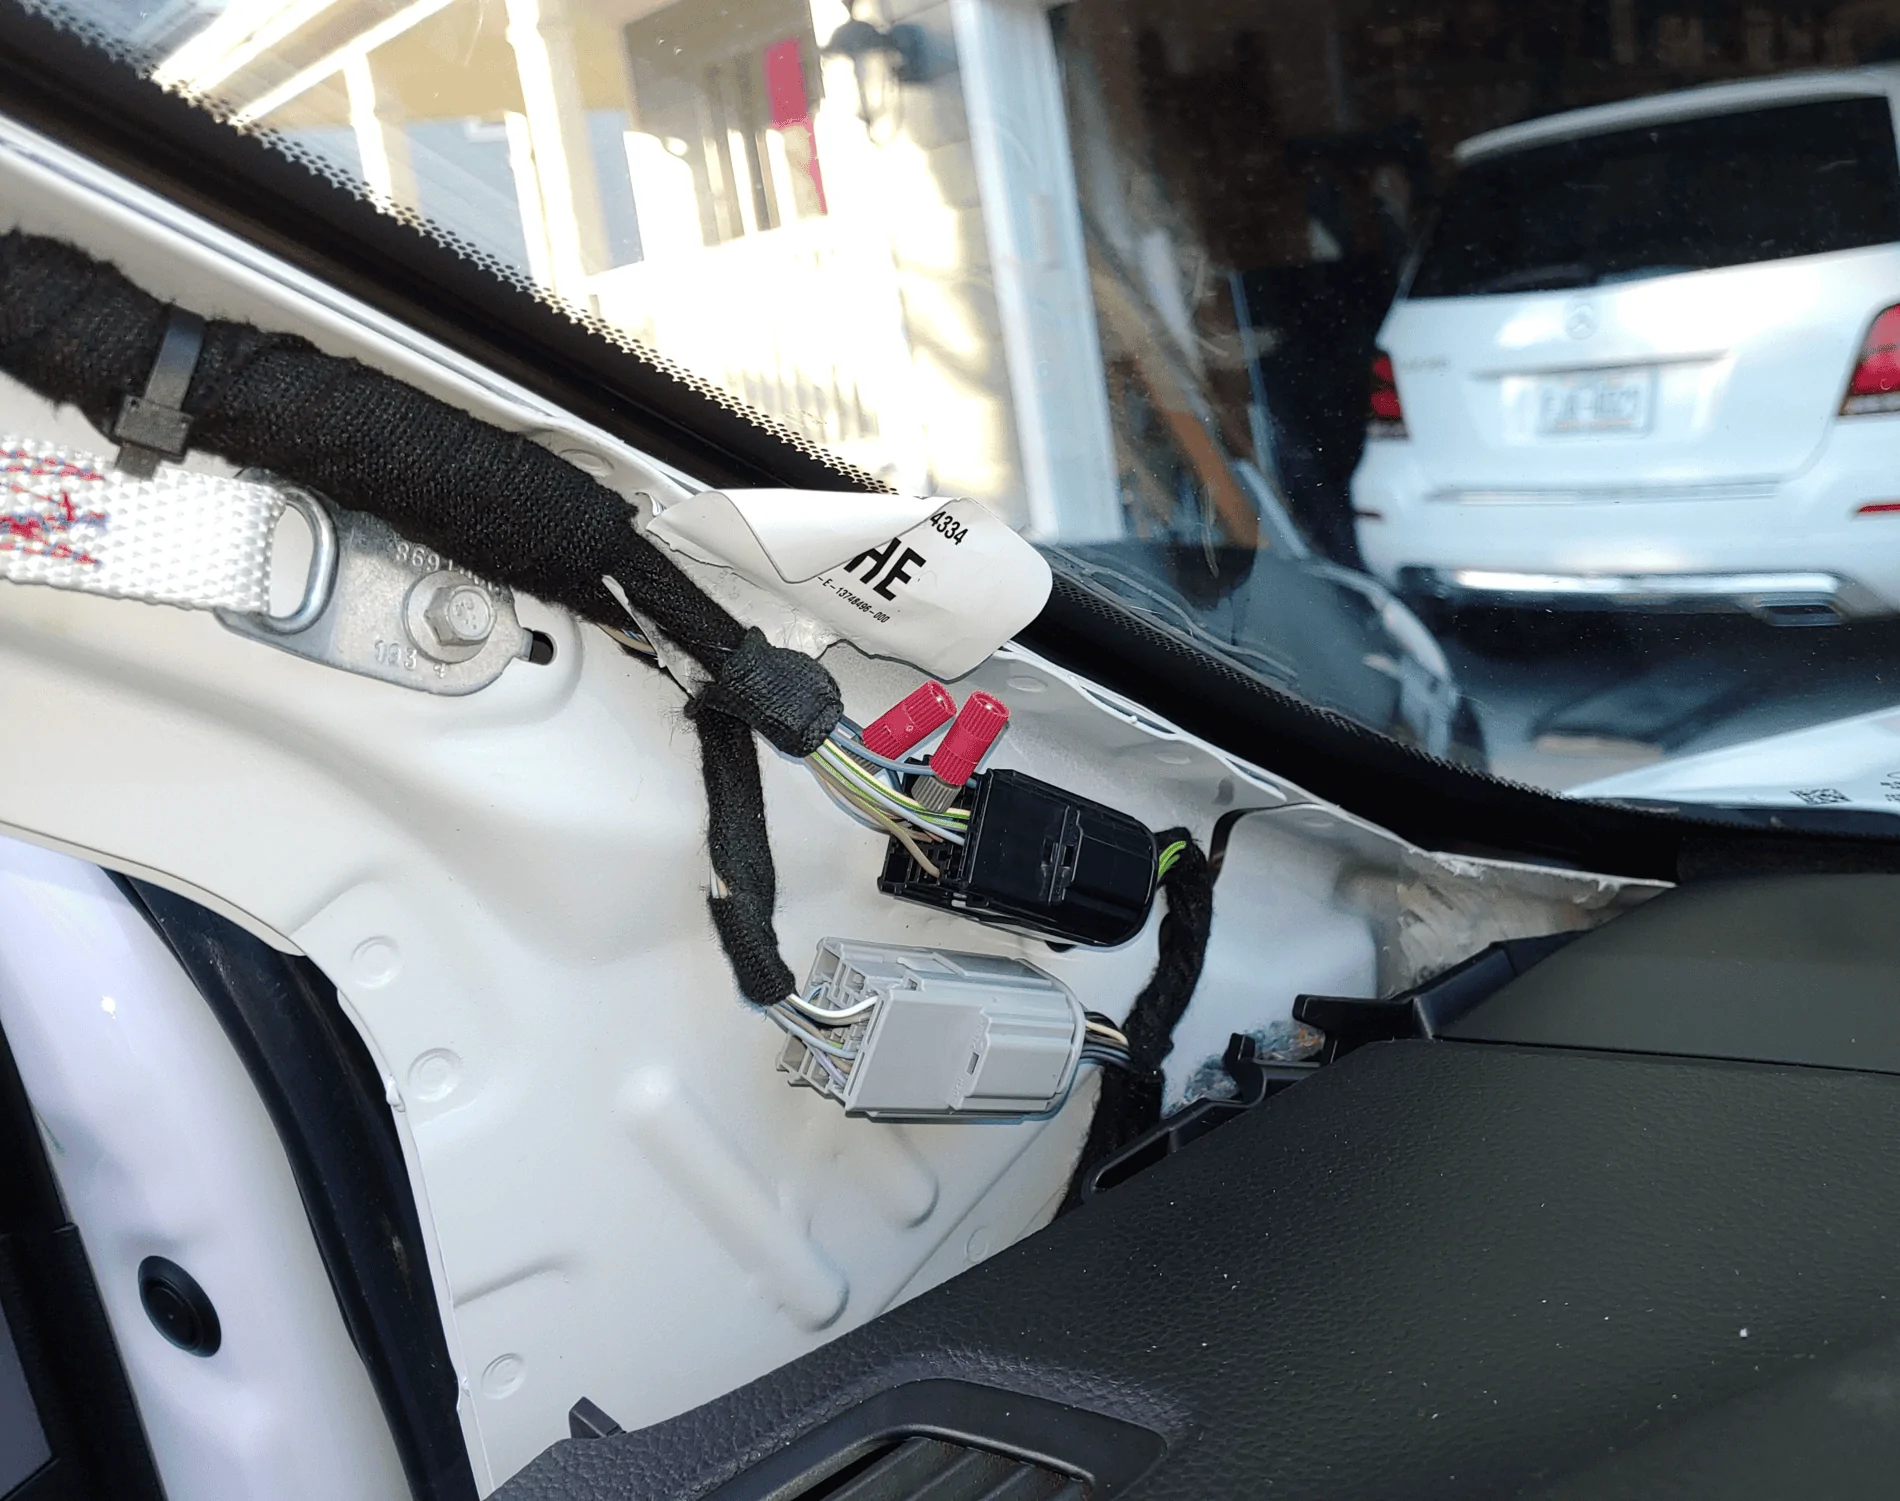
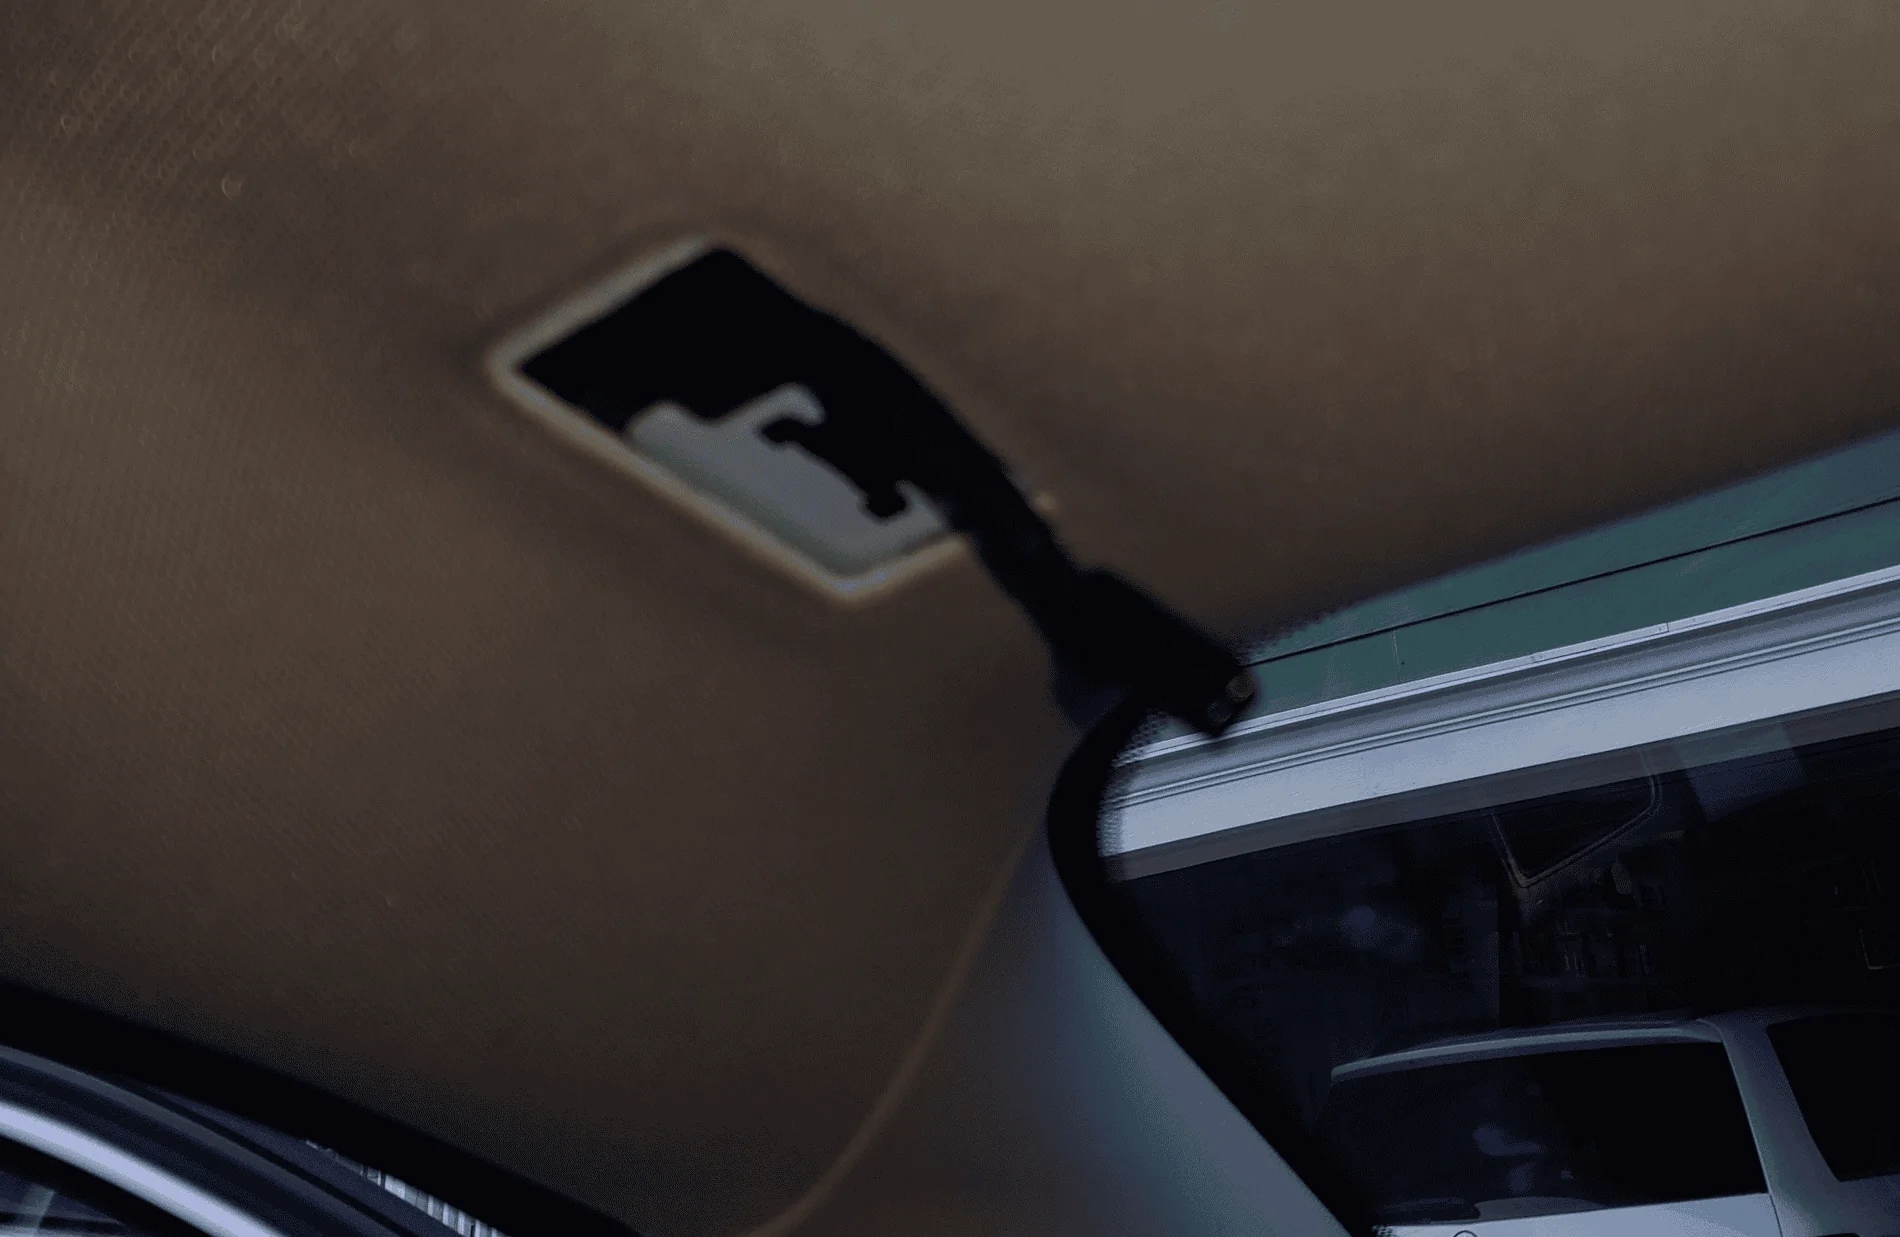
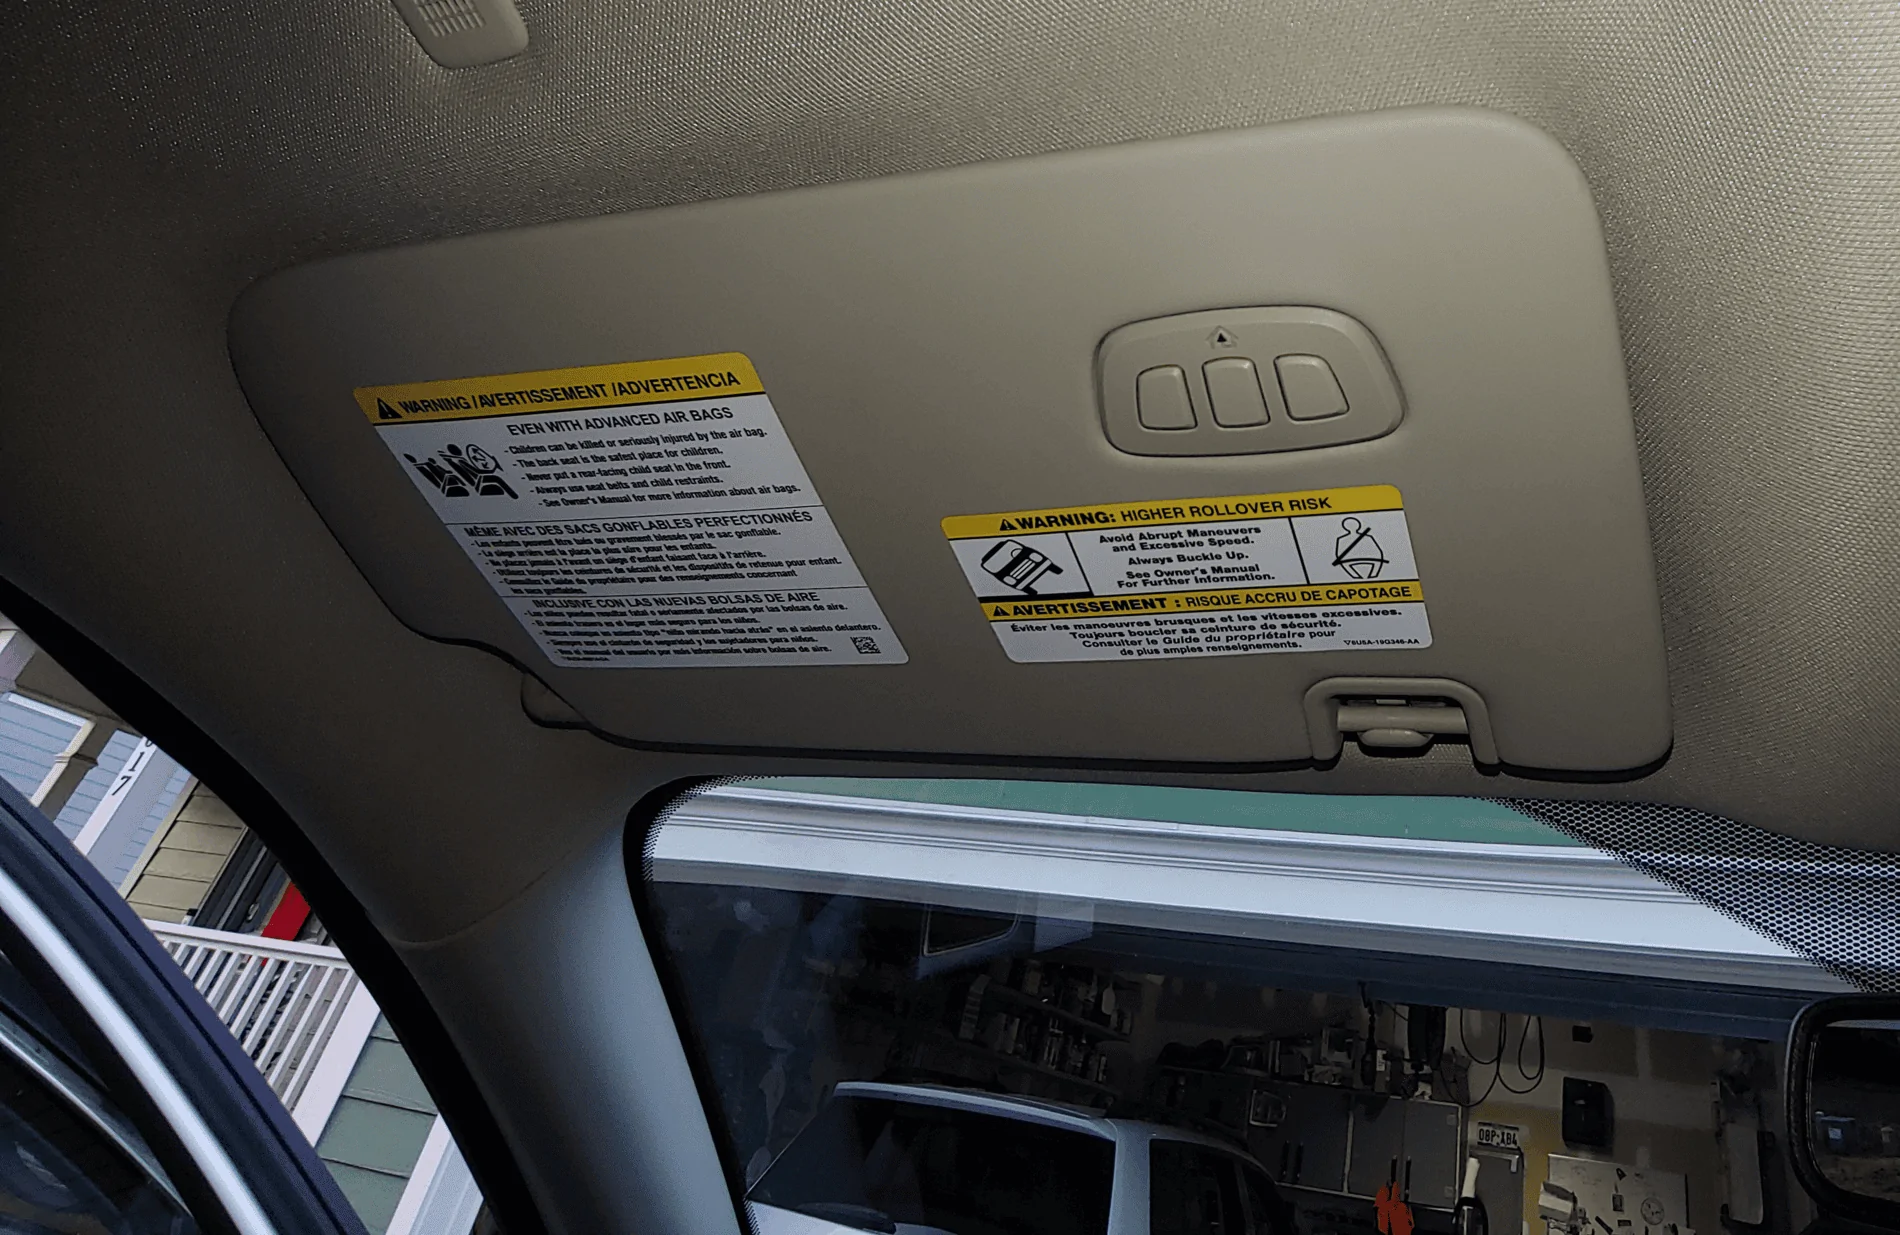
I just installed a Lariat visor with Homelink and working mirror lights in my XLT (pics coming). When I removed my XLT visor, I fished a snake camera in the hole and in between the headliner and roof, no pigtail for the powering the visor. I had to run 20ga wire from the mirror power.
Sponsored

 
OP
OP
TexasTruck

TexasTruck

Active Member
Joined
Jan 10, 2020
Threads
1
Messages
32
Reaction score
55
Location
Central Texas
Vehicle(s)
2019 Ford Ranger XLT CC
Vehicle Showcase
1
LOL thanks Phil
well that means I might just stick with the G door remote Velcroed on the angle surface below the 2 12V pwr ports. My main drive to add the homelink was the added security of not being able to open the G door if I leave my truck unlocked.
I hardwired a Lariat visor to the mirror power. The mirror power is keyed; when the truck is off, the Homelink is off.
 
OP
OP
TexasTruck

TexasTruck

Active Member
Joined
Jan 10, 2020
Threads
1
Messages
32
Reaction score
55
Location
Central Texas
Vehicle(s)
2019 Ford Ranger XLT CC
Vehicle Showcase
1
Post pictures!
I installed a Lariat visor in my XLT. I have done a few of the Amazon Homelink kits (approx $160), which work well, but this time I wanted to see what it would take to get a factory visor with Homelink built in this time. I shopped around and the best price I could find was on Tasca ($240 at the time).

Ford Lariat visor part number. XL, XLT, Lariat headliners, visors, pillars are all the same color.

1-PartNumber.jpg


It did take about three weeks from the time I ordered it till it arrived. I've ordered parts from Tasca before and know that when the part comes in, they ship it ASAP. I was anxious to get rid of the three clickers hanging on my XLT visor.... Not to mention, if someone got into my truck, they have access to my property now. My plan is to hardwire the visor to the mirror power which is keyed and convenient. I was sorta hoping Ford would provide the power pigtail to factory connect the Lariat visor, but no. Which is fine, because that would have been easy and boring.

I tried to take photos of each step, but I forgot a few along the way. The project was pretty simple though. As you can imagine, we have to run a couple of wires from the visor mount point over to the mirror, then attach the wires to the Lariat visor and finally connect them to the mirror power. Tip: Keep your hands clean and limit the handling of the light colored interior surfaces.

2-Frontside.jpg


Functioning mirror light, notice the connector extending from the visor mount point.

4-Backside-Mirror.jpg


Close up of the connector and visor mount point.

5-Connector.jpg


This next picture shows how the facia plate is snapped on to cover the visor mounting screw. As easy as it would seem to pop that facia cover off, think again. Also be careful prying it off, you need those little tabs to hold it place again.

6-NewFaciaRemoved.jpg


Using the Lariat visor facia cover as a gauge, carefully pry off the facia cover on the XLT visor. This is where I wish I had interior trim tools, but I don't, just be careful not to gouge your headliner or worse, get it dirty.

7-OldFaciaRemoval.jpg


Using a 7mm wrench or socket, remove the visor mounting screw.

9-RemoveVisorScrew.jpg


Carefully, tilt the visor out of the mount point. Don't forget to disconnect the other end from the headliner.

10-RemoveOldVisor.jpg


This is where we'll run a couple of wires over to the mirror.

11-OldVisorRemoved.jpg


Now the unknown part, moving over to the mirror area. I haven't seen many write ups on how the mirror, camera, power, etc. is put together. I looked around the mirror area and it's obvious that we have to remove the black cover. Using my hand, I just grabbed a hold of it and pulled straight away from the windshield. Pull steady and straight with a continuous pull and pop. It sounds like you broke something. If I had trim tools, they would have made it easier. I could have used a screw driver too, but something about prying against the glass and black cover just seemed wrong.

13-BlackPanelRemovedInside.jpg


That gray connector is the mirror power and where we will spice to get keyed +12v and gnd for our Lariat visor.

12-RemoveBlackPanelAboveMirror.jpg


The mirror area is pretty tight, so be careful and don't yank or pull or snag on anything in here. I have sausage fingers and I managed, just be careful. As you can see, I peeled some of the gray foam off of the three wires to make room for my T-tap connectors. You can use what ever splicing mechanism you like, but just remember there isn't a lot of room in the mirror area and I was slightly concerned about space inside the black cover for my spice.

Gray = ground or negative
Blue = 12v or positive

I will use 20ga stranded wire for this since it looks like the same size as the mirror power wires. Also, be sure to give yourself enough wire length to reach from the visor over to the mirror too.

14-DisconnectMirrorGaryConnector.jpg


Here you can see my wire taps and I've reconnected the gray mirror power connector. I probably should have disconnected the battery first, but since the mirror power is off when the vehicle is off, I wasn't worried.

15-WireTapsForVisor.jpg


Now we need to add some length of wire to the Lariat visor so we can attach the mirror power to it. I started by carefully unwrapping the factory black cloth tape. I wanted to reuse this after I attaching a length of wire. Notice the white with blue chris/cross insulation.

16-PeelOffBlackTape.jpg


Now, carefully cut off the factory black connector. Try to cut it as close to the connector as you can leaving as much wire as you can on the Lariat visor. Notice the white with blue chris/cross insulation now, it slide easily over the red and black wires. We want to keep this so don't loose track of it.

17-CutOffFactoryConnector.jpg


Now we need to strip the red and black insulation off the Lariat visor wires. I decided to solder the wire lengths to the Lariat visor wires mainly because I wanted to keep the wire runs as smooth as possible. I stripped about 1/8" from the ends.

18-StripBackInsulation.jpg


...and soldered the 20ga red and black wire lengths to the ends. I also used heat shrink on the exposed solder joints to prevent shorts and slid the white with blue chris/cross insulation up to the solder joints. Finally, I took the factory black cloth tape and wrapped it all back up, nice and neat.

19-SolderWireLengths.jpg


Heat shrink the solder joints, slide the white with blue chris/cross insulation as far as you can to the heat shrink.

20-HeatShrinkSolder.jpg


Reuse the factory black cloth tape to wrap it all up, nice and neat again. I don't have a picture of it, but I also used braided sleeving over the wires to protect them inside the headliner and roof against any abrasion.

21-ReuseFactoryClothTape.jpg


Moving back to the mirror area again, more fun. Remember how I said the visor mount point hole opens into a cavity that goes from side to side.... the cavity passes right above the overhead console. We need to remove the overhead console, drill a hole in the cavity so we can fish the wire from the visor over to the mirror. I didn't take any pictures of removing the overhead console, but let me just say it's about as unnerving as removing the black cover above the mirror. Start at the rear of the overhead console and using your fingers, pull/pry down on the corners of the overhead console until it pops. Now, move your fingers along the sides to the middle of the overhead console and pull/pry again to release the middle. Finally, the overhead console will want to swing down, hinging on the front where it hooks above the headliner. It sounds terrible and difficult, but it's not that bad. Again, if you have interior trim tools they really help here.

The next picture shows that I removed the overhead console and drilled a 3/8" hole in the cavity. BTW, the cavity is some sort of reinforcement bar across the roof. I did try to simply "tuck" the wires above the headliner and windsheild, but the visor mount point hole is not accessible except from within the cavity. Before you go drilling, beware of metal filings as you drill the hole and on the other side of the hole is the outside skin of the roof! I laid out a beach towel to catch the metal fillings. Also be careful not to push so hard on the drill motor that when the hole is drilled that you don't poke through and dent your outside roof skin.

As you can see I have fished a solid 16ga picture frame wire through the hole and over to the visor mount point hole. It might take you a couple of attempts to get the fish to the hole, just be patient.

22-DrillHoleFishWireToVisorMountHole.jpg


Fish wire exiting the visor mount point hole.

23-FishWireExits.jpg


Now attach the end of wire lengths you attached to the Lariat visor to the end of the fish. Again, keep things smooth because you'll be pulling it all back through to the hole you drilled by the mirror. I use black electrical tape to attach the wires together. Take your time pulling the fish back to the drilled hole or you might cause the visor power wires to come off the end of the fish. Also, you're probably holding the visor in one hand and pulling the fish back with the other, so be careful. Once you pull enough fish and visor power wire back to the drilled hole, you can temporarily hook the new visor in the visor mount point hole.

Once you have the fish and visor power wires at the drilled hole, remove the wire fish now. I don't have a lot of pictures here, but we need to route the visor power between the headliner and the windshield now. You'll notice where the existing mirror power runs and the factory groove in the headliner. I just pushed the visor power wires through along the existing mirror wire harness. You can see where I routed the visor power from the drilled hole, through the headliner and out. Just look for my braider sleeve to the left of the wire splices.

24-PullWireLengthBackToDrilledHole.jpg


Moving back to the visor side, chances are you left it hooked as you pulled the fish back to the drilled hole. We need to feed the visor power wires into the hole and reattach the new Lariat visor. Reinstall the single visor screen with the 7mm wrench or socket and carefully position and snap on the visor facia plate that hides the screw. Make sure your hands are clean first.

25-NewVisorScrewFaciaAttached.jpg


Again, I don't have a lot of pictures, but we need to button things up. You'll need to crimp on the male connectors that plug into the T-taps in my case or how ever you decided to splice the mirror power. Once you have it all connected, but before you put the black cover back on, let's test it. Remember, you need to turn the key on to accessory or run or even start it to energize the mirror power and your Lariat visor.

26-VisorMirrorLights.jpg


...and Homelink!

27-VisorHomelink.jpg


I hope this helps others make the decision. Yeah, the Lariat visor costs a little more, but it looks factory now. If you have any questions just send a message.
 

micl9

Well-Known Member
First Name
Mike
Joined
Dec 21, 2019
Threads
30
Messages
1,332
Reaction score
1,847
Location
Apex, NC
Vehicle(s)
2019 Ranger XLT Fx4 302A
Vehicle Showcase
1
Awesome write up TX!
 

H2Ocooled

Active Member
First Name
Rich
Joined
Jan 2, 2020
Threads
1
Messages
27
Reaction score
44
Location
Oregon
Vehicle(s)
2019 Ranger XLT, 1967 SS Camaro
Occupation
Network Administrator
Yes thank you for the great write up.


Mokume

Well-Known Member
First Name
Jeff
Joined
Aug 18, 2019
Threads
40
Messages
1,718
Reaction score
2,625
Location
Honolulu, Hawaii
Vehicle(s)
2000 Ranger Supercab (sold 12/19) , 2002 Honda CR-V
Occupation
Retired Firefighter III, Honolulu Fire Department
I hardwired a Lariat visor to the mirror power. The mirror power is keyed; when the truck is off, the Homelink is off.
Hmm... my 2020 Lariat is housed in a carport, so no garage door.
The poor Homelink device will sit unused forever, unless I can somehow program it to run my beer fridge on "turbo-cool"...lol
 

Dustoff262

Well-Known Member
Joined
Feb 9, 2020
Threads
5
Messages
76
Reaction score
160
Location
Florida
Vehicle(s)
2020 Ford Ranger Lariat, black package
Is it even a switched 12v?

I'm 99% sure that I raised and lowered my garage door in my lariat without having the truck running or even the accessory on.
Thats a serious security problem. I brought this up with the dealer and they werent sure if there is an update to disable the garage opener when the vehicle is off.

You can stick a small hand sized air bag to gain a purchase and insert a rod long enough to hit any of the buttons and open the garage door. Inside, the perp can close the door again, access tools and gain entry into the home.

For those reasons I didnt program my homelink opener. I have the key fob opener that is attached to my home keys and take it inside.
 

revbevis

Active Member
First Name
Tom
Joined
May 11, 2020
Threads
2
Messages
42
Reaction score
66
Location
Ava, IL
Vehicle(s)
2019 Ford Ranger XLT SuperCrew Chrome Package
Great instructions, much appreciated. Now, I need to source a Lariat visor.
 

deeve

Well-Known Member
Joined
Nov 18, 2019
Threads
16
Messages
198
Reaction score
72
Location
USA
Vehicle(s)
Ford Ranger
I have found a few cars allow the homelink to be powered all the time. For my garage, I ended up getting a smart outlet switch that shuts off the garage opener after hours.
 

LRB45

Active Member
First Name
LONNY
Joined
Jan 28, 2020
Threads
3
Messages
33
Reaction score
57
Location
FLORIDA
Vehicle(s)
2019 FORD RANGER
Vehicle Showcase
1
Wouldn't the easiest option be to simply power the visor from switched position in the fuse box? It's on the driver side anyways and getting down the pillar is easy. I installed my homelink in the upper console and powered from position 37 in the FB which is switched.
 
OP
OP
TexasTruck

TexasTruck

Active Member
Joined
Jan 10, 2020
Threads
1
Messages
32
Reaction score
55
Location
Central Texas
Vehicle(s)
2019 Ford Ranger XLT CC
Vehicle Showcase
1
Wouldn't the easiest option be to simply power the visor from switched position in the fuse box? It's on the driver side anyways and getting down the pillar is easy. I installed my homelink in the upper console and powered from position 37 in the FB which is switched.
I thought about the left A-pillar too but didn't want to mess around with the side curtain air bag in any way... especial since key power is only a few inches away at the rear view mirror ;-)
 

micl9

Well-Known Member
First Name
Mike
Joined
Dec 21, 2019
Threads
30
Messages
1,332
Reaction score
1,847
Location
Apex, NC
Vehicle(s)
2019 Ranger XLT Fx4 302A
Vehicle Showcase
1
Well I found a great deal on a junkyard Lariat sun visor with home-link. Thru some Googling I figured out the mating connector and pins - LINK.
I also discovered why the remote works without the key, its (and the vanity mirror lights) are wired to the interior light system, so open the door and you have Homelink power. So I did same as Texas and tapped into the mirror power.
But I took the A-pillar trim off and wired from there.
To remove the A-pillar trim panel pull the door weatherstrip off.
1608765595895.png


Pull the trim panel off starting at the top. DO BE CAREFUL as was mentioned there is an airbag under there! There are 2 tethers that you need to twist and remove .
1608765749554.png


Lift upward and outward and remove the A-pillar trim panel.
1608765843460.png


Blue-Brown is 12V IGN and Black-Grey is GND. Air bad is to the left and up, attached to the white nylon strap. DO NOT run wires near the air bag!
1608762188183.png


I then ran the wires up the A-pillar to the visor mounting point. Used a woven sleeve to protect the wires. and tucked them under the harness.
Sorry blurry pic...
1608762305844.png


and done! All in all a pretty easy mod!
1608762376379.png
 
Last edited:

Robisten8

Well-Known Member
Joined
Dec 11, 2020
Threads
4
Messages
193
Reaction score
508
Location
Central Texas
Vehicle(s)
2020 Ranger XLT Sport 4WD, 2021 Bronco Sport
Vehicle Showcase
1
Thats a serious security problem. I brought this up with the dealer and they werent sure if there is an update to disable the garage opener when the vehicle is off.

You can stick a small hand sized air bag to gain a purchase and insert a rod long enough to hit any of the buttons and open the garage door. Inside, the perp can close the door again, access tools and gain entry into the home.

For those reasons I didnt program my homelink opener. I have the key fob opener that is attached to my home keys and take it inside.
I'm not trying to sound like an a-hole or anything, but why wouldn't you just secure your vehicle in the garage in the first place.
 

Robisten8

Well-Known Member
Joined
Dec 11, 2020
Threads
4
Messages
193
Reaction score
508
Location
Central Texas
Vehicle(s)
2020 Ranger XLT Sport 4WD, 2021 Bronco Sport
Vehicle Showcase
1
Great information......I was wondering if this was possible. I hate garage door openers clipped on visors for so many reasons!
 

micl9

Well-Known Member
First Name
Mike
Joined
Dec 21, 2019
Threads
30
Messages
1,332
Reaction score
1,847
Location
Apex, NC
Vehicle(s)
2019 Ranger XLT Fx4 302A
Vehicle Showcase
1
I'm not trying to sound like an a-hole or anything, but why wouldn't you just secure your vehicle in the garage in the first place.
Back at ya ?
Well some don't have a garage and others get kicked to the curb in favor of the wife's vehicle!
And of course sometimes you forget to lock the truck, very common past 50 I find!
Sponsored


Top