Sponsored

Fuse Tap

Muscleford

Well-Known Member
First Name
George
Joined
Mar 24, 2021
Threads
91
Messages
760
Reaction score
1,499
Location
Ohio north coast
Vehicle(s)
21 Ranger Lariat, 84 & 85 Merc Capri 5.0, 23 Escape
Occupation
Retired CFO
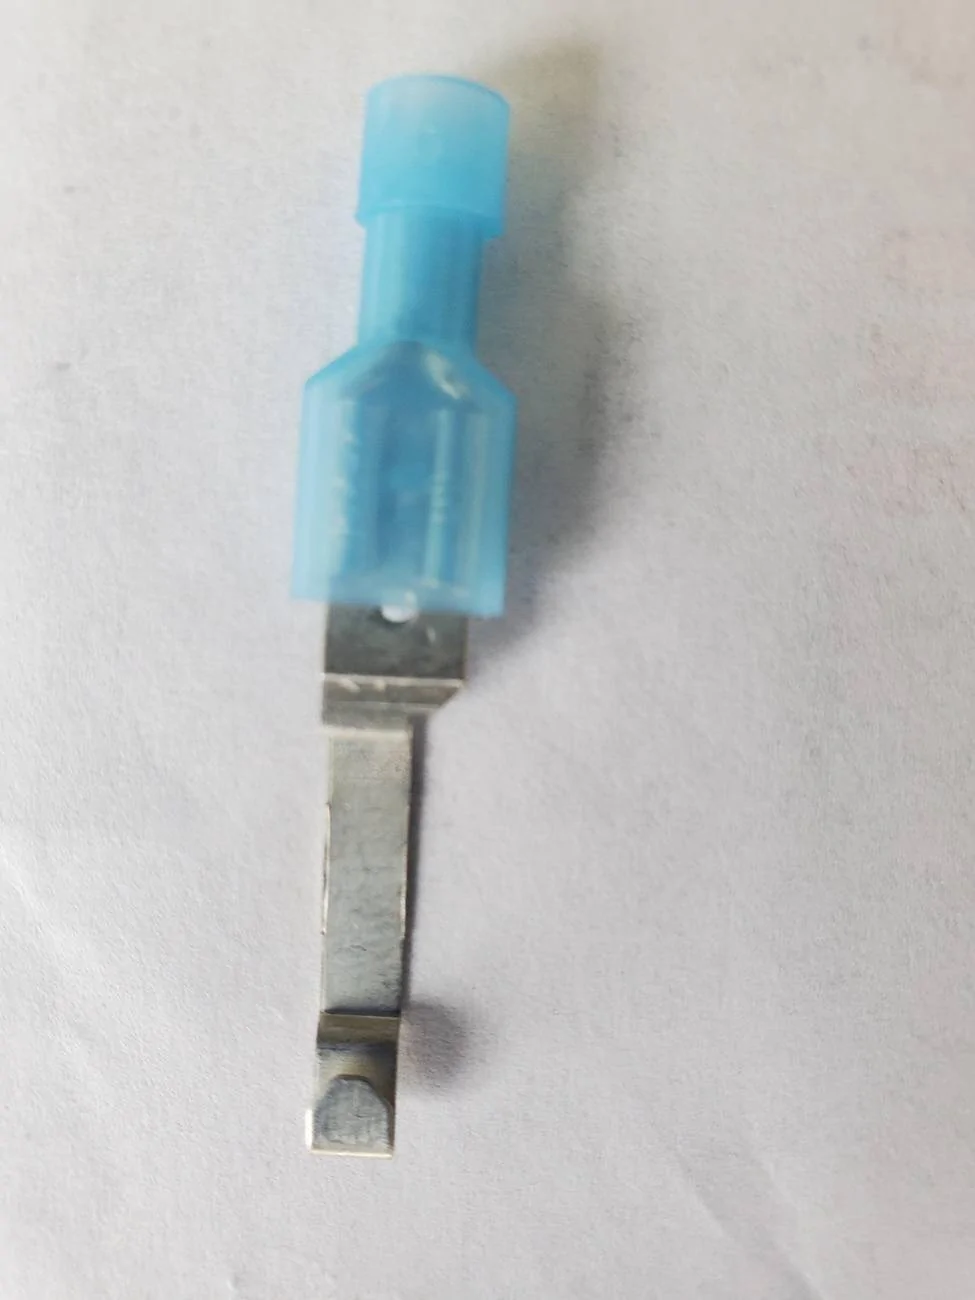
Anyone use a fuse tap like this?

Are there problems with using this type of fuse tap?

Does it damage the fuse socket?

Thanks for the help.


20250403_151545[1].webp
Sponsored


airline tech

Well-Known Member
Joined
Aug 24, 2022
Threads
28
Messages
4,461
Reaction score
8,524
Location
Midwest - KS
Vehicle(s)
2022 Ranger Lariat-Super Crew, Cactus Gray
Occupation
Aircraft Tech
Ok:
First, I have to disclose I have never really dealt with the newer style fuse taps and just realized the difficulty in Fuse Tapping the BJB (Engine Bay Fuse Box)
Moreso: The popular Fuse #19 Slot.
As I never looked into how those are wired and how they need to be properly oriented to allow proper circuit protection - I see why the Aftermarket Mfgs want to use Fuse #24 as a tapped source.
You can properly orient the Fuse Tap to pick up - (Source Power) on the proper leg vs Fuse #19 you have the relays blocking you.

First:
I have used this type of Tap on previous vehicles and actually had this type for my (Head Unit) (RAP) Power where it held all the presets/ clock etc.
I did have to (reseat) the fuse on occasion as over time the contacts in the fuse box were spreading from the extra thickness that is added by the tap.
So yes, they work, but they will eventually require you to spread the tap end out to take up any gap created as time goes by.

1743760519882-64.webp


A Better Option - Same Idea of Tap is this
Do not know if any cheaper options are out there, but found a better alternative to the blade tap damaging the fuse box contacts
So, to use this (properly) install the fuse (Power Leg - Most Forward) and then install a (In-Line) fuse on the wire for your output source.
Note: You can easily make your own with a soldering iron and wire, this set they have done that for you.

Prewired.webp


I believe it was asked in another thread about this:
I did find this, note this is a Canadian Company, need to research deeper if the US can get this style.

LH - Exit - all others that I have found are RH-Exit
This will allow the same (Cube) the extend over to the right across the top of the other fuses, but you are still dealing with the wire & relay interference.
Note: As it appears the RH- Exit style is too long and will hang outside of the box enclosure if you were to flip it around to pick up the proper orientation as well as the (Relay Interference)
So, this style (LH Exit) only cures 1/2 of the problem - you still have (wire to relay interference)

Optifuse Left Hand.webp


I did not know this about this style of fuse taps as I never used them but in order for them to properly protect (2) circuits they must be (Installed) in the correct orientation.

The picture below shows (IMPROPER ORIENTATION)

Reason: The side that the (wire exits) is the (Output Feed) side of the fuse
This is tapped into Fuse #19 Slot
With the (Vertical) Fuses (pictured) the (Source Feed - Contact) is on the (Most Forward) Pin or the one closest to the cab.

So, with the below install the lower fuse is taking the current of both fused circuits
So, if improperly oriented (like below) if there is an issue on either circuit the Bottom Fuse could Blow and take both circuits vs separate circuits as the tap is intended.
I find it somewhat amazing that this is not highlighted in the install packaging or instructions from most of the manufactures of these taps and I only recently noted this from the latest posts about taps and locations, I never thought that these were (orientation dependent) but they are to get the (Full - Intended Usage) of the tap.

Intended Function:
Two Sperate Circuits - Protected By (2 Separate) fuses.

Improper Function:
The Lower Fuse (OE-Circuit) is being used to power 2 separate circuits, so you have an amperage draw across the fuse before it reaches the (Upper -added circuit) fuse, so depending on what you are adding this may create issues with the device you are adding, and it is dependent on the device power requirements (it may not like the reduced power) that is actually being feed to it.


Fuse 19 Tap.jpeg


Here is a video for explanation:
He does a good job explaining what I am talking about.

How to INSTALL a FUSE Tap correctly | AnthonyJ350

So Real World since I think all owners who have tapped (Fuse #19) with a fuse tap have not experienced the (fuses blowing) but however there are reported issues with (Headlights) and this tapped source, and this would Highlight some of the various intermittent issues with them as a possible (Fuse Tap) orientation from the tap (MAY) be the source of the issues.
Too much amp draws for the 10-Amp fuse feeding 2 outputs.
But other than that - it appears the circuit can handle being tapped improperly; it works but it's not as it is designed for.

So, to close, we are limited to fuse tapped sources in the Engine Bay Fuse Box, more highlighted in the 2020 and up Rangers who lost Fuse #24 as a viable tapped source.
To only way to gain it back would be to open up the fuse box and solder in a Fuse Socket, it would be nice to find the Part Number of one or get a salvage yard (pick n pull) fuse box with or without Fuse #24 present - Swap in the salvage box or use it as a doner box and swap the fuse socket over to the existing box if unable to find a part number for the (new socket)

Another option would be to - add an auxiliary fuse box and then just run your wires to that and skip all the (Fuse Tap) Limitations


Top