
Sponsored
Is there an extension for the positive battery terminal to aid with jumping?

IdahoRanger
Well-Known Member
It is tight. Personally I wouldn't jump another vehicle or the Ranger the old fashion way with cables, I would use a jump starter and carry one with me.

airline tech
Well-Known Member
- Joined
- Aug 24, 2022
- Threads
- 28
- Messages
- 4,499
- Reaction score
- 8,592
- Location
- Midwest - KS
- Vehicle(s)
- 2022 Ranger Lariat-Super Crew, Cactus Gray
- Occupation
- Aircraft Tech
Unfortunately, No. - BUT see below
You could possibly rig something to work
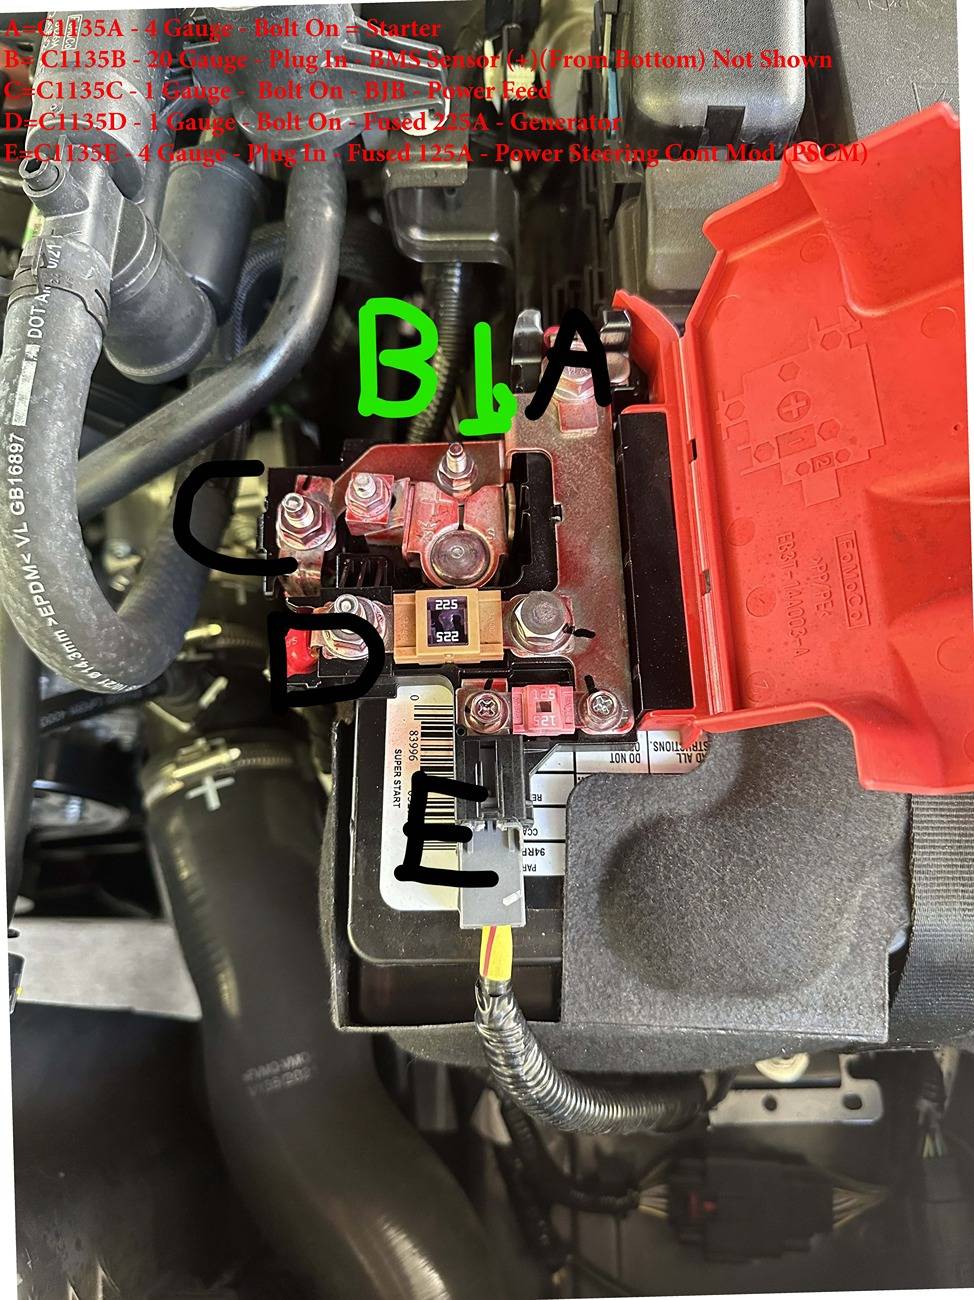
For Jump Starting: However, there are some - DO NOT CONNECT - HERE points
And that is the Fused locations, mainly the 225-Amp (easy to access) stud, this fuse does not like abnormal amperage draw across it.
I know the recess sucks, makes it impossible to get directly on the post.
The best spot for a Positive Cable - Jump Start (Connection) is the stud (in line vertically) with the post-split. This is the closest stud to the post.
Stud (C) - Runs down to the High Current Fuse Box and ties in more fuses and then back up to the BJB - (Engine Bay Fuse Box)
This is another (Jump Start) hook-up location, now this cable runs down to the lower fuse link, direct connects to it - and routes back up to the BJB.
The extra cable runs may hamper a jump start event.
Stud (D) - Feeds down to the alternator, the issue with hooking up here is that - the current from the charging / jumping - supply flows through the 225-Amp fuse and can potentially blow the fuse.
Note: Most Autoparts stores - DO NOT STOCK this fuse and has to be ordered.
My daughter's boyfriend blew his, jumping my daughter's car - Hooked up to this stud
NOTE: The whole plate (metal) is HOT.
But: My idea for an adaptor
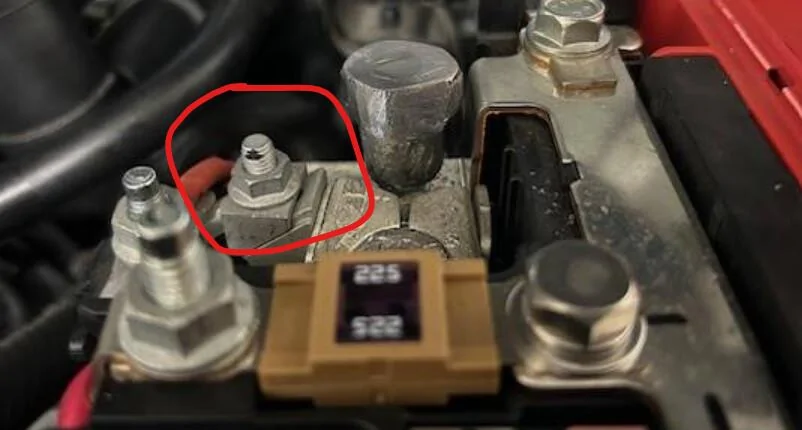
The idea was to improvise an attaching stud, that can be screwed on the stud as it sits.
That can be kept - in the truck, along with the Jumper Pack.
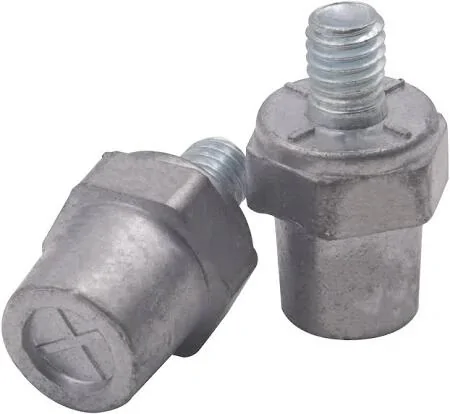
The stud (Under the Arrow)
My idea, use one of these and make an adaptor.
Drill & Tap, a hole on the bottom side that will attach (screw on) the stud (top half showing)
by a few threads - just enough for a solid connection and the clamps have something to grab.
Alternate: Ideas
Threaded Rod & DBL Nutted (locked together) - and use the nut to attach to the stud
Barrell Nut - and attached to the stud
and then attach the jumper adapter to either set-up
When finished just remove the adaptor assembly and stow


You could possibly rig something to work
For Jump Starting: However, there are some - DO NOT CONNECT - HERE points
And that is the Fused locations, mainly the 225-Amp (easy to access) stud, this fuse does not like abnormal amperage draw across it.
I know the recess sucks, makes it impossible to get directly on the post.
The best spot for a Positive Cable - Jump Start (Connection) is the stud (in line vertically) with the post-split. This is the closest stud to the post.
Stud (C) - Runs down to the High Current Fuse Box and ties in more fuses and then back up to the BJB - (Engine Bay Fuse Box)
This is another (Jump Start) hook-up location, now this cable runs down to the lower fuse link, direct connects to it - and routes back up to the BJB.
The extra cable runs may hamper a jump start event.
Stud (D) - Feeds down to the alternator, the issue with hooking up here is that - the current from the charging / jumping - supply flows through the 225-Amp fuse and can potentially blow the fuse.
Note: Most Autoparts stores - DO NOT STOCK this fuse and has to be ordered.
My daughter's boyfriend blew his, jumping my daughter's car - Hooked up to this stud
NOTE: The whole plate (metal) is HOT.
But: My idea for an adaptor
The idea was to improvise an attaching stud, that can be screwed on the stud as it sits.
That can be kept - in the truck, along with the Jumper Pack.
The stud (Under the Arrow)
My idea, use one of these and make an adaptor.
Drill & Tap, a hole on the bottom side that will attach (screw on) the stud (top half showing)
by a few threads - just enough for a solid connection and the clamps have something to grab.
Alternate: Ideas
Threaded Rod & DBL Nutted (locked together) - and use the nut to attach to the stud
Barrell Nut - and attached to the stud
and then attach the jumper adapter to either set-up
When finished just remove the adaptor assembly and stow
got3fords
Well-Known Member
I have the same concern when connecting a battery tester. The fact that I can get widely variable results in quick succession makes me wonder if I am getting proper connection with all going on there. I take the best result and roll with it.
airline tech
Well-Known Member
- Joined
- Aug 24, 2022
- Threads
- 28
- Messages
- 4,499
- Reaction score
- 8,592
- Location
- Midwest - KS
- Vehicle(s)
- 2022 Ranger Lariat-Super Crew, Cactus Gray
- Occupation
- Aircraft Tech
Yes - it is very strange, the whole thing is hot, why the varying results.I have the same concern when connecting a battery tester. The fact that I can get widely variable results in quick succession makes me wonder if I am getting proper connection with all going on there. I take the best result and roll with it.
I have thought about disconnecting the whole link and take ohm readings across it, just to verify .001 throughout.
The spots we connect to - with the testers should not vary that much.

awd.nv
Well-Known Member
- First Name
- Anthony
- Joined
- Apr 26, 2021
- Threads
- 30
- Messages
- 1,260
- Reaction score
- 2,377
- Location
- Las Vegas, NV
- Vehicle(s)
- '21 Ranger XLT Tremor
- Occupation
- Computers
It may not be the solution you are asking about but I get this on the Ranger battery easily. I personally use a capacitor based jump starter. The storage temperature range was what made this great for me and that I can charge it with a weak battery too.
https://www.amazon.com/autowit-Supe...arrancador/dp/B086L29DL9?ref_=ast_sto_dp&th=1
There really are no downsides to it other than waiting 2min to charge it off a good battery to help someone. I usually start my Ranger and it hits 100% by roughly 2min. I have helped a handful of people with it now. It has even started my Mustang with a 11.0:1 v8 302 that the battery was weak on from not driving it (need a battery tender). It takes up less space than cables too.
A reviewer tested the charging off a weak battery that would not crank a vehicle, took about 30min. Cheap enough, it can be your backup to your preferred method but personally it is all I carry for jumping.
https://www.amazon.com/autowit-Supe...arrancador/dp/B086L29DL9?ref_=ast_sto_dp&th=1
There really are no downsides to it other than waiting 2min to charge it off a good battery to help someone. I usually start my Ranger and it hits 100% by roughly 2min. I have helped a handful of people with it now. It has even started my Mustang with a 11.0:1 v8 302 that the battery was weak on from not driving it (need a battery tender). It takes up less space than cables too.
A reviewer tested the charging off a weak battery that would not crank a vehicle, took about 30min. Cheap enough, it can be your backup to your preferred method but personally it is all I carry for jumping.

pismo1
Well-Known Member
- Joined
- Sep 5, 2023
- Threads
- 2
- Messages
- 235
- Reaction score
- 420
- Location
- Temecula,Ca
- Vehicle(s)
- 2020 FX2
https://www.montanajacks.com/products/wrn-26769My 2019 XLT positive battery terminal is loaded with connections that make it difficult to get a clamp on to jump a battery. Anyone know of an extension or gadget to make this easier?
awd.nv
Well-Known Member
- First Name
- Anthony
- Joined
- Apr 26, 2021
- Threads
- 30
- Messages
- 1,260
- Reaction score
- 2,377
- Location
- Las Vegas, NV
- Vehicle(s)
- '21 Ranger XLT Tremor
- Occupation
- Computers
That is a pretty cool kit. If someone wanted to make their own, those connectors are used on electric pallet jacks. Looks like Amazon and Harbor Freight to the rescue.
Connectors
https://www.amazon.com/Connectors-C...1-1-spons&sp_csd=d2lkZ2V0TmFtZT1zcF9hdGY&th=1
Cables
https://harborfreight.com/30-ft-1-gauge-heavy-duty-jumper-cables-with-storage-case-57802.html
Crimper
https://www.amazon.com/Battery-Cabl...-7-spons&sp_csd=d2lkZ2V0TmFtZT1zcF9tdGY&psc=1
airline tech
Well-Known Member
- Joined
- Aug 24, 2022
- Threads
- 28
- Messages
- 4,499
- Reaction score
- 8,592
- Location
- Midwest - KS
- Vehicle(s)
- 2022 Ranger Lariat-Super Crew, Cactus Gray
- Occupation
- Aircraft Tech
I have never had the battery disconnected (YET)
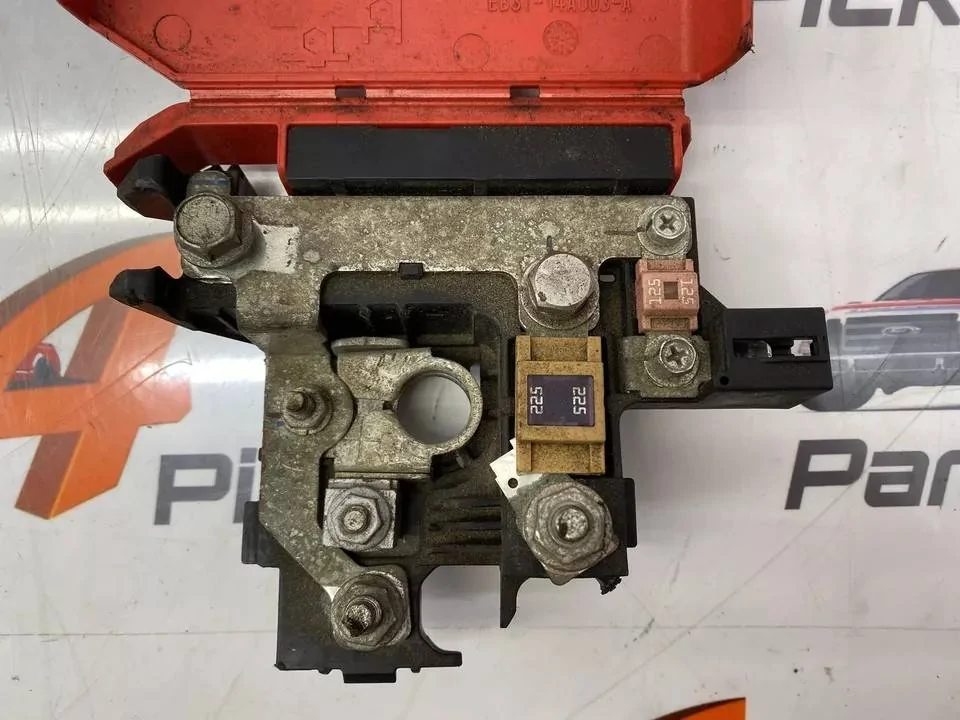
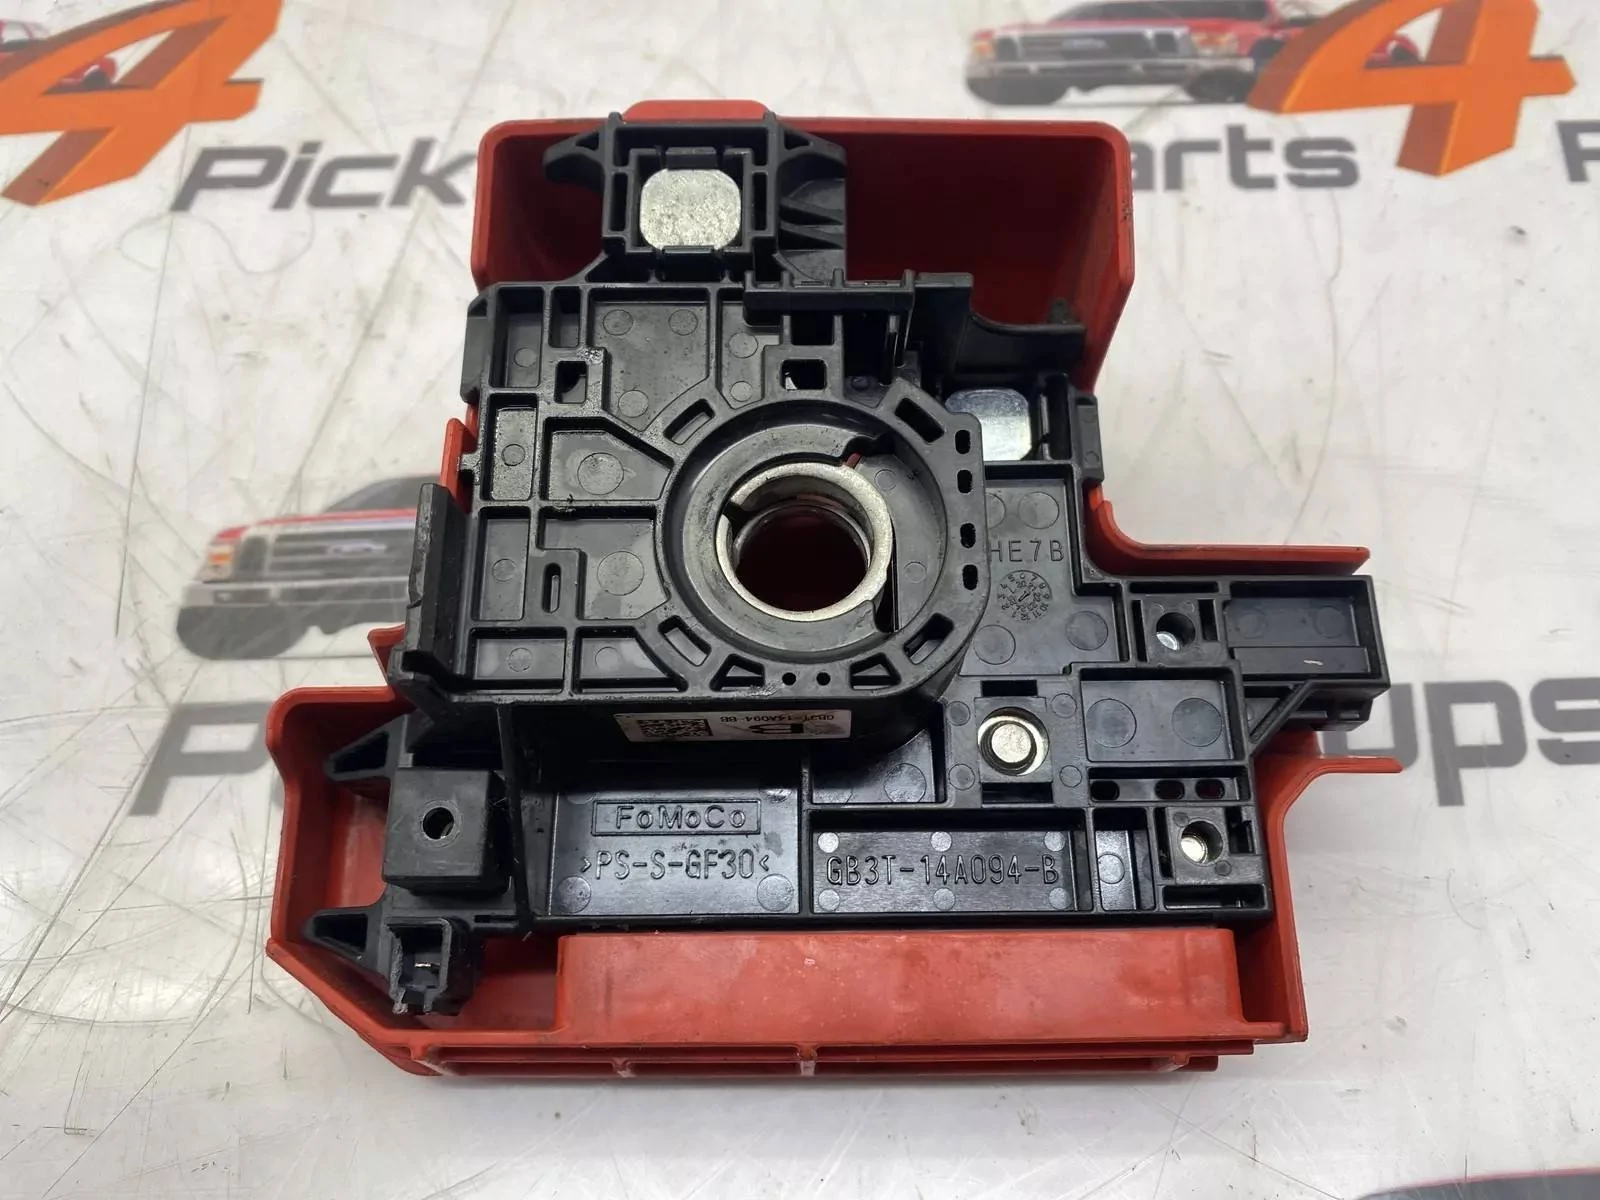
So, I did some Ebay searching for pics - found some ROW's as a ref: to brainstorm ideas
and find the best option.
This is sold as a - UNIT and you cannot get anything separate.
But it appears that the metal plate can be separated from the plastic base.
Now depending on how the (stud) to the left of the (Terminal) is integrated:
Is it part of the terminal or just a separate stud to connect the (2)?
It does not protrude through to the bottom (plastic)
We could possibly replace this with a longer stud, or larger stud
It visually appears - clearance wise - we can go to the top of the ledge in length and the cover will still close.
We could also make a bracket (U) Shaped and attach it under the nut, and then attach a larger
Bolt & Nut to make a better connection point.
and with the right measurements the cover will still close, or we can just make a threaded hole for the above (charging) adapters to screw into.

Bottom Side:
Note: The only protrusions through the bottom are:
Besides the Terminal (itself)
The Stud for the (BJB) , The 225-Amp Alternator Studs & The 125-Amp -PSCM Studs

So, I did some Ebay searching for pics - found some ROW's as a ref: to brainstorm ideas
and find the best option.
This is sold as a - UNIT and you cannot get anything separate.
But it appears that the metal plate can be separated from the plastic base.
Now depending on how the (stud) to the left of the (Terminal) is integrated:
Is it part of the terminal or just a separate stud to connect the (2)?
It does not protrude through to the bottom (plastic)
We could possibly replace this with a longer stud, or larger stud
It visually appears - clearance wise - we can go to the top of the ledge in length and the cover will still close.
We could also make a bracket (U) Shaped and attach it under the nut, and then attach a larger
Bolt & Nut to make a better connection point.
and with the right measurements the cover will still close, or we can just make a threaded hole for the above (charging) adapters to screw into.
Bottom Side:
Note: The only protrusions through the bottom are:
Besides the Terminal (itself)
The Stud for the (BJB) , The 225-Amp Alternator Studs & The 125-Amp -PSCM Studs
RangerBill
Well-Known Member
I've used my Ranger to jump other vehicles a couple of times and had no issue getting a secure connection to the positive battery terminal on my truck with no additions to it. I only used standard battery jumper cables. I don't remember exactly how to connect, but there was no issue.
Remember to not use the fuse connections, or the fuse will probably blow.
Remember to not use the fuse connections, or the fuse will probably blow.
Awg9Tech
Well-Known Member
Those are great and all, and I have a couple myself.It is tight. Personally I wouldn't jump another vehicle or the Ranger the old fashion way with cables, I would use a jump starter and carry one with me.
But, you still have to get the clamp on the battery, be it cables or starter pack.
You might think it not a big deal, but I once pulled out my starter pack to jump a car in a parking lot. The clamps simply would not fit on the battery or any remote post so, I ended up pulling out my jumper cables that had more connection options on the clamps.
Point is, if you have a starter pack, make sure the clamps are functional for your vehicle.
IdahoRanger
Well-Known Member
True, my NOCO 5 clamps fit good and starter clamps good. The Topdon tester is really tight and takes a few tries to get a good connection.Those are great and all, and I have a couple myself.
But, you still have to get the clamp on the battery, be it cables or starter pack.
You might think it not a big deal, but I once pulled out my starter pack to jump a car in a parking lot. The clamps simply would not fit on the battery or any remote post so, I ended up pulling out my jumper cables that had more connection options on the clamps.
Point is, if you have a starter pack, make sure the clamps are functional for your vehicle.
Last edited:
airline tech
Well-Known Member
- Joined
- Aug 24, 2022
- Threads
- 28
- Messages
- 4,499
- Reaction score
- 8,592
- Location
- Midwest - KS
- Vehicle(s)
- 2022 Ranger Lariat-Super Crew, Cactus Gray
- Occupation
- Aircraft Tech
Played Today:
Notes: The stud (centerline) of the Post Clamp = 6mm x 1.0 Threads
Use #9 Drill Bilt and a tap
The standard (Terminal) - Charging Posts for side terminal batteries: 3/8 x 16 Threads
Use 5/16 drill bit and a tap
Had some of these laying around, so I made 2 attempts at this.
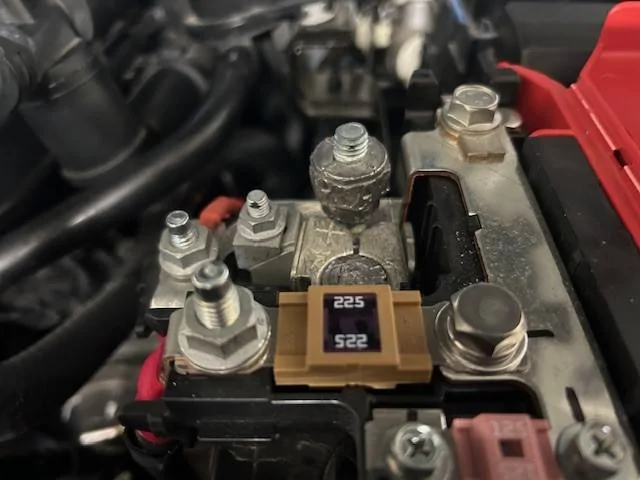
1st Attempt - Tapped the end of the adapter for the threads and screwed it down, grabbed my Top-Don tester and test results were normal (as I would have got) just straight to the stud.
Now to address the fitment issue - cannot get the cover to fully close.
Filed down the end to about 1/2 way, and cover was still barely hitting the adapter.
I needed to add a deeper thread as I did not go full depth.
So, when I went to use the tap, I blew out the threads - Grr - but this is SOFT material.
So took a closer look at the clearance issue, it turns out you do not have to file that much off the end. (It's the Hex-Flats) hitting the edge of the cover.
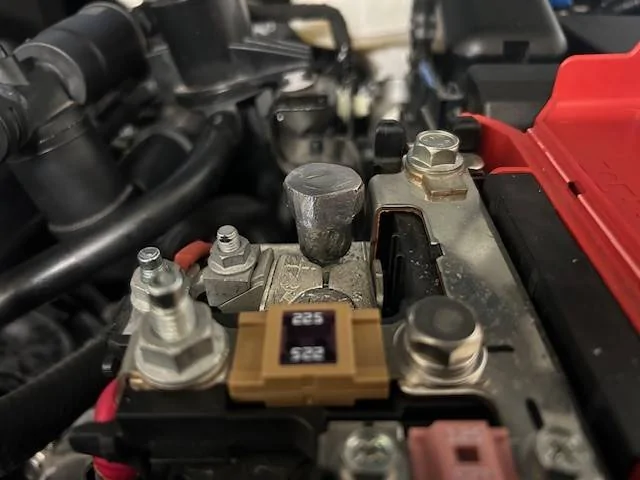
2nd attempt:
Thought I would try, cutting off the (stud) end of the adapter and just file down the Hex-Flats,
Tapped the bottom end - and fitment issues resolved.
But now when I run a test with the battery tester - I get battery replace and very high IR.
The adapter is screwed down tight and secure. - Threads are clean
Grr -- Note on the First attempt - I left the stud on the adapter, and the 2nd attempt - I cut it off.
I was on that stud - 1st attempt.
I am out of adapters - Now, so for a 3rd attempt, I have a better idea on what needs to be done.
Thoughts:
Being that I wanted to try to get - Battery Test results up (better readings) with the battery installed as the battery tester (resistance based) has a hard time giving the actual battery health due to the design of the terminal connections.
Did the adapter help - NO but did make it easier to connect - Clamps (something to bite)
1st attempt:

2nd attempt
My other idea is to make a bracket out of 1/8 stock, secure it to the stud and have the bracket overlap the (battery post) - then installed a threaded bolt through the stock so it's touching the top of the battery post.
I am hoping that there will be enough (spring tension) in the stock to produce a (resistance - tight) test point.
IDK - just playing with ideas on a test point to give the exact results I would get, if the battery was removed and I was directly on the posts.
Another note: for an option and that is use a Wingnut or added another nut - on the stud also makes it easier to clamp onto, just need something meatier than the stud itself.
Notes: The stud (centerline) of the Post Clamp = 6mm x 1.0 Threads
Use #9 Drill Bilt and a tap
The standard (Terminal) - Charging Posts for side terminal batteries: 3/8 x 16 Threads
Use 5/16 drill bit and a tap
Had some of these laying around, so I made 2 attempts at this.
1st Attempt - Tapped the end of the adapter for the threads and screwed it down, grabbed my Top-Don tester and test results were normal (as I would have got) just straight to the stud.
Now to address the fitment issue - cannot get the cover to fully close.
Filed down the end to about 1/2 way, and cover was still barely hitting the adapter.
I needed to add a deeper thread as I did not go full depth.
So, when I went to use the tap, I blew out the threads - Grr - but this is SOFT material.
So took a closer look at the clearance issue, it turns out you do not have to file that much off the end. (It's the Hex-Flats) hitting the edge of the cover.
2nd attempt:
Thought I would try, cutting off the (stud) end of the adapter and just file down the Hex-Flats,
Tapped the bottom end - and fitment issues resolved.
But now when I run a test with the battery tester - I get battery replace and very high IR.
The adapter is screwed down tight and secure. - Threads are clean
Grr -- Note on the First attempt - I left the stud on the adapter, and the 2nd attempt - I cut it off.
I was on that stud - 1st attempt.
I am out of adapters - Now, so for a 3rd attempt, I have a better idea on what needs to be done.
Thoughts:
Being that I wanted to try to get - Battery Test results up (better readings) with the battery installed as the battery tester (resistance based) has a hard time giving the actual battery health due to the design of the terminal connections.
Did the adapter help - NO but did make it easier to connect - Clamps (something to bite)
1st attempt:
2nd attempt
My other idea is to make a bracket out of 1/8 stock, secure it to the stud and have the bracket overlap the (battery post) - then installed a threaded bolt through the stock so it's touching the top of the battery post.
I am hoping that there will be enough (spring tension) in the stock to produce a (resistance - tight) test point.
IDK - just playing with ideas on a test point to give the exact results I would get, if the battery was removed and I was directly on the posts.
Another note: for an option and that is use a Wingnut or added another nut - on the stud also makes it easier to clamp onto, just need something meatier than the stud itself.
got3fords
Well-Known Member
I like your approach. I always try to get a good connection to the location shown, the beefy metal, not the threaded part. Sometimes I connect ground first, sometimes positive. Again, the results vary.Played Today:
Notes: The stud (centerline) of the Post Clamp = 6mm x 1.0 Threads
Use #9 Drill Bilt and a tap
The standard (Terminal) - Charging Posts for side terminal batteries: 3/8 x 16 Threads
Use 5/16 drill bit and a tap
Had some of these laying around, so I made 2 attempts at this.
1st Attempt - Tapped the end of the adapter for the threads and screwed it down, grabbed my Top-Don tester and test results were normal (as I would have got) just straight to the stud.
Now to address the fitment issue - cannot get the cover to fully close.
Filed down the end to about 1/2 way, and cover was still barely hitting the adapter.
I needed to add a deeper thread as I did not go full depth.
So, when I went to use the tap, I blew out the threads - Grr - but this is SOFT material.
So took a closer look at the clearance issue, it turns out you do not have to file that much off the end. (It's the Hex-Flats) hitting the edge of the cover.
2nd attempt:
Thought I would try, cutting off the (stud) end of the adapter and just file down the Hex-Flats,
Tapped the bottom end - and fitment issues resolved.
But now when I run a test with the battery tester - I get battery replace and very high IR.
The adapter is screwed down tight and secure. - Threads are clean
Grr -- Note on the First attempt - I left the stud on the adapter, and the 2nd attempt - I cut it off.
I was on that stud - 1st attempt.
I am out of adapters - Now, so for a 3rd attempt, I have a better idea on what needs to be done.
Thoughts:
Being that I wanted to try to get - Battery Test results up (better readings) with the battery installed as the battery tester (resistance based) has a hard time giving the actual battery health due to the design of the terminal connections.
Did the adapter help - NO but did make it easier to connect - Clamps (something to bite)
My other idea is to make a bracket out of 1/8 stock, secure it to the stud and have the bracket overlap the (battery post) - then installed a threaded bolt through the stock so it's touching the top of the battery post.
I am hoping that there will be enough (spring tension) in the stock to produce a (resistance - tight) test point.
IDK - just playing with ideas on a test point to give the exact results I would get, if the battery was removed and I was directly on the posts.
Another note: for an option and that is use a Wingnut or added another nut - on the stud also makes it easier to clamp onto, just need something meatier than the stud itself.
airline tech
Well-Known Member
- Joined
- Aug 24, 2022
- Threads
- 28
- Messages
- 4,499
- Reaction score
- 8,592
- Location
- Midwest - KS
- Vehicle(s)
- 2022 Ranger Lariat-Super Crew, Cactus Gray
- Occupation
- Aircraft Tech
The only logical thing that I can think of that creates - varied battery test results (installed) is the change of metal types - Aluminum for the Buss Bar connected to what appears to be a Zinc Allow (Terminal) at the battery, and that small resistance barrier for a sensitive tester that specifically is looking at the resistance of the voltage pulse it sends through the battery.
This is my reasoning for trying to find a way to make a (Test Point) that makes direct contact with the battery post.
Zinc Alloy although conductive - Aluminum is far better
This is my reasoning for trying to find a way to make a (Test Point) that makes direct contact with the battery post.
Zinc Alloy although conductive - Aluminum is far better
Sponsored
Similar threads


- Replies
- 29
- Views
- 3,671