Jfleming
Well-Known Member
- First Name
- Joe
- Joined
- Jun 18, 2020
- Threads
- 19
- Messages
- 58
- Reaction score
- 140
- Location
- Brecksville OH
- Vehicle(s)
- 2020 Ranger Lariat 4wd Supercab, 1996 Ranger XLT 2WD
- Occupation
- Fireman
- Thread starter
- #1
I have a Lariat SuperCab. I am adding LED light strips to the underside of the bed rails for extra lighting in the bed. There are many ways to control the added lights, but I want them to function the same as the factory cargo lights on the back of the cab. To power those lights the factory uses a white wire with a green stripe. (See schematic below).
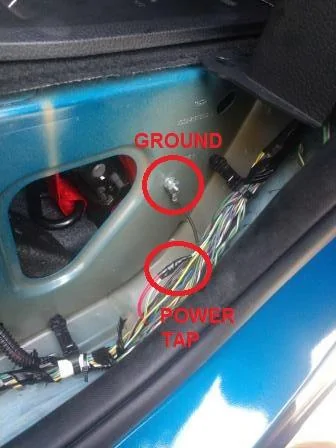
So if you want to do it this way, an easy location to make a splice into this circuit is shown in the photo below. This is on the left side under the plastic trim for the back door. (No need to go all the way up to the Body Control Module to make the splice) There is already a hole in the body that I used to make a ground stud. The paint is not real thick right there, but I scratched up the surface and used a couple internal star washers to insure good contact to the body with a long screw and nut. This left me with a nice ground stud for my lights.
As for the power I skinned back the white with green stripe wire and soldered in a tap for my lights. Both new wires were routed through a grommet in the floor of the jack compartment. This is terminated at a weatherproof (Deutsch) connector in case the bed ever needs to be removed. The connector can just be disconnected instead of cutting wires.
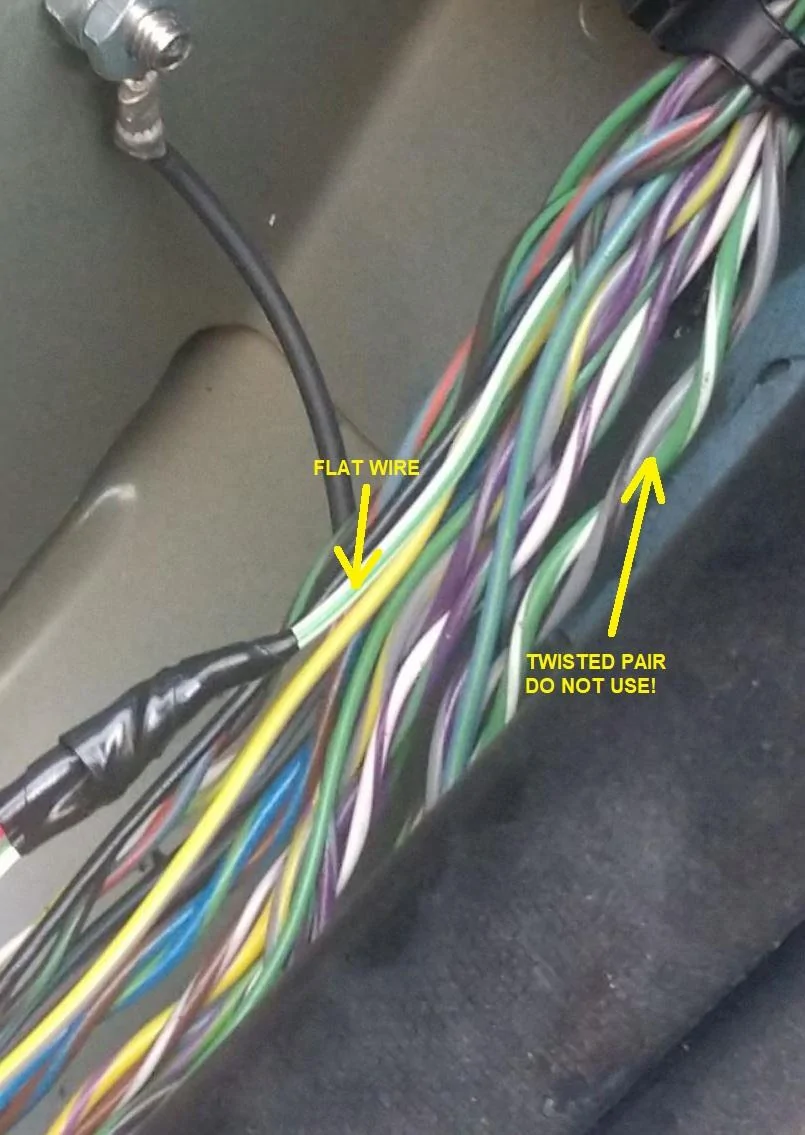
NOTE: The White w/Green stripe wire is a straight piece of wire. There are MANY twisted pairs of wires in this same location. Stay away from the twisted wires. They are not the right ones. This wire is just a flat non-twisted wire.


So if you want to do it this way, an easy location to make a splice into this circuit is shown in the photo below. This is on the left side under the plastic trim for the back door. (No need to go all the way up to the Body Control Module to make the splice) There is already a hole in the body that I used to make a ground stud. The paint is not real thick right there, but I scratched up the surface and used a couple internal star washers to insure good contact to the body with a long screw and nut. This left me with a nice ground stud for my lights.
As for the power I skinned back the white with green stripe wire and soldered in a tap for my lights. Both new wires were routed through a grommet in the floor of the jack compartment. This is terminated at a weatherproof (Deutsch) connector in case the bed ever needs to be removed. The connector can just be disconnected instead of cutting wires.
NOTE: The White w/Green stripe wire is a straight piece of wire. There are MANY twisted pairs of wires in this same location. Stay away from the twisted wires. They are not the right ones. This wire is just a flat non-twisted wire.

Sponsored
Last edited:
