Bullet Proof Diesel Antenna Mount Install

WxNerd2015

Well-Known Member
First Name
Trevor
Joined
Oct 17, 2018
Threads
9
Messages
296
Reaction score
1,032
Location
Gregory, Michigan
Vehicle(s)
2019 Ranger, 2011 Wrangler, 2017 Escape
Occupation
Applications Engineer
Vehicle Showcase
1
I first want to preface this post by stating that I purchased this product on my own and have no affiliation with Bullet Proof Diesel, but I want to share my honest opinions and experience when installing the Third Brake Light Dual Antenna Mount.

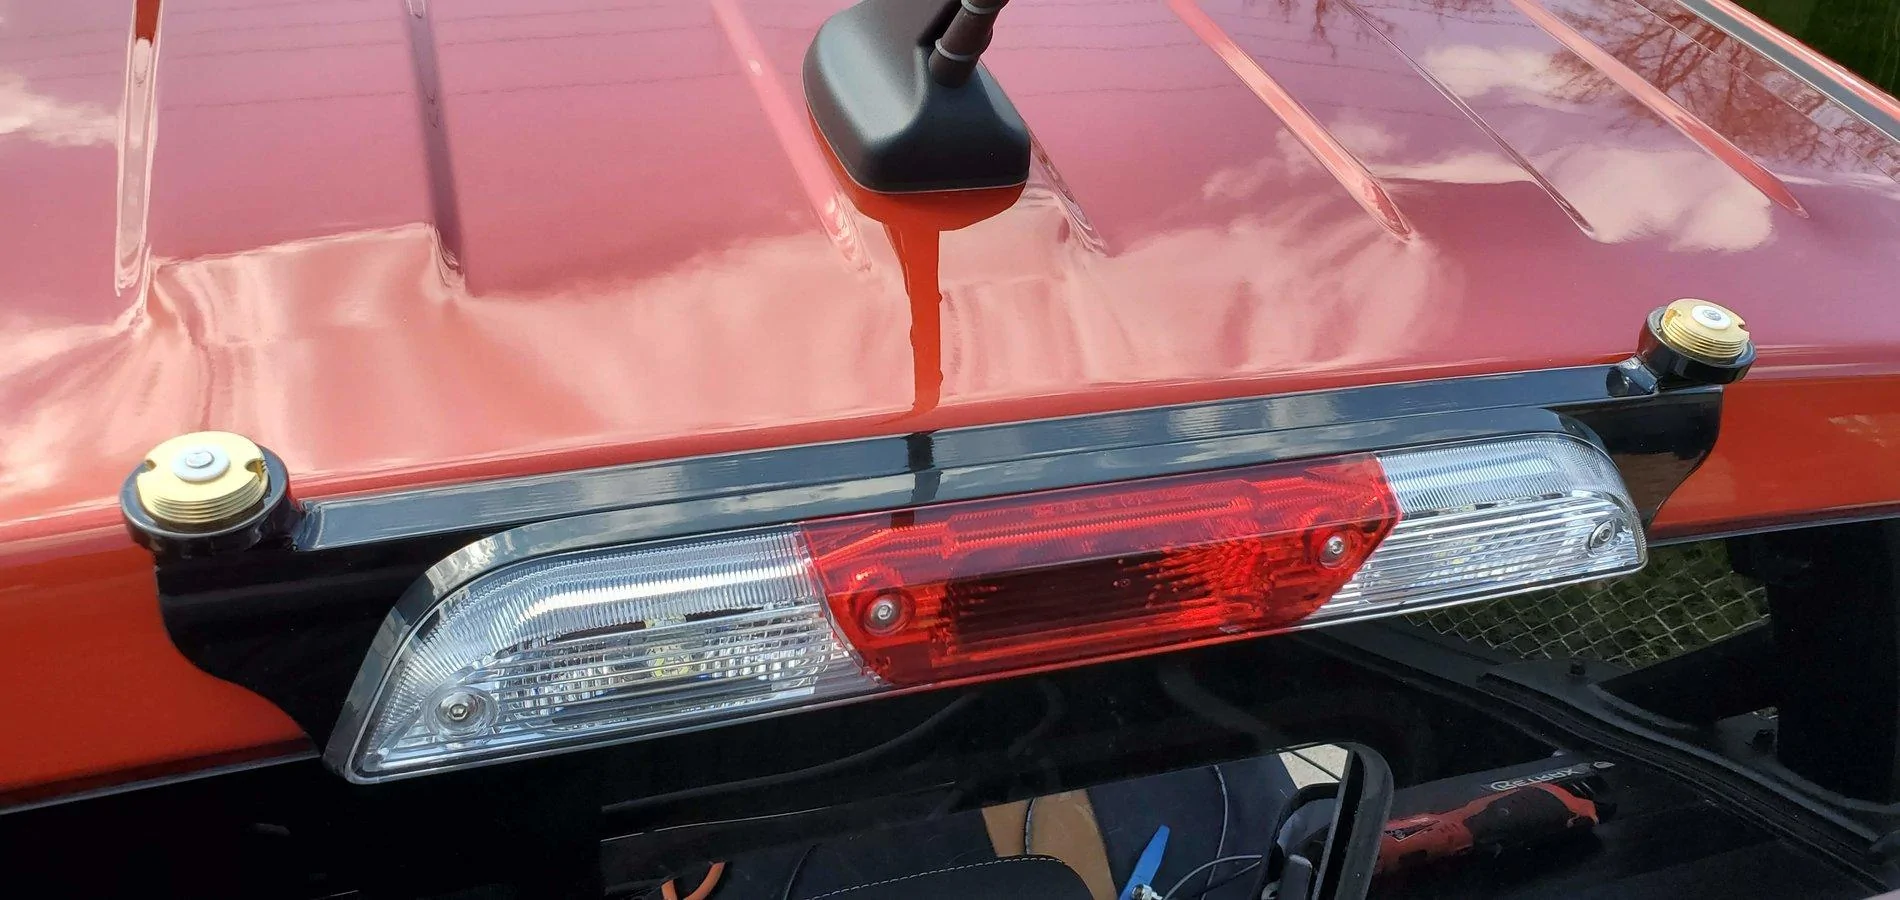
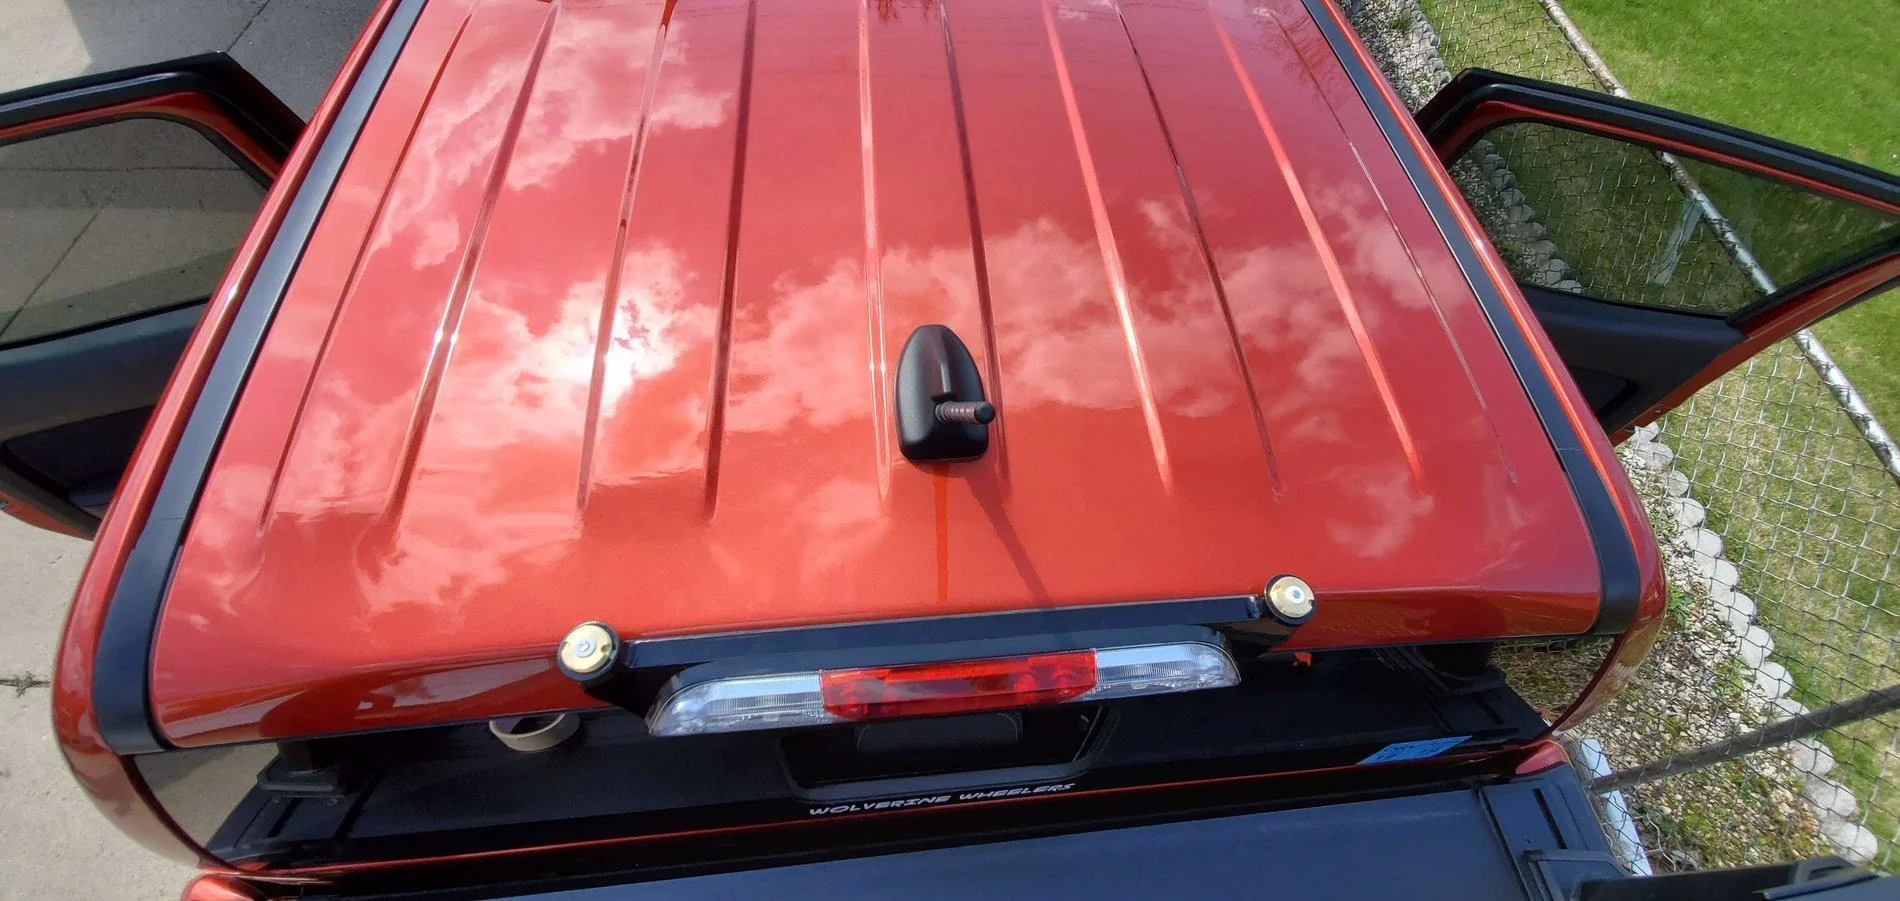
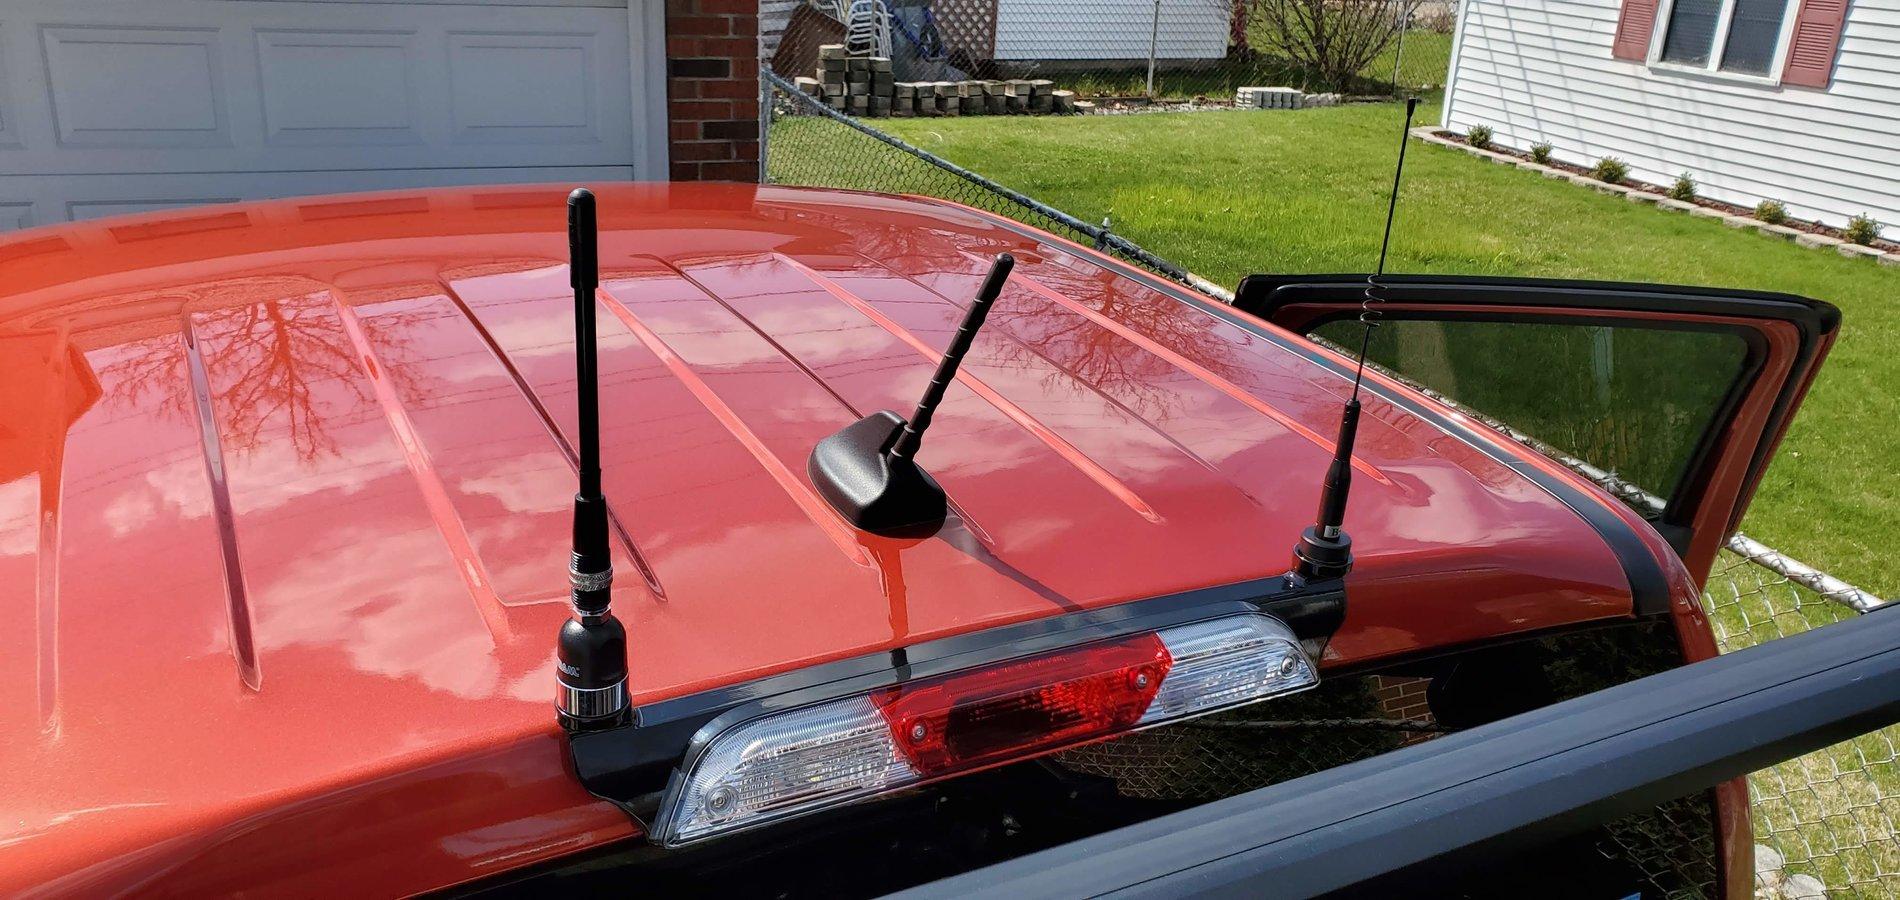
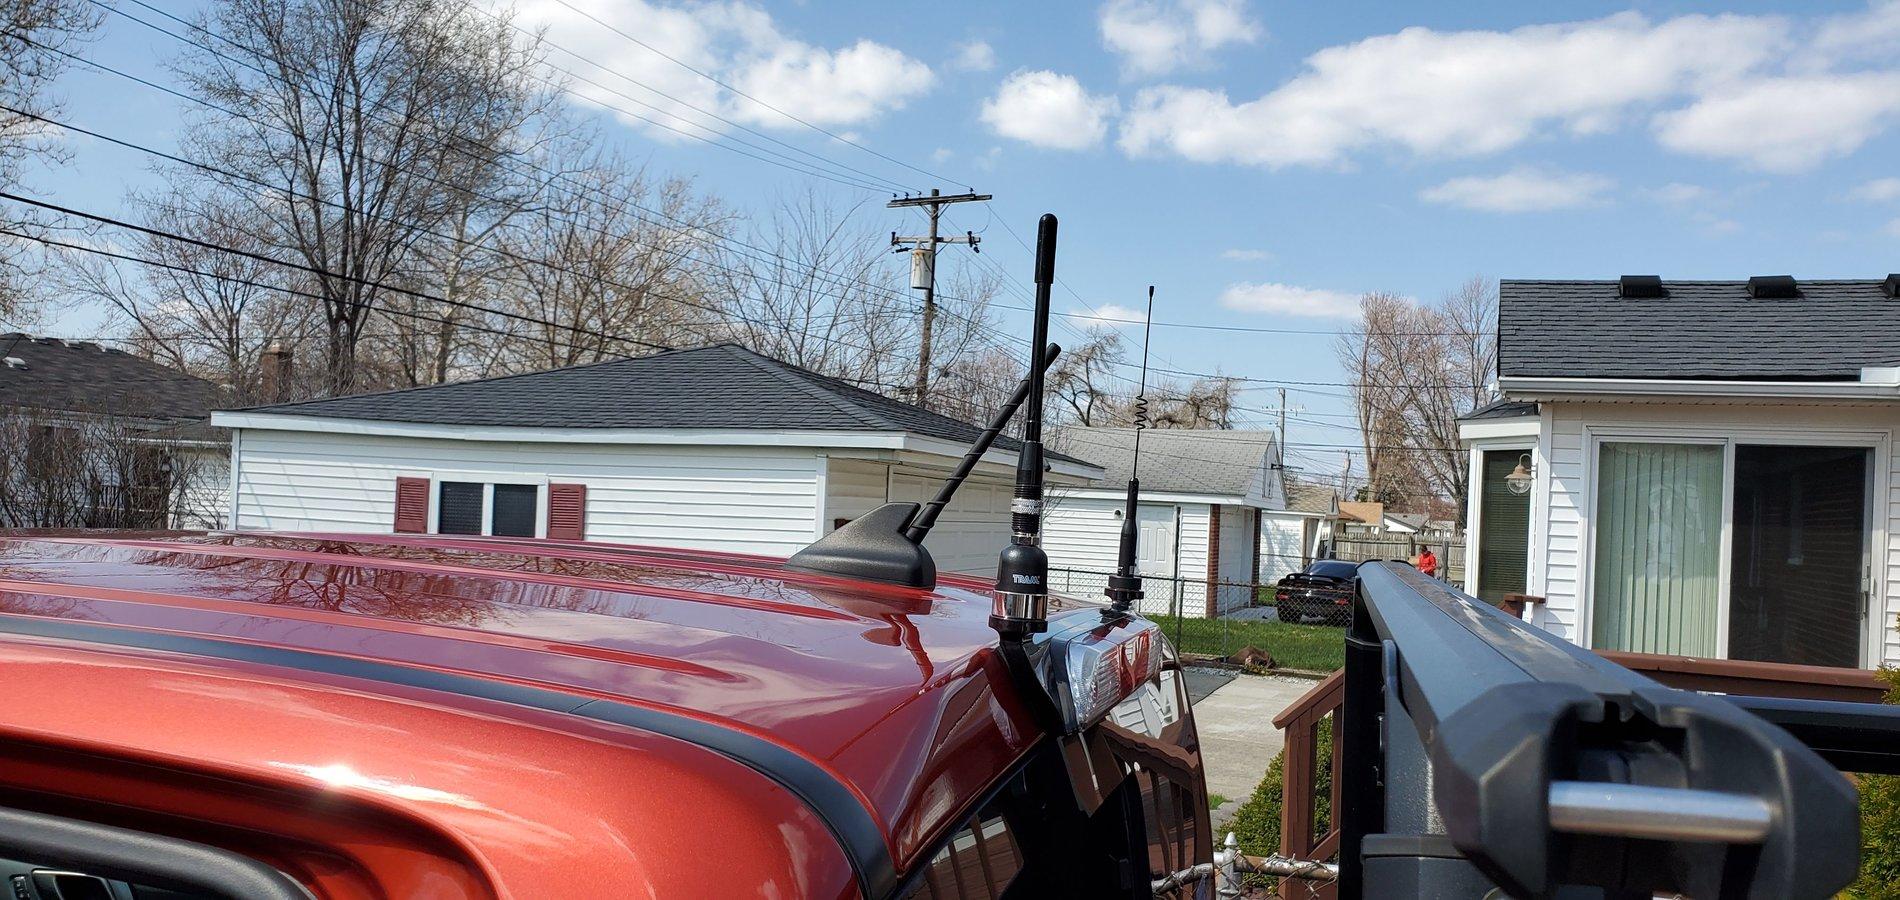
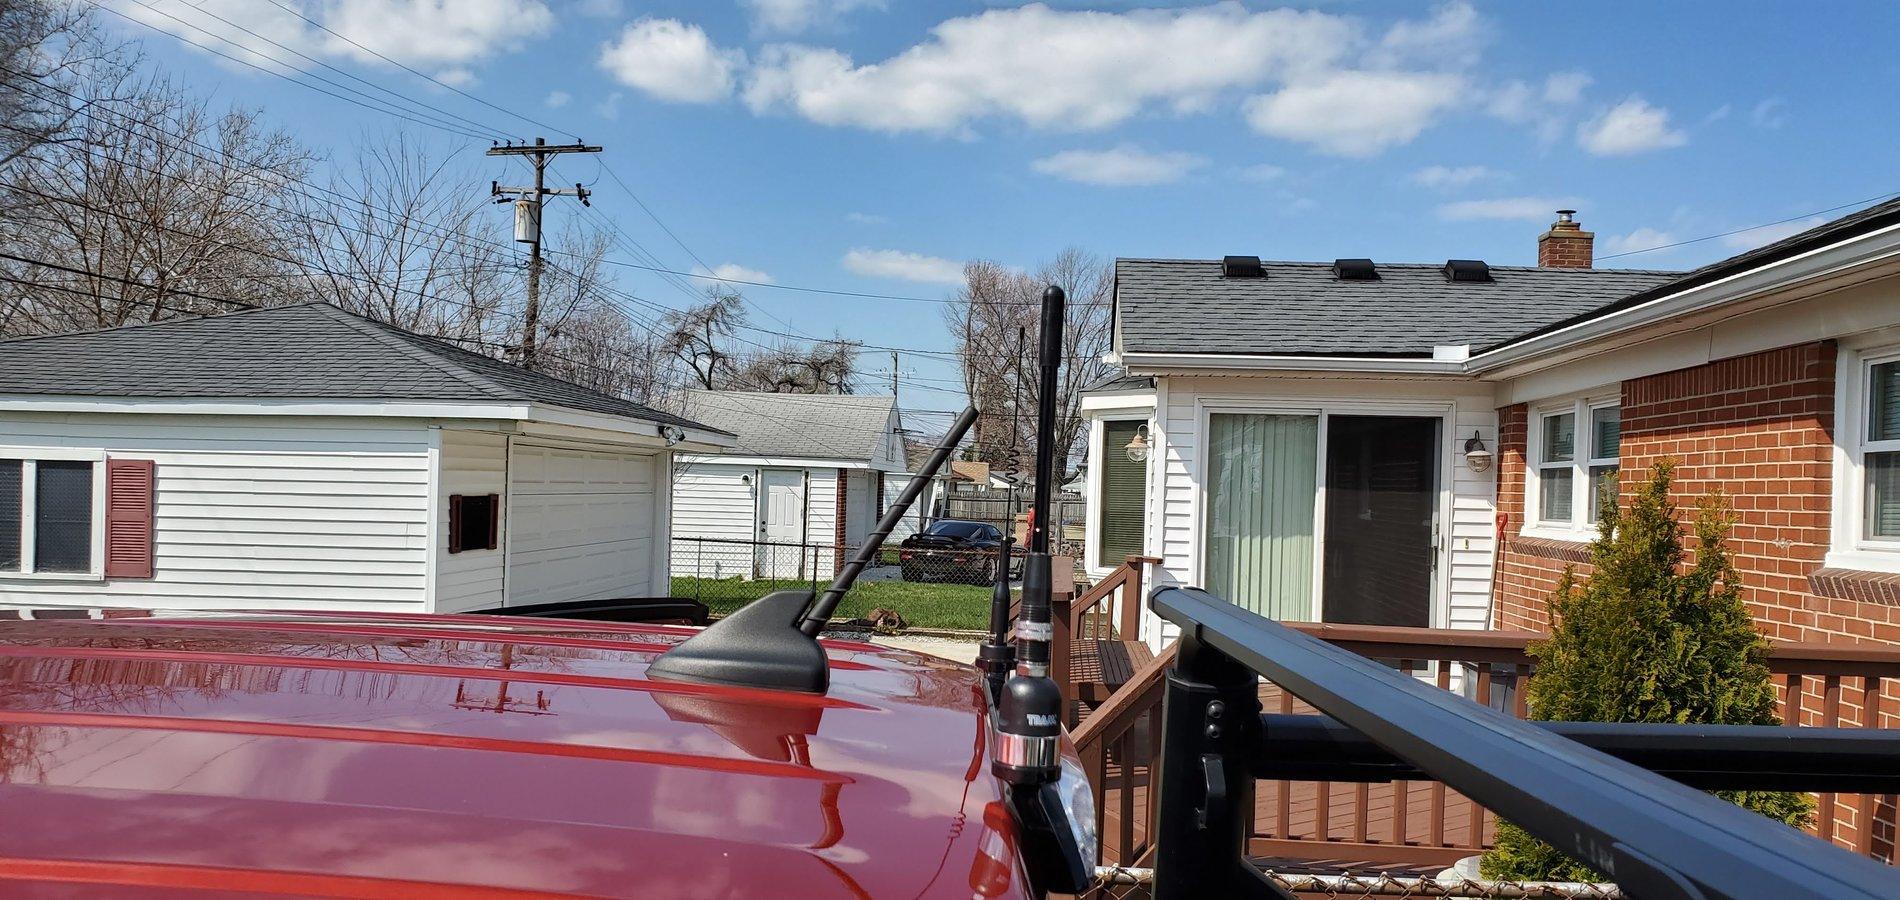
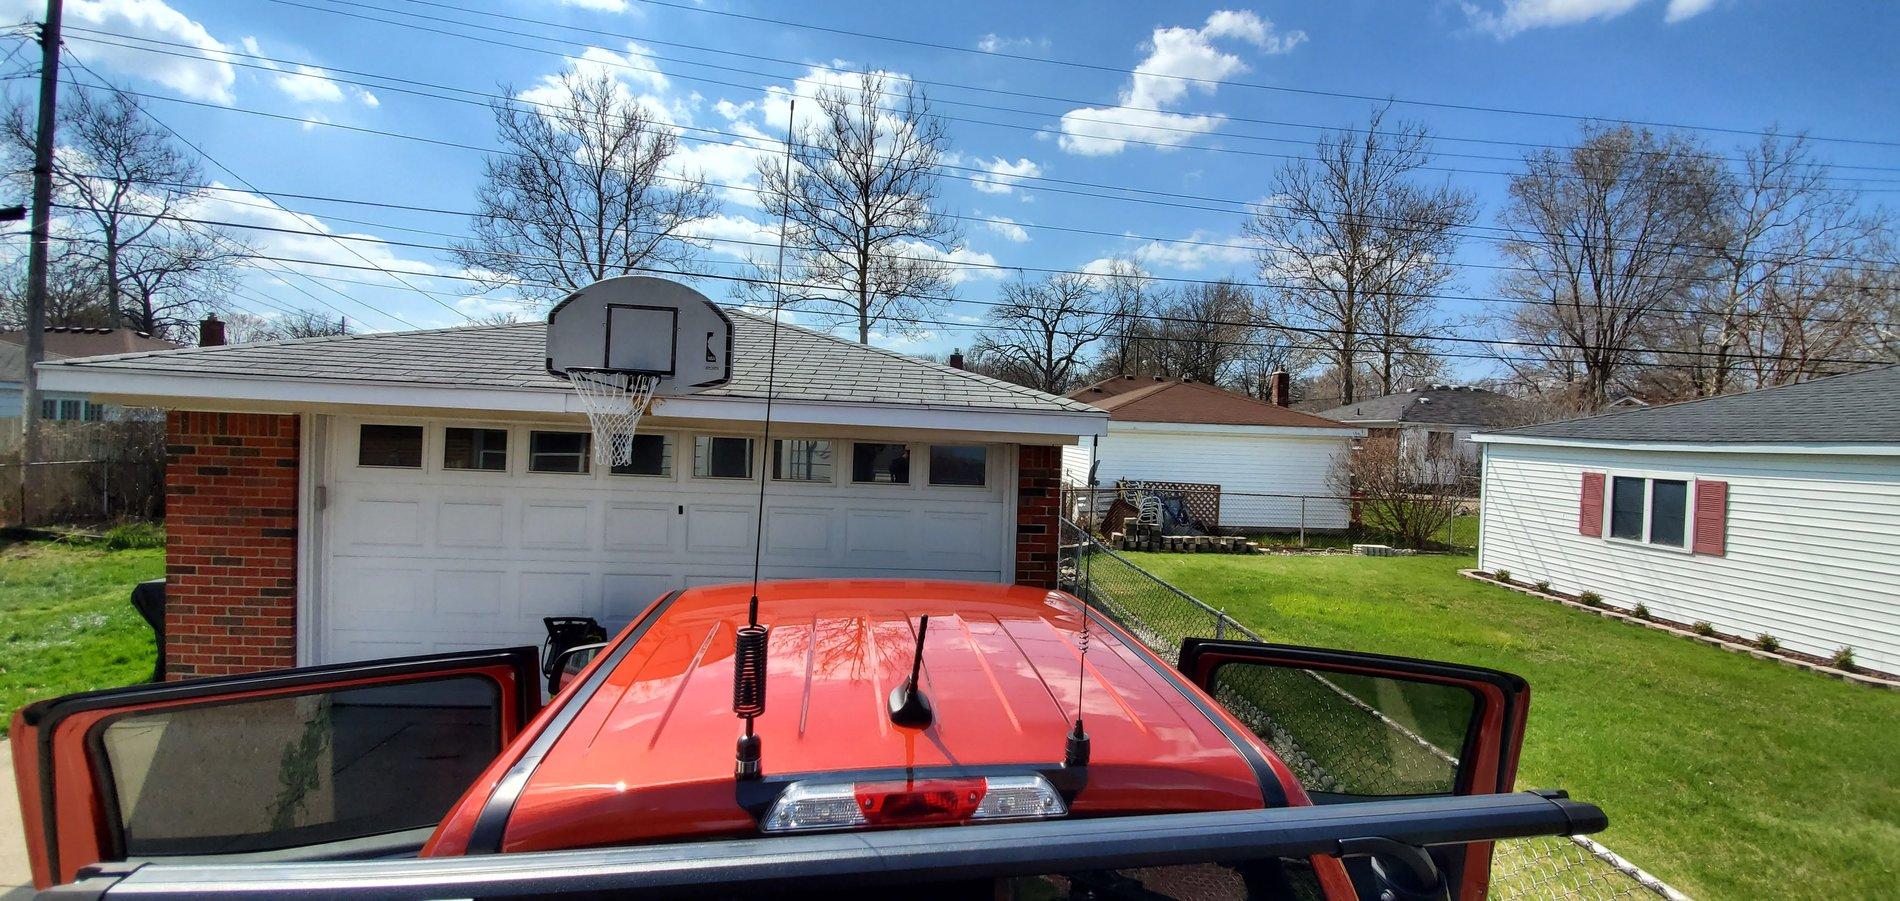
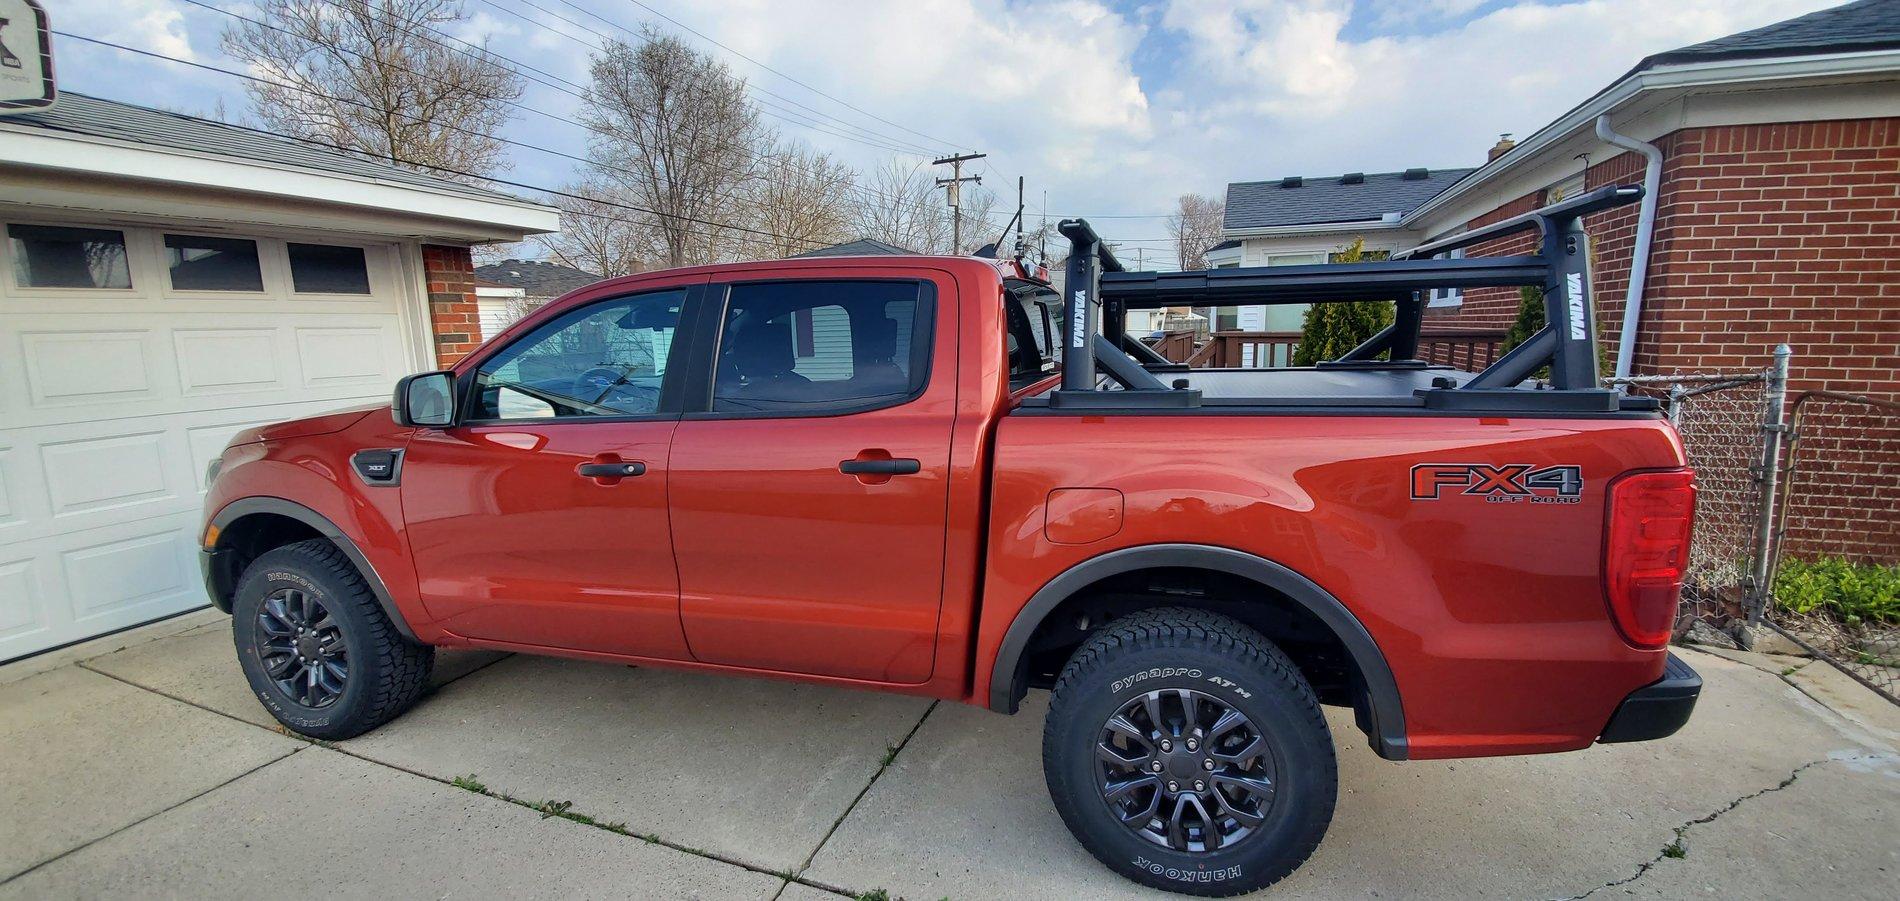
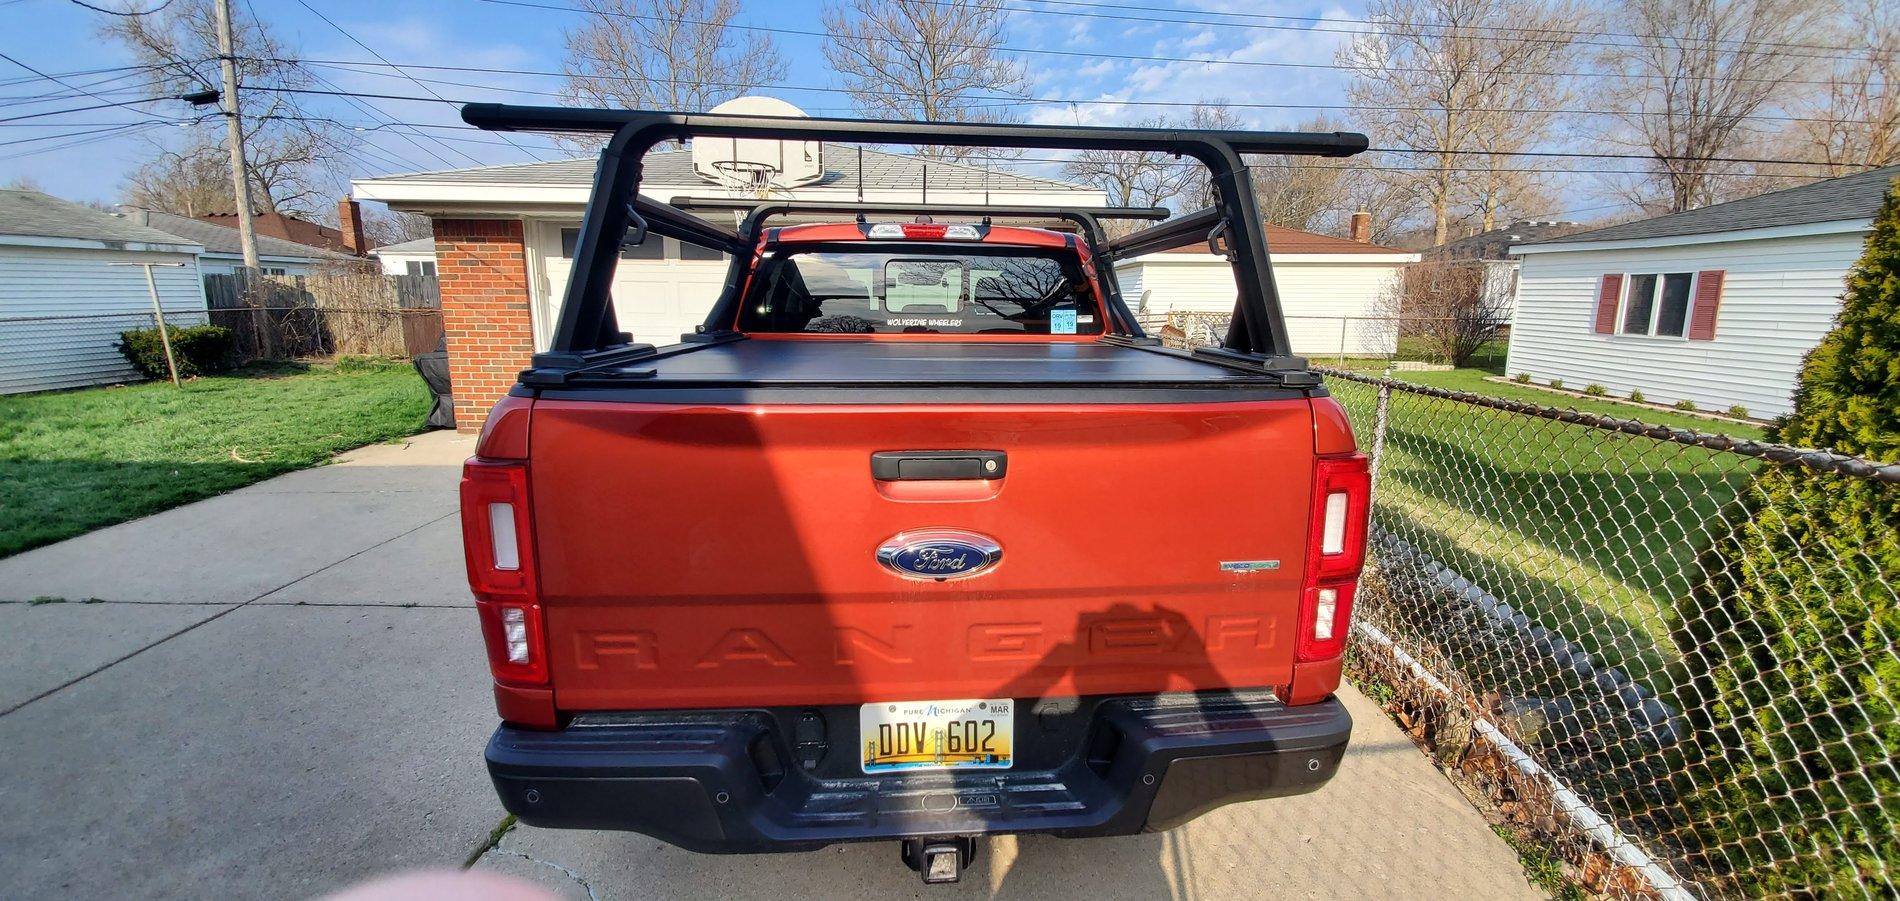
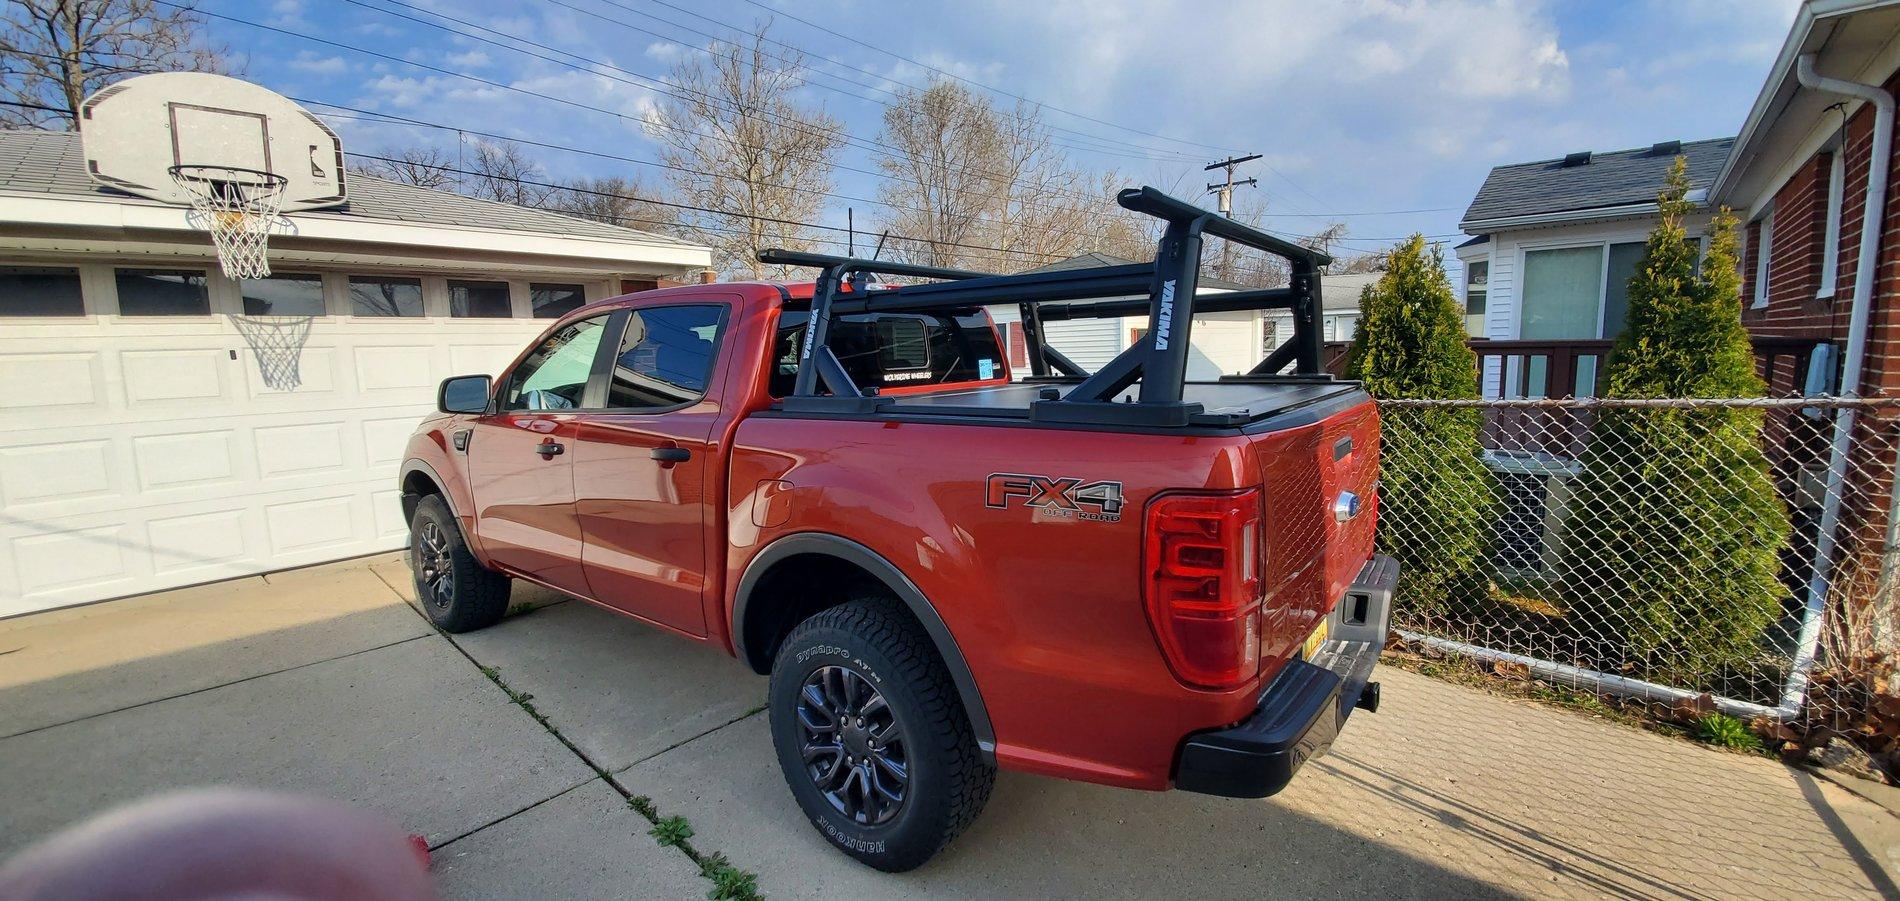
So what we have for review today is the Third Brake Light Dual Antenna Mount from Bullet Proof Diesel. They started out with creating these mounts for the 15+ Raptor and F-150, and have now created these for most of the modern trucks today!

90201160-2T.jpg

90201160-3T.jpg


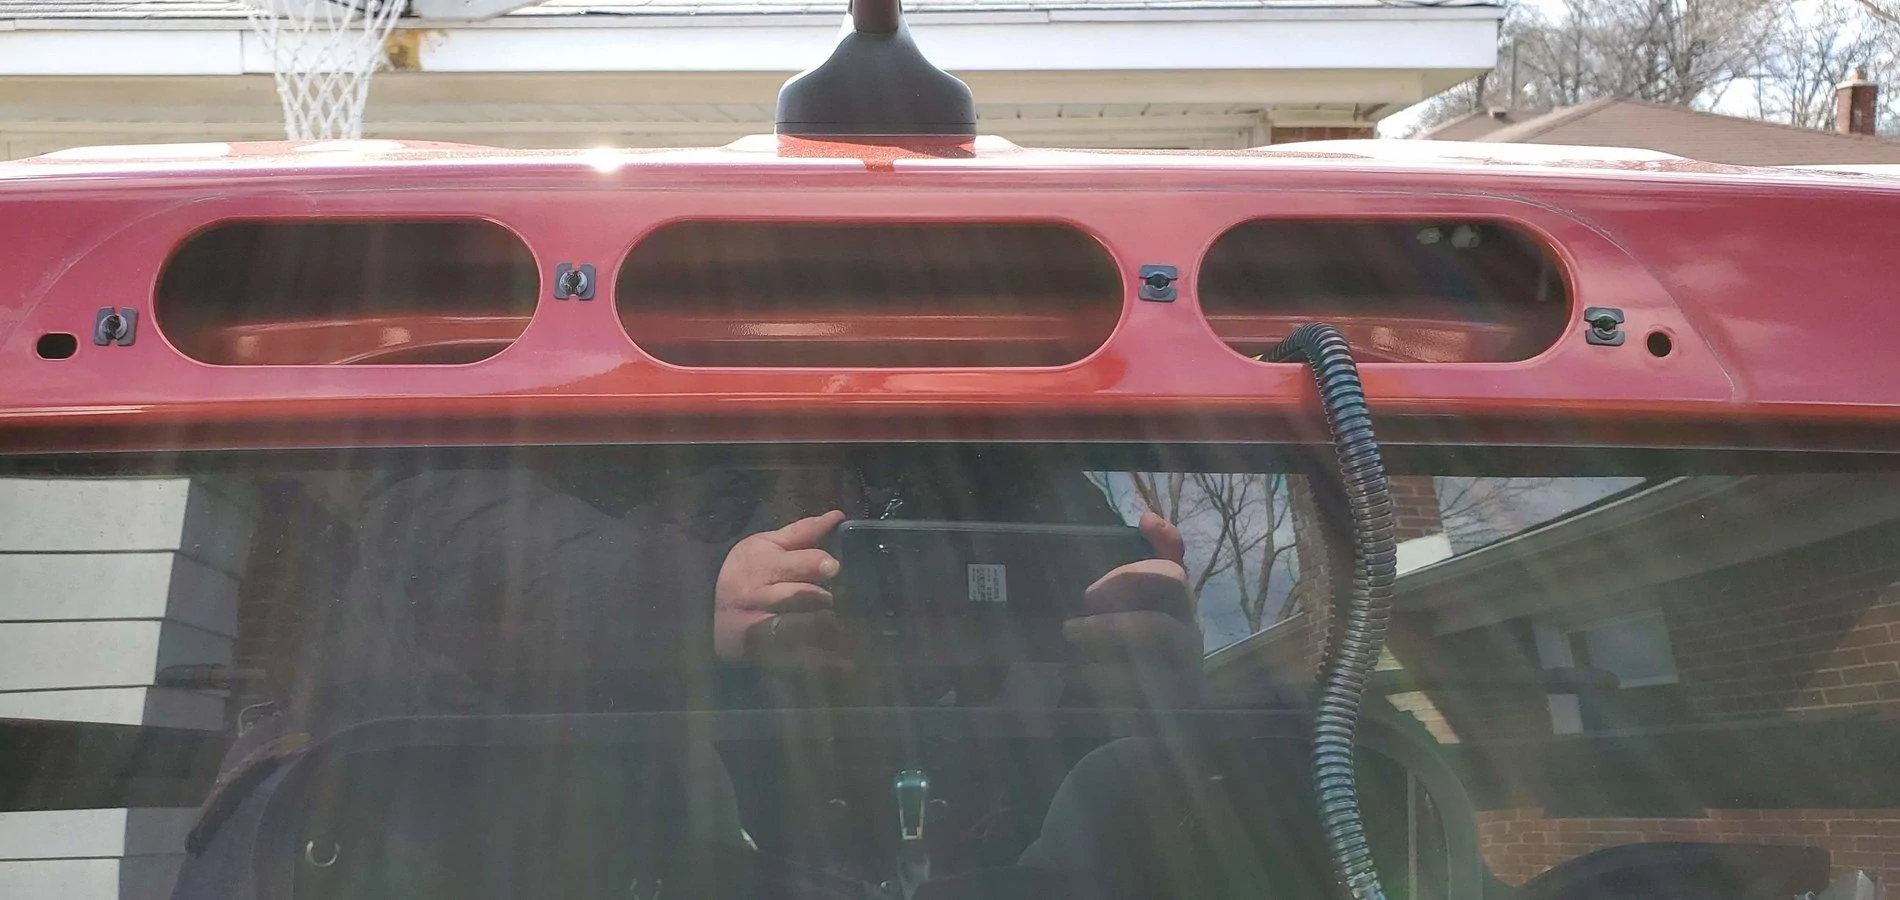
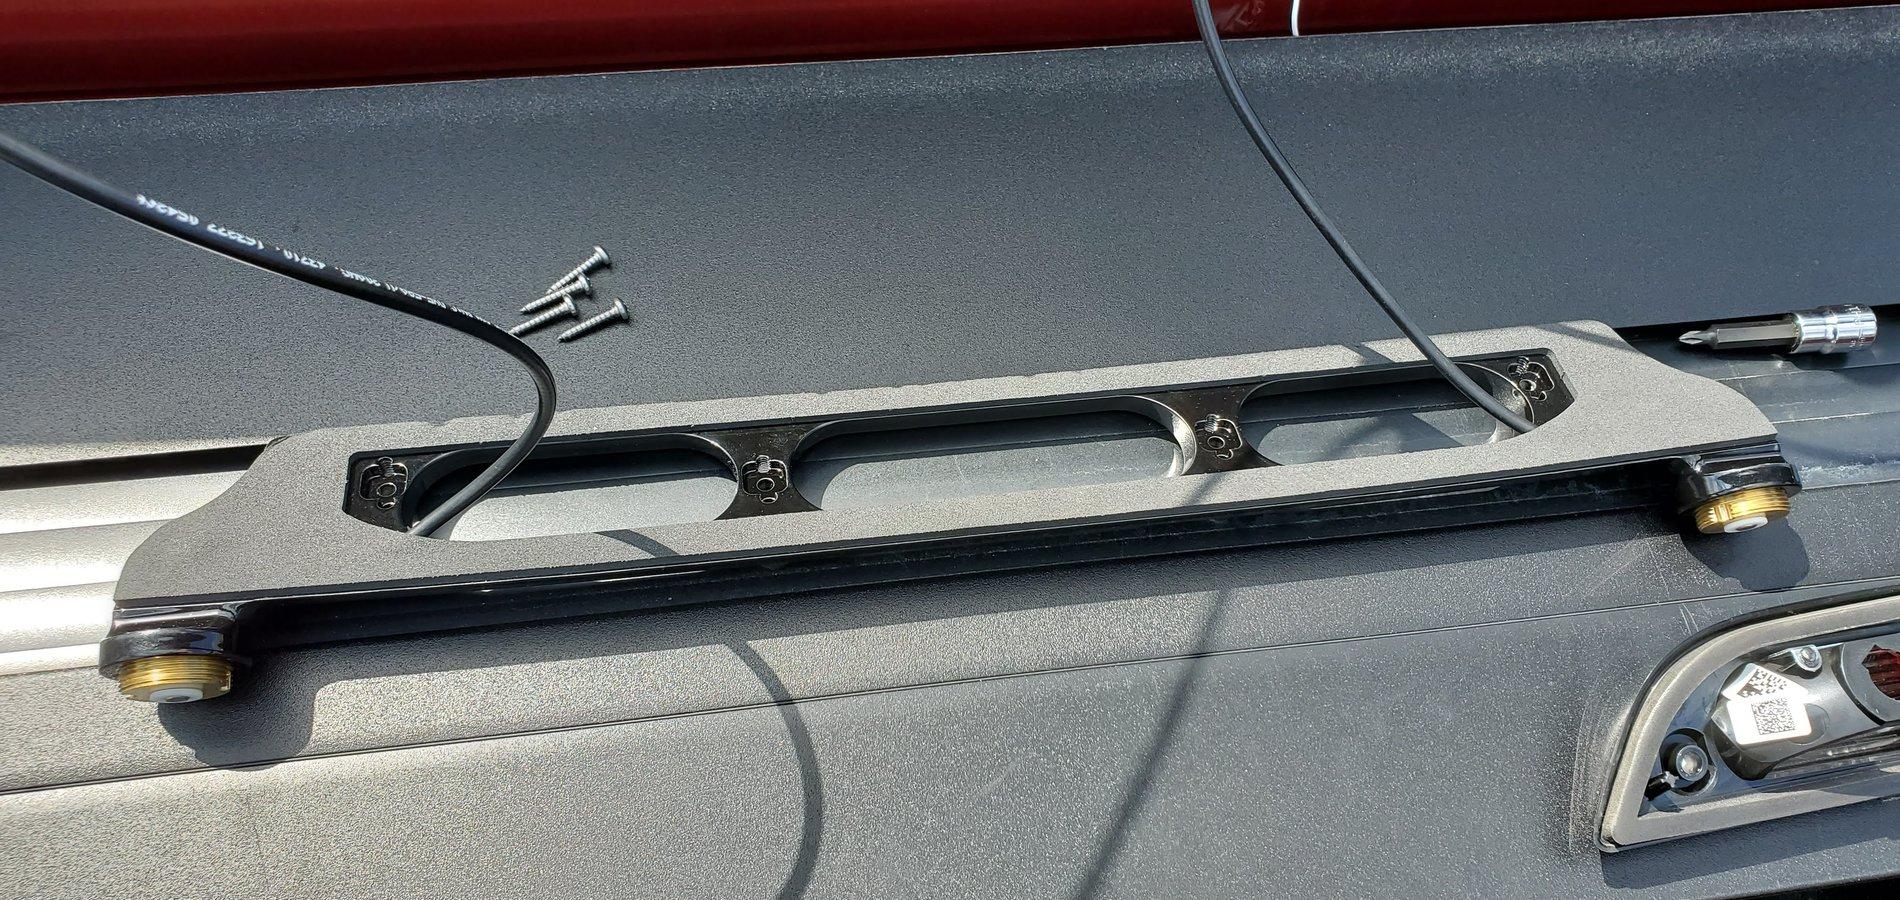
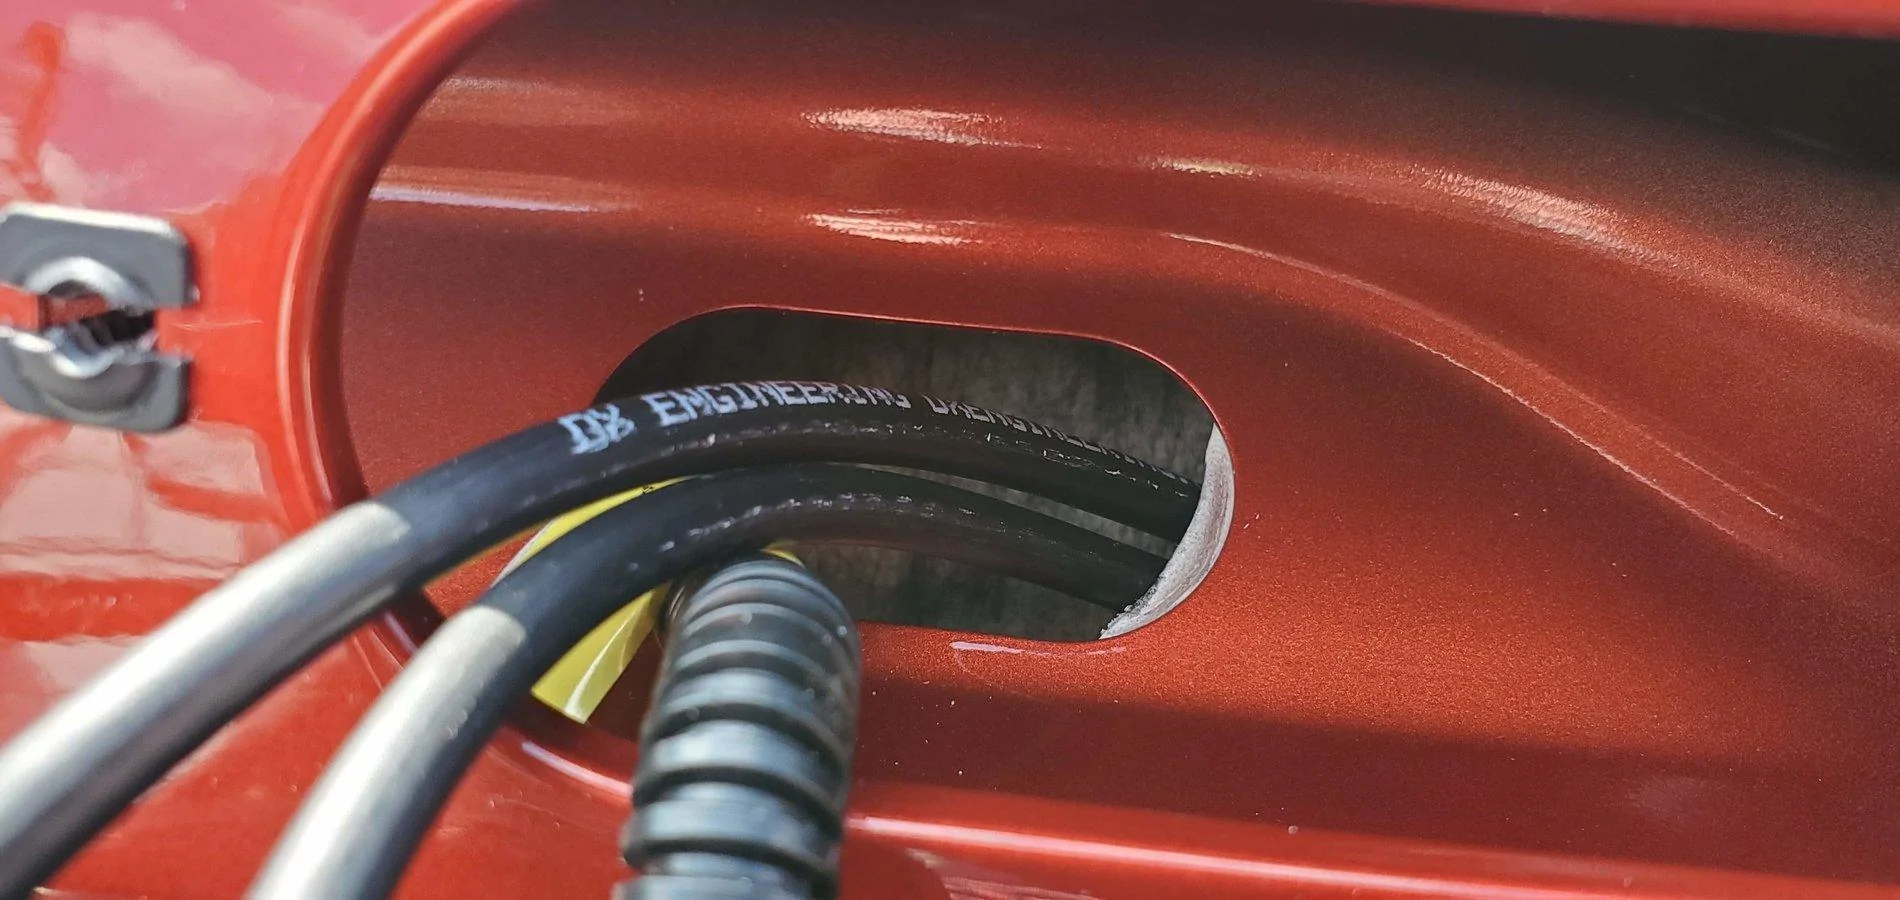
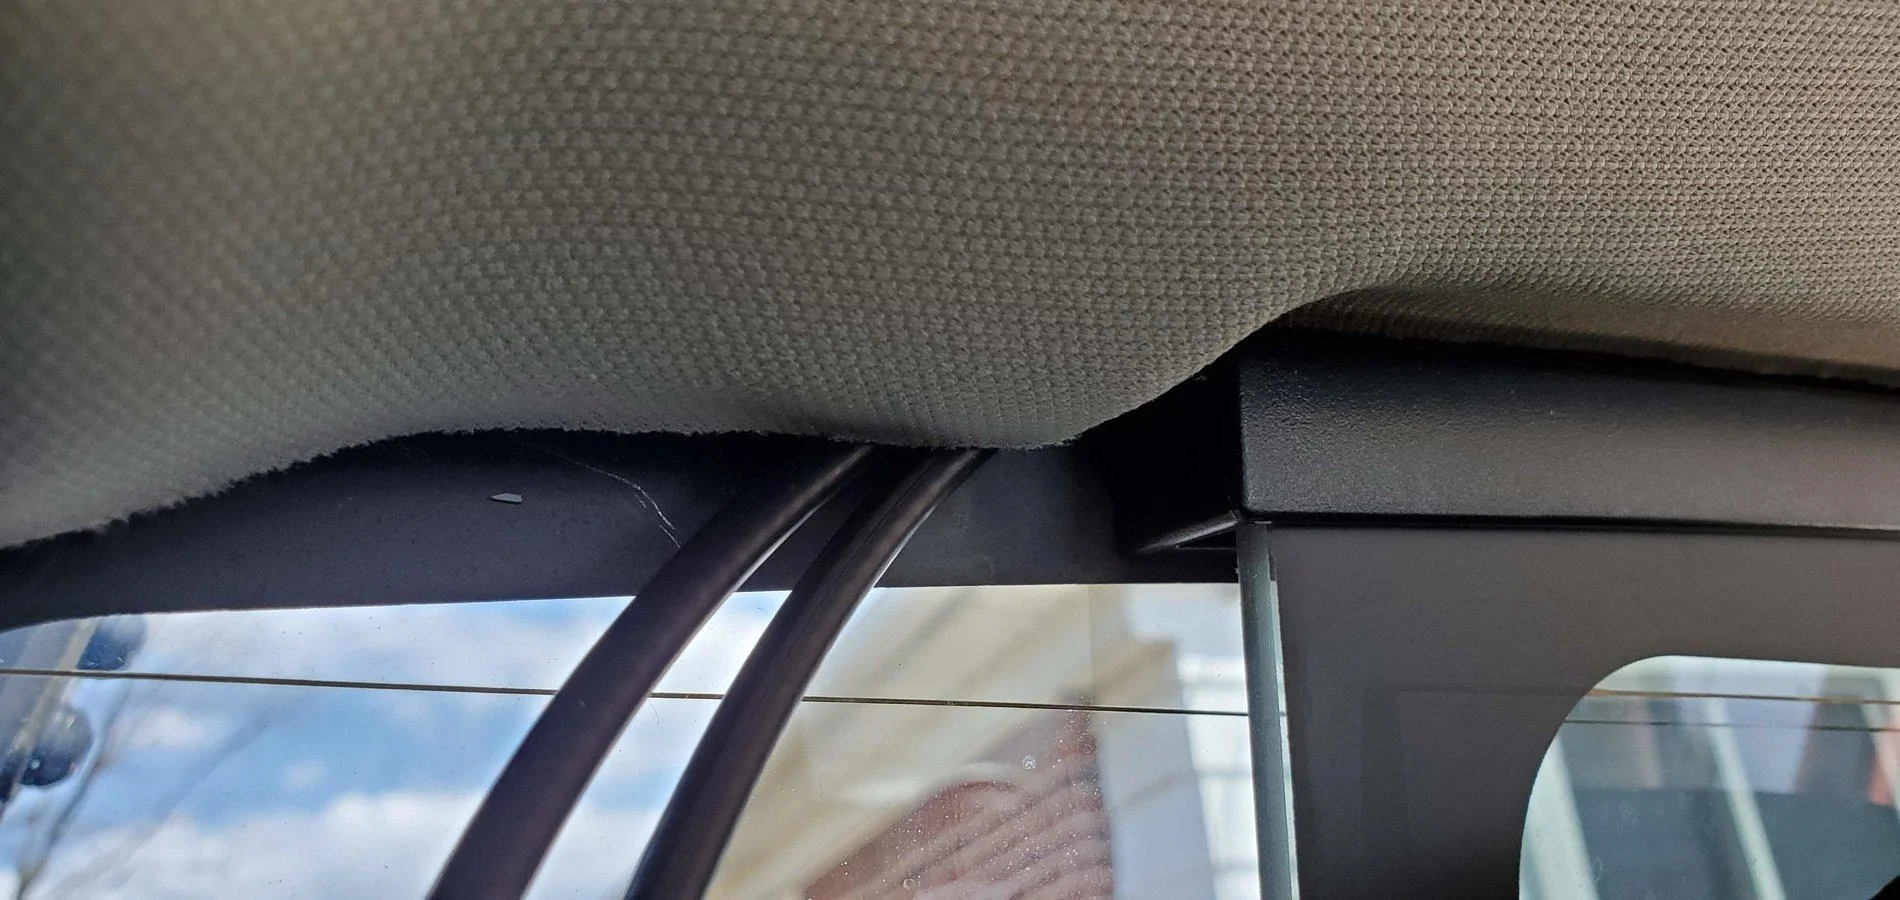
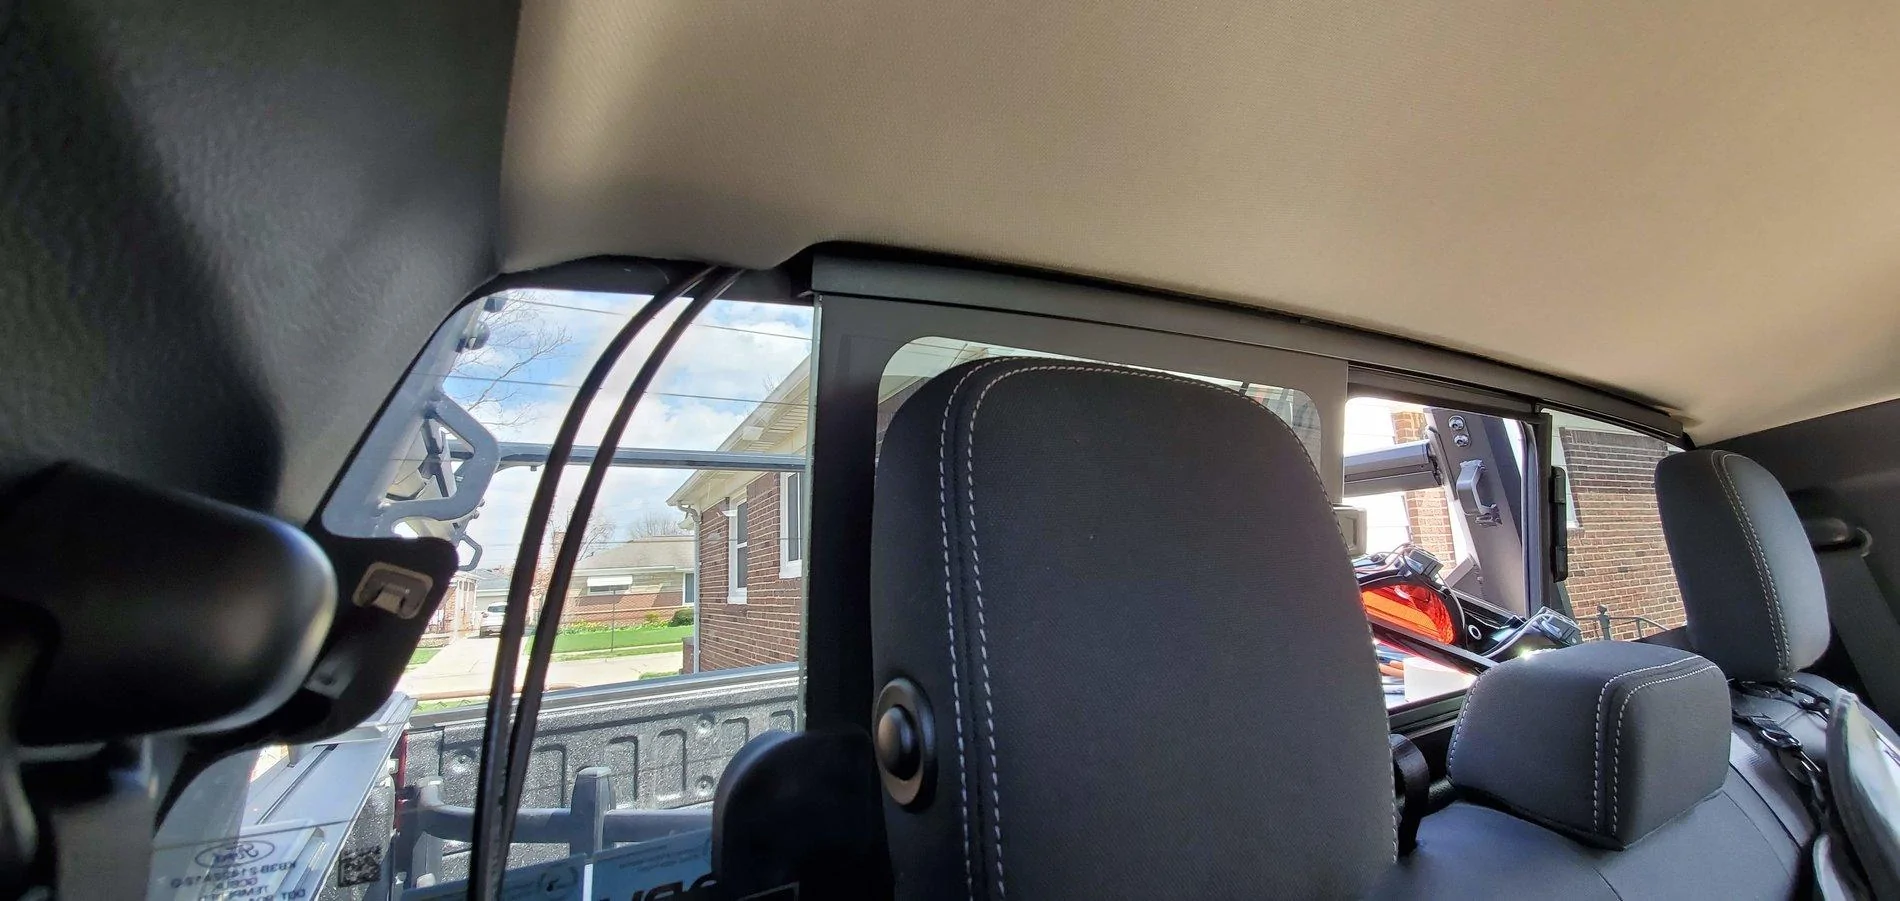
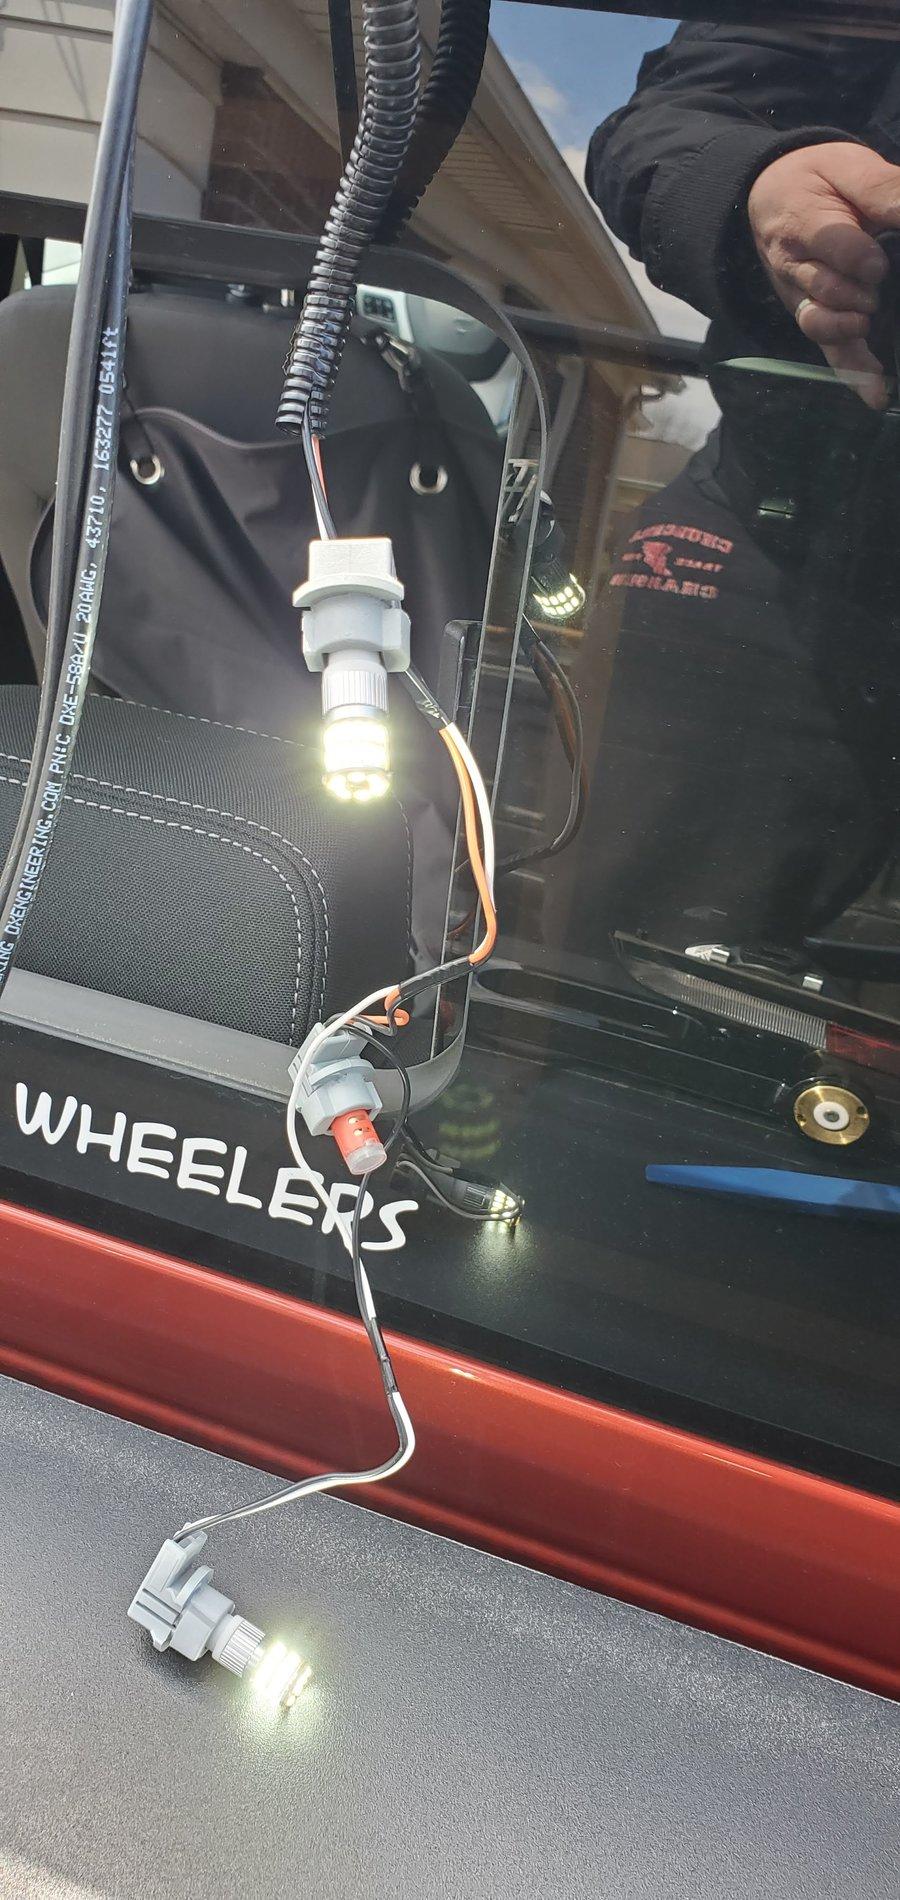
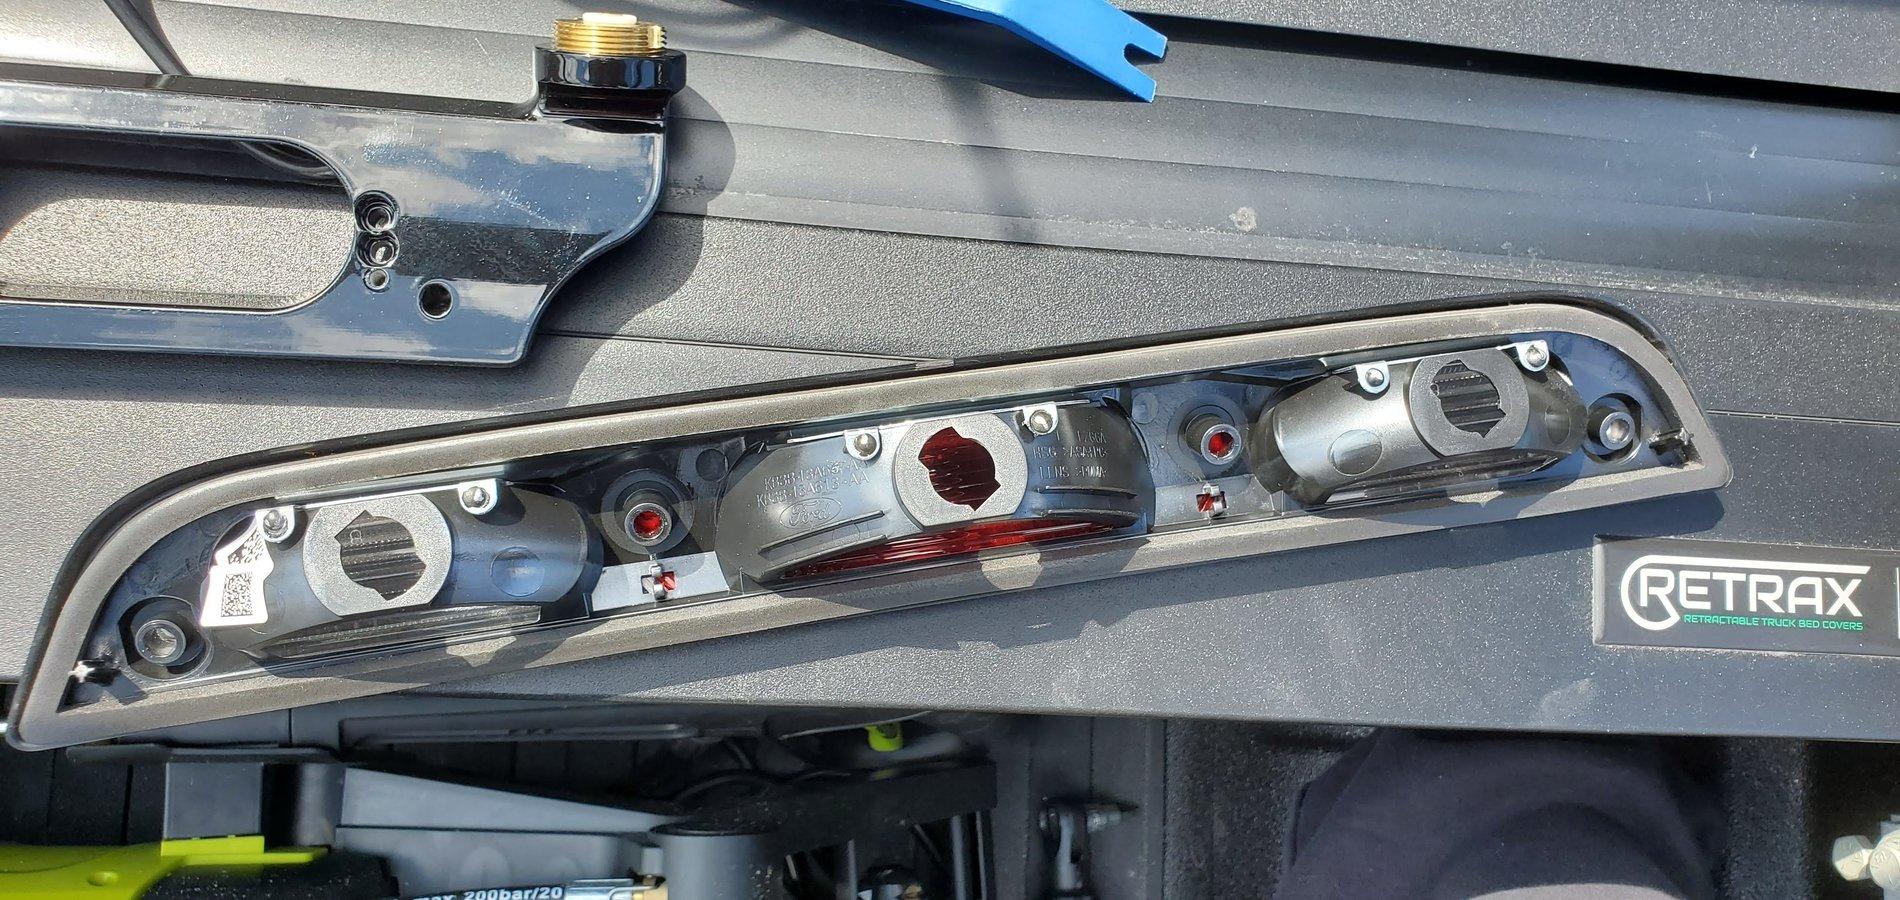
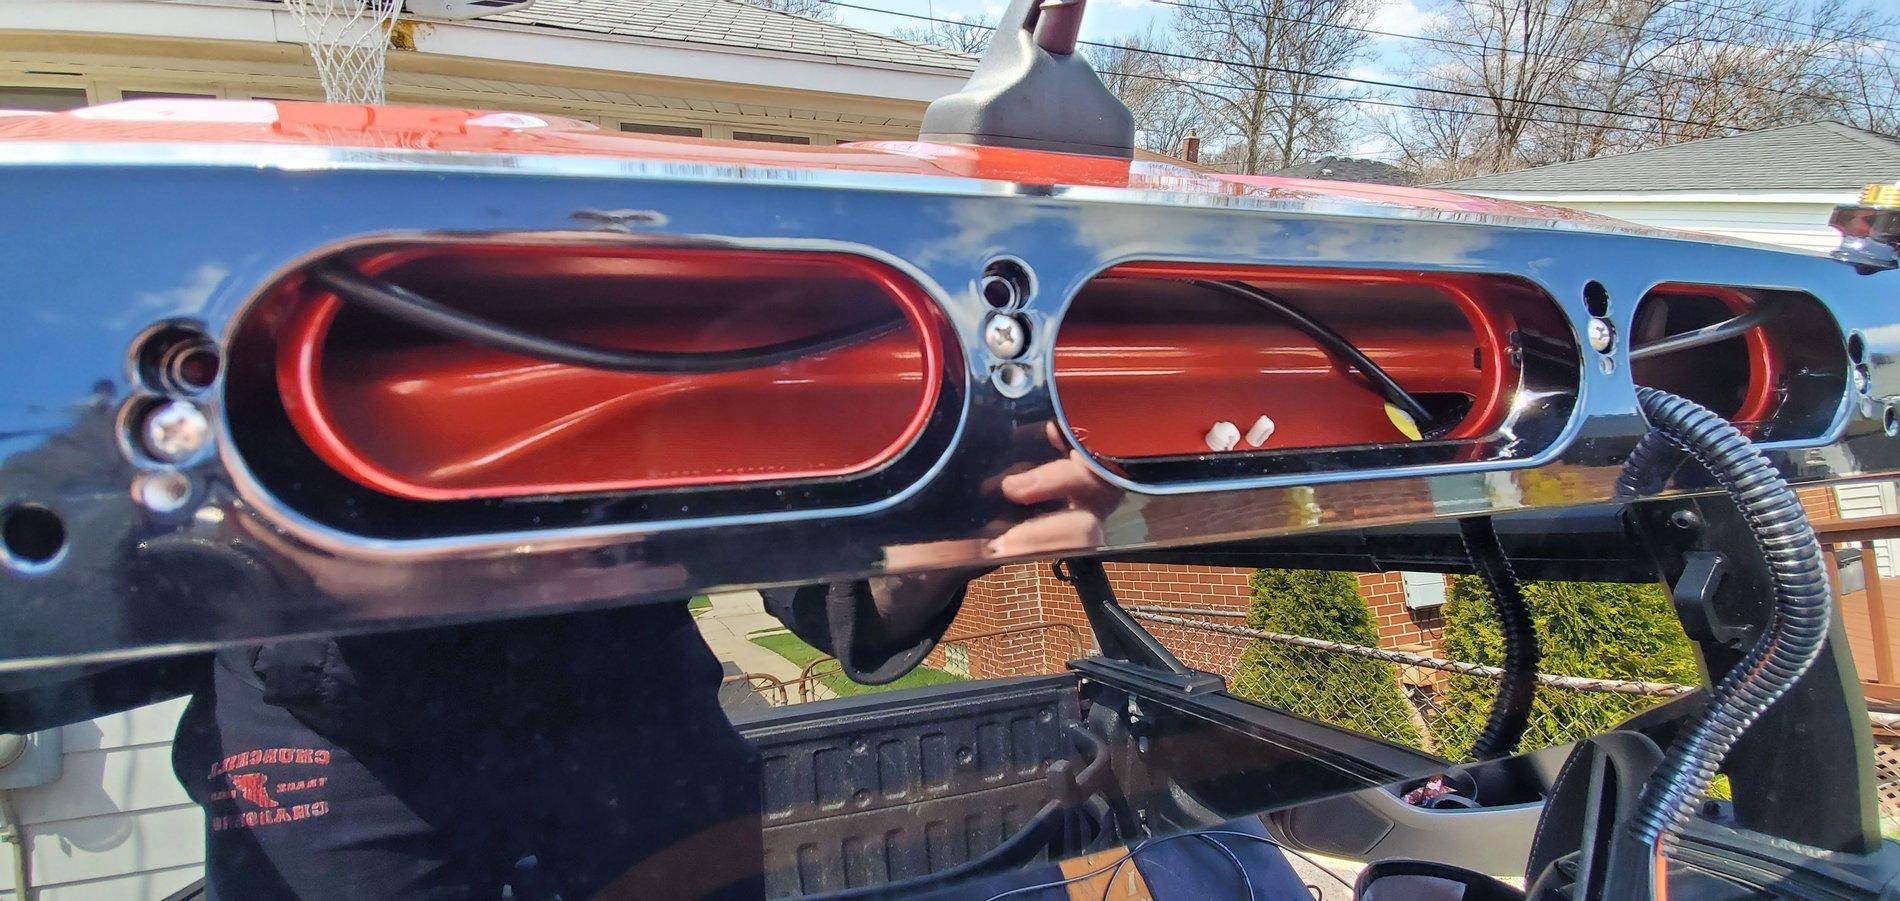
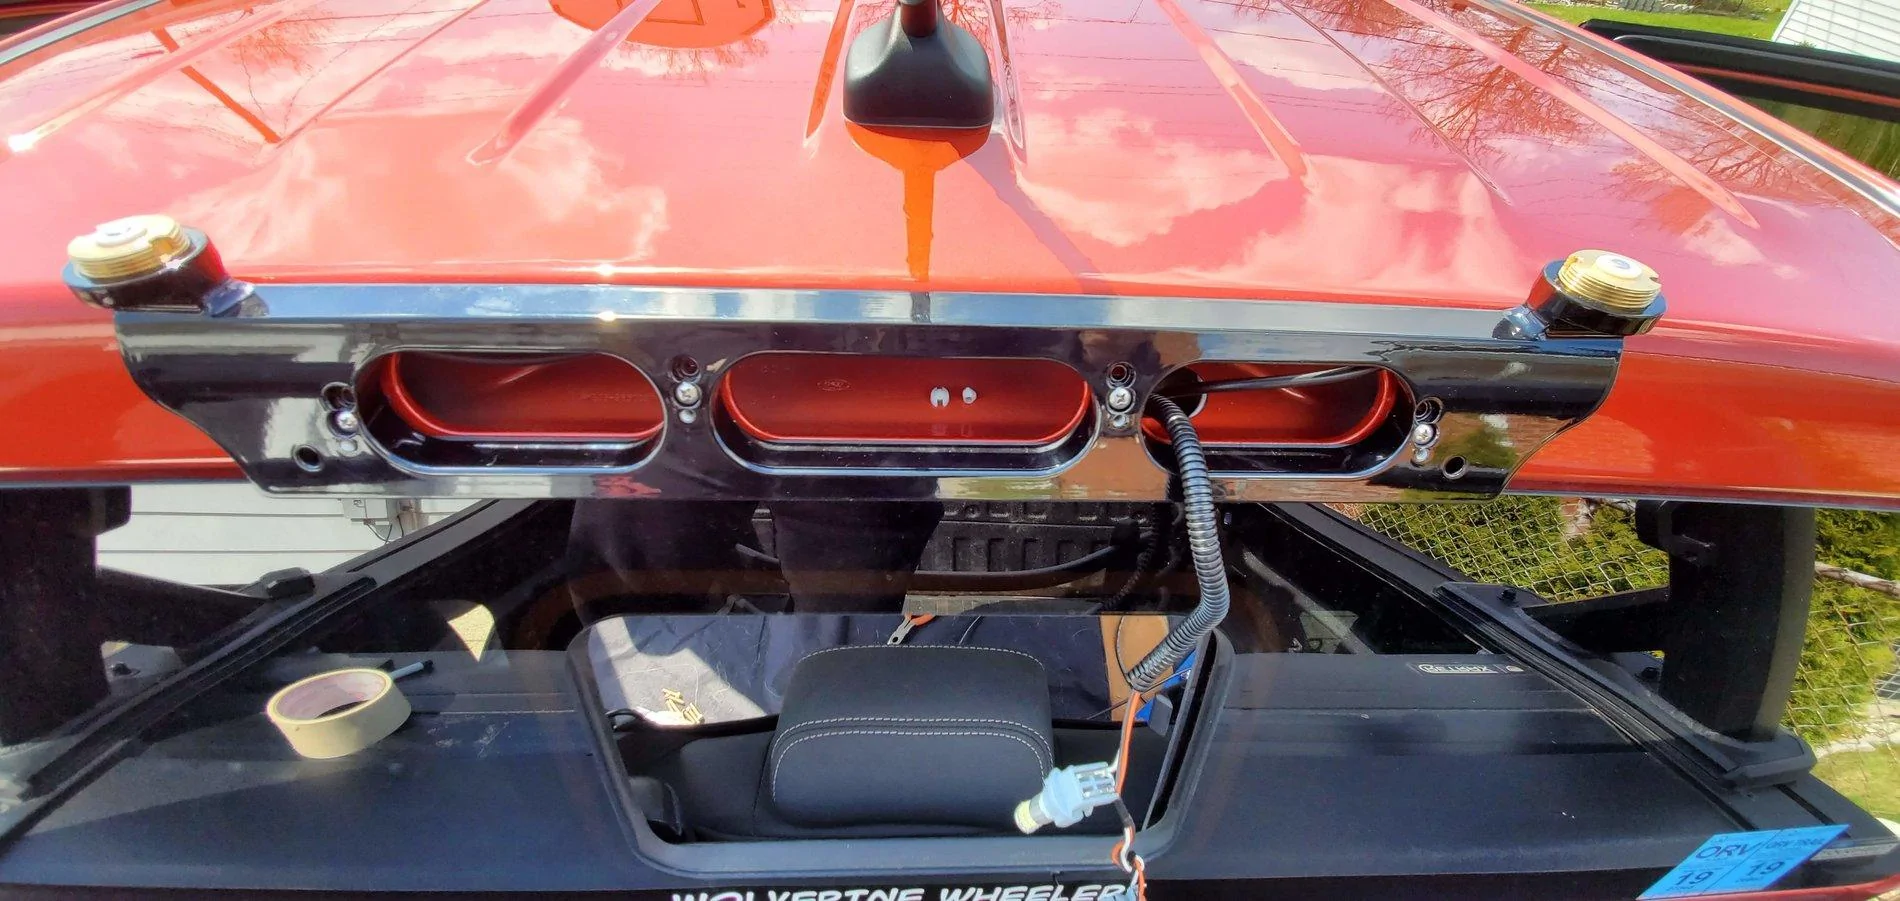
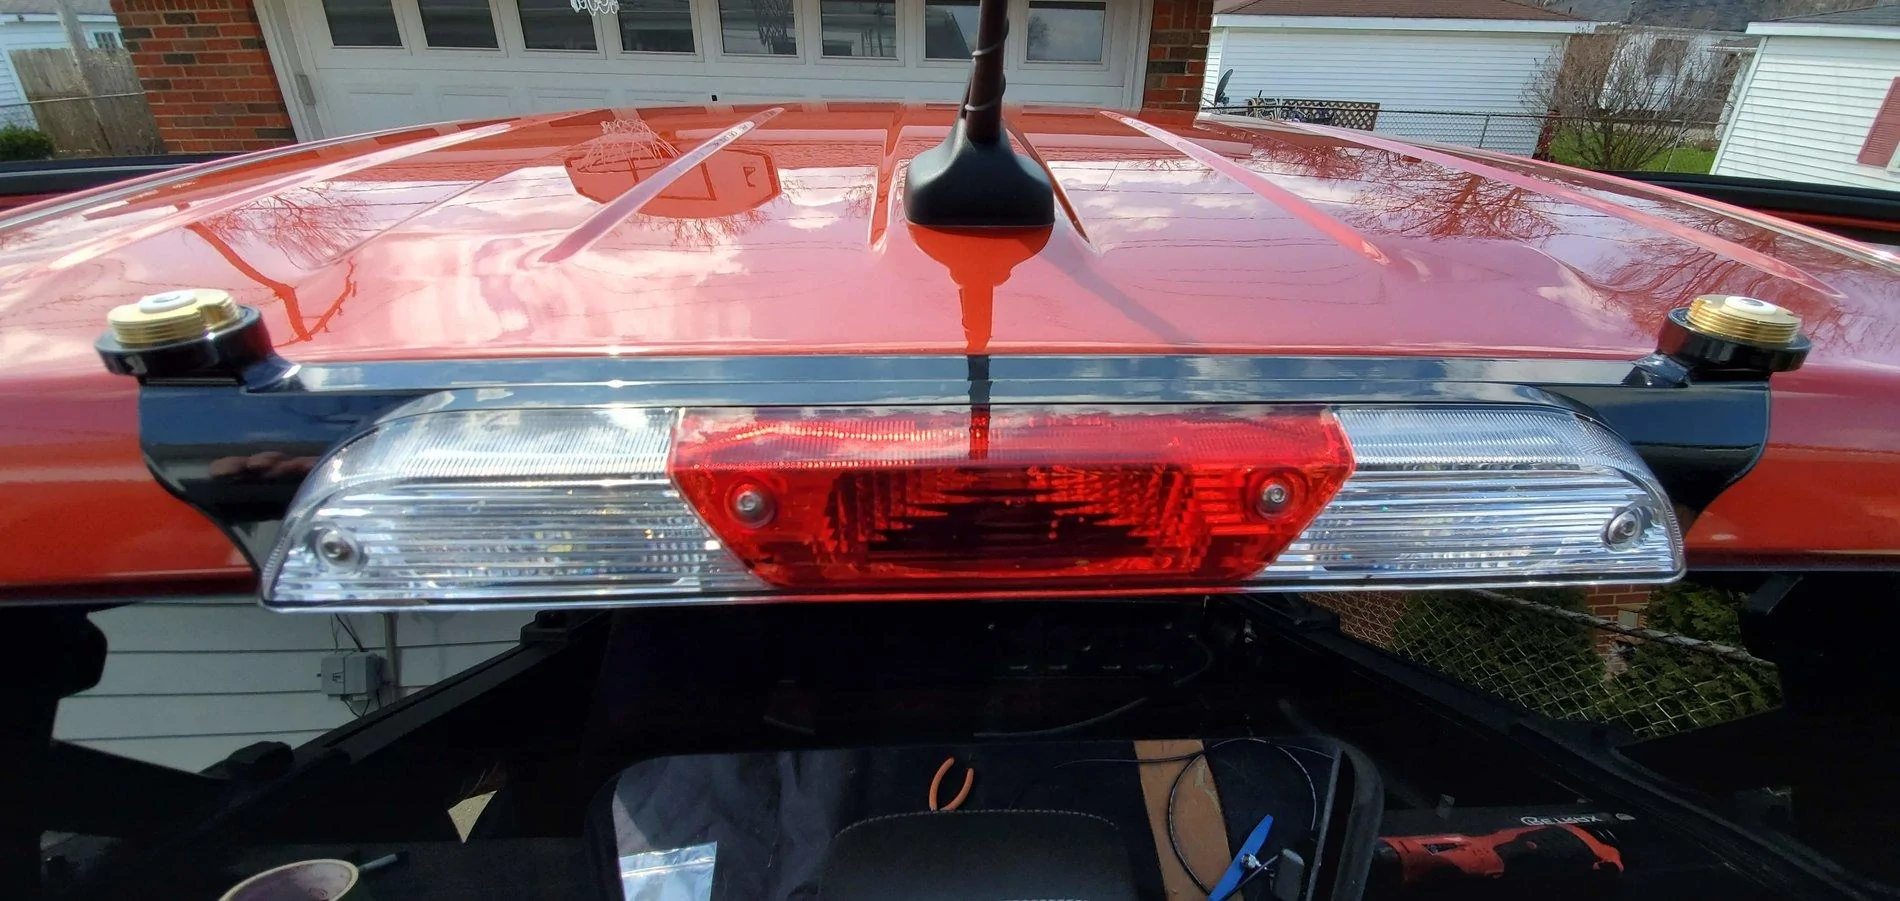
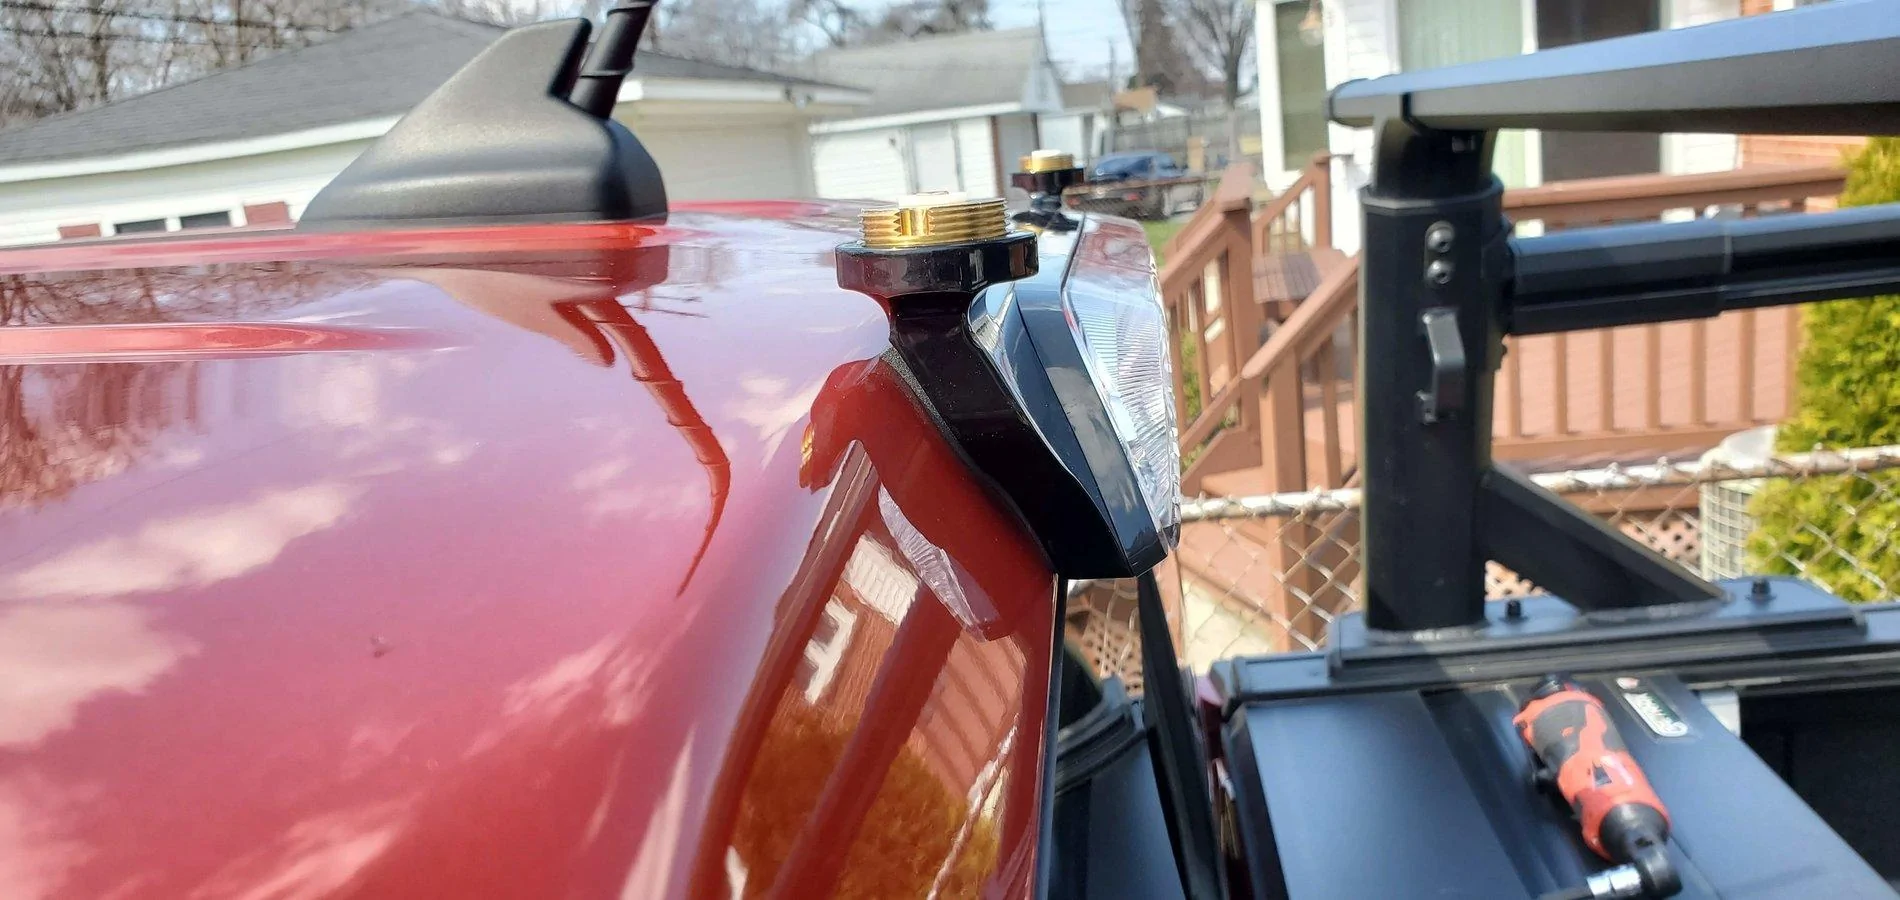
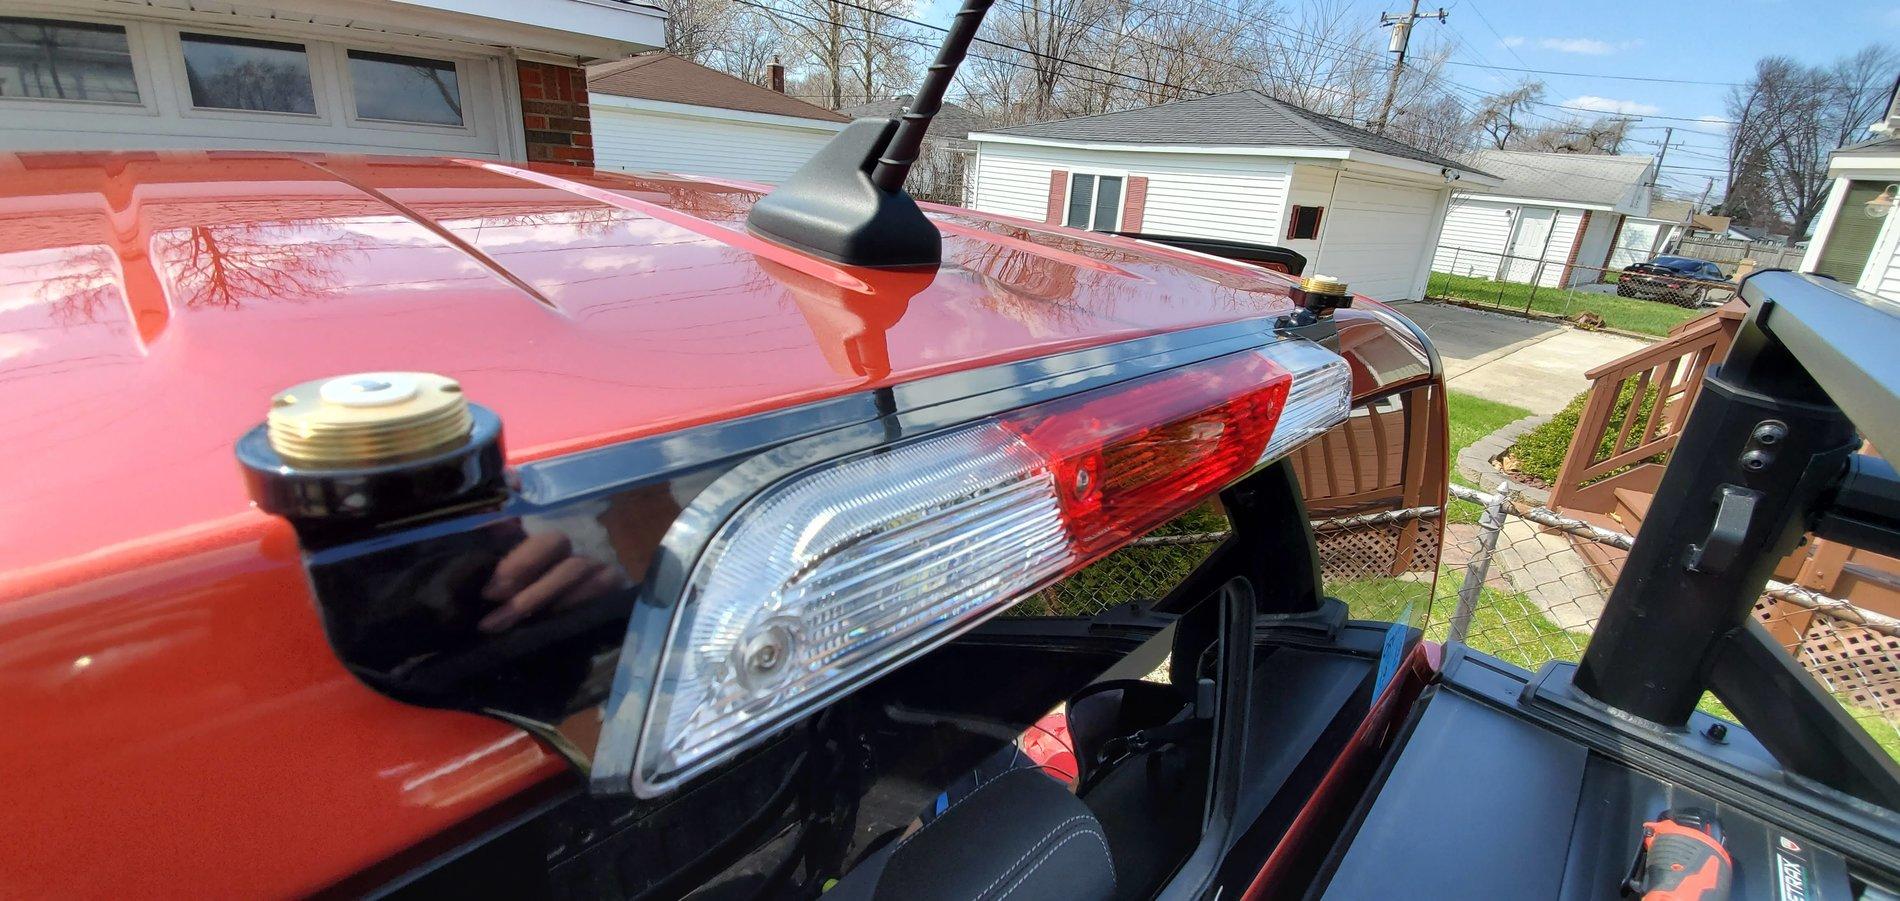
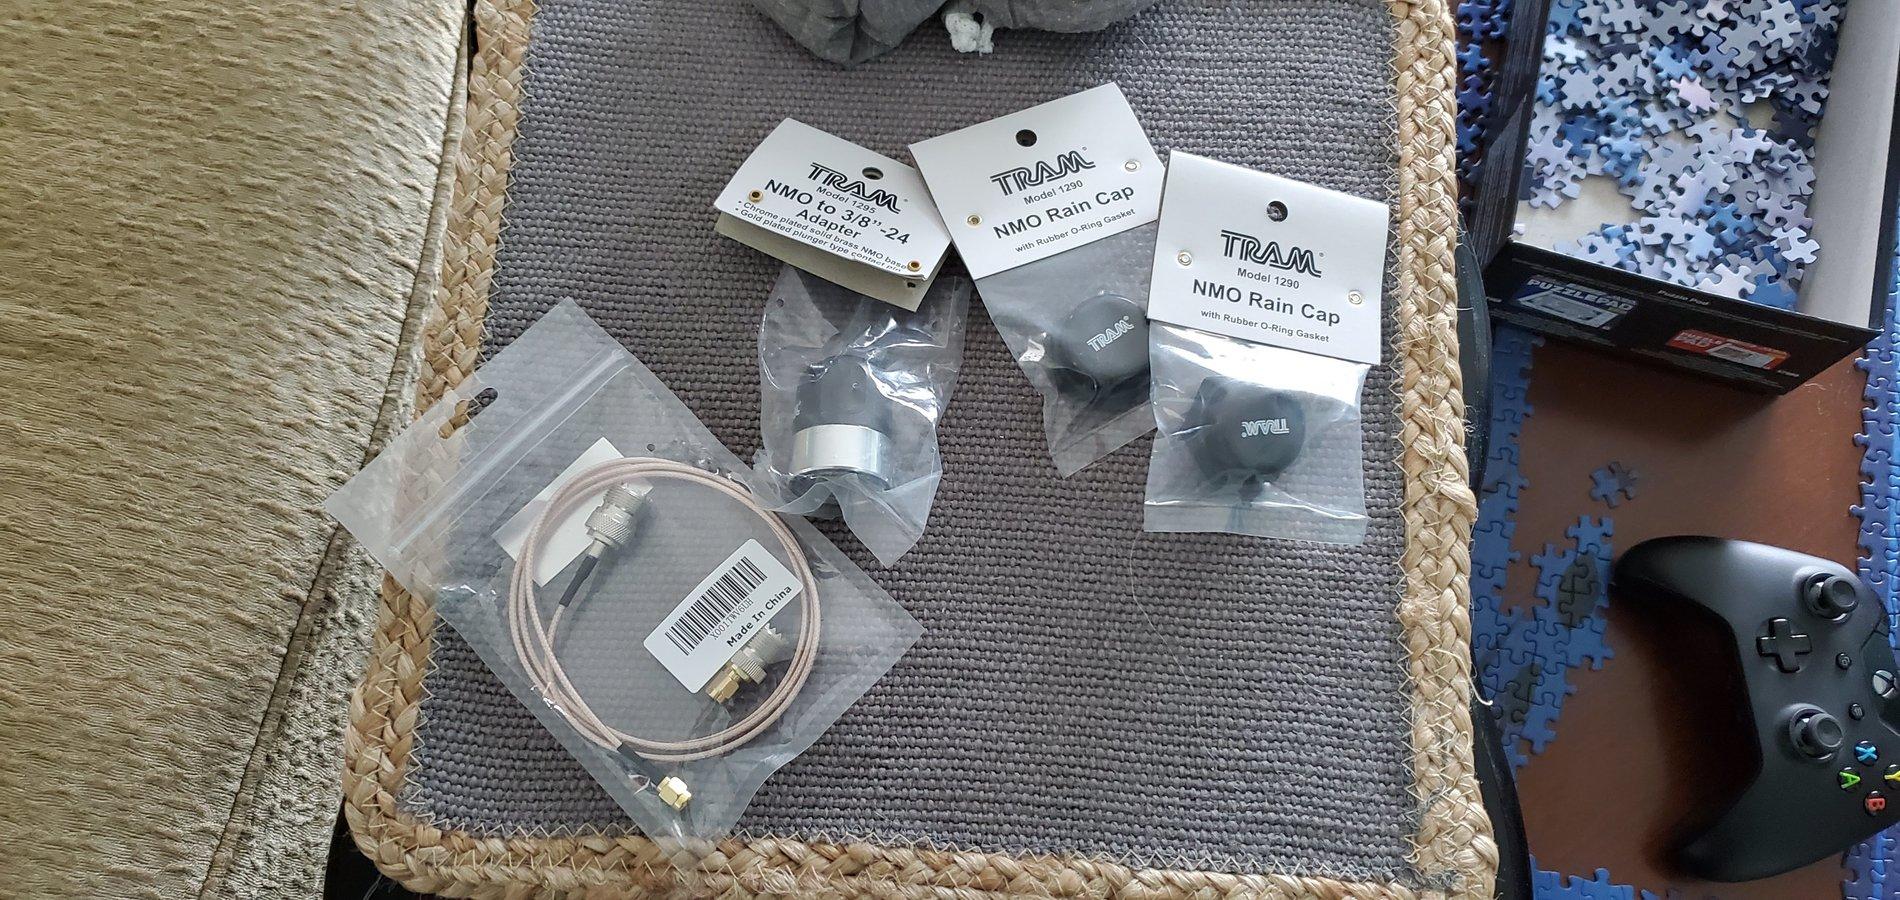
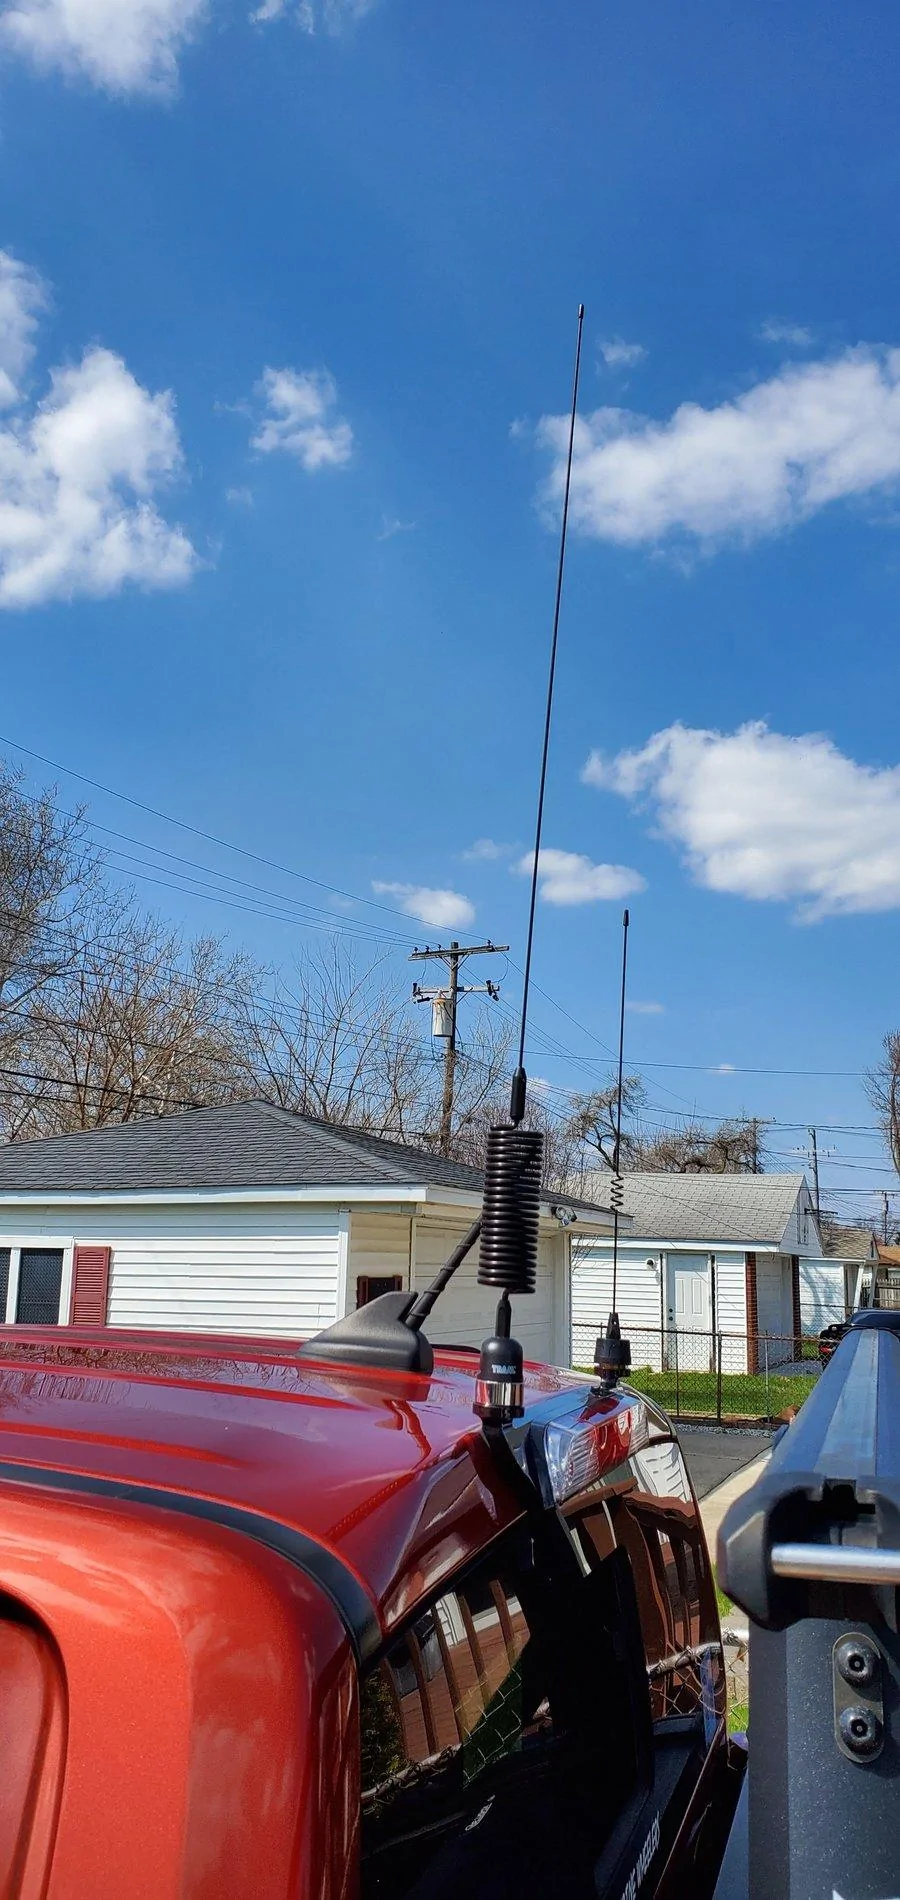
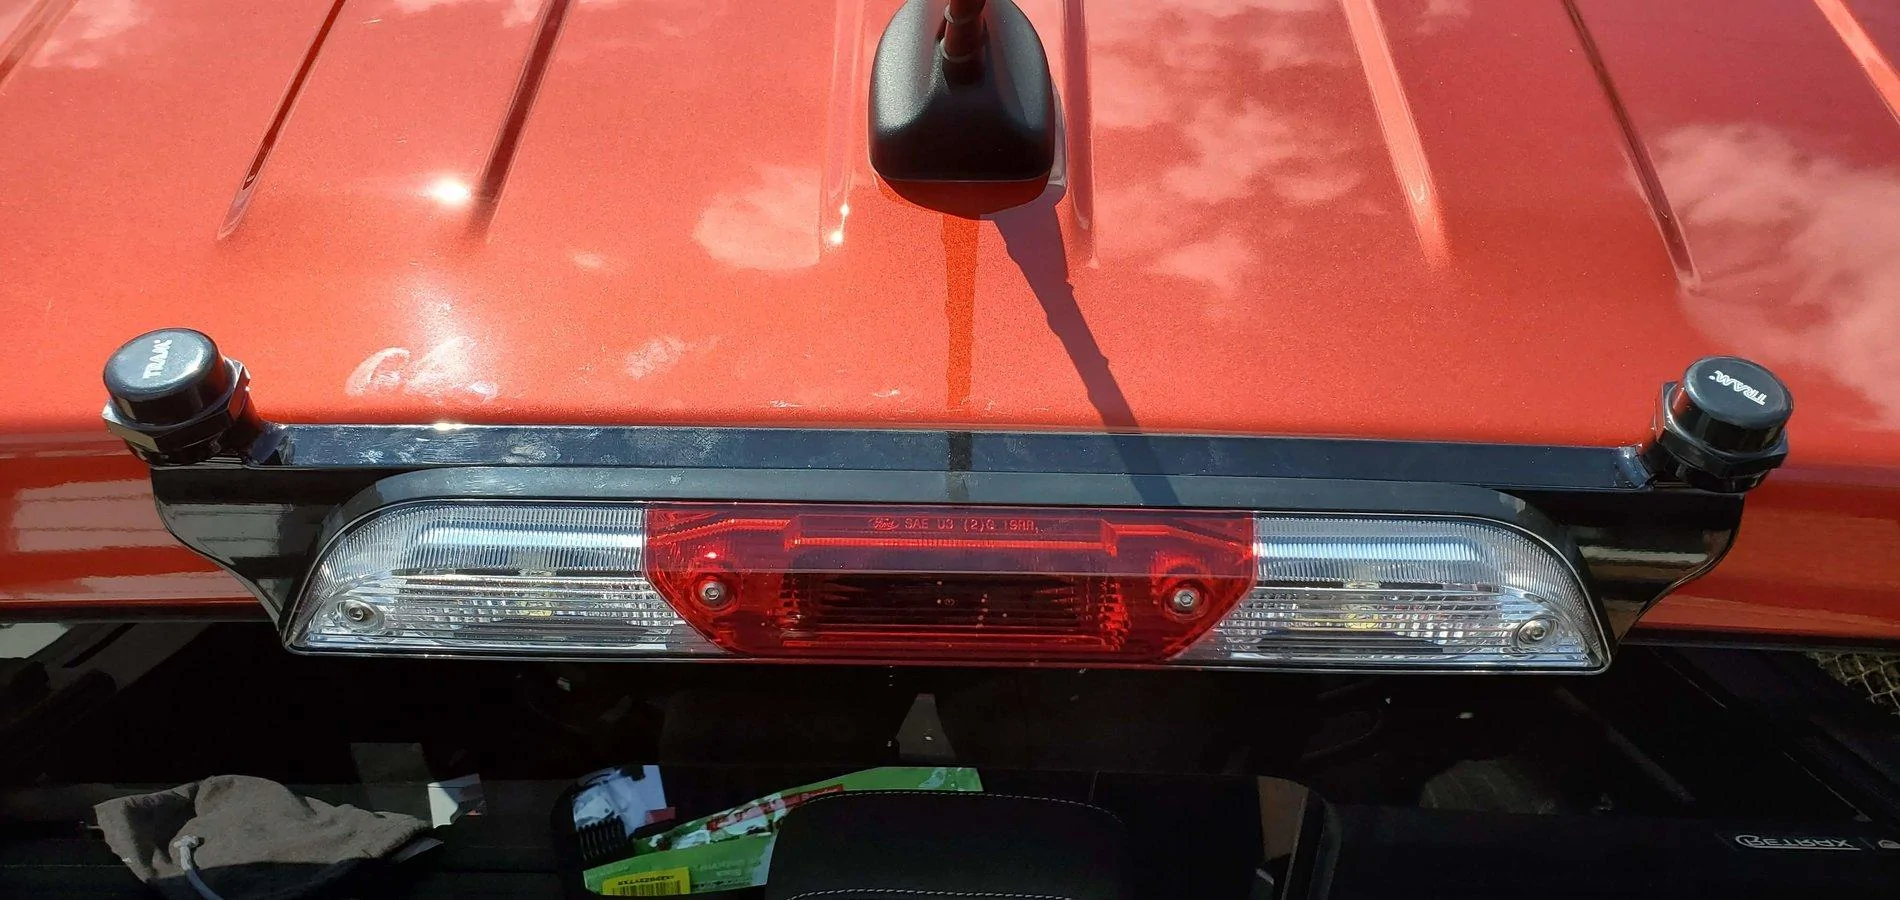
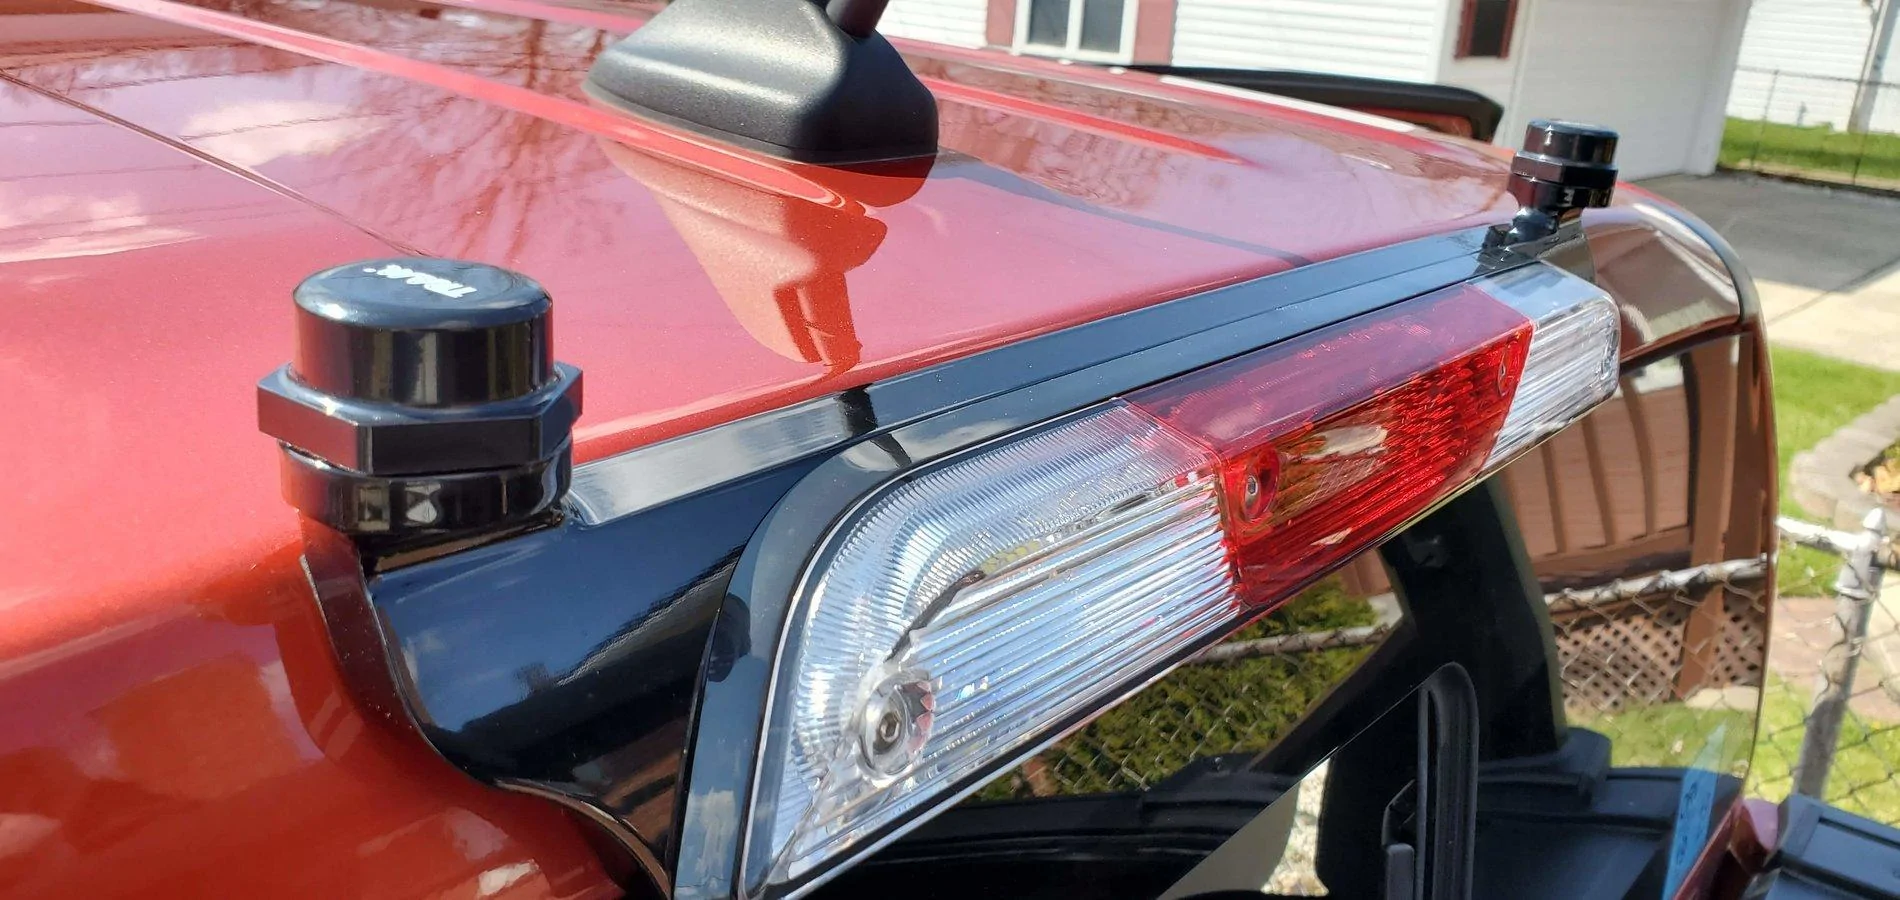
These mounts are built solid. I believe they are machined out of solid steel, but they provide some great strength for your antenna mounting needs. Additionally, these come with two separate NMO antenna mounts located at either side of side. From the mounts, there is 15 feet of low profile coax cable for each antenna. and lastly, to provide a good and safe seal to the truck, there is a thick gasket across the entire backside of the mount, and two cab supports for your antennas as well so no damage will come to your cab.

I purchased this mount for $499. I know $499 is still quite a steep price, definitely some sticker shock with it, but this was the mount that I thought looked the best, and fit my need the best. From this entire mount, that is definitely the biggest downside, as that price is a hard pill to swallow, but once you get the mount in your hands, you know you have a great mount that will last a long time!

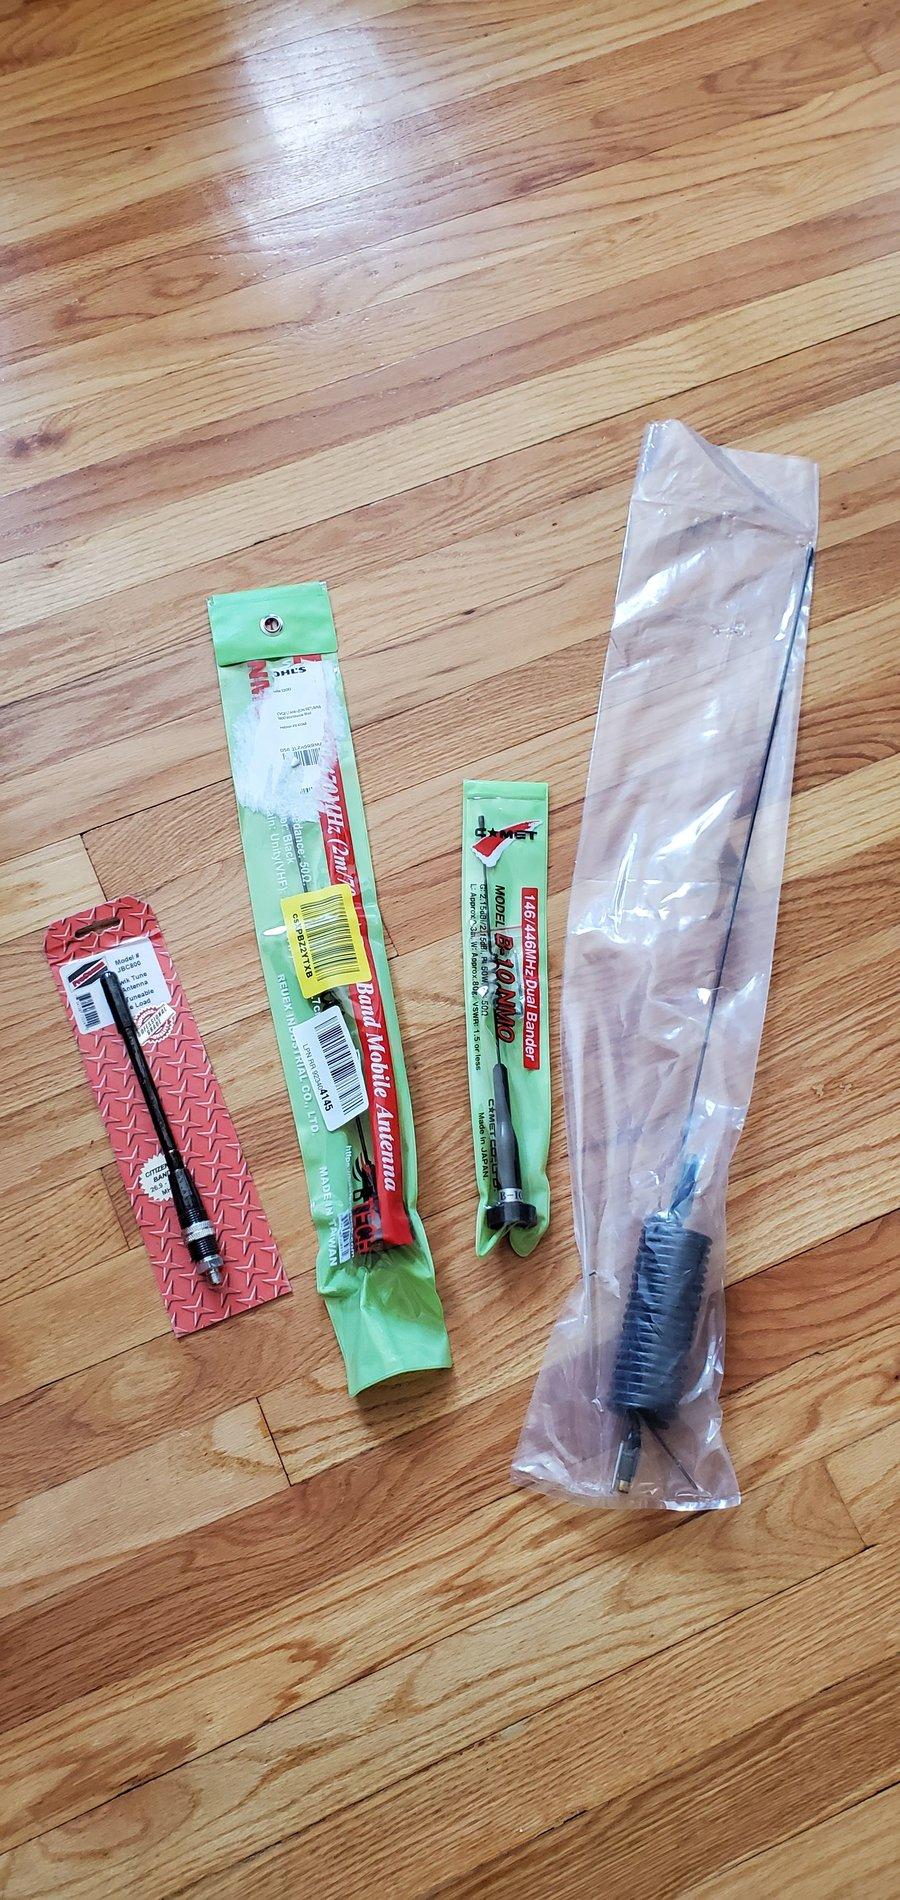
I chose this mount as I will be needing to run both a CB Radio and a VHF/UHF Radio from my truck and I had had my eye on these for a while. Additionally, I wanted a most ideal antenna location on the the truck, without needing to drill into the body or make too many, or really any body modifications. The highest mounting location you can get in the middle of the roof of the vehicle, and this is about the closest I can get, short of using a magnet mount, and I wanted more permanent than that. From there, I also had to take into consideration the location of the stock antenna on the Ranger. This is located in the middle of the rear taillight, sloped back. If one were to use the single antenna mount, my concern would be the antennas being much to close together or even touching. So moving the antennas out to the side of the third brake light gives more space for each antenna to prevent interference as well. And lastly, I really do like the look of this truck in OEM fashion, so I don't want to change that too much at this time! And this mount is definitely one of the most OEM looking mounts that I can see!

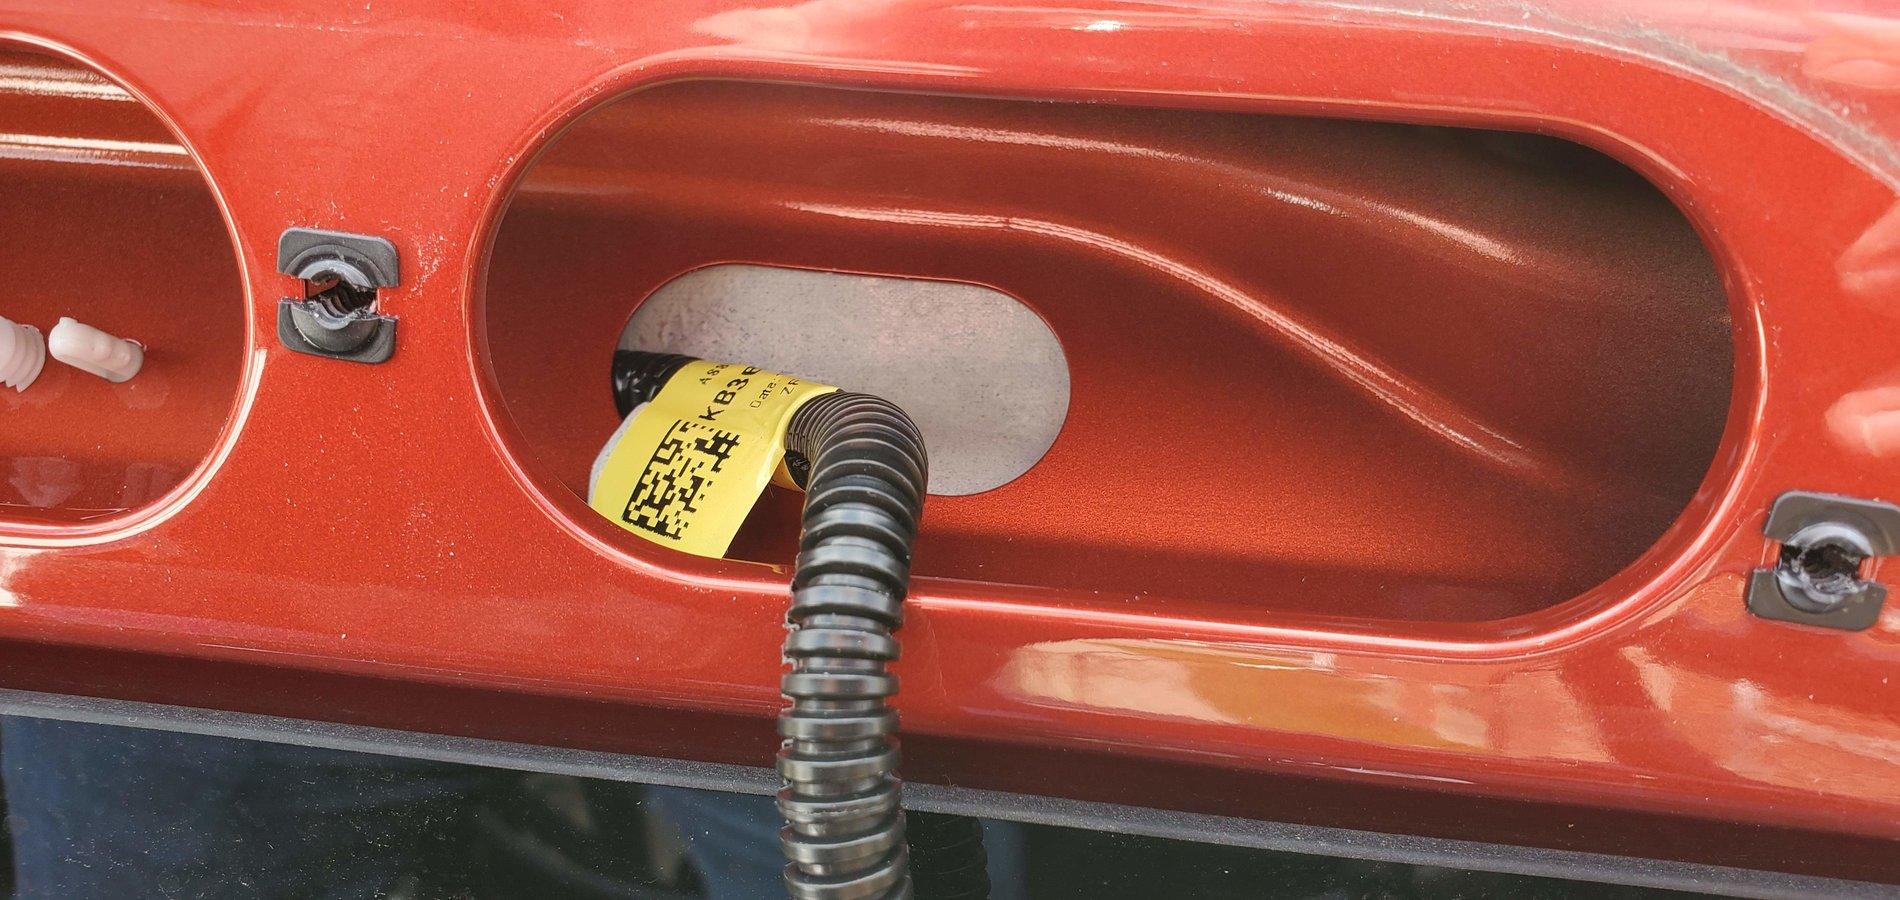
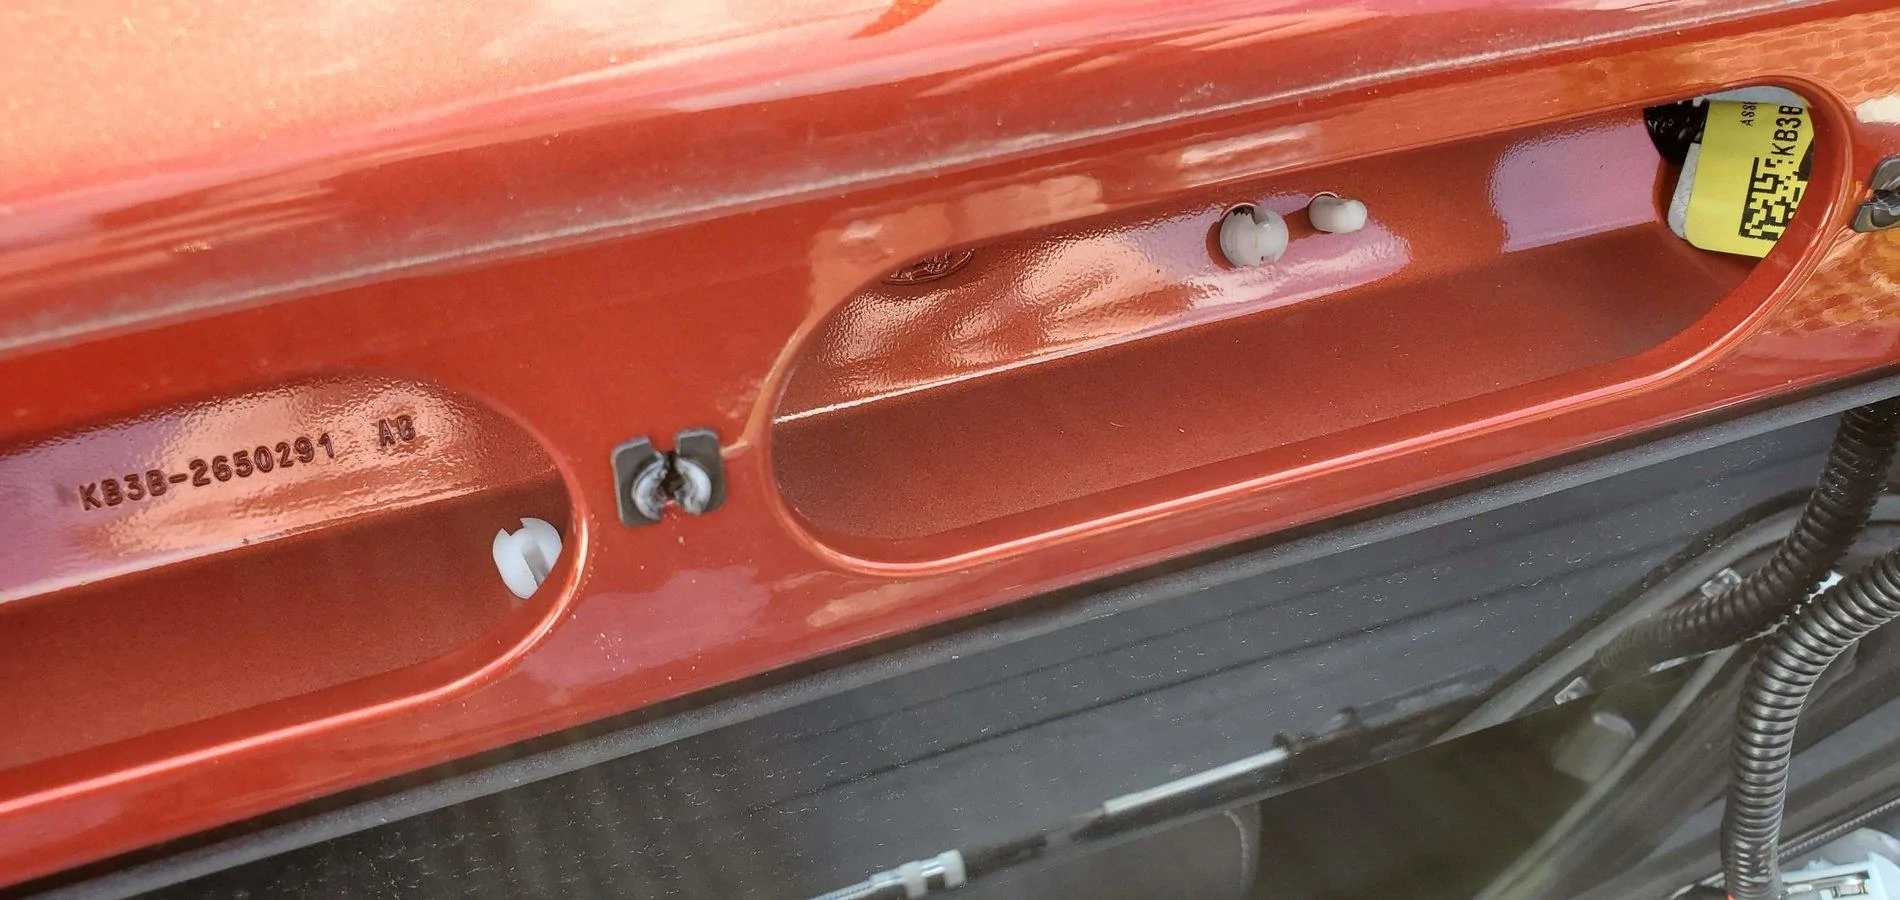
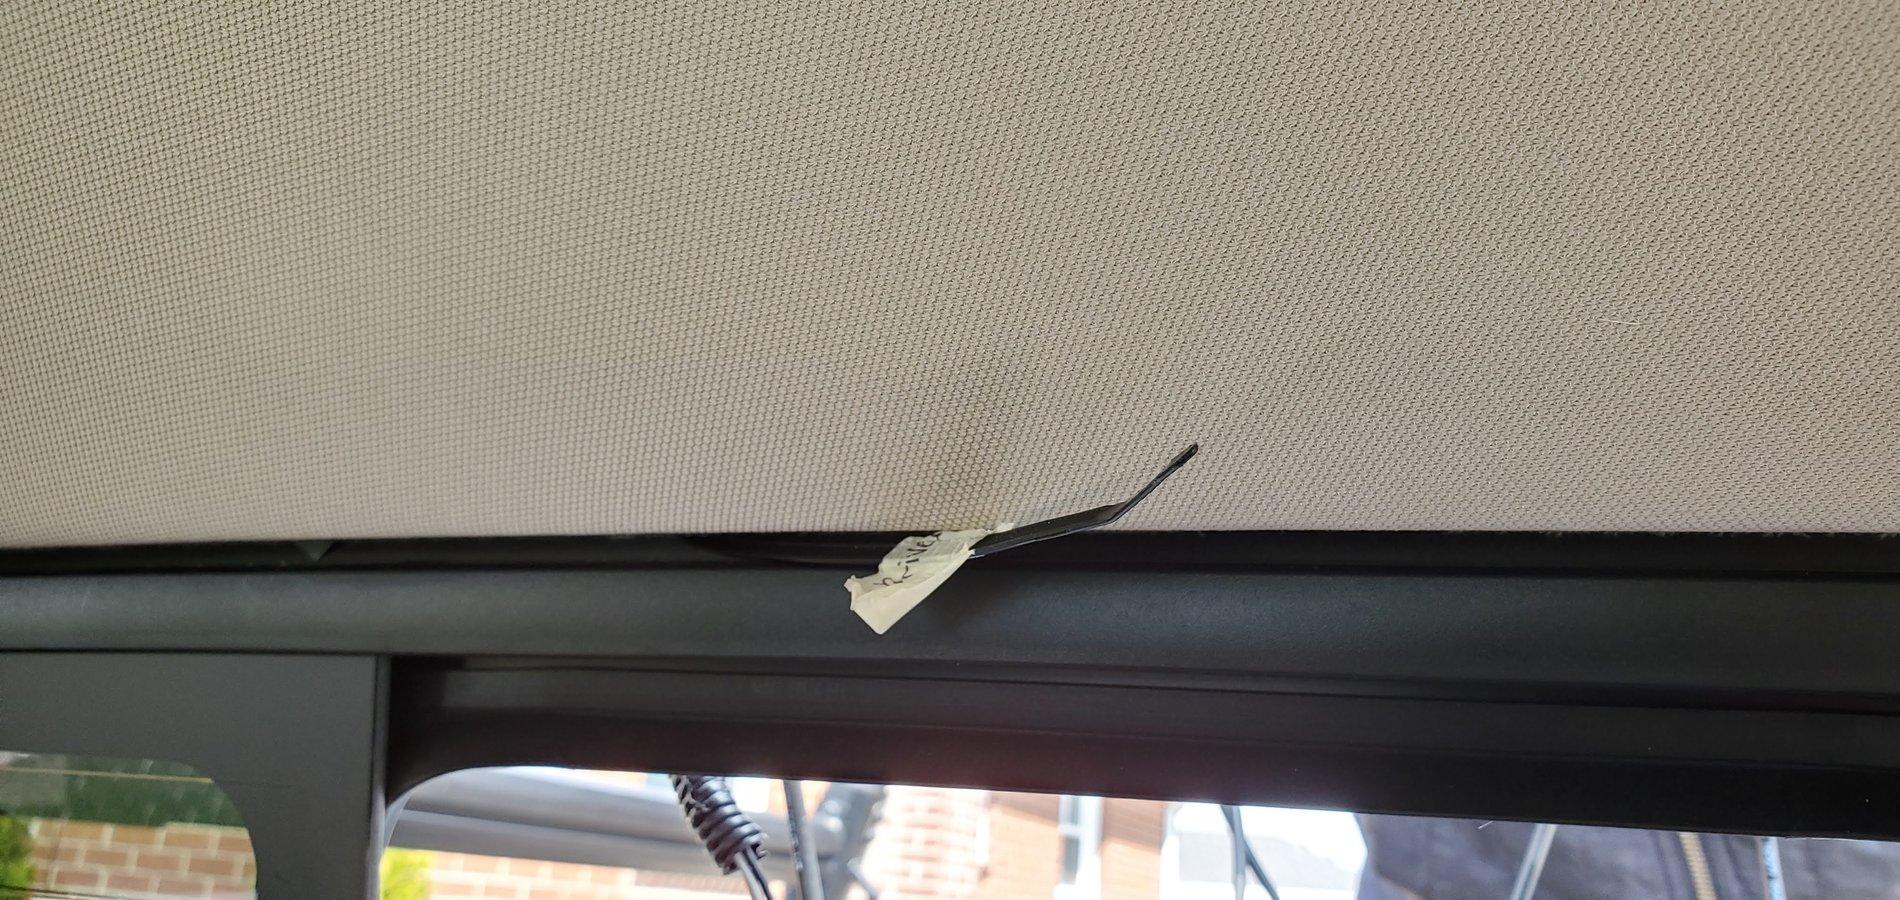
So with that out of the way, on to getting the mount and a couple of struggles starting out! I will cover the installation procedure in the next post then! When I received the mount, my first two impressions were that It was very heavy (very solid), and that it was quite large. I couldn't believe that taillight was that big, but it definitely appears a bit smaller on the truck than holding it in your hands. Everything was packaged great in the box and the mount was basically ready for installation. I did however have a few failed starts with getting the mount installed though, as there is a white felt sticker over the hole where the stock taillight wiring passes into the cab. It had no play, and I could not even attempt to move the wiring at all, let alone pass a coax cable through! I was also hesitant to push too hard to move the felt or poke a hole through it, as I didn't want to damage my headliner on the other side.

20200416_165756.jpg


Now the white felt looking portion. It was actually sealed extremely tightly around that hole and held on stronger than you would think. But after some further investigation, I contacted Bullet Proof Diesel for some customer service, and they actually brought a Ranger into their facility and investigated themselves to provide me with further details and pictures from their side as to how to run through the cab! Definitely some great customer service that I really appreciated! Specifically Andrew from Bullet Proof Diesel for the helpful information!

Last thing to note is, when I purchased this mount, it was only listed for the F-150s, though the Ranger is the same taillight, and it was also verified for the Ranger, so the instructions that came with the mount, are specific to the F-150. In most of the installation, it really makes no difference, but the portion of routing the wiring through the mount and cab is where the confusion came in. SO please read the following post for my details on the Ranger installation for this mount!

20200418_153609.jpg
Sponsored

 
OP
OP
WxNerd2015

WxNerd2015

Well-Known Member
First Name
Trevor
Joined
Oct 17, 2018
Threads
9
Messages
296
Reaction score
1,032
Location
Gregory, Michigan
Vehicle(s)
2019 Ranger, 2011 Wrangler, 2017 Escape
Occupation
Applications Engineer
Vehicle Showcase
1
On to the installation now! As mentioned in the previous post, this is the Third Brake Light Dual Antenna Mount for 2019 Ford Ranger from Bullet Proof Diesel! Just to repeat a couple of things, removing the taillight itself is very simple, however I struggled with where to route the wiring through the cab, as the hole was pretty much sealed up with a piece of felt from the factory and didn't even really allow movement of the factory wiring harness, let alone getting two coax cables through! And the directions were F-150 specific that came with the mount, so all is very similar, with the exception of the wiring locations in the cab.

SO...after some work with customer service over at Bullet Proof Diesel, they were able to provide me a great explanation and some pictures as to what I needed to do, and I was able to progress from there. Here is what it looks like behind the Ranger's third brake light.

20200416_165756.jpg

20200416_165804.jpg

20200416_165816.jpg


Note that hole is covered by what appears to be some sort of felt pad! So the first step, after removing the taillight of coarse, is to start right at the side the wiring loom goes through and give it a good amount of pressure with your thumb to release this sticker from the loom and the cab. You will have to give it more force than you would think for what it is, but it will start to release and open that hole up much better! And don't worry, there is a good amount of room behind the headliner there, so using your finger, you shouldn't worry about any headliner damage! Once removed, the hole should look something like this:

20200418_144253.jpg


You can see the back of the headliner through the hole, but you, like me, might wonder what that piece of felt was for. To the best of my knowledge so far, it seems as though it was there to block light from coming into the cab from the third brake light. The third brake light is not fully sealed on the inside, so when the cab lights are on, I actually get a small light spot on the inside of the headliner now, but all it is, is the light reflecting into the cab slightly, no big deal!

Next up, is to start to run the 15 feet of coax cable through into the cab for each antenna mount that you have. In my case, two! Before you start though, I caution a few things to take into consideration, as well as a few notes! First, note where your antenna is located on the mount and where the wiring runs. This caused me to have to remove one of the cables completely and start from scratch because I did not pay close enough attention. Here is the backside of the antenna mount:

20200418_151147.jpg


In the dual mount, note how each of the cables comes through at the outside edge of the light. (For the single mount, it will come through the middle). Also note in the above picture that there are three separate holes for the third brake light. In the directions, nothing is specifically stated which holes on the outside of the cab to run the wiring through, so I just took the most direct route, as the mount was still sitting on the bed cover until I run the wiring, which was the right side hole. I ran all of the wiring through and then went to put the mount up to the cab and released that I needed to run the driver's side antenna cable through the driver's side hole. It is a very slight difference, but make sure you get it right the first time because it is not something you would notice right away when installing! So for the dual mount, you initial cable routing should look something like this with one going through teh passenger side hole and the other the driver's side:

20200418_151152.jpg


Next, make sure to label each wire for driver's side and passenger side. It's a minor detail, but once they are passed through the cab, it's a lot harder to tell them apart! SO I just took a small piece of tape on each able and labels DS and PS so i could more easily keep the cables straight on the inside.

And lastly, on the Ranger, it is very hard to try and get your fingers behind the headliner at the taillight, as with our manual sliding real window, the track does not provide enough space to move the headliner or pull it down without potentially damaging it. So I decided to try and make locating the wires a bit easier. I attached a zip tie to the end of each coax like below:

20200418_144347.jpg


From there, I then had my wife go inside the truck, and I carefully routed the zip tie straight down along the headliner until it appeared on the inside of the cab.

20200418_151304.jpg


Once my wife saw it, she pulled the zip tie through a bit further, so we had a good handhold, while I carefully routed the coax end into the cab. This also eliminated the need for us to try and pass the coax through the headliner right there. What it did do, was allow us to use the zip tie as a guide to pull sideways along the headliner to the passenger side and run the coax inside the headliner with no troubles. Once you get to the passenger side, the rear window track stops and allows more space for you to easily pull the coax through. However this part definitely takes two people to make it a lot easier!

20200418_145606.jpg

20200418_145531.jpg

20200418_145536.jpg


Once the coax cables are inside the cab, the next step is getting the mount placed up to the cab and routing the stock wiring harness through the mount. The directions specify that you should disconnect the light wiring from the plug inside the cab. These clips are really are to release to begin with, and I decided against it due to the fact that you cannot get your fingers behind the headliner to push the clip back in after removed. So I opted to remove the wiring from the third brake light, which turned out to be super easy, and I had new LED bulbs from Diode Dynamics to install anyways. The bulbs simply just twist out, and the clips along the backside of the light easily release the wiring loom. I then replaced the stock bulbs with the LED bulbs and verified that they were working properly, and then it was time to get the mount up!

20200418_145744.jpg

20200418_145747.jpg


Also, it is important to note that this part is specific to the XL and XLT Rangers with the halogen third brake light, not the LED one. I do not have any experience with the LED Third Brake Lights!

Now, with the wring loom free, route the loom through the passenger side hole in the mount and place the mount then up to the cab like below:

20200418_151621.jpg

20200418_151626.jpg


The kit provides new pan head phillips screws to attach the mount to the cab using the stock mounting holes. On the mount itself, that would be the middle holes. Now is also the time to attache the cab supports if you will be installing them. On the dual mount, that consists of two two piece that you place on the inside of the cab, and you drill through the upper holes on the mount, through the cab, and then you can attach the strengthening brackets through those holes. This is the one step that I did not do. I did not feel like drilling through my cab, and the mount itself felt solid enough in it's current location as is. Additionally, I do not plan on running larger antennas very option, and the truck is not parked in a garage, so there are very minimal conditions that I would experience currently that would cause me to need the strengthening bracket, but that can be each our your own choices when installing. I decided to take my chances for now. On the single mount, I believe you only need to drill the upper middle two holes, as there is only one support bracket for the middle.

Moving on, I next grabbed my third brake light, and started reinstalling the wiring loom to the light housing, and it went back in just at it came out, with no problems at all! Honestly, if you have the halogen light, I have no idea why you would struggle with the plug in the cab, this method is so much easier! Once the lights are installed back into their sockets and the loom is attached, Bullet Proof Diesel also supplies new button head cap screws to install the taillight, and you thread those through the light housing and into the bottom holes of the mount. Initially, there will appear to be a big gap between the light housing and mount, but as you tighten the screws up, it sucks the housing up very nicely to the mount and seals great!

And without further adieu...here is the mount installed on the truck!

20200418_152424.jpg

20200418_152429.jpg

20200418_152440.jpg

20200418_152447.jpg

20200418_152451.jpg


Overall, once I figured out the routing into the cab and I got out of my own way with some dumb mistakes, this mount was very easy to install, and with the right info and procedures you could easily get this installed in 30 minutes to an hour! The fitment is perfect and I love the look! It feels very solid and everything installed exactly as it was supposed to! I have now had the mount on for almost a month I believe and it has worked great, no noises, no leaks, and all the cables and lighting is working as it should! I know it is pricey, but if you can afford it, you get what you pay for, and this is a very high quality mount that is going to last a long time!
 
OP
OP
WxNerd2015

WxNerd2015

Well-Known Member
First Name
Trevor
Joined
Oct 17, 2018
Threads
9
Messages
296
Reaction score
1,032
Location
Gregory, Michigan
Vehicle(s)
2019 Ranger, 2011 Wrangler, 2017 Escape
Occupation
Applications Engineer
Vehicle Showcase
1
Lastly, I of coarse how some radios still to install, along with the mounting for them and the antennas. I am still working on the radio mounts. Those will be done soon, but I will cover my antenna setups that I will be using here and some links to what I have here.

20200418_152957.jpg

20200418_153235.jpg


First up, I needed to make sure the bases were NMO mounts, as this is what the mount included. I needed an antenna for CB bands, and an antenna for UHF/VHF bands. And lastly, I considered two setups, one for daily use, and one for heavier use.

First up, NMO antennas for Ham bands are no problem to find, as their are plenty of options, however the options for CB antennas are much more limited. So I decided, instead of limiting myself on antenna choices, I would use the Tram 3/8 24 antenna adapter (TRAM1295). This adapter basically allows you to attach a standard thread CB antenna (3/8 24) to an NMO mount.

81di4ihIucL._AC_SL1500_.jpg


With that figured out, I then set out on finding my daily antennas. My main priorities with the daily antennas were to keep them right around the height of the stock radio antenna, as they should then be able to fit into lower clearance locations without needing to take the antennas off, such as parking garages and such. I figured that if the stock radio antenna is that height, that should be a relative standard for most locations to be able to fit with extra antennas as well.

So for the CB, I settled on the ProComm 8" Base Loaded CB Antenna (JBC800)

61sFHYIkd-L._AC_SL1500_.jpg


And for the Ham, I went with the Comet B-10NMO

s-l1600.jpg


Both of these antennas end up sitting about 10" high and fit with the height of the stock radio antenna greatly!

20200418_153606.jpg

20200418_153630.jpg

20200418_153638.jpg


Next up was the heavy use setup. This would be used for Amateur Radio Club and Emergency operations, Off Road Trips, Convoy trips, etc. where I know I will need better antennas to help get further range and make everything clearer. Here, I was only restricted by making sure they had the right base mounts. No height or other restrictions!

For the CB, I settled on the Mini Stinger Springer 90cm Antenna in Black. For CB a longer antenna will in many cases preform much better as the ideal length is 102", and with this base loaded antenna (the coils), it definitely should work out pretty well when I am utilizing it more heavily!

s-l1600 (1).jpg


And for the Ham, I went with the Nagoya NMO-72 19.25" Antenna.

71kqoNScquL._AC_SL1500_.jpg


And this setup definitely gets some more height, but I have already utilized it some and it gets great reception for me! The antennas attach great to the mount and no movement or anything like that has occurred.

20200418_154141.jpg


20200418_154204.jpg


And lastly, I also do know there are times that I might remove the antennas completely, and especially with NMO mounts, you do not want to leave them exposed to the elements, so I got a couple of rain caps from Tram as well! They feel like a cheaper plastic, but should do their jobs fine, just make sure not to lose the o ring in the base of the caps as they were not seated very good when I got mine and I almost lost one!

20200418_154501.jpg

20200418_154505.jpg


And lastly, here's a few shots of the whole truck with the antennas on! Besides, who of us doesn't want to see more of the Ranger on here, it's a beautiful truck!

20200419_090518.jpg

20200419_090527.jpg

20200419_090539.jpg

20200419_090558.jpg

20200419_090612.jpg
 
OP
OP
WxNerd2015

WxNerd2015

Well-Known Member
First Name
Trevor
Joined
Oct 17, 2018
Threads
9
Messages
296
Reaction score
1,032
Location
Gregory, Michigan
Vehicle(s)
2019 Ranger, 2011 Wrangler, 2017 Escape
Occupation
Applications Engineer
Vehicle Showcase
1
looks good, but yes...ouch on the price.

my only suggestion is a color matched mount would look literally invisible up there. but even black its looks like a great install.
Yeah, Color matched would completely disappear, and you absolutely could still paint this mount to match with no problem!
 

elvis-earl

Member
First Name
Mike
Joined
Oct 10, 2020
Threads
0
Messages
12
Reaction score
30
Location
Jefferson, Louisiana
Vehicle(s)
2020 Ranger Lariat
Occupation
Motion picture accountant
All I can say is WOW! Good job, good pics and explanation! I would like to see where the wire run went to the radios. Thanks!


OP
OP
WxNerd2015

WxNerd2015

Well-Known Member
First Name
Trevor
Joined
Oct 17, 2018
Threads
9
Messages
296
Reaction score
1,032
Location
Gregory, Michigan
Vehicle(s)
2019 Ranger, 2011 Wrangler, 2017 Escape
Occupation
Applications Engineer
Vehicle Showcase
1
All I can say is WOW! Good job, good pics and explanation! I would like to see where the wire run went to the radios. Thanks!
Thanks! And @elvis-earl, I will see what I can do soon to get some more pics of where the wiring is run up near the dash. From the antenna mount, it is run down the back passenger side of the cab, along the back cab wall to the middle of seat, then across under the rubber floor mat and to the passenger side of the console, along the passenger side of the console up to the passenger side of the dash, then I released the glove box and fished the wiring up from the floor up the passenger side of the center of the dash up to the tray. As said though, I will see if I can get some pics, or at least draw a diagram on the pics I have where the wiring is run!
 
OP
OP
WxNerd2015

WxNerd2015

Well-Known Member
First Name
Trevor
Joined
Oct 17, 2018
Threads
9
Messages
296
Reaction score
1,032
Location
Gregory, Michigan
Vehicle(s)
2019 Ranger, 2011 Wrangler, 2017 Escape
Occupation
Applications Engineer
Vehicle Showcase
1
All I can say is WOW! Good job, good pics and explanation! I would like to see where the wire run went to the radios. Thanks!
Also, here's a few links in my full build page with some more details:

99
108
 

THLONE

Well-Known Member
First Name
Thom
Joined
Feb 12, 2019
Threads
10
Messages
1,456
Reaction score
2,167
Location
Tucson,AZ
Vehicle(s)
68 Chev C-20, 2019 Ford Ranger XL 4X4
Occupation
internet wise guy
Vehicle Showcase
1
Hay good buddy you got your ears on.
Does anybody except gay truckers use CB any more? ?
 
OP
OP
WxNerd2015

WxNerd2015

Well-Known Member
First Name
Trevor
Joined
Oct 17, 2018
Threads
9
Messages
296
Reaction score
1,032
Location
Gregory, Michigan
Vehicle(s)
2019 Ranger, 2011 Wrangler, 2017 Escape
Occupation
Applications Engineer
Vehicle Showcase
1
Hay good buddy you got your ears on.
Does anybody except gay truckers use CB any more? ?
Well, we still use em in most of the Jeep groups/offroad groups around here. We haven't transitioned away from the CBs yet, so it is still a necessity.
 

JoeC

Well-Known Member
First Name
Joe
Joined
Oct 29, 2019
Threads
2
Messages
216
Reaction score
545
Location
New England
Vehicle(s)
2019 Ranger Lariat
Hay good buddy you got your ears on.
Does anybody except gay truckers use CB any more? ?
Come on now, have you not taken a long trip lately and appreciated road reports on CB?
Or, maybe you don't have CB?
Anyway, how does that contribute to the thread of a pretty darn nice install?

I've been looking for something like this antenna mount, thank you for bringing it to my attention.
I'm looking forward to any pics you might post as to where you mounted the radios in the cab.
Thanks
 
OP
OP
WxNerd2015

WxNerd2015

Well-Known Member
First Name
Trevor
Joined
Oct 17, 2018
Threads
9
Messages
296
Reaction score
1,032
Location
Gregory, Michigan
Vehicle(s)
2019 Ranger, 2011 Wrangler, 2017 Escape
Occupation
Applications Engineer
Vehicle Showcase
1
Come on now, have you not taken a long trip lately and appreciated road reports on CB?
Or, maybe you don't have CB?
Anyway, how does that contribute to the thread of a pretty darn nice install?

I've been looking for something like this antenna mount, thank you for bringing it to my attention.
I'm looking forward to any pics you might post as to where you mounted the radios in the cab.
Thanks
Check out posts 99 and 108 over on my build thread for radio locations and full setup!
 

JoeC

Well-Known Member
First Name
Joe
Joined
Oct 29, 2019
Threads
2
Messages
216
Reaction score
545
Location
New England
Vehicle(s)
2019 Ranger Lariat
Check out posts 99 and 108 over on my build thread for radio locations and full setup!
Thanks for the referenced pics on your previous posts.
I'm not sure I'm ready to mount everything up by the windshield, but I do appreciate the looks to help me decide.
 
OP
OP
WxNerd2015

WxNerd2015

Well-Known Member
First Name
Trevor
Joined
Oct 17, 2018
Threads
9
Messages
296
Reaction score
1,032
Location
Gregory, Michigan
Vehicle(s)
2019 Ranger, 2011 Wrangler, 2017 Escape
Occupation
Applications Engineer
Vehicle Showcase
1
Thanks for the referenced pics on your previous posts.
I'm not sure I'm ready to mount everything up by the windshield, but I do appreciate the looks to help me decide.
I was a bit worried about doing the Ram Mounts track there, but it was actually pretty simple and really liked how it turned out! However, there are a few other interesting options to consider with radios to mount as well. BuiltRight Industries makes a different type of dash tray mount for radios and whatever else you want to mount up there.

Additionally, you could do something that has the main unit hidden behind the dash, such as a Cobra 75WXST or a Uniden CMX760. These would allow you to only have the mic in front of the dash. and the Uniden could even use the the LightForce switch panel with a Cable connecting through that. Would also be a pretty clean install! Even with the handheld ham, you could just have wires tucked in glove box and pull out to connect to the radio as needed in a cup holder mount! There are some interesting options that are pretty simple still to get the radios out of the windshield.

However, I will say, where mine are mounted and where I sit in the truck, no visibility of the road is blocked at all! I can still see the hood over the CB and the radio screen and mirror around the ham!
 

WhiteLightning19

Well-Known Member
First Name
Chris
Joined
Apr 9, 2019
Threads
2
Messages
56
Reaction score
58
Location
PA
Vehicle(s)
2019 Ranger Lariat
Vehicle Showcase
1
@WxNerd2015 So after using this antenna mount for a while I am wondering how the antenna performance is? I have read lots of information on antenna placement and it is recommended to place the antenna in the center of the roof for the best ground plane. Do you notice any performance issues with the antenna being mounted so far back on the roof that your not getting a 360* ground plane?
 
OP
OP
WxNerd2015

WxNerd2015

Well-Known Member
First Name
Trevor
Joined
Oct 17, 2018
Threads
9
Messages
296
Reaction score
1,032
Location
Gregory, Michigan
Vehicle(s)
2019 Ranger, 2011 Wrangler, 2017 Escape
Occupation
Applications Engineer
Vehicle Showcase
1
@WxNerd2015 So after using this antenna mount for a while I am wondering how the antenna performance is? I have read lots of information on antenna placement and it is recommended to place the antenna in the center of the roof for the best ground plane. Do you notice any performance issues with the antenna being mounted so far back on the roof that your not getting a 360* ground plane?
@WhiteLightning19 Absolutely! I had a more detailed discussion on the performance of the antennas and my setup as a whole that I have over on this CB/HAM Thread. So you can read in more details starting at post 65 there and onward! As for my experience so far, everything has been acceptable for what I have used it for. I have only tested the SWR on the CB so far, and the shorter antenna is definitely on the high side for readings down near channel 1, but it is around 1.4-1.8 throughout most of the rest of the band and especially in the areas I use most! And the longer antenna has a great SWR reading! Distance has been as far as I have needed so far and reception is clear and easy to understand. Mostly limited on the HAM side by the fact that I am only running an 8 watt handheld and not a higher powered radio. It could definitely be better if mounted in the middle of the roof, but with my long antenna setup, I have picked up an sent messages over about 3-5 miles, but also I am in more populated areas, so reception limited by environmental interference, and with the HAM I have easily hit 8-10 in some more ideal areas than where I live in and I am able to hit all of my repeaters near me with no issues!

Let me know if you have any other questions and I will see if I can answer and I will continue to update further as I get more usage on my setup!
Sponsored


Top