pickettf3nce
Well-Known Member
- Thread starter
- #1
Wolfbox G900 Pro Review

Build Quality/My First Impressions:
First hands-on with the Wolfbox G900 pro immediately points to the camera system and its components being top-tier hardware. There’s a nice heft to the camera system and it feels solid in the hand. I’m a tech nerd at heart, and this product easily meets the experience and quality you would expect from top-tier hardware manufacturers. The packaging is premium, supporting documentation is more than sufficient, and all components are thoughtfully organized.
Image/Video Quality:
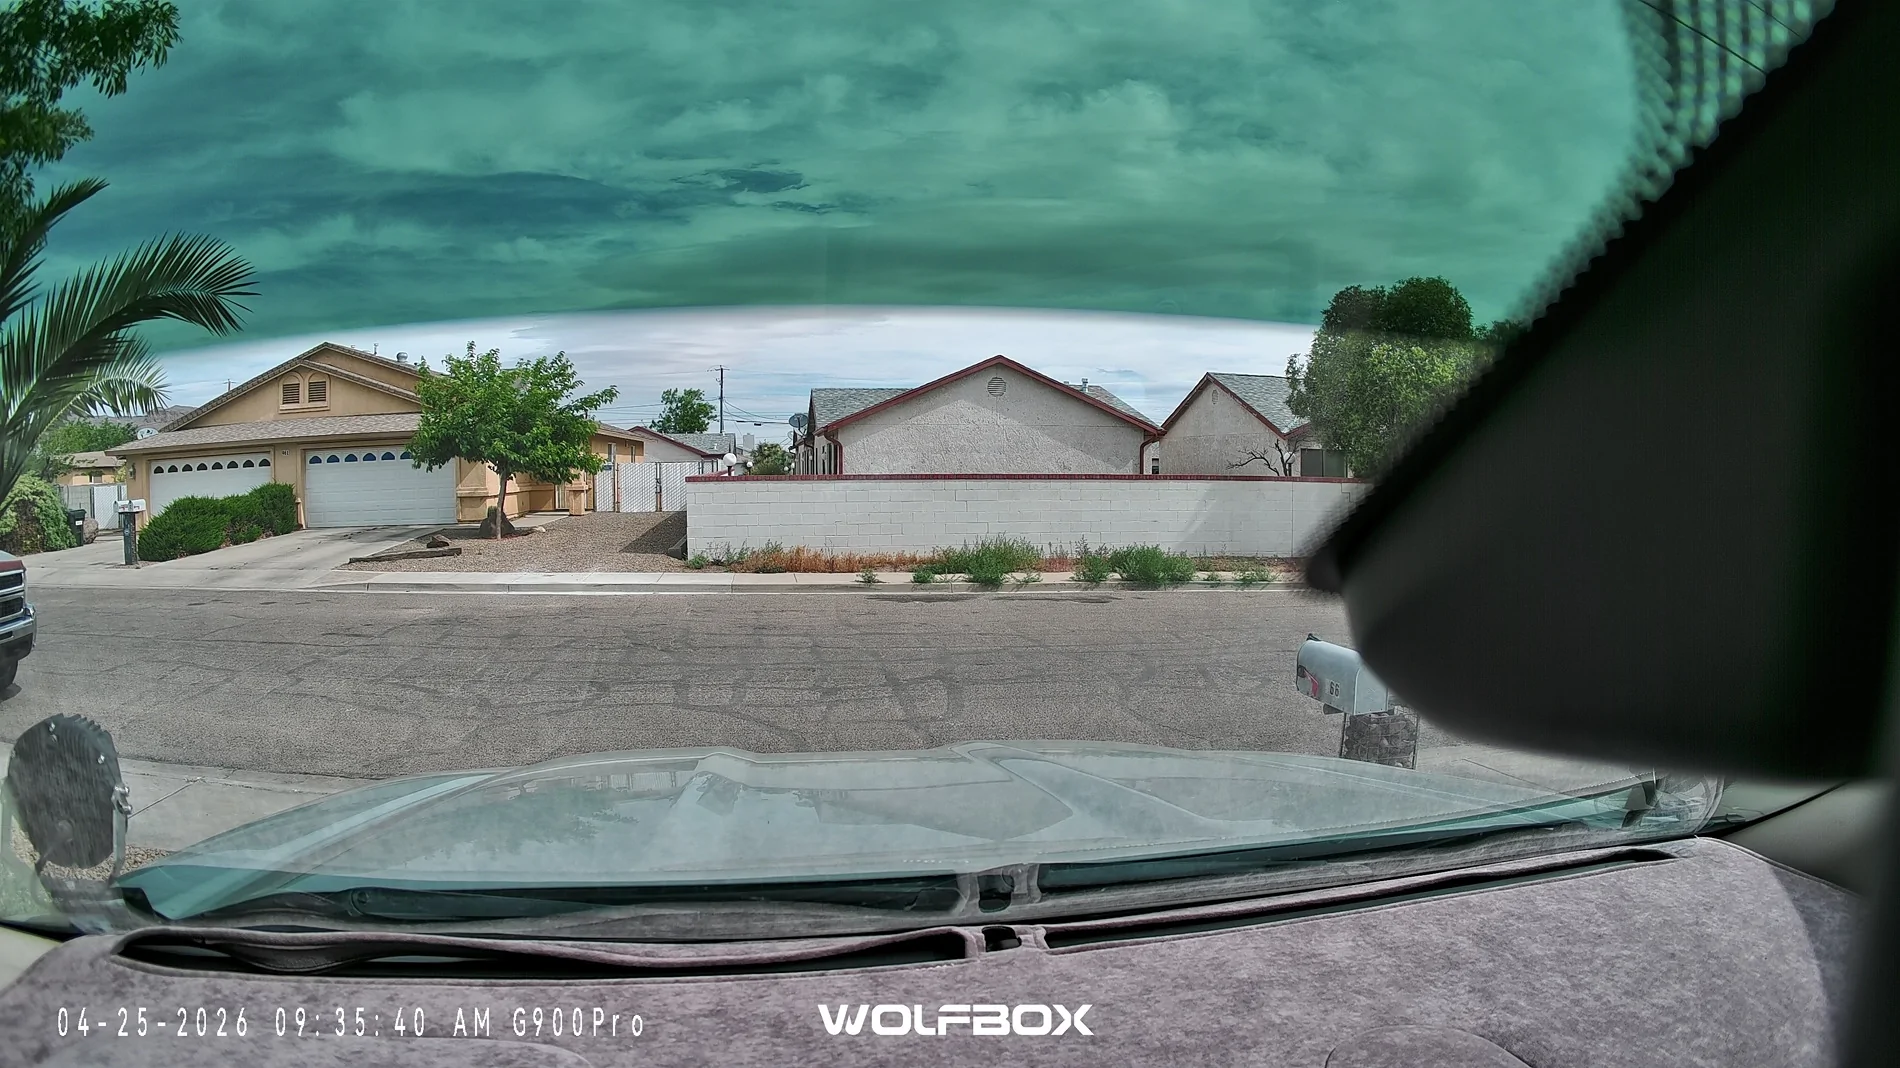
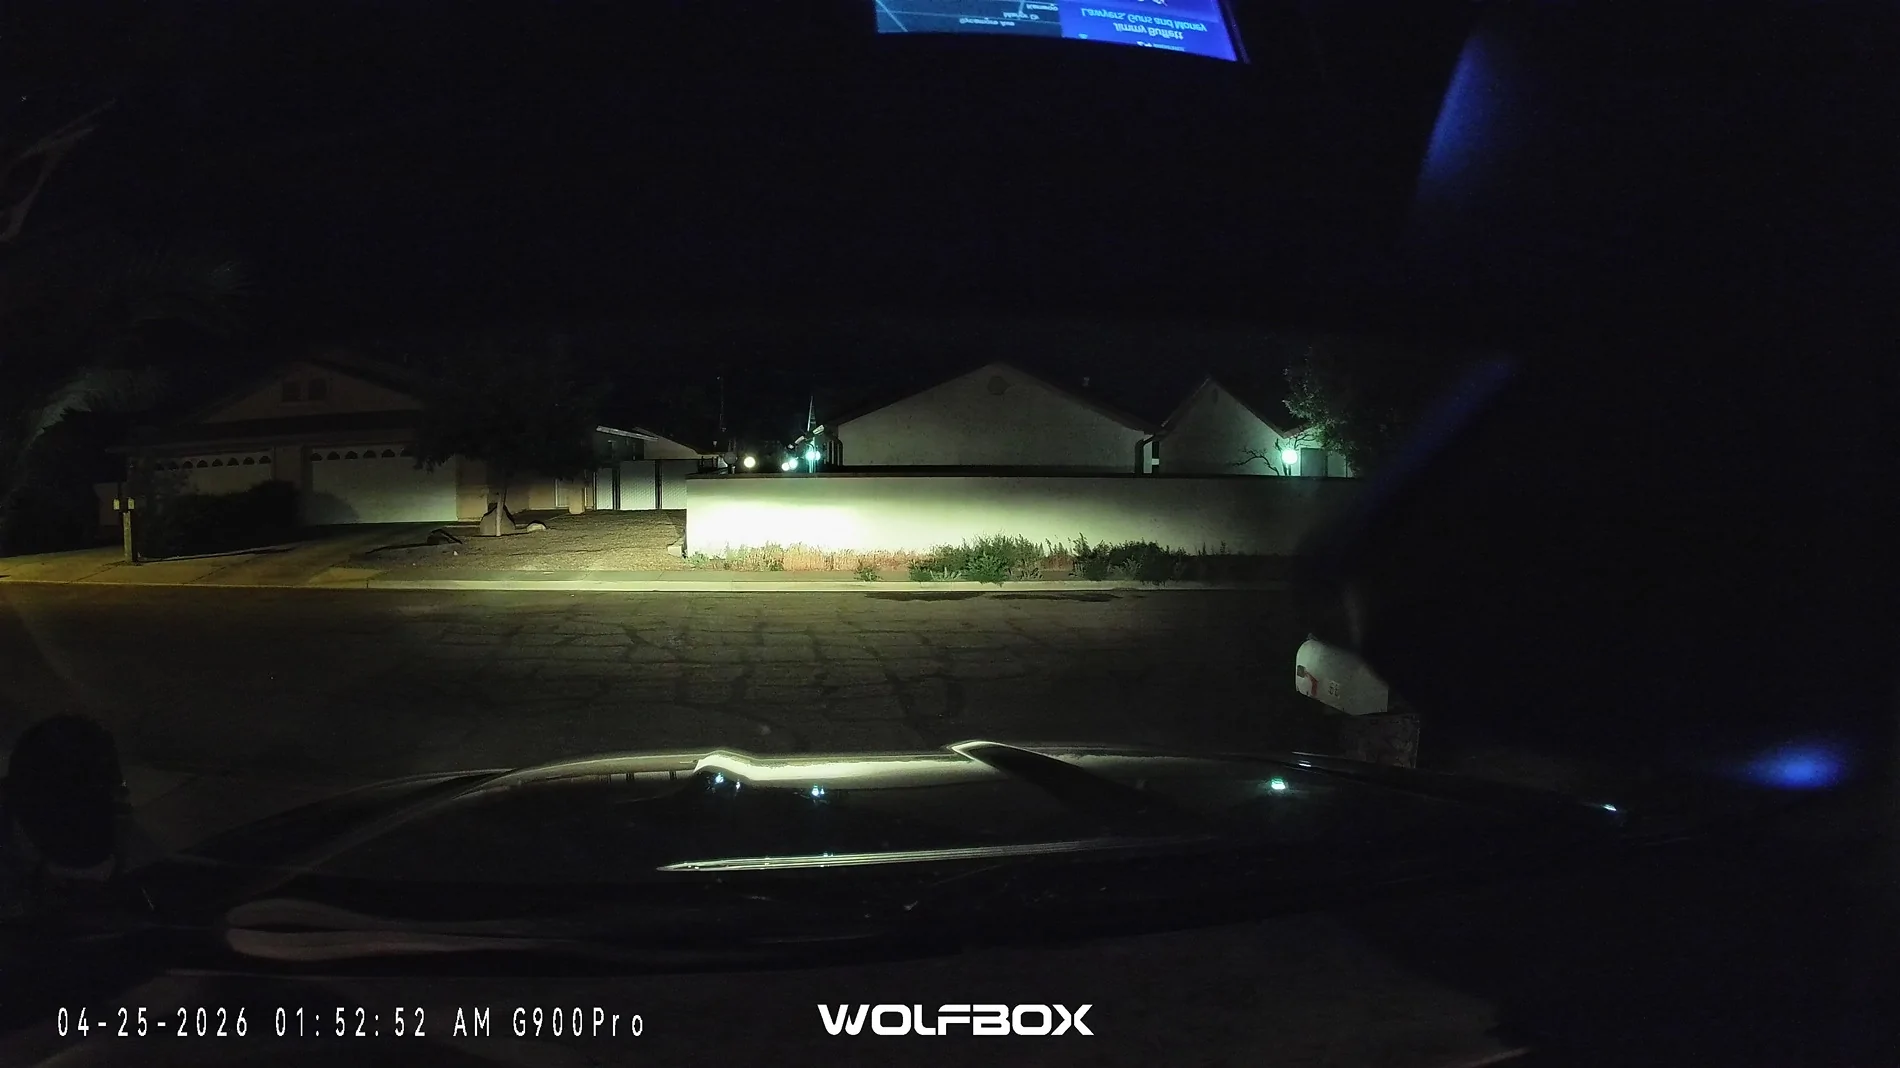
The front 4K and rear 2.5K cameras are more than sufficient to provide footage for your daily commute, long road trips, or even capturing neat cinematic shots in the wilderness.
On road, you can easily capture all the necessary details you may need; like the plate(s) of nearby vehicles in an emergency, the events and how they happen through video and audio, or the time, day, physical location (in GPS coordinates), and speed you were traveling at the time. (please note this footage is compressed to 1080p from the native 4K footage.)
Off-road, the camera systems are great for recording the beautiful wilderness to share with friends and family that may live elsewhere, or for utility purposes like avoiding a big tree or rock on a hard to navigate trail. Especially when you have a truck bed and rear-view mirror obscured by camping essentials.
Front Camera Photo Examples:
Day:

Night:
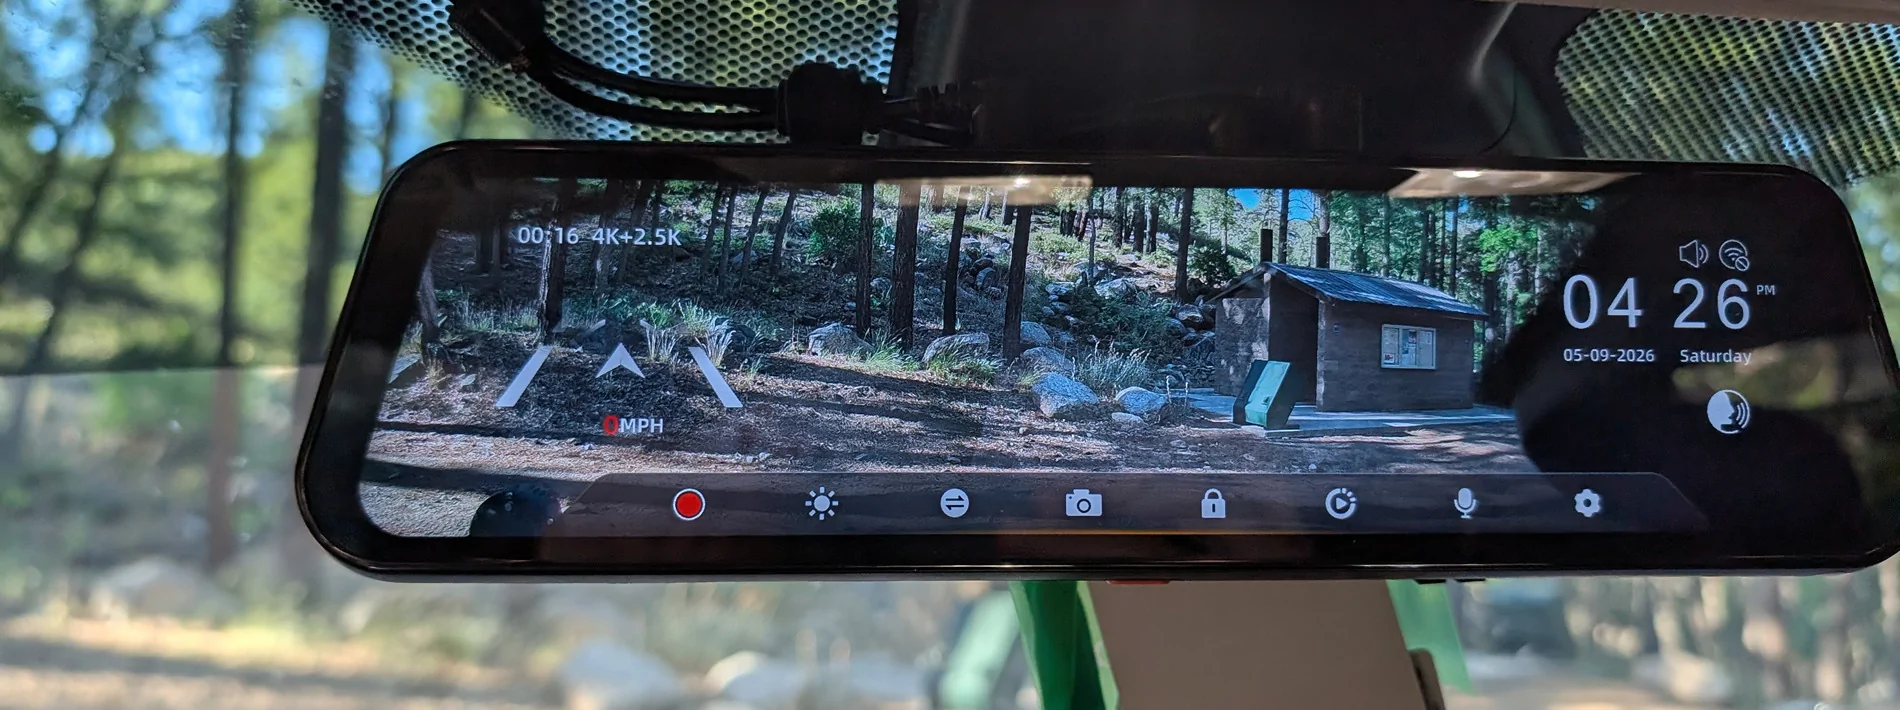
User Interface:
The camera system easily allows you to swap between the front and rear cameras, or to display both views simultaneously side-by-side. Within a given camera’s view, you can also pan the FOV up or down vertically to better suit what you need to see at a glance while you’re driving, versus the whole picture being recorded in the background.
The included menu has buttons for controlling recording, brightness, snapping a picture, triggering an emergency mode, video playback, and toggling the microphone on/off. Additionally, there are buttons for accessing the various settings menus and to view all the voice commands. (I will update this thread with additional footage of these features)

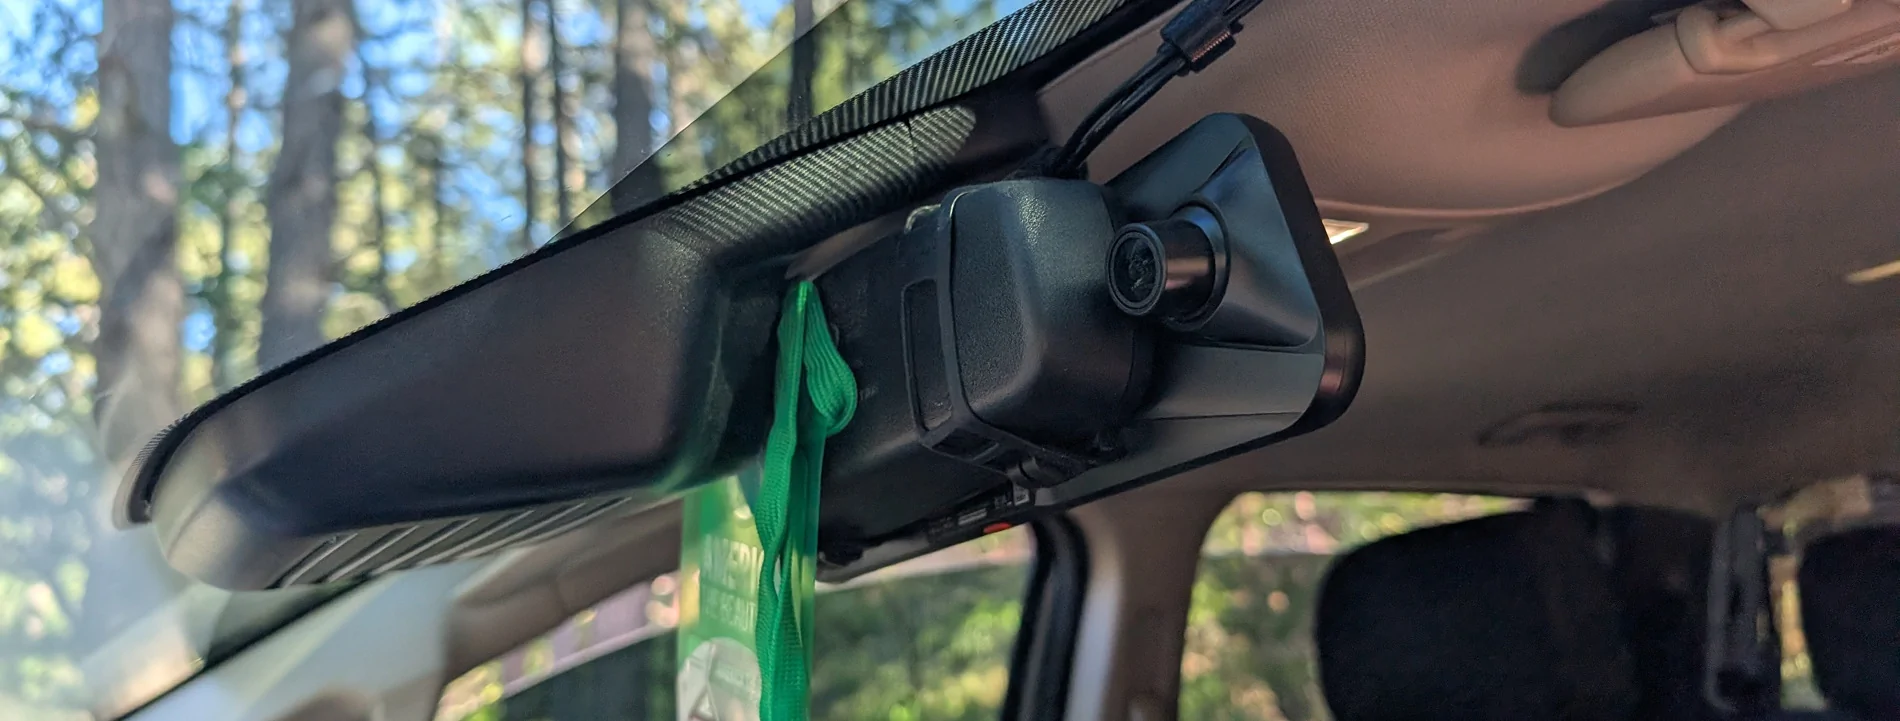
OEM Fitment:
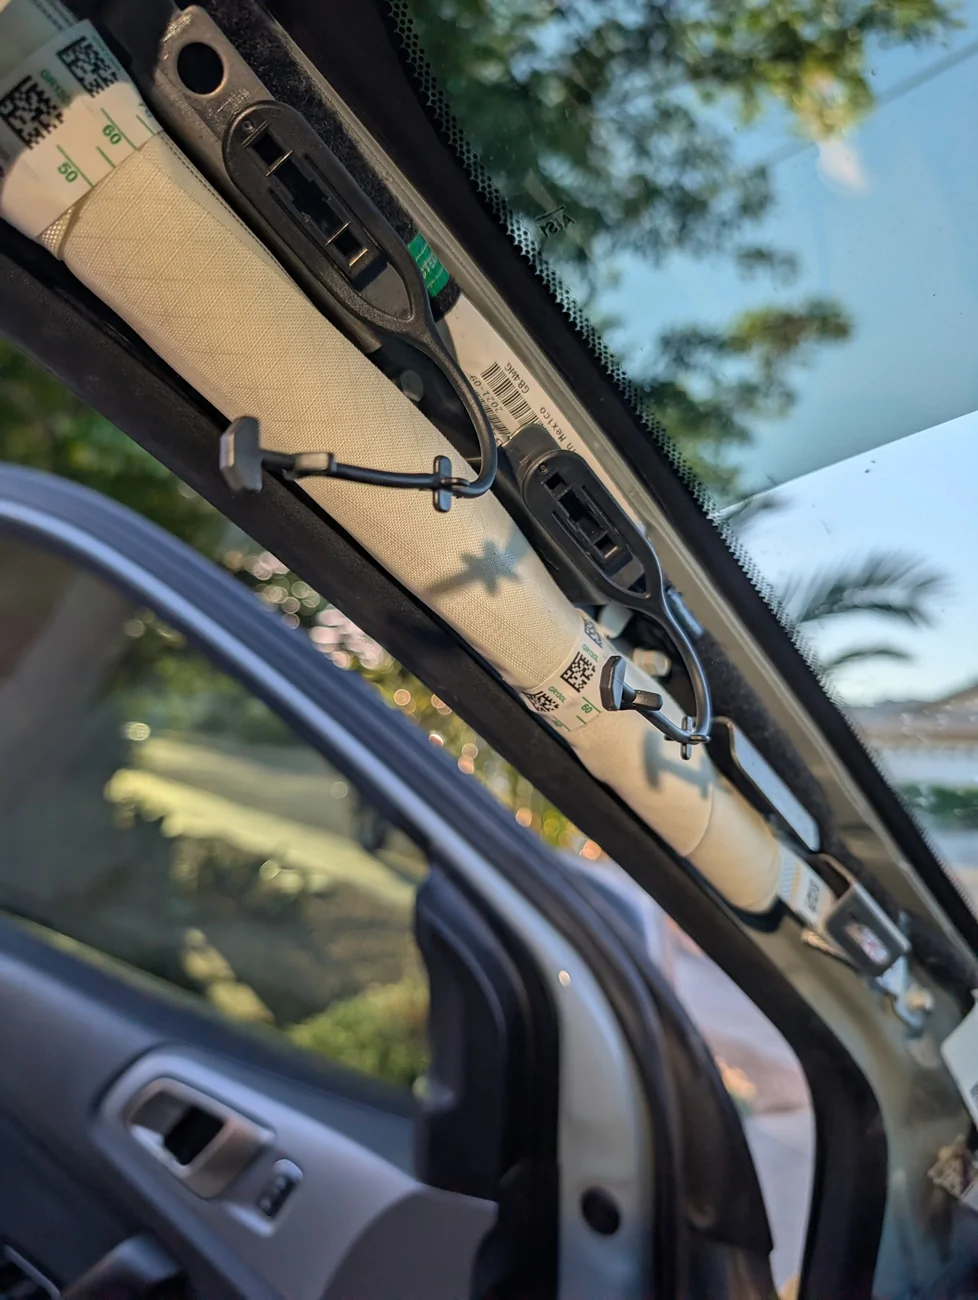
Fit and fitment is 90% there on a 5th gen Ford Ranger. The included rubber straps easily and attach the dash cam mirror to the factory auto-dimming mirror. With little to no movement even when bouncing around on rocky and wash-boarded mountain roads. The included cabling kits provide sufficient cable length to hide wiring behind the factory interior panels. The camera system can also additionally be powered via the included 12V cigarette lighter or via a “hardwired” OBD2 connection.

The remaining 10% of fitment is unfortunately compromised by the front camera’s partial obstruction by the factory mirror’s hardware, antennas, and OEM modem. Wolfbox does include an optional windshield mount and separate arm to mount the camera independently of the factory mirror, or have an optional dash mount, but these options can impede the cabin area, further obscure the drivers FOV, and introduce additional cable management needs.
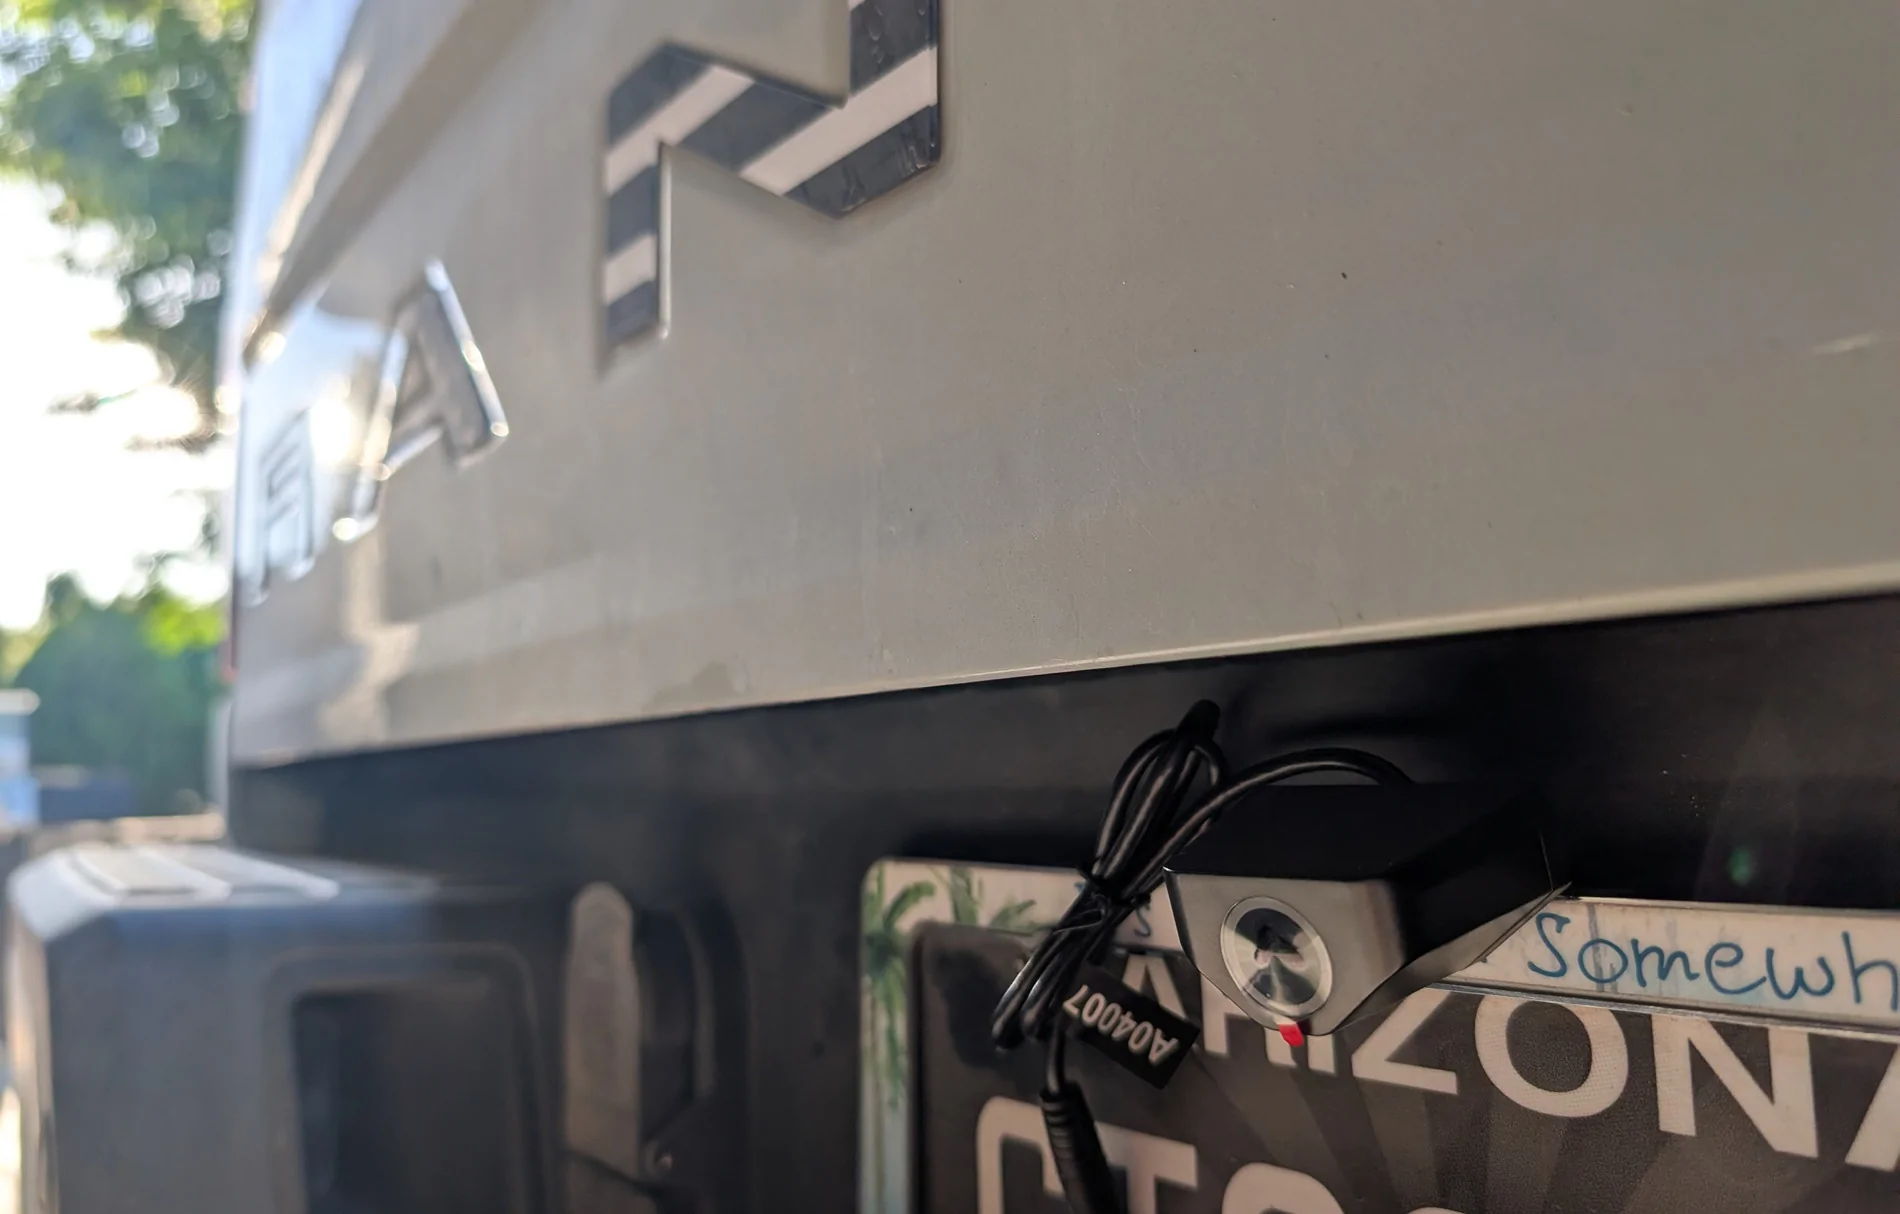
The rear camera on the other hand will depend on your specific mounting options and needs. I chose to purchase an additional license plate mount from Wolfbox for my rear camera, so that I could swap between my tonneau cover, bed rack and tent, and Thule rack as desired. With the license plate mounting in its intended orientation, the tailgate unfortunately strikes the rear camera as it folds down. For the time being, I opted to mount the bracket upside down to get around this fitment issue. Doing so does partially obscure my plate, so I don’t expect that to fly with law enforcement forever
.

Installation:
For the everyday DIY-er, installation is a breeze. If you’ve ever installed a radio (head unit/speakers/amp/subs) or got your hands dirty under the hood fixing your vehicle; you’ve got this. If you’re inexperienced, all you need is a couple pry/trim tools, a screwdriver, and a bit of time and patience. (Optionally grab a pair of needle nose pliers (or similar) for tight to reach areas.)
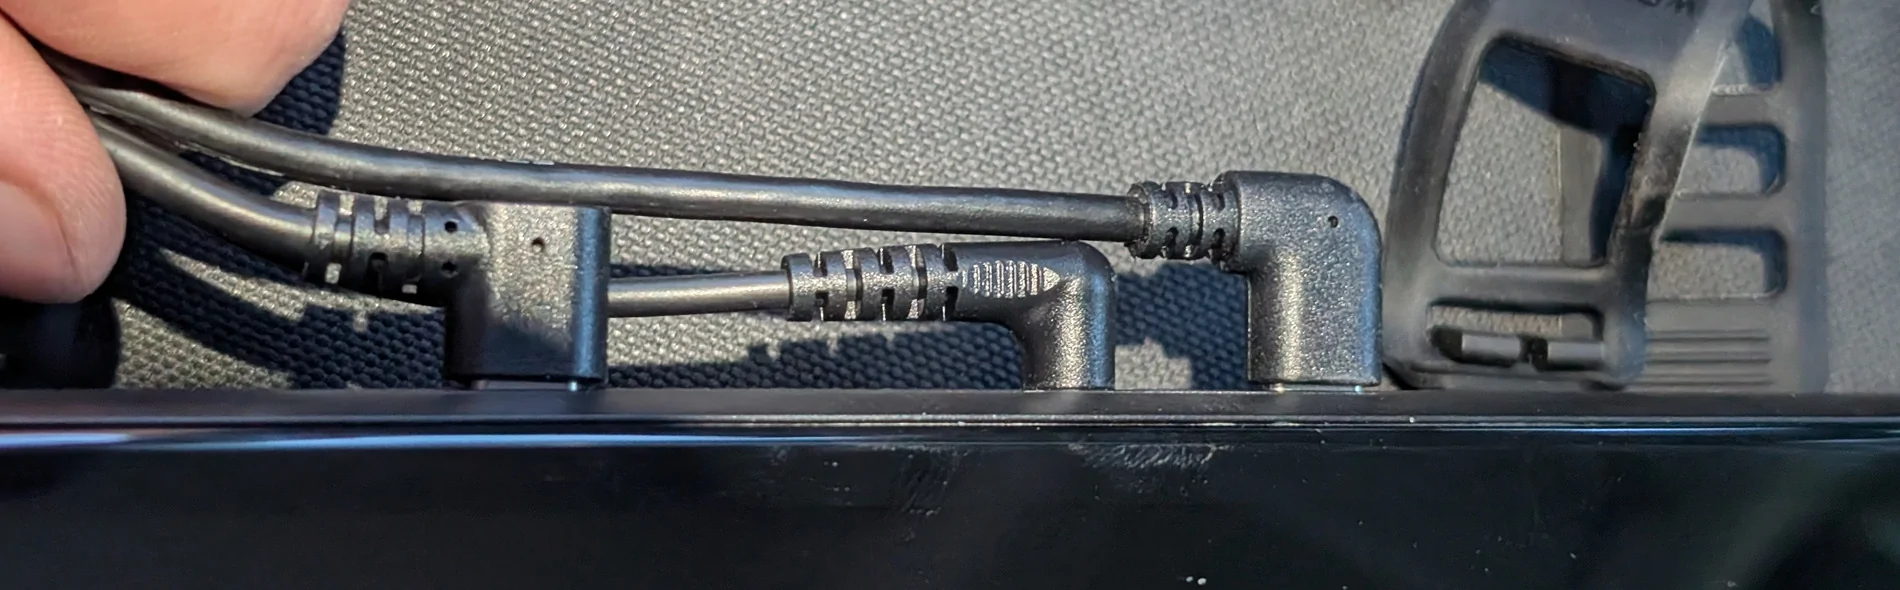
The G900 Pro needs three main connections to the main mirror; a GPS 3.5mm aux, USB-C power (via OBD2 or 12V), and a USB-C rear camera connector.

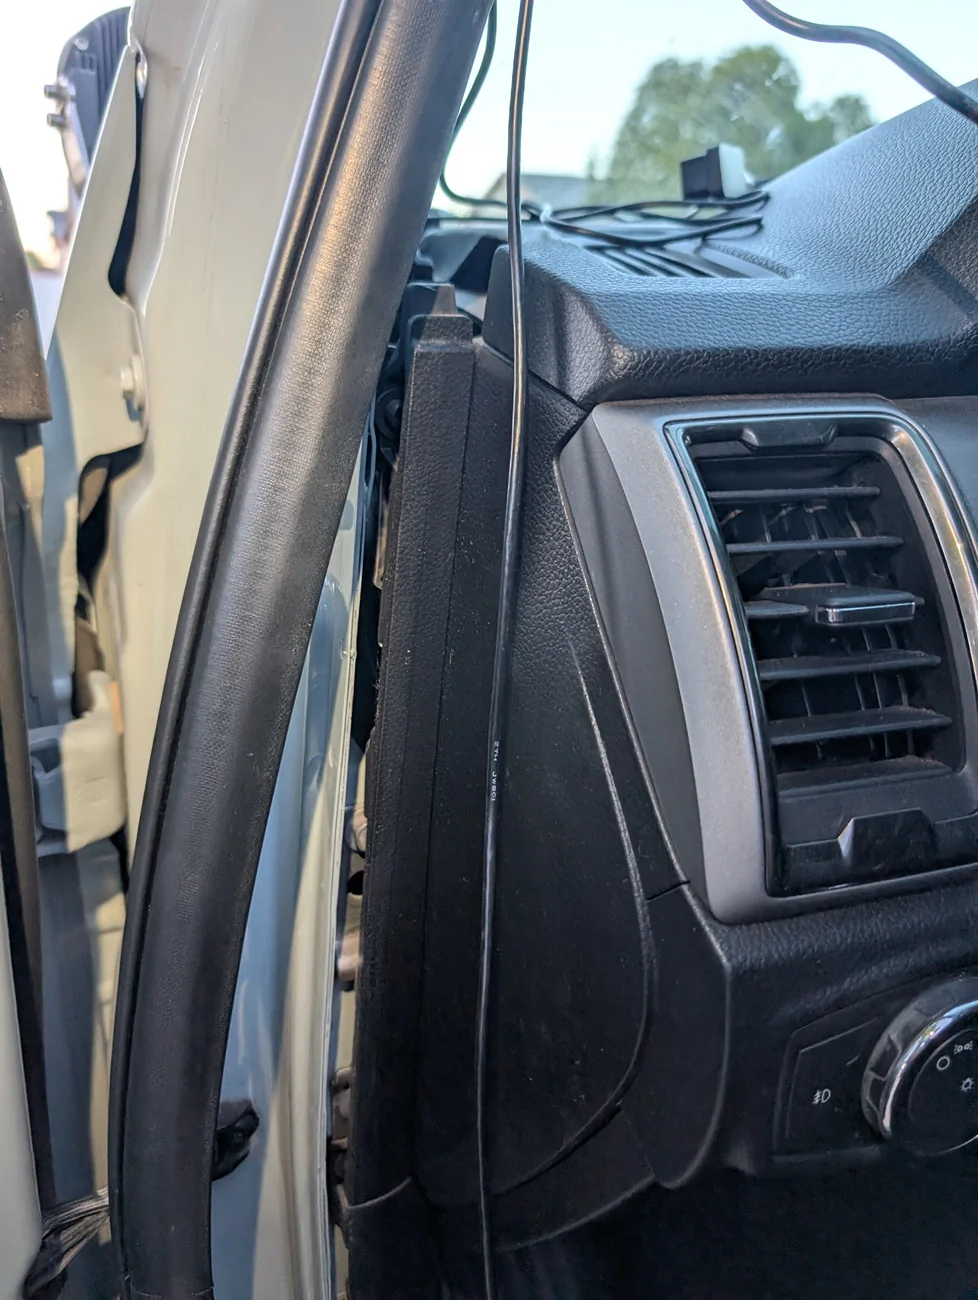
I chose to bundle these cables together first, tucked them up into and under the headliner, routed the cables over to and down the driver’s side A-pillar (making careful note to avoid the side-curtain airbag), and split the cables from there.

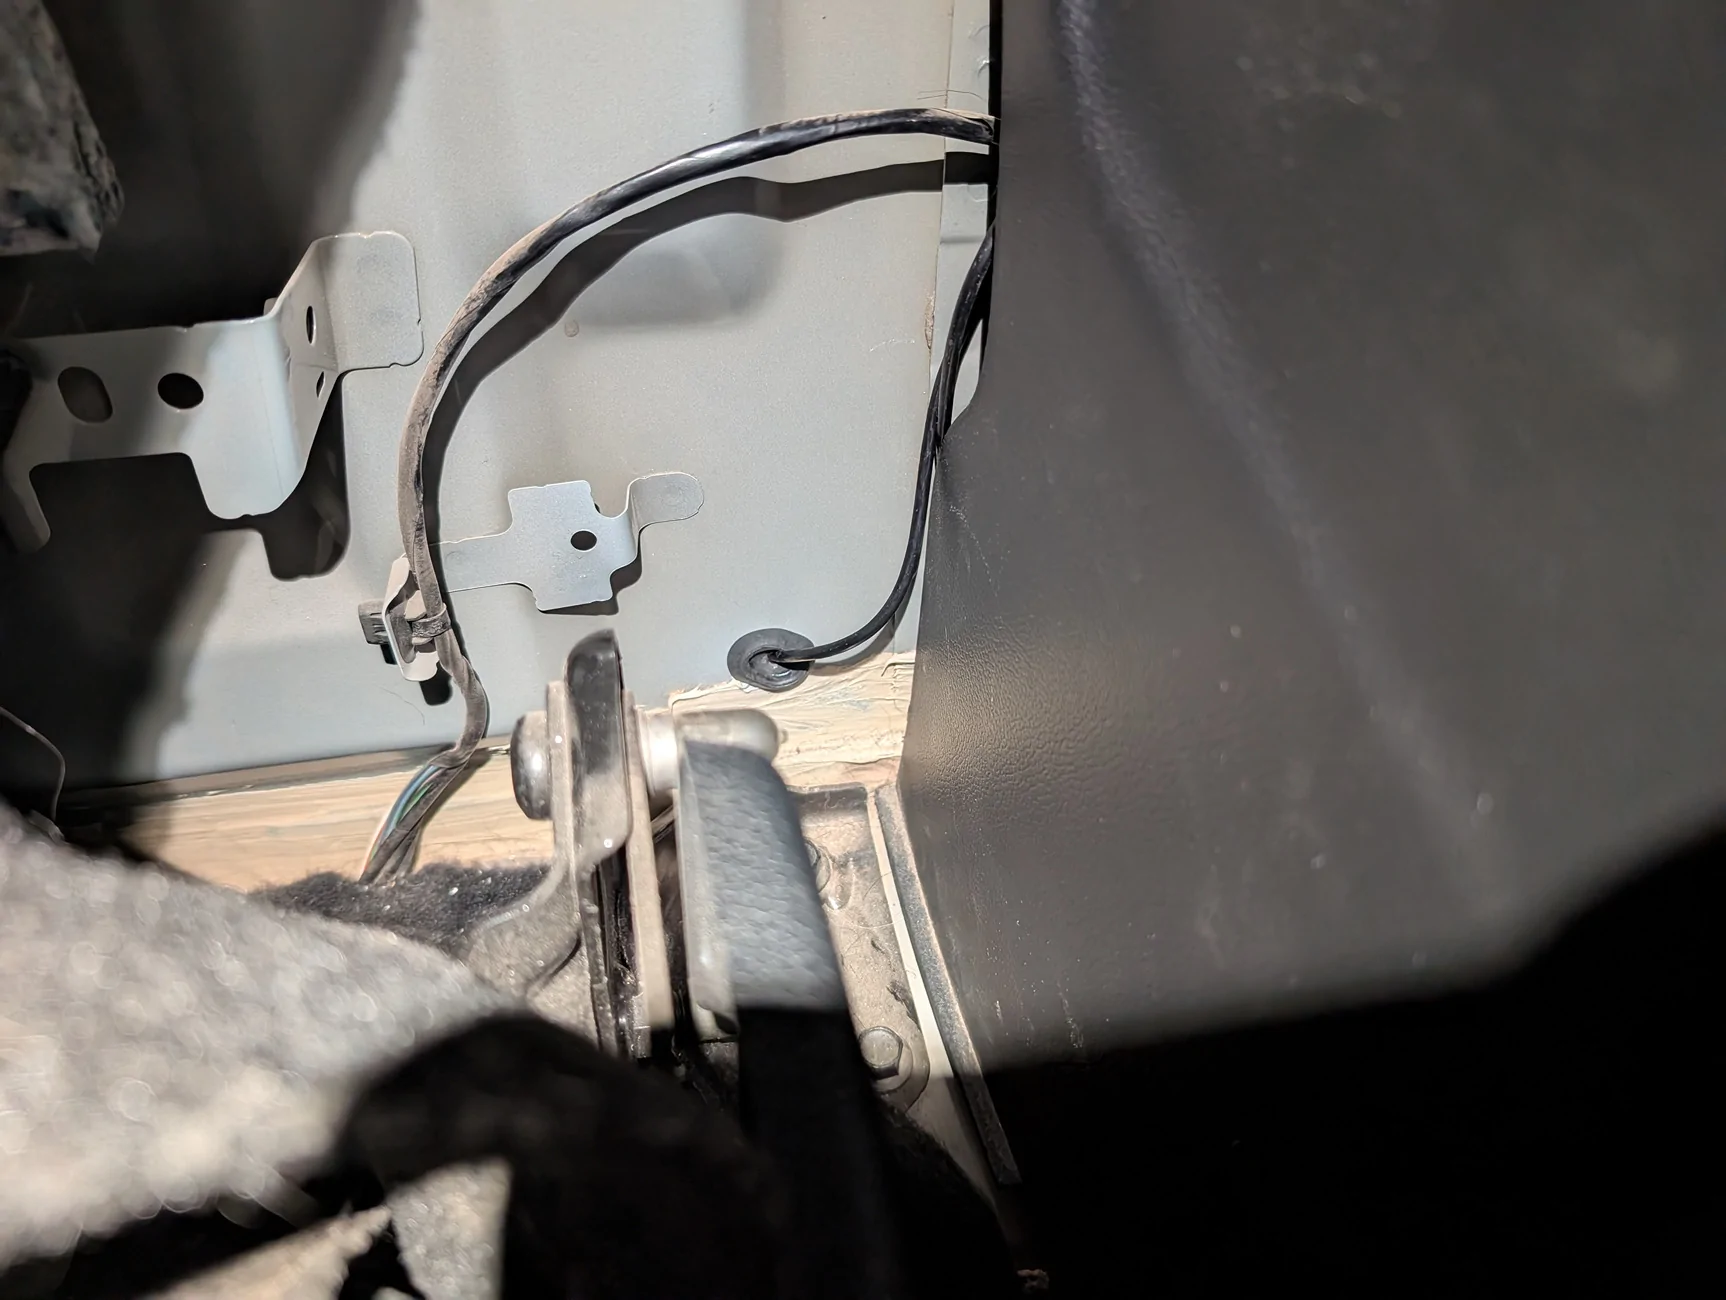
GPS module - can easily be routed to the driver’s side front corner of the dashboard, the cable tucked underneath the front edge, and the excess wiring bundled up underneath the a-pillar.

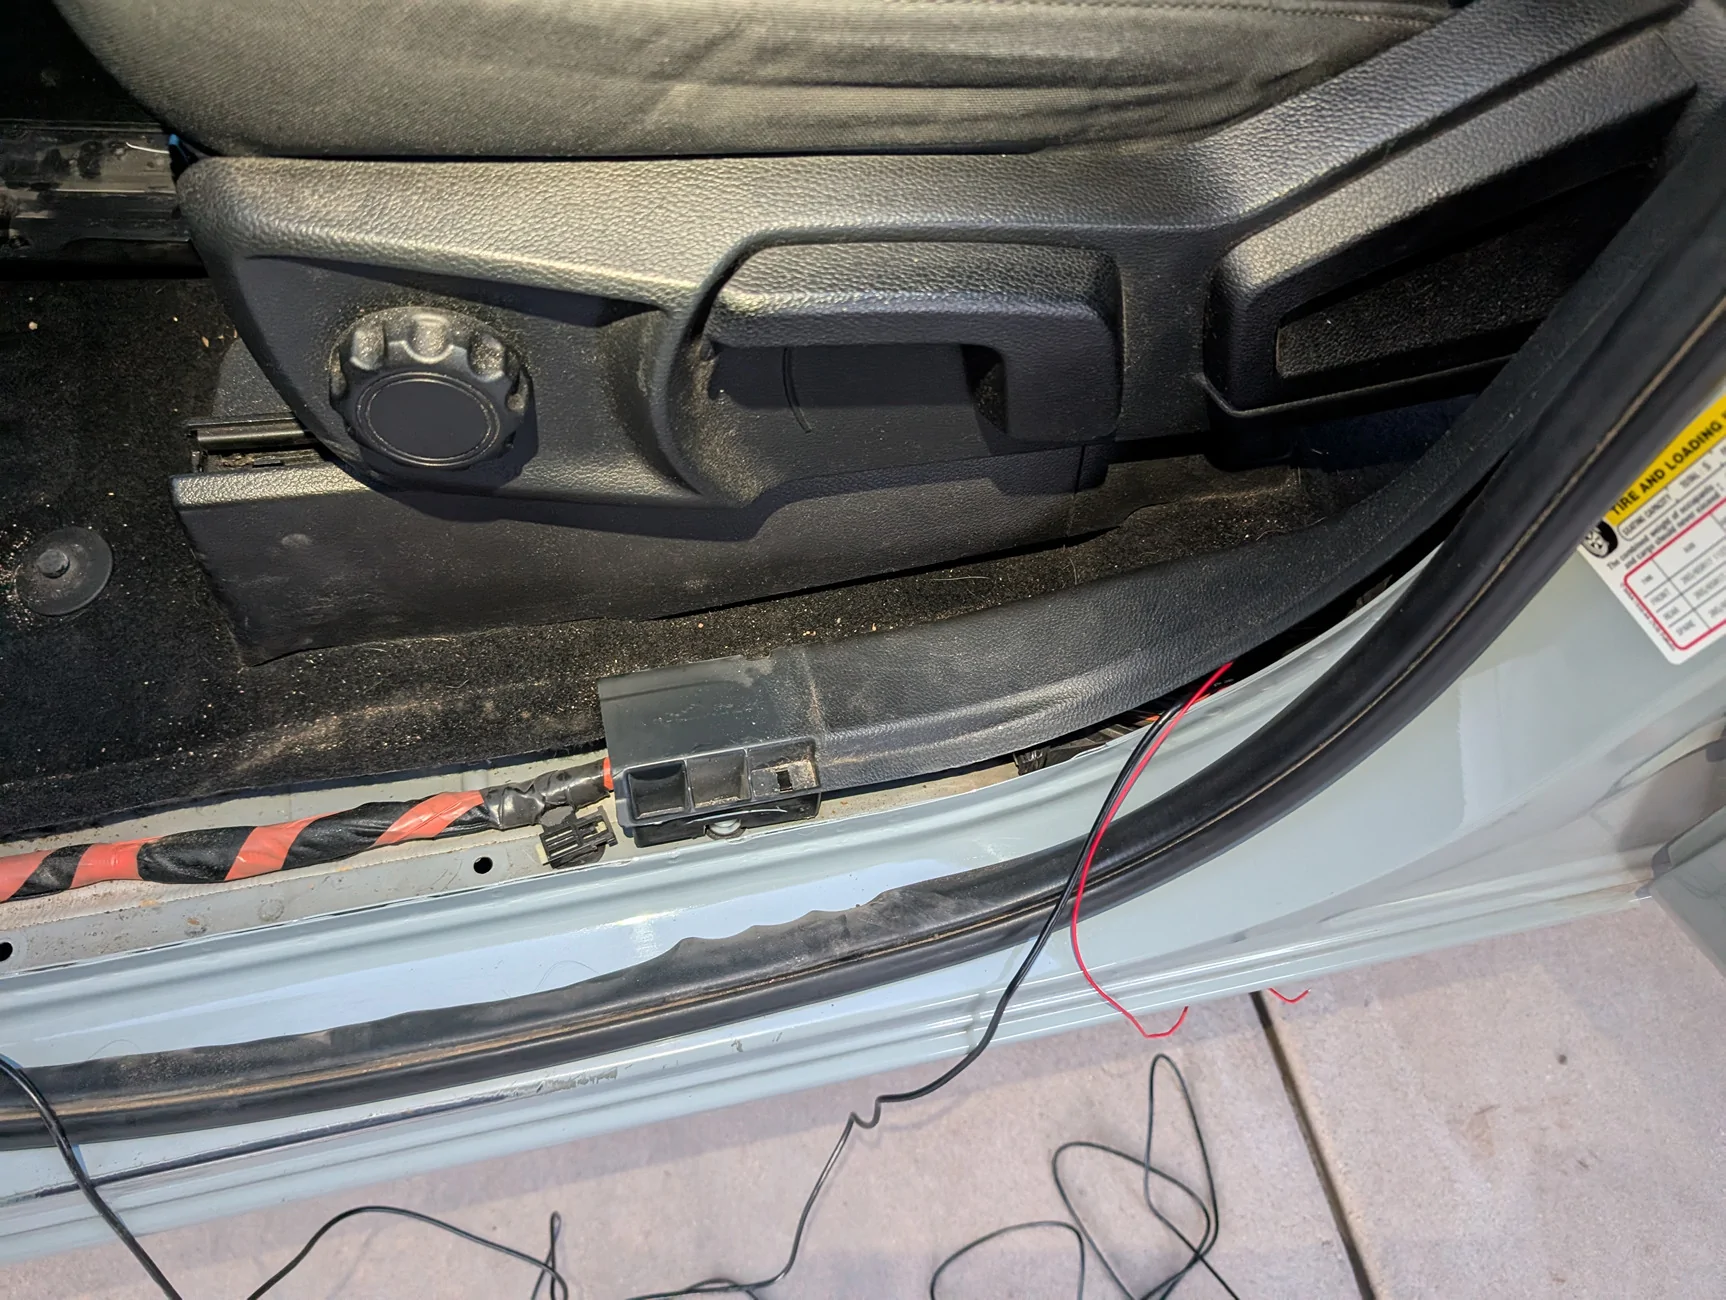
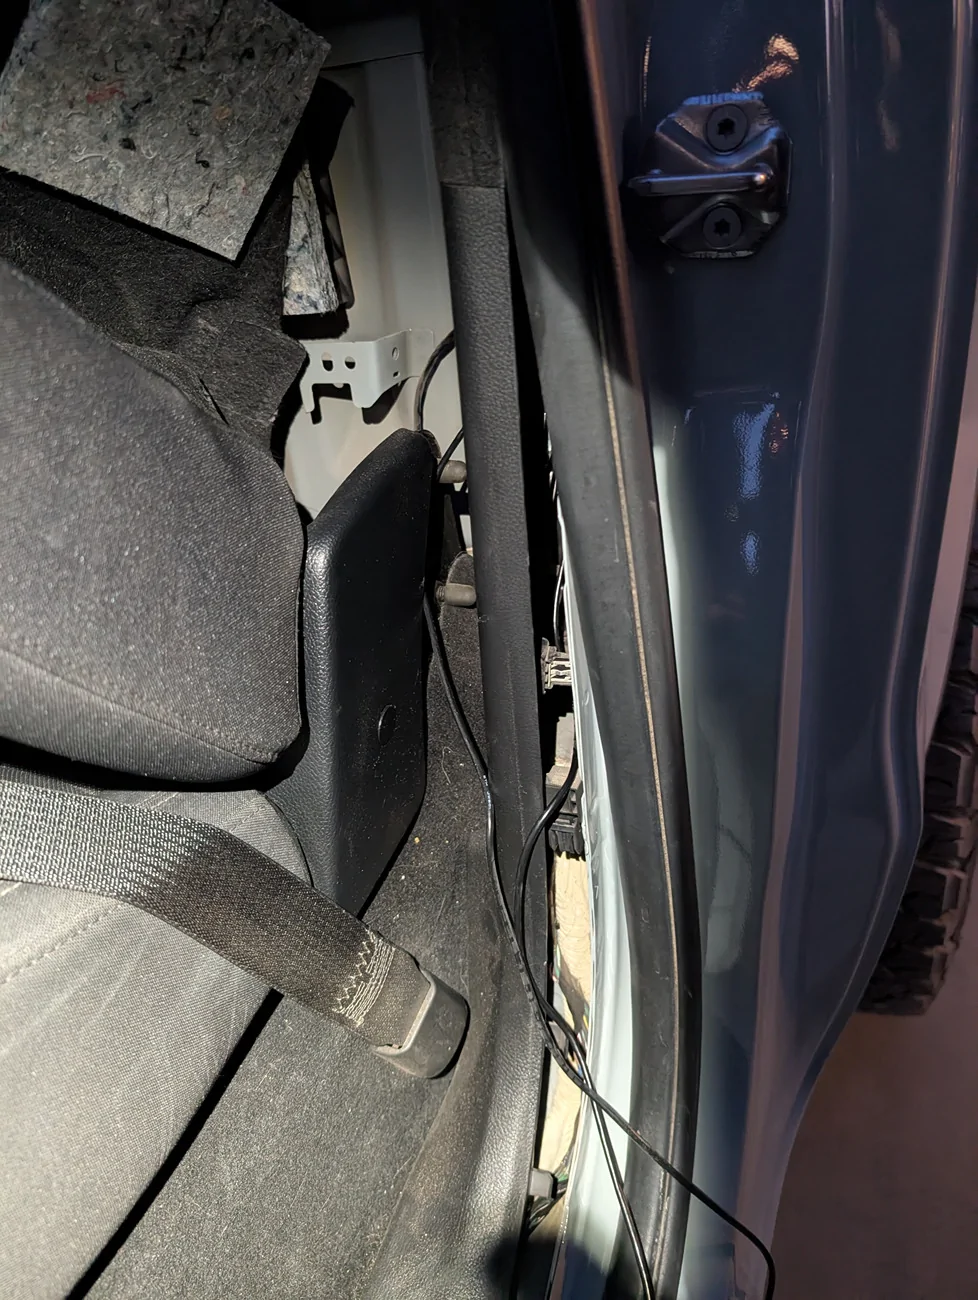
The remaining cables can easily be routed down the door jamb by pulling back the weather seal. These are simply pressed into place and can easily be slid back to expose a gap where the wire can be tucked into. With a pry tool or two, simply lift on the kick plate at the bottom of the door opening and it should lift away (be careful not to snap OEM clips). The front and rear portions of door sill plastics can then be pushed out of their connectors and pulled away from the body to allow cable routing through them.
OBD2 power – Removing the kick plate and pulling the front door sill trim aside allowed me to easily slip the OBD2 connector behind the trim and pop the connection up right next to the OEM port.
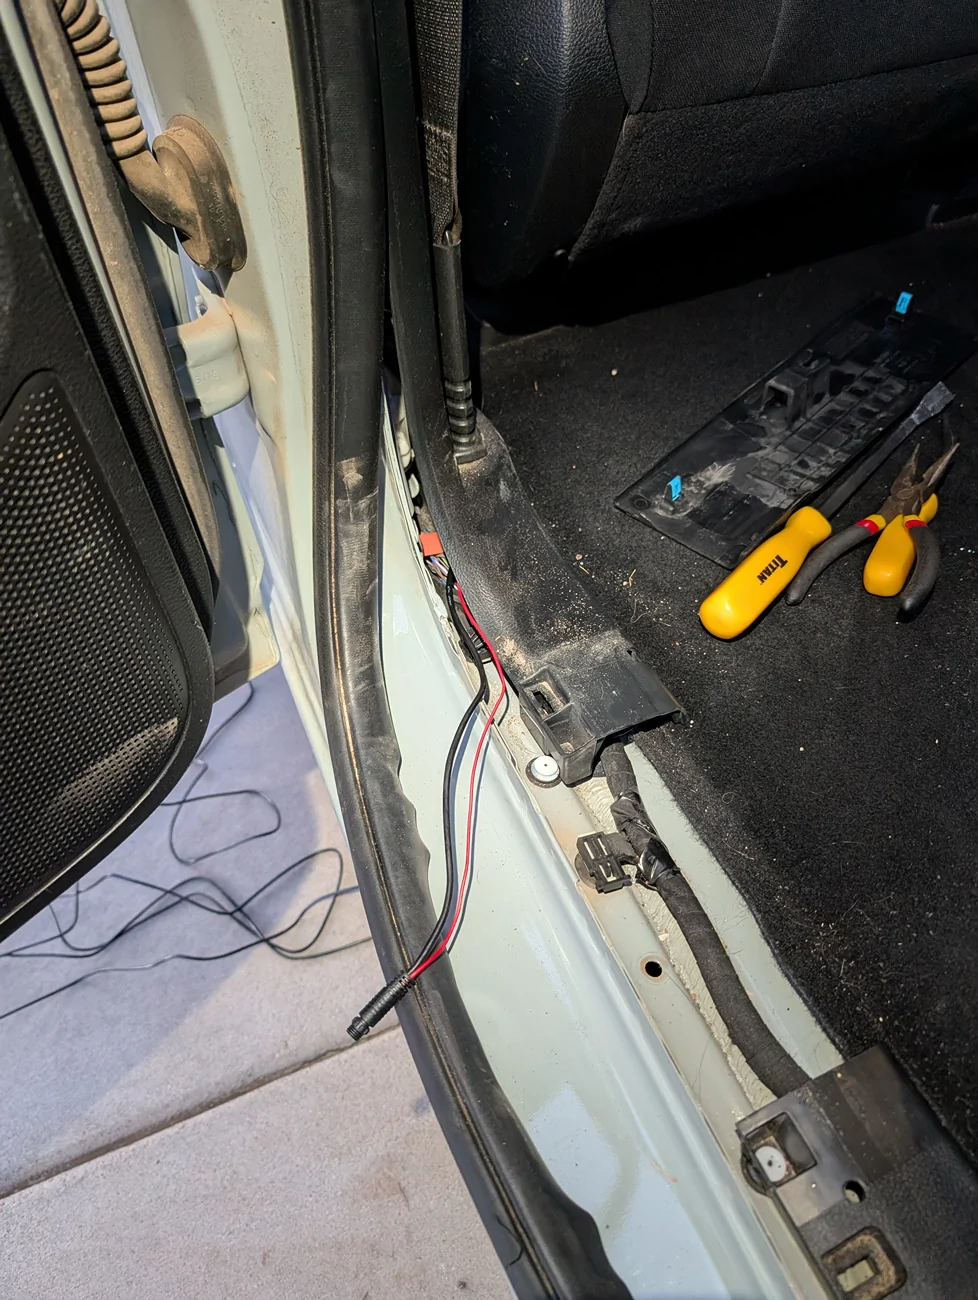
Rear Camera - To complete the rear camera installation, route its cable underneath the kick-plate and door sills you exposed. Repeat the kick-plate and door sill removal process for the rear passenger area and pass the wire through. Remove carpet at the back of the cab with the single press-fit trim clip and pull the carpet aside. Locate the rubber grommet at the back of the cab, directly behind the rear seat’s left-most edge. I used my needle-nose pliers to remove this grommet, punch a hole through, and then reinstall the grommet with the wire poking through.
From there, I routed the cable underneath the bed, up and over to in-between the frame rails, and followed the existing wire-loom’s path to the rear bumper and tailgate connections. Securing the cable with zip ties and ensuring the wire stays clear of moving suspension components and road debris.
-----------------------------------------------
If you have any questions or would like additional photographs/videos, please let me know.
-----------------------------------------------
Disclosure: I received this product free of charge via a Ranger5G forum giveaway. Wolfbox retroactively requested that I post a review in exchange for the product. Besides receiving said product free of charge, I was not paid for this review nor my thoughts, and hope to paint an honest review of the product and its experience.

Build Quality/My First Impressions:
First hands-on with the Wolfbox G900 pro immediately points to the camera system and its components being top-tier hardware. There’s a nice heft to the camera system and it feels solid in the hand. I’m a tech nerd at heart, and this product easily meets the experience and quality you would expect from top-tier hardware manufacturers. The packaging is premium, supporting documentation is more than sufficient, and all components are thoughtfully organized.
Image/Video Quality:
The front 4K and rear 2.5K cameras are more than sufficient to provide footage for your daily commute, long road trips, or even capturing neat cinematic shots in the wilderness.
On road, you can easily capture all the necessary details you may need; like the plate(s) of nearby vehicles in an emergency, the events and how they happen through video and audio, or the time, day, physical location (in GPS coordinates), and speed you were traveling at the time. (please note this footage is compressed to 1080p from the native 4K footage.)
Off-road, the camera systems are great for recording the beautiful wilderness to share with friends and family that may live elsewhere, or for utility purposes like avoiding a big tree or rock on a hard to navigate trail. Especially when you have a truck bed and rear-view mirror obscured by camping essentials.
Front Camera Photo Examples:
Day:
Night:
User Interface:
The camera system easily allows you to swap between the front and rear cameras, or to display both views simultaneously side-by-side. Within a given camera’s view, you can also pan the FOV up or down vertically to better suit what you need to see at a glance while you’re driving, versus the whole picture being recorded in the background.
The included menu has buttons for controlling recording, brightness, snapping a picture, triggering an emergency mode, video playback, and toggling the microphone on/off. Additionally, there are buttons for accessing the various settings menus and to view all the voice commands. (I will update this thread with additional footage of these features)
OEM Fitment:
Fit and fitment is 90% there on a 5th gen Ford Ranger. The included rubber straps easily and attach the dash cam mirror to the factory auto-dimming mirror. With little to no movement even when bouncing around on rocky and wash-boarded mountain roads. The included cabling kits provide sufficient cable length to hide wiring behind the factory interior panels. The camera system can also additionally be powered via the included 12V cigarette lighter or via a “hardwired” OBD2 connection.
The remaining 10% of fitment is unfortunately compromised by the front camera’s partial obstruction by the factory mirror’s hardware, antennas, and OEM modem. Wolfbox does include an optional windshield mount and separate arm to mount the camera independently of the factory mirror, or have an optional dash mount, but these options can impede the cabin area, further obscure the drivers FOV, and introduce additional cable management needs.
The rear camera on the other hand will depend on your specific mounting options and needs. I chose to purchase an additional license plate mount from Wolfbox for my rear camera, so that I could swap between my tonneau cover, bed rack and tent, and Thule rack as desired. With the license plate mounting in its intended orientation, the tailgate unfortunately strikes the rear camera as it folds down. For the time being, I opted to mount the bracket upside down to get around this fitment issue. Doing so does partially obscure my plate, so I don’t expect that to fly with law enforcement forever
.
Installation:
For the everyday DIY-er, installation is a breeze. If you’ve ever installed a radio (head unit/speakers/amp/subs) or got your hands dirty under the hood fixing your vehicle; you’ve got this. If you’re inexperienced, all you need is a couple pry/trim tools, a screwdriver, and a bit of time and patience. (Optionally grab a pair of needle nose pliers (or similar) for tight to reach areas.)
The G900 Pro needs three main connections to the main mirror; a GPS 3.5mm aux, USB-C power (via OBD2 or 12V), and a USB-C rear camera connector.
I chose to bundle these cables together first, tucked them up into and under the headliner, routed the cables over to and down the driver’s side A-pillar (making careful note to avoid the side-curtain airbag), and split the cables from there.
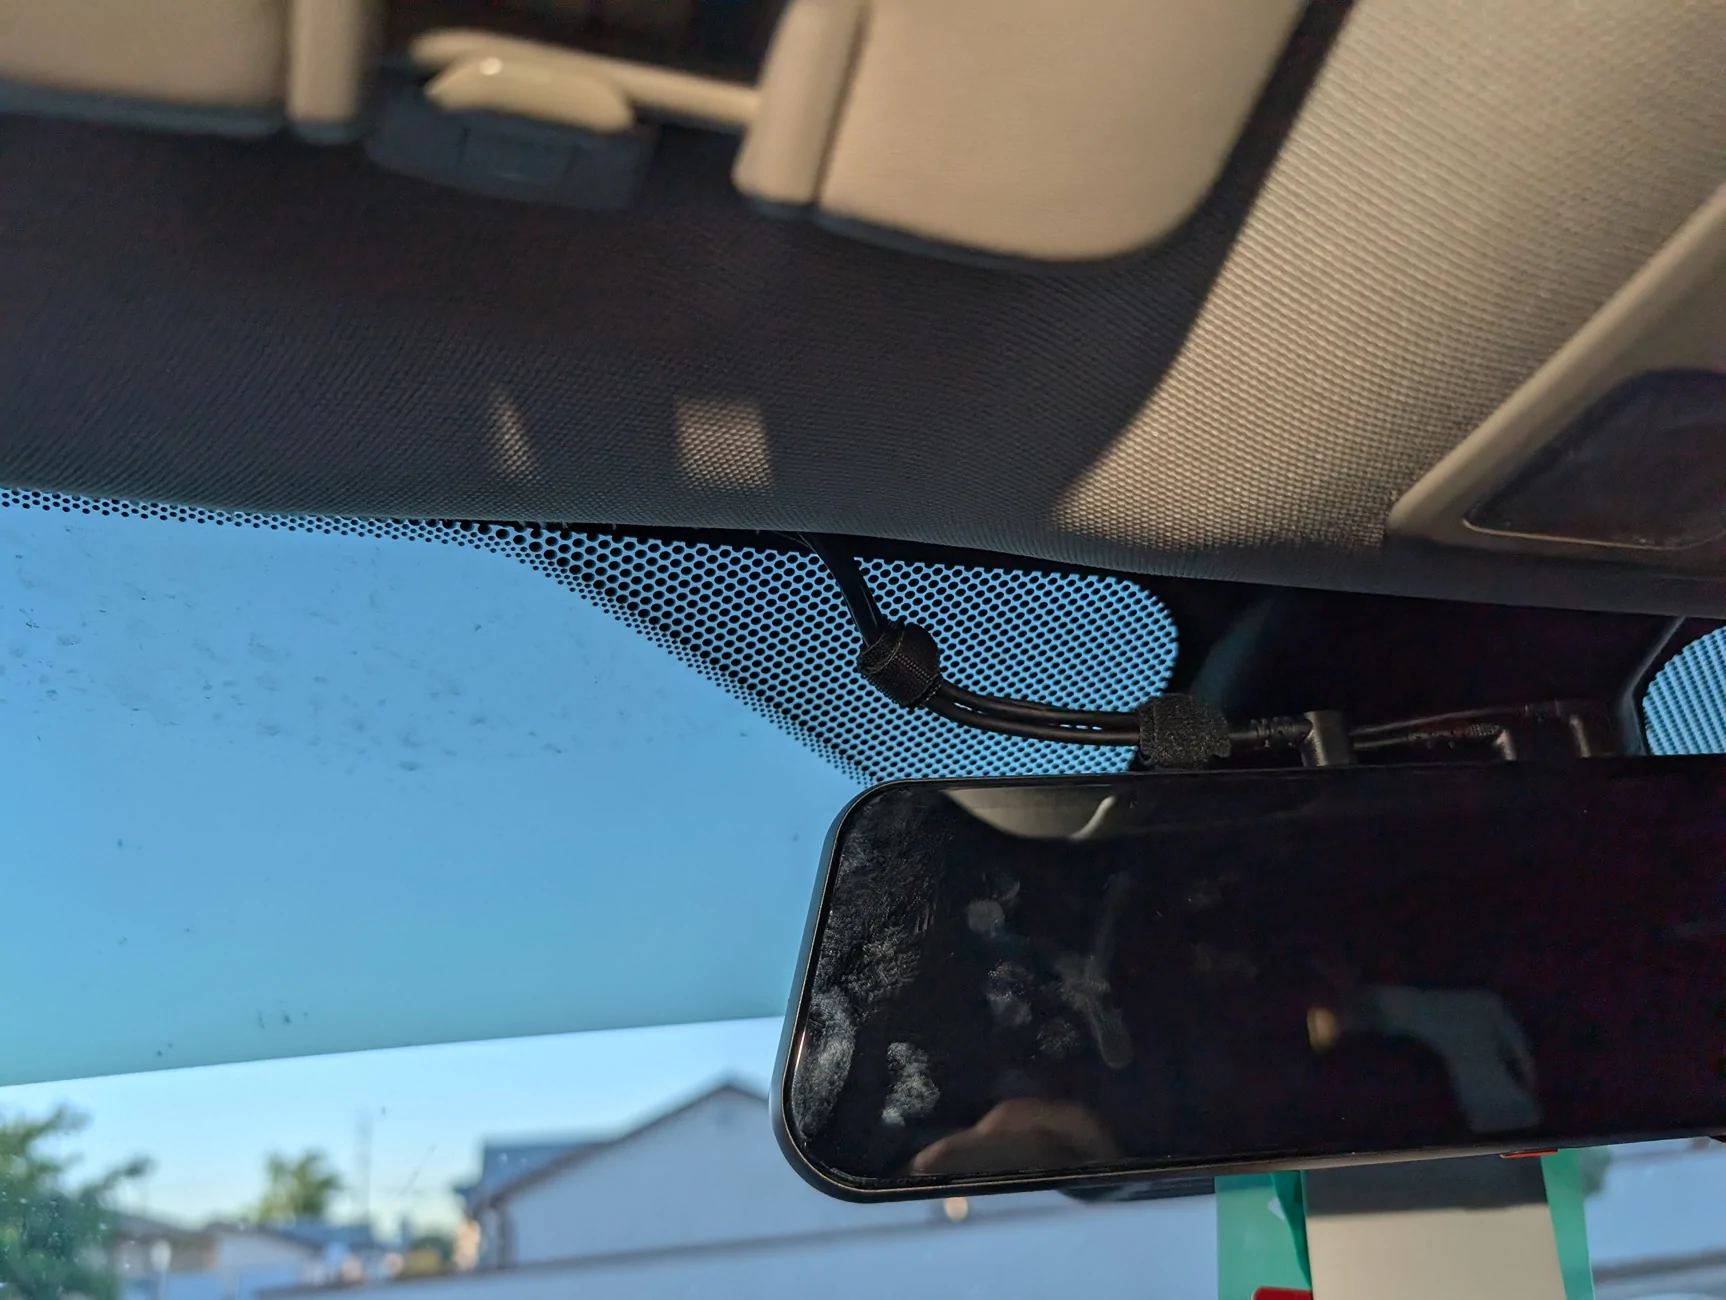
GPS module - can easily be routed to the driver’s side front corner of the dashboard, the cable tucked underneath the front edge, and the excess wiring bundled up underneath the a-pillar.
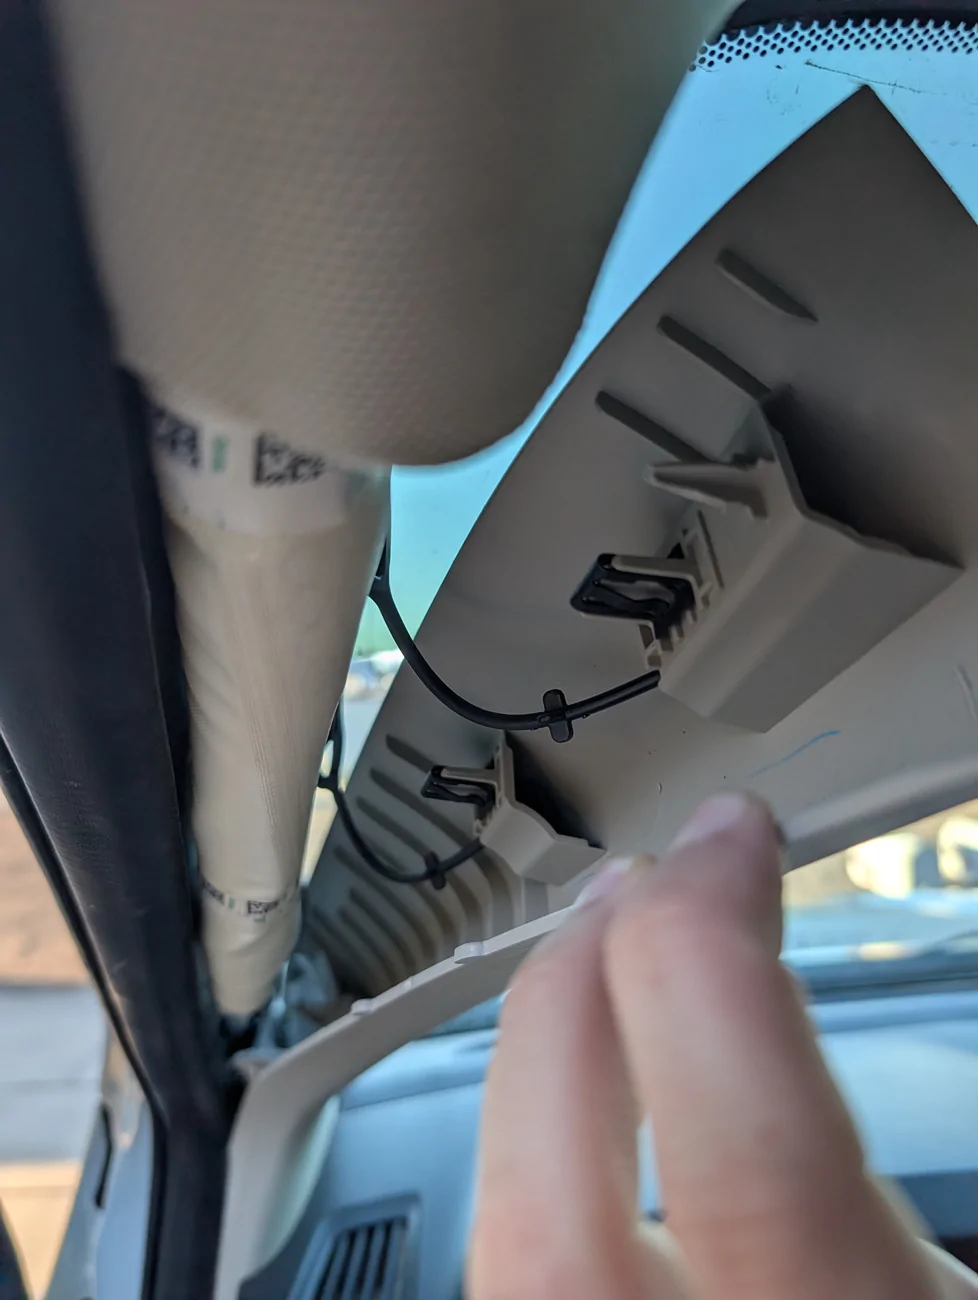
The remaining cables can easily be routed down the door jamb by pulling back the weather seal. These are simply pressed into place and can easily be slid back to expose a gap where the wire can be tucked into. With a pry tool or two, simply lift on the kick plate at the bottom of the door opening and it should lift away (be careful not to snap OEM clips). The front and rear portions of door sill plastics can then be pushed out of their connectors and pulled away from the body to allow cable routing through them.
OBD2 power – Removing the kick plate and pulling the front door sill trim aside allowed me to easily slip the OBD2 connector behind the trim and pop the connection up right next to the OEM port.
Rear Camera - To complete the rear camera installation, route its cable underneath the kick-plate and door sills you exposed. Repeat the kick-plate and door sill removal process for the rear passenger area and pass the wire through. Remove carpet at the back of the cab with the single press-fit trim clip and pull the carpet aside. Locate the rubber grommet at the back of the cab, directly behind the rear seat’s left-most edge. I used my needle-nose pliers to remove this grommet, punch a hole through, and then reinstall the grommet with the wire poking through.
From there, I routed the cable underneath the bed, up and over to in-between the frame rails, and followed the existing wire-loom’s path to the rear bumper and tailgate connections. Securing the cable with zip ties and ensuring the wire stays clear of moving suspension components and road debris.
-----------------------------------------------
If you have any questions or would like additional photographs/videos, please let me know.
-----------------------------------------------
Disclosure: I received this product free of charge via a Ranger5G forum giveaway. Wolfbox retroactively requested that I post a review in exchange for the product. Besides receiving said product free of charge, I was not paid for this review nor my thoughts, and hope to paint an honest review of the product and its experience.
Sponsored