Sponsored
10 Foot Platform / Cargo Rack build.
- Thread starter OFC Ranger
- Start date
- Watchers 11
LightingBlue
Well-Known Member
I don't have a degree in engineering or anything (the better half of this account does, however), but isn't your design going to generate a fair amount of lift on the leading edge above the cab?I love Google so much.
So cruising the internet I stumble across this...
Half inch thick, $23 for 2' x 4' panels...
Polymax Grating


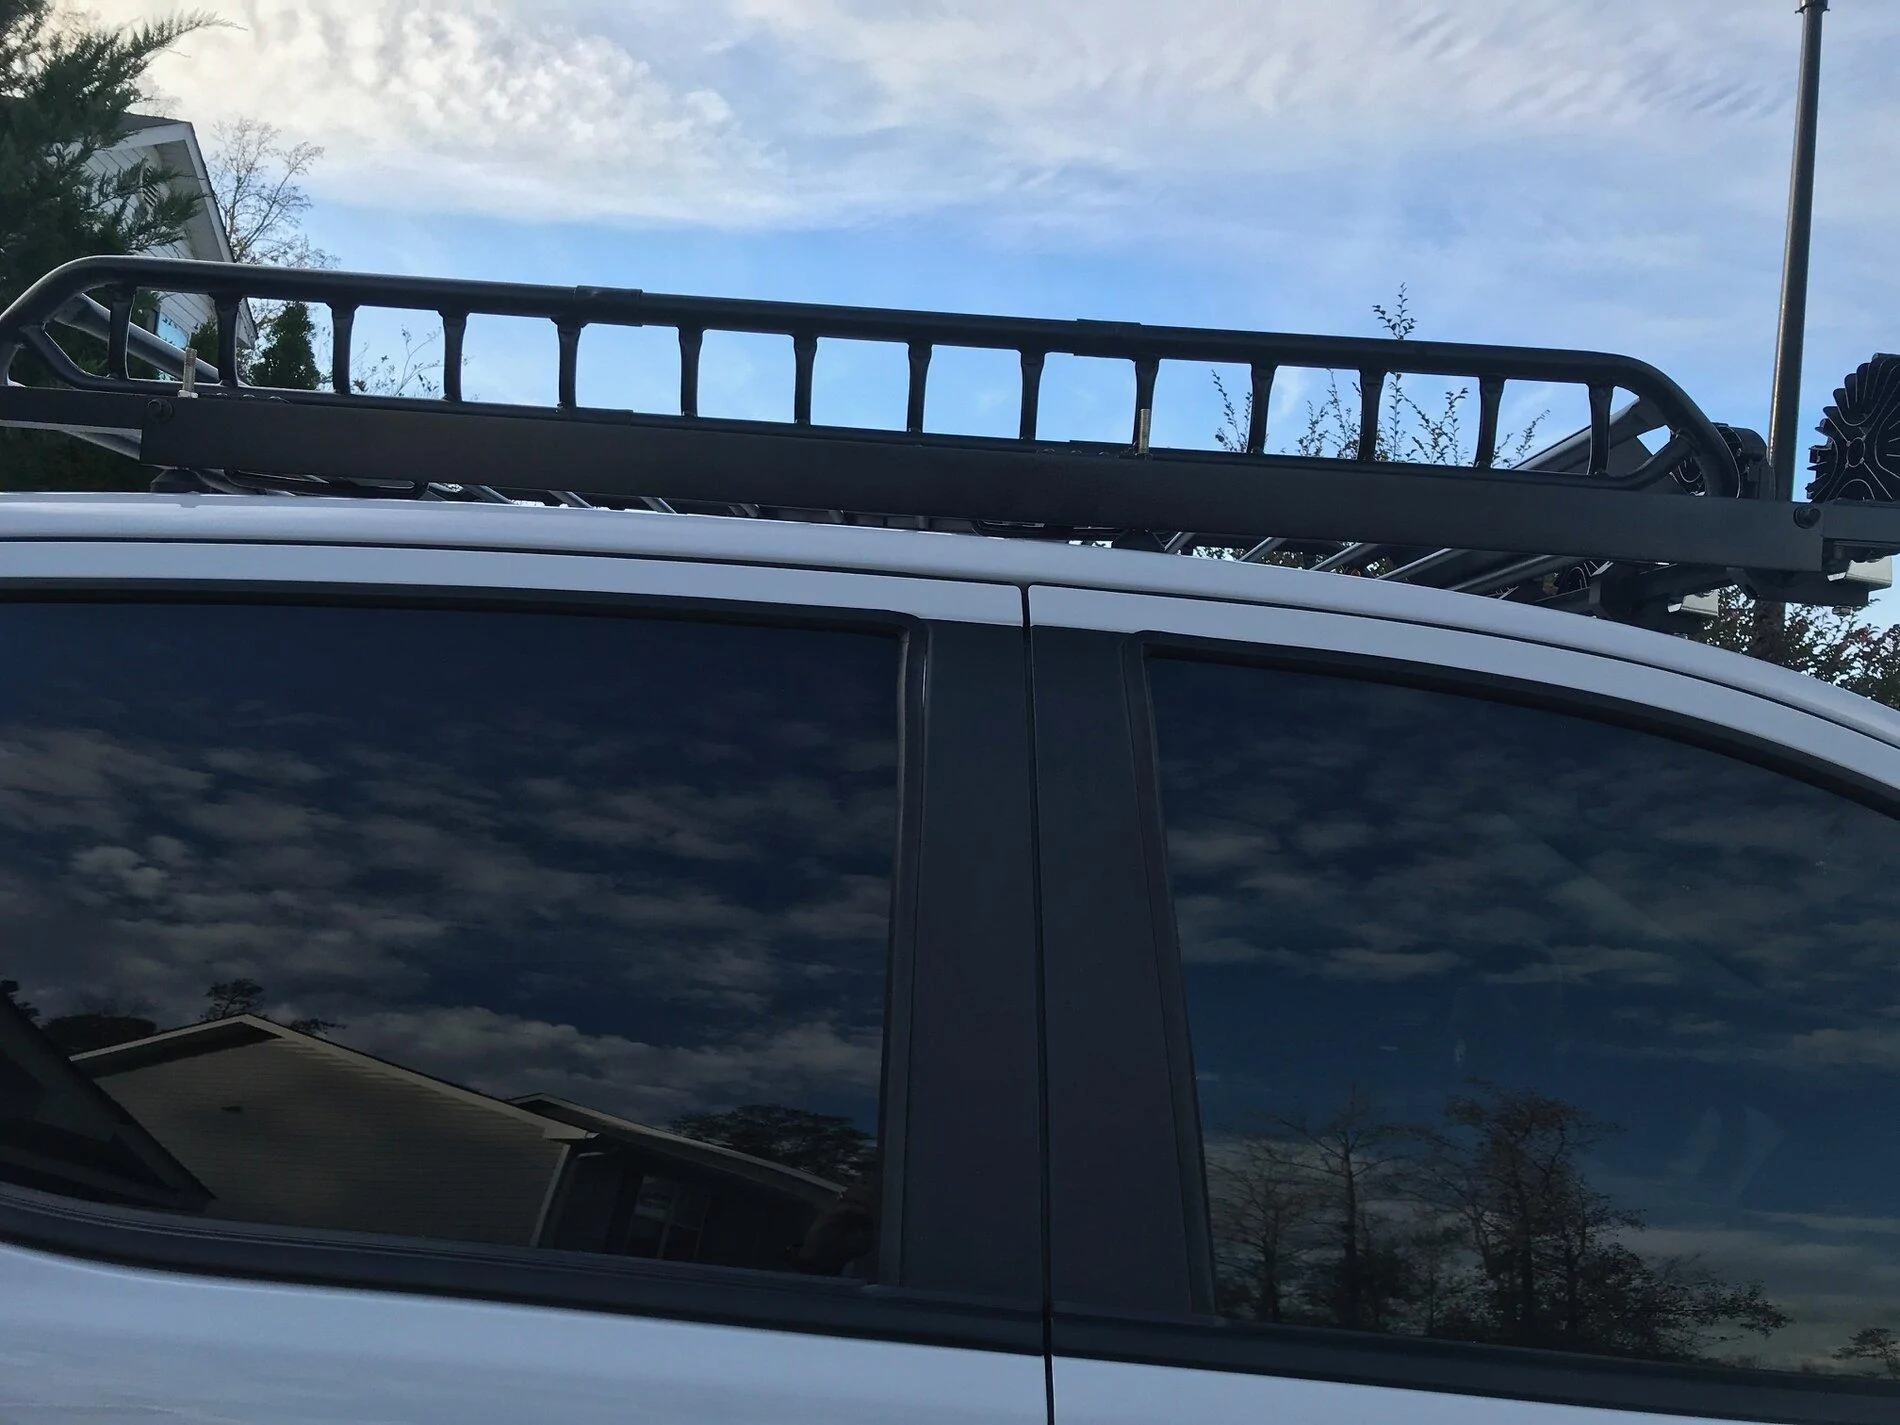
From what I can tell, your only solid mounting points for this over-rider rack is to the bed-rail extender rack, you're only relying on four leg rests on the cab's rain gutter as the support over the cab, but that is only providing support from weight, not lift.
OP
OP
OFC Ranger
Well-Known Member
- Thread starter
- #33
I don't have a degree in engineering or anything (the better half of this account does, however), but isn't your design going to generate a fair amount of lift on the leading edge above the cab?
From what I can tell, your only solid mounting points for this over-rider rack is to the bed-rail extender rack, you're only relying on four leg rests on the cab's rain gutter as the support over the cab, but that is only providing support from weight, not lift.
I'm not completely done yet. A fairing system of some form will be installed as long as some other items. I mulled over running a turnbuckle system to the front push bar, but I don't think there is anyway to do that without it just looking bizarre.
I will be running side skirts (thinking 1/4 steel flat bar) along the sides when all is said and done. So any chance of the aluminum tubing bending should be pretty nill even at high speeds once its re-enforced with that. Also, at minimum the first 12" (maybe as much as 24") will not have any platform grating installed. The frame was just run that far forward for light mounting purposes. Basically there will be an open "box" at the very front that air will just freely flow through.
I had planned to install some solar panels in this area, but its still very much on the drawing board and something much further down the road.
Last edited:
OP
OP
OFC Ranger
Well-Known Member
- Thread starter
- #34
Little something something to add this afternoon. I'll toss pics up when I can.
1.) 7" Round Lights for front of the platform (x4) - may order 2 more we shall see.
2.) Testing steel flat bar trim (to hide the construction of the platform) - these will be bolted on so they can be removed as needed.
3.) New cargo lighting idea.
On that note...
I think what I am going to try first for flooring is 1x6x8 pressure treated planks that will be sealed and coated with roll on truck bed liner. This will keep my platform cost down to about $75 including hardware to bolt it to the frame. These will be laid across the aluminum cross beams every 12" which should be overkill for human weight. The last two feet of the front will not be platformed as the plan is to eventually installed solar paneling in the front area and keep most of the weight rearward of the cab. They will be spaced about half inch or so. When we climb up to go shooting I can just lay out a shooters mat so the bipods have a nice level surface at any position to rest on. I figured planks with small gaps would be better than a single plywood sheet for water run over and less flex. What do you think?
Decided I am going to install side rails (about 4" tall), but no front or rear rails.
Also I plan to order a sheet of ABS plastic from Amazon to start designing the fairing. Debating if I should order a Ranger5g.com vinyl decal to put on it. haha
I also need to order a bunch of amber marker lights (or use rock lights) - I am still debating the lay out. Maybe four each side and three on the rear.
Maybe one day I will reach @Msfitoy level lighting and look like a UFO going down the road haha
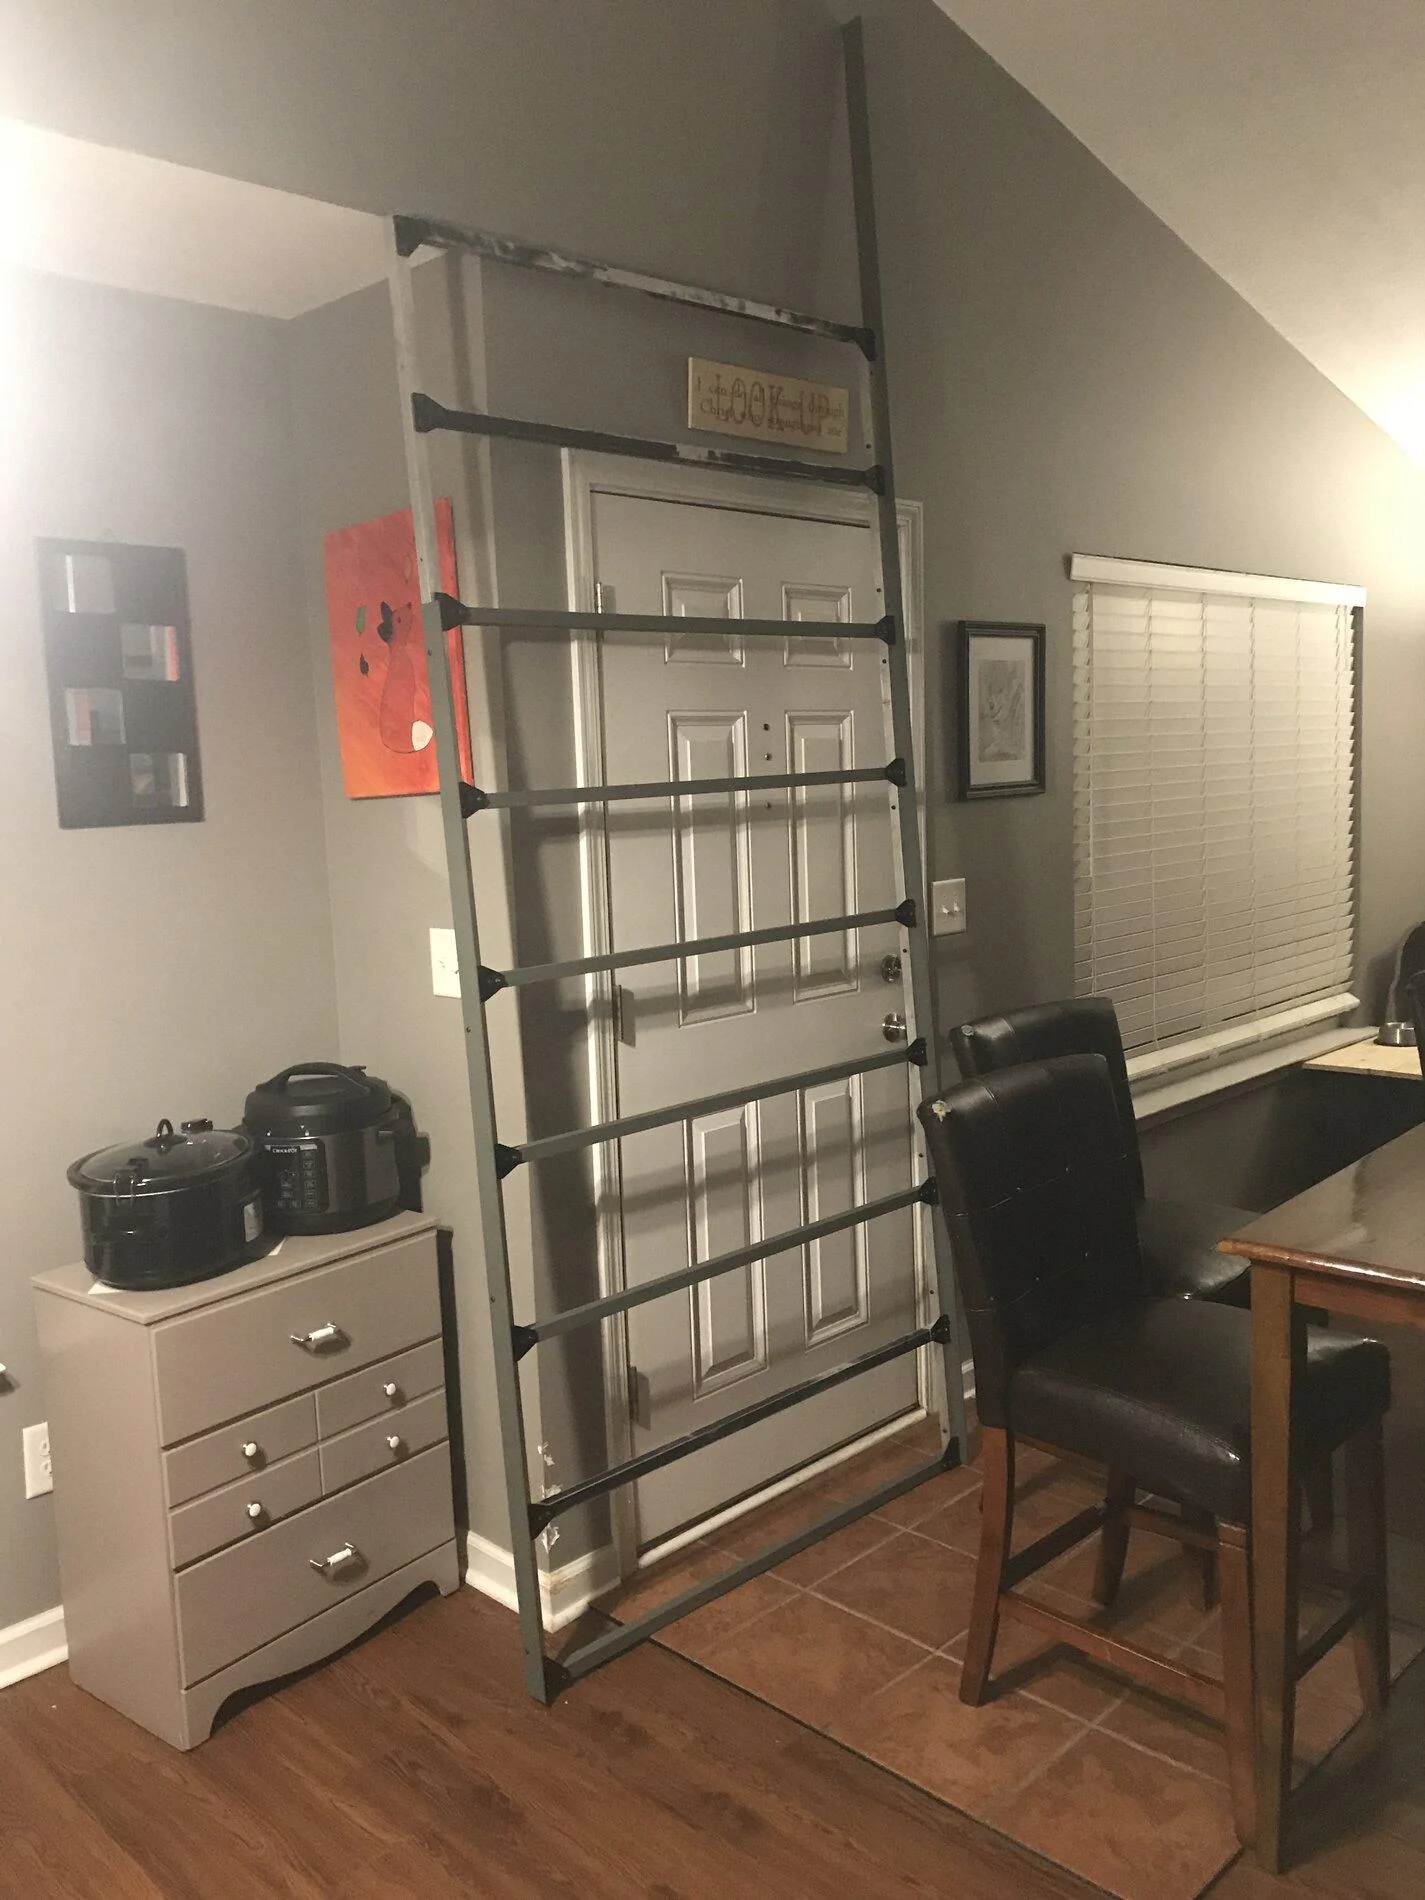
Still want a ladder system of some sort. Not sure if I should build it from scratch, modifyan existing product (for vans, suvs, etc etc), use a watercraft boarding system, or use a bunk ladder that goes in the bed when not in use. The latter would be my last choice as I have plans for the bed already and less junk piled in it the better.
1.) 7" Round Lights for front of the platform (x4) - may order 2 more we shall see.
2.) Testing steel flat bar trim (to hide the construction of the platform) - these will be bolted on so they can be removed as needed.
3.) New cargo lighting idea.
On that note...
I think what I am going to try first for flooring is 1x6x8 pressure treated planks that will be sealed and coated with roll on truck bed liner. This will keep my platform cost down to about $75 including hardware to bolt it to the frame. These will be laid across the aluminum cross beams every 12" which should be overkill for human weight. The last two feet of the front will not be platformed as the plan is to eventually installed solar paneling in the front area and keep most of the weight rearward of the cab. They will be spaced about half inch or so. When we climb up to go shooting I can just lay out a shooters mat so the bipods have a nice level surface at any position to rest on. I figured planks with small gaps would be better than a single plywood sheet for water run over and less flex. What do you think?
Decided I am going to install side rails (about 4" tall), but no front or rear rails.
Also I plan to order a sheet of ABS plastic from Amazon to start designing the fairing. Debating if I should order a Ranger5g.com vinyl decal to put on it. haha
I also need to order a bunch of amber marker lights (or use rock lights) - I am still debating the lay out. Maybe four each side and three on the rear.
Maybe one day I will reach @Msfitoy level lighting and look like a UFO going down the road haha
Still want a ladder system of some sort. Not sure if I should build it from scratch, modifyan existing product (for vans, suvs, etc etc), use a watercraft boarding system, or use a bunk ladder that goes in the bed when not in use. The latter would be my last choice as I have plans for the bed already and less junk piled in it the better.
Last edited:
OP
OP
OFC Ranger
Well-Known Member
- Thread starter
- #35
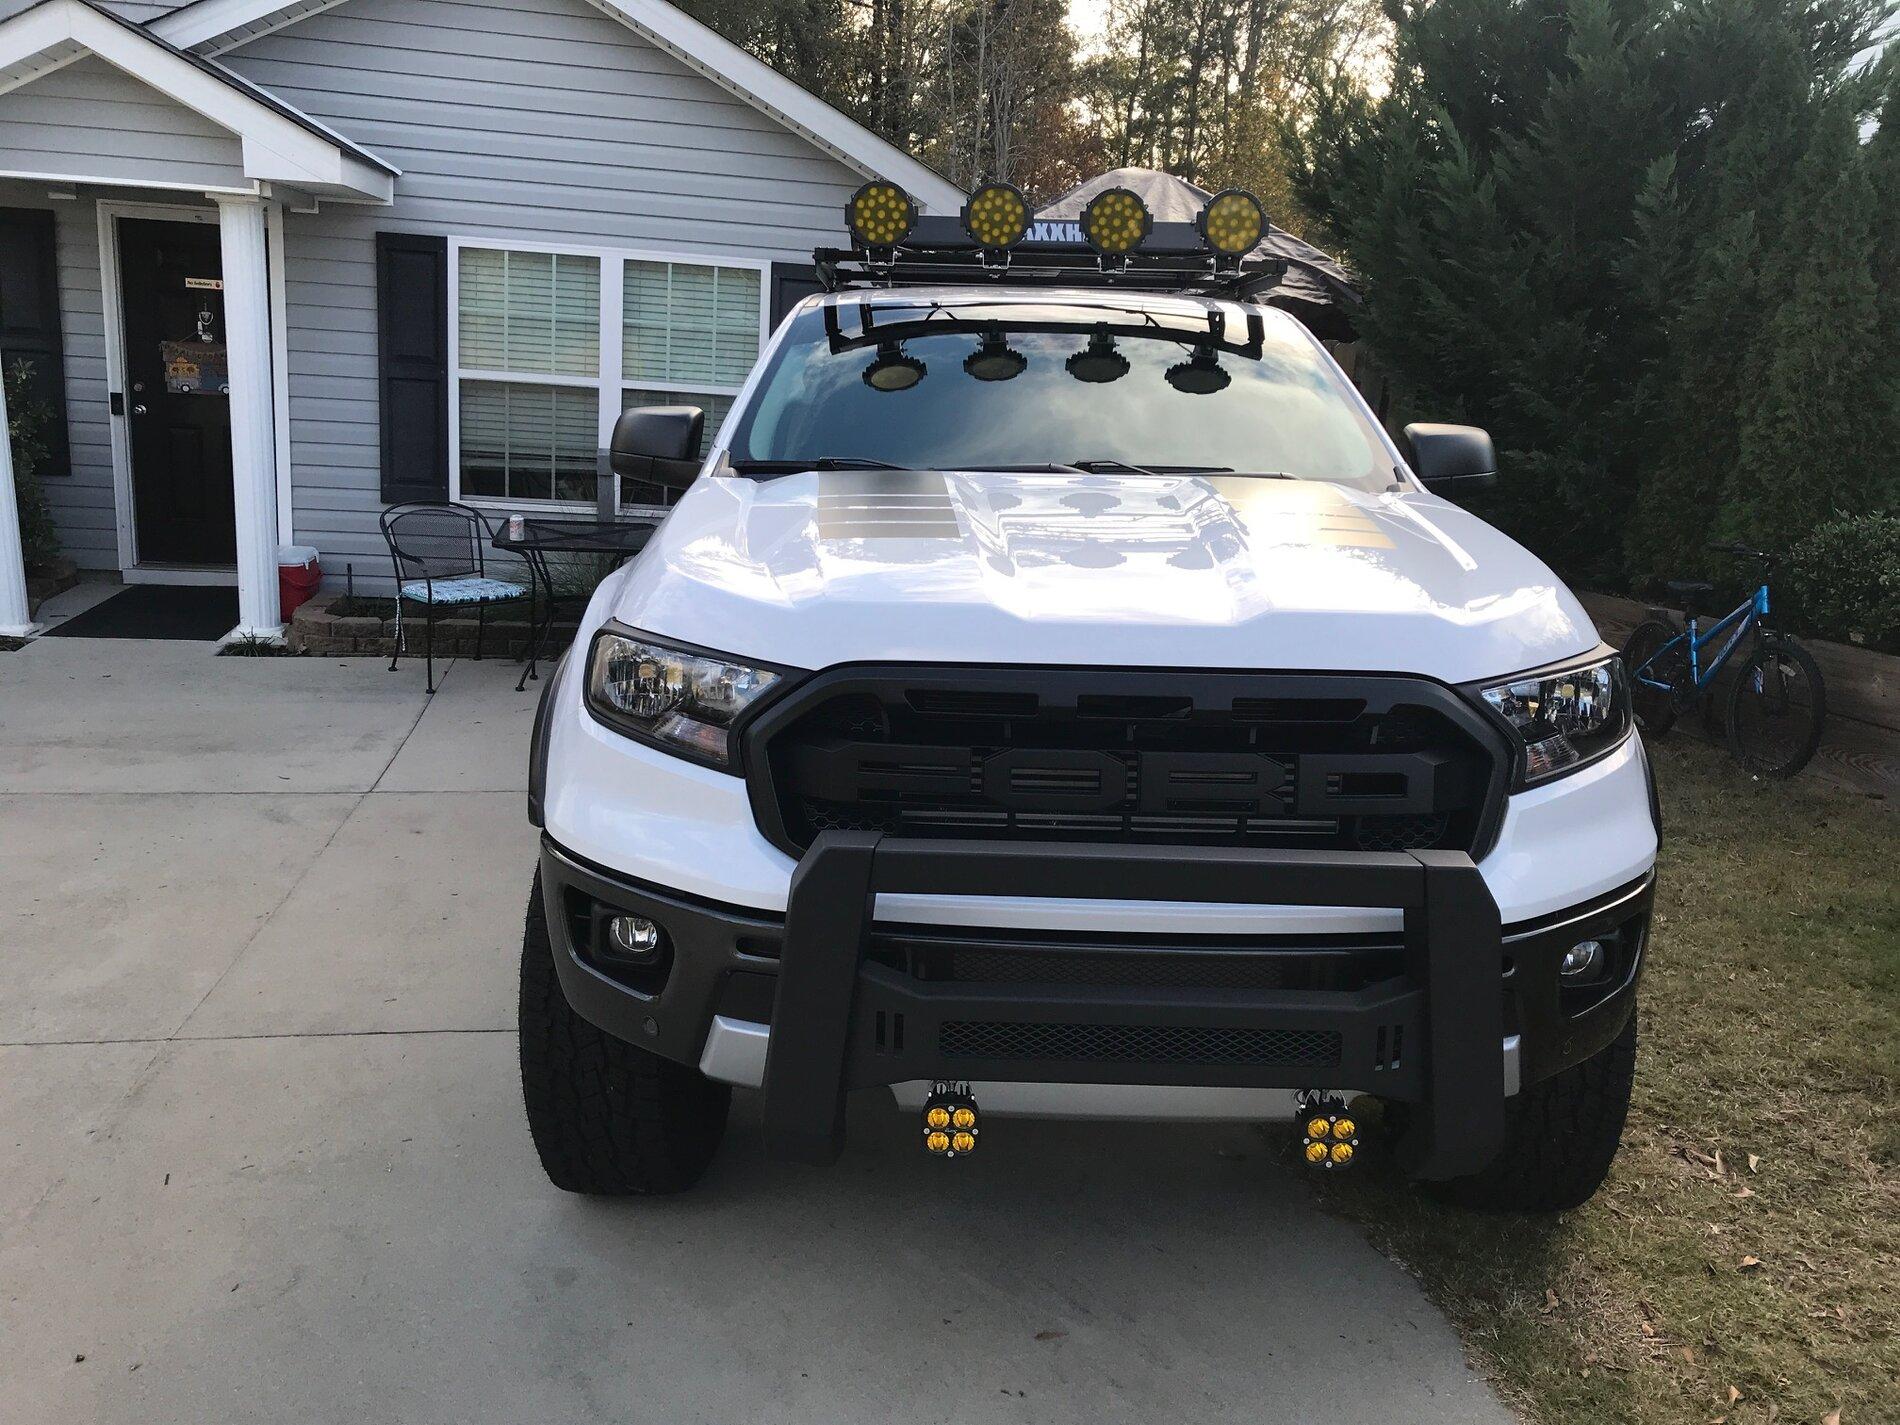
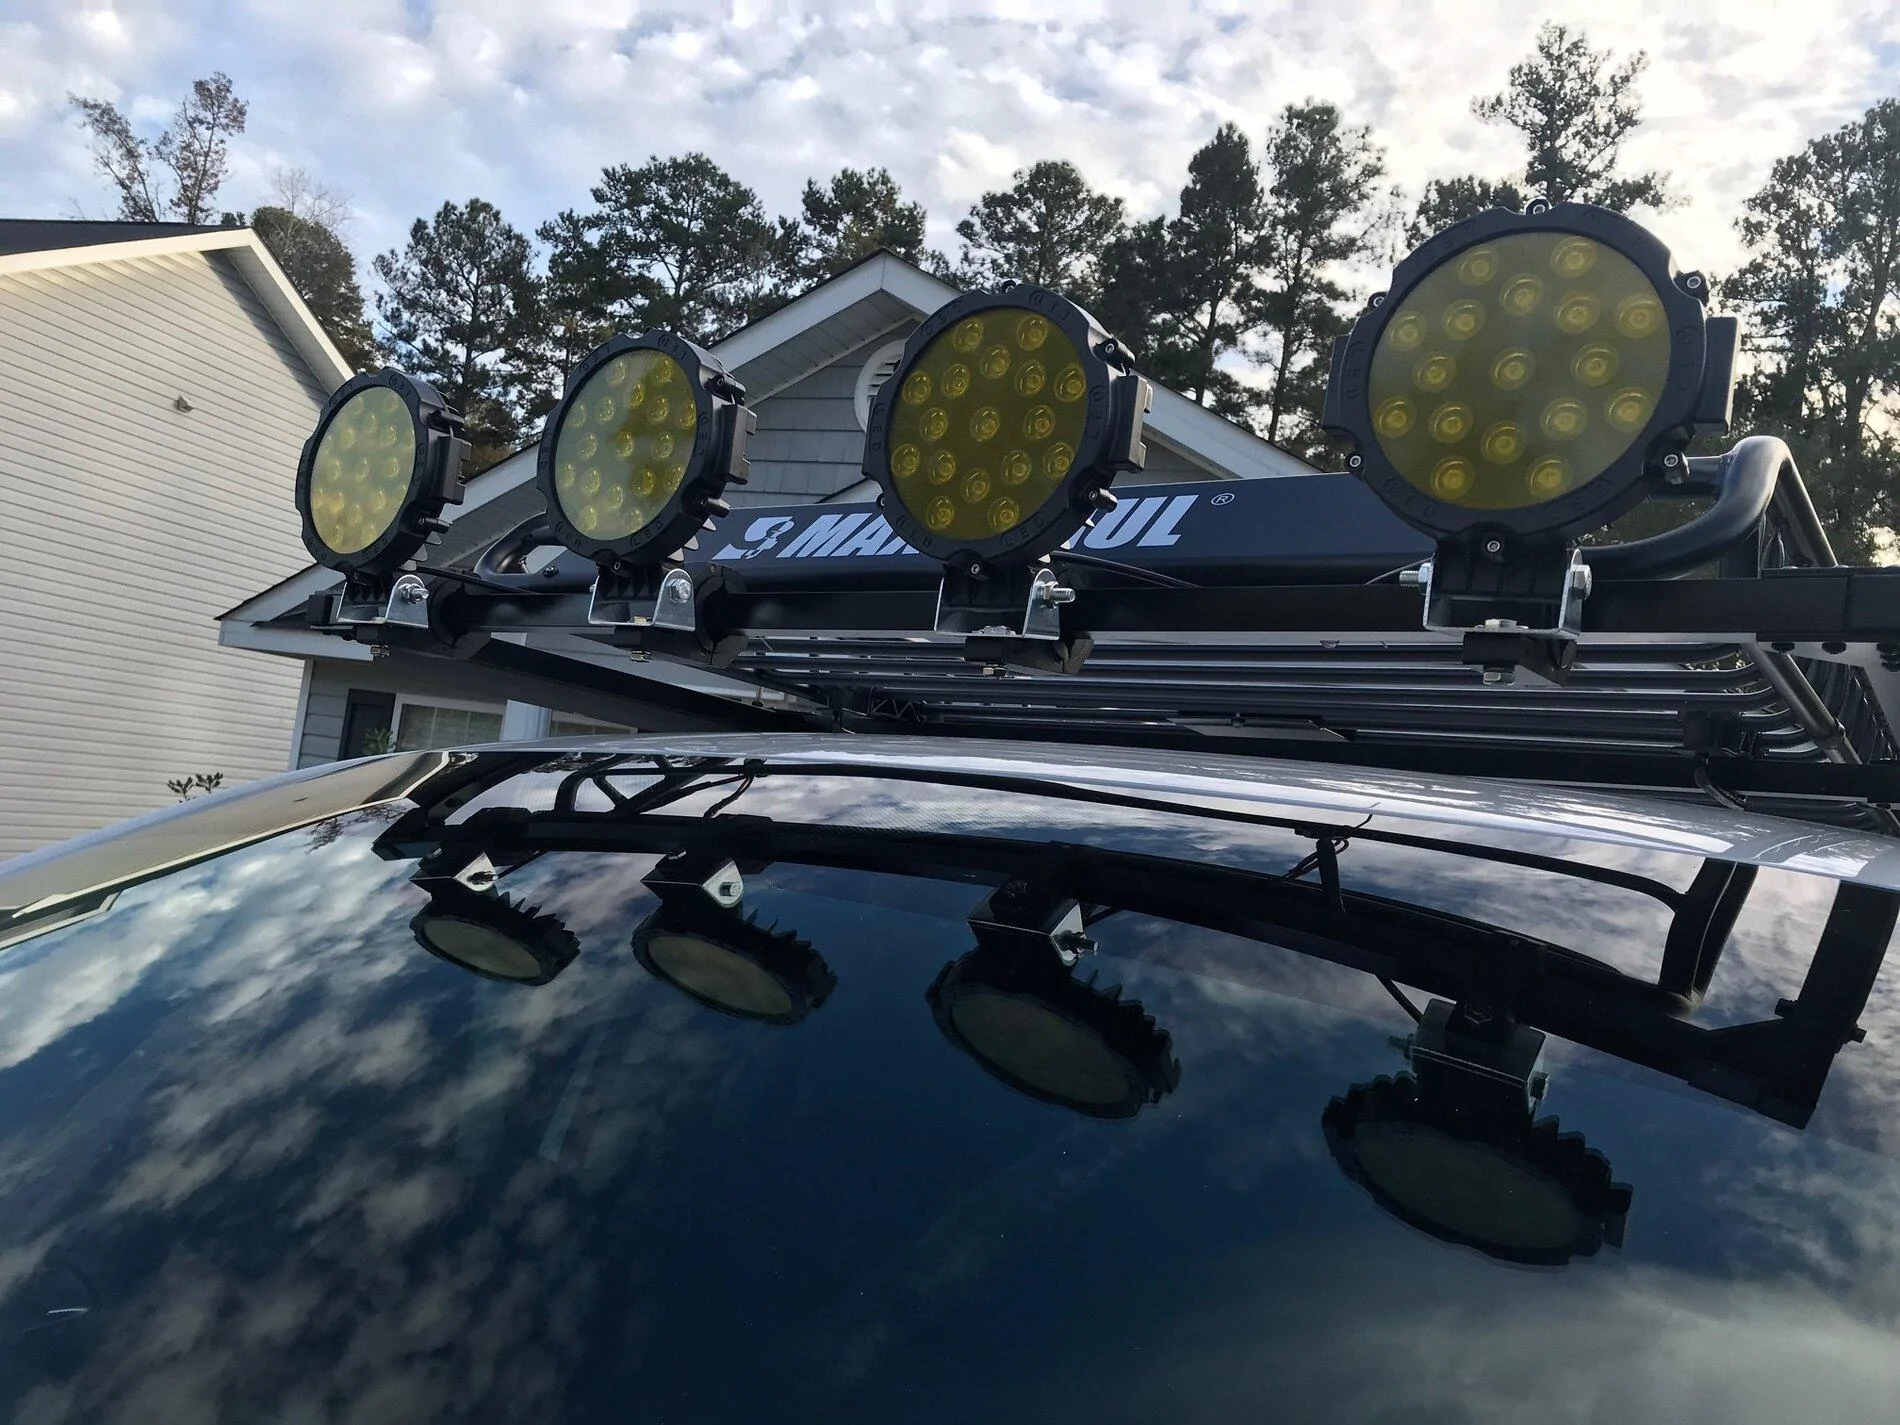
Tooting around with some new lights (the bar clamp mounts are only temporary). I could not find this style in amber so I had to take apart each one and apply a few layers of Vvivid golden yellow tint and while I had them apart I also sealed them with good stuff instead of just relying on the rubber ring inside. Also you can see the side skirting I plan to run for the platform. I will also eventually cut off that extra screw length for the support feet. Side skirts will also give me some additional space to map out marker lighting and some other ideas Im rolling around.
Also had a spare set of lights I've rigged up as cargo lights just to see how they work. I won't be able to get the platform done and wiring done till a week from tomorrow sadly.

Also had a spare set of lights I've rigged up as cargo lights just to see how they work. I won't be able to get the platform done and wiring done till a week from tomorrow sadly.
Glocker
Well-Known Member
- First Name
- John
- Joined
- Feb 11, 2020
- Threads
- 97
- Messages
- 2,700
- Reaction score
- 8,426
- Location
- Boca Raton
- Vehicle(s)
- 2019 Ford Ranger XLT FX4, 2014 Mustang GT
- Vehicle Showcase
- 1
I'm running those lights on my bumper and they seem to be rocking on pretty good right now. They look good in amber!Tooting around with some new lights (the bar clamp mounts are only temporary). I could not find this style in amber so I had to take apart each one and apply a few layers of Vvivid golden yellow tint and while I had them apart I also sealed them with good stuff instead of just relying on the rubber ring inside. Also you can see the side skirting I plan to run for the platform. I will also eventually cut off that extra screw length for the support feet. Side skirts will also give me some additional space to map out marker lighting and some other ideas Im rolling around.
Also had a spare set of lights I've rigged up as cargo lights just to see how they work. I won't be able to get the platform done and wiring done till a week from tomorrow sadly.
OP
OP
OFC Ranger
Well-Known Member
- Thread starter
- #37
On a side note I did the math on final project cost. Some components drove cost up, while others drove it down (think aluminum vs steel as example).
$650 will be the final price tag. That accounts for every bolt, nut, washer, can of primer, can of paint, metal materials, and so forth. I believe it could be done for sub $500 if you dropped all the aluminum components and welded vs bolt together.
$650 will be the final price tag. That accounts for every bolt, nut, washer, can of primer, can of paint, metal materials, and so forth. I believe it could be done for sub $500 if you dropped all the aluminum components and welded vs bolt together.
Last edited:
OP
OP
OFC Ranger
Well-Known Member
- Thread starter
- #38
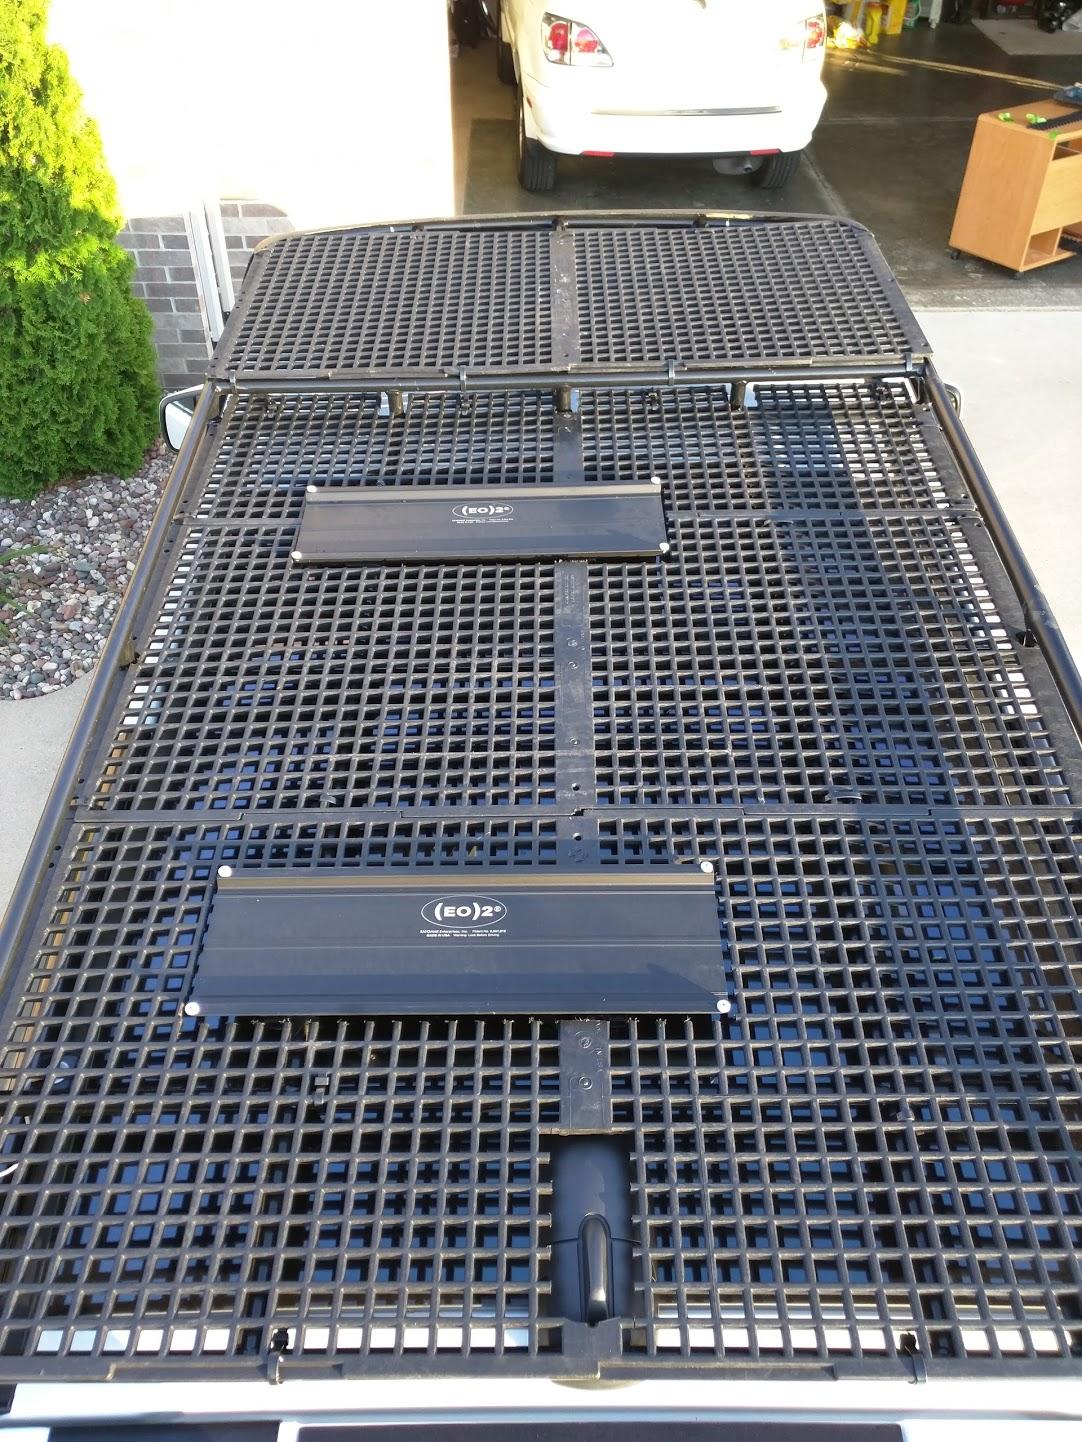
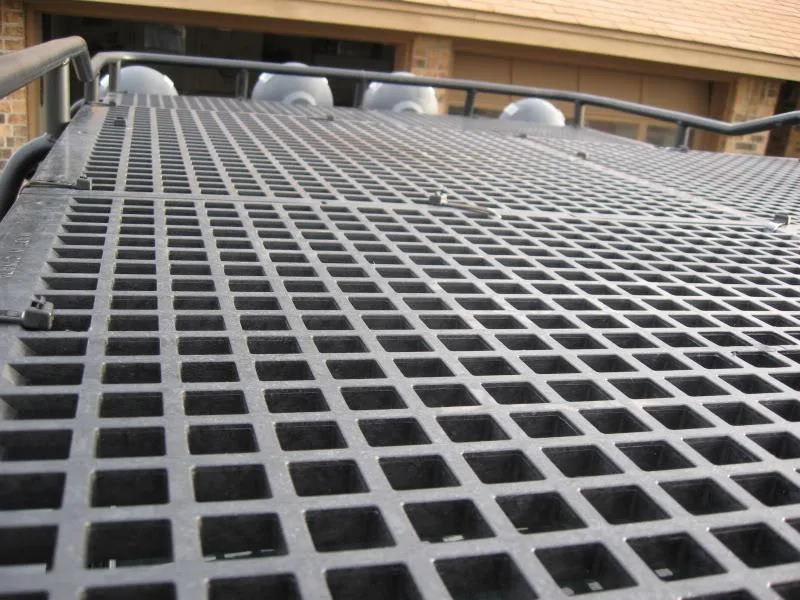
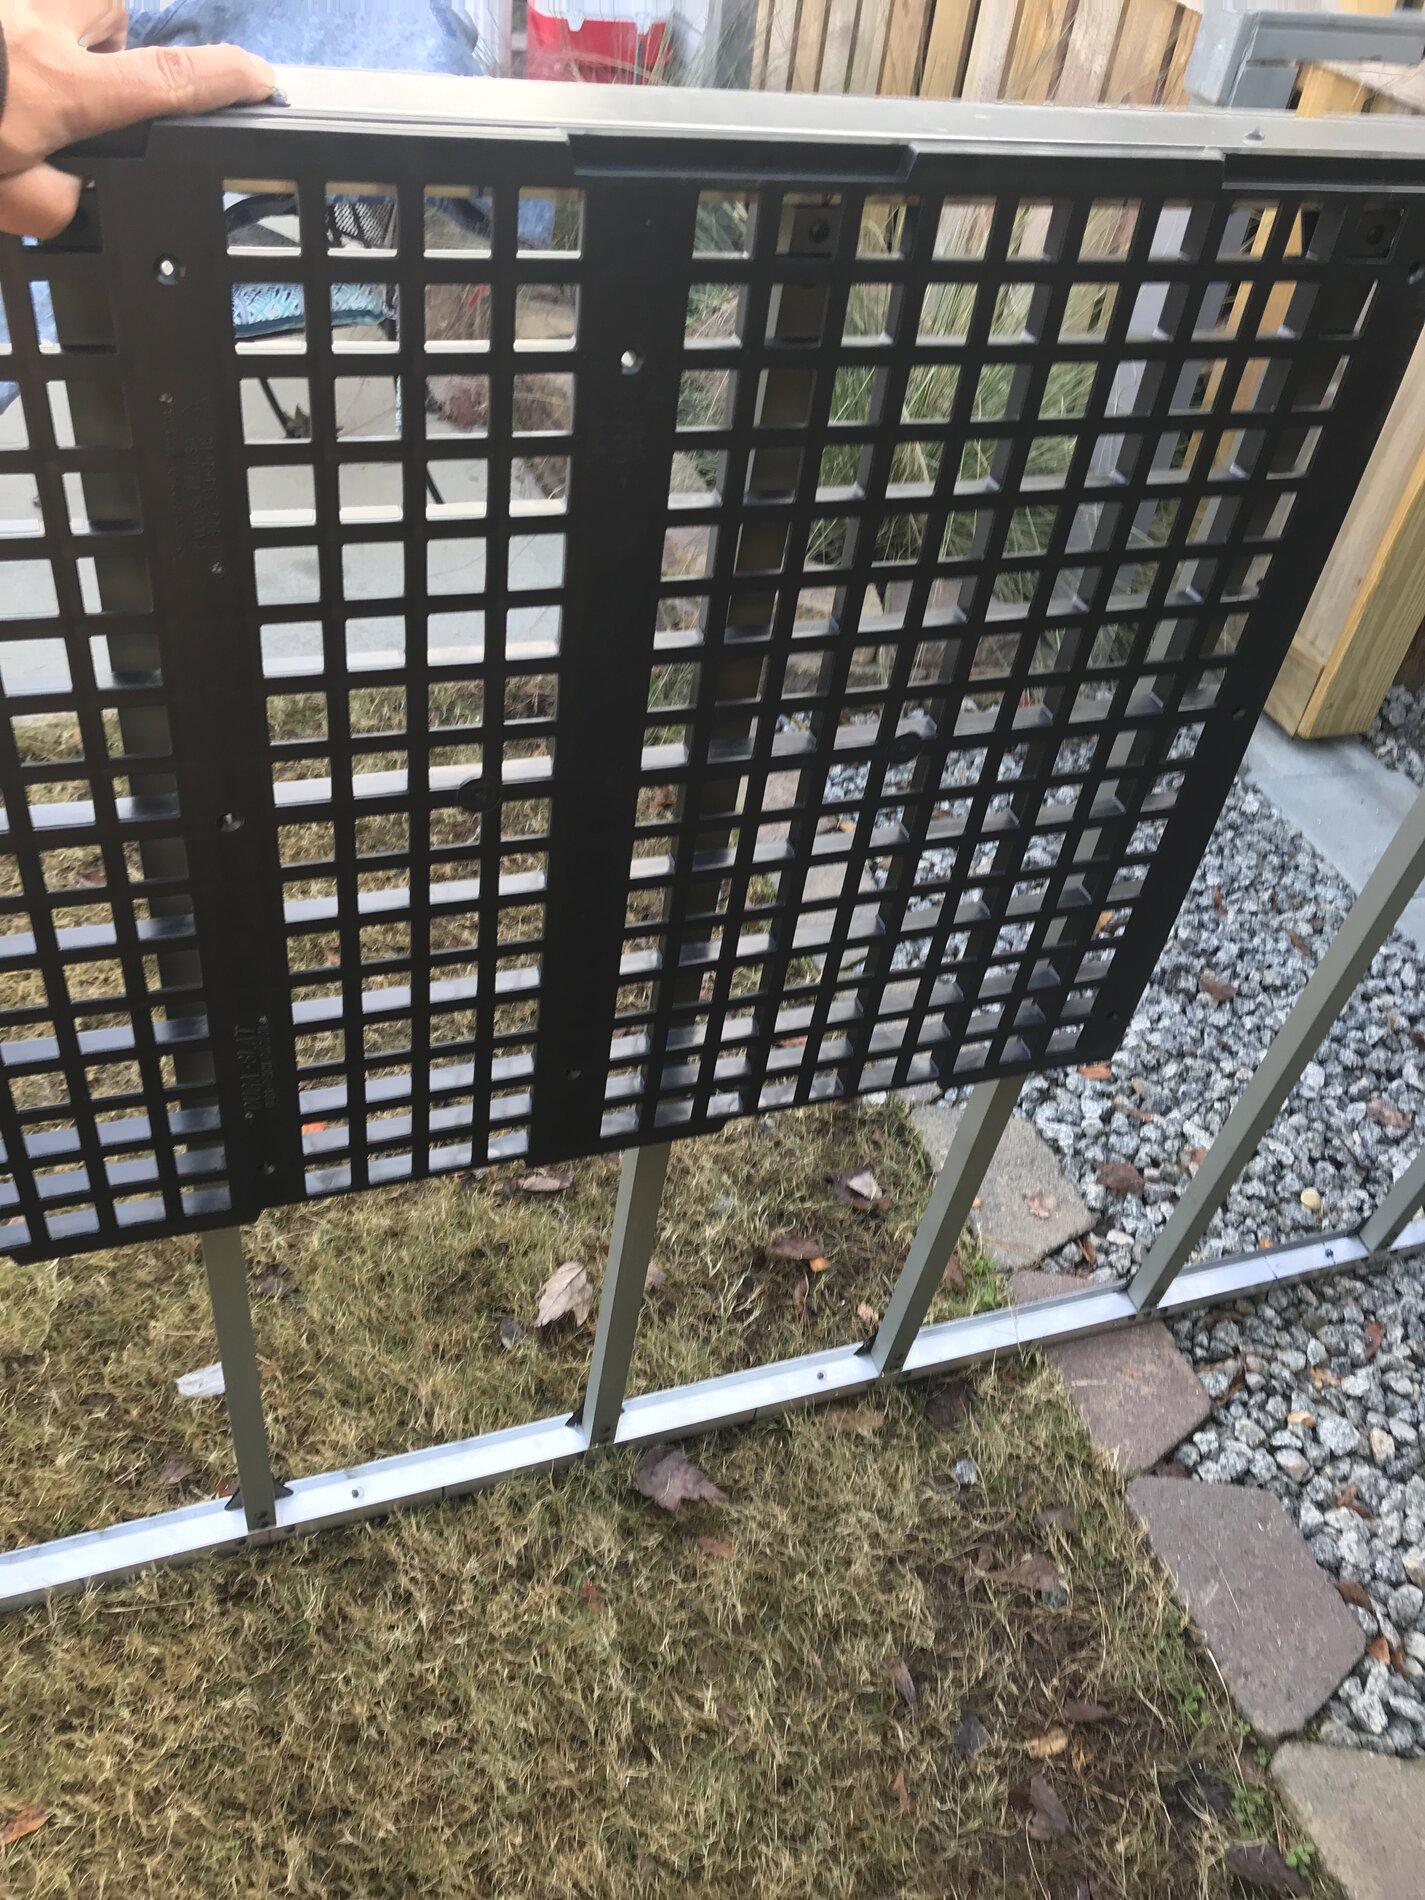
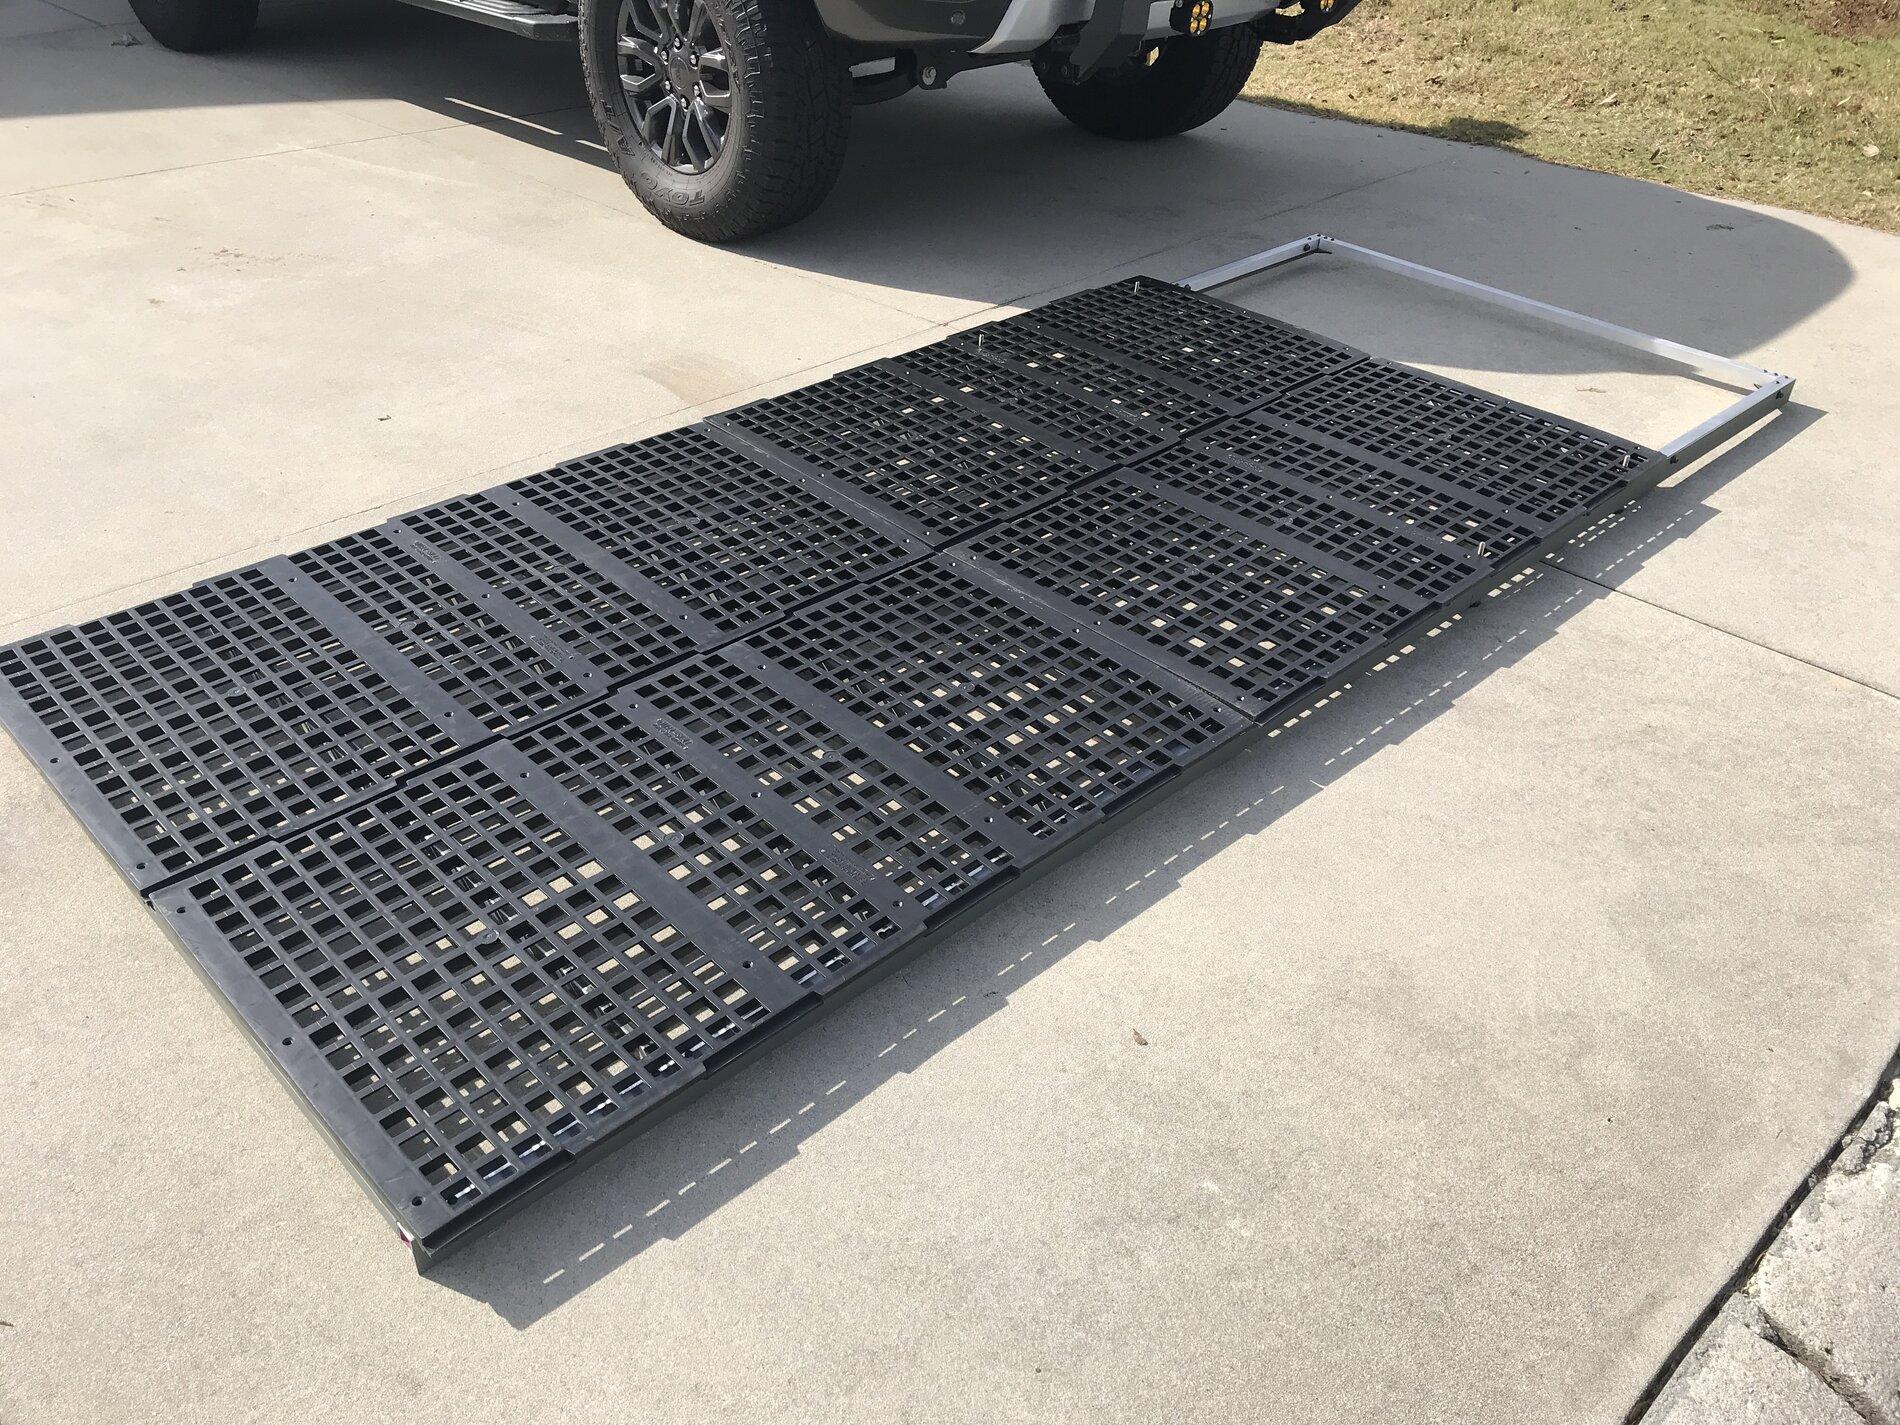
Ok well, I said fudge it and ordered 4' x 8' worth of the polypropylene grating. I ordered from a different company that offered 3/4 thickness (vs 1/2) and they were $16 a a panel (total of four) vs $25 a panel. They claim it can hold human weight on 24" spans - well my platform runs spans at 12" so I should be golden. https://www.qcsupply.com/93334-dura-slat-24-48.html
Also remainder of supplies ordered from Home Depot and Amazon to complete the project minus side railing. Still on schedule for Monday to start.
I also re-positioned the rack lights so they sit a good 4" lower. They looked a bit odd sitting so high and I had to fold them back to fit in my garazeebo. haha
Im seriously considering adding one more set up top for a total of six. Why? I dunno, why not?! Would give me a claimed 36,000 flood lumens (though I know wattage claims are done by advertising math vs real math).
Whatcha think?

Last edited:
OP
OP
OFC Ranger
Well-Known Member
- Thread starter
- #39
Taking a little break, picked up last of aluminum I needed this morning just finished cutting it. I've learned a lot going through this process; this may seem like a no brainer to some of you all, but I just switched from a metal cut off wheel on my circular saw to a 60 tooth carbine saw blade and the cuts are so much cleaner (way less filing to be done). I also sprung on a simple table top vise that clamps on and while my old method of using wood clamps to keep things in place this way is much quicker with no accident movement.
QC Supply just gave me my FedEx shipping number so the floor grating should be in later this week without issue. Today I'm going to get items cut and primed, then tomorrow assemble everything and hopefully get the paint finished that way it can cure while I am at work Wednesday. Then I am off Thursday all the way through Sunday to finish any odds and ends and assemble the top platform in place.
QC Supply just gave me my FedEx shipping number so the floor grating should be in later this week without issue. Today I'm going to get items cut and primed, then tomorrow assemble everything and hopefully get the paint finished that way it can cure while I am at work Wednesday. Then I am off Thursday all the way through Sunday to finish any odds and ends and assemble the top platform in place.
OP
OP
OFC Ranger
Well-Known Member
- Thread starter
- #40
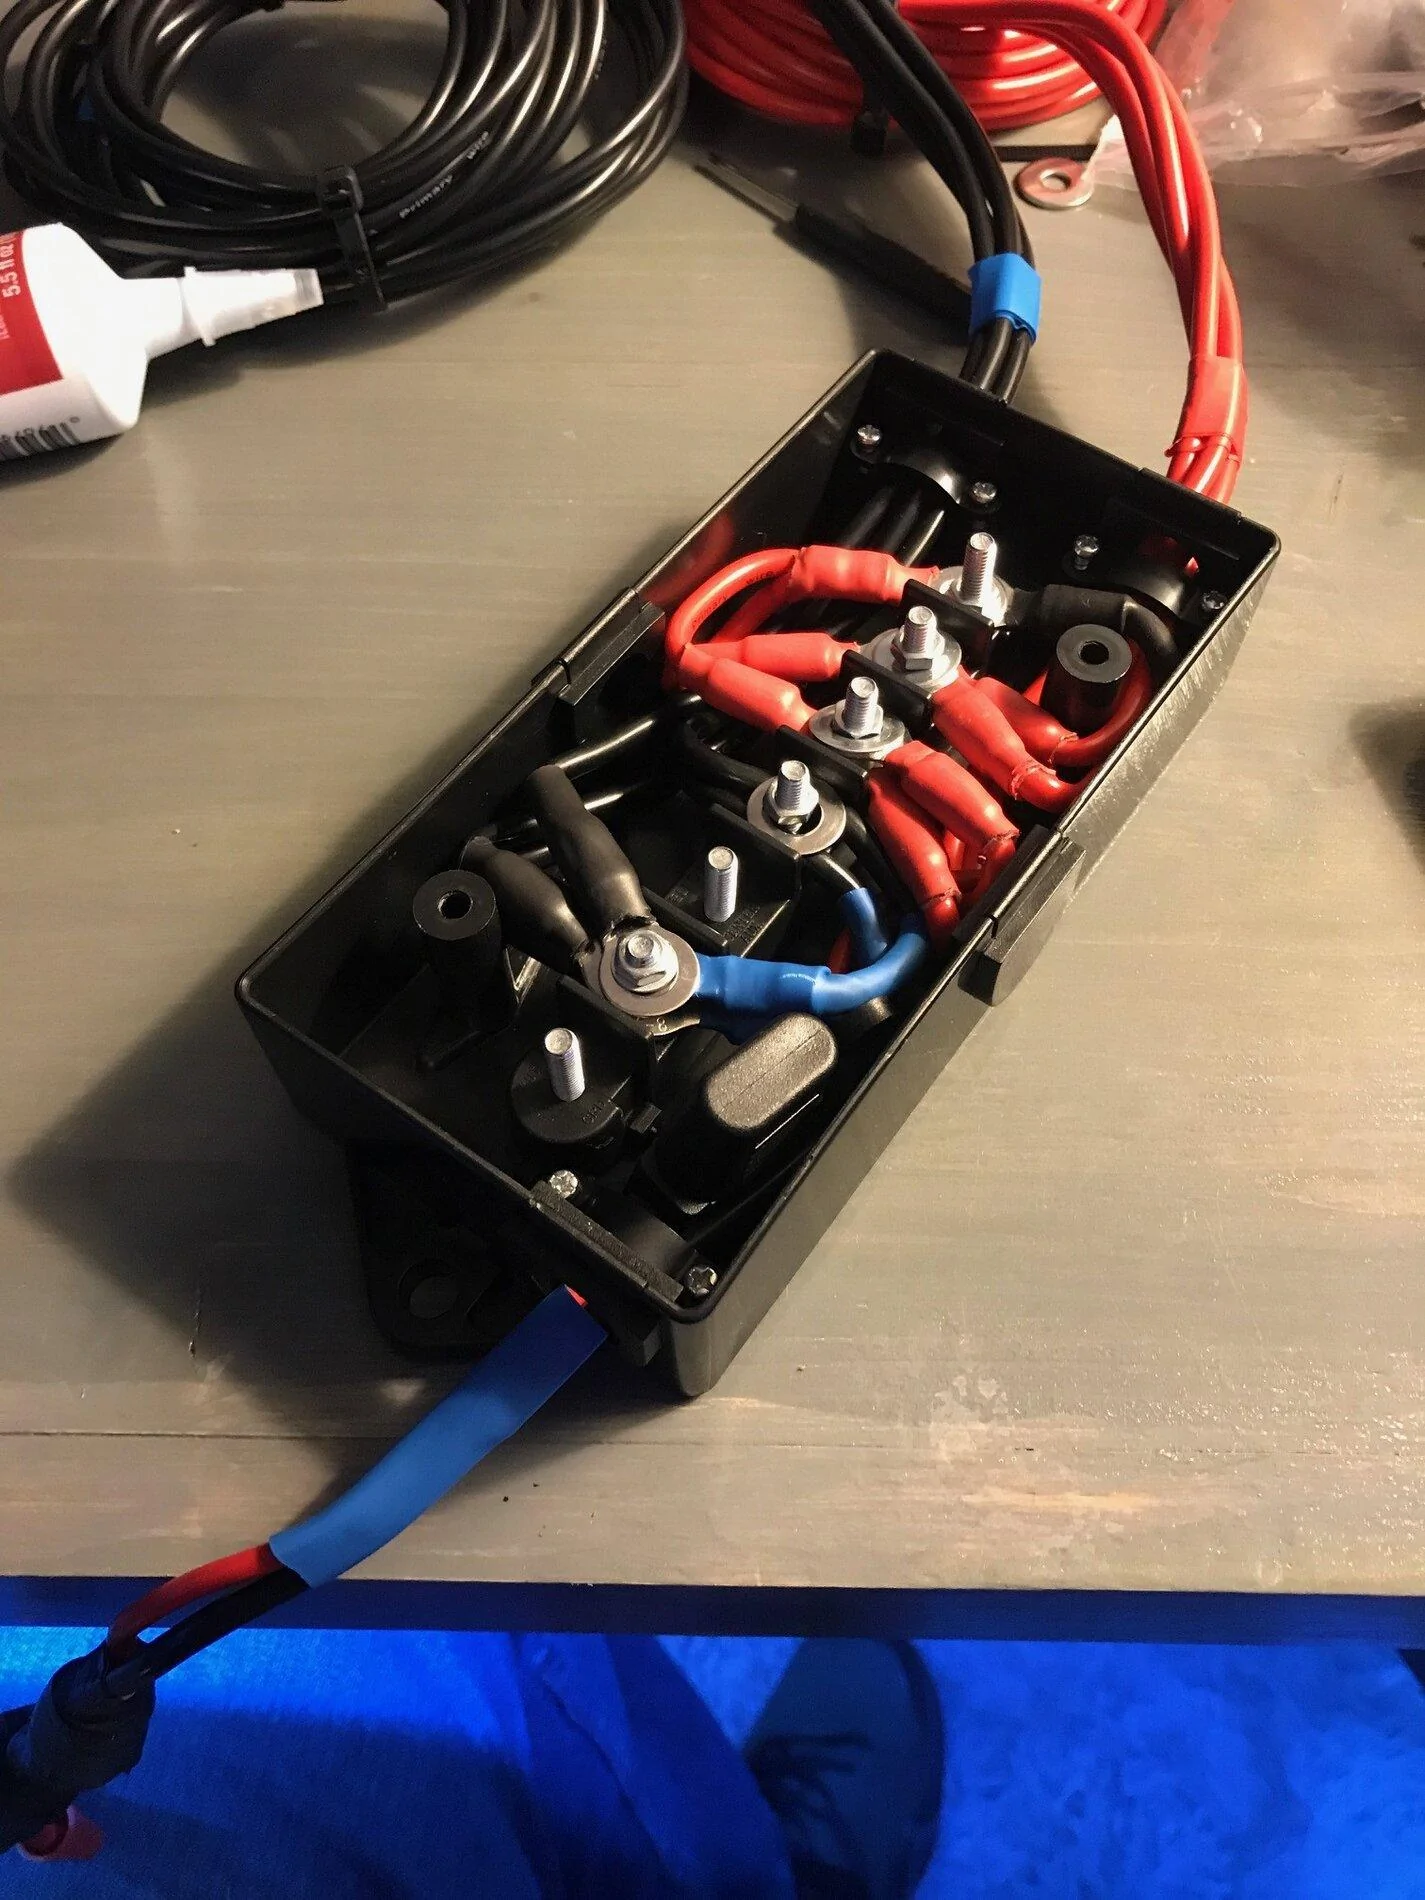
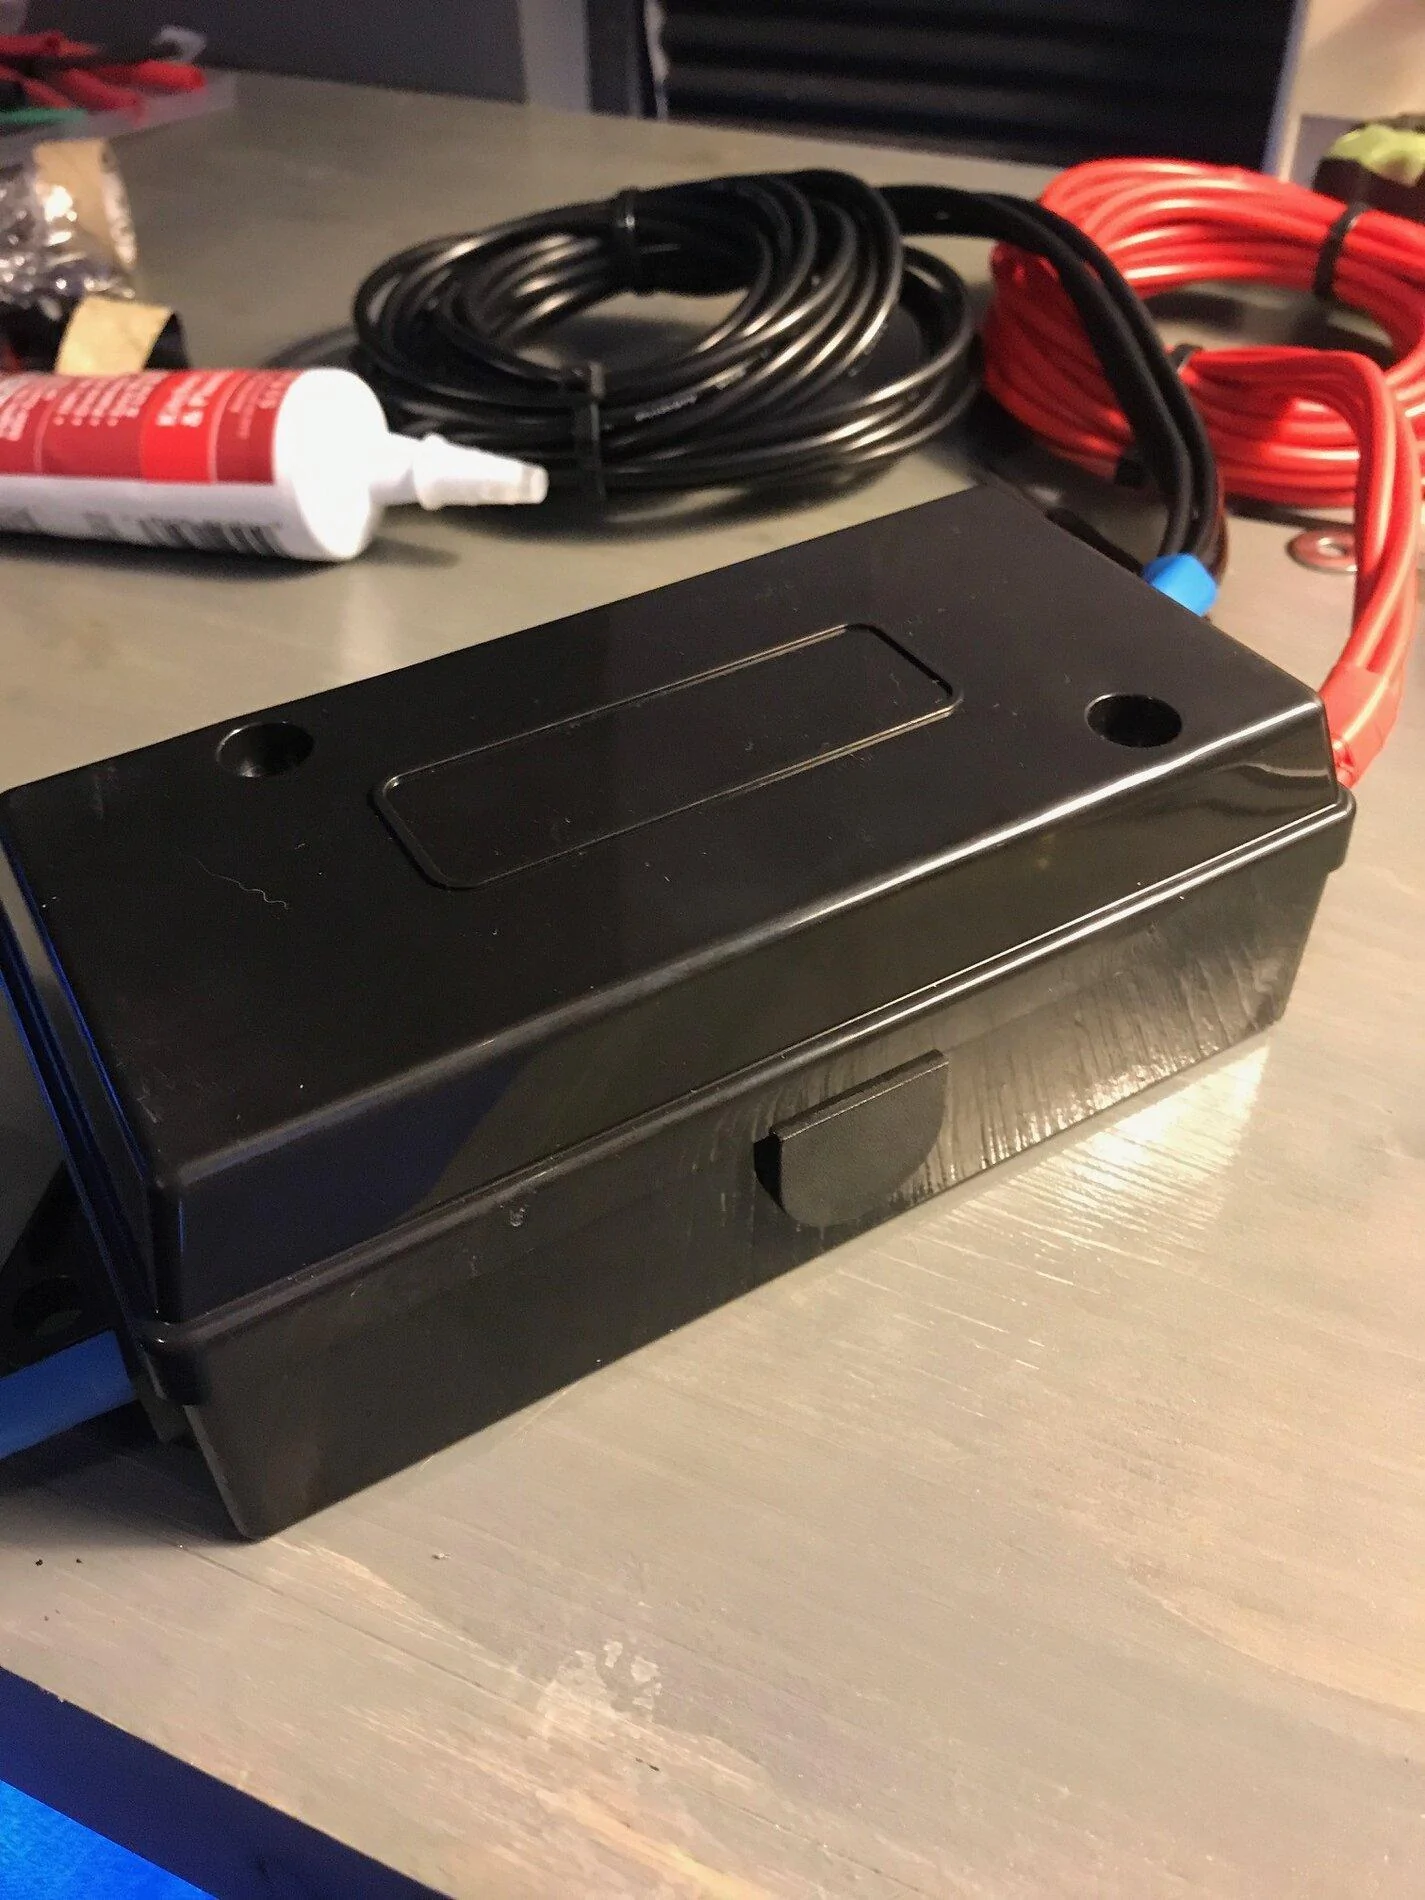
Put together a little junction terminal block box for the front rack lights to run to my main control system. Nice little trailer box for the price, but does need extra love to make it weather resistant. This will be installed on the underside of the platform just past the rear of the cab roof. I kind of went with too big with 12g ring connectors, but I got everything to fit. If I had to re-do it I would still down to 16g connectors just for the sake of room.
Amazon - Trailer Wiring Box

Amazon - Trailer Wiring Box
Last edited:
OP
OP
OFC Ranger
Well-Known Member
- Thread starter
- #41
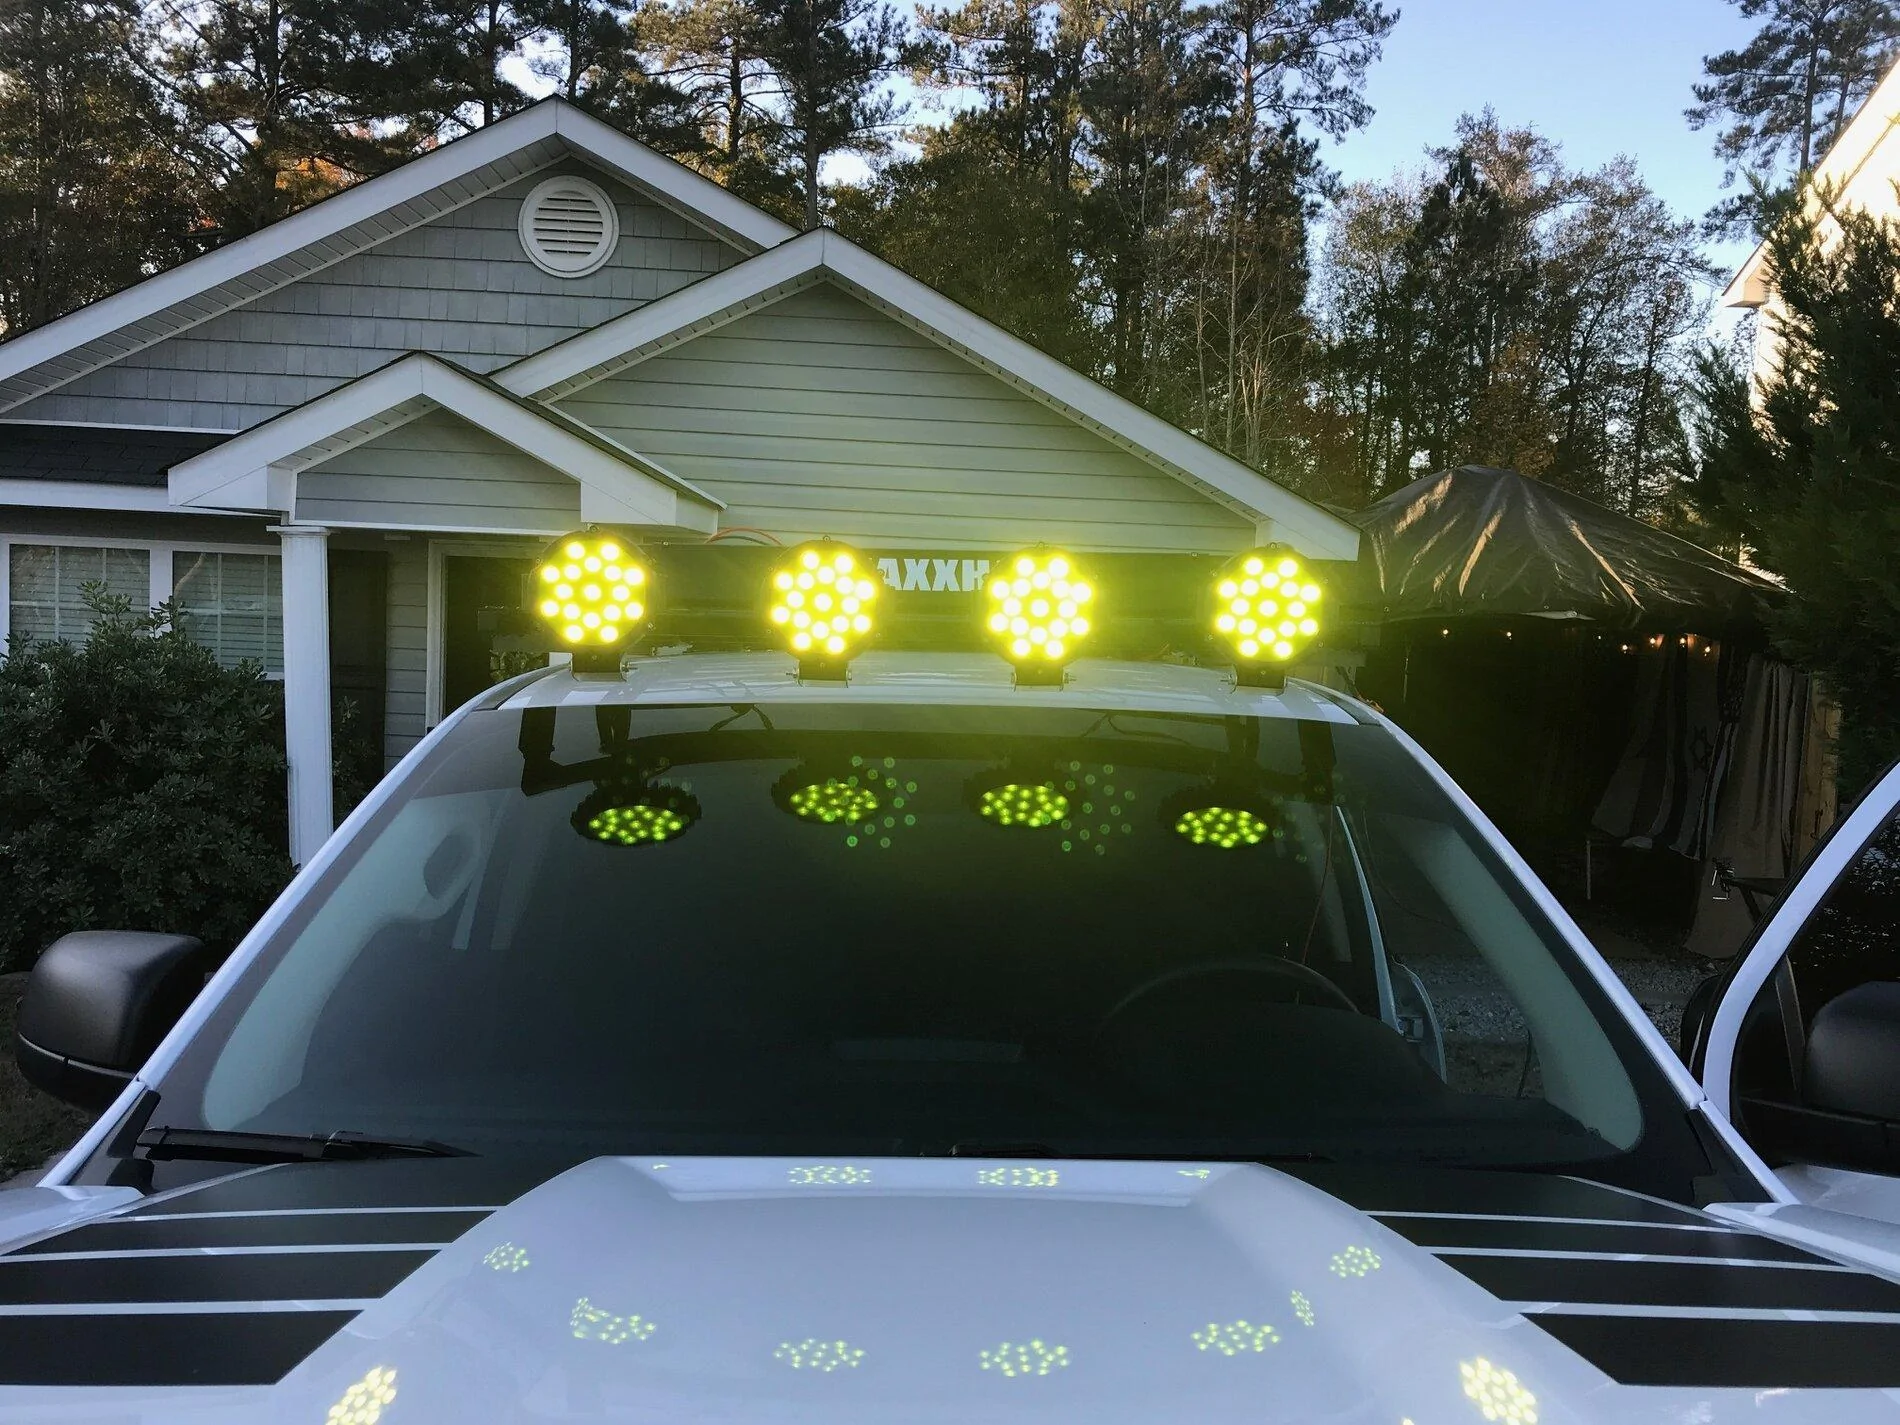
Well lights are functioning.

OP
OP
OFC Ranger
Well-Known Member
- Thread starter
- #42
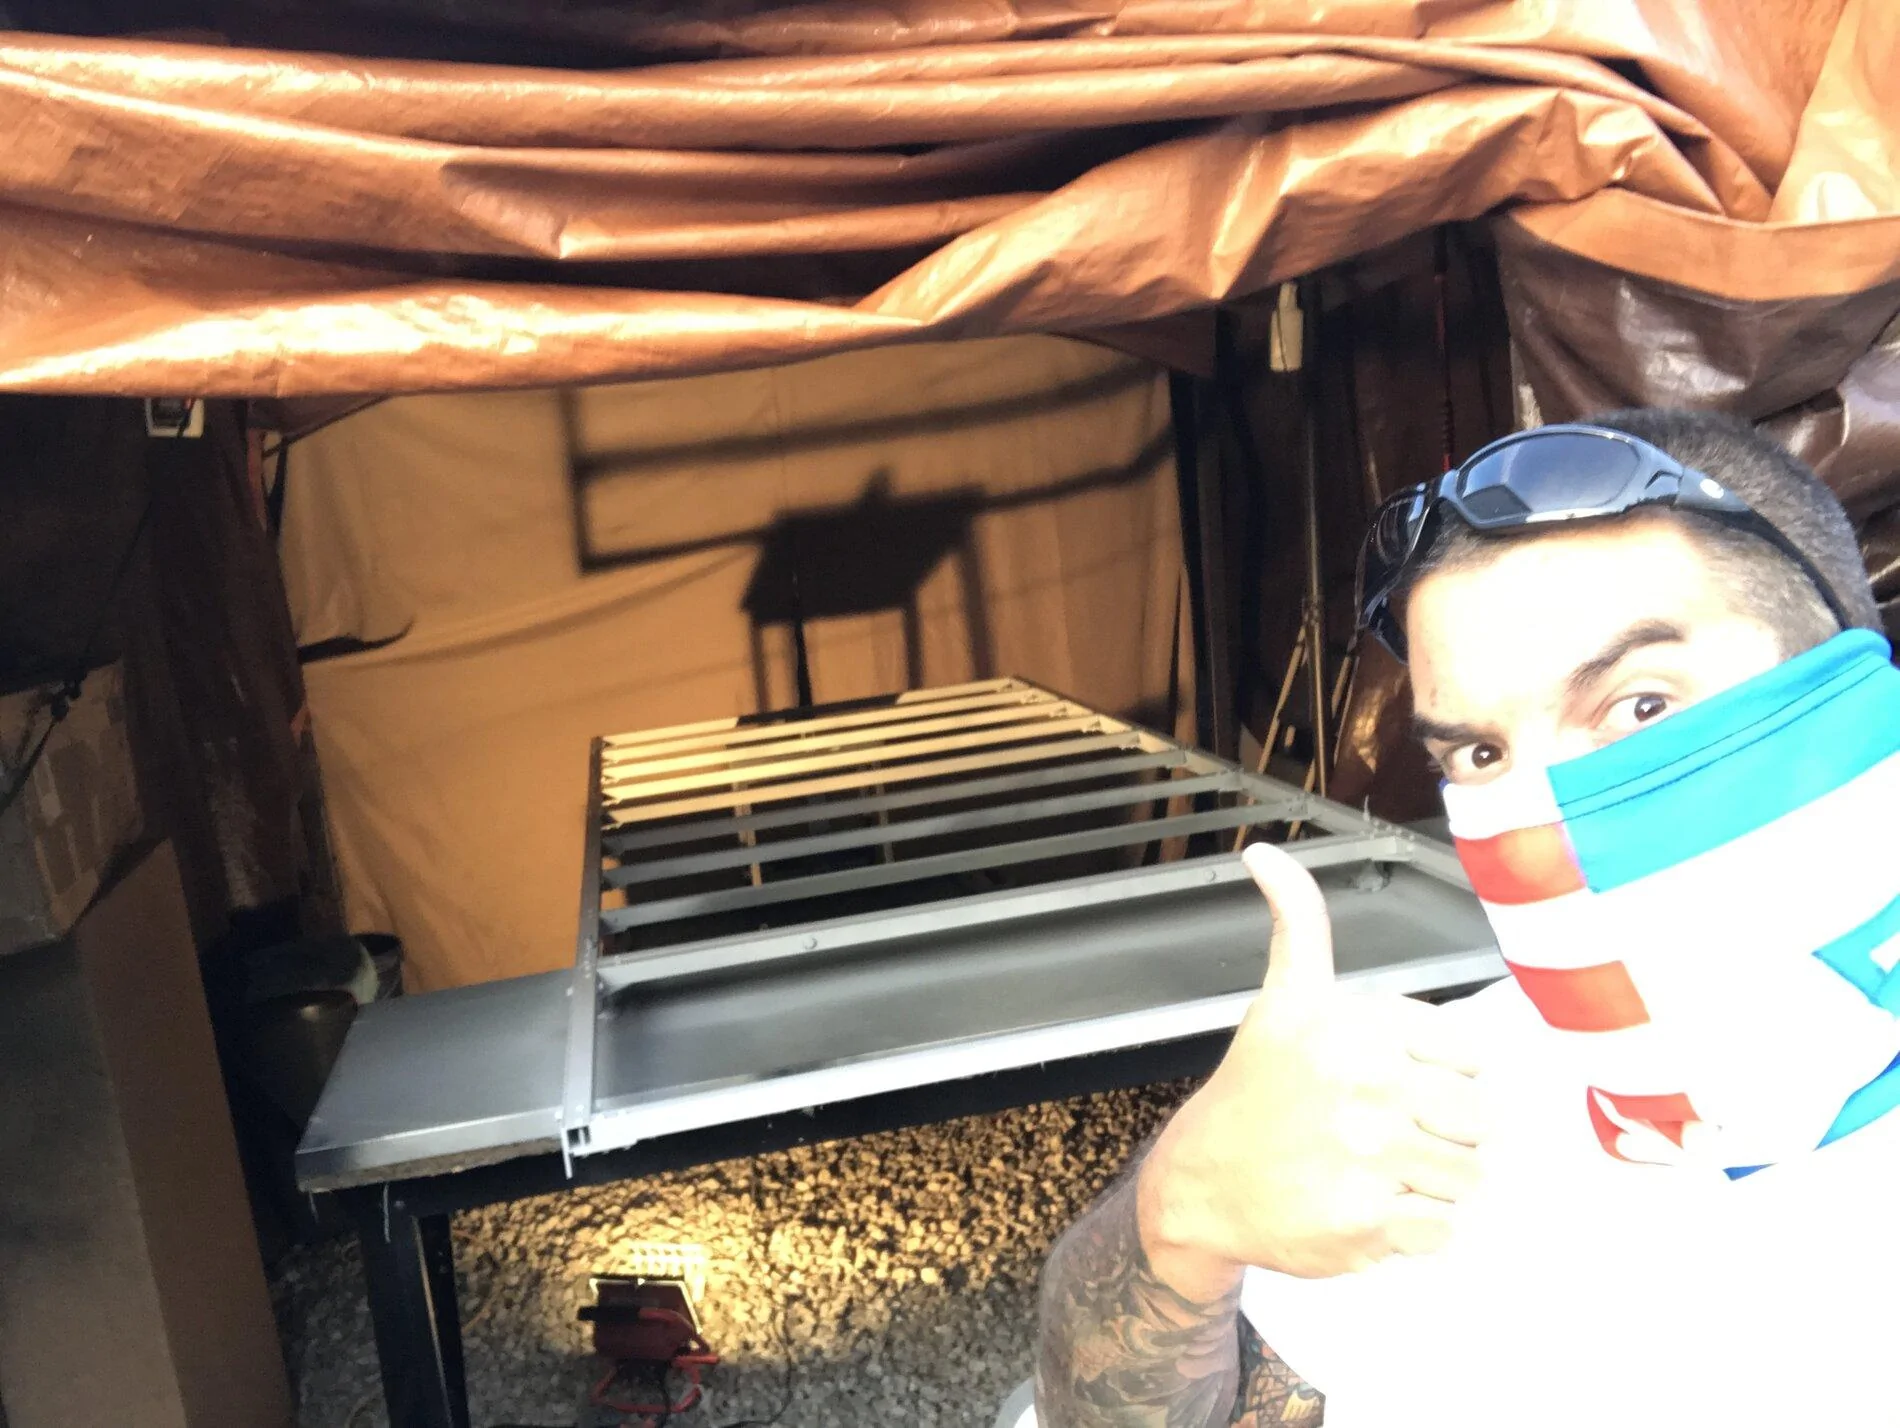
Ended up redoing somethings brought it indoors tonight to get it ready for primer and paint tomorrow (the front 2 foot section) not in picture.
Flooring comes tomorrow as well hope to install on friday after painting cures.
Flooring comes tomorrow as well hope to install on friday after painting cures.
OP
OP
OFC Ranger
Well-Known Member
- Thread starter
- #43
Oooo
OP
OP
OFC Ranger
Well-Known Member
- Thread starter
- #44
Oooo #2
OP
OP
OFC Ranger
Well-Known Member
- Thread starter
- #45
Ugh think i am high cough cough 

Sponsored
